Chapter 13. Play Music and Other Audio
When the first iPad was announced in January 2010, many technology critics dismissed it as “a giant iPod Touch” before going back to complaining about other things they hadn’t actually experienced. Although that particular response was snarky, it was also correct. Partly, anyway. Among many other things, the iPad is a giant iPod Touch. And what a handsome flat-screen jukebox it is.
Thanks to its larger size, the iPad makes playing music, audiobooks, podcasts, and iTunes U lectures a breeze—it’s easy to find the tracks you want to hear, create your own playlists, control your music, and admire full-screen cover art on the bigger screen.
Granted, the iPad is a bit bulky to haul to the gym or schlep along for your morning jog, but it’s a great music machine for other situations—like when you have a stack of email to get through and you want to bliss out to a little Yo-Yo Ma.
Whether you’re after background music or front-and-center playback controls, this chapter shows you how to get your iPad singing. And if you pony up $5 for Apple’s GarageBand app for iPad, you may even find yourself singing along to your own songs on the tablet. Play on!
Get Music and Audio for Your iPad
Have absolutely no music or audio files on your computer? Here are a few ways to get them on your iPad. (If you’ve had an iPod for years and have the music-transfer thing down cold, feel free to skip to the next page to see how the iPad organizes your music once you get it on there.)
Import a CD
You can use iTunes to convert tracks from your existing audio CDs into iPad-ready digital music files. Start up iTunes and stick a CD in your computer’s disc drive. The program asks if you want to import the CD into iTunes. (If it doesn’t, click the Import CD button at the bottom right of the iTunes window.) If you’re connected to the Internet, iTunes automatically downloads song titles and artist information for the CD. (Yes, strange as it may seem, music managers like iTunes don’t get information about an album from the album itself, they search for it in a huge database on the Web.)
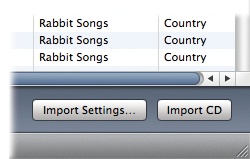
Once you tell iTunes to import music, it begins adding the songs to your library. You can bring in all the tracks from a CD or skip unwanted tracks by turning off the checkboxes next to them. Eject the CD when iTunes finishes.
Import Existing Songs into iTunes
If you’ve had a computer for longer than a few years, odds are you already have some songs in the popular MP3 format on your hard drive. When you start iTunes for the first time, the program asks if you’d like it to search your PC or Mac for music and add it to iTunes. Click “Yes” and iTunes will go fetch. If someone else in the house uses iTunes and you both have Home Sharing turned on (Authorize Computers for iTunes and Home Sharing), iTunes searches the shared libraries, too (Use iTunes Home Sharing on Your iPad).
Buy Music in the iTunes Store
Another way to get music is to buy it from the iTunes Store (The iTunes Store). Once you have an iTunes account (Set Up an iTunes/App Store Account), you can buy and download audio directly from your iPad (The Wireless iTunes Store) or via iTunes on your desktop computer. To shop from your computer, click the iTunes Store icon on the left side of the iTunes window and browse away.
When you buy music and audiobooks through iTunes, you need to sync up your ’Pad to transfer those files to the tablet (Sync Music). If you already have music on your iPad, read on to see how to organize and control it.
Explore the iPod Menu

The iPad has a Photos icon and a Videos icon, so you’d think it would have a Music icon for tunes, because that would make some sense. It doesn’t; Apple put all the iPad’s music functions in its iPod app, so tap the iPod icon on the iPad’s Home screen.
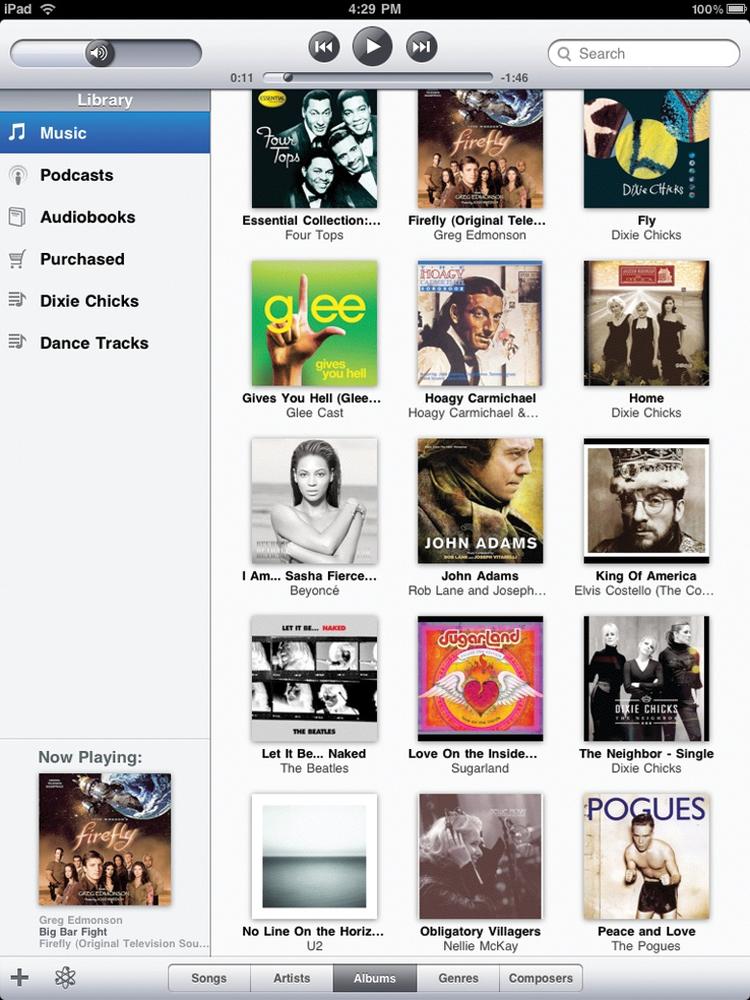
The iPad divvies up the iPod screen into four distinct areas:
Controls & Search bar. Located at the very top of the screen are all the iPod’s audio playback controls, like volume, next/previous buttons to move between songs or audiobook chapters, and a time counter for the track that’s playing. The search box in the top-right corner can help you find a tune fast, too.
Library. As in iTunes, your music, podcast, audiobook, and iTunes U tracks are all grouped under tappable sub-menus, as are any playlists you made (Make a New Playlist in iTunes). The Now Playing pane in the bottom-left corner displays the cover art for the current selection; tap it to get to the giant Now Playing screen (Control the Now Playing Screen).
Bottom bar. The lower edge of the iPod window is further concerned with music organization. Click the
 icon to create a playlist with the songs you choose. Click the
atom-shaped Genius icon to have the iPad automatically generate a
playlist based on songs like the one currently playing. In the center of the bar, click
the appropriate button to display your collection by Songs, Artists, Albums (above),
Genres, or Composers.
icon to create a playlist with the songs you choose. Click the
atom-shaped Genius icon to have the iPad automatically generate a
playlist based on songs like the one currently playing. In the center of the bar, click
the appropriate button to display your collection by Songs, Artists, Albums (above),
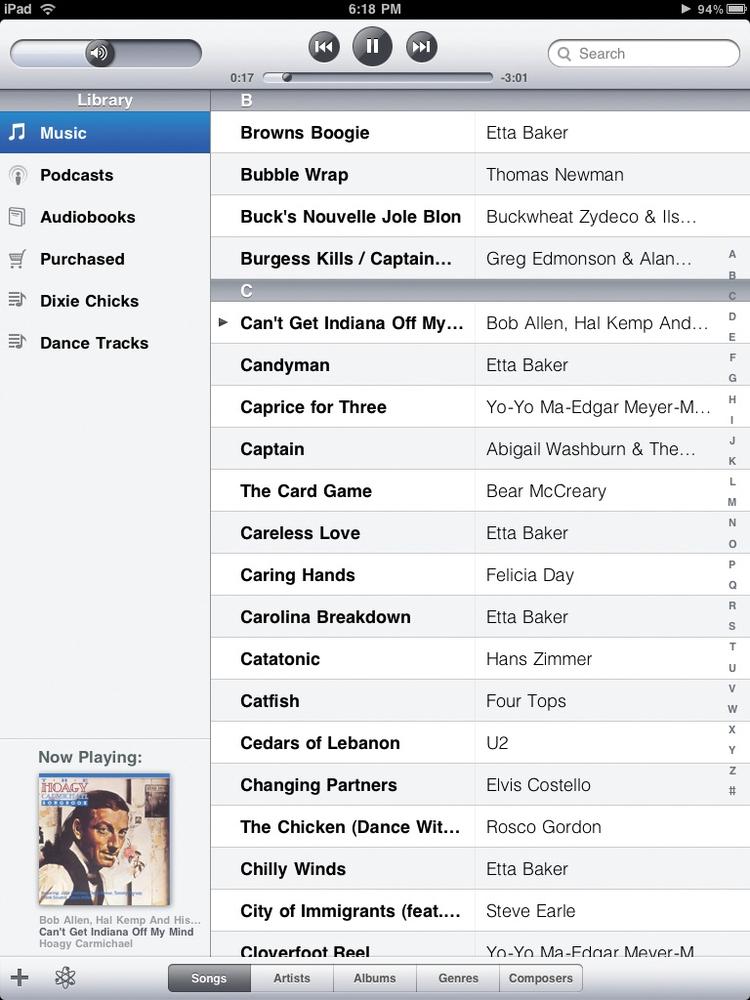
Genres, or Composers.Main window. No matter which media collection you choose—music, podcasts, audiobooks, or playlists—the iPad displays track names in the center of the screen. Most views show cover art in one size or another, except Songs, which shows a text list of tracks, and Genre, which shows themed art depicting “Folk,” “R&B,” and other music disciplines.
Play Music
To play a song, just tap its title on the screen. If you sort your music collection by album, tap the album cover to spin it around and reveal its list of songs, and then tap a title to hear it play. Use the playback controls at the top of the screen to adjust the volume, to play and pause songs, and to jump between tracks.
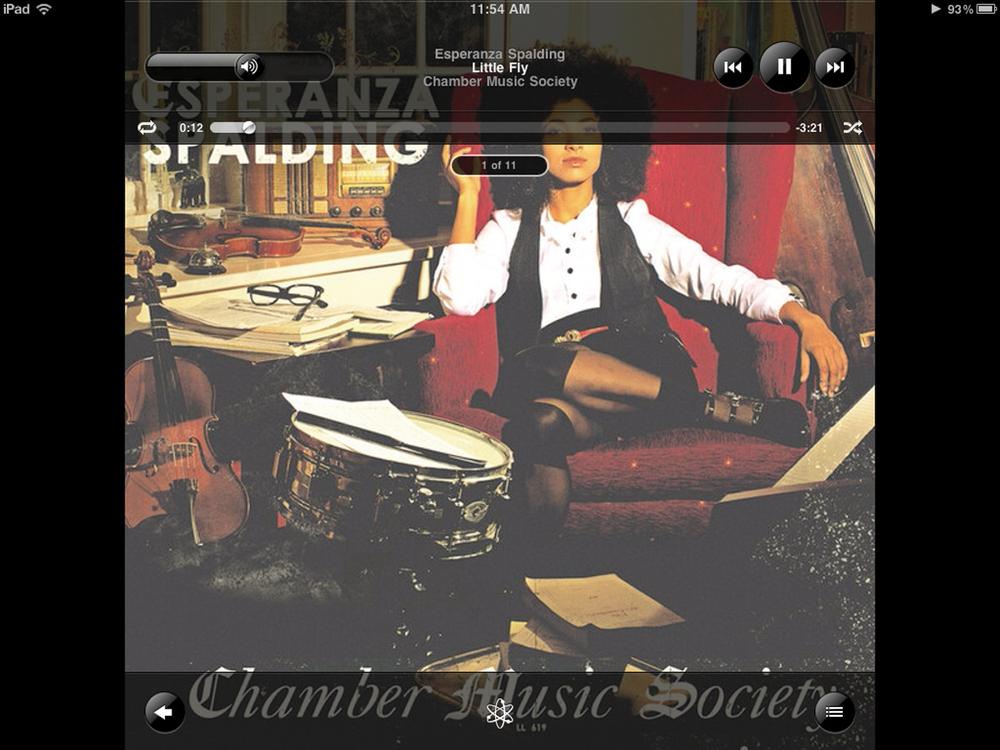
To switch to the full-screen version of the album cover along with the Now Playing screen’s controls (Control the Now Playing Screen), tap the artwork in the Now Playing corner.
If you have a playlist on the iPad that you’d like to hear, tap the name of it in the Library list and tap the title of its first song to kick it off. Should the iPad screen go to sleep while you’re rocking out, the album cover of the current song appears on your Lock screen when you wake it back up. (Don’t have any album art, just a big gray music note? See Get Album Art in iTunes.)
Tip
The iPad lets you keep playing music even as you move on to other things, like Safari browsing or note-writing. If you need to call up the iPod controls in a hurry while you’re on another screen, you can program the iPad to summon them with a double-click of the Home button. Use the Home Button to Switch Apps has instructions.
Play Audiobooks and Podcasts
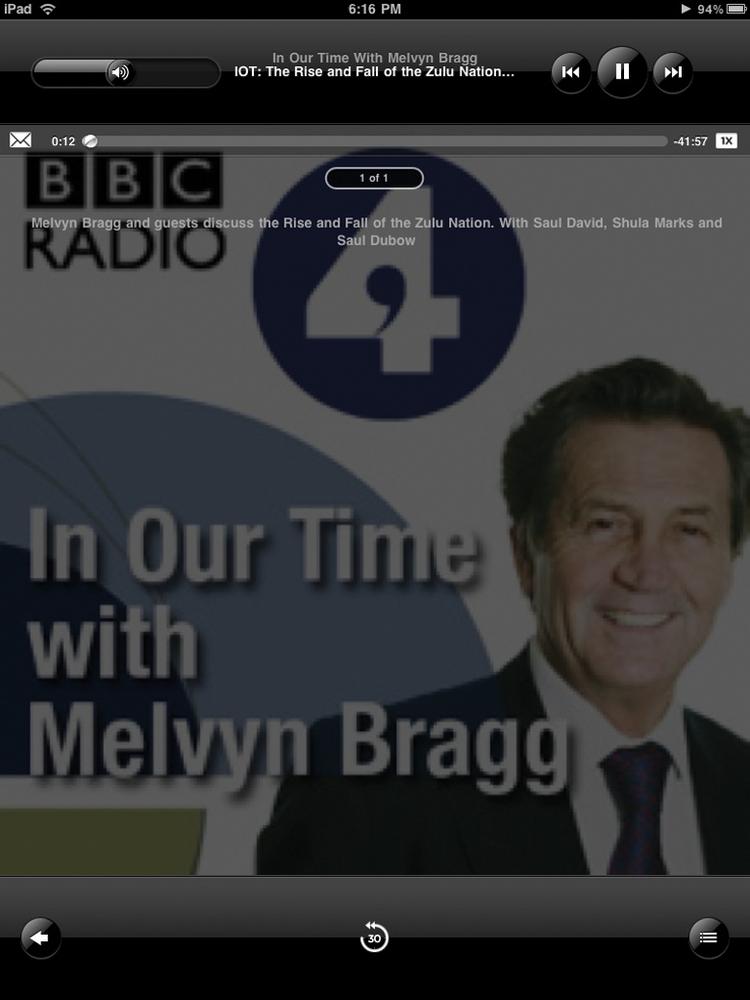
Spoken-word tracks like audiobooks, podcasts, and iTunes U lectures use some special controls that music tracks don’t need. To see them, tap the Now Playing artwork in the corner of the main iPod screen, which enlarges the artwork full-screen. Tap it to see the controls. The usual playback buttons and sliders are at the top of the screen, and you can drag the slider to any point in the recording to jump around within it. But now you can do other things, like:
Tap the envelope icon (
 ) to email a link to the podcast to a friend.
Speed up or slow down the narrator’s voice. Tap the
 button for normal speed,
  for double-time (if the person is talking too slowly), and
 for half-speed (in case the person’s talking too fast).
Tap the
 icon to see other chapters in the audiobook or other episodes in
the podcast series.
icon to see other chapters in the audiobook or other episodes in
the podcast series.Tap the
 button to replay the last 30 seconds of a recording, in case you
spaced out and missed something.
button to replay the last 30 seconds of a recording, in case you
spaced out and missed something.Tap the left-arrow button (
 ) in the bottom-left corner to leave the Now Playing screen and go
back to the iPod’s list of audio files.
) in the bottom-left corner to leave the Now Playing screen and go
back to the iPod’s list of audio files.
Control the Now Playing Screen
To keep the full-size Now Playing album art nice and tidy, the iPad displays its playback controls atop the art. Here’s what all the screen iconography means:
Volume. Drag the round
 icon forward or backward on the slider bar to increase or decrease
the iPad’s volume. (You can also use the Volume rocker on the right side of the
iPad.)
icon forward or backward on the slider bar to increase or decrease
the iPad’s volume. (You can also use the Volume rocker on the right side of the
iPad.)Play/Pause (
 /
/ ) button. If you have music playing, the Pause button looks like a pair of upright sticks
(). If you tap to pause a song, it turns into the triangular Play button
(). Tap to resume your tune.
) button. If you have music playing, the Pause button looks like a pair of upright sticks
(). If you tap to pause a song, it turns into the triangular Play button
(). Tap to resume your tune.Previous, Next (
 ,
,  ). These buttons, which evolved from the rewind and fast-forward buttons on
tape players, perform the same tasks as they used to—only better. Tap to go to the start of a song (or if you’re at
the start, to jump to the previous song). Tap to skip to the next song.
). These buttons, which evolved from the rewind and fast-forward buttons on
tape players, perform the same tasks as they used to—only better. Tap to go to the start of a song (or if you’re at
the start, to jump to the previous song). Tap to skip to the next song.Like old tape players, if you hold down one of these buttons instead of just tapping it, you rewind or fast-forward through a song, just like bygone days, when your ancestors wanted to find the good part of a tune. When you press the icon, the track audibly zips by and goes faster if you continue pressing the button.
To see a list of all the tracks on an album, tap the button in the lower-right corner, circled above. The cover spins around to reveal the song list.
Now, those are the obvious controls. Then there are the ones that look like iPad hieroglyphics, numbered here for your illumination.
Loop button. Got a particular album, playlist, or song you just can’t get enough of? As it plays, tap the Loop button (
 ) to turn it blue (
 ). This tells the iPad to play the music over and over, until you tap Loop again.
Scroll slider. Perched at the top of your screen, this slider displays your progress through a track. It also displays, in minutes and seconds, how much of the song you’ve heard and how much you have left to hear. You can jump around in the progress bar by dragging the little white dot. And you can see where the tune falls in the current playlist or album.
Shuffle button. If you don’t want to hear songs on an album or in a playlist in their usual order, tap Shuffle (
 ) to play the tracks randomly.
Genius playlist. Tap the
 icon to make a Genius playlist based on the song currently
playing. Make Genius Playlists on the iPad has
details.
icon to make a Genius playlist based on the song currently
playing. Make Genius Playlists on the iPad has
details.
To assign a song a one- to five-star rating, swipe the series of dots below the scroll slider to convert them into stars. Tap the album icon in the bottom-right corner to return to the full-screen album art. Tap the arrow in the bottom-left corner to return to the full list of songs.
Get Album Art in iTunes
Are you plagued with gray music-note icons mixed in with regular album art on your iPad’s screen? Do you long for a fully arted album collection? While songs purchased from the iTunes Store include album-cover artwork, tracks you rip from your own CDs don’t. But you have options.
Automatically Add Art
You can ask iTunes to head to the Internet and find as many album covers as it can. You need a (free) iTunes Store account to make this work, so if you haven’t signed up yet, flip back to Set Up an iTunes/App Store Account. To make iTunes fetch covers, choose Advanced→Get Album Artwork.
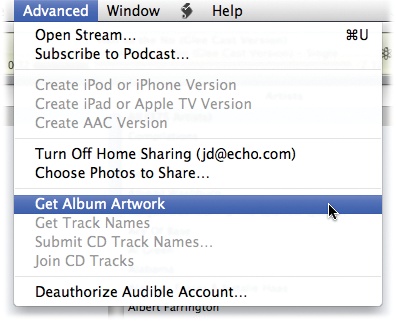
Since Apple has to root around in your library to figure out what covers you need, you get an alert box warning you that the company will be getting (and then dumping) personal information from you. Click OK and let iTunes get to work—which may take a while. When iTunes finishes, you should have a healthy dose of album art filling up the iTunes window.
Manually Add Art
Despite its best intentions, sometimes iTunes can’t find an album cover (or retrieves the wrong one). If that happens, take matters into your own hands by manually adding your own album artwork—or a photo of your choice. If Pachelbel’s Canon in D makes you think of puppies, you can have a baby dachshund photo appear every time you play that song.
To add your own art to a song, pick a photo or image—JPEG files are the most common.
If you found the cover on Amazon (hint: a great source!), save a copy of it by dragging it off the web page and onto your desktop or by right-clicking (Ctrl-clicking) it and choosing “Save Image” in your browser.
With your image near the iTunes window, select the song and click the Show Artwork button in the bottom-left corner of the iTunes window.
Drag the image into the iTunes Artwork pane to add it to the song file.
No matter which method you choose, the art rides along when you sync the songs over to your iPad.
Add Lyrics in iTunes
You can add lyrics to a song just like you add album art. Select a song in iTunes and press Ctrl+I (⌘-I) to call up the Get Info box. Then click the Lyrics tab.
Here, you can either meticulously type in a song’s verses or look them up on one of the hundreds of websites devoted to lyrics. Once you find your words, getting them into iTunes is a mere cut ’n’ paste job. If you want to add lyrics to all the songs on an album, or have several sets to add to the same playlist, click the Next button (circled). That advances you to the next song, thereby saving you repeated keystrokes invoking the Get Info command. Now that you’ve spent all that time grooming your song files, sync them to your iPad to get the fruits of your labor onto the tablet’s screen.

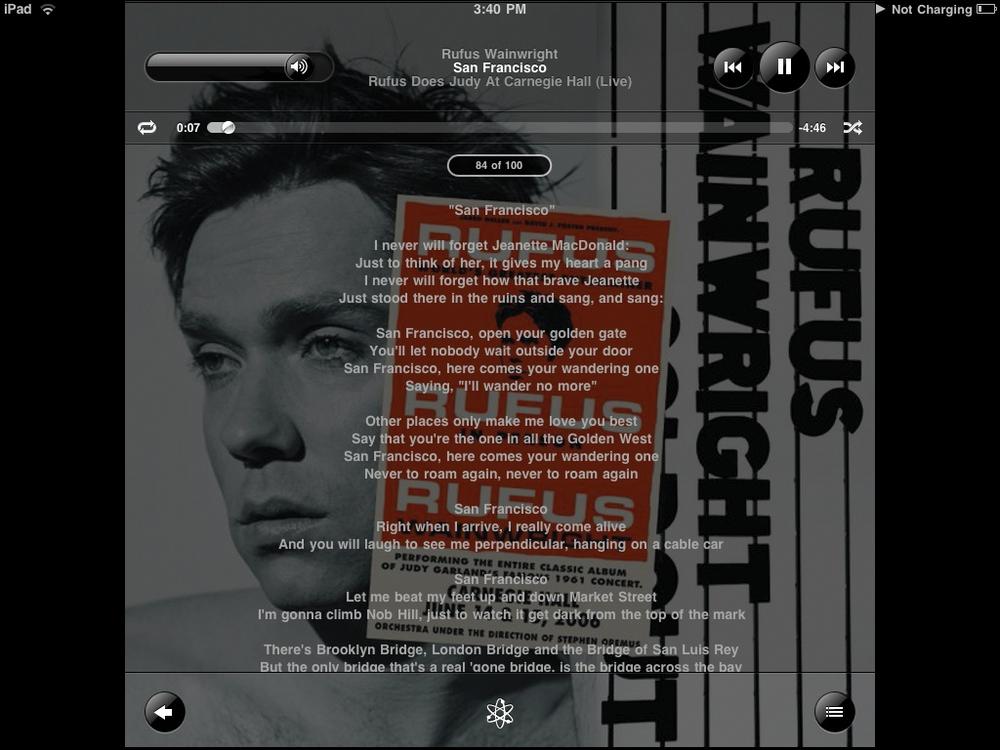
When you’re listening to a song on the iPad’s Now Playing screen, just tap the album cover to see its lyrics.
Make Playlists
You have a few ways to make playlists—those personalized song sets made up of tunes you think go great together. You can create them in iTunes and sync them over to your iPad (Make a New Playlist in iTunes), you can make them on the iPad itself, or you can have the iPad make them for you.
In iTunes, one way to make a new playlist is to choose File→New Playlist. When the Untitled Playlist icon appears in the iTunes Source list, click once to select it—so you can type in a better name—and then drag songs from your library onto the playlist name. You can also select a bunch of tracks in the library (hold down the Control key while clicking), and choose File→New Playlist From Selection. Then sync the new playlist to the iPad (Sync Music).
You can make a playlist from tracks in the iPad’s music collection, too:
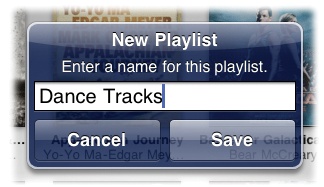
On the main iPod screen, tap the
) button at the bottom of the Library column. In the box that pops
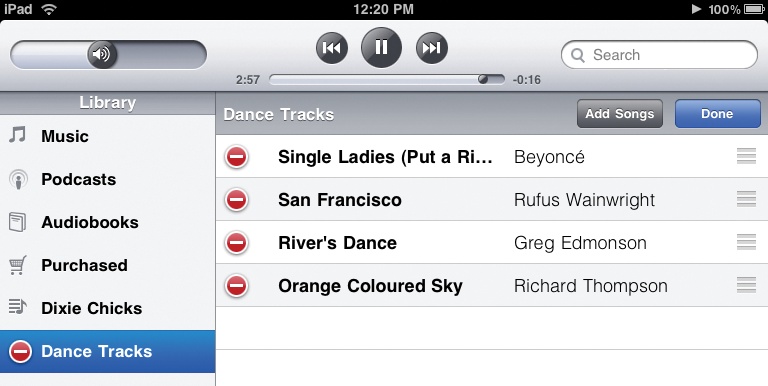
up, give the resulting blank playlist a memorable new name and tap Save.A list of all your iPad-resident songs pops up. Each time you see one worth adding, tap its name (or the
 button). You can also tap one of the icons at the bottom of the
screen, like Artists or Albums, to find the stuff you want—or tap the Sources button at
the top of the screen.
button). You can also tap one of the icons at the bottom of the
screen, like Artists or Albums, to find the stuff you want—or tap the Sources button at
the top of the screen.When you finish, tap Done. Your playlist is ready to play.
To rework a playlist, tap its name and then tap the blue Edit button. You can add tracks to the mix by tapping the Add Songs button.
You can reorder the songs in a playlist, too. Note the “grip strip” at the right edge of
song titles (![]() ). With your finger, drag these handles up or down to rearrange the
tunes. When you finish, tap Done. To remove a song from a list, tap the universal iPad
Delete symbol (
). With your finger, drag these handles up or down to rearrange the
tunes. When you finish, tap Done. To remove a song from a list, tap the universal iPad
Delete symbol (![]() ), and then tap the Delete confirmation button on the right side.
(Remember, while the song’s no longer in your playlist, it’s still in your library.) Note
the
), and then tap the Delete confirmation button on the right side.
(Remember, while the song’s no longer in your playlist, it’s still in your library.) Note
the ![]() next to the playlist names in the Library list. Tap one to whack the
whole playlist.
next to the playlist names in the Library list. Tap one to whack the
whole playlist.
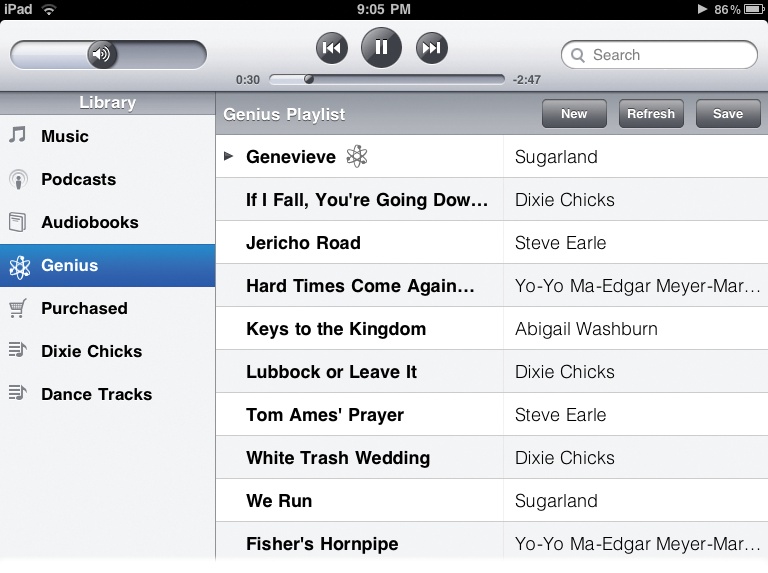
Make Genius Playlists on the iPad
Apple’s Genius feature in iTunes and on the iPad analyzes your music collection and automatically generates Genius Mixes and Genius Playlists for you. These are sets of songs (or in the case of the Mixes, entire music genres) that the Genius thinks sound good together.
Your iPad automatically generates the Genius Mixes. They appear in the Library list when you have enough music to collect into genres; click the Genius Mixes icon to see them. Genius Playlists are a little more personalized, because they require you to choose the first song, which inspires the Genius to select songs that go with it.
Tap the
icon at the bottom of the iPod window. When the Songs list appears,
tap the track you want to use as the playlist foundation.The Genius whips together a song set. If you don’t like the resulting mix, tap the Refresh button atop the screen to get new tunes.
If you love the work of the Genius, select or tap the Save option at the top of the screen. Tap New to start over again.
To delete a Genius playlist, select it in the Library list and tap Delete. As in iTunes, Genius playlists are named after the song you chose as the cornerstone of your mix. When you sync the iPad with iTunes, the Genius playlists get copied over to iTunes. You can’t delete them from the iPad after you sync them with iTunes; you have to trash them from the iTunes side of the USB cable and resync your tablet to get them off the iPad.
Tip
If a currently playing song is totally the vibe you want for a playlist, you can summon the Genius from the Now Playing screen (Control the Now Playing Screen). Just tap the screen to call up the playback controls, and then tap the atom-shaped Genius icon in the lower-middle part of the screen.
Make Music With GarageBand
So far, this chapter has been all about playing other people’s music on your iPad—which can be quite fun, because some people are pretty darn good at making music. But what if you have your own tunes in mind with no place to turn them into real music?
Good news. You can compose songs in an electronic eight-track recording studio that just happens to be thinner than most music-theory textbooks. For a mere $5, you can get a copy of Apple’s GarageBand app, which turns your iPad into that studio. Just visit the App Store and search for GarageBand.
The GarageBand app is the tapworthy cousin to Apple’s desktop GarageBand program, which is part of its iLife suite of creative software for Mac OS X. Over the years, many Mac users have composed their own songs, edited audio files, and generally had a good time noodling around in GarageBand. The iPad app works on both first- and second-generation models, so you don’t have to have the latest hardware to start your own one-’Pad band.
The first thing you see after you open the app is the Touch Instrument browser, which displays several screens’ worth of digital instruments. You get a selection of guitars, bass guitars, drums, and keyboards to choose from, and you play them right there on the iPad by tapping and swiping. The virtual instruments sound just like their real-life counterparts, but they’re much easier to haul around. (Hey, when was the last time you could fit a fully playable grand piano in your backpack?)
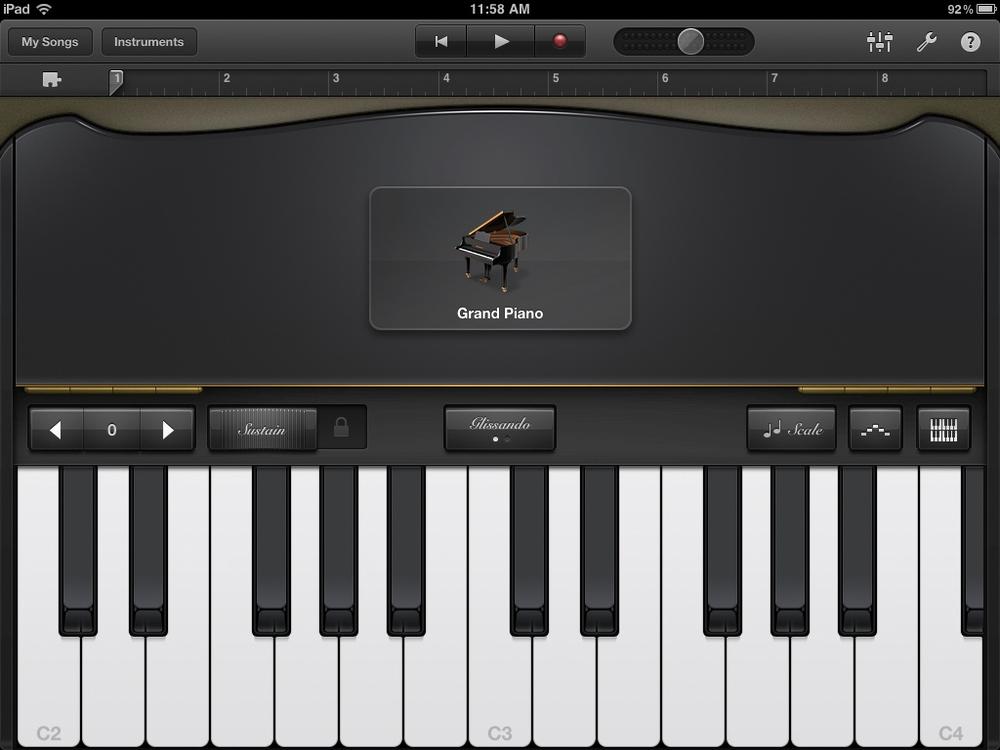
Once you get the hang of playing the Touch Instruments, you can record your efforts. And with the iPad’s built-in microphone, you can record your own vocal accompaniment.
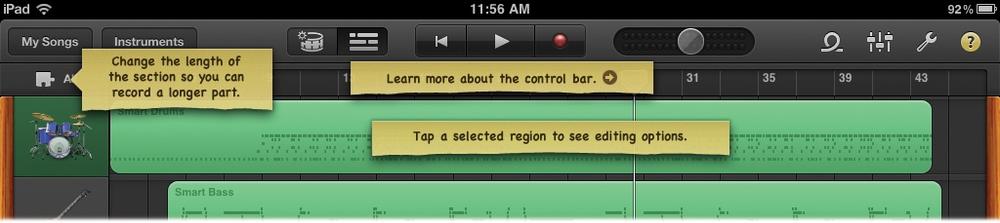
As you record the different elements of your song and save them to the iPad, you can begin to piece together each part into a unified composition on the track-mixing screen, shown at the top of the next page.
You can layer eight tracks in each song. You can even add some of the 250 professional musical loops included with the app to enhance your song. (If you’re new to the music business, loops are short audio snippets of percussion and other instruments that automatically repeat, hence the name “loop.”)
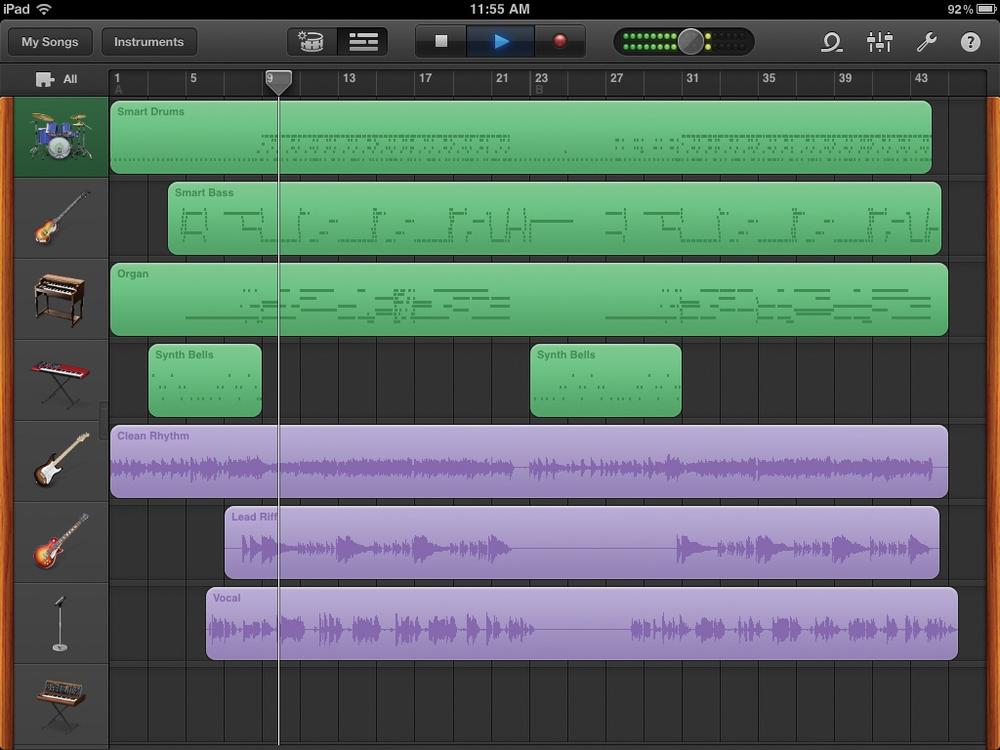
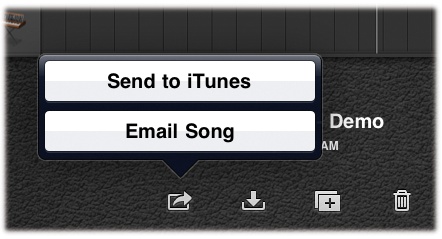
When you finish a song, you can email it as an AAC audio file right from the iPad. You can also export it into iTunes the next time you sync up your tablet. Once the track is in your iTunes library, you can burn it to a CD or add it to a playlist.
With its huge collection of musical instruments, mixing controls, and sound effects,
GarageBand may seem a little overwhelming at first. But don’t get stressed—the app comes
with its own tutorial file. Tap the wrench icon at the top of the screen and then tap Help
on the menu. And if you tap the ![]() icon in the top-right corner, GarageBand displays helpful yellow tool
tips (shown below) on-screen to guide you as you go. And finally, there’s a whole manual for
the app online at http://www.apple.com/support/ipad/garageband
icon in the top-right corner, GarageBand displays helpful yellow tool
tips (shown below) on-screen to guide you as you go. And finally, there’s a whole manual for
the app online at http://www.apple.com/support/ipad/garageband