The code for this recipe shows you how to create a small application for loading a Google Map at a specific location and adding a map marker to it. For simplicity, we are going to use the current location. You've learned how to find the current location in the previous recipe. However, if you want, you can use another location of your choice.
For marking our location on the map, we'll use a red pushpin. Actually, it's the default map marker provided by Google Maps.
Even though the application developed for this recipe is quite simple, it sets up an important foundation for building complex applications, which require such functionality.
The files for this recipe can be found at code/ch09/location_map/ in the code bundle provided on the Packtpub site.
The main requirement for this recipe is the Sencha Touch framework. Before continuing, make sure you have this framework installed on your computer or server.
Also, we need to use the Google Maps JavaScript API, but this JavaScript library can be loaded directly from the website of Google Maps, as you'll learn in this recipe.
- Let's start by creating a new directory or folder inside the
DocumentRootdirectory of our web server. This new folder will be calledlocation_map. After creating this folder, we need to create a new XHMTL file calledindex.html. In addition to the standard headers for this kind of file, we'll add the required lines for Sencha Touch:<link rel="stylesheet" type="text/css" href="../../sencha-touch/resources/css/ext-touch.css"/> <script type="text/javascript" src="../../sencha-touch/ext-touch-debug.js"> </script>
- Our recipe requires the API offered by Google. Add the following lines to load this library:
<script type="text/javascript" src="http://maps.google.com/maps/api/js?sensor=true">
</script>
- Add the following CSS to apply some styles to our user interface:
<style type="text/css"> body { background: rgb(197,204,211); margin: 0; padding: 0; } </style> - Don't forget to include a reference to the main JavaScript file of our Sencha Touch project:
<script type="text/javascript" src="main.js"></script>
- The last lines of code for our
index.htmlfile will be the required lines for closing ourhead, body, andhtmltags. After saving this XHTML file, we're going to create a new one calledmain.js, which contains the required JavaScript code for our recipe. The code lines for this file are the following:Ext.setup({ onReady: function() { var map = new Ext.Map({ title: 'Map', getLocation: true, mapOptions: { zoom: 16 } }); var panel = new Ext.Panel({ fullscreen: true, items: [map] }); var refresh = function() { var coords = map.geo.coords; var position = new google.maps.LatLng(coords.latitude, coords.longitude); setMarker(position); }; var setMarker = function(position) { var marker = new google.maps.Marker({ map: map.map, position: position }); }; map.geo.on('update', refresh); } }); - When you save
main.js, you are ready to run and test our new application, which displays a Google Map showing our current location through a simple pin (marker):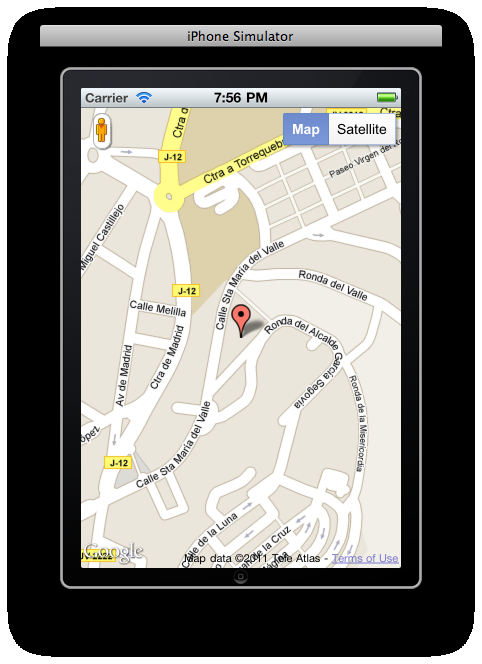
Thanks to the Ext.Map provided by Sencha Touch, we can load a Google Map for a specific location. This recipe is using our current location, but we can just as easily use another one. The parameter getLocation with the value true directs Ext.Map to use our current location. Another parameter is used for setting the level of zoom. In the example, we're using 16 to get a higher zoom level but you can use a custom value. For example, it's very common to use 12.
Our map is loaded using full screen. This is the reason for using a main object called panel, which represents a main widget for loading our map inside it. The parameter fullscreen with the value true is used for this purpose.
The refresh() function is a callback invoked by the method map.geo.on(). This JavaScript function gets our position and then uses google.maps.LatLng to create a specific object representing our current location. The map.geo.coords object encapsulates the information about the point, the most important properties being latitude and longitude.
Finally, the setMarker() method is used for displaying a mark inside the map for our location. As you can guess, marker is a new object belonging to the class google.maps.Marker. Actually, the Google Maps JavaScript API provides this class and google.maps.LatLng both of them are used for displaying our mark.
A good resource for searching information related to the Google Maps API for JavaScript can be found at http://code.google.com/apis/maps/documentation/javascript/.
Sencha Touch offers us complete reference documentation for the object Ext.Map at http://dev.sencha.com/deploy/touch/docs/output/Ext.Map.html.
- Installing the Sencha Touch framework recipe in Chapter 1 , Frameworks Make Life Easier.
- Identifying the current location recipe