
![]()
jQuery Effects and Animation
This chapter covers the techniques used to implement effects and animations using jQuery methods. jQuery provides methods to:
- Add effects to web pages. Effects can be customized by specifying the duration of the effect and the transition mode.
- Create and run custom animations by specifying the target CSS properties of the element and the duration of the transition from the current CSS properties to the target CSS properties.
- Manage the effects and animations queue by adding, removing, and replacing effects and animation methods to/from the queue.
- Control animation by smoothing, pausing, stopping, and skipping animation steps.
- Plug in additional custom functions at various stages of the animation.
All jQuery’s effects are a combination of CSS properties and timers. jQuery uses the fx object to manage CSS properties of the selected element and its timers. The fx object keeps track of the current CSS properties of the selected element and the time after which a change to the element’s style occurs.
The effects queue plays a very important role in achieving multi-step transitional effects and animations. The effects queue is an array of functions that is executed in sequential order.
During program execution, if an effect/animation method is found for an element, it is copied to the effects queue of the element and program execution continues to the next code statement. In parallel, effects and animation methods are executed from the element’s effects queue. By default, each element has its own standard effects queue, which is called fx queue. If the queueName is not explicitly specified in a method as an argument, fx queue is used. If you want, you can define multiple named queues for each element.
Options for Effects and Animations Methods
For all of the effects and animations methods, a map object can be passed as an argument to the method. The following options can be used in the map object:
– duration—The duration of the effect and animation in milliseconds (the default is 400 ms). It can be set as a number (in milliseconds) or as a string (such as slow or fast).
– easing—Specifies the speed of the transition at different points during the transition in the core jQuery library. Possible values are swing (slow in the beginning and at the end and faster in the middle) and linear (same speed throughout). There are many more easing functions available in jQuery UI library.
– specialEasing—A map object with CSS properties as keys and the easing function as their values. Using this option, you can apply different easing functions to different CSS properties.
– queue—Specifies if the effect or animation should be placed in the queue or not. The default is true. If it’s set to false, the effect will start immediately. It can also be set to custom queueName, in which case effect/animation will be added to the specified queueName instead of the default effects queue (fx). If the effect method is put in the custom queueName, you use the .dequeue() method to start it.
– start—Specifies the function that’s executed when the animation starts.
– step—Specifies the function that’s executed for each animated CSS property of the selected elements.
– progress—Specifies the function that’s executed after each step of the animation.
– complete—Specifies the function that’s executed after the animation is completed.
– done—Specifies the function that’s executed after the animation is completed. It is a common jQuery method that works with a promise object. Since the .animate() method returns a promise object, you can use done with the animate method. The function specified with done is executed before the complete callback function.
– fail—Specifies the function that’s executed when the animation fails to complete.
– always—Specifies the function that’s executed irrespective of whether animation is completed successfully or failed.
Out of these options, you can pass duration and complete directly as arguments or by specifying them in the map object. In the case of animate() method, you can also pass easing as an argument. For example, these two ways of using these options have the same effect:
- $(selector).show(1000, function() {
alert('effect is completed.'),
}); - var options = {duration: "1000",
                        complete: function() {
       alert('effect is completed.'),
   }
};

$(selector).show(options);
8-1. Showing and Hiding Elements
Problem
Based on user interaction, you want to show some elements and hide others. For example, after a payment is made and the user clicks the Submit button, you want to hide that button so that he/she doesn’t click it again, while also showing a message about the payment being processed.
Solution
The following jQuery syntax is used to hide selected elements:
$(selector).hide()
$(selector).hide(effectDuration)
$(selector).hide(effectCompleteCallbackFunction)
$(selector).hide(effectDuration, effectCompleteCallbackFunction)
$(selector).hide(options)
The following jQuery syntax is used to show selected elements:
$(selector).show()
$(selector).show(effectDuration)
$(selector).show(effectCompleteCallbackFunction)
$(selector).show(effectDuration, effectCompleteCallbackFunction)
$(selector).show(options)
hide() and show() can be used with any HTML element. hide() makes all the selected elements and their descendants invisible and releases the space used by the element(s) on the page. This makes other elements move up or left to fill the freed space. show() displays all the selected elements and their descendants. These methods can also be used during animation by hiding and showing elements whenever it is needed.
effectDuration is the duration of the effect run in milliseconds, that is, the amount of time it takes to transition from visible to invisible and vice versa. The default value is 400 milliseconds. For example, if you want to slow down the message display, you can use show(1000), which will display the message for 1 second. During animation, you can use hide() and show() to change the visibility of animated objects.
effectCompleteCallbackFunction is the callback function that’s executed when the effect is completed.
For options details, refer to the introduction section of this chapter.
Listing 8-1 provides demonstrates the use of the hide() and show() methods.
Listing 8-1. Using hide() and show() to change the visibility of selected elements
<!DOCTYPE html>
<html lang="en">
<head>
      <meta charset="utf-8">
      <script src="scripts/jquery-2.1.0.min.js"></script>
      <style>
      label {
          float:left;
          display:block;
          width: 175px;
          font-weight: bold;
      }

      div {
            width: 400px;
            border:3px double green;
            background-color: lightyellow;
      }

      .message {
            width: 400px;
            color: green;
      }
      </style>

      <script>
      $(function() {
           $("#lblProcessingStatus").hide();

            $("#btnSubmit").click(function () {
            $("#lblProcessingStatus").show();
            $("#btnSubmit").hide();
            });
      });
      </script>
</head>

<body>
      <h3>Payment Details:</h3>
      <div>
      <fieldset>
            <label for="txtCustomerName">Name:</label>
            <input type="text" id="txtCustomerName"><br>

            <label for="txtCustomerAddress">Address:</label>
            <input type="text" id="txtCustomerAddress"><br>

            <label for="txtCreditCardNumber">Credit Card Number:</label>
            <input type="text" id="txtCreditCardNumber" size="16"><br>

            <label for="txtExpiryDate">Expiry Date:</label>
            <input type="text" id="txtExpiryDate" size="5"><br>
            <label for="txtCCV">CCV:</label>
            <input type="text" id="txtCCV" size="4"><br>
      </fieldset>
      </div><br>

      <label id="lblProcessingStatus" class="message">Processing payment.Please wait for the confirmation.</label>
      <button id="btnSubmit">Submit</button>
</body>
</html>
How It Works
Within the document ready function, $("#lblProcessingStatus").hide() hides the label with the ID "lblProcessingStatus". When the user clicks the Submit button, the following code is executed:
$("#lblProcessingStatus").show();
$("#btnSubmit").hide();
The .show() method displays the message in the label with the ID lblProcessingStatus and the .hide() method hides the button with the ID btnSubmit so that user doesn’t click it again and inadvertently submit multiple payments. Figure 8-1 displays the page that’s initially loaded in the browser.

Figure 8-1. Initial page display
Figure 8-2 displays the page that appears after the Submit button is clicked.
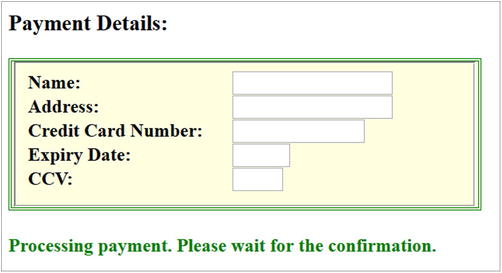
Figure 8-2. Processing payment message that appears after the Submit button is clicked
8-2. Toggling Between an Element’s Show and Hide States
You want to show an element if it is hidden and hide an element if it is displayed.
Solution
The following jQuery syntax toggles the visibility state of the selected elements:
$(selector).toggle()
Listing 8-2 demonstrates the use of the toggle() method to change the visibility of selected elements.
Listing 8-2. Using the toggle() method to toggle between the show and hide states
<!DOCTYPE html>
<html lang="en">
<head>
     <meta charset="utf-8">
     <script src="scripts/jquery-2.1.0.min.js"></script>
     <style>
       label {
            color: green;
            font-size: 20px;
       }

       div {
            border:3px double green;
            height:60px;
            width:60px;
            border-style:solid;
            background-color:lightgreen;
       }
     </style>

     <script>
       function startFunc() {
            $("#lblMessage").html("Toggle effect has started.");
       }

       function completeFunc() {
            $("#lblMessage").html("Toggle effect has completed.");
       }

       $(function() {
            $("#btnToggle").click(function () {
              var options = {duration:2000,
                              easing:"linear",
                              start: startFunc,
                              complete: completeFunc
                             };

              $("div").toggle(options);
             });

       });
      </script>
</head>

<body>
       <div></div><br><br>
       <button id="btnToggle">Toggle</button><br><br>
       <label id="lblMessage"></label>
</body>
</html>
How It Works
When the Toggle button is clicked, its event handler executes the following code:
var options = {duration:2000,
               easing:"linear",
               start: startFunc,
               complete: completeFunc
       };
 $("div").toggle(options);
This example first sets duration, easing, start, and complete in the map object to control the effect of toggle() (i.e., the effects of hiding and showing). These settings are optional. If these are not specified, default values will be used. Refer to the introduction section of this chapter for more information about these options. The toggle() method is then executed on the div tag, which will show the div element if it is hidden or hide the div element if it is visible. The transition of hiding and displaying are specified by the duration and easing options. Since this example also specifies named functions for the start and complete options, these named functions will be executed at the start and at the completion of the animation. These two functions display the appropriate status of the animation in the message label by using the following code:
$("#lblMessage").html("Toggle effect has started.");
$("#lblMessage").html("Toggle effect has completed.");
Figure 8-3 displays the initial page in the browser.

Figure 8-3. Initial page display
Figure 8-4 displays the page when the Toggle button is clicked and the animation has just started.
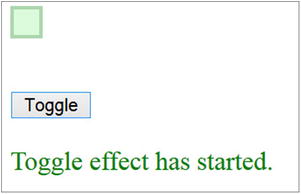
Figure 8-4. The hide transition effect when the Toggle button is clicked
Figure 8-5 displays the page when the animation has completed.
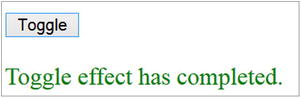
Figure 8-5. Animation is complete
When the Toggle button is clicked again, the green box will reappear with the same type of transition effect and the animation start/completion message will be displayed. The same set of parameters can be used for the toggle() method as are used by the hide() and show() methods. Refer to argument’s details in Recipe 8-1.
8-3. Effects Methods for Hiding and Showing Elements
Problem
You want to use effects other than hide() and show() to hide and show elements with different transition effects.
Solution
There are other effects methods that hide and display selected elements—specifically, fade out and in and slide up and down.
The following jQuery syntax is used to hide selected elements:
$(selector).hide()
$(selector).fadeOut()
$(selector).slideUp()
The following jQuery syntax is used to display selected elements:
$(selector).show()
$(selector).fadeIn()
$(selector).slideDown()
The following jQuery syntax is used to toggle between hiding and displaying selected elements:
$(selector).toggle()
$(selector).fadeToggle()
$(selector).slideToggle()
The following jQuery syntax is used to change the opacity of the selected elements:
$(selector).fadeTo(opacityValue)
Listing 8-3 demonstrates the use of all of these effects methods.
Listing 8-3. Effects methods to hide and display selected elements
<!DOCTYPE html>
<html lang="en">
<head>
     <meta charset="utf-8">
     <script src="scripts/jquery-2.1.0.min.js"></script>

     <style>
       div {
            border:3px double black;
            border-style:solid;
            width: 400px;
                   background-color:lightyellow;
                   padding: 10px;
       }

       label {
            display: block;
            float: left;
            width:250px;
       }

       .boxStyle {
            border:3px double green;
            height:60px;
            width:60px;
            margin-left:150px;
            border-style:solid;
                   background-color:lightgreen;
       }
     </style>

     <script>
       $(function() {
            $("#btnTestIt").click(function () {
              var effectSelected = $("#effectName").val();
              var durationValue = $("#duration").val();
              var opacityValue = $("#txtOpacity").val();

              if (effectSelected == "hide") {
                   $("#box").hide(durationValue);
              } else if (effectSelected == "show") {
                   $("#box").show(durationValue);
              } else if (effectSelected == "toggle") {
                   $("#box").toggle(durationValue);
              } else if (effectSelected == "fadeIn") {
                   $("#box").fadeIn(durationValue);
              } else if (effectSelected == "fadeTo") {
                   $("#box").fadeTo(durationValue, opacityValue);
              } else if (effectSelected == "fadeOut") {
                   $("#box").fadeOut(durationValue);
              } else if (effectSelected == "fadeToggle") {
                   $("#box").fadeToggle(durationValue);
              } else if (effectSelected == "slideUp") {
                   $("#box").slideUp(durationValue); // hide with slide up animation
              } else if (effectSelected == "slideDown") {
                   $("#box").slideDown(durationValue);// show with slide up animation
              }  else if (effectSelected == "slideToggle") {
                   $("#box").slideToggle(durationValue);
              }
            });

            $("#btnReset").click(function (){
              $("#box").show();
              $("#effectName").prop("selectedIndex", 0);
              $("#duration").prop("selectedIndex", 0);
              $("#txtOpacity").val(0.5);
            });

       });
     </script>
</head>

<body>
     <div id="box" class="boxStyle"></div><br>

     <div>
          <label>Effect's Method Name: </label>
          <select id="effectName">
       <option>hide</option>
       <option>show</option>
       <option>toggle</option>
       <option>fadeIn</option>
       <option>fadeTo</option>
       <option>fadeOut</option>
       <option>fadeToggle</option>
       <option>slideUp</option>
       <option>slideDown</option>
       <option>slideToggle</option>
         </select><br><br>

         <label>Duration:</label>
         <select id="duration">
              <option value="500">0.5 Second</option>
       <option value="1000">1 Second</option>
       <option value="2000">2 Seconds</option>
       <option value="3000">3 Seconds</option>
       <option value="slow">Slow</option>
       <option value="fast">Fast</option>
         </select><br><br>

         <label>Opacity (For fadeTo) (Range: 0-1):</label>
         <input type="text" id="txtOpacity" value="0.5"><br><br>
     </div><br><br>

     <input id="btnTestIt" type="button" value="Test It">
     <input id="btnReset" type="button" value="Reset">
</body>
</html>
How It Works
This code displays drop-downs for the effect’s method name and duration of the transition and a textbox for the opacity value. Opacity is valid for the fadeTo() method only. When the Test It button is clicked, depending on the user’s selection, the following variables are set:
var effectSelected = $("#effectName").val();
var durationValue = $("#duration").val();
var opacityValue = $("#txtOpacity").val();
Based on the value of the effectSelected variable, one of the following effects methods will be executed with the parameter duration—hide(), show(), toggle(), fadeIn(), fadeTo(), fadeOut(), fadeToggle(), slideUp(), slideDown(), and slideToggle(). For the fadeTo() method, an additional parameter called opacity is passed. You need to show the div box first before testing the hide methods (hide(), fadeOut(), and slideUp()) and you need to hide the div box before testing the display methods (show(), fadeIn(), and slideDown()). When the Reset button is clicked, the original values of the drop-downs and textbox are set and the div box returns to its initial state. Table 8-1 displays the list of hide and display methods for various transition modes. The same set of parameters can be used as are used by the hide() and show() methods in Recipe 8-1.
Table 8-1. Hide and Display Effects Methods
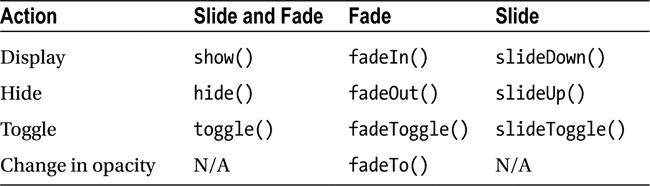
Figure 8-6 displays the initial page in the browser.

Figure 8-6. Initial page display
The user can select any of the effects’ names and durations from the drop-down and enter an opacity value in the textbox. Figure 8-7 displays the page when the fadeTo effect method name is selected, the duration is set to 1 Second, the opacity is set to 0.2, and the Test It button is clicked. Notice that the fade effect took place and the opacity has reduced gradually to 0.2 in one second.
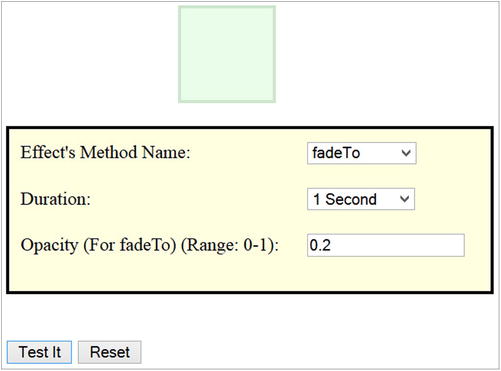
Figure 8-7. Fading effect due to the fadeTo() method
8-4. Applying Custom Animation to the CSS Properties of Selected Elements
Problem
You want to perform custom animation to the CSS properties of the selected elements.
Solution
All effects and animations are duration-based. Program execution doesn’t wait for the effects to complete before it moves on to the next method; instead, it copies those effects and animation methods to the effects queue of the selected elements and continues with the program execution. The hide() and the show() methods without any arguments are not added to the element’s effects queue. Functions in the effects queue are processed in sequential order while program keeps on executing in parallel.
The most commonly used syntax of the animate() method is:
$(selector).animate(targetCSSProperties, animationDuration)
where targetCSSProperties is a map object with the following format:
{ cssPropertyName1: 'propertyValue1', cssPropertyName2: 'propertyValue2' ...}
You get the animated effect as a result of CSS properties being changed from the current CSS property values to the specified target CSS property values. Listing 8-4 demonstrates the use of the animate() method to change the CSS properties over time.
Listing 8-4. Using the animate() method to show animation of selected elements
<!DOCTYPE html>
<html lang="en">
<head>
     <meta charset="utf-8">
     <script src="scripts/jquery-2.1.0.min.js"></script>
     <style>
       div {
            border:3px double green;
            width: 50px;
            height: 50px;
            position:absolute;
            left:100px;
            top:50px;
            background-color: yellow;
       }
     </style>

     <script>
       $(function () {
            $("#btnAnimate").click( function() {
              $("#box").animate({left:"+=300", opacity: 0.6}, 2000, 'linear')
                    .animate({top: "+=200", opacity: 0.2}, 2000, 'linear')
                    .slideUp(1000)
                    .slideDown(1000);
           });

           $("#btnReset").click( function() {
              location.reload();
            });
       });
     </script>
</head>
<body>
     <input id="btnAnimate" type="button" value="Animate">
     <input id="btnReset" type="button" value="Reset">

     <div id="box"></div>
</body>
</html>
How It Works
When the Animate button is clicked, the following code is executed:
$("#box").animate({left:"+=300", opacity: 0.6}, 2000, 'linear')
       .animate({top: "+=200", opacity: 0.2}, 2000, 'linear')
       .slideUp(1000)
       .slideDown(1000);
– $("#box") selects the div tag with the ID as "box".
– animate({left:"+=300", opacity: 0.6}, 2000, 'linear') puts this animation function in the effects queue. It specifies that you want to animate the selected div box by incrementing its left CSS property by 300 pixels and changing its opacity from 1.0 (the default) to 0.6 (this moves the box 300 pixels toward the right while changing its opacity from 1.0 to 0.6 over the period of two seconds by using the linear easing function).
– animate({top: "+=200", opacity: 0.2}, 2000, 'linear') puts this animation function in the effects queue. It specifies that you want to animate the selected div box by incrementing its top CSS property by 200 pixels and changing its opacity from 0.6 (the current) to 0.2 (this moves the box 200 pixels toward the bottom while changing its opacity from 0.6 to 0.2 over the period of two seconds by using the linear easing function).
– slideUp(1000) puts this effect function in the effects queue. It specifies that you want to animate the selected div box by hiding it using a sliding transition over the period of one second.
– slideDown(1000) puts this effect function in the effects queue. It specifies that you want to animate the selected div box by showing it using a sliding transition over the period of one second.
All these effects and animation functions are in the div box effects queue and are executed in sequential order while the main program execution continues to run in parallel. This is an asynchronous process, meaning that program execution won’t wait for the animation to complete. Figure 8-8 displays the initial page in the browser.
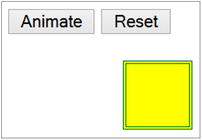
Figure 8-8. Initial page display
Figure 8-9 displays the animation’s intermediate state, when the Animate button is clicked.

Figure 8-9. Animation’s intermediate state
Figure 8-10 displays the animation’s final state.
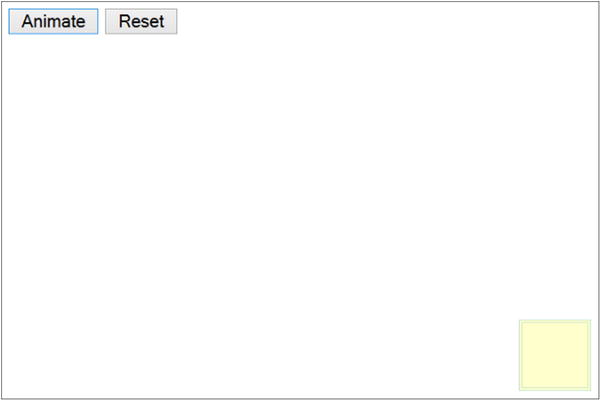
Figure 8-10. Animation’s final state
If the Animate button is clicked again, the animation will start from the current location since this examples uses relative positioning. If the Reset button is clicked and then the Animate button is clicked, the animation will start from its original position.
A few points to remember about CSS properties used in the animate() method are:
– CSS property names are written in camelCase. For example, the CSS property name margin-left is specified as marginLeft.
– Only CSS properties with numeric values can be animated. If the propertyValue contains any other character (such as px, +=), then you must enclose the value with " (double quotes) or ' (single quotes).
– cssPropertyValue can be prefixed with += or -=. These notations are used to specify relative positions. += means increment the current value of the CSS property by the specified amount. -= means decrement the current value of the CSS property by the specified amount. For example, left: '+=50px' means increase the left spacing of the element by 50px, which will move the element to the right by 50 px.
– There are certain properties that cannot be animated using the core jQuery library. For example, background-color cannot be used as target CSS property for the elements. It can be implemented using other jQuery plug-ins or by using the following syntax.
CSS style code:
.myClass {
       background-color: green;
}
JavaScript code:
$(selector).queue(function () {
$(this).addClass('myClass').dequeue();
});
I cover the queue() and dequeue() methods in Recipes 8-5, 8-6, and 8-7.
Here’s the other syntax for the animate() method:
– $(selector).animate(targetCSSProperties, animationDuration, easingFunctionName, animationCompleteCallbackFunction) —Note that animationDuration, easingFunctionName, and animationCompleteCallbackFunction are optional.
– $(selector).animate(targetCSSProperties, options) —Refer to the introduction section of this chapter for details about these options.
8-5. Displaying Functions in the Effects Queue of Selected Elements
Problem
You want to display functions in the effects queue of the selected elements.
Solution
A queue makes it possible to run a sequence of actions (functions) asynchronously. The program execution won’t wait for all functions to be completed. You can attach many queues to the same element. For example, the function in one queue can be moving the object, whereas the function in another queue (associated with the same element) can be changing the size of the element. In most of the cases, only one queue per element is used.
A queue is an array of effects and animation functions that are executed sequentially. All the properties and methods that are valid for an array can be used for the queue. By default, each element has its own standard effects queue, which is called the fx queue. If the queueName is not explicitly specified in a method as an argument, the fx queue is used. The following syntax is used to get the default queue (fx) of the selected elements:
$(selector).queue()
Listing 8-5 demonstrates the use of the queue() method to get the functions list in the default queue.
Listing 8-5. Using the queue() method to get details about the items in the effects queue
<!DOCTYPE html>
<html lang="en">
<head>
     <meta charset="utf-8">
     <script src="scripts/jquery-2.1.0.min.js"></script>
     <style>
       div {
            border:3px double green;
            width: 50px;
            height: 50px;
            position:absolute;
            left:100px;
            top:50px;
            background-color: yellow;
       }

       .message {
            position:absolute;
            top:300px;
            left:0px;
            width:100%;
            height:100%;
       }
     </style>

     <script>
       $(function () {
            $("#animate").click( function() {
              $("#box").animate({left:"+=300", opacity: 0.6}, 2000, 'linear')
                    .animate({top: "+=200", opacity: 0.2}, 2000, 'linear')
                    .slideUp(1000)
                    .slideDown(1000);

              var queue = $("div").queue(); // default is "fx" - standard effects queue

              var msg = "Queue Length: " + queue.length + "<br><br>";

              for (var i = 0; i<queue.length; i++) {
                   msg += "Function [" + i + "]: " + queue[i] + "<br>";
              }

              $("#message").html(msg);
            });

            $("#reset").click( function() {
              location.reload();
            });
       });
     </script>
</head>

<body>
     <input id="animate" type="button" value="Animate">
     <input id="reset" type="button" value="Reset">

     <div id="box"></div>
     <span id="message" class="message"></span>
</body>
</html>
How It Works
When the Animate button is clicked, the following code is executed for the animation:
$("#box").animate({left:"+=300", opacity: 0.6}, 2000, 'linear')
       .animate({top: "+=200", opacity: 0.2}, 2000, 'linear')
       .slideUp(1000)
       .slideDown(1000);
Refer to Recipe 8-4 to see the details about this code. The code for getting the queue information is as follows:
              var queue = $("div").queue(); // default is "fx" - standard effects queue

              var msg = "Queue Length: " + queue.length + "<br><br>";

              for (var i = 0; i<queue.length; i++) {
                    msg += "Function [" + i + "]: " + queue[i] + "<br>";
              }
In this code sample:
- $("div").queue() gets the standard default queue of the selected div element and sets the local variable queue.
- queue.length gets the number of effect functions in the queue.
- The for loop iterates over all the effect functions in the queue and gets their code.
Finally, the code for displaying queue information on the page is:
$("#message").html(msg);
Figure 8-11 displays the queue information for the div box.
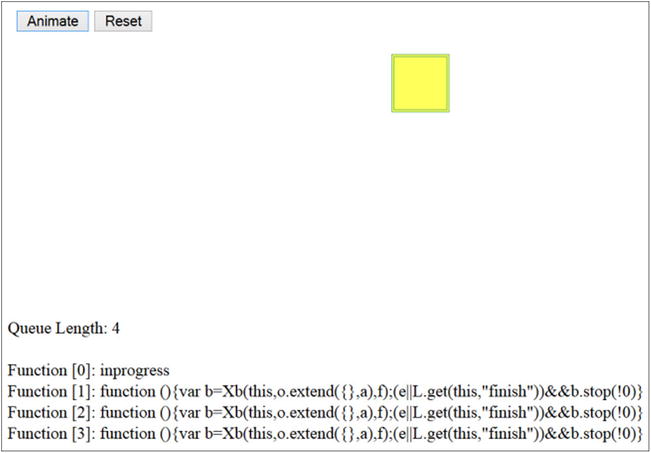
Figure 8-11. Displays the effects queue information of the selected div element
By using the JavaScript function setTimeout(functionName, timeInterval), you can show the queue details after every specified period of time. In Figure 8-11, the function code looks different than the animate(), slideUp(), and slideDown() methods. It shows the information stored in the queue corresponding to these effects and animations functions.
8-6. Replacing Functions in the Effects Queue of Selected Elements
Problem
You want to replace the remaining functions in the queue with a new array of effects functions. This functionality is useful when, based on user interaction, you want to change the normal set of animation effects to a different set of animation effects.
Solution
The following is the syntax to replace the effects and animations functions in the queue with a new array of functions:
$(selector).queue(newFunctionsArray)
Listing 8-6 demonstrates the use of the queue() method to replace remaining effects functions with a new set of effects functions.
Listing 8-6. Using the queue() method to replace effects functions in the effects queue
<!DOCTYPE html>
<html lang="en">
<head>
     <meta charset="utf-8">
     <script src="scripts/jquery-2.1.0.min.js"></script>
     <style>
       div {
            border:3px double green;
            width: 50px;
            height: 50px;
            position:absolute;
            left:100px;
            top:50px;
            background-color: yellow;
       }
     </style>

     <script>
       var fadeOutFunc = function () {
            $(this).fadeOut();
       }

       $(function (){
            $("#animate").click( function() {
              $("#box").animate({left:"+=300", opacity: 0.6}, 2000, 'linear')
              .animate({top: "+=200", opacity: 0.2}, 2000, 'linear')
              .slideUp(1000)
              .slideDown(1000);
            });

            $("#replaceFunctions").click( function() {
              var functionArray = new Array();
              functionArray.push(fadeOutFunc);

              $("#box").queue(functionArray);
            });

            $("#reset").click( function() {
                 location.reload();
            });

       });
     </script>
</head>

<body>
     <input id="animate" type="button" value="Animate">
     <input id="replaceFunctions" type="button" value="Replace Functions in the queue">
     <input id="reset" type="button" value="Reset">

     <div id="box"></div>
</body>
</html>
How It Works
When the Animate button is clicked, the following code is executed:
$("#box").animate({left:"+=300", opacity: 0.6}, 2000, 'linear')
       .animate({top: "+=200", opacity: 0.2}, 2000, 'linear')
       .slideUp(1000)
       .slideDown(1000);
Refer to Recipe 8-4 to learn more about this code.
To understand this functionality, let the animation run up to the end state. Now click the Animate button again and click the Replace Functions in the Queue button. The following code will be executed:
var functionArray = new Array();
functionArray.push(fadeOutFunc);

$("#box").queue(functionArray);
The following actions take place as a result of this code:
- functionArray.push(fadeOutFunc) adds a function called fadeOutFunc to the array functionArray. fadeOutFunc makes a call to the fadeOut() method.
- $("#box").queue(functionArray) replaces the remaining effects in the effects queue with the new set of functions (i.e., fadeOut()).
After the current step of the animation is completed, the box will fade out instead of continuing with its normal set of animation effects.
The following syntax is used to replace the remaining effects functions with an array of new functions in the named queue associated with the selected elements:
$(selector).queue(queueName, newFunctionsArray)
8-7. Adding Custom Functions in the Effects Queue
Problem
You want to add a new custom function in the effects queue. This functionality can be used to add effects (such as to change the background color) that are not supported by the target CSS property parameter of the animate() method.
Solution
The following is the syntax to add a custom function in the effects queue:
$(selector).queue(function () {....})
This new function is executed when all the effects functions before it in the queue are completed. It is important to call the dequeue() method in the custom function so that next effects function in the queue can be executed.
Listing 8-7 demonstrates the use of the custom function as a parameter in the queue() method.
Listing 8-7. Using the queue() method with the custom function as a parameter
<!DOCTYPE html>
<html lang="en">
<head>
     <meta charset="utf-8">
     <script src="scripts/jquery-2.1.0.min.js"></script>
     <style>
       div {
            border:3px double green;
            width: 50px;
            height: 50px;
            position:absolute;
            left:100px;
            top:50px;
            background-color: yellow;
       }

       .newColor {
            background-color: green;
       }
     </style>

     <script>
       $(function (){
            $("#animate").click( function() {
              $("#box").animate({left:"+=300", opacity: 0.6}, 2000, 'linear')
                    .queue(function () {
                         $(this).addClass('newColor').dequeue();
                    })
                    .animate({top: "+=200", opacity: 0.2}, 2000, 'linear')
                    .slideUp(1000)
                    .slideDown(1000);
            });

            $("#reset").click( function() {
              location.reload();
            });
       });
     </script>
</head>

<body>
     <input id="animate" type="button" value="Animate">
     <input id="reset" type="button" value="Reset">

     <div id="box"></div>
</body>
</html>
How It Works
When the Animate button is clicked, the following code is executed:
$("#box").animate({left:"+=300", opacity: 0.6}, 2000, 'linear')
       .queue(function () {
         $(this).addClass('newColor').dequeue();
        })
       .animate({top: "+=200", opacity: 0.2}, 2000, 'linear')
       .slideUp(1000)
       .slideDown(1000);
Refer to Recipe 8-4 for more information about the animate(), slideUp(), and slideDown() methods. After the first step of the animation is completed, the following code is executed from the effects queue:
queue(function () {
    $(this).addClass('newColor').dequeue();
})
In this custom function, addClass('newColor') adds the CSS class .newClass to the selected element and changes the color of the box to green. For the custom function in the effects queue, it is important to call .dequeue() so the next effects in the queue can be executed.
Figure 8-12 displays the page when the Animate button is clicked. The custom function is executed after the first animation step (moving the yellow box from left to right) is completed.
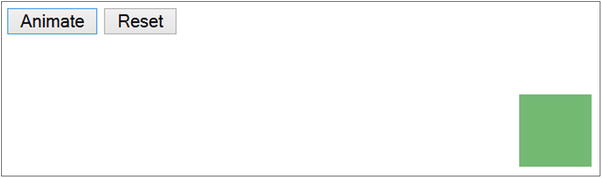
Figure 8-12. Displays the effect of executing a custom function in the effects queue
The following syntax adds a custom function in the named queue associated with the selected elements:
$(selector).queue(queueName, function () {....})
8-8. Controlling the Animation by Pausing It
Problem
You want to delay the execution of effects and animations.
Solution
The following syntax can be used to pause an animation:
$(selector).delay(delayTime)
where delayTime is in milliseconds. The delay() method pauses the animation for the specified number of milliseconds.
Listing 8-8 demonstrates the use of the delay() method. This code listing is same as Listing 8-4, with the exception of including the delay() step between the two animate() methods.
Listing 8-8. Using the delay() method to pause the animation
<!DOCTYPE html>
<html lang="en">
<head>
     <meta charset="utf-8">
     <script src="scripts/jquery-2.1.0.min.js"></script>
     <style>
       div {
            border:3px double green;
            width: 50px;
            height: 50px;
            position:absolute;
            left:100px;
            top:50px;
            background-color: yellow;
       }
     </style>

     <script>
       $(function () {
            $("#btnAnimate").click( function() {
              $("#box").animate({left:"+=300", opacity: 0.6}, 2000, 'linear')
                    .delay(800)
                    .animate({top: "+=200", opacity: 0.2}, 2000, 'linear')
                    .slideUp(1000)
                    .slideDown(1000);
           });

           $("#btnReset").click( function() {
              location.reload();
            });
       });
     </script>
</head>
<body>
     <input id="btnAnimate" type="button" value="Animate">
     <input id="btnReset" type="button" value="Reset">

     <div id="box"></div>
</body>
</html>
How It Works
When the Animate button is clicked, the animation will start by moving the box from left to right. It then pauses for 800 milliseconds due to the statement .delay(800) and then continues to move the box from top to bottom. The animation hides the box by sliding it up and then displays it by sliding it down. Refer to Figures 8-8, 8-9, and 8-10 for the initial, intermediate, and final states of the animation, respectively.
8-9. Removing All Remaining Effects and Animations Functions from the Effects Queue
Problem
You want to remove all the remaining effects and animation functions from the effects queue.
Solution
The following jQuery syntax removes all the effects from the queue that have not yet been executed:
$(selector).clearQueue()
Listing 8-9 demonstrates the use of the clearQueue() method to remove all remaining elements from the effects queue of the selected elements. The effects function that’s currently being executed won’t be removed.
Listing 8-9. Using the clearQueue() method to remove remaining effects
<!DOCTYPE html>
<html lang="en">
<head>
     <meta charset="utf-8">
     <script src="scripts/jquery-2.1.0.min.js"></script>
     <style>
       div {
            border:3px double green;
            width: 50px;
            height: 50px;
            position:absolute;
            left:100px;
            top:50px;
            background-color: yellow;
       }
     </style>

     <script>
       $(function () {
            $("#animate").click( function() {
              $("#box").animate({left:"+=300", opacity: 0.6}, 2000, 'linear')
                    .animate({top: "+=200", opacity: 0.2}, 2000, 'linear')
                    .slideUp(1000)
                    .slideDown(1000);
            });

            $("#clearQueue").click( function() {
              $("#box").clearQueue(); // won't clear the currently running effect.
            });

            $("#reset").click( function() {
              location.reload();
            });
       });
     </script>
</head>

<body>
     <input id="animate" type="button" value="Animate">
     <input id="clearQueue" type="button" value="Clear Queue">
     <input id="reset" type="button" value="Reset">

     <div id="box"></div>
</body>
</html>
How It Works
When the Animate button is clicked, the following code is executed:
$("#box").animate({left:"+=300", opacity: 0.6}, 2000, 'linear')
       .animate({top: "+=200", opacity: 0.2}, 2000, 'linear')
       .slideUp(1000)
       .slideDown(1000);
Refer to Recipe 8-4 to read more about this code.
You can test the effect of the clear queue functionality by clicking Clear Queue before the animation is completed. When Clear Queue is clicked, the following code is executed:
$("#clearQueue").click( function() {
  $("#box").clearQueue(); // won't clear the currently running effect.
});
The clearQueue() method will let the current effect complete and then it will remove all the remaining effects from the queue.
The animation will stop at the point at which the currently running effect ended. Figure 8-13 displays the page that appears when the Clear Queue button is clicked immediately after the animation has started.
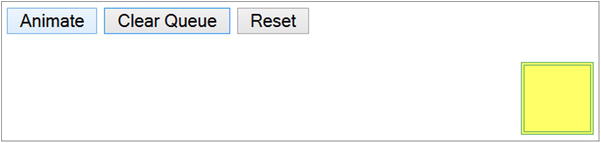
Figure 8-13. Displays the effect on the animation of the clearQueue() method
The following syntax is used to remove remaining functions from the named queue associated with the selected elements:
$(selector).clearQueue(queueName)
8-10. Stopping the Currently Running Animation
Problem
You want to stop the currently running animation in the effects queue.
Solution
The following syntax is used to stop the currently running animation in the effects queue of the selected elements:
$(selector).stop(clearQueue, goToTheEndState)
Use clearQueue to specify if you want to clear the queue and remove the remaining effects. The goToTheEndState parameter specifies if you want to go to the end state of the current animation. Both these parameters are optional; you simply use the Boolean values and their default value is false. Listing 8-10 demonstrates the use of the stop() method with all the possible combinations of values of the clearQueue and goToTheEndState parameters.
Listing 8-10. Using the stop() method to terminate the current animation step
<!DOCTYPE html>
<html lang="en">
<head>
<meta charset="utf-8">
<script src="scripts/jquery-2.1.0.min.js"></script>
<style>
div {
border:3px double green;
width: 50px;
height: 50px;
position:absolute;
left:100px;
top:100px;
background-color: yellow;
}
.newColor {
background-color: green;
}
</style>
<script>
$(function () {
$("#animate").click( function() {
$("#box").animate({left:"+=300", opacity: 0.6}, 2000, 'linear')
.animate({top: "+=200", opacity: 0.2}, 2000, 'linear')
.queue(function () {
$(this).addClass('newColor').dequeue();
})
.slideUp(1000)
.slideDown(1000);
});
$("#stopAnimation").click( function() {
var clearQueue = $("#clearQueue").prop("checked");
var goToTheEnd = $("#goToTheEnd").prop("checked");
$("#box").stop(clearQueue, goToTheEnd);
});
$("#reset").click( function() {
location.reload();
});
});
</script>
</head>
<body>
<input type="checkbox" id="clearQueue">Clear queue
<input type="checkbox" id="goToTheEnd">Go to the end<br><br>
<input id="animate" type="button" value="Animate">
<input id="stopAnimation" type="button" value="Stop Animation">
<input id="reset" type="button" value="Reset"><br>
<div id="box"></div>
</body>
</html>
How It Works
To understand the stop() method functionality, you need to click the Animate button first and then click the Stop Animation button. When you click the Stop Animation button, the following code is executed:
var clearQueue = $("#clearQueue").prop("checked");
var goToTheEnd = $("#goToTheEnd").prop("checked");
$("#box").stop(clearQueue, goToTheEnd);
The following is the explanation of this code:
– $("#clearQueue").prop("checked") returns true if the Clear Queue checkbox is checked; otherwise it returns false. The return value is used to set the value of the clearQueue variable.
– $("#goToTheEnd").prop("checked") returns true if the Go to the End checkbox is checked; otherwise, it returns false. The return value is used to set the value of the goToTheEnd variable.
– clearQueue and goToTheEnd are passed as parameters to the stop() method.
The following are the possible combinations for the clearQueue and goToTheEndState parameters and their effect on the behavior of the stop() method:
- If clearQueue and goToTheEndState are false, the current animation will stop immediately and subsequent animations will be executed.
- If clearQueue is true and goToTheEndState is false, the current animation will stop immediately and subsequent animations will not be executed.
- If clearQueue is false and goToTheEndState is true, the current animation will jump to the end state of the current animation step and subsequent animations will be executed. To test this behavior, click the Animate button and then immediately click the Stop Animation button.
- If clearQueue and goToTheEndState are true, the current animation will jump to its end state and subsequent animations will be executed.
The following syntax is used to execute the stop() method on the named queue associated with the selected elements:
$(selector).stop(queueName, clearQueue, goToTheEndState)
The finish() Method
If you want to finish the animation by stopping the currently running animation effect, clear all the remaining animation effects in the queue, and reach the end state of all the animations, you use the finish() method. The syntax for the finish() method is:
$(selector).finish()
$(selector).finish(queueName)
To test the effect of the finish() method, add the following code to Listing 8-10. Then test it by clicking the Animate button first and then the Finish Animation button.
HTML code:
     <input id="finishAnimation" type="button" value="Finish Animation">
jQuery Code:
     $("#finishAnimation").click( function() {
$("#box").finish();
     });
8-11. Determining Global Settings for All the Animation Effects
Problem
You want to determine the global settings for all the animation effects.
Solution
The following are the two global settings for all animation effects:
– $.fx.interval can be set to the frequency at which animation changes are displayed. The default value is 13 milliseconds. By setting its value to 1, the animation will be much smoother but there might by CPU utilization issues. You should fine-tune this value to create a smoother animation without impacting system resources and performance problems. Since this value is set at a global level and all animations will be impacted, you will see the difference in animation transition after stopping and restarting the animation after the $.fx.interval value is set. The syntax to set its value is:
$.fx.interval = n;
where n is the value in milliseconds.
– $.fx.off can be set to true or false. When it is set to true, animations won’t start and all the selected elements, with the effects queue, will be displayed as their final animation state. This value is set at the global level and it is useful to disable all the animations if system resources (CPU and memory) constraints are expected or noticed. When it is set to false, all subsequent animations will work as designed and coded. The syntax to set its value is:
$.fx.off = booleanValue;
where booleanValue can be true or false.
Summary
This chapter covered topics about effects and animations. You learned to:
- Add effects to web pages by using the following methods—hide(), show(), toggle(), fadeIn(), fadeOut(), fadeTo(), fadeToggle(), slideUp(), slideDown(), and slideToggle().
- Create and run custom animations by specifying target CSS properties of the element and the duration of the transition from the current CSS properties to the target CSS properties of the element by using the animate() method.
- Manage effects and animations queue by adding, removing, and replacing effects and animation methods to/from the queue. You did this by using the following methods—queue(), dequeue(), and clearQueue().
- Control animation by smoothing, pausing, stopping, and skipping animation steps. You do this by using the following methods—delay(), stop(), and finish().
- Plug in additional custom functions at various steps of the animation by using the queue(function () {...}) function.