
![]()
DOM Manipulation
This chapter covers the jQuery methods used to manipulate the DOM. Chapters 3, 4, and 5 used jQuery selectors to get (or select) HTML elements based on their IDs, tag names, class names, types, attributes, and attribute’s values, and based on their relationship with other elements in the DOM tree. Once you have selected the desired elements, you can use a DOM-manipulation method to change their styles (CSS properties), properties, and attributes. You can also use DOM-manipulation methods to add new nodes and remove or replace existing nodes.
Sections in this chapter are organized in the following order:
- Manipulation of existing node(s) in the DOM tree
- Manipulation of style
- Manipulation of attributes and properties
- Manipulation of the DOM tree structure
- Adding new nodes
- Removing existing nodes
- Replacing existing nodes
Refer to Chapter 2 for information about the DOM tree structure, as well as to understand nodes, ancestors, siblings, and descendants.
6-1. Adding CSS Class(es) to All Selected Elements
Problem
You want to add CSS classes to all the selected elements. This is generally needed to change the visual behavior of a group of elements. For example, when you want to disable all the data-entry fields when the form is submitted for processing or want to highlight a list of elements, you can use addClass() method.
Solution
The following jQuery syntax is used to add CSS class(es) to all the selected HTML elements.
$(selector).addClass("cssClassName1 cssClassName2 ...")
One or more CSS classes can be added to the class attribute of each element in the set of selected elements. Multiple class names can be specified by using spaces as separators. This method returns the jQuery object. Listing 6-1 demonstrates the use of addClass() method to add a CSS class to each element in a set of selected elements.
Listing 6-1. The jQuery method to add a CSS class to the selected elements
<!DOCTYPE html>
<html lang="en">
<head>
   <meta charset="utf-8">
   <script src="scripts/jquery-2.1.0.min.js"></script>
   <style>
      ul { width:150px; }
              .highlight { border: 3px dotted red; background-color: yellow; }
   </style>
   <script>
      $(function(){
         $("#btnTestIt").click(function (){
            $("ul").addClass("highlight");
         });
      });
   </script>
</head>
<body>
   <strong>Departments:</strong>
   <ul>
      <li>Marketing</li>
      <li>Sales</li>
      <li>Technology</li>
      <li>Customer Support</li>
   </ul>
   <input id="btnTestIt" type="button" value="Test It">
</body>
</html>
How It Works
The department names are listed using <ul> and <li> HTML tags. If you want to highlight all department names and surround them with a border, you must first define the CSS class name (for example, highlight) using the CSS properties background-color and border and then select the parent of the <li> elements using $("ul"). You then execute the addClass() method on the selected elements.
When the Test It button is clicked, the following code is executed:
$("ul").addClass("highlight");
$("ul") selects the HTML element with the tag name ul and returns the jQuery object. .addClass("highlight") adds the highlight CSS class to the selected element (ul). Figure 6-1 displays the page when it is viewed in a browser.
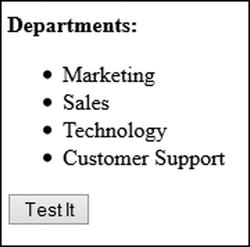
Figure 6-1. Initial page display
When you press the Test It button, the button’s click event handler changes the background color and draws the border around the selected element. Figure 6-2 displays the effect of clicking the Test It button.
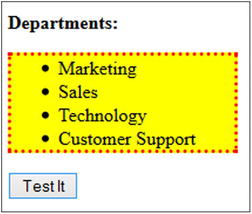
Figure 6-2. Selected elements are highlighted and have a border around them
The following shows another way to apply addClass to each element in the selected set of elements:
.addClass( function(index, currentClass) { ... } )
This method iterates over each element in the set of selected elements. You can implement some logic in the function to decide which class name(s) are to be added based on the current element, current index, and current class associated with the current element. The argument index specifies the index number of the current element in the set of selected elements. A function needs to be created with the arguments index and currentClass and the body of the function contains the logic to determine which class name needs to be added to the current element. The returned class name(s) is added to the current element in the set of selected elements.
The following code segment uses index to change the background color of the even and odd numbered records in the table:
<style>
      .evenRow { background-color:lightyellow; }
      .oddRow { background-color:lightgreen; }
</style>
<script>
      $(function(){
         $("tr").addClass(function (index, currentClass) {
              if (index % 2 == 0) {
                 return("evenRow");
              } else {
                 return("oddRow");
               }
         });
      });
</script>
6-2. Checking if a CSS Class Is Associated with Any of the Selected Elements
Problem
You want to check if a CSS class is associated with any of the selected elements.
Solution
The following jQuery syntax is used to check if a CSS class is associated with any of the selected elements:
.hasClass("className")
className is the name of the class you want to check if it is already assigned to any of the selected elements. This returns a Boolean. True is returned if className is assigned to any of the selected elements.
Listing 6-2 demonstrates the use of the jQuery method .hasClass() to check if it assigned to any of the selected elements.()
Listing 6-2. Use of the jQuery method .hasClass()
<!DOCTYPE html>
<html lang="en">
<head>
   <meta charset="utf-8">
   <script src="scripts/jquery-2.1.0.min.js"></script>
   <style>
      ul { width:150px; }
     .highlight { border: 3px dotted red; background-color: yellow; }
   </style>
   <script>
      $(function(){
         $("#btnTestIt").click(function (){
            if ($("ul").hasClass("highlight") == true) {
               $("#classAssociation").prop("innerHTML", "ul tag has the class - 'highlight'");
            } else {
               $("#classAssociation").prop("innerHTML", "ul tag doesn't have the class - 'highlight'");
            }
         });
      });
   </script>
</head>
<body>
   <strong>Departments:</strong>
   <ul class="highlight">
      <li>Marketing</li>
      <li>Sales</li>
      <li>Technology</li>
      <li>Customer Support</li>
   </ul>
   <input id="btnTestIt" type="button" value="Test It"><br><br>
   <div id="classAssociation"></div>
</body>
</html>
How It Works
The department names are listed using the <ul> and <li> HTML tags. If you want to check if the highlight CSS class is assigned to the ul tag, you select the <ul> elements using $("ul") and then execute the hasClass() method on the selected element.
When the Test It button is clicked, the following code is executed:
$("ul").hasClass("highlight");
$("ul") selects the HTML element with the tag name ul and returns the jQuery object. .hasClass("highlight") checks if the highlight CSS class is associated with selected element (ul) and returns true. The message displays "ul tag has the class - 'highlight'" on the page. Figure 6-3 displays the page when it is viewed in a browser.

Figure 6-3. Displays the page when viewed in a browser
When you press the Test It button, the button’s click event handler checks if the highlight class is associated with the ul tag and displays the message. Figure 6-4 displays the effect of clicking the Test It button.
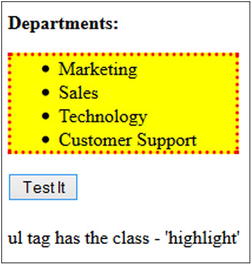
Figure 6-4. Message is displayed indicating that the highlight class is associated with the ul tag
6-3. Removing CSS Class(es) from Each Selected Element
Problem
You want to remove CSS class(es) from each selected element.
Solution
The following jQuery syntax is used to remove CSS class(es) from all the selected HTML elements.
$(selector).removeClass("cssClassName1 cssClassName2 ...")
One or more CSS classes can be removed from the class attribute of each element in the set of selected elements. Multiple class names can be specified by using spaces as separators. This method returns the jQuery object. Listing 6-3 demonstrates the use of the removeClass() method to remove the CSS class from each element in the set of selected elements. If no className is specified as an argument, all classes are removed from the set of selected elements.
Listing 6-3. The jQuery method to remove a CSS class from the selected elements
<!DOCTYPE html>
<html lang="en">
<head>
   <meta charset="utf-8">
   <script src="scripts/jquery-2.1.0.min.js"></script>
   <style>
      ul { width:150px; }
      .highlight { border: 3px dotted red; background-color: yellow; }
   </style>
   <script>
      $(function(){
         $("#btnTestIt").click(function (){
            $("ul").removeClass("highlight");
         });
      });
   </script>
</head>
<body>
   <strong>Departments:</strong>
   <ul class="highlight">
      <li>Marketing</li>
      <li>Sales</li>
      <li>Technology</li>
      <li>Customer Support</li>
   </ul>
   <input id="btnTestIt" type="button" value="Test It">
</body>
</html>
How It Works
The department names are listed using the <ul> and <li> HTML tags. If you want to remove highlight and the border from all department names, you select the <ul> elements using $("ul") and execute the removeClass() method on the selected elements.
When Test It button is clicked, the following code is executed:
$("ul").removeClass("highlight");
$("ul") selects the HTML element with the tag name ul and returns the jQuery object. .removeClass("highlight") removes the highlight CSS class from the selected element (ul). Figure 6-5 displays the page when it is viewed in a browser.
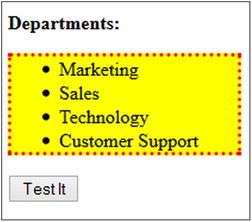
Figure 6-5. Initial page display
When you press the Test It button, the button’s click event handler removes the background color and the border around the selected element. Figure 6-6 displays the effect of clicking the Test It button.
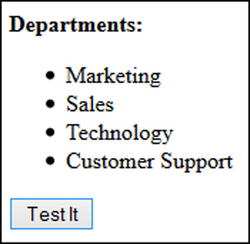
Figure 6-6. Highlight and border are removed from the selected elements
Here’s another way to apply removeClass to each selected element:
.removeClass( function(index, currentClass) )
This method iterates over each element in the set of selected elements. You can implement some logic in the function to decide which class name(s) will be removed based on the current element, current index, and current class associated with the current element. The argument index specifies the index number of the current element in the set of selected elements. A function needs to be created with the arguments index and currentClass and the body of the function contains the logic to determine which class name needs to be removed from the current element. The returned class name(s) is removed from the current element in the set of selected elements.
6-4. Toggling CSS Class(es) for Each Element of the Selected Elements
Problem
You want to add class(es) name to all the selected elements or remove the class names if they are already associated with them. This technique can be used when you want to toggle a visual display of a set of elements between two states. For example, if a user clicks a button to make a payment and the payment processing has started and is in process, you want to disable all data-entry fields. Then, when the payment processing is completed, you want to enable all data-entry fields.
Solution
The following jQuery syntax is used to toggle CSS class(es) for all the selected HTML elements.
$(selector).toggleClass("cssClassName1 cssClassName2 ...")
One or more CSS classes can be added (or removed) to (or from) the class attribute of each element in the set of selected elements. Multiple class names can be specified by using spaces as separators. This method returns the jQuery object. Listing 6-4 demonstrates the use of the toggleClass() method to add (or remove) CSS class to (or from) each element in the set of selected elements.
Listing 6-4. The jQuery method to add (or remove) a CSS class to (or from) selected elements
<!DOCTYPE html>
<html lang="en">
<head>
   <meta charset="utf-8">
   <script src="scripts/jquery-2.1.0.min.js"></script>
   <style>
      ul { width:150px; }
      .highlight { border: 3px dotted red; background-color: lightblue; }
   </style>
   <script>
      $(function(){
         $("#btnTestIt").click(function (){
            $("ul").toggleClass("highlight");
         });
      });
   </script>
</head>
<body>
   <strong>Departments:</strong>
   <ul>
      <li>Marketing</li>
      <li>Sales</li>
      <li>Technology</li>
      <li>Customer Support</li>
   </ul>
   <input id="btnTestIt" type="button" value="Test It">
</body>
</html>
How It Works
The department names are listed using the <ul> and <li> HTML tags. If you want to highlight all department names and surround them with a border or do the reverse, you must select the <ul> element using $("ul") and then execute the toggleClass() method on the selected element.
When the Test It button is clicked, the following code is executed:
$("ul").toggleClass("highlight");
$("ul") selects the HTML element with the tag name ul and returns the jQuery object. .toggleClass("highlight") adds the highlight CSS class to the selected element (ul) if the highlight class is not already associated with the selected element (ul) and removes the highlight CSS class from the selected element (ul) if that class is already associated with the selected element (ul). Figure 6-7 displays the page when it is viewed in a browser.
Figure 6-7. Initial page display
When you press the Test It button, the button’s click event handler changes the background color and draws the border around the selected element. Figure 6-8 displays the effect of clicking the Test It button.
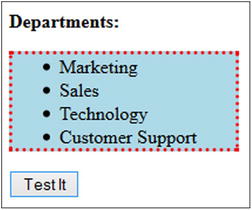
Figure 6-8. Selected elements are highlighted and have a border around them
On pressing the Test It button again, the background color is removed and the page is displayed as it was on the initial page (shown in the Figure 6-7).
6-5. Toggling CSS Class(es) for Selected Elements Based on the Return Value of a Function
Problem
You want to add class names to/from all selected elements if they are not already associated with them or remove them if they are already associated with them based on each element’s attributes and/or existing classes associated with the element.
Solution
The following jQuery syntax is used to toggle CSS class(es) for each selected HTML element based on its attributes, properties, and/or currently associated class names.
$(selector).toggleClass(function(index, currentClass) )
This method iterates over each element in the set of selected elements. You can implement some logic in the function to decide which class name(s) will be toggled based on the current element, current index, and current class associated with the current element. Returned class name(s) are added (or removed) to (or from) the current element in the set of selected elements. Listing 6-5 demonstrates the use of the toggleClass() method while iterating over each element in the set of selected elements.
Listing 6-5. The jQuery method to add/remove a CSS class to/from each element in the set of selected elements
<!DOCTYPE html>
<html lang="en">
<head>
   <meta charset="utf-8">
   <script src="scripts/jquery-2.1.0.min.js"></script>
   <style>
      ul { width:150px; }
      .underline { text-decoration: underline; }
              .item_0 { background-color: lightyellow; }
              .item_1 { background-color: lightblue; }
              .item_2 { background-color: lightgray; }
              .item_3 { background-color: lightgreen; }
   </style>
   <script>
      $(function(){
         $("#btnTestIt").click(function (){
            $("li").toggleClass(function(index, currentClassName){
                                return("item_" + index);
                             });
         });
      });
   </script>
</head>
<body>
   <strong>Departments:</strong>
   <ul>
      <li class="underline">Marketing</li>
      <li>Sales</li>
      <li>Technology</li>
      <li>Customer Support</li>
   </ul>
   <input id="btnTestIt" type="button" value="Test It">
</body>
</html>
How It Works
The department names are listed using the <ul> and <li> HTML tags. If you want to highlight all department names based on their position in the list, you select the <li> elements using $("li") and execute the toggleClass() method with the function as its parameter. Within the function, you can return the className you want to associate with the current element in the set of selected elements.
When the Test It button is clicked, the following code is executed:
$("li").toggleClass(function(index, currentClassName){
   return("item_" + index);
});
$("li") selects the HTML element with the tag name li and returns the jQuery object. .toggleClass (function()) iterates over each element in the set of the selected elements ("li"). return("item_" + index) returns the class name item_0 for the first element, the class name item_1 for the second element, and so on, in the set of selected elements. These returned class names are then associated with the corresponding element. Figure 6-9 displays the page when it is viewed in a browser. If the Test It button is clicked again, these newly added class names will be removed from the set of selected elements.
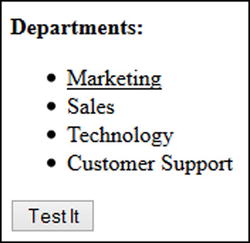
Figure 6-9. Initial page display
When you press the Test It button, the button’s click event handler changes the background color based on the element’s position in the set of selected elements. Figure 6-10 displays the effect of clicking the Test It button.
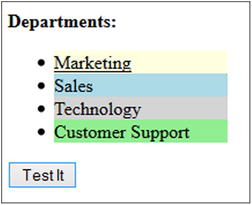
Figure 6-10. Selected elements are highlighted and have a border around them
If you press the Test It button again, the background color will be removed and the page will be displayed the same as the initial page (shown in Figure 6-9).
6-6. Getting and Setting the CSS Property of the Selected Element(s)
Problem
You want to get and set the CSS property of the elements in the set of selected elements.
Solution
The following jQuery syntax is used to get the CSS property of the first element in the set of selected elements.
$(selector).css("cssPropertyName")
This method returns the value of the specified CSS (style) property name (as a string).
The following jQuery syntax is used to set the CSS property of all the elements in the set of selected elements.
$(selector).css("cssPropertyName", "cssPropertyValue")
This method returns the jQuery object after setting the specified CSS (style) property of all selected elements. Listing 6-6 demonstrates the use of the css() method to get and set the CSS property of the elements in the set of selected elements.
Listing 6-6. The jQuery method to get and set a CSS property of the selected elements
<!DOCTYPE html>
<html lang="en">
<head>
   <meta charset="utf-8">
   <script src="scripts/jquery-2.1.0.min.js"></script>
   <style>
      .label { width: 200px; font-weight: bold; color: blue; }
      .dataEntry { background-color: yellow; }
      .highlight {
         text-decoration:underline;
         background-color:yellow;
         width: 150px;
      }
   </style>
   <script>
      $(function(){
         $("#btnTestItGet").click(function () {
            alert($("input:text").css("background-color"));
         });
         $("#btnTestItSet").click(function () {
            $("input:text").css("background-color", "lightblue");
         });
      });
   </script>
</head>
<body>
   <div class="label">Name:</div><input type="text" id="txtName" class="dataEntry"><br>
   <div class="label">Address:</div><input type="text" id="txtAddress" class="dataEntry"><br><br><br>
   <input id="btnTestItGet" type="button" value="Test It (Get CSS Property)"> <br><br>
   <input id="btnTestItSet" type="button" value="Test It (Set CSS Property)">
</body>
</html>
How It Works
The two data entry input textboxes are created using the input HTML tag. If you want to display a value of the CSS property called background-color of the first input text element, you select the input text either by using $("#txtName") or by using $("input:text") and execute the css() method on the selected elements.
When the Test It (Get CSS Property) button is clicked, the following code is executed:
alert($("input:text").css("background-color"));
$("input:text") selects all the HTML elements with the tag name input and the type set to text and returns the jQuery object. .css("background-color") gets the value of the CSS property background-color of the first element in the selected elements, which is the txtName input element.
When the Test It (Set CSS Property) button is clicked, the following code is executed:
$("input:text").css("background-color", "lightblue")
$("input:text") selects all the HTML elements with the tag name input and type set to text and returns the jQuery object. .css("background-color", "lightblue") sets the value of the CSS property background-color of all the selected elements to lightblue. Figure 6-11 displays the page when it is viewed in a browser.
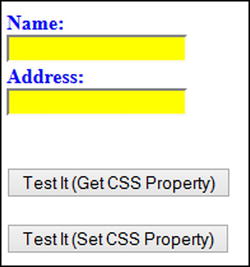
Figure 6-11. Initial page display
When you press the Test It button, the button’s click event handler displays the current background-color value of the first element in the set of selected elements and then sets the background-color of all selected elements to lightblue. Figure 6-12 displays the message with the current background-color. rgb(255, 255, 0) is RGB code for yellow. Figure 6-13 displays the change in background-color to lightblue.
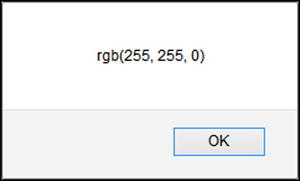
Figure 6-12. Current background color of the input textbox
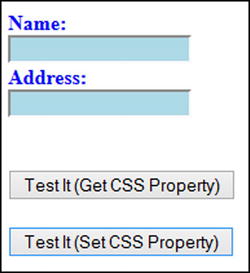
Figure 6-13. Background color of all input textboxes changes to lightblue
You can get multiple CSS properties of the first element in the selected elements by passing an array of strings containing CSS property names as an argument to the css() method. The return value is an object with key/value pairs. For example, in order to determine the width, font-weight, and color properties of the label, you can use following code:
var arrProperty = ["width", "font-weight", "color"];
var result = $(".label").css(arrProperty);
// result is an object with key value pairs
You can access the key-value pair in the return object using following code:
$.each( result, function( prop, value ) {
   alert( prop + ": " + value );
});
$.each(result, function(key, value)) will iterate over each element in the result and pass the key and value as arguments to the inline function. Inside the function, you can access and use the key and value as per your requirements. This example displays the key and value pairs as pop-up messages.
6-7. Setting Multiple CSS Properties of All the Selected Elements
Problem
You want to set multiple CSS properties of all the selected elements.
Solution
The following jQuery syntax is used to set multiple CSS properties of all the selected HTML elements.
$(selector).css(cssProperties)
where cssProperties is a map object with key/value pairs. Key is the property name and value is the property value. This method returns the jQuery object. The syntax for defining the map object is:
var cssProperties = {"cssPropertyName1":"cssPropertyValue1",
      "cssPropertyName2":"cssPropertyValue2",
      "cssPropertyName3":" cssPropertyValue3",
       ...};
Listing 6-7 demonstrates the use of the css() method to set multiple CSS properties of all the selected elements.
Listing 6-7. Setting multiple CSS properties of all the selected elements
<!DOCTYPE html>
<html lang="en">
<head>
   <meta charset="utf-8">
   <script src="scripts/jquery-2.1.0.min.js"></script>
   <style>
      .label {width: 200px; font-weight: bold; color: blue; }
      .dataEntry { background-color: yellow; }
      .highlight {
         text-decoration:underline;
         background-color:yellow;
         width: 150px;
      }
   </style>
   <script>
      $(function(){
         $("#btnTestIt").click(function () {
            // map object of key value pairs
            var cssProperties = {"width":"140px", "font-weight" : "normal", "color" : "white", "background-color" : "darkblue"};
             $(".label").css(cssProperties);
         });
      });
   </script>
</head>
<body>
   <div class="label">Name:</div><input type="text" id="txtName" class="dataEntry"><br>
   <div class="label">Address:</div><input type="text" id="txtAddress" class="dataEntry"><br><br><br>
   <input id="btnTestIt" type="button" value="Test It"><br>
   <div id="message"></div>
</body>
</html>
How It Works
There are two div tags with the class name label. If you want to change multiple properties (such as width, font-weight, color, and background-color) of these div tags, you first define the map object containing the key value pairs as cssPropertyName and cssProperty values, then select the labels by using $("label"), and finally execute the css() method on all the selected elements.
When the Test It button is clicked, the following code is executed:
var cssProperties = {"width":"140px", "font-weight" : "normal", "color" : "white", "background-color" : "darkblue"};

$(".label").css(cssProperties);
cssProperties contains cssPropertyName and cssPropertyValue key/value pairs.
$(".label") selects the HTML element with the class name label and returns the jQuery object. .css(cssProperties) sets all the CSS property names, which are specified in the map object, of the selected elements with the specified property values. Figure 6-14 displays the page when it is viewed in a browser.
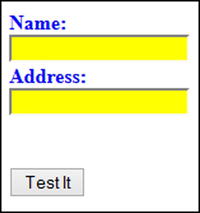
Figure 6-14. Initial page display
When you press the Test It button, the button’s click event handler changes the width, font-weight, color, and background-color properties of the selected element. Figure 6-15 displays the effect of clicking the Test It button.
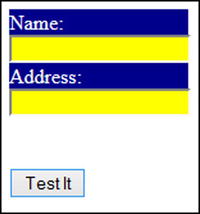
Figure 6-15. CSS properties of the selected elements are changed
6-8. Setting a Single CSS Property of Each Element in the Set of Selected Elements Based on a Function
Problem
You want to change the CSS property of each element in the set of selected elements based on the element’s attributes and/or properties by using the programming logic in a function.
Solution
The following jQuery syntax is used to change the CSS property of each of the elements in the set of selected HTML elements.
$(selector).css("cssPropertyName", function(index) { ... })
function is executed for each element in the set of selected elements and the specified cssPropertyName is set with the return value of the function. This method returns the jQuery object. Listing 6-8 demonstrates the use of the css() method, with function as an argument, to set the CSS property on each element in the set of selected elements.
Listing 6-8. The jQuery method to change a CSS property of each element in the set of selected elements
<!DOCTYPE html>
<html lang="en">
<head>
   <meta charset="utf-8">
   <script src="scripts/jquery-2.1.0.min.js"></script>
   <style>
      .label { width: 200px; font-weight: bold; color: blue; }
      .dataEntry { background-color: yellow; }
      .highlight {
         text-decoration:underline;
         background-color:yellow;
         width: 150px;
      }
   </style>
   <script>
      $(function(){
         $("#btnTestIt").click(function () {
            $("input:text").css("background-color", function (index) {
               if (index == 1) {
                  return("lightblue");
               } else {
                  return("lightyellow");
               }
            });
         });
      });
   </script>
</head>
<body>
   <div class="label">Name:</div><input type="text" id="txtName" class="dataEntry"><br>
   <div class="label">Address:</div><input type="text" id="txtAddress" class="dataEntry"><br><br><br>
   <input id="btnTestIt" type="button" value="Test It"><br>
  <div id="message"></div>
</body>
</html>
How It Works
The two data-entry input textboxes are created using the input HTML tag with an attribute type set to text. If you want to highlight different elements in the selected set of elements with the different background color, you select the <input> elements with type attribute set to text using $("input:text") and then execute the css() method, with the function as an argument, on the selected elements.
When the Test It button is clicked, the following code is executed:
$("input:text").css("background-color", function (index) {
   if (index == 1) {
      return("lightblue");
   } else {
      return("lightyellow");
   }
});
$("input:text") selects all the HTML elements with the tag name input and type set to text and then returns the jQuery object. .css("background-color", function (index) {...}) executes function for each element in the set of selected elements and sets the background-color to the return value of the function. For the second element in the set of selected elements (for index=1), the background color changes to light blue. For all other elements, the background color changes to light yellow. Figure 6-16 displays the page when it is viewed in a browser.
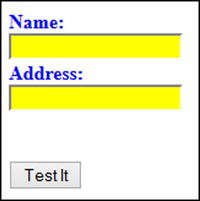
Figure 6-16. Initial page display
When you press the Test It button, the button’s click event handler changes the background color of the second input textbox to light blue and all other textboxes’ background color to light yellow. Figure 6-17 displays the effect of clicking the Test It button.
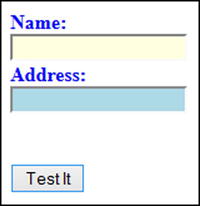
Figure 6-17. Second textbox element is highlighted with a light blue background color and all other textboxes have a light yellow background
6-9. Getting the Attribute Value of the First Element in a Selection of Elements
Problem
You want to get the attribute value of a single selected element or of the first element of multiple selected elements.
Solution
The following jQuery syntax is used to get an attribute value of a selected HTML element.
$(selector).attr("attributeName")
This will return the string containing the attribute value of the specified attributeName of the first element in the set of selected elements. Listing 6-9 demonstrates the use of the attr() method to get the attribute value of the first element in the set of selected elements.
Listing 6-9. The jQuery method to get the attribute’s value
<!DOCTYPE html>
<html lang="en">
<head>
    <meta charset="utf-8">
    <script src="scripts/jquery-2.1.0.min.js"></script>
    <style>
       .list { border:3px double green; width:350px; }
       .newRecord { font-weight: bold; }
       .tableHeader { background-color: lightgray; }
       .listDepartments {width: 200px; }
    </style>
    <script>
       $(function(){
         $("#btnTestIt").click(function () {
            var attributesDetail =
               "Input Textbox: " +
               " <b>type:</b> " +  $("#txtName").attr("type") +
               " <b>id:</b> " +  $("#txtName").attr("id") +
               " <b>value:</b> " +  $("#txtName").attr("value") +
               " <b>maxlength:</b> " +  $("#txtName").attr("maxlength") +
               "<br>" +
               "Checkbox (1): " +
               " <b>type:</b> " +  $("#chkMale").attr("type") +
               " <b>id:</b> " +  $("#chkMale").attr("id") +
               " <b>name:</b> " +  $("#chkMale").attr("name") +
               " <b>checked:</b> " +  $("#chkMale").attr("checked") +
               "<br>" +
               "Checkbox (2): " +
               " <b>type:</b> " +  $("#chkFemale").attr("type") +
               " <b>id:</b> " +  $("#chkFemale").attr("id") +
               " <b>name:</b> " +  $("#chkFemale").attr("name") +
               " <b>checked:</b> " +  $("#chkFemale").attr("checked");

            $("#message").prop("innerHTML", attributesDetail);
          });
       });
</script>
</head>
<body>
   Gender: <input type="radio" name="gender" id="chkMale" checked>Male
           <input type="radio" name="gender" id="chkFemale">Female <br>
   Name: <input type="text" id="txtName" value="" maxlength="40"><br>
   <input id="btnTestIt" type="button" value="Test It"><br>
   <div id="message"></div>
</body>
</html>
How It Works
The two radio buttons and one input textbox are created using the input HTML tag with the type set to radio and text. If you want to get attribute values of attributes such as ID, type, value, maxlength, checked, and so on, of these elements, you select the element first using $("#idValue") and execute the attr() method on the selected elements with the appropriate attributeName as an argument of the attr() method.
When the Test It button is clicked, the following code is executed:
var attributesDetail =
         "Input Textbox: " +
         " <b>type:</b> " +  $("#txtName").attr("type") +
         " <b>id:</b> " +  $("#txtName").attr("id") +
         " <b>value:</b> " +  $("#txtName").attr("value") +
         " <b>maxlength:</b> " +  $("#txtName").attr("maxlength") +
         "<br>" +
         "Checkbox (1): " +
         " <b>type:</b> " +  $("#chkMale").attr("type") +
         " <b>id:</b> " +  $("#chkMale").attr("id") +
         " <b>name:</b> " +  $("#chkMale").attr("name") +
         " <b>checked:</b> " +  $("#chkMale").attr("checked") +
         "<br>" +
         "Checkbox (2): " +
         " <b>type:</b> " +  $("#chkFemale").attr("type") +
         " <b>id:</b> " +  $("#chkFemale").attr("id") +
         " <b>name:</b> " +  $("#chkFemale").attr("name") +
         " <b>checked:</b> " +  $("#chkFemale").attr("checked");

      $("#message").prop("innerHTML", attributesDetail);
$("#idValue") selects the HTML element with the ID attribute set to idValue and returns the jQuery object. .attr("type") gets the value of attributeName type of the selected element. Similarly, other attribute values are retrieved by using the syntax $(selector).attr(“attributeName”). All retrieved attribute values are concatenated in a string attributesDetail, which is then displayed in the page by using the line $("#message").prop("innerHTML", attributesDetail). Figure 6-18 displays the page when it is viewed in a browser.
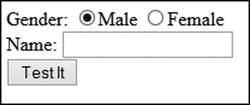
Figure 6-18. Initial page display
When you press the Test It button, the button’s click event handler gets the attribute values of the two radio buttons and the textbox and displays them on the page. Figure 6-19 displays the effect of clicking the Test It button.
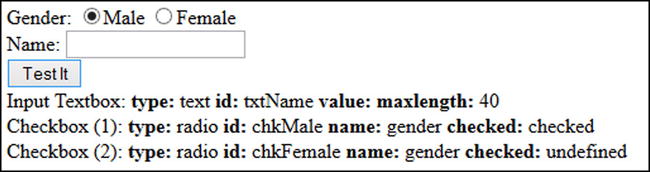
Figure 6-19. The attribute values of radio buttons and textbox are displayed
6-10. Setting the Attribute Value(s) of All the Selected Elements
Problem
You want to set the attribute values of all the selected elements. This can be used to set default values of data-entry form fields at runtime.
Solution
The following jQuery syntax is used to set attributes of all the selected HTML elements.
$(selector).attr("attributeName", "attributeValue")
The attribute value of HTML tags can be set by using the attr() method. The specified attributeName should be a valid attribute of the HTML tag. This method returns the jQuery object. Listing 6-10 demonstrates the use of the attr() method to set the attribute value of the selected elements.
Listing 6-10. The jQuery method to set an attribute’s value
<!DOCTYPE html>
<html lang="en">
<head>
   <meta charset="utf-8">
   <script src="scripts/jquery-2.1.0.min.js"></script>
   <style>
       .list { border:3px double green; width:350px; }
       .newRecord { font-weight: bold; }
       .tableHeader { background-color: lightgray; }
       .listDepartments { width: 200px; }
   </style>
   <script>
      $(function(){
         $("#btnTestIt").click(function () {
            $("#txtName").attr("value", "John Smith");
            var msg = "attr: " + $("#txtName").attr("value") + "<br>" +
                     "prop: " + $("#txtName").prop("value");
            $("#message").prop("innerHTML", msg);
         });
      });
   </script>
</head>
<body>
   Gender: <input type="radio" name="gender" id="chkMale" checked>Male
   <input type="radio" name="gender" id="chkFemale">Female <br>
   Name: <input type="text" id="txtName" value="" maxlength="40"><br><br>
   <input id="btnTestIt" type="button" value="Test It"><br><br>
   <div id="message"></div>
</body>
</html>
How It Works
The textbox for entering the name is created using the input HTML tag with the type set to text. If you want to set the default value for the name then select the name input element using $("#txtName") and execute the attr() method on the selected element.
When the Test It button is clicked, the following code is executed:
$("#txtName").attr("value", "John Smith");
$("#txtName ") selects the HTML element with the ID as txtName and returns the jQuery object. .attr("value", "John Smith") sets the value of the attribute value as John Smith. Refer to Chapter 2 to understand the difference between attributes and properties. When an attribute of an HTML element is set, its property is also set with the same value. But the reverse is not true; if you change the property of an HTML element, only the property value is changed and its attribute remains unaffected. Figure 6-20 displays the page when it is viewed in a browser.
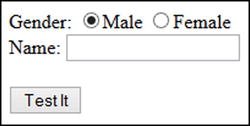
Figure 6-20. Initial page display
When you press the Test It button, the button’s click event handler changes the value of the name textbox to John Smith and then displays the new value of the attribute value and property value. Figure 6-21 displays the effect of clicking the Test It button.
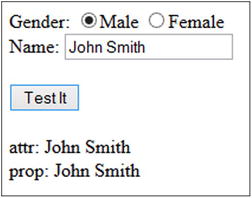
Figure 6-21. The Name textbox’s value is changed and new the attribute and property value are displayed
You can set multiple attributes of all the selected elements by passing the map object with the attribute name and attribute value as a key-value pair. For example, in order to set the value to John Smith and the background color to yellow, you can use following code:
var attributes = { "value" : "John Smith",
                 "style" : "background-color:yellow"};
$("#txtName").attr(attributes);
You can remove single or multiple attributes of all the selected elements by using the method removeAttr() and passing space-separated attribute names. For example, in order to remove the style attribute from the ul element in the following code, you use $("ul").removeAttr("style").
<ul id="listDepartments" style="text-decoration:underline; background-color:yellow; width:150px">
6-11. Setting the Attribute Value of All the Selected Elements Based on a Function
Problem
You want to change the attribute of each element in the set of selected elements based on the element’s attributes, properties, and/or any other criteria by using the programming logic in a function.
Solution
The following jQuery syntax is used to change the CSS property of each of the elements in the set of selected HTML elements.
$(selector).attr("attributeName", function(index) { ... })
function is executed for each element in the set of selected elements and the specified attributeName is set with the return value of the function. This method returns the jQuery object. Listing 6-11 demonstrates the use of the attr() method, with function as an argument, to set the attribute on each element in the set of selected elements.
Listing 6-11. The jQuery method to change the attribute value of each element in the set of selected elements
<!DOCTYPE html>
<html lang="en">
<head>
   <meta charset="utf-8">
   <script src="scripts/jquery-2.1.0.min.js"></script>
   <style>
      .list { border:3px double green; width:350px; }
      .newRecord { font-weight: bold; }
      .tableHeader { background-color: lightgray; }
      .listDepartments { width: 200px; }
   </style>
   <script>
      $(function(){
         $("#btnTestIt").click(function () {
            var attributes = { "value" : "John Smith",
                              "style" : "background-color:yellow"};
            $("#txtName").attr("value", function () {
               if ($("#chkMale").prop("checked") == true) {
                  return("John Smith");
               } else {
                  return("Jane Smith");
               }
            });
          });
      });
   </script>
</head>
<body>
   Gender: <input type="radio" name="gender" id="chkMale" checked>Male
   <input type="radio" name="gender" id="chkFemale">Female <br>
   Name: <input type="text" id="txtName" value="" maxlength="40"><br><br>
   <input id="btnTestIt" type="button" value="Test It"><br><br>
   <div id="message"></div>
</body>
</html>
How It Works
The name data entry input textbox is created using the input HTML tag with attribute type set to text. If you want to change the default value of the textbox based on the value of other fields in the form, you select the input element by using $("#txtName") and execute the attr() method, with the function as an argument, on the selected elements.
When the Test It button is clicked, the following code is executed:
var attributes = { "value" : "John Smith",
                "style" : "background-color:yellow"};
$("#txtName").attr("value", function () {
   if ($("#chkMale").prop("checked") == true) {
       return("John Smith");
   } else {
       return("Jane Smith");
   }
});
$("#txtName ") selects the HTML element with the ID txtName and returns the jQuery object. .attr("value", function () {...}) executes function for each element in the set of selected elements and sets the value attribute to the return value of the function. Inside the function, the following logic is used—if the Male radio button is clicked, it will return John Smith, otherwise return Jane Smith. The return value is then used to set the attribute value of the name textbox. There are other ways to implement this logic. This simple program is used to demonstrate the use of the attr() method with the function as an argument. You can also pass an index as an argument to the function when you want to use it in the logic. Figure 6-22 displays the page when it is viewed in a browser.
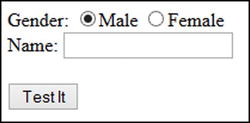
Figure 6-22. Initial page display
When you press the Test It button, the button’s click event handler changes the value of the name textbox based on which radio button is checked. Figure 6-23 displays the effect of clicking the Test It button.
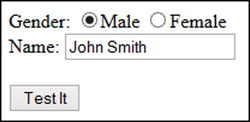
Figure 6-23. The Name textbox’s value is changed based on the checked radio button
6-12. Getting the Property Value of the First Element of the Selected Elements
Problem
You want to get the property value of the single selected element or of the first element of the multiple selected elements.
Solution
The following jQuery syntax is used to get the property value of selected HTML elements.
$(selector).prop("propertyName")
This will return the string containing the property value of a specified propertyName of the first element in the set of selected elements. Listing 6-12 demonstrates the use of the prop() method to get the property value of the first element in the set of selected elements.
Listing 6-12. The jQuery method to get a property’s value
<!DOCTYPE html>
<html lang="en">
<head>
   <meta charset="utf-8">
   <script src="scripts/jquery-2.1.0.min.js"></script>
   <style>
       .list { border:3px double green; width:350px; }
       .newRecord { font-weight: bold; }
       .tableHeader { background-color: lightgray; }
       .listDepartments { width: 200px; }
   </style>
   <script>
      $(function(){
         $("#btnTestIt").click(function () {
           var propertiesDetail =
              "Input Textbox: " +
              " <b>type:</b> " +  $("#txtName").prop("type") +
              " <b>id:</b> " +  $("#txtName").prop("id") +
              " <b>value:</b> " +  $("#txtName").prop("value") +
              " <b>maxlength:</b> " +  $("#txtName").prop("maxlength") +
              "<br>" +
              "Checkbox (1): " +
              " <b>type:</b> " +  $("#chkMale").prop("type") +
              " <b>id:</b> " +  $("#chkMale").prop("id") +
              " <b>name:</b> " +  $("#chkMale").prop("name") +
              " <b>checked:</b> " +  $("#chkMale").prop("checked") +
              "<br>" +
              "Checkbox (2): " +
              " <b>type:</b> " +  $("#chkFemale").prop("type") +
              " <b>id:</b> " +  $("#chkFemale").prop("id") +
              " <b>name:</b> " +  $("#chkFemale").prop("name") +
              " <b>checked:</b> " +  $("#chkFemale").prop("checked");

             $("#message").prop("innerHTML", propertiesDetail);
          });
      });
   </script>
</head>

<body>
   Gender: <input type="radio" name="gender" id="chkMale" checked>Male
         <input type="radio" name="gender" id="chkFemale">Female <br>
   Name: <input type="text" id="txtName" value="" maxlength="40"><br>
   <input id="btnTestIt" type="button" value="Test It"><br>
   <div id="message"></div>
</body>
</html>
How It Works
The two radio buttons and one input textbox are created using the input HTML tag with the type set to radio and text. If you want to get the property values such as id, type, value, maxlength, checked, and so on of these elements, you select the element first using $("#idValue") and then execute the prop() method on the selected elements with the appropriate propertyName as an argument of the prop() method.
When the Test It button is clicked, the following code is executed:
var propertiesDetail =
        "Input Textbox: " +
        " <b>type:</b> " +  $("#txtName").prop("type") +
        " <b>id:</b> " +  $("#txtName").prop("id") +
        " <b>value:</b> " +  $("#txtName").prop("value") +
        " <b>maxlength:</b> " +  $("#txtName").prop("maxlength") +
        "<br>" +
        "Checkbox (1): " +
        " <b>type:</b> " +  $("#chkMale").prop("type") +
        " <b>id:</b> " +  $("#chkMale").prop("id") +
        " <b>name:</b> " +  $("#chkMale").prop("name") +
        " <b>checked:</b> " +  $("#chkMale").prop("checked") +
        "<br>" +
        "Checkbox (2): " +
        " <b>type:</b> " +  $("#chkFemale").prop("type") +
        " <b>id:</b> " +  $("#chkFemale").prop("id") +
        " <b>name:</b> " +  $("#chkFemale").prop("name") +
        " <b>checked:</b> " +  $("#chkFemale").prop("checked");

       $("#message").prop("innerHTML", propertiesDetail);
$("#idValue") selects the HTML element with the ID attribute idValue and returns the jQuery object. .prop("type") gets the value of propertyName type of the selected element. Similarly, other attribute values are retrieved by using the syntax $(selector).prop("propertyName"). All retrieved property values are concatenated in a string called propertiesDetail, which is then displayed in the page by using the line $("#message").prop("innerHTML", propertiesDetail). Figure 6-24 displays the page when it is viewed in a browser.
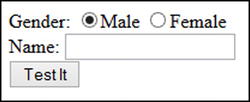
Figure 6-24. Initial page display
When you press the Test It button, the button’s click event handler gets the property values of the two radio buttons and the textbox and displays it on the page. Figure 6-25 displays the effect of clicking the Test It button.
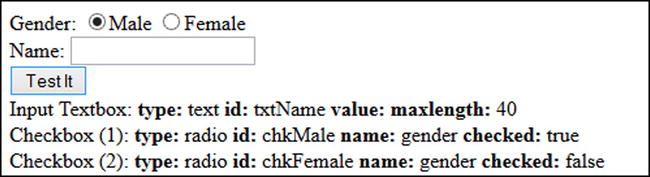
Figure 6-25. Property values of the radio buttons and the textbox are displayed
6-13. Setting the Property Value of All Selected Elements
Problem
You want to set the property value of all the selected elements.
Solution
The following jQuery syntax is used to set the property of all the selected HTML elements.
$(selector).prop("propertyName", "propertyValue")
The property value of the HTML tags can be set by using the prop() method. This method returns the jQuery object. If propertyName property doesn’t exist, it is created for the selected elements. The prop() method is used to set properties such as selectedIndex, tagName, nodeName, and so on. These properties cannot be set using the attr() method as they do not have corresponding attribute name. Listing 6-13 demonstrates the use of the prop() method to set the property value of the selected elements.
Listing 6-13. The jQuery method to set the property’s value
<!DOCTYPE html>
<html lang="en">
<head>
   <meta charset="utf-8">
   <script src="scripts/jquery-2.1.0.min.js"></script>
   <style>
      .list { border:3px double green; width:350px; }
      .newRecord { font-weight: bold; }
      .tableHeader { background-color: lightgray; }
      .listDepartments { width: 200px; }
   </style>
   <script>
      $(function(){
         $("#btnTestIt").click(function () {
            $("#txtName").prop("value", "John Smith");
            var msg =   "attr: " + $("#txtName").attr("value") + "<br>" +
                     "prop: " + $("#txtName").prop("value");

            $("#message").prop("innerHTML", msg);
         });
      });
   </script>
</head>
<body>
   Gender: <input type="radio" name="gender" id="chkMale" checked>Male
   <input type="radio" name="gender" id="chkFemale">Female <br>
   Name: <input type="text" id="txtName" value="" maxlength="40"><br><br>
   <input id="btnTestIt" type="button" value="Test It"><br><br>
   <div id="message"></div>
</body>
</html>
How It Works
The textbox for entering the name is created using the input HTML tag with the type set to text. If you want to set the property value for the name textbox, you select the name input element using $("#txtName") and execute the prop() method on the selected element.
When the Test It button is clicked, the following code is executed:
$("#txtName").prop("value", "John Smith");
$("#txtName ") selects the HTML element with the ID set to txtName and returns the jQuery object. .prop("value", "John Smith") sets the value of the value property to John Smith. Refer to Chapter 2 to understand the difference between attributes and properties. When the property of an HTML element is set, only its property is changed. Its attribute value remains unchanged. Figure 6-26 displays the page when it is viewed in a browser.
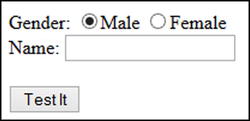
Figure 6-26. Initial page display
When you press the Test It button, the button’s click event handler changes the property value of the name textbox to John Smith and then displays the new value of the attribute value and property value. As you can see, the value attribute remains unchanged. Figure 6-27 displays the effect of clicking the Test It button.
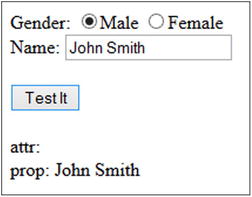
Figure 6-27. Name textbox value is changed due to the change in property “value”
You can set multiple properties of all the selected elements by passing the map object with the property name and property value as the key/value pair.
You can remove a property of the selected elements by using the removeProp() method and passing the property name as an argument. Only those properties created using the prop(propertyName, propertyValue) method can be removed. For example, customProperty is created using $( selector).prop("customProperty", "customValue") and so it can be removed later in the code by using $(selector).removeProp("customProperty").
6-14. Getting and Setting the Value Property of Selected Elements
Problem
You want to get the value of the first element of the selected elements and set the value of all of the selected elements.
Solution
The following jQuery syntax is used to get the value of first element of the selected HTML elements.
$(selector).val()
It returns a string, number, or array depending on selector. The val() method is used to get the values of data-entry form fields such as input, select, and textarea.
The following jQuery syntax is used to set the value of all the selected HTML elements.
$(selector).val("newValue")
It returns a jQuery object. Listing 6-14 demonstrates the use of the val() method to get and set the value of a textbox.
Listing 6-14. The jQuery method val() gets and sets the value of a textbox
<!DOCTYPE html>
<html lang="en">
<head>
   <meta charset="utf-8">
   <script src="scripts/jquery-2.1.0.min.js"></script>
   <style>
      .highlight {
         text-decoration:underline;
         background-color:yellow;
         width: 150px;
      }
   </style>
   <script>
      $(function(){
         $("#btnTestItGetValue").click(function () {
         alert($("#txtName").val());
      });

      $("#btnTestItSetValue").click(function () {
         $("#txtName").val("John Smith");
      });
   });
   </script>
</head>
<body>
   <strong>Name:</strong><input type="text" id="txtName"><br><br><br>
   <input id="btnTestItGetValue" type="button" value="Test It (Get Value)"><br><br>
   <input id="btnTestItSetValue" type="button" value="Test It (Set Value)">
</body>
</html>
How It Works
The Name textbox is created using the input HTML tag with the type set to text. If you want to get or set the value of this textbox, you select the textbox using $("#txtName") and execute the val() method on the selected element to get the value and execute the val("newValue") to set the value.
If some value is entered for the Name textbox and the Test It (Get Value) button is clicked, the following code is executed:
alert($("#txtName").val());
$("#txtName") selects the HTML element with the ID set to txtName and returns the jQuery object. .val() gets the current value of the textbox. This value is then displayed as a pop-up message.
When the Test It (Set Value) button is clicked, the following code is executed:
$("#txtName").val("John Smith");
$("#txtName") selects the HTML element with the id set to txtName and returns the jQuery object. .val("John Smith") sets the value of the textbox to John Smith. Figure 6-28 displays the page when it is viewed in a browser.
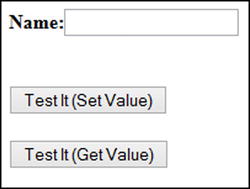
Figure 6-28. Initial page display
When you press the Test It (Set Value) button, the button’s click event handler changes the value of the textbox. Figure 6-29 displays the effect of clicking the Test It (Set Value) button.
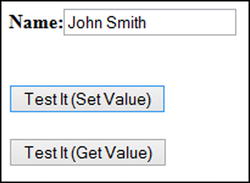
Figure 6-29. Value of name textbox is set
When you press the Test It (Get Value) button, the button’s click event handler gets the current value of the textbox. Figure 6-30 displays the effect of clicking the Test It (Get Value) button.

Figure 6-30. Current value of name textbox is displayed
The selected value of a drop-down can be retrieved using $("#dropdownIdValue").val(). If multiple items are selected in the drop-down, an array is returned. An item in the drop-down can be selected at runtime by using $("#dropdownIdValue").val("newValue"). For example, the state drop-down is implemented by the following code. Default state is IL and can be set by using the code $("#ddState").val("IL").
<select id="ddState">
   <option value="">Select State</option>
   <option value="CA">California</option>
   <option value="IL">Illinois</option>
   <option value="IN">Indiana</option>
</select>
6-15. Getting or Setting the Value of Each Element from the Set of Selected Elements Using a Function
Problem
You want to get and then set the value of the selected elements using a function.
Solution
The following jQuery syntax is used to iterate over each element from the set of selected elements using a function and then set its value.
$(selector).val(function (index, currentValue) { ... })
For each element, the return value of the function is used to set its value. This val() method returns the jQuery object with the function as its argument. Listing 6-15 demonstrates the use of the val() method to set each element’s value.
Listing 6-15. The jQuery method to set each element’s value
<!DOCTYPE html>
<html lang="en">
<head>
   <meta charset="utf-8">
   <script src="scripts/jquery-2.1.0.min.js"></script>
   <style>
      .label { width: 200px; font-weight: bold; color: blue; }
      .highlight {
         text-decoration:underline;
         background-color:yellow;
         width: 150px;
      }
   </style>
   <script>
      $(function(){
         $("#btnTestIt").click(function () {
            $("input:text").val(function (index, currentValue) {
               return(currentValue.toUpperCase());
            });
         });
      });
   </script>
</head>
<body>
   <div class="label">Name:</div><input type="text" id="txtName"><br>
   <div class="label">Address:</div><input type="text" id="txtAddress"><br><br><br>
   <input id="btnTestIt" type="button" value="Test It">
</body>
</html>
How It Works
The name and address textboxes are created using the input HTML tag with the type set to text. If you want to set each textbox value based on its current value, you select all input elements with the type set to text using $("input:text") and execute the val() method, with the function as an argument, on the selected elements.
When the Test It button is clicked, the following code is executed:
$("input:text").val(function (index, currentValue) {
   return(currentValue.toUpperCase());
});
$("input:text") selects the HTML element with the tag name input and with the type set to text and returns the jQuery object. .val(function (index, currentValue) {...}) iterates over each element in the set of selected elements. This function converts the current value to uppercase and returns it. The returned value is used to set the value of each element in the set of selected elements. Figure 6-31 displays the page when it is viewed in a browser and after some test data is entered.
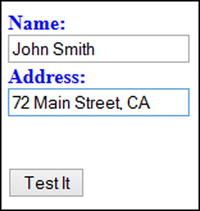
Figure 6-31. Initial page display with some test data
When you press the Test It button, the button’s click event handler converts the current value of each element to uppercase and then sets each element’s value. Figure 6-32 displays the effect of clicking the Test It button.
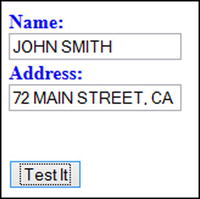
Figure 6-32. Entered values are converted to uppercase
6-16. Getting the HTML of the First Element of the Selected Elements
Problem
You want to get the HTML (the content of the DOM tree node, including the HTML tags) of the first element of the selected elements.
Solution
The following jQuery syntax is used to get the HTML content of the first element of the selected HTML elements:
$(selector).html()
It returns a string with the HTML content. Listing 6-16 demonstrates the use of the html() method to get the HTML content of the selected HTML element.
Listing 6-16. Using the jQuery method html() to get HTML content
<!DOCTYPE html>
<html lang="en">
<head>
   <meta charset="utf-8">
   <script src="scripts/jquery-2.1.0.min.js"></script>
   <style>
      .highlight {
         width: 300px;
         border: 3px double green;
         background-color: lightyellow;
      }
   </style>
   <script>
      $(function(){
         $("#btnTestIt").click(function () {
            alert($("ul").html());
         });
      });
   </script>
</head>
<body>
   <ul>
      <li>Marketing</li>
      <li>Sales</li>
      <li>Technology</li>
      <li>Customer Support</li>
   </ul>
   <input id="btnTestIt" type="button" value="Test It">
</body>
</html>
How It Works
The department names are listed using the <ul> and <li> HTML tags. If you want to get the HTML content of the ul tag, you select the <ul> element using $("ul") and execute the html() method on the selected elements.
When the Test It button is clicked, the following code is executed:
alert($("ul").html());
$("ul") selects the HTML element with the tag name ul and returns the jQuery object. .html() gets the HTML content of the selected element (ul). Figure 6-33 displays the page when it is viewed in a browser.
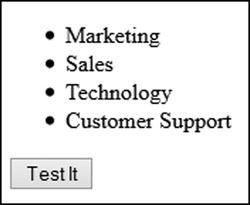
Figure 6-33. Initial page display
When you press the Test It button, the button’s click event handler gets the HTML content of the selected element. Figure 6-34 displays the effect of clicking the Test It button.
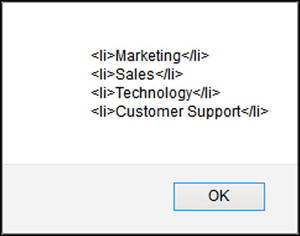
Figure 6-34. HTML content of the ul tag is displayed
6-17. Replacing the HTML in All the Selected Elements
Problem
You want to replace the HTML content in all the selected eleements.
Solution
The following jQuery syntax is used to set the HTML content of all the selected HTML elements.
$(selector).html("htmlString")
htmlString is the string with its HTML tags and text. This method returns the jQuery object. Listing 6-17 demonstrates the use of the html() method to set the HTML content of the selected elements.
Listing 6-17. The jQuery method to set the HTML content of the selected elements
<!DOCTYPE html>
<html lang="en">
<head>
   <meta charset="utf-8">
   <script src="scripts/jquery-2.1.0.min.js"></script>
   <style>
      .highlight {
         width: 300px;
         border: 3px double green;
         background-color: lightyellow;
      }
   </style>
   <script>
      $(function(){
         $("#btnTestIt").click(function () {
            $("ul").html("<li>New Department</li>");
         });
      });
   </script>
   </head>
   <body>
   <ul>
      <li>Marketing</li>
      <li>Sales</li>
      <li>Technology</li>
      <li>Customer Support</li>
   </ul>
   <input id="btnTestIt" type="button" value="Test It">
</body>
</html>
How It Works
The department names are listed using the <ul> and <li> HTML tags. If you want to change the HTML content of the HTML element ul, you select the <ul> element using $("ul") and execute the html() method with htmlString as a parameter, on the selected element. Since you are setting HTML content, the old HTML content is replaced.
When the Test It button is clicked, the following code is executed:
$("ul").html("<li>New Department</li>");
$("ul") selects the HTML element with the tag name ul and returns the jQuery object. .html("<li>New Department</li>") replaces the HTML content of the selected element (ul) with <li>New Department</li>. Figure 6-35 displays the page when it is viewed in a browser.
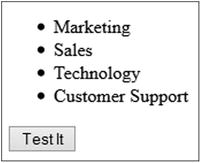
Figure 6-35. Initial page display
When you press the Test It button, the button’s click event handler replaces the HTML content of the ul HTML element. Figure 6-36 displays the effect of clicking the Test It button.
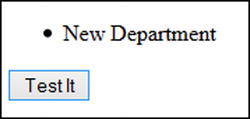
Figure 6-36. Department names are replaced with the New Department text
The HTML content of each element of the selected elements can be replaced with the different HTML content by using following syntax:
$(selector).html(function (index, oldHTMLContent) { ... return("newHTMLContent"); })
The return value of the function is used to set the HTML content of each element.
6-18. Getting the Combined Contents of Each of the Selected Elements
Problem
You want to get the combined text of all selected elements.
Solution
The following jQuery syntax is used to get the combined text of all the selected HTML elements.
$(selector).text()
It returns a string with the text of all selected elements. Listing 6-18 demonstrates the use of the text() method to get the combined text of all selected elements.
Listing 6-18. The jQuery method to get the combined text of the selected elements
<!DOCTYPE html>
<html lang="en">
<head>
   <meta charset="utf-8">
   <script src="scripts/jquery-2.1.0.min.js"></script>
   <style>
      .highlight {
         width: 300px;
         border: 3px double green;
         background-color: lightyellow;
      }
   </style>
   <script>
      $(function(){
               $("#btnTestIt").click(function () {
            alert($("li").text());
         });
   });
   </script>
</head>
<body>
   <ul>
      <li>Marketing</li>
      <li>Sales</li>
      <li>Technology</li>
      <li>Customer Support</li>
   </ul>
   <input id="btnTestIt" type="button" value="Test It">
</body>
</html>
How It Works
The department names are listed using the <ul> and <li> HTML tags. If you want to get all the department names, you select all the li HTML tags using $("li") and execute the text() method on the selected elements.
When the Test It button is clicked, the following code is executed:
alert($("li").text());
$("li") selects the HTML element with the tag name li and returns the jQuery object. .text() gets the combined text of all the selected elements (ul). Figure 6-37 displays the page when it is viewed in a browser.
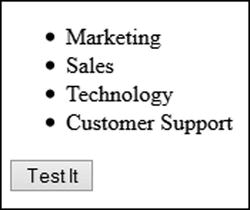
Figure 6-37. Initial page display
When you press the Test It button, the button’s click event handler gets the text of all selected elements. Figure 6-38 displays the effect of clicking the Test It button.
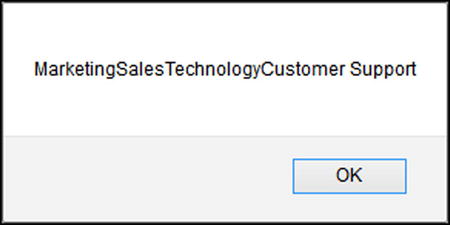
Figure 6-38. All department names are displayed as combined text
The following jQuery syntax is used to set the text of each element of the selected HTML elements.
$(selector).text("textString")
For example, all the departments in the previous example are replaced by “New Department” using this code:
$("ul").text("New Department");
The text of each element of the selected elements can be replaced with the different text by using following syntax:
$(selector).text(function (index, oldText) { ... return("newText"); })
The return value of the function is used to set the text of each element of the selected elements.
6-19. Inserting Content at the End of a Selection
Problem
You want to add HTML content (a DOM node) to the end of the selected HTML elements.
Solution
The following jQuery syntax is used to add HTML content to the end of all the selected HTML elements.
$(selector).append("htmlContent")
htmlContent can be HTML tags with their attributes and text content. This method returns the jQuery object. Listing 6-19 demonstrates the use of the append() method to add HTML content to all the selected elements.
Listing 6-19. The jQuery method to add HTML content to the end of a selection
<!DOCTYPE html>
<html lang="en">
<head>
   <meta charset="utf-8">
   <script src="scripts/jquery-2.1.0.min.js"></script>
   <style>
      .highlight {
         width: 300px;
         border: 3px double green;
         background-color: lightyellow;
      }
   </style>
   <script>
      $(function(){
          $("#btnTestIt").click(function () {
            $("ul").append("<li>Implementation</li>");
         });
      });
   </script>
</head>
<body>
   <ul>
      <li>Marketing</li>
      <li>Sales</li>
      <li>Technology</li>
      <li>Customer Support</li>
   </ul>
   <input id="btnTestIt" type="button" value="Test It">
</body>
</html>
How It Works
The department names are listed using the <ul> and <li> HTML tags. If you want to add a new department to the list of existing departments, you select the <ul> element using $("ul") and execute the append() method on the selected element.
When the Test It button is clicked, the following code is executed:
$("ul").append("<li>Implementation</li>");
$("ul") selects the HTML element with the tag name ul and returns the jQuery object. .append("<li>Implementation</li>") appends the HTML content—<li>Implementation</li>—to the selected element (ul). Figure 6-39 displays the page when it is viewed in a browser.
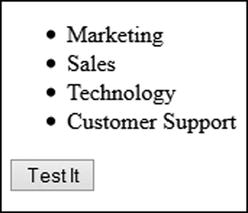
Figure 6-39. Initial page display
When you press the Test It button, the button’s click event handler appends the new department name to the end of the department names list. Figure 6-40 displays the effect of clicking the Test It button.
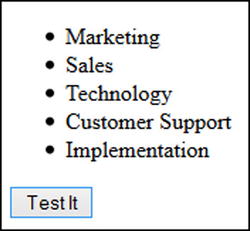
Figure 6-40. “Implementation” is added to the end of the list
$("ul").append("<li>Implementation</li>") can also be written as $("<li>Implementation</li>").appendTo("ul"). Since the append() and appendTo() methods have the same effect, you can use either. The syntax for the appendTo method is:
$("htmlContent").append("selector ")
The following syntax is used to append multiple HTML contents:
$(selector).append("htmlContent1", "htmlContent2", ...)
The following syntax is used to append HTML content based on the return value of a function:
$(selector).append(function(index, currentHTML) { ... return ("htmlContent");})
6-20. Inserting Content at the Beginning of Each Element of the Selected Elements
Problem
You want to add HTML content (a DOM node) to the beginning of the selected HTML elements.
Solution
The following jQuery syntax is used to add HTML content to the beginning of all the selected HTML elements.
$(selector).prepend("htmlContent")
htmlContent can be HTML tags with their attributes and text content. This method returns the jQuery object. Listing 6-20 demonstrates the use of the prepend() method to add HTML content to all the selected elements.
Listing 6-20. The jQuery method to add HTML content to the beginning of a selection
<!DOCTYPE html>
<html lang="en">
<head>
   <meta charset="utf-8">
   <script src="scripts/jquery-2.1.0.min.js"></script>
   <style>
      .highlight {
         width: 300px;
         border: 3px double green;
         background-color: lightyellow;
      }
   </style>
   <script>
      $(function(){
         $("#btnTestIt").click(function () {
             $("ul").prepend("<li>Infrastructure</li>");
         });
      });
   </script>
</head>
<body>
   <ul>
      <li>Marketing</li>
      <li>Sales</li>
      <li>Technology</li>
      <li>Customer Support</li>
   </ul>
   <input id="btnTestIt" type="button" value="Test It">
</body>
</html>
How It Works
The department names are listed using the <ul> and <li> HTML tags. If you want to add a new department to the list of existing departments, you select the <ul> element using $("ul") and execute the prepend() method on the selected element.
When the Test It button is clicked, the following code is executed:
$("ul").prepend("<li>Infrastructure</li>");
$("ul") selects the HTML element with the tag name ul and returns the jQuery object. .prepend("<li>Infrastructure</li>") prepends the HTML content—<li>Infrastructure </li>—to the selected element (ul). Figure 6-41 displays the page when it is viewed in a browser.
Figure 6-41. Initial page display
When you press the Test It button, the button’s click event handler prepends the new department name to the beginning of the department names list. Figure 6-42 displays the effect of clicking the Test It button.

Figure 6-42. “Infrastructure” is added to the beginning of the list
$("ul").prepend("<li> Infrastructure</li>") can also be written as $("<li> Infrastructure </li>").prependTo("ul"). Since prepend() and prependTo() have the same effect, you can use them interchangeably.
The following syntax is used to prepend multiple HTML content:
$(selector).prepend("htmlContent1", "htmlContent2", ...)
The following syntax is used to prepend HTML content based on the return value of a function:
$(selector).prepend(function(index, currentHTML) { ... return ("htmlContent");})
6-21. Wrapping an HTML Structure Around Each Selected Element
Problem
You want to wrap the HTML structure (opening and closing HTML tags) around each selected element.
Solution
The following jQuery syntax is used to wrap the HTML structure around each selected element.
$(selector).wrap("htmlContent")
This method returns the jQuery object. Listing 6-21 demonstrates the use of the wrap() method to wrap the HTML structure around each selected element.
Listing 6-21. The jQuery method to wrap an HTML structure around each element
<!DOCTYPE html>
<html lang="en">
<head>
   <meta charset="utf-8">
   <script src="scripts/jquery-2.1.0.min.js"></script>
   <style>
            .highlight {
               width: 300px;
               border: 3px double green;
               background-color: lightyellow;
            }
   </style>
   <script>
      $(function(){
         $("#btnTestIt").click(function () {
            $("ul").wrap("<div class='highlight'></div>");
         });
      });
   </script>
</head>
<body>
   <ul>
      <li>Marketing</li>
      <li>Sales</li>
      <li>Technology</li>
      <li>Customer Support</li>
   </ul>
   <input id="btnTestIt" type="button" value="Test It">
</body>
</html>
How It Works
The department names are listed using the <ul> and <li> HTML tags. If you want to wrap all the department names with the <div> tag with its class attribute or any other attribute, you select the <ul> element using $("ul") and execute the wrap() method on the selected element.
When the Test It button is clicked, the following code is executed:
$("ul").wrap("<div class='highlight'></div>");
$("ul") selects the HTML element with the tag name ul and returns the jQuery object. .wrap("<div class='highlight'></div>") wraps the <div> tag around the selected element (ul). Figure 6-43 displays the page when it is viewed in a browser.
Figure 6-43. Initial page display
When you press the Test It button, the button’s click event handler wraps a <div> tag with the class set to highlight around the selected ul element. Figure 6-44 displays the effect of clicking the Test It button.
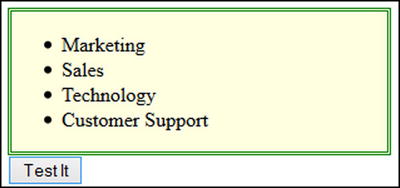
Figure 6-44. Selected element is wrapped with a div tag
Other variations of the wrap() method include:
$(selector).wrap(wrappingSelector)
$(selector).wrap(htmlElement)
$(selector).wrap(jQueryObject)
$(selector).wrap(function(index) { ... return("htmlString");})
6-22. Wrapping an HTML Structure Around the Content of Each Selected Element
Problem
You want to wrap an HTML structure around the content of each selected element.
Solution
The following jQuery syntax is used to wrap an HTML structure around the content of each selected element:
$(selector).wrapInner("htmlContent")
This method returns the jQuery object. Listing 6-22 demonstrates the use of the wrapInner() method to wrap an HTML structure around the content of each selected element.
Listing 6-22. The jQuery method to wrap an HTML structure around the content of elements
<html lang="en">
<head>
   <meta charset="utf-8">
   <script src="scripts/jquery-2.1.0.min.js"></script>
   <style>
      .highlight {
         width: 150px;
         border: 3px double green;
         background-color: lightyellow;
      }
   </style>
   <script>
      $(function(){
         $("#btnTestIt").click(function () {
            $("li").wrapInner("<div class='highlight'></div>");
         });
      });
   </script>
</head>
<body>
   <ul>
      <li>Marketing</li>
      <li>Sales</li>
      <li>Technology</li>
      <li>Customer Support</li>
   </ul>
   <input id="btnTestIt" type="button" value="Test It">
</body>
</html>
How It Works
The department names are listed using the <ul> and <li> HTML tags. If you want to wrap all the department names content separately with the <div> tag with its class attribute or any other attribute, you select the <li> elements using $("li") and execute the wrapInner() method on the selected elements.
When the Test It button is clicked, the following code is executed:
$("li").wrapInner("<div class='highlight'></div>");
$("li") selects the HTML element with the tag name li and returns the jQuery object. .wrapInner("<div class='highlight'></div>") wraps the <div> tag around the content of the selected elements (li). Figure 6-45 displays the page when it is viewed in a browser.
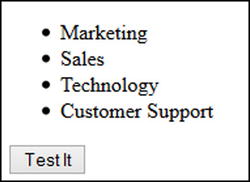
Figure 6-45. Initial page display
When you press the Test It button, the button’s click event handler wraps the <div> tag with the class as highlight around the content of the selected li elements. Figure 6-46 displays the effect of clicking the Test It button.
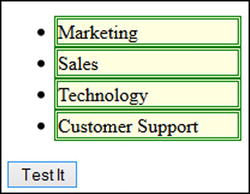
Figure 6-46. Content of selected elements are wrapped with div tag
Other variations of using the wrapInner() method are:
$(selector).wrapInner(wrappingSelector)
$(selector).wrapInner(htmlElement)
$(selector).wrapInner(jQueryObject)
$(selector).wrapInner(function(index) { ... return("htmlString");})
The difference between wrap() and wrapInner() is that wrap()wraps the specified HTML structure around the selected element(s), whereas wrapInner() wraps the specified HTML structure around the content of the selected element(s).
6-23. Wrapping an HTML Structure Around All Selected Elements
Problem
You want to wrap an HTML structure around all the selected elements as a single unit.
Solution
The following jQuery syntax is used to wrap an HTML structure around all selected elements:
$(selector).wrapAll("htmlContent")
This method returns the jQuery object. Listing 6-23 demonstrates the use of the wrapAll() method to wrap an HTML structure around all selected elements.
Listing 6-23. The jQuery method to wrap an HTML structure around all selected elements
<!DOCTYPE html>
<html lang="en">
<head>
   <meta charset="utf-8">
   <script src="scripts/jquery-2.1.0.min.js"></script>
   <style>
      .highlight {
         width: 150px;
         border: 3px double green;
         background-color: lightyellow;
      }
   </style>
   <script>
      $(function(){
         $("#btnTestIt").click(function () {
            $("li").wrapAll("<div class='highlight'></div>");
         });
      });
   </script>
</head>
<body>
   <ul>
      <li>Marketing</li>
      <li>Sales</li>
      <li>Technology</li>
      <li>Customer Support</li>
   </ul>
   <input id="btnTestIt" type="button" value="Test It">
</body>
</html>
How It Works
The department names are listed using the <ul> and <li> HTML tags. If you want to wrap all the department names as a single unit with the <div> tag with its class attribute or any other attribute, you select the <li> elements using $("li") and execute the wrapAll() method on the selected elements.
When the Test It button is clicked, the following code is executed:
$("li").wrapAll("<div class='highlight'></div>");
$("li") selects the HTML element with the tag name li and returns the jQuery object. .wrapAll("<div class='highlight'></div>") wraps the <div> tag around all of the selected elements ("li"). Figure 6-47 displays the page when it is viewed in a browser.
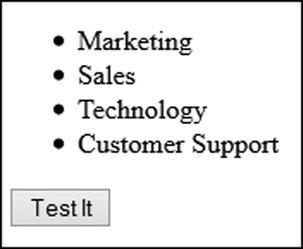
Figure 6-47. Initial page display
When you press the Test It button, the button’s click event handler wraps the <div> tag with the class set to highlight around all of the selected li elements. Figure 6-48 displays the effect of clicking the Test It button.
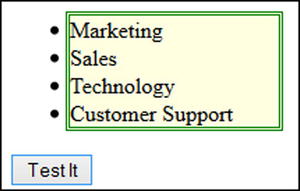
Figure 6-48. All selected elements are wrapped with a div tag
Other variations of the wrapAll() methods include:
$(selector).wrapAll(wrappingSelector)
$(selector).wrapAll(htmlElement)
$(selector).wrapAll(jQueryObject)
6-24. Inserting Content After Each Selected Element
Problem
You want to insert HTML content after each selected element.
Solution
The following jQuery syntax is used to insert HTML content at the end of all the selected HTML elements.
$(selector).after("htmlContent")
htmlContent can be the HTML tags with their attributes and text. This method returns the jQuery object. Listing 6-24 demonstrates the use of the after() method to insert HTML content after each selected element.
Listing 6-24. The jQuery method to insert HTML content at the end of a selection
<!DOCTYPE html>
<html lang="en">
<head>
   <meta charset="utf-8">
   <script src="scripts/jquery-2.1.0.min.js"></script>
   <style>
      .highlight {
         width: 150px;
         border: 3px double green;
         background-color: lightyellow;
      }
   </style>
   <script>
      $(function(){
         $("#btnTestIt1").click(function () {
            $("#lstDepartments").after("<b>- Implementation</b>");
         });

         $("#btnTestIt2").click(function () {
            $("#lstDepartments").append("<b>- Production Support<b>");
         });
      });
   </script>
</head>
<body>
   <div id="lstDepartments" class="highlight">
      - Marketing<br>
      - Sales<br>
      - Technology<br>
      - Customer Support<br>
   </div><br><br>
   <input id="btnTestIt1" type="button" value="Test It (After)">
   <input id="btnTestIt2" type="button" value="Test It (Append)">
</body>
</html>
How It Works
The department names are listed using the <ul> and <li> HTML tags. If you want to insert a new department after the list of existing departments, you select the <ul> element using $("ul") and execute the after() method on the selected element.
When the Test It (After) button is clicked, the following code is executed:
$("ul").after("<li>Implementation</li>");
$("ul") selects the HTML element with the tag name ul and returns the jQuery object. .after("<li>Implementation</li>") inserts the HTML content <li>Implementation</li> after the end of the selected element (ul). Figure 6-49 displays the page when it is viewed in a browser.
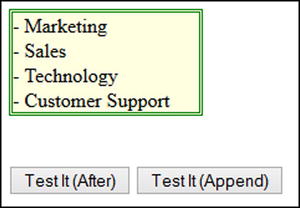
Figure 6-49. Initial page display
When you press the Test It (After) button, the button’s click event handler inserts the new department name after the department names list. Figure 6-50 displays the effect of clicking the Test It (After) button.
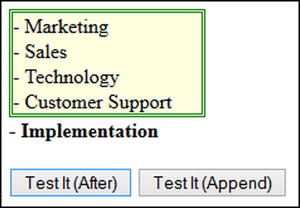
Figure 6-50. “Implementation” is inserted after the departments list
When you refresh the page and press the Test It (Append) button, the button’s click event handler inserts the new department name at the end of the department names list. Figure 6-51 displays the effect of clicking the Test It (Append) button. Figures 6-50 and 6-51 demonstrate difference between the append() and after() methods.

Figure 6-51. “Production Support” is inserted at the end of departments list
Multiple HTML content can be inserted by using the following syntax:
$(selector).after("htmlContent1", "htmlContent2"...)
The following syntax is used to insert HTML content by the value returned by a function:
$(selector).after(function(index) { .... return("htmlContent"); })
6-25. Copying All Selected Elements
Problem
You want to copy all selected elements and their descendant elements.
Solution
The following jQuery syntax is used to copy all selected elements and their descendant elements.
$(selector).clone()
This method returns the jQuery object. Listing 6-25 demonstrates the use of the clone() method to copy all elements and their descendant elements.
Listing 6-25. The jQuery method that copies the selected elements and their descendants
<!DOCTYPE html>
<html lang="en">
<head>
   <meta charset="utf-8">
   <script src="scripts/jquery-2.1.0.min.js"></script>
   <style>
      .label {
         width:150px;
      }
      .input {
         width: 500px;
      }
      .highlight {
         border: 3px dotted red;
         background-color: yellow;
      }
   </style>
   <script>
      $(function(){
         $("#chkShippingAddress").click(function (){
            if ($(this).prop("checked")) {
                  $("#shippingAddress").append($(".billingAddress").clone());
            } else {
                  $("#shippingAddress > .billingAddress").remove();
            }
         });
      });
   </script>
</head>
<body>
   Billing Address:
   <div class="billingAddress">
        <div class="label">Name: </div>
        <div class="text"><input type="text"></div><br>
        <div class="label">Address: </div>
        <div class="text"><input type="text"></div>
   </div><br>
   Shipping Address same as Billing Address: <input id="chkShippingAddress" type="checkbox"><br><br>
   Shipping Address:
   <div id="shippingAddress"></div>
</body>
</html>
How It Works
There are two blocks of address fields—billing address and shipping address. If you want to copy all the fields in the billing address block (the <div> tag with the class "billingAddress") to the shippingAddress block when the Shipping Address Same as Billing Address checkbox is checked, you must first clone the div tag with the class billingAddress and append it to the div tag with the ID of shippingAddress. If the checkbox is unchecked, use the remove() method to remove the newly created div tag that has the class billingAddress and is a descendant of the div tag with the id shippingAddress. Figure 6-52 displays the page when it is viewed in a browser.
Figure 6-52. Initial page display
When the Shipping Address same as Billing Address checkbox is checked, the following code is executed:
$("#shippingAddress").append($(".billingAddress").clone());
$(".billingAddress").clone() selects the div tag with the class billingAddress and copies all the elements. $("#shippingAddress").append() appends the newly created elements to the div tag with the ID set to shippingAddress.
When the Shipping Address same as Billing Address checkbox is unchecked, the following code is executed:
$("#shippingAddress > .billingAddress").remove();
$("#shippingAddress > .billingAddress") selects the element that has the class set to billingAddress and is a descendant of the element that has an ID set to shippingAddress. The remove() method removes the selected HTML element from the DOM tree. See Figure 6-52.
Figure 6-53 displays the screen after the user enters some test data.
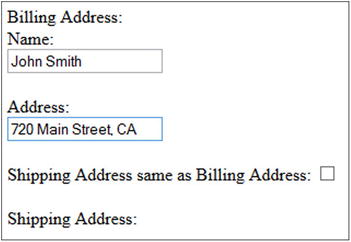
Figure 6-53. Test data entered by the user
Figure 6-54 displays the page when the Shipping Address Same as Billing Address checkbox is checked. Billing Address is cloned and then appended to the end.
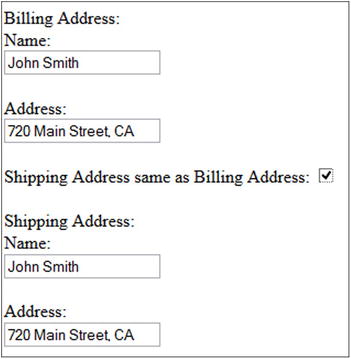
Figure 6-54. Billing Address is copied as the Shipping Address
The clone() method also accepts two optional arguments:
- copyDataAndEvents—if this is true, all data and event handlers associated with the selected elements are copied; otherwise, data and event handlers are not copied (the default).
- deepCopyDataAndEvents—If this is true, all data and event handlers associated with the descendants of the selected elements are copied; otherwise data and event handlers are not copied (the default).
6-26. Removing Selected Elements from the DOM
Problem
You want to remove the selected elements from the DOM.
Solution
The following jQuery syntax is used to remove selected HTML elements.
$(selector).remove()
This method removes all the selected elements along with all bound events and the jQuery data associated with selected elements. It returns the jQuery object. Listing 6-26 demonstrates the use of the remove() method to remove selected elements.
Listing 6-26. The jQuery method to remove selected elements
<!DOCTYPE html>
<html lang="en">
<head>
   <meta charset="utf-8">
   <script src="scripts/jquery-2.1.0.min.js"></script>
   <style>
       .list { border:3px double green; width:350px; }
       .newRecord { font-weight: bold; background-color: lightyellow; }
       .tableHeader { background-color: lightgray; }
   </style>
   <script>
      $(function(){
         $("#btnTestIt").click(function () {
            $(".newRecord").remove();
         });
      });
   </script>
</head>
<body>
   <strong>Employees:</strong>
   <table class="list">
      <tr class="tableHeader">
         <td>Employee Name</td><td>Department Name</td>
   <td>Salary</td>
      </tr>
      <tr>
         <td>Jane Smith</td><td>Marketing</td><td>$95,000</td>
      </tr>
      <tr class="newRecord">
         <td>John Smith</td><td>Technology</td><td>$90,000</td>
      </tr>
      <tr>
         <td>Brian Adam</td><td>Sales</td><td>$72,000</td>
      </tr>
      <tr>
         <td>Mary Jones</td><td>Customer Support</td><td>$60,000</td>
      </tr>
      <tr>
         <td>Michael Jefferson</td><td>Technology</td><td>$85,000</td>
      </tr>
   </table><br>
   <input id="btnTestIt" type="button" value="Test It">
</body>
</html>
How It Works
The employees details are listed using the <table>, <tr>, and <td> HTML tags. New employee records have the class set to newRecord. If you want to remove all the new employee records from the table, you select the elements with the class newRecord using $(".newRecord") and execute the remove() method on the selected elements.
When the Test It button is clicked, the following code is executed:
$(".newRecord").remove();
$(".newRecord") selects the HTML element with the class name newRecord and returns the jQuery object. .remove() removes all selected HTML elements. Figure 6-55 displays the page when it is viewed in a browser.
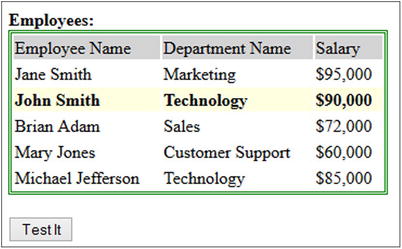
Figure 6-55. Initial page display
When you press the Test It button, the button’s click event handler removes the selected elements. Figure 6-56 displays the effect of clicking the Test It button.
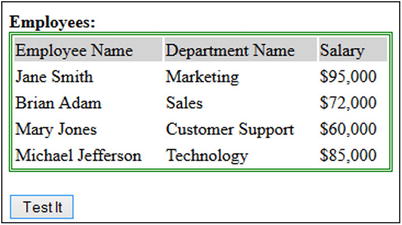
Figure 6-56. The new records are removed
If you want to filter the selected records and then remove only those elements, you can use following syntax:
$(selector).remove(filterSelector)
For example, if there are other elements in this example in which class name is set to newRecord, you can limit the removal of tr elements with the class set to newRecord by using $("tr").remove(".newRecord").
If you don’t want to remove all the bound events and jQuery data associated with the selected elements, you should use the detach() method instead. The detach() method is used when you intend to add detached elements back in the DOM.
6-27. Removing the Child Nodes of All the Selected Elements from the DOM
Problem
You want to remove the child nodes of all the selected elements from the DOM.
Solution
The following jQuery syntax is used to remove the child nodes and text of all the selected HTML elements.
$(selector).empty()
This method returns the jQuery object. Listing 6-27 demonstrates the use of the empty() method to remove the child nodes of selected elements.
Listing 6-27. The jQuery method to remove the child nodes of selected elements
<!DOCTYPE html>
<html lang="en">
<head>
   <meta charset="utf-8">
   <script src="scripts/jquery-2.1.0.min.js"></script>
   <style>
      .list {border:3px double green; width:350px; }
      .newRecord { font-weight: bold; background-color: lightyellow; }
      .tableHeader { background-color: lightgray; }
   </style>
   <script>
      $(function(){
         $("#btnTestIt").click(function () {
            $("#tech").empty();
            $("#tech").append("<li>Mobile Development</li>");
         });
      });
   </script>
</head>
<body>
   <strong>Departments:</strong>
   <div>
      <ul class="listDepartments">
         <li>Marketing</li>
         <li>Sales</li>
         <li>Technology
            <ul id="tech">
               <li>Hardware Technology</li>
               <li class="oldRecord">Software Technology</li>
            </ul>
         </li>
         <li>Customer Support</li>
      </ul>
   </div><br>
   <input id="btnTestIt" type="button" value="Test It">
</body>
</html>
How It Works
The department names are listed using the <ul> and <li> HTML tags. If you want to remove all child elements (li) of the ul element, you select the parent of the <li> elements using $("#tech") and execute the empty() method on the selected element. #tech is the ID of the nested ul element. empty() removes the child nodes only of the selected elements and not the selected elements itself.
When the Test It button is clicked, the following code is executed:
$("#tech").empty();
$("#tech").append("<li>Mobile Development</li>");
$("#tech") selects the HTML element with the ID tech and returns the jQuery object. .empty() removes all the child nodes, that is, all items within the inner ul node. A new department name is added to the $("#tech") element to prove that only child nodes are removed and the selected element itself is not removed. Figure 6-57 displays the page when it is viewed in a browser.
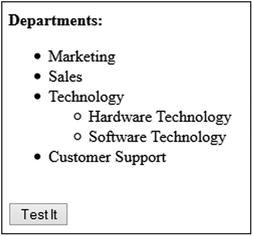
Figure 6-57. Initial page display
When you press the Test It button, the button’s click event handler removes all departments under “Technology” and a new department name “Mobile Development” is appended to the Technology list. Figure 6-58 displays the effect of clicking the Test It button.
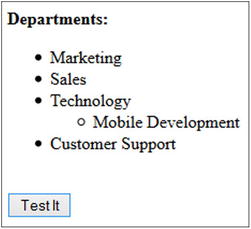
Figure 6-58. The previous technology departments are removed and a new one is added
6-28. Removing the Parent of Each Selected Element
Problem
You want to remove the parent of each selected element.
Solution
The following jQuery syntax is used to remove the parent of each selected element:
$(selector).unwrap()
This method’s effect is the reverse of the wrap() method. It removes the parent of the selected elements and keeps the selected elements intact. It returns the jQuery object. Listing 6-28 demonstrates the use of the unwrap() method to remove the parent of the selected elements.
Listing 6-28. The jQuery method to remove the parent of the selected elements
<!DOCTYPE html>
<html lang="en">
<head>
   <meta charset="utf-8">
   <script src="scripts/jquery-2.1.0.min.js"></script>
   <style>
      .item_0 { background-color: lightyellow; }
      .item_1 { background-color: lightblue; }
      .item_2 { background-color: lightgray; }
      .item_3 { background-color: lightgreen; }
   </style>
   <script>
      $(function(){
         $("#btnTestIt").click(function () {
            $("p").unwrap();
         });
      });
   </script>
</head>
<body>
   <div class="item_0"><p>This is paragraph 1</p></div>
   <div class="item_1"><p>This is paragraph 2</p></div>
   <div class="item_2"><p>This is paragraph 3</p></div>
   <div class="item_3"><p>This is paragraph 4</p></div>
   <input id="btnTestIt" type="button" value="Test It">
</body>
</html>
How It Works
The paragraphs are listed using the <p> HTML tag and the paragraph tag is surrounded by its parent <div> tag. The background color of each paragraph tag is due to the value of the class attribute associated with the <div> tag. If you want to remove the background color of all the paragraphs, you select the <p> elements using $("p") and execute the unwrap() method on the selected elements.
When the Test It button is clicked, the following code is executed:
$("p").unwrap();
$("p") selects the HTML element with the tag name p and returns the jQuery object. .unwrap() removes the parent of all the selected elements (p). Figure 6-59 displays the page when it is viewed in a browser.
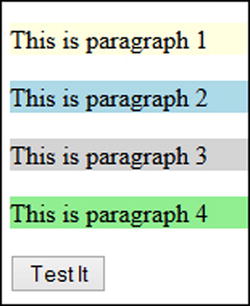
Figure 6-59. Initial page display
When you press the Test It button, the button’s click event handler removes the parent of the selected elements and also removes the background color. Figure 6-60 displays the effect of clicking the Test It button.

Figure 6-60. Background color is removed
6-29. Replacing Selected Items with New Items (Specified by HTMLString) in the DOM
Problem
You want to replace selected elements with specified HTML content.
Solution
The following jQuery syntax is used to replace selected elements with new HTML content:
$(selector).replaceWith("newHTMLContent")
newHTMLContent can be an HTML string, an HTML element, an array of HTML elements, or a jQuery object. This method replaces the selected elements with the new specified HTML content and returns the jQuery object containing the set of elements that are removed. Listing 6-29 demonstrates the use of the replaceWith() method to replace the selected elements.
Listing 6-29. The jQuery method to replace selected elements
<!DOCTYPE html>
<html lang="en">
<head>
   <meta charset="utf-8">
   <script src="scripts/jquery-2.1.0.min.js"></script>
   <style>
       .list {border:3px double green; width:350px; }
       .newRecord { font-weight: bold; background-color: lightyellow; }
       .tableHeader { background-color: lightgray; }
       .listDepartments { width: 200px; }
   </style>
   <script>
      $(function(){
         $("#btnTestIt").click(function () {
            $(".newRecord").replaceWith("<li>Mobile Development</li>");
         });
      });
   </script>
</head>
<body>
   <strong>Departments:</strong>
   <div>
      <ul class="listDepartments">
         <li>Marketing</li>
         <li>Sales</li>
         <li>Technology
            <ul id="tech">
               <li>Hardware Technology</li>
               <li class="newRecord">Software Technology</li>
            </ul>
         </li>
         <li>Customer Support</li>
      </ul>
   </div><br>
   <input id="btnTestIt" type="button" value="Test It">
</body>
</html>
How It Works
The department names are listed using the <ul> and <li> HTML tags. In this list of departments, new departments’ <li> tags are associated with the newRecord class. If you want to replace these elements with the newRecord class, you select those elements using $(".newRecord") and execute the replaceWith() method on the selected elements.
When the Test It button is clicked, the following code is executed:
$(".newRecord").replaceWith("<li>Mobile Development</li>");
$(".newRecord") selects the HTML element with the class name newRecord and returns the jQuery object. .replaceWith("<li>Mobile Development</li>") replaces the selected element with the new HTML content. Figure 6-61 displays the page when it is viewed in a browser.
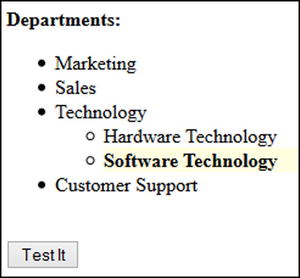
Figure 6-61. Initial page display
When you press the Test It button, the button’s click event handler replaces the element with the newRecord class with the new HTML content. Figure 6-62 displays the effect of clicking the Test It button.
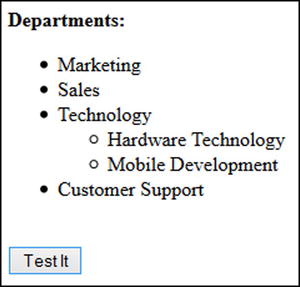
Figure 6-62. Selected element is replaced by the new department name
$(".newRecord").replaceWith("<li>Mobile Development</li>") can also be written as $("<li>Mobile Development</li>").replaceAll(".newRecord"). Since replaceWith() and replaceAll() have the same effect, you can use either. The syntax for the replaceAll method is:
$("htmlString").replaceAll(selector)
The following syntax is used to replace selected elements with the return value of a function:
$(selector).replaceWith(function() { ... return("htmlContent");})
Summary
This chapter covered jQuery manipulation methods that are used to change the DOM by changing properties and attributes and by adding, replacing, and removing DOM nodes. The following methods change the styles, properties, attributes, and content of the selected elements:
- css()
- attr()
- prop()
- val()
- html()
- text()
The following methods are used to add new nodes to the DOM:
- append() and appendTo()
- prepend() and prependTo()
- wrap(), wrapInner(), and wrapAll()
- after()
- clone()
The following methods are used to remove DOM nodes:
- detach()
- remove()
- empty()
- unwrap()
The replaceWith() and replaceAll() methods are used to replace existing DOM nodes with new ones.