
<!DOCTYPE html>
<html lang="en">
<head>
      <meta name="viewport" content="width=device-width, initial-scale=1">

      <link rel="stylesheet" href="styles/jquery.mobile-1.4.3.min.css" />

      <style>
              #footerMsg {font-size: 12px;}

              .ui-slider-switch { width: 100px !important }
      </style>

      <script src="scripts/jquery-2.1.0.min.js"></script>
      <script src="scripts/jquery.mobile-1.4.3.min.js"></script>
</head>

<body>
    <div data-role="page">
        <div data-role="header">
            <h1>Employee Form</h1>
        </div>

        <div data-role="main" class="ui-content">
            <form id="frmEmployee">
                <div class="ui-field-contain">
                    <label for="selActive" class="ui-hidden-accessible"></label>
                    <select id="selActive" name="txtDepartmentName" data-role="slider" data-mini="true">
                        <option value="A">Active</option>
                        <option value="I">Inactive</option>
                    </select>
                </div>

                <div data-role="collapsibleset">
                    <div data-role="collapsible"  data-inset="false"  data-collapsed-icon="carat-r"
                      data-expanded-icon="carat-d"  data-iconpos="right" data-mini="true" data-content-theme="b">
                          <h2>Basic Information</h2>
                          <div class="ui-field-contain">
                              <label for="txtEmployeeName">Name:</label>
                              <input type="text" id="txtEmployeeName" name="txtEmployeeName" data-mini="true">
                          </div>

                          <div class="ui-field-contain">
                              <label for="selDepartmentName">Department:</label>
                              <select id="selDepartmentName" name="selDepartmentName" data-mini="true">
                                  <option value=""></option>
                                  <option value="Marketing">Marketing</option>
                                  <option value="Sales">Sales</option>
                                  <option value="Support"></option>
                                  <option value="Technology"></option>
                              </select>
                          </div>

                          <div class="ui-field-contain">
                              <label for="sldAge">Age:</label>
                              <input  type="range" name="sldAge" id="sldAge" min="18" max="80"
                                         data-mini="true"  data-highlight="true" data-track-theme="a">
                          </div>

                           <div class="ui-field-contain">
                              <label for="txtSalary">Salary:</label>
                              <input type="number" id="txtSalary" name="txtSalary" data-mini="true">
                          </div>

                          <div class="ui-field-contain">
                              <label for="txtHireDate">Hire Date:</label>
                              <input type="date" id="txtHireDate" name="txtHireDate" data-role="date"
                                        data-mini="true">
                          </div>

                          <div class="ui-field-contain">
                              <fieldset data-role="controlgroup" data-type="horizontal"  data-mini="true">
                                  <legend>Gender:</legend>

                                  <input type="radio" name="rdoGender" id="rdoMale" checked>
                                  <label for="rdoMale">Male</label>

                                  <input type="radio" name="rdoGender" id="rdoFemale">
                                  <label for="rdoFemale">Female</label>
                              </fieldset>
                          </div>
                    </div>

                    <div data-role="collapsible"  data-inset="false"  data-collapsed-icon="carat-r"
                      data-expanded-icon="carat-d"  data-iconpos="right" data-mini="true" data-content-theme="b">
                        <h2>Experience</h2>
                        <fieldset data-role="controlgroup" data-mini="true">
                            <legend>Experience:</legend>
                            <input type="checkbox" name="chkProgramming" id="chkProgramming">
                            <label for="chkProgramming">Programming</label>
                            <input type="checkbox" name="chkAnalysis" id="chkAnalysis">
                            <label for="chkAnalysis">Analysis</label>
                            <input type="checkbox" name="chkSales" id="chkSales">
                            <label for="chkSales">Sales</label>
                            <input type="checkbox" name="chkBudgetPlanning" id="chkBudgetPlanning">
                            <label for="chkBudgetPlanning">Budget Planning</label>
                        </fieldset>

                        <div class="ui-field-contain">
                            <label for="selIndustryExperience">Industry Experience:</label>
                            <select id="selIndustryExperience" name="selIndustryExperience"
                                 data-mini="true" multiple>
                                <option value="Auto">Auto</option>
                                <option value="Financial">Financial</option>
                                <option value="Healthcare">Healthcare</option>
                                <option value="Insurance">Insurance</option>
                                <option value="Technology">Technology</option>
                            </select>
                        </div>
                    </div>

                    <div data-role="collapsible"  data-inset="false"  data-collapsed-icon="carat-r"
                      data-expanded-icon="carat-d"  data-iconpos="right" data-mini="true" data-content-theme="b">
                        <h2>Miscellaneous</h2>
                        <div class="ui-field-contain">
                            <label for="txtComments">Comments:</label>
                            <textarea id="txtComments" name="txtComments" data-mini="true"></textarea>
                        </div>
                    </div>
                </div><br><br>

                <fieldset data-role="controlgroup" data-type="horizontal"  data-mini="true" data-theme="b">
                    <a href="#" class="ui-btn">Submit</a>
                    <a href="#" class="ui-btn">Cancel</a>
                </fieldset>
            </form>
        </div>

        <div data-role="footer" data-position="fixed">
            <h1 id="footerMsg">© 2014 Acme Corporation. All rights reserved.</h1>
        </div>
    </div>
</body>
</html>
How It Works
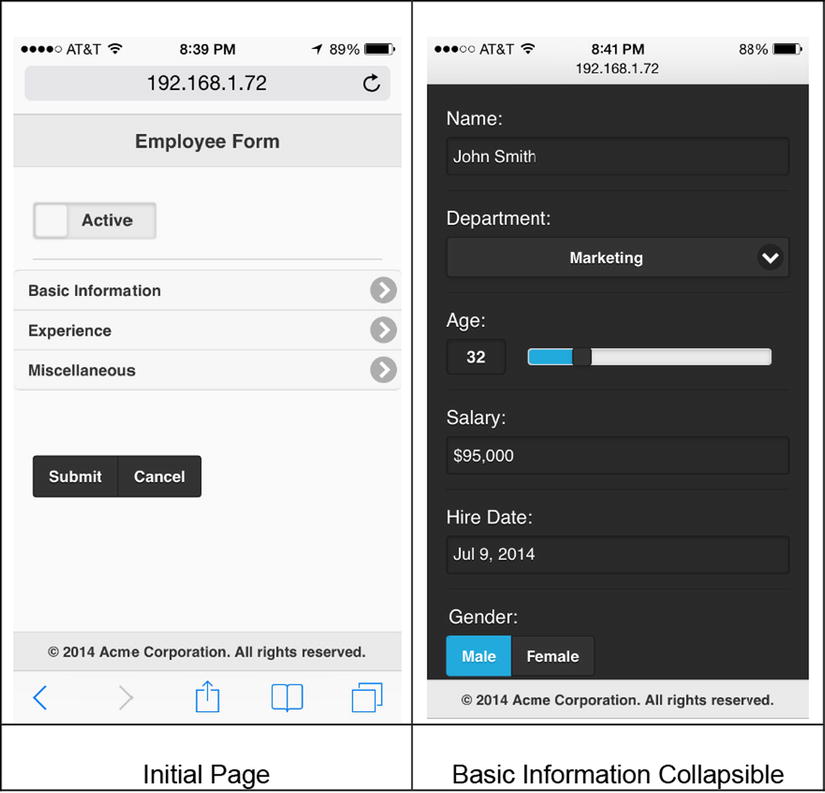
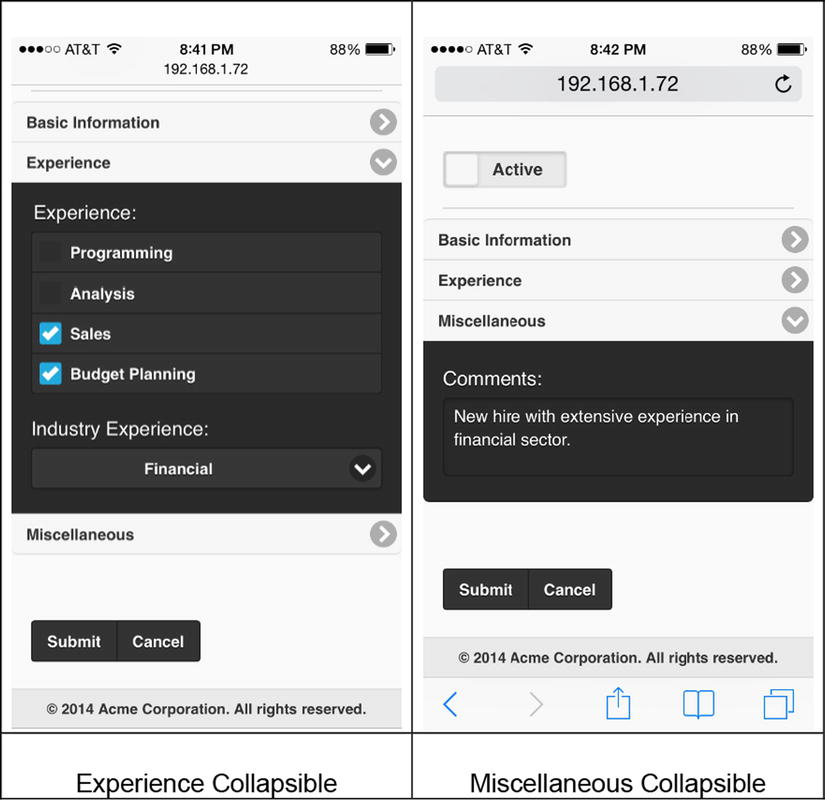
All the form controls are wrapped in the <form> element. The data-entry form is broken in three categories—Basic Information, Experience, and Miscellaneous. Therefore, three collapsibles are created so that all the form controls are not displayed at once. This way, users won’t have to scroll up and down to enter data. The following code is used to create collapsibles:
<div data-role="collapsible"  data-inset="false" data-collapsed-icon="carat-r"
                   data-expanded-icon="carat-d" data-iconpos="right" data-mini="true" data-content-theme="b">
             <h2>collapsibleTitle</h2>
              ...
</div>
All the form controls for checkboxes, radio buttons, and buttons are grouped together by using:
<fieldset data-role="controlgroup" data-mini="true">
                  <legend>groupName</legend>
       ...
</fieldset>
The form control and the corresponding label are grouped together by using:
<div class="ui-field-contain">
       ...
</div>
The following sections explain the classes and data attributes used in this recipe.
Labels
All form controls should be paired with a label control. For example, for the input form control, the following syntax is used:
<label for="formControlName">labelText</label>
<input type="text" name="formControlName" id="formControlName">
The value for the label’s for attribute and the form control’s id attribute must be same.
If you want to use a placeholder for the form control and would like to hide the label, you can add the ui-hidden-accessible class to the label form control:
<label for="formControlName" class="ui-hidden-accessible">labelText</label>
Fieldcontainer
To prevent scrolling, wrap the form control and its label in a div tag with the class ui-field-contain. This will display the label and the form control side by side on the wider screen display instead of stacking them in two lines. The following is the syntax:
<div class="ui-field-contain">
Text Inputs
The following is the syntax to create a text input:
<input type="textType" name="formControlName" id="formControlName" value="defaultValue">
where textType can be text, date, datetime, email, tel, number, search, and so on.
For a date, set both the type and data-role to date. This will use the jQuery UI datetime picker.
Textarea
The following is the syntax to create a textarea:
<textarea cols="numberOfColumns" rows="numberOfRows" name="textarea"
          id="textarea">defaultValue</textarea>
File
The following is the syntax to create a file control. A Browse button is displayed.
<input type="file" name="formControlName" id="formControlName">
A file cannot by uploaded using an AJAX multipart form. You need to use:
<form id="formId" method="POST" data-ajax="false">
Flip Switch
Flip switches is used when a Boolean value is needed, such as on/off, true/false, or active/inactive. The following is the syntax to create a flip switch:
<select id="sldStatus" name="sldStatus" data-role="slider">
              <option value="option1">option1</option>
              <option value="option2">option2</option>
</select>
You can change the width of the flip switch by changing the CSS property width of the ui-slider-switch CSS class. For example, .ui-slider-switch { width: 100px !important }.
Checkboxes
The following is the syntax to create checkboxes:
<input type="checkbox" name="formControlName" id="formControlName">
<label for="formControlName" class="ui-hidden-accessible">labelText</label>
Radio Buttons
The following is the syntax to create radio buttons:
<input type="radio" name="formControlName" id="formControlName">
<label for="formControlName" class="ui-hidden-accessible">labelText</label>
If you want user to select a radio button among many choices, keep the value of the name attribute the same.
Grouping Checkboxes and Radio Buttons
You can group related checkboxes and radio buttons by wrapping them in a fieldset with the data-role set to controlgroup:
<fieldset data-role="controlgroup">
- The label for the group can be specified by using <legend>legendTitle</legend>.
- If data-type="horizontal" is added to the fieldset, the checkbox and radio buttons’ label text will be displayed on the buttons.
Select
The select drop-down is generally used to select one out of many options. The syntax to create a select drop-down is:
<select id="formControlName" name="formControlName">
    <option value="optionValue1">optionText1</option>
    <option value="optionValue2">optionText2</option>
      ...
</select>
If you want to allow users to choose more than one option, you can add the multiple attribute to select an element:
<select id="formControlName" name="formControlName" multiple>
Sliders
The slider is used to enter numeric values, either by sliding a handle or entering a number. You can also specify the value, min, max, and step attributes. The following is the syntax to create a slider:
<input type="range" id="formControlName" name="formControlName" value="defaultValue"
                     min="minValue" max="maxValue" step="incrementOrDecrementBy">
If you want to highlight a slider from a minimum value to the current selection, you can set the data-highlight attribute to true.
If you want to change the theme of the slider track, you can set the value of the data-track-theme attribute. The data-theme attribute sets the theme of the textbox containing the current value of the slider control.
If you want a user to enter range of values (such as start and end values) instead of one value, you can wrap two slider controls in the same div element with data-role set to rangeslider. The following HTML code is an example of creating the range slider:
Range Slider:<br>
<div data-role="rangeslider"  >
      <input type="range" id="start" name="start" value="20" min="1" max="100">
      <input type="range" id="end" name="end" value="80" min="1" max="100" >
</div>
Figure 11-19 displays the range slider control.
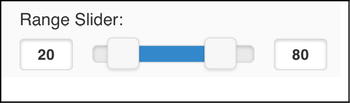
Figure 11-19. Range slider
Buttons and Links
Refer to Recipe 11-3 for information about buttons and links.
Figure 11-20 displays the employee form with form controls in collapsibles.
11-18. Understanding the jQuery Mobile User-Initiated Events
Problem
You want to know which user-initiated events are provided by the jQuery mobile framework.
Solution
The jQuery mobile events are built on DOM native events. Table 11-5 lists the user-initiated events and their descriptions. I have covered page-related events in the Recipe 11-7. You can use the events handling and triggering concepts you learned in the Chapter 7.
Table 11-5. User-Initiated Events
|
Event |
Event Is Triggered |
|---|---|
|
orientationchange |
When the orientation of the device changes from portrait to landscape or vice versa. |
|
scrollstart |
When scrolling starts. |
|
scrollstop |
When scrolling stops. |
|
swipe |
When swipe occurs for more than 30 pixels horizontally and less than 75 pixels vertically. |
|
swipeleft |
When a swipe toward the left occurs. |
|
swiperight |
When a swipe toward the right occurs. |
|
tap |
When a quick tap occurs. |
|
taphold |
When a tap and stay occurs. |
|
vclick |
When a virtualized mouse button click occurs. |
|
vmousemove |
When a virtualized mouse move occurs. |
|
vcancel |
When the system cancels a virtualized mouse event. |
|
vmousedown |
When a virtualized mouse button down occurs. |
|
vmouseup |
When a virtualized mouse button up occurs. |
|
vmouseover |
When a virtualized mouse over occurs. |
|
vmouseout |
When a virtualized mouse out occurs. |
You can get the orientation (portrait or landscape) of the device by using the following code:
$(window).on("orientationchange", function(eventObj) { alert(eventObj.orientation); });
$(window).trigger("orientationchange");
11-19. Creating a Web Application Using jQuery Mobile Concepts
Problem
You want to write an application using the concepts covered in this chapter—page structure, headers, footers, page navigation, transitions, page containers, dialogs, navigation bars, panels, popups, and form controls.
Solution
Listing 11-16 displays a login screen that prompts the users to enter a user ID and password. This recipe uses a plaintext user Id and password to authenticate logon for the sake of explaining the concept. In real-world applications, user’s credentials are saved in the encrypted form on the server side. Since server-side coding is out of the scope of this book, I have not provided the code for user authentication on the server side.
Listing 11-16. Login screen (the filename is login.htm)
<!DOCTYPE html>
<html lang="en">
<title>Title</title>
   <meta name="viewport" content="width=device-width, initial-scale=1">

   <link rel="stylesheet" href="styles/jquery.mobile-1.4.3.min.css"/>

   <style>
      #footerMsg { font-size: 12px; }
   </style>

   <script type="text/javascript" src="scripts/jquery-2.1.0.min.js"></script>
   <script type="text/javascript" src="scripts/jquery.mobile-1.4.3.min.js"></script>

   <script>
      $(function() {
         $("#btnLogin").click(function (){
            if ( $("#txtUserId").val().toLowerCase() == "testuser" && $("#txtPassword").val() == "test123" ) {
               location.href = "departments.htm";
            } else {
               $( ":mobile-pagecontainer" ).pagecontainer( "change", "#loginErrorDialog", {
                   role: "dialog", transition: "pop"
               } );
            }
         });
      });
   </script>
</head>

<body>
    <div data-role="page" id="homePage">

        <div data-role="header" data-position="fixed" data-theme="b">
            <a href="index.html"><img src="images/logo.png" style="height:15px; width:15px"></a>
            <h1>Acme</h1>
        </div>

        <div data-role="main" class="ui-content">
            <input type="text" id="txtUserId" placeholder="Enter User ID" data-mini="true">
            <input type="password" id="txtPassword" name="txtPassword" placeholder="Enter Password"
                 data-mini="true">

            <div class="ui-grid-a">
                <div class="ui-block-a">
                    <input type="checkbox" id="chkSaveUserId" name="chkSaveUserId"  data-mini="true">
                    <label for="chkSaveUserId"  data-mini="true">Save User ID.</label>
                </div>

                <div class="ui-block-b">
                    <button id="btnLogin" class="ui-btn-b ui-corner-all ui-shadow" data-mini="true"
                        data-theme="b">Login</button>
                </div>
            </div>
        </div>

        <div data-role="footer" data-position="fixed" data-theme="b">
            <h1 id="footerMsg">© 2014 Acme Corporation. All rights reserved.</h1>
        </div>
    </div>

    <div  data-role="dialog" id="loginErrorDialog">
        <div data-role="header">
            <h1>Login Status</h1>
        </div>
        <div data-role="main" class="ui-content" >
            <p>Failed to Login. Please try again.
        </div>
    </div>
</body>
</html>
Figure 11-21 displays the login screen.

Figure 11-21. Login screen
For this example, enter testuser (case-insensitive) for the user ID and test123 (case-sensitive) for the password. If an incorrect user ID or password is entered and the Login button is clicked, the following code is executed:
$( ":mobile-pagecontainer" ).pagecontainer( "change", "#loginErrorDialog", {
            role: "dialog", transition: "pop"
        } );
This will display the div element with the ID set to loginErrorDialog as a dialog box. The following is the code used to create the dialog box:
<div  data-role="dialog" id="loginErrorDialog">
        <div data-role="header">
              <h1>Login Status</h1>
        </div>
        <div data-role="main" class="ui-content" >
              <p>Failed to Login. Please try again.
        </div>
</div>
Figure 11-22 displays the dialog box with the login failed message.
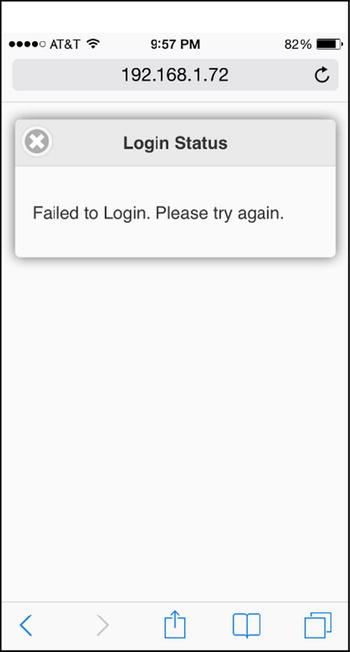
Figure 11-22. Dialog box with login failed message
If the correct user ID and password are entered and the Login button is clicked, following code is executed:
location.href = "departments.htm";
This will display the external HTML page called departments.htm. Listing 11-17 shows the content of the departments.htm file.
Listing 11-17. Display list of department names and employee records (the departments.htm file)
<!DOCTYPE html>
<html lang="en">
<head>
      <meta name="viewport" content="width=device-width, initial-scale=1">

      <link rel="stylesheet" href="styles/jquery.mobile-1.4.3.min.css" />

      <script src="scripts/jquery-2.1.0.min.js"></script>
      <script src="scripts/jquery.mobile-1.4.3.min.js"></script>

      <script>
              var employees = new Array();

              employees.push({name:"Jane Smith", department:"Marketing", salary:"$95,000"});
              employees.push({name:"Brian Adam", department:"Sales", salary:"$72,000"});
              employees.push({name:"Mary Jones", department:"Support", salary:"$60,000"});
              employees.push({name:"John Smith", department:"Technology", salary:"$90,000"});
              employees.push({name:"Michael Jefferson", department:"Technology", salary:"$85,000"});

              $(function() {
                    $("#listDepartments").click(function (eventObj) {
                            var selectedDepartmentName = $(eventObj.target).text();

                            $("#deptName").html(selectedDepartmentName);

                            $("#employeeRecords").empty();
                            $.each(employees, function(currentIndex) {
                                  if (employees[currentIndex].department == selectedDepartmentName) {
                                          $("#employeeRecords").append("<tr><td>" + employees[currentIndex].name +
                                                           "</td><td>" + employees[currentIndex].salary + "</td></tr>");
                                  }
                            });

                            $( ":mobile-pagecontainer" ).pagecontainer( "change", "#employees", {
                                           role: "page", transition: "slide"
                             } );

                    });
              });
      </script>
</head>

<body>
      <div id="departments" data-role="page">
              <div data-role="header" data-theme="b">
                    <h1>Departments</h1>
                    <a href="login.htm" data-role="button" data-icon="home" data-iconshadow="true"
                            data-shadow="true" data-corners="true" data-iconpos="notext">Home</a>

                    <a href="#myPanel" data-role="button" data-icon="bars" data-iconshadow="true"
                            data-shadow="true" data-corners="true" data-direction="reverse"
                            data-transition="slide" data-iconpos="notext"  class="ui-btn-right">Panel</a>
               </div>

               <div data-role="main" class="ui-content">
                    <ul id="listDepartments" data-role="listview" data-inset="true" data-filter="true">
                            <li><a href="#">Marketing</a></li>
                            <li><a href="#">Sales</a></li>
                            <li><a href="#">Support</a></li>
                            <li><a href="#">Technology</a></li>
                    </ul>
              </div>

              <div data-role="footer" data-position="fixed" data-theme="b">
                    <div data-role="navbar" data-iconpos="left">
                            <ul>
                                  <li><a href="addDepartment.htm" data-icon="plus">Add</a></li>
                                  <li><a href="#departments" data-icon="bullets" class="ui-btn-active">List</a></li>
                                  <li><a href="#myPanel"  data-icon="bars">More...</a></li>
                            </ul>
                    </div>
              </div>

              <div data-role="panel" id="myPanel" data-position="right" data-theme="b">
                    <ul data-role="listview">
                            <li data-icon="false"><a href="#">Add Employee</a></li>
                            <li data-icon="false"><a href="#">Search Employees</a></li>
                            <li data-icon="false"><a href="addDepartment.htm">Add Department</a></li>
                            <li data-icon="false"><a href="#">Search Departments</a></li>
                    </ul>
              </div>
      </div>

      <div id="employees" data-role="page">
              <div data-role="header" data-theme="b"  data-add-back-btn="true">
                            <h1 id="deptName"></h1>
              </div>

              <div data-role="main" class="ui-content">
                <table id="tableName" data-role="table" class="ui-responsive ui-shadow table-stroke table-stripe"
                             data-mode="reflow">
                            <thead>
                                  <tr>
                                          <th>Name</th>
                                          <th>Salary</th>
                                  </tr>
                            </thead>

                            <tbody id="employeeRecords"></tbody>
                    </table>
              </div>

              <div data-role="footer" data-position="fixed" data-theme="b">
                    <h1 id="footerMsg">© 2014 Acme Corporation. All rights reserved.</h1>
              </div>
      </div>
</body>
</html>
In this listing:
- The header has a home icon button, which is created by the following code:
<a href="login.htm" data-role="button" data-icon="home" data-iconshadow="true"
     data-shadow="true" data-corners="true" data-iconpos="notext">Home</a>
When the home icon button is clicked, the login.htm page will be displayed.
- The header has a menu icon button, which is created by the following code:
<a href="#myPanel" data-role="button" data-icon="bars" data-iconshadow="true"
     data-shadow="true" data-corners="true" data-direction="reverse"
     data-transition="slide" data-iconpos="notext"  class="ui-btn-right">Panel</a>
When the bars icon button is clicked, the div element with the ID of myPanel will be displayed as a panel on the right side of the main screen. Figure 11-24 displays the panel.
- The department names are displayed in a listview due to the following code:
<ul id="listDepartments" data-role="listview" data-inset="true" data-filter="true">
                <li><a href="#">Marketing</a></li>
                <li><a href="#">Sales</a></li>
                <li><a href="#">Support</a></li>
                <li><a href="#">Technology</a></li>
</ul>
The filter textbox is created because data-filter is set to true.
When a department name is clicked in the listview, the following code is executed:
- To get the name of the selected item in the list view:
var selectedDepartmentName = $(eventObj.target).text(); - To set the name of the selected department name in the header:
$("#deptName").html(selectedDepartmentName); - To initialize the data records in the reflow table:
$("#employeeRecords").empty(); - To loop through the employees array and get the records for the selected department name:
$.each(employees, function(currentIndex) {
      if (employees[currentIndex].department == selectedDepartmentName) {
              $("#employeeRecords").append("<tr><td>" + employees[currentIndex].name +
              "</td><td>" + employees[currentIndex].salary + "</td></tr>");
     }
}); - To display the page with the ID of employees:
$( ":mobile-pagecontainer" ).pagecontainer( "change", "#employees", {
            role: "page", transition: "slide"
} );
Figure 11-25 displays the page with the employees’ names and salaries of the selected department name.
- To get the name of the selected item in the list view:
- The three buttons (Add, List, and More...) in the navigation bar are created in the footer due to the following code:
<div data-role="navbar" data-iconpos="left">
      <ul>
              <li><a href="addDepartment.htm" data-icon="plus">Add</a></li>
              <li><a href="#departments" data-icon="bullets"  class="ui-btn-active">List</a></li>
              <li><a href="#myPanel"  data-icon="bars">More...</a></li>
      </ul>
</div>
When the Add button is clicked, the external HTML file called addDepartment.htm will be displayed. Listing 11-18 shows the content of the addDepartment.htm file.
When the More... button is clicked, the div element with the ID of myPanel will be displayed as a panel on the right side of the main screen. Figure 11-24 displays the panel.
Figure 11-23 displays the department names with a page header and a navigation bar in the page footer.
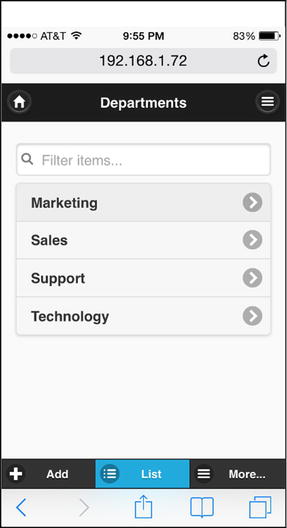
Figure 11-23. Display department names and navigation bar
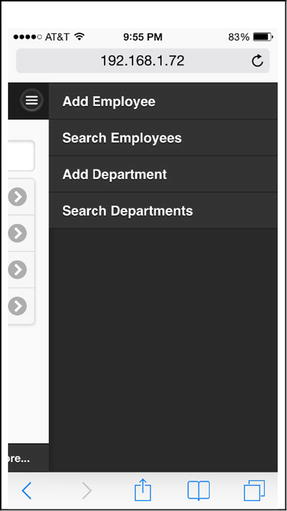
Figure 11-24. Display panel with the menu items
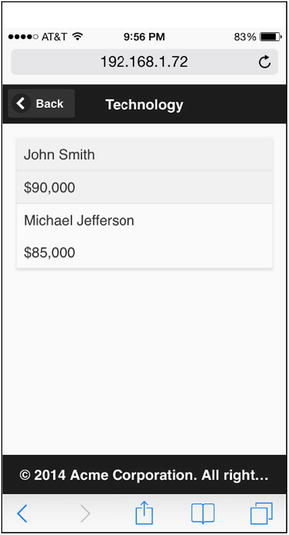
Figure 11-25. Display employee records for the selected department
Listing 11-18. Code to enter a new department (the filename is addDepartment.htm)
<!DOCTYPE html>
<html lang="en">
<head>
      <meta name="viewport" content="width=device-width, initial-scale=1">

      <link rel="stylesheet" href="styles/jquery.mobile-1.4.3.min.css" />
      <script src="scripts/jquery-2.1.0.min.js"></script>
      <script src="scripts/jquery.mobile-1.4.3.min.js"></script>
</head>

<body>
   <div data-role="page">
      <div data-role="header" data-theme="b" data-add-back-btn="true">
         <h1>New Department</h1>
      </div>

      <div data-role="main" class="ui-content">
         <form id="frmDepartment">
            <div class="ui-field-contain">
               <label for="txtDepartmentName">Name:</label>
               <input type="text" id="txtDepartmentName" name="txtDepartmentName"
                      data-mini="true">
            </div>

            <fieldset data-role="controlgroup" data-type="horizontal" data-mini="true" data-theme="b">
               <a href="#popupName"  data-rel="popup" class="ui-btn">Submit</a>
               <a href="departments.htm" class="ui-btn">Cancel</a>
            </fieldset>
         </form>
      </div>

      <div data-role="footer" data-position="fixed" data-theme="b">
         <h1 id="footerMsg">© 2014 Acme Corporation. All rights reserved.</h1>
      </div>

      <div data-role="popup" id="popupName" class="ui-content" data-position-to="window"
                    data-transition="flip" data-theme="b" data-overlay-theme="b">

       <a href="#" data-rel="back" class="ui-btn ui-corner-all  ui-icon-delete ui-btn-icon-notext ui-btn-right">Close</a>
           New department <br>record is created.<br>
      </div>
   </div>
</body>
</html>
In this listing:
- The label and textbox are created by using the following code:
<label for="txtDepartmentName">Name:</label>
         <input type="text" id="txtDepartmentName" name="txtDepartmentName" data-mini="true">
Figure 11-26 displays the data-entry form used to enter a new department name.
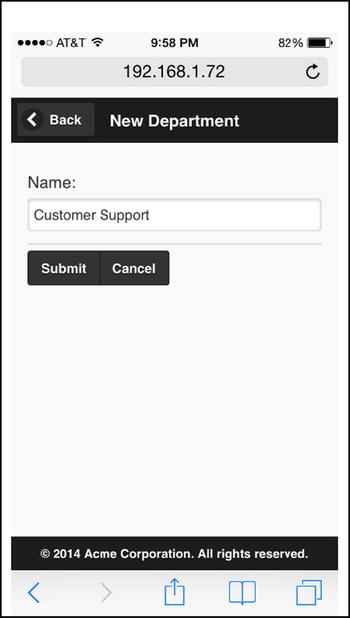
Figure 11-26. Department data-entry form
- The Submit button is created due to the following code:
<a href="#popupName" data-rel="popup" class="ui-btn">Submit</a>When the Submit button is clicked, the div element with the ID of popupName is displayed as a popup.
Figure 11-27 displays the record-creation message in a popup window. The server-side code to save the entered information is out of the scope of this recipe.
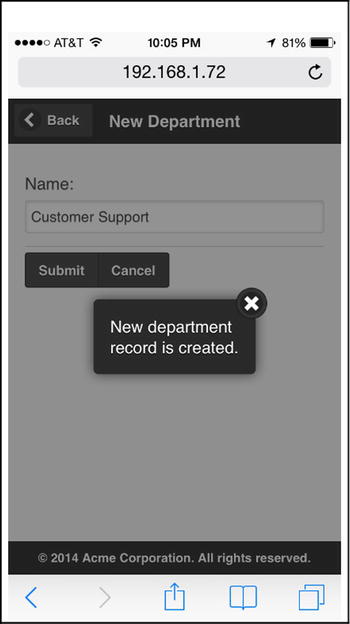
Figure 11-27. Popup message
- The Cancel button is created due to the following code:
<a href="departments.htm" class="ui-btn">Cancel</a>When the Cancel button is clicked, the external HTML file called departments.htm is displayed.
Summary
This chapter covered the following jQuery Mobile library concepts:
- The CSS Framework
- Page structure—headers, content, and footers
- Pages—Container, Transition, and Navigation
- Navigation bars
- Dialog boxes, panels, and popups
- Collapsibles
- Grid view, listviews, and tables
- Form elements
- Events
This chapter covered the data-role attribute with the following values—page, dialog, header, main, footer, controlgroup, navbar, panel, popup, collapsible, collapsibleset, listview, list-divider, table, slider, date, and rangeslider.
The chapter also covered the following theme-related data attributes—data-theme, data-overlay-theme, data-content-theme, data-filter-theme, data-track-theme, data-column-btn-theme, data-column-popup-theme, and data-count-theme.
The display attributes of an element are controlled by either setting the attribute data-displayProperty or by adding the class ui-displayProperty.
You have worked on recipes to demonstrate how the rich set of data attributes and CSS classes can create a wide range of layouts and form controls for mobile web applications development. By using jQuery concepts (selectors, events, and AJAX), as well as jQuery UI and jQuery mobile controls, you can develop highly dynamic web applications.