
![]()
jQuery Fundamentals
This chapter covers the fundamentals of the jQuery library, including the following topics:
- How to access jQuery library functionalities
- Using conditional statements
- Looping
- The structure of the Document Object Model (DOM)
- Commonly used objects in the jQuery library
- jQuery functions
- Method chaining
2-1. Setting Up jQuery
As with any other JavaScript library, if you want to access functionalities of the jQuery library, you need to include the jQuery JavaScript file. There are two ways to include the jQuery JavaScript library in an HTML file:
- Using a local file—The jQuery library can be downloaded from http://jquery.com/download/. At the time of this writing, the latest version of jQuery was 2.1.0. Download the compressed (production) version of the library if you don’t intend to modify or debug the jQuery JavaScript code. Otherwise, you can download the uncompressed (development) version.
If your user base is still using Internet Explorer 8 or older, download the latest version of jQuery 1.x. You should download the latest version of jQuery 2.x if your user base is using Internet Explorer 9 (or newer) or any other new version of browsers such as Firefox, Google Chrome, and Apple Safari.
- Using the Content Delivery Network (CDN)—CDN is a distributed network of servers that hosts open source libraries like jQuery. When a request is made in a browser to access the jQuery library, CDN identifies the closest server and provides the jQuery JavaScript file to the browser.
The advantages of using CDN include:
– If another application has already used the CDN to locate the jQuery JavaScript file, the chances are the file is in the browser’s cache. If it is in the cache, that copy of the library will be used; otherwise it will be downloaded from the closest server.
– Has a faster download since the closest server is used to deliver the file.
The only problem with using CDN is that if an Internet connection is not available, the web page won’t work. This is an issue for developers who sometimes want to develop and test their sites offline.
Setting Up the Development Environment
Before you start a new project, you need to set up the development environment folder structure so that files with a similar purpose are in the same folder and are easy to find. For example, all JavaScript library files should be in the scripts folder, all images should be in the images folder, and all CSS files and image files used in the CSS should be in the styles folder. To set up your development environment, create a new folder (called for example, jQueryLearn) where you want to keep all your HTML (.htm and .html) files and folders that contain JavaScript (.js) files, CSS (.css) files, and image (.jpg, .png, .bmp, and so on) files.
The structure of your development environment should follow this:
- jQueryLearn/
- Images/*.png, *.gif, *.jpg, etc.
- Scripts/*.js
- Styles/*.css
- Styles/images/*.png, *.gif, *.jpg, etc.
- *.htm
Copy the downloaded jQuery compressed file called jquery-2.1.0.min.js in the scripts/ folder.
Create a template HTML file in the jQueryLearn folder. You can use this template.htm file to create other HTML files. Listing 2-1 displays the content of the template.htm file.
Listing 2-1. Including jQuery library in the HTML page (the template.htm file)
<!doctype html>
<html lang="en">
   <head>
      <meta charset="utf-8">
      <script src="scripts/jquery-2.1.0.min.js"></script>
   </head>
   <body>
   </body>
</html>
Replace jquery-2.1.0.min.js with the jQuery library version you have downloaded and are planning to use. If you are planning to step through the jQuery library code during debugging, you should use an uncompressed development version of jQuery library.
If instead of using a local downloaded jQuery file, you want to use the CDN, include one of the following lines in your code:
<script src="http://ajax.googleapis.com/ajax/libs/jquery/2.1.0/jquery.min.js">
</script>
<script src="http://code.jquery.com/jquery-2.1.0.min.js">
</script>
2-2. Using Conditional Statements
There are two types of conditional statements—if...else and switch. The if...else statement is used if the value of the variable is checked only a few times. If the value of the same variable is checked many times and a different set of statements is executed, a switch statement is used. These conditional statements are not specific to the jQuery library, they are native to the JavaScript.
if...else Statements
Conditional statements tests whether a certain condition is true. If the condition is true, all the statements between the curly braces immediately after the if statement are executed. If the condition is false, all the statements between the curly braces immediately after the else statement are executed. If there is only one statement you want to execute when the condition is true or false, you don’t need to specify the braces but it is preferable to use braces all the time.
In JavaScript and jQuery, the basic syntax for conditional statements is as follows:
if (condition) {
   // code segment if condition is true
 } else {
    // code segment if condition is false
  }
Listing 2-2 demonstrates the use of the if...else statement.
Listing 2-2. Using the if...else statement
<!DOCTYPE html>
<html lang="en">
   <head>
      <meta charset="utf-8">
      <script>
         function submitForm() {
          var firstName = document.getElementById("txtFirstName");

            if (firstName.value == "") {
               alert("Please enter First Name before submitting");
               return false;
            } else {
               // Perform some action
               alert("Form is successfully submitted");
               return true;
            }
        }
     </script>
   </head>
   <body>
      <form>
         First Name: <input id="txtFirstName" type="text"><br><br>
         <input type="button" value="Submit" onClick="submitForm()">
      </form>
   </body>
</html>
Figure 2-1 displays the page created by Listing 2-2 when viewed in a browser.
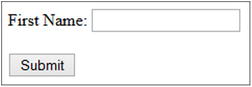
Figure 2-1. Using a conditional statement
This code is binding the submitForm() function to the button’s click event. When a user clicks the button, submitForm() function is executed. In the submitForm() function, you are first getting the input element with the ID txtFirstName using the getElementById() method and then checking its value property. If value is blank, "Please enter First Name before submitting" is displayed; otherwise "Form is successfully submitted" is displayed. Figures 2-2 and 2-3 show the pop-up messages that are displayed depending on the value entered for First Name.
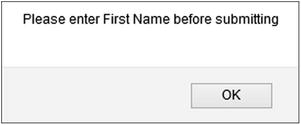
Figure 2-2. The message displayed when First Name is left blank

Figure 2-3. The message displayed when value is entered for First Name
if ... if else ... else Statements
If the logic is more complex and you have to check multiple conditions, you can use the following syntax:
if (condition1) {
    // code segment if condition1 is true
} else if (condition2) {
    // code segment if condition2 is true
} else {
   // code segment if condition1 is not true and
   // condition2 is not true
}
Listing 2-3 demonstrates the use of an if...else if...else statement.
Listing 2-3. Using multiple conditional statements
<!DOCTYPE html>
<html lang="en">
<head>
   <meta charset="utf-8">

   <script>
      function getDepartmentName() {
         var departmentID = document.getElementById("departmentID").value;
       var departmentName = "";

      if (departmentID == "") {
                 alert("Please enter Department ID");
      } else if (departmentID == "S")  {
                 departmentName = "Sales";
      } else if (departmentID == "M")  {
                 departmentName = "Marketing";
      } else if (departmentID == "T")  {
                 departmentName = "Technology";
      } else if (departmentID == "C")  {
                 departmentName = "Customer Support";
      } else {
                 departmentName = "Unknown";
      }
      document.getElementById("departmentName").innerHTML = departmentName;
     }
    </script>
</head>
<body>
      Department ID [S, M, T, C]:<input id="departmentID" type="text">
      <label id="departmentName"></label>
      <br>
      <input type="button" value="Get Department Name" onClick="getDepartmentName();">
</body>
</html>
Figure 2-4 displays the page when viewed in a browser.
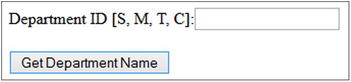
Figure 2-4. Using multiple conditional statements
This code binds the getDepartmentName() function to the button’s click event. When a user clicks the button, the getDepartmentName() function is executed. In the getDepartmentName() function, you first get the input element with the ID departmentID using the getElementById() method and then check its value property. If value is blank, "Please enter Department ID" is displayed; otherwise, based on the value entered for the Department ID, departmentName is set. Its value is then used to set the innerHTML property of the label tag with an ID of departmentName. Figures 2-5 and 2-6 show the pop-up messages depending on the value entered for the Department ID.
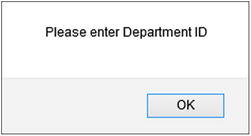
Figure 2-5. The message displayed when the Department ID is left blank

Figure 2-6. The Department Name is displayed when a valid value is entered for the Department ID
switch Statements
In place of multiple if...else statements, you can use the switch statement. In the case of the switch statement, the value of the expression is compared with the value of each case statement and if it matches, the following block of statements is executed until a break statement is encountered. If none of the case statements is true, the block of statements in the default statement will be executed. The switch statement is used in place of an if...else statement to make the code more organized and readable.
The syntax for a switch statement is:
switch(n) {
  case 1:
    // code segment if n == 1
    break;
  case 2:
    // code segment if n == 2
    break;
  default:
    // code segment if none of the above case statements is true
}
Listing 2-4 demonstrates the use of a switch statement.
Listing 2-4. Using the switch statement
<!DOCTYPE html>
<html lang="en">
<head>
   <meta charset="utf-8">
   <script>
      function getDepartmentName() {
         var departmentID = document.getElementById("departmentID").value;
         var departmentName = "";

        switch (departmentID) {
                        case "": alert("Please enter Department ID");
                                     break;
                        case "S": departmentName = "Sales";
                                       break;
                        case "M": departmentName = "Marketing";
                                        break;
                        case "T": departmentName = "Technology";
                                       break;
                        case "C": departmentName = "Customer Support";
                                       break;
                        default:  departmentName = "Unknown";
                    }
       document.getElementById("departmentName").innerHTML = departmentName;
     }
    </script>
</head>
<body>
      Department ID [S, M, T, C]:<input id="departmentID" type="text">
      <label id="departmentName"></label>
      <br>
      <input type="button" value="Get Department Name" onClick="getDepartmentName();">
</body>
</html>
2-3. Looping
Loops are used when the same statements need to be executed for a range of values (each time with a different value from the range) or for each element in an array or in the collection of objects. A loop statement is also used when the same statements are executed until a condition becomes true. The two commonly used looping statements are for and while. These looping statements are not specific to the jQuery library; they are native to JavaScript.
for Loops
The for loop executes the same code segment for each element from a collection or for a number of times until a condition becomes true.
In JavaScript and jQuery, the syntax for using the for loop is as follows:
for (var i=initialValue; i <= finalValue; i++) {
    // code logic
}
Listing 2-5 demonstrates the use of a for loop.
Listing 2-5. Using a for loop to display all the elements in an array
<!DOCTYPE html>
<html lang="en">
<head>
   <meta charset="utf-8">
   <script>
      var departments = [
           "Sales",
           "Marketing",
           "Technology",
           "Customer Support"
     ];
             for (var i=0; i<departments.length; i++) {
                document.write(departments[i] + "<br>");
              }
    </script>
</head>
<body>
</body>
</html>
Figure 2-7 displays the page when viewed in a browser.
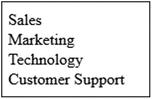
Figure 2-7. Using a for loop
This code creates an array called departments with a list of department names. Since the index in an array is 0-based, the loop starts with position number i as 0 and then displays the department name stored at the 0th position in the array. The for loop repeats the execution of the same code segment until it reaches the end of the array. With each iteration, the position number is incremented by 1 by using the i++ statement.
while Loops
The while loop is used to execute the same code segment as long as a condition is true.
The syntax for the while loop is:
while (condition) {
    // code segment if condition is true
}
Listing 2-6 demonstrates the use of a while loop.
Listing 2-6. Using a while loop to display all the elements in an array
<!DOCTYPE html>
<html lang="en">
<head>
   <meta charset="utf-8">
   <script>
     var departments = [
          "Sales",
          "Marketing",
          "Technology",
          "Customer Support"
     ];
     var i=0;
        while (i < departments.length) {
                 document.write(departments[i] + "<br>");
                 i++;
              }
    </script>
</head>
<body>
</body>
</html>
Figure 2-8 displays the page when viewed in a browser.
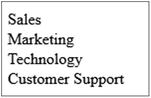
Figure 2-8. Using a while loop
This code creates an array called departments with a list of department names. Since the index in an array is 0-based, it starts the loop with position number i as 0 and then displays the department name stored at the 0th position in the array. The while loop repeats the execution of the same code segment until it reaches the end of the array. With each iteration, the position number is incremented by 1 by using the i++ statement. In the while loop, the same logic is implemented as in the for loop in Listing 2-5. The difference is in the way the looping counter (i.e., the i variable) is initialized and incremented. In the while loop, the looping counter is initialized before the while statement and it is incremented inside the while loop.
For both the for and while loops, the following statements can be used inside the looping logic:
– The break statement breaks out of the loop without executing the code segment of the remainder of the items in the iteration. This is used when a particular condition is true and no further processing inside the loop is needed.
– The continue statement skips the current iteration and continues with the next iteration. This is used when the current element in the loop doesn’t need to be processed.
2-4. Understanding the Document Object Model (DOM)
When a browser loads a web page, it creates a document object model (DOM) of the page within its memory. Using this object model, you can programmatically access, update, and restructure all the HTML elements in the web page. The DOM interface gives access to HTML elements’ attributes, properties, content, styles, and events.
The DOM Structure
The DOM is represented by a tree structure with the document as the root node and all other elements in the document as descendant nodes. Each node in the tree structure is an HTMLElement object with its associated attributes, properties, styles (CSS), and events.
For example, a button:
<input id="btnSubmit" type="button" value="Submit">
is represented as an object node in the DOM with the tagName property of INPUT, an id attribute with the value "btnSubmit", a type attribute with the value "button," and a value attribute with the value "Submit".
Listing 2-7 demonstrates the concept of the DOM structure.
Listing 2-7. Code to demonstrate the DOM structure
<!DOCTYPE html>
<html lang="en">
   <head>
      <meta charset="utf-8">
      <title>Title Text</title>

      <style>
            .btn {
                  background-color: lightblue;
                  color: blue
            }
      </style>
      <script>
            alert("JavaScript Code Placeholder...");
      </script>
   </head>
   <body>
      <H1>Sample HTML Page</H1>
      <p>Employee Information:</p>
      Department
      <ul>
        <li>Marketing</li>
        <li>Sales</li>
       </ul>
      <form id="frmRegistration">
         <label id="lblFirstName">First Name:</label>
         <input id="txtFirstName" />
         <button id="btnSubmit" class="btn">Submit</button>
      </form>
      <table id="tblEmployee">
         <tr>
            <td>Employee Name</td>
            <td>Department Name</td>
         </tr>
         <tr>
            <td>John Smith</td>
            <td>Technology</td>
         </tr>
      </table>
   </body>
</html>
Figure 2-9 represents the DOM tree of the previous code.
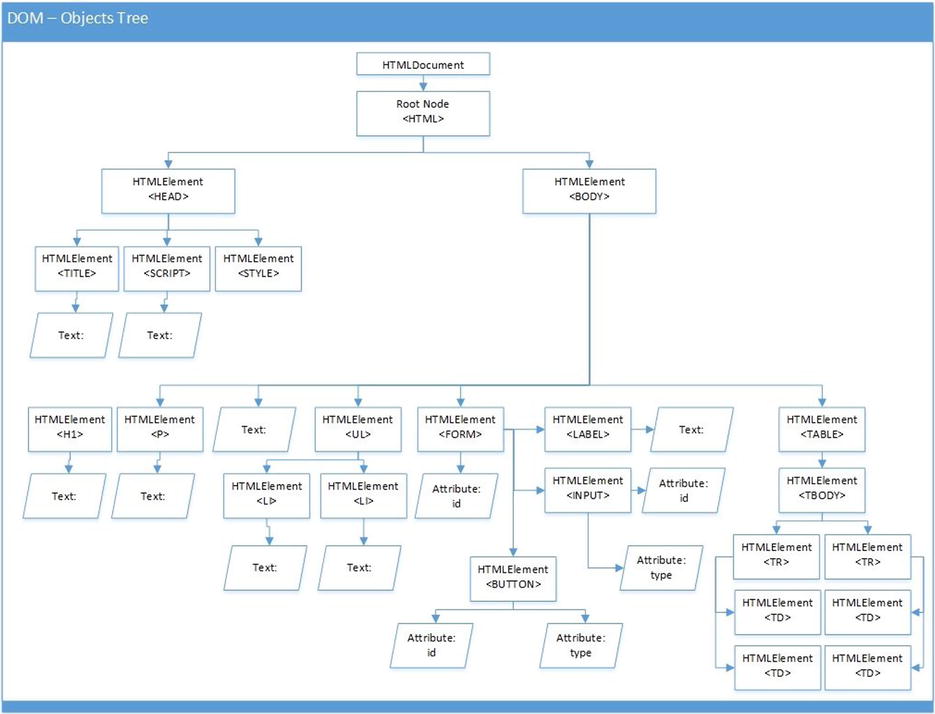
Figure 2-9. DOM objects tree
jQuery methods can manage the DOM and its elements by:
- Changing HTML elements, including their properties, attributes, and styles
- Removing existing HTML elements
- Adding new HTML elements
- Binding event handlers to HTML elements
- Restructuring the DOM
2-5. Navigating the DOM
The DOM hierarchy is represented as a tree structure. In this structure, starting from any node, you can get:
– Ancestor nodes by traversing upward until you reach the root node. For example, in Figure 2-9, for the HTMLElement (<INPUT>) node, the ancestors are HTMLElement (<FORM>), HTMLElement (<BODY>), and HTMLElement (<HTML>).
– Descendent nodes by traversing downward through all possible branches until you reach leaf nodes. For example, for the HTMLElement (<TABLE>), the descendents are HTMLElement (<TBODY>), two HTMLElements (<TR>), and four HTMLElements (<TD>).
– Sibling nodes by traversing to the parent node and then traversing down one level. For example, for the HTMLElement (<BUTTON>), the sibling nodes are HTMLElement (“<LABEL>”) and HTMLElement (“<INPUT>”). This concept is helpful for applying the same action to all elements within the same container.
The DOM native methods and jQuery methods provide mechanisms to traverse the DOM tree to get the ancestor, descendent, and sibling nodes, and to perform actions on those nodes if needed. You will read about node(s) selection and manipulation in the next chapter.
2-6. Using Attributes vs. Properties
When a web page is loaded, the browser parses the HTML code and, for each HTML tag, a corresponding HTMLElement object is created in the DOM. Like any other object, this object has properties and methods. Some of the properties are attributes, class names, child nodes, IDs, inner HTML, tag names, and so on. In addition to a predefined set of properties, a property corresponding to each attribute of the HTML tag is also created.
For an HTML tag, each of its attributes and values are saved in the attributes properties of the HTMLElement object (DOM node) as a collection of key/value pairs and each attribute-value pair is also saved as a property of the HTMLElement. For example, for the HTML tag <input id="txtName" type="text" value="Default Value">, its corresponding HTMLElement in DOM will have ID, type, and value properties and also an attributes property with key/value pairs as {id: "txtName" type: "text", value: "Default Value"}. When a user changes the value, the current value is reflected in the value of the property and in the value of the attribute. Table 2-1 is the partial representation of the HTMLElement object that’s created by the HTML tag <input id="txtName" type="text" value="Default Value">.
Table 2-1. Partial Representation of the HTML Element Object
|
Property Name |
Property Value | |
|---|---|---|
|
tagName |
input | |
|
id |
txtName | |
|
type |
text | |
|
value |
defaultValue | |
|
attributes |
Attribute Name |
Attribute Value |
|
id |
txtName | |
|
type |
text | |
|
value |
Default Value | |
Listing 2-8 demonstrates the difference between attributes and properties.
Listing 2-8. Code to demonstrate the difference between attributes and properties
<!DOCTYPE html>
<html lang="en">
<head>
   <meta charset="utf-8">
   <script>
      function displayValues() {
         var name = document.getElementById("txtName");
         alert("Attribute value of 'value': " +
             name.attributes["value"].value + "
" +
             "Property value of 'value': " + name.value);
      }
   </script>
</head>
<body>
    Name: <input id="txtName" type="text" value="Default Value" ><br><br>
    <input id="btnDisplay" type="button" value="Display Attributes and Properties" onClick="displayValues();">
</body>
</html>
Figure 2-10 displays the page when viewed in a browser.
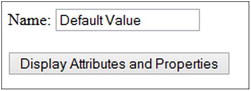
Figure 2-10. Attributes vs. properties
This code binds the displayValues() function to the button’s click event. When a user clicks the button, the displayValues() function is executed. In the displayValues() function, you get the input element with the ID of txtName using the getElementById() method and then display its value of the value attribute and value property. Figure 2-11 shows the pop-up message when the value of the field Name: is not changed and the Display Attributes and Properties button is clicked. Initially, the attribute and property value are the same.
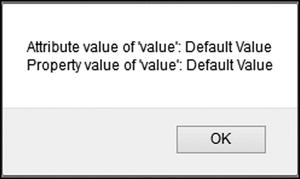
Figure 2-11. The initial attribute and property values
Notice that the attribute and property value of value is the same. Now change Name: to something else (for example, to John Smith) and click the button again. Figure 2-12 shows the pop-up message when the value of the Name: field is changed and the Display Attributes and Properties button is clicked.

Figure 2-12. Attribute and property value after a value is entered in the Name: field
The value of the value property has changed to John Smith, but the attribute value remains unaffected.
2-7. Commonly Used Objects in jQuery
The jQuery library is based on JavaScript and hence supports all JavaScript data types (string, number, Boolean, array, and object), which are covered in Chapter 1. The following are the other commonly used objects used in jQuery:
- Map object
- HTMLElement object
- jQuery object
Map Object
The map object contains key/value pairs. The syntax for declaring a map object is:
var variableName = { key1: value1, key1: value1, ... };
The key and value entries can be either primitive types or objects.
For example, to declare a map object, you’d use this code:
var employeeMap = {
            "Name": "John Smith",
            "Department": "Technology",
            "Salary":50000,
            "Joining Date": new Date("01/05/2010")
};
To display a key’s value in the map object, you’d use this code:
alert(employeeMap.Name);
To display all the key/value pairs in the map object, you’d use this code:
for (var k in employeeMap){
   alert("Key: " + k + " Value:" + employeeMap[k]);
}
HTML Element
In this book, I use HTMLElement as a generic term for all the types of elements in the DOM tree—it can refer to HTMLFormElement (for <form>), HTMLDivElement (for <div>), HTMLParagraphElement (for <p>), HTMLInputElement (for <input>), and so on.
Each HTMLElement in the DOM has properties like any other JavaScript object. One of the important properties is attributes, which contains an element’s attributeName and attributeValue pairs. HTML elements have methods like appendChild(), getAttribute(), and getElementByTagName().
Listing 2-9 demonstrates how an HTML element from the DOM can be referenced and how to use its property and execute its method.
Listing 2-9. Code to demonstrate how to access to an HTMLElement’s property and method
<!doctype html>
<html lang="en">
   <head>
      <meta charset="utf-8">
      <script>
         function getFirstName() {
           var htmlElement = document.getElementById("txtFirstName");
                             alert("Value: " + htmlElement.value);
                             alert("Type: " + htmlElement.getAttribute("type"));
        }
      </script>
   </head>
   <body>
      First Name: <input id="txtFirstName" type="text"><br>
      <input type="button" value="Get First Name & Type" onClick="getFirstName()">
   </body>
</html>
Figure 2-13 displays the page when viewed in a browser.
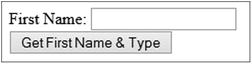
Figure 2-13. An HTML element’s property and method
The var htmlElement = document.getElementById("txtFirstName"); line gets the HTMLElement from the DOM that has an ID of txtFirstName. Once you have the HTMLElement, you can get and set its properties and attributes and execute DOM methods on it. This example is getting its property value by using htmlElement.value and getting its attribute type by executing the getAttribute() method.
Figures 2-14 and 2-15 show the pop-up messages that appear when any name (for example, John) is entered and the Get First Name & Type button is clicked.
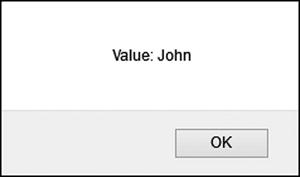
Figure 2-14. An HTML element and its value property
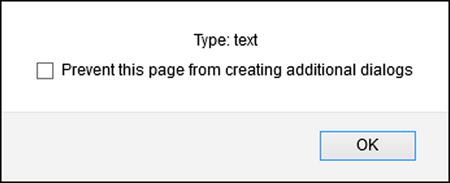
Figure 2-15. An HTML element and its type attribute
The screen and messages in the previous figures are from Firefox browser; you might see slightly different format depending on the browser you are using.
jQuery Objects
When creating new HTML elements or selecting existing ones, jQuery returns a jQuery object that’s a collection of HTML elements. A jQuery object wraps these HTML elements and native DOM methods to make them work across different browsers and to implement consistent behavior. A jQuery object enables you to achieve tasks easily and with less code compared to using native DOM method calls. jQuery objects are not dynamic in the sense that their HTMLElements collection won’t grow or shrink based on addition or removal of elements in the HTML document.
Chapters 3, 4, 5, and 6 cover how jQuery objects are created and explain the methods you can use to act on HTML elements within the jQuery object.
2-8. Using the jQuery Function
You can access the jQuery library’s properties and methods using the jQuery function. One of the most commonly used methods is ready(), which accepts a function parameter and binds it to the document’s ready event.
The syntax is as follows:
jQuery(document).ready(function () {
   // Code segment to execute when document is ready
   // (i.e., when DOM is completely created)
});
In place of jQuery, you can use its shorthand $. Using $, you can rewrite the previous code as:
$(document).ready(function () {
   // Code segment to execute when document is ready
   // (i.e., when DOM is completely created)
});
The previous code can also be written as:
$(function () {
   // Code segment to execute when document is ready
   // (i.e., when DOM is completely created)
});
which has the same effect as the original code.
If you are using some other JavaScript library that also uses $ as shorthand, in order to prevent a conflict between the JavaScript libraries, you should instead set your own shorthand (for example, jq) for the jQuery library by using the following code:
var jq = jQuery.noConflict();
jQuery Function Arguments
The following is the list of jQuery function’s ($) arguments and their purposes:
- $(function)—A code segment in the specified function is executed when the DOM is ready. The following is the syntax to define the DOM-ready function:
$(function() { ... });
When you specify a function and its code, you are just defining the function and logic in it. It won’t be executed until the document-ready event is triggered. If you use a function name in its place, that function is executed immediately when the browser interprets the line, without waiting for the DOM to be ready.
- $("selector")—Selects HTML elements that match the specified selector and returns a jQuery object.
- $(HTMLElement)—Returns a jQuery object with the specified HTMLElement in it.
- $(HTMLElement[])—Returns a jQuery object with the HTML elements specified in the HTMLElement[] array.
- $("HTMLString")—Creates new HTML elements from the specified HTMLString.
Chapters 3, 4, 5, and 6 cover these function arguments in detail. Here I am simply providing very basic examples to familiarize you with the concepts.
The jQuery Function with the Function as an Argument
Using the jQuery function ($) with the function as an argument is the most used feature in the jQuery. If the code is accessing or manipulating DOM elements, then that code must be defined inside this function. The body of the function will be executed only when all the DOM elements are created and are ready to be used. Listing 2-10 demonstrates the use of the jQuery function with the function as an argument.
Listing 2-10. jQuery function with the function as an argument
<!DOCTYPE html>
<html lang="en">
<head>
   <meta charset="utf-8">
   <script src="scripts/jquery-2.1.0.min.js"></script>
   <script>
              $(function() {
                    alert("DOM is ready. Now, we can perform actions on HTML Elements in this page.");
              });
   </script>
</head>

<body>
</body>
</html>
This jQuery code is binding function() {...} to the document ready event. After the DOM is ready, this function will be executed. Such functions, which are bound to events, are also called event handlers. Figure 2-16 show the pop-up message after the DOM is ready.
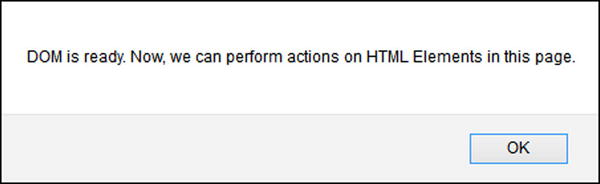
Figure 2-16. Message displayed after the DOM is ready
The jQuery Function with the Selector as an Argument
Using a jQuery function with the selector as an argument enables you to select DOM elements that match the selector, so that selected elements’ values can be accessed and/or manipulated by using jQuery object’s methods. Listing 2-11 demonstrates the use of the jQuery function with the selector as an argument.
Listing 2-11. jQuery function with the selector as an argument
<!DOCTYPE html>
<html lang="en">
<head>
   <meta charset="utf-8">
   <script src="scripts/jquery-2.1.0.min.js"></script>
   <script>
              $(function() {
                 $("img").mouseover(function () {
                    $(this).css("opacity", "0.3");
                 });
                 $("img").mouseout(function () {
                    $(this).css("opacity", "1.0");
                 });
              });
   </script>
</head>
<body>
   <img src="images/panda.png">
</body>
</html>
Figure 2-17 displays the page when viewed in a browser.

Figure 2-17. Image with the default opacity of 1
This code has an image tag. Inside the DOM-ready function, this image is selected by the jQuery selector, $("img"), and then a function is bound to its mouseover event. When the mouse moves over the image, the mouseover event is triggered and this function is executed, which changes the opacity of the image to 0.3. Opacity can range from 0 to 1. The higher the number, the sharper the image will be. Another function is bound to the mouseout event, and it changes the opacity to its default value of 1. Figure 2-18 displays the image with opacity of 0.3 when the mouse cursor moves over the image.

Figure 2-18. Opacity changes to 0.3 when mouse cursor moves over the image
The jQuery Function with the HTMLElement as an Argument
Using a jQuery function with the HTML element as an argument enables you to put an HTML element into a jQuery object so that the jQuery object’s methods can be executed on the HTML element, in order to access or manipulate its value. Listing 2-12 demonstrates the use of the jQuery function with the HTMLElement as an argument.
Listing 2-12. jQuery function with the HTMLElement as an argument
<!DOCTYPE html>
<html lang="en">
<head>
   <meta charset="utf-8">
   <script src="scripts/jquery-2.1.0.min.js"></script>
   <script>
     $(function() {
                            var currentDateTime = document.getElementById("currentDatetime");
                            $(currentDateTime).prop("innerHTML", new Date());
      });
      </script>
</head>
<body>
   <div id="currentDatetime"></div>
</body>
</html>
Figure 2-19 displays the page when viewed in a browser.
![]()
Figure 2-19. Current system datetime set to an HTMLElement
In this code, a div tag is created with the currentDateTime ID. When the DOM is ready, the document-ready function is executed, which gets the HTMLElement from the DOM using the statement $("#currentDatetime").first(). The same HTML element can be selected by using the native DOM method called document.getElementById("currentDatetime"). In the $(currentDateTime) statement, the HTMLElement currentDateTime is passed to the jQuery function ($) as an argument. The jQuery object is returned due to this statement. On this jQuery object, the prop() method is executed to set its innerHTML property with the current system date and time.
The jQuery Function with the HTMLString as an Argument
Using a jQuery function with the HTML string as an argument enables you to convert an HTML string into a jQuery object so that the jQuery object’s methods can be applied to the HTML elements in the jQuery object or it can be appended to an existing element. Listing 2-13 demonstrates the use of the jQuery function with the HTMLString as an argument.
Listing 2-13. The jQuery function with the HTMLString as an argument
<!DOCTYPE html>
<html lang="en">
<head>
   <meta charset="utf-8">
   <script src="scripts/jquery-2.1.0.min.js"></script>
   <script>
      $(function() {
         var newDepartment = $("<li>Implementation</li>")
         $("#listDepartments").append(newDepartment);
      });
      </script>
</head>
<body>
    Departments:
    <ul id="listDepartments">
      <li>Sales</li>
      <li>Marketing</li>
      <li>Technology</li>
      <li>Customer Support</li>
    </ul>
</body>
</html>
Figure 2-20 displays the page when viewed in a browser.
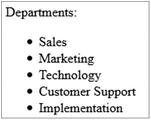
Figure 2-20. Adding a new department to the list at runtime
In this code when an HTMLString called "<li>Implementation</li>" is passed to the jQuery function ($), an HTMLElement is created. This new <li> element (newDepartment) can be appended to an existing list of departments by executing the method append() on the, $("#listDepartments") jQuery object. listDepartments is the ID of the <ul> tag. Due to the statement $("#listDepartments").append(newDepartment), a new department ("Implementation") is added to the list of existing departments at runtime.
2-9. jQuery Methods Chaining
jQuery code is concise due to the availability of various shorthand notations, execution of the same method on multiple elements within the same jQuery object with one method call, and because of the chaining concept. Most of the jQuery methods you’ll execute on jQuery objects will return another jQuery object. That means that more jQuery methods can be executed on the return value of the previous call in a single statement.
Listing 2-14 demonstrates the use of method chaining.
Listing 2-14. Method chaining
<!DOCTYPE html>
<html lang="en">
<head>
     <meta charset="utf-8">
     <script src="scripts/jquery-2.1.0.min.js"></script>
     <script>
                    $(function() {
                            $("ul").css("color", "blue").css("text-decoration",
                                "underline").append("<li>Implementation</li>").css("color", "green");
                    });
     </script>
</head>
<body>
    Departments:
    <ul id="listDepartments">
      <li>Sales</li>
      <li>Marketing</li>
      <li>Technology</li>
      <li>Customer Support</li>
    </ul>
</body>
</html>
Figure 2-21 displays the page when viewed in a browser.
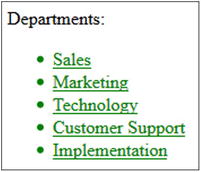
Figure 2-21. Method chaining
This code uses the ul selector to get a jQuery object containing the <ul> HTML element. Once you have the jQuery object, you can execute methods such as css(), append(), and so on, on it. These methods will manipulate the HTML element contained in the object. The css() method sets the CSS property and the append() method adds new element(s) to the existing HTML element as its children.
In the statement:
$("ul").css("color", "blue").css("text-decoration", "underline").append("<li>Implementation</li>").css("color", "green")
– $("ul") gets the <ul> HTML element from the DOM.
– css("color", "blue") changes the CSS color property of HTML element <ul> to blue.
– css("text-decoration", "underline") changes the CSS text-decoration property of the HTML element <ul> to underline.
– append("<li>Implementation</li>") appends a new child (item) to the HTML element <ul>.
– css("color", "green") changes the CSS color property of the HTML element <ul> to green.
All of this is done in one single statement.
In the code example, I set the CSS color property twice to demonstrate that when chaining, method execution is performed from left to right.
Summary
This chapter covered how to reference the jQuery library file, the typical folder structure of a web application, and conditional and loop statements. It also covered the most important aspect of the jQuery library—the DOM. You looked into the details of its structure and how to navigate through it. You also read about the difference between attributes and properties. Other important fundamental topics covered in this chapter are commonly used objects in jQuery and different forms for jQuery functions. The following chapters will develop real-life application functionalities based on the fundamentals you learned in this chapter.