
We'll continue working with the form we've been creating through the last three sections. Follow these steps to validate user entry into the form:
- The first thing we'll do is download the Validation plugin and get it attached to our page.
Head over to http://bassistance.de/jquery-plugins/jquery-plugin-validation/ and click on the Download button in the Files section to download a ZIP file.
- Open up the ZIP file and take a look at what we've got.

- There's a lot going on here. Several different JavaScript files, a changelog, and so on. Remember how I said this plugin is powerful and can handle lots of different approaches to validation? That's what all this is for. Handling form validation in just about any old crazy situation you might find yourself in.
Luckily, though, our situation is pretty simple, so we don't have to do anything complicated.
- There's a lot going on here. Several different JavaScript files, a changelog, and so on. Remember how I said this plugin is powerful and can handle lots of different approaches to validation? That's what all this is for. Handling form validation in just about any old crazy situation you might find yourself in.
- Copy
jquery.validate.min.jsto your ownscriptsfolder and attach it to your page.<script src="scripts/jquery.js"></script> <script src="scripts/jquery.placeholder.js"></script> <script src="scripts/jquery.validate.min.js"></script>
In this case, there's no dependency between the placeholder script and the validation script, so it doesn't matter which order they appear in, as long as they're both after jQuery itself.
- Next, we're going to go back through our form and add some information that the Validation plugin will use. Let's start with the username field:
<p>
<label for="username">Username</label>
<input type="text" name="username" id="username" placeholder="At least 5 characters long" minlength="5" maxlength="20" class="required"/>
</p>
This is a required field — any site visitor who completes this form must select a username, so I'll simply add a
classofrequired. I can use that class name to create a special style for this form field with CSS if I'd like. Even if I don't, Validation will use this to make sure this field is filled in.Next, all usernames must be between 5 and 20 characters long. So I've added a
minlengthandmaxlengthattribute. - Next up is the password field, which is also required. So I'll add the required class.
<p>
<label for="password">Password</label>
<input type="password" name="password" id="password" class="required" placeholder="Choose a secure password"/>
</p>
While I'm at it, I'll add the required class to the e-mail field too.
<p>
<label for="email">Email address</label>
<input type="email" name="email" id="email" placeholder="[email protected]" class="required"/>
</p>
- Next, let's take a look at that list of favorite beverages. Remember we had a note on there for the site visitor to select at least three but no more than six? We can actually enforce that with the Validation plugin. Go to the first checkbox in the series and add
minlengthandmaxlengthattributes as follows:<li> <input type="checkbox" name="favorites[]" id="bev-water" value="bev-water" maxlength="6" minlength="3"/> <label for="bev-water">Water</label> </li>
We only have to add this on the first checkbox, not all of them. Validation is smart enough to figure out that we're talking about this set of checkboxes.
- Now, let's take a look at the field where we ask the site visitor how many days per year they drink a beverage. Obviously, since there are only 365 days in a year, that's the highest number they could enter in this field. So we'll add a
maxattribute to specify the highest possible number.<p> <label for="days">How many days per year do you drink a beverage?</label> <input type="number" name="days" id="days" max="365"/> </p>
- And that brings us to the payment section. Whatever we're selling, it's not free, so we're going to require both the credit card type and credit card number. To require entry for radio buttons, we just have to add the
requiredclass to the first radio button in the set.<li> <input type="radio" name="cc-type" id="cc-visa" value="cc-visa" class="required"/> <label for="cc-visa">Visa</label> </li>
We don't have to make any other changes to the radio button series.
- Now, let's handle the credit card number itself. We need to add the
requiredclass. We also need to add acreditcardclass to validate that the number entered is, in fact, a valid credit card number.<p> <label for="cc-number">Credit card number</label> <input type="text" name="cc-number" id="cc-number" placeholder="xxxxxxxxxxxxxxxx" class="creditcard required"/> </p>
- And at the bottom of our form, we have our Terms of Service checkbox. This is required too, so we'll add the
requiredclass.<li> <input type="checkbox" name="tos" id="tos" class="required" value="tos"/> <label for="tos">Click here to accept our terms of service</label> </li>
- Now, we just need to call the
validate()method that Validation makes available to us. Inside your document ready statement, select the form and call thevalidate()method.$(document).ready(function(){ $('#username').focus(); $('#account-form').validate(); }); - Now if you refresh the page in the browser, you'll see that you can't submit the form without filling anything in — the required fields will be marked with an error message saying the field is required. If you try to type an invalid URL or e-mail address into the Website or Email address fields, you'll get an error message letting you know there's a problem to be corrected. Just one problem those error messages are sort of in a weird place for our checkboxes and radio buttons.

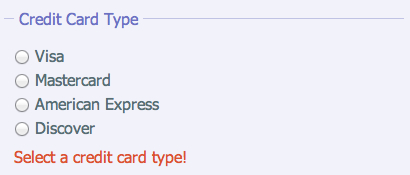
- We're going to add an error message after the list of credit card type radio buttons.
<li>
<input type="radio" name="cc-type" id="cc-discover" value="cc-discover"/>
<label for="cc-discover">Discover</label>
</li>
</ul>
<label for="cc-type" class="error">Select a credit card type!</label>
</fieldset>
We'll add a
<label>. The for attribute will refer to thenameof the field in this case, all the radio buttons share thecc-typename. We'll add a class of error, and add whatevererrormessage we'd like inside.Note that for this case, the
forattribute of ourlabelis referring to thenameof the field rather than the ID. This is a special case created by the Validation plugin. If you're not using custom error messages with the Validation plugin, then your label'sforattribute should always reference theidof the form element. - Next, we don't want those error messages showing up on the page unless they're needed. We'd also like them to display in red so they stick out and are easy to find. Open your
styles.cssfile and add some styles for the error message:label.error { display:none;width:360px;color:#dc522f;margin-top:5px; }We're adding a width since I've set my other labels to be short and floated to the left. And we're adding a little margin for some space between the error message and the field it's referring to.
Now if you refresh the browser and try to submit the form without selecting a credit card type, you'll get the error message in a much better place as follows:
- Next we need to do the same thing for our favorite beverages and our Terms of Service checkbox: Here's what we'll add for favorite beverages:
<li>
<input type="checkbox" name="favorites[]" id="bev-wine" value="bev-wine"/>
<label for="bev-wine">Wine</label>
</li>
</ul>
<label for="favorites[]" class="error">Please select at least three and no more than six favorite beverages</label>
</fieldset>
And here's what we'll add for Terms of Service:
<fieldset>
<ul>
<li>
<input type="checkbox" name="tos" id="tos" class="required"/>
<label for="tos">Click here to accept our terms of service</label>
</li>
</ul>
<label for="tos" class="error">You must accept our terms of service</label>
<p>
<input type="submit"/>
</p>
</fieldset>
Now, if you refresh the page in the browser and try to submit the form without completing required fields or try to enter invalid information in the form, you'll get an appropriate error message as soon as the problem is detected.
What just happened?
We used the Validation plugin to add some simple client-side validation to our form. The simplest way to use the Validation plugin is to simply add some class names and attributes to your form elements. Validation will take care of the rest — it's smart enough to recognize the HTML5 input types and validate those and offers some other useful validation rules such as required fields, a maximum number value, minimum and maximum lengths, and credit card numbers. We dropped in a line of CSS to style the error messages the way we wanted.