
We'll walk through creating a simple photo gallery with the Colorbox plugin:
- We'll get started by setting up a basic HTML page and associated files and folders just like we did in Chapter 1, Designer, Meet jQuery. The body of the HTML document will contain a list of thumbnails:
<ul class="thumb-list">
<li><a href="images/abandoned-house.jpg" title="Old Abandoned House" rel="ireland"><img src="images/thumbs/ abandoned-house.jpg" alt="Abandoned House"/></a></li>
<li><a href="images/cemetary.jpg" title="Celtic Cemetary with Celtic Crosses" rel="ireland"><img src="images/thumbs/cemetary.jpg" alt="Celtic Cemetary"/></a></li>
<li><a href="images/cliffs-of-moher.jpg" title="Cliffs of Moher" rel="ireland"><img src="images/thumbs/cliffs-of-moher.jpg" alt="Cliffs of Moher"/></a></li>
<li><a href="images/dublin.jpg" title="River Liffey in Dublin" rel="ireland"><img src="images/thumbs/dublin.jpg" alt="Dublin"/></a></li>
<li><a href="images/dun-aonghasa.jpg" title="Dun Aonghasa on Inis More" rel="ireland"><img src="images/thumbs/dun-aonghasa.jpg" alt="Dun Aonghasa"/></a></li>
<li><a href="images/falling-in.jpg" title="Warning Sign" rel="ireland"><img src="images/thumbs/falling-in.jpg" alt="Falling In"/></a></li>
<li><a href="images/guagan-barra.jpg" title="Guagan Barra" rel="ireland"><img src="images/thumbs/guagan-barra.jpg" alt="Guagan Barra"/></a></li>
<li><a href="images/inis-more.jpg" title="Stone Fences on Inis More" rel="ireland"><img src="images/thumbs/inis-more.jpg" alt="Inis More"/></a></li>
<li><a href="images/inis-more2.jpg" title="Cliffs on Inis More's West Coast" rel="ireland"><img src="images/thumbs/inis-more2.jpg" alt="Inis More Too"/></a></li>
<li><a href="images/inis-more3.jpg" title="Inis More Fence" rel="ireland"><img src="images/thumbs/inis-more3.jpg" alt="Inis More Three"/></a></li>
<li><a href="images/mizen-head.jpg" title="Crashing Waves Near Mizen Head" rel="ireland"><img src="images/thumbs/mizen-head.jpg" alt="Mizen Head"/></a></li>
<li><a href="images/obriens-tower.jpg" title="O'Brien's Tower at the Cliffs of Moher" rel="ireland"><img src="images/thumbs/obriens-tower.jpg" alt="O'Brien's Tower"/></a></li>
<li><a href="images/random-castle.jpg" title="Some Random Castle" rel="ireland"><img src="images/thumbs/random-castle.jpg" alt="Random Castle"/></a></li>
<li><a href="images/turoe-stone.jpg" title="Turoe Stone" rel="ireland"><img src="images/thumbs/turoe-stone.jpg" alt="Turoe Stone"/></a></li>
</ul>
Note that we've wrapped each thumbnail in a link to the full-size version of the image. If you load the page in a browser, you'll see that the page works for users with JavaScript disabled. Clicking a thumbnail opens the full-size image in the browser. The back button takes you back to the gallery.
Note that we've also included a
titleattribute on each link. This is helpful for our site visitors as it will show a short description of the image in a tooltip when they hover over the thumbnail with their mouse, but it will also be used later on for the Colorbox plugin. We've also included arelattribute on each link and set it equal to ireland. This will make selecting our group of links to Ireland images easy when we're ready to add the Colorbox plugin magic. - Next, we'll add a bit of CSS to lay our images out in a grid. Open your
styles.cssfile and add these styles:ul.thumb-list { margin:20px 0;padding:0;text-align:center; } ul.thumb-list li { margin:0;padding:0;display:inline-block; }
Feel free to play around a bit with the CSS to create a different layout for your image thumbnails if you'd like.
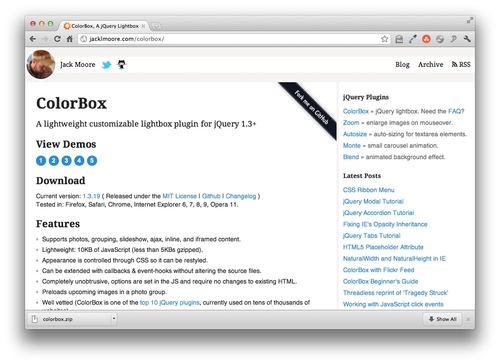
- Now, let's add the jQuery magic. We're going to be using Color Powered's Colorbox plugin. Head over to http://jacklmoore.com/colorbox to find the downloads, documentation, and demos. You'll find the download link in the Download section, near the top of the page. Just click the current version number to download a ZIP file.
- Unzip the folder and have a look inside. You'll find the plugin script file itself, of course, but a lot of other goodies as well.
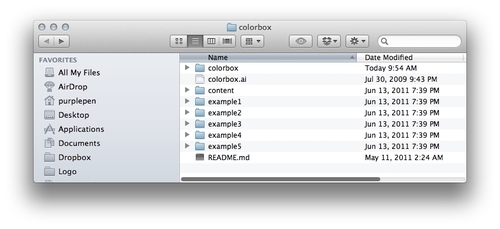
The plugin code itself is in the
colorboxfolder — you'll find both the development and minified versions. The five example folders each contain an example file (index.html) that shows the plugin in action. Why five different folders? Each folder contains the same basic example, but with five different looks for the Colorbox. These same examples can be viewed on the Colorbox website by clicking numbers in the View Demos section on the website.Right out of the box, the plugin's developers are providing us with five different possibilities for our Colorbox's look and feel. And if that's not enough choice, they've also included a
colorbox.ai( Adobe Illustrator) file that contains all of the image assets used to create these five different looks. You can customize them to your heart's content and then export your new fully custom look from Illustrator to create your own appearance. Changing colors and special effects is straightforward enough, but remember that if you change the size and shape of the image assets, you'll have to touch up the accompanying CSS file to accommodate the new sizes. - Try out each of the different examples, either on the website or using the example files included in the ZIP download, and note that the appearance, size, placement of the back and forward buttons, the close button, the caption, the pagination indicator (image 1 of 3), and so on, are all controlled via CSS—not the plugin code itself. This makes it very easy to customize the look and feel—it's all done via CSS rather than in JavaScript.
- Inside the ZIP download, in the
colorboxfolder, you'll find the plugin code a file namedjquery.colorbox-min.js. Copy this file to your ownscriptsfolder. - We'll get started by choosing one of the provided CSS skins. Pick your favorite, then copy and paste its CSS file to your own
stylesfolder. Open up theimagesfolder for that CSS skin and copy and paste the images from that folder to your ownimagesfolder. Once you've chosen a skin, your own setup should look like the following: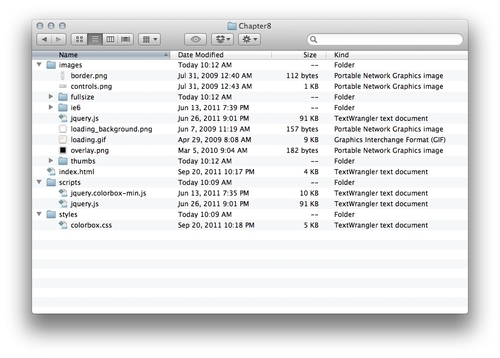
The
index.htmlfile contains the HTML with thumbnail images that link to full-size versions. Theimagesfolder contains the images provided with my chosen Colorbox skin, alongside my own images for my slideshow, both the thumbnail and full-size versions. Myscriptsfolder contains jQuery (jquery.js) and the Colorbox plugin script (jquery.colorbox-min.js). Mystylesfolder contains the CSS file for the Colorbox skin I chose. - We do have to open up
colorbox.cssto make a minor set of edits. In the example files, the CSS file is not in astylesorcssfolder, but rather sits at the top level alongside theindex.htmlfile. We've chosen to follow our preferred convention and store our CSS in ourstylesfolder. This means that we'll have to open up thecolorbox.cssfile and update the references to images in the CSS. I'll have to replace references like this:#cboxTopLeft{width:21px; height:21px; background:url(images/controls.png) no-repeat -100px 0;}with references like this:
#cboxTopLeft{width:21px; height:21px; background:url(../images/controls.png) no-repeat -100px 0;}I'm just telling the CSS to go up one level and then look for the
imagesfolder. You should be able to replace all of these quickly by using the Find and Replace functionality of your text editor. - Next, open up your
index.htmlfile and attach thecolorbox.cssfile in the head section, before your ownstyles.css:<head> <title>Chapter 8: Showing Content in Lightboxes</title> <link rel="stylesheet" href="styles/colorbox.css"/> <link rel="stylesheet" href="styles/styles.css"/> </head> - And then head down to the bottom of the file, just before the closing
</body>tag, and attach the Colorbox plugin, after jQuery and before your ownscripts.jsfile:<script src="scripts/jquery.js"></script> <script src="scripts/jquery.colorbox-min.js"></script> <script src="scripts/scripts.js"></script> - Now, remember that
rel="ireland" attribute we included on each of our links? We're going to use that in our JavaScript to select all of our Ireland image links for the Colorbox plugin. Open yourscripts.jsfile and write the attribute selector to select all links with arelattribute equal toirelandinside of the document ready statement:$(document).ready(function(){ $('a[rel="ireland"]') }); - The only thing left to do is call the
colorbox()method on those links the Colorbox plugin will take care of everything else for us:<script type="text/javascript"> $('a[rel="ireland"]').colorbox(); </script>Now if you open the page in the browser and click one of the thumbnail images, you'll see the full-size image open up in a Colorbox. You can navigate through all of the full-size images without having to close the lightbox, thanks to the back and forward buttons included. You can also move between the images by pressing the left and right arrow keys on your keyboard. The pagination indicator helps you to see where you are in the collection of photos. You'll also notice that the
titleattribute included on each link gets re-used as an image caption for each image. The Colorbox can be closed by clicking the close button, clicking outside the Colorbox, or by hitting the Esc key on your keyboard. All in all, it's a pretty nice experience right out of the box.
What just happened?
We used the Colorbox jQuery plugin to turn a list of links to images into a lightbox that allows site visitors to navigate through the full-size images without leaving the page. We used the title attribute of the links to provide captions for the images. We used one of the five Colorbox styles provided with the plugin to create a nicely-designed lightbox.