Chapter 4. Spotlight
Every computer offers a way to find files. But Spotlight, a star feature of macOS, shows matches for your search word beyond your Mac; it can fetch results from the web, from Apple’s app and music stores, in the Maps app, from movie theaters, and so on. As a bonus, it’s also the world’s most flexible calculator. It can not only do math, but it can also convert things: kilometers to miles, Celsius to Fahrenheit, euros to dollars, and so on.
And it can pull down more information types from the Internet, like sports scores (and schedules and rosters and player stats), Twitter handles (and hashtags), weather, stock quotes, and lists of Vimeo and YouTube videos.
Finally, you can now use “natural language” searches. That is, you can type out plain-English queries that describe what you’re looking for, like “files I worked on in January,” “slides from 2017 containing WidgeTech,” or “images from last year.”
The Spotlight Menu
See the little magnifying-glass icon (![]() ) in your menu bar? That’s the mouse-driven way to open the Spotlight search box.
) in your menu bar? That’s the mouse-driven way to open the Spotlight search box.
The other way is to press ![]() -space bar. If you can memorize only one keystroke on your Mac, that’s the one to learn. It works both at the desktop and in other programs.
-space bar. If you can memorize only one keystroke on your Mac, that’s the one to learn. It works both at the desktop and in other programs.
In any case, the Spotlight text box appears just below your menu bar (Figure 4-1). Feel free to drag it around your screen.
As soon as you begin typing what you’re looking for, a list of results appears below the search box. This is a live, interactive search; that is, Spotlight modifies the menu of search results as you type.
Tip
You can make this results window taller—drag downward on its bottom edge—or move it around the screen (drag its top bar). Bonus tip: To restore the Spotlight window to its original size and position, hold the cursor down on the ![]() icon at the top of your screen.
icon at the top of your screen.
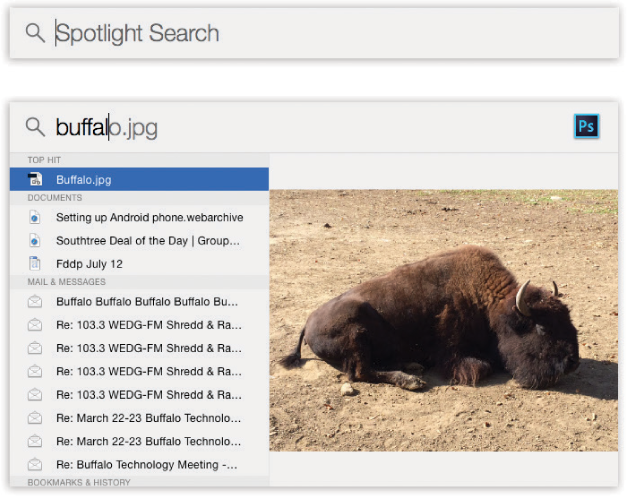
Figure 4-1. Press  -space bar, or click the magnifying-glass icon, to make the search box appear.
As you type, Spotlight builds the list of every match it can find, neatly organized by type: programs, documents, folders, images, PDF documents, and so on. Better yet, if you’re not sure what something is, click its name—or pause on it as you walk down the list with the arrow keys. A preview pops out to the right. It shows exactly what’s in that movie, picture, document, web page, or whatever.
Searching Your Mac
As you’d expect, Spotlight can round up anything with an icon on your Mac. Any file, folder, program, picture, movie, PDF document, music file, Microsoft Office document, and even font, regardless of its name or folder location. Spotlight can also find things according to their file types (type .docx to find Word files), download source (type cnet.com to find programs you downloaded from that site), sender (a name or email address), or Finder tag (“POWER USERS’ CLINIC Designing Your Own Icons”).
In the Spotlight search box, you can type part of its name or some text that appears inside the document you want. For example, if you’re trying to find a file called Pokémon Fantasy League.doc, typing just pok or leag would probably suffice. (The search box doesn’t find text in the middles of words, though; it searches from the beginnings of words.)
Spotlight also finds matching information within many of your Mac programs: every email message, Contacts entry, calendar appointment, web bookmark, System Preferences panel, To Do item, chat transcript, dictionary definition, and website in your History list. Spotlight can even find photos according to who is in them (using the Faces feature in Photos) or where they were taken (using its Places feature). If you use Messages (Chapter 20), Spotlight also finds the lucky members of your buddies lists.
Tip
The Spotlight menu is a full-blown English dictionary, too. Or, more specifically, it’s wired directly into macOS’s own dictionary, which sits in your Applications folder.
So if you type a word—say, myrmecophile—into the search box, you see the Dictionary definition in the results. Click it to see the full-blown entry in the preview pane. (In this example, that would be: “n: an invertebrate or plant that has a symbiotic relationship with ants.”)
You can also type out, in plain English, a description of files you’re trying to find. You can use any combination of file types (documents, movies, images, presentations, email), dates and times (2018, last year, this week, last month, in February), the names of email senders or recipients (simon jary, halle franklin), plus the words and phrases inside each file.
In other words, you can search for things like these: files I worked on last week, slides from 2018 containing EduMotion, images from last year, messages from Xerxes, photos of tia, files I created yesterday, emails from Bob last year that contain documents, or the presentation that I was working on yesterday.
Searching the Internet
Spotlight is also a Google wannabe. It can bring up results from the web for all kinds of common information, saving you the trouble of opening your web browser and doing a search.
You’ll often find, for example, a Wikipedia entry in the results, or Twitter results, along with matches from the App Store, the iTunes music/movie/TV store, the Maps app’s database of restaurants and businesses, movies currently playing, and so on. Here are the kinds of things it knows about:
General information. Spotlight uses Google to provide lists of web links it thinks you’ll find useful. The beauty of Spotlight is that, often, you get the answers you need right in the Spotlight box, without having to venture any further afield on the web.
Movies. Spotlight is seamlessly integrated with its software cousin, iTunes. When you type the name of a movie—past or present—the preview panel shows you a handy dossier about that flick: its year of release; genre; rating (like PG-13 or R); its rating by viewers (like four stars); plot summary, cast and crew lists; and even a button or two that allow you to rent, buy, or preorder the movie on iTunes (Figure 4-2).
Tip
For recent movies, you see the critical rating from RottenTomatoes.com, a popular movie-rating site. This rating is expressed as a percentage (like 66 percent, meaning that’s how many people liked the movie), as well as with icons. The red tomato indicates a good movie (over 60 percent liked it); the green splatter means a bad one.

Figure 4-2. You can use Spotlight to call up details about any movie, past or present (if your Mac is online). If it’s a current movie in theaters, you get the option to look up today’s showtimes.
Music. Spotlight can find a song in your own iTunes music collection. Type the name of a performer, album, or song to find it.
Restaurants, businesses, points of interest. Spotlight is hooked into macOS’s Maps program and everything it knows about the world. You can quickly look up landmarks like empire state building or washington monument, business names like home depot, and business categories like sushi, pizza, or gas station.
In each case, the preview pane shows you a snippet of the map of that location, plus handy buttons like Directions, Website, and Share. Most of these buttons hand you off to the Maps app to complete the task. (Spotlight finds only the biggest-name businesses. It can’t find addresses, coordinates, or smaller companies.)
If you search for the name of a nearby restaurant, the results include driving directions, photos, hours of operation, Yelp reviews, and contact information.
Stocks. Type a stock abbreviation (AAPL or NFLX) or a wordier phrase (Microsoft stock) to see an info panel of its current price, its rise or fall today, and its 52-week high and low.
Weather. Need a forecast? Type “weather” plus the city name (weather boston).
Tweets and hashtags. You can type Twitter hashtags to see the latest tweets. (A hashtag is a searchable keyword preceded by a # symbol, like #firstworldproblems or #StanleyCup.) When you search for one, Spotlight shows you a few matching tweets—a great way to find out what’s happening in the world.
Sports scores, standings, and info. Spotlight is the world’s most smug sports know-it-all; see Figure 4-3.
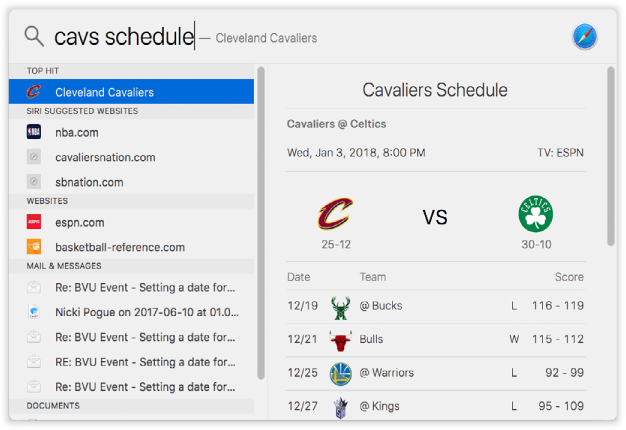
Figure 4-3. You can search for team scores or schedules (sf giants schedule), team lineups (knicks roster), league standings (marlins standings), or player stats (lebron james). You can double-click within the preview pane to open a web page with further details.
The iTunes Store. Want to know if Apple sells or rents a certain movie or TV show? Use Spotlight. It searches Apple’s online store without your having to open the iTunes program. (Only the biggest names show up in these searches; Spotlight doesn’t search the entire music or movie store.)
Web videos. Spotlight can find a video from YouTube or Vimeo. You generally get only a single result, and you can’t actually play the video in the Spotlight box, so it’s not as handy as it could be.
Flight info. Spotlight can find you the latest information about any flight. Just type in the airline and the flight number to get a map of the flight, status, and other details.
Calculations and Conversions
Yes, Spotlight is great for searching your Mac and the Internet. But it also has a third skill: It can do math for you.
Get into the habit of hitting ![]() -space when you have a quick question about any of the following:
-space when you have a quick question about any of the following:
Calculations. Spotlight is a tiny pocket calculator, always at the ready. Press
-space, type or paste 38*48.2-7+55, and marvel at the first result in the Spotlight menu: 1879.6. There’s your answer—and you didn’t even have to fire up the Calculator.(Use the asterisk, *, to mean “times” and the slash, /, as “divided by.”)
And Spotlight is not just a four-function calculator, either. It works with square roots: Type sqrt(25), and you’ll get the answer 5. It also works with functions like log(x), exp(x), sin(x), sinh(x), and e. You can even type pi to represent, you know, pi.
You can copy the result to the Clipboard by pressing
-C, so that you can paste it into another program.Conversions. This handy feature (see Figure 4-4) converts units of measurement for you. It converts time, temperature, mass (weight), length, and even currency.
Usually, you don’t have to type anything more than the amount you want to convert; Spotlight instantly converts it to the five most likely other units. For example, if you type 338 feet, the preview pane shows you the same distance in meters, yards, kilometers, miles, and inches.
But what if what you really wanted was to know how many miles that is? Just keep typing. If you type 338 feet in miles, you get the answer: 0.064 miles.
In the same way, you can convert volume (teaspoons, tablespoons, cups, pints, quarts, gallons, cubic feet, fluid ounces, centiliters, milliliters, liters, cubic feet, cubic inches, cubic meters); weight and mass (pounds, ounces, kilograms, grams, milligrams, short tons, metric tonnes, long tons); area (acres, hectares, square feet, square yards, square meters, square kilometers); temperature (Fahrenheit, Celsius, Kelvin—you can abbreviate F, C, or K); force (joules, calories, foot-pounds, newton meters, British thermal units); or power (watts, kilowatts, BTUs per minute). And those are just a few examples.
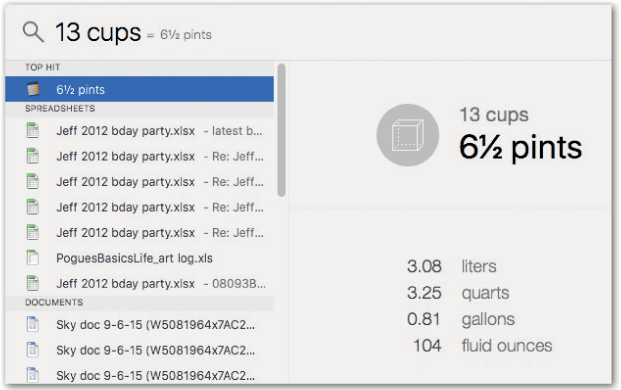
Figure 4-4. Spotlight is a units-conversion mastermind. If you simply type a quantity (without saying what you want it converted to), Spotlight displays five different conversions.
If you have an Internet connection, you can even convert currencies. Type 134 euros, for example, and you’ll find out that that’s $150.40 in U.S. dollars—a lot for a hamburger. The preview pane also offers the same figure in British pounds, Japanese yen, Canadian dollars, and Swiss francs. If you want a different unit, say so. Type 134 euros in yuan, for example, to find out how much that’s worth in China.
Note
Spotlight doesn’t offer to convert the lesser-known units, like furlongs, leagues, cubits, and spans. It leaves those conversions to the lucrative market serving biblical scholars and sea captains.
The Preview Pane
Spotlight’s window is divided in half. The left side is the list of results.
On the right, though, is a preview pane that shows what’s in each result. When you click an item in the results list—or use the arrow keys to walk down that list—the preview pane bursts to life, presenting a visual display of that result (Figure 4-5).
Plenty of times, your quest for information ends with a glance at the preview pane. If you were hoping to find a dictionary definition, a phone number, an email address, a unit conversion, the address of a business from Maps, or the rating or plot summary of a current movie, for example, that information is now attractively arrayed before you. No need to open anything from here.
In the same way, you can grab yourself a Quick Look preview of what’s inside a document. That is, you can see the actual photo when you highlight a JPEG file’s name, or you can read the actual text when you highlight a Word document’s name.
Tip
You can even copy material out of the preview pane. Just drag through it and then press ![]() -C.
-C.
Figure 4-5. If you press as you click one of the results, you get a line of text beneath the image that identifies the file’s location.
Opening a Result
If you’re using Spotlight to find and open an app or a document, double-click it to open it. Or use the arrow keys to walk down the menu, and then press Return to open the one you want.
If you click an application, it opens. If you select a System Preferences panel, System Preferences opens to that panel. If you choose an appointment, the Calendar program opens, already set to the appropriate day and time. Selecting an email message opens that message in Mail or Outlook. And so on.
Spotlight is so fast that it eliminates a lot of the folders-in-folders business that’s a side effect of modern computing. Why burrow around in folders when you can open any file or program with a couple of keystrokes?
Tip
You can drag icons right out of the results list. For example, you can drag one onto the desktop to park it there, into a window or a folder to move it, into the Trash to delete it, onto the AirDrop icon (in the Sidebar) to hand it over to a colleague, to another disk icon to back it up, and so on.
Spotlight Results Tips
It should be no surprise that a feature as important as Spotlight comes loaded with options, tips, and tricks. Here it is—the official, unexpurgated Spotlight Tip-O-Rama:
You may wonder why Spotlight bothers to display, in big gray lettering, the name of each item you highlight in the results list. It’s because sometimes the item’s name doesn’t match your search term. You might search for kumquats, for example, and find it inside a file called “Frank’s Favorite Fruits.” The lettering tells you the document name.
The same sort of thing happens when you see a website’s name in the results. The results list might show the “.com” name for the site (like Amazon.com), and the gray lettering might say “Top Sellers in Electronics.”
If the very first item—labeled Top Hit—is the icon you were looking for, then press Return to open it. This is a huge deal, because it means that in most cases, you can perform the entire operation without ever taking your hands off the keyboard.
To open Safari in a hurry, for example, press
-space bar (to open the Spotlight search box), type safa, and hit Return, all in rapid-fire sequence, without even looking. Presto: Safari is before you.And what, exactly, is the Top Hit? MacOS chooses it based on its relevance (the importance of your search term inside that item) and timeliness (when you last opened it).
Tip
Spotlight makes a spectacular application launcher. That’s because Job One for Spotlight is to display the names of matching programs in the results menu. Their names appear in the list nearly instantly—long before Spotlight has built the rest of the menu of search results.
If some program on your hard drive doesn’t have a Dock icon, for example—or even if it does—there’s no faster way to open it than to use Spotlight.
To find out where something is on your hard drive—that is, to see its folder path (“What to Do with Search Results”)—
-click its name. The folder path appears at the bottom of the preview pane (Figure 4-5).To jump to (highlight) a search result’s Finder icon instead of opening it,
-double-click its name. Or arrow-key your way to the result’s name and then press -Return, or just -R. (If it’s information from a program, like an email message, calendar appointment, or address-book entry, then it opens in Mail, Calendar, or Contacts instead.)Spotlight’s menu shows you, at most, a couple dozen of the most likely suspects, evenly divided among the categories (Documents, Applications, and so on). To see the complete list, you have to open the Spotlight Searching window (“The Searching Window”). Scroll to the bottom of the list and double-click “Show all in Finder.”
It’s easy to open something in the results list from the keyboard. Just press
- (or -
(or - ) to jump from category to category. Once you’ve highlighted the first result in a category, you can walk through the remaining four by pressing the arrow key by itself. Then, once you’ve highlighted what you want, press Return to open it.
In other words, you can get to anything in the Spotlight menu with only a few keystrokes.
The Esc key (top-left corner of your keyboard) offers a two-stage “back out of this” method. Tap it once to close the Spotlight menu and erase what you’ve typed, so that you’re all ready to type in something different. Tap Esc a second time to close the Spotlight text box entirely, having given up on the whole idea of searching. (If you’ve managed to lose your Esc key, then
-period does the same thing.)You can drag things out of the results—either to the desktop, where it becomes an icon, or onto an app’s icon on the Dock to open it. For example, you might drag a JPEG graphic from the results list directly onto the Dock icon for Photoshop Elements to open it with that program (instead of whatever program would have opened when you double-clicked the result).
Think of Spotlight as your little black book. When you need to look up a number in Contacts, don’t bother opening Contacts; it’s faster to use Spotlight. You can type somebody’s name or even part of someone’s phone number.
Among a million other things, Spotlight tracks the keywords, descriptions, faces, and places you’ve applied to your pictures in Photos. As a result, you can find, open, or insert any photo at any time, no matter what program you’re using, just by using the Spotlight box at the top of every Open File dialog box! This is a great way to insert a photo into an outgoing email message, a presentation, or a web page you’re designing. The photo program doesn’t even have to be running.
Spotlight is also a quick way to adjust one of your Mac’s preference settings. Instead of opening the System Preferences program, type the first few letters of, say, volume or network or clock into Spotlight. The Spotlight menu lists the appropriate System Preferences panel, so you can jump directly to it.
When something is selected in the results list, you can press
-B to summon a Google search of that term and -K to see the Wikipedia entry for it.Spotlight’s menu lists only a couple of dozen found items. In the following pages, you’ll learn about how to see the rest of the stuff. But, for now, note that you can eliminate some of the categories that show up here (like PDF files or bookmarks)to permit more of the other kinds of things to enjoy those limited seats of honor. Details are in “Customizing Spotlight”.
Spotlight shows you only the matches from your account and the public areas of the Mac (like the System, Application, and Developer folders)—but not what’s in anyone else’s Home folder. If you were hoping to search your spouse’s email for phrases like “meet you at midnight,” forget it.
If Spotlight finds a different version of something on each of two hard drives, it lets you know by displaying a faint gray hard drive name after each item in the menu.
Spotlight works by storing an index—a private, multimegabyte Dewey Decimal System—on each hard drive, disk partition, or USB flash (memory) drive. If you have some oddball type of disk, like a hard drive that’s been formatted for Windows, Spotlight doesn’t ordinarily index it—but you can turn on indexing by using the File→Get Info command on that drive’s icon.
Tip
Spotlight can even find words inside files on other computers on your network—as long as they’re also Macs running Mac OS X Leopard (10.5) or later. If not, Spotlight can search only for the names of files on other networked computers.
The Searching Window
As you may have noticed, the Spotlight window doesn’t list every match on your hard drive. Unless you own one of those extremely rare 60-inch Apple Skyscraper Displays, there just isn’t room.
Instead, Spotlight uses some fancy behind-the-scenes analysis to display the most likely matches for what you typed. But at the bottom of the results list, you usually see that there are other matches; it says “Show all in Finder,” meaning that there are other candidates.
There is, however, a second, more powerful way into the Spotlight labyrinth. And that’s to use the Searching window, shown in Figure 4-6.
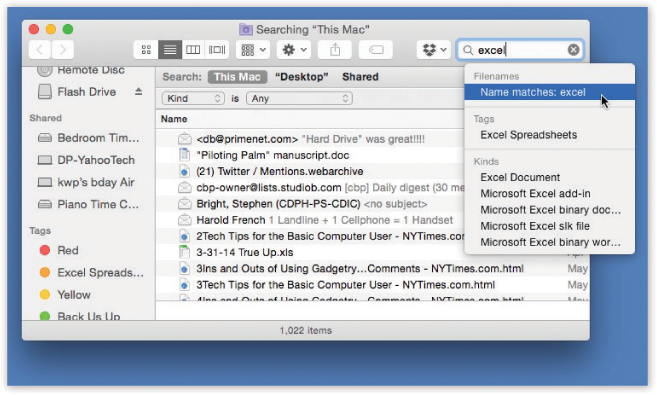
Figure 4-6. When you type your search term, macOS presents a pop-up menu of suggestions. For example, when you type excel, it’s asking: “Would you like me to limit the search to Excel spreadsheets?” If you ignore the suggestions, the window shows you all matches—including files with the word “excel” inside them.
You can open the Searching window in either of two ways.
From Spotlight
If the Spotlight results list—its Most Likely to Succeed list—doesn’t include what you’re looking for, then click “Show all in Finder” at the bottom. You’ve just opened the Searching window.
Now you have access to the complete list of matches, neatly listed in what appears to be a standard Finder window.
From the Finder
When you’re in the Finder, you can also open the Searching window directly, without using the Spotlight window as a trigger. Actually, there are three ways to get there:
- -F (for Find, get it?). When you choose File→Find (-F), you get an empty Searching window, ready to fill in for your search.
Tip
When the Find window opens, what folder does it intend to search?
That’s up to you. Choose Finder→Preferences→Advanced. From the “When performing a search” pop-up menu, you can choose Search This Mac, Search the Current Folder (usually what you want), or Use the Previous Search Scope (that is, either “the whole Mac” or “the current folder,” whichever you set up last time).
Option-
-space bar. This keystroke opens the same window. But it always comes set to search the currently open window, rather than everything on your Mac, regardless of the setting you made in Preferences (as described in the previous Tip).Open any desktop window, and type something into the search box at upper right. Presto—the mild-mannered folder window turns into the Searching window, complete with search results.
Tip
You can change the Find keystrokes to just about anything you like. See “Redefining a Keystroke”.
The Basic Search
When the Searching window opens, you can start typing whatever you’re looking for into the search box at the top.
As you type, the window fills with a list of the files and folders whose names contain what you typed. It’s just like the Spotlight results, but without the item-count limit (Figure 4-6).
Where to look
The three phrases at the top of the window—This Mac, [Folder Name], and Shared—are buttons. Click one to tell the Mac where to search:
This Mac means your entire computer, including secondary disks attached to it (or installed inside)—minus other people’s files, of course.
“Letters to Congress” (or whatever the current window is) limits the search to whatever window was open. So if you want to search your Pictures folder, open it first and then hit
-F. You’ll see the “Pictures” button at the top of the window, and you can click it to restrict the search to that folder.Shared. Click this button to expand the search to your entire network and all the computers on it. (This assumes, of course, that you’ve brought their icons to your screen as described in Chapter 14.)
If the other computers are Macs running Leopard (OS X 10.5) or later, then the Searching window can search their files just the way it does on your own Mac—finding words inside the files, for example. If they’re any other kind of computer, Spotlight can search for files only by name.
Tip
If the object of your quest doesn’t show up, you can adjust the scope of the search with one quick click on another button at the top of the window, like This Mac or Shared. The Mac updates the results list.
The suggestions list
When you search, macOS tries to figure out whether you’re looking for file names or words inside files. The Searching window may show you both in the same results list.
But more important, it offers a suggestions pop-up menu, shown in Figure 4-7. Its purpose is to help you narrow down the results list with one quick click. Whatever you click here is instantly immortalized as a search token, described next.
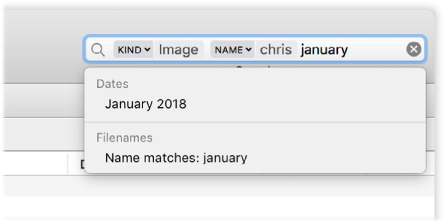
Figure 4-7. Each time you add a criterion by clicking the drop-down list of suggestions, the Mac adds a new token (criterion bubble) to the search box.
Or you can just type what you’re seeking instead of using the bubbles. For example, pictures of chris from january 2018.
You may see any of these headings in the suggestions list:
Filenames. The top option is always Filenames; click it to search by the files’ names only. If you type chris into the box, you want files whose names contain that word.
Sent by. If you type chris, the Mac wants to know if, by chance, you’re looking for email messages and other documents from somebody named Chris (or Christina, or Christopher…).
Kinds. If you type image, the Kinds option here offers you choices like “image” (any kind), “JPEG image,” “Disk image,” or “Portable Network Graphics Image.” If you type document, you get options like “Word document” and “PDF document.” If you search for photo, the menu lets you pinpoint files whose file type contains “photo”—like photo libraries or Adobe Photoshop files. And so on.
Downloaded From. You see this option when what you type is a web address. If you type Macworld into the search box, then “Downloaded From Macworld.com” appears in the results list—a handy way to round up all the files you’ve downloaded from a specific site.
Dates. If you type a month (august or august 2017) or a year into the search box, the suggestions pop-up menu says “Dates: August 2017” (or whatever). Clicking it lets you do a quick roundup of all files you created, modified, last opened, or added during that period.
Tags. Here’s yet another way to use the file tags described in “POWER USERS’ CLINIC Designing Your Own Icons”. When you type a search term that matches one of your tags (for example, green), the suggestions menu includes “Tags: green.”
In each case, the suggestions in this menu reflect only files that actually exist on your Mac. If you search for “green,” but green isn’t one of your Finder tags, then the Tags suggestion doesn’t appear. If you haven’t downloaded anything from Macworld.com, then that option doesn’t appear. And so on.
Once you learn to actually start using these suggestions—once you get the hang of the kinds of things they offer—you can get a lot of mileage out of them.
If, on the other hand, you just find them confusing, no big deal. Tap the Esc key to close the suggestions list and reveal the existing Searching window.
Power Searches with Tokens
The real beauty of the Searching window is that it can hunt down icons via more specific searches than you could using the main Spotlight feature. For example, a feature called tokens lets you combine criteria, so you can find only music files sent to you by Casey. (A token, in Apple’s usage, means “a visual representation of a search criterion.”)
Here, for example, is how you might search for pictures of Chris that were last opened in December.
Note
Before you get too invested in this tokens business—which is not, ahem, especially user-friendly—remember that you can do the same thing using Spotlight’s plain-English searches. You can type, for example, photos of chris from december.
In the Finder, press
-F.The Searching window opens.
In the search box, type image.
Sure enough: The window now shows everything on your Mac that is an image or contains the word “image” in its name, or even contains the word “image” within the file. But the list of suggestions (Figure 4-6) wants to know: Which do you really want? Files that are images? Or files with the word “image” in their names?
In the suggestions menu, under Kinds, click Image.
You’ve just pared down the list of results. Now it shows only the files that are photos.
Note, too, that the first token has appeared. Each time you click a refinement criterion, as you did in this step, macOS enshrines it in the search box as a shaded bubble. In this case, it created a token that says “Kind: Image.” (You can see it in Figure 4-7.)
Note
See the tiny ▾ next to the search token’s name? You can click it to see a very short pop-up menu of options: the criterion you selected (like “Kind:” or “Date:”) and another command that says “Everything.” Choosing it undoes the filtering effect of the suggestion, so that this token searches for any attribute of your file (like the words inside it).
Why do you need an “Everything” option here? If you’d wanted to search all attributes on your Mac, you could have just typed directly into the search box without even using the suggestions menu.
Three reasons. First, you might want to expand the scope (from “Kind” to “Everything,” for example) without having to retype the search term. Second, because you might want to make this token part of a smart folder—a saved search—described at the end of this chapter. Finally, you might want to go on to add another search criterion—another search token—that builds on this search for “Everything.”
Now you need to narrow the quest to files containing the word “Chris.”
Continue typing in the search box. This time, type chris.
The suggestions appear again, offering options for file names and, probably, a Sent By list that lists everyone named Chris who’s ever sent you messages or files. What you want is images whose names contain the word “Chris.”
Click Filename.
The list of files is much smaller now. It shows only image files with “Chris” in their names.
For your final stunt, you’ll screen out all but the December images.
Continue typing in the search box. This time, type december.
The suggestions list offers dates like December 2016 and December 2017. You can see the result so far in Figure 4-7.
Click the month you want.
And voilà: The results list shows you only the December photos of Chris.
To delete a token, click it and then press the Delete key, or backspace over it. You can also edit one: Double-click the right side of the token bubble; now you can retype the search term.
Note
This same feature is also in Mail, where it’s even more useful; you have search options like Subject, From, To, and so on.
Power Searching the Old Way
Search tokens are supposed to make multi-criteria searches easier than they used to be. But they’re not as powerful as the Old Way, which is still around.
Using the Old Way of power searching, you can set up a search that finds a document whose name begins with the letters Cro, is over a megabyte in size, was created after 10/1/17 but before the end of the year, was changed within the past week, has the file name suffix .doc, and contains the phrase “attitude adjustment.” (Of course, if you knew that much about a file, you’d probably know where it was, too. But you get the picture.)
In all, the Old Way lets you specify over 125 different search criteria: date modified, file size, the “last opened” date, color label, copyright holder’s name, shutter speed (of a digital photo), tempo (of a music file), and so on. Figure 4-8 illustrates how detailed this kind of search can be.
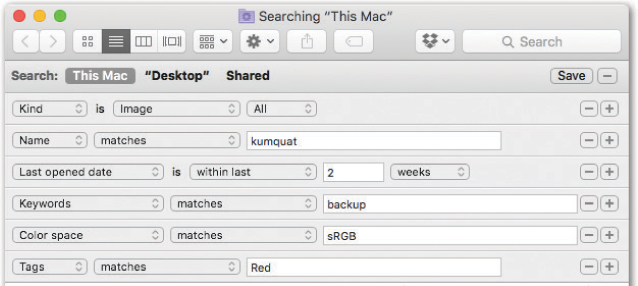
Figure 4-8. By repeatedly clicking the  button, you can turn on as many criteria as you’d like; each additional row further narrows the search. To delete a row, click the
  button at its right end.
To set up a complex search like this, use the second row of controls at the top of the window.
And the third, and the fourth, and the fifth. Each time you click one of the ![]() buttons at the right end of the window, a new criterion row appears; use its pop-up menus to specify what date, what file size, and so on.
buttons at the right end of the window, a new criterion row appears; use its pop-up menus to specify what date, what file size, and so on.
Tip
If you press Option, the ![]() button changes into a “
button changes into a “![]() ” button. When you click it, you get subrows of parameters for a single criterion. A pop-up menu lets you choose Any, All, or None, so you can build what are called exclusionary searches.
” button. When you click it, you get subrows of parameters for a single criterion. A pop-up menu lets you choose Any, All, or None, so you can build what are called exclusionary searches.
The idea here is that you can set up a search for documents created between November 1 and 7 or documents created between November 10 and 14. Or files named Complaint that are also either Word or InDesign files.
The mind boggles.
Here’s a rundown of the ways you can restrict your search, according to the options in the first pop-up menu of a row. Note that after you choose from that first pop-up menu (Last Opened, for example), you’re supposed to use the additional pop-up menus to narrow the choice (“within last,” “2,” and “weeks,” for example), as you’ll read in a moment.
Note
It may surprise you that choosing something from the Kind pop-up menu triggers the search instantly. As soon as you choose Applications, for example, the window fills with a list of every program on your hard drive. Want a quick list of every folder on your entire machine? Choose Folders. (Want to see which folders you’ve opened in the past couple of days? Add another row.)
If you also type something into the search box at the very top of the window—before or after you’ve used one of these pop-up menus—the list pares itself down to items that match what you’ve typed.
Kind
When the first pop-up menu says Kind, you can use the second pop-up menu to indicate what kind of file you’re looking for: Applications, Documents, Executables (programs and Dashboard widgets), Folders, Images, Movies, Music, PDF files, Presentations, Text files, or Other.
For example, when you’re trying to free up some space on your drive, you could round up all your movie files, which tend to be huge.
And what if the item you’re looking for isn’t among those 10 canned choices? What if it’s an alias, or a Photoshop plug-in, or some other type?
That’s what the Other option is all about. Here you can type in almost anything that specifies a kind of file: Word, Excel, TIFF, JPEG, AAC, final cut, alias, or whatever.
Last opened date/Last modified date/Created date
When you choose one of these options, the second pop-up menu lets you isolate files, programs, and folders according to the last time you opened them, the last time you changed them, or when they were created.
Today, yesterday, this week, this month, this year. This second pop-up menu offers quick, canned time-limiting options.
Within last, exactly, before, after. If you choose “before,” “after,” or “exactly,” then your criterion row sprouts a month/day/year control that lets you round up items that you last opened or changed before, after, or on a specific day, like 5/27/17. If you choose “within last,” then you can limit the search to things you’ve opened or changed within a specified number of days, weeks, months, or years.
These are awesomely useful controls, because they let you specify a chronological window for whatever you’re looking for.
Tip
You’re allowed to add two Date rows—a great trick that lets you round up files you created or edited between two dates. Set up the first Date row to say “is after” and the second one to say “is before.”
Science!
Name
Spotlight likes to find text anywhere inside your files, no matter what their names are. But when you want to search for an icon by the text that’s in only its name, this is your ticket. (Capitalization doesn’t matter.)
Wouldn’t it be faster just to click Filenames in the suggestions pop-up menu (Figure 4-6)? Yes—but using the Searching window gives you far more control, thanks to the second pop-up menu that offers you these options:
Matches. You’ll see files whose names contain entire words you’re looking for. If you search for peas, you’ll find files called “Peas & Crackers” and “Snow Peas”—but not “Appeasement.”
Contains. The position of the letters you type doesn’t matter. If you type then, you find files with names like “Then and Now,” “Authentic Cajun Recipes,” and “Lovable Heathen.”
Starts with. The Find program finds only files beginning with the letters you type. If you type then, you find “Then and Now,” but not “Authentic Cajun Recipes” or “Lovable Heathen.”
Ends with. If you type then, you find “Lovable Heathen,” but not “Then and Now” or “Authentic Cajun Recipes.”
Is. This option finds only files named precisely what you type (except that capitalization still doesn’t matter). Typing then won’t find any of the file names in the previous examples. It would unearth only a file called simply “Then.” In fact, a file with a file name suffix, like “Then.doc,” doesn’t even qualify.
Contents
You can think of this option as the opposite of Name. It finds only the text that’s inside your files and completely ignores their icon names.
That’s a handy function when, for example, a document’s name doesn’t match its contents. Maybe a marauding toddler whacking the keys renamed your doctoral thesis “xggrjpO#$5%////.” Or maybe you just can’t remember what you called something.
Other
If this were a math equation, it might look like this: options × options = overwhelming.
Choosing Other from the first pop-up menu opens a special dialog box containing at least 125 other criteria. Not just the big kahunas like Name, Size, and Kind, but far more targeted (and obscure) criteria like “Bits per sample” (so you can round up MP3 music files of a certain quality), “Device make” (so you can round up all digital photos taken with, say, a Canon Rebel camera), “Key signature” (so you can find all the GarageBand songs you wrote in the key of F-sharp), “Pages” (so you can find all Word documents that are really long), and so on. As you can see in Figure 4-9, each one comes with a short description.
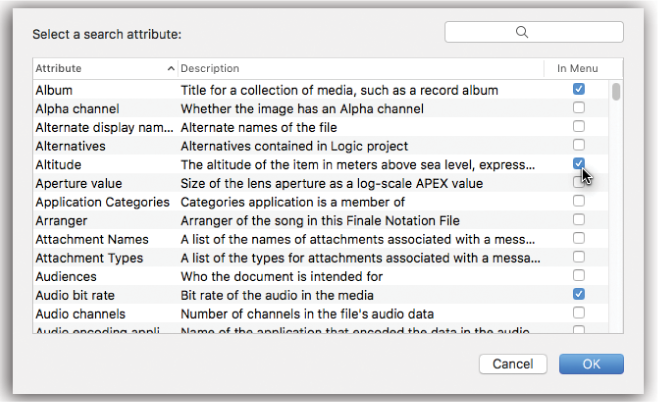
Figure 4-9. Here’s the master list of search criteria. Turn on the In Menu checkboxes of the ones you’ll want to reuse often. Once you’ve added some of these to the menu, you’ll get an appropriate set of “find what?” controls (“Greater than” and “Less than” pop-up menus, for example).
You may think Spotlight is offering you a staggering array of file-type criteria. In fact, though, big bunches of information categories (technically called metadata) are all hooks for a relatively small number of document types. For example:
Digital photos and other graphics files account for the metadata types alpha channel, aperture, color space, device make, device model, EXIF version, exposure mode, exposure program, exposure time, flash, f-number, focal length, ISO speed, max aperture, metering mode, orientation, pixel height, pixel width, red eye, resolution height, resolution width, and white balance.
Digital music files have searchable metadata categories like album, audio bit rate, bits per sample, channel count, composer, duration, General MIDI sequence, key signature, lyricist, musical genre, recording date, sample rate, tempo, time signature, track number, and year recorded. There’s even a special set of parameters for GarageBand and Soundtrack documents, including instrument category, instrument name, loop descriptors, loop file type, loop original key, and loop scale type.
Microsoft Office documents can contain info bits like authors, contributors, fonts, languages, pages, publishers, and contact information (name, phone number, and so on).
This massive list also harbors a few criteria you may use more often, like File Size, File Label, and File Invisible (which lets you see all the invisible files on your hard drive).
Now, you could argue that in the time it takes you to set up a search for such a specific kind of data, you could have just rooted through your files and found what you wanted manually. But, hey—you never know. Someday, you may remember nothing about a photo you’re looking for except that you used the flash and an f-stop of 1.8.
Tip
Don’t miss the search box in this dialog box. It makes it super-easy to pluck one useful criterion needle—File Size, say—out of the haystack. Also don’t forget about the In Menu checkbox in the right column. It lets you add one of these criteria to the main pop-up menu, so you don’t have to go burrowing into Other again the next time.
What to Do with Search Results
The results window is a regular old Finder window, with all the familiar views and controls (Figure 4-10).
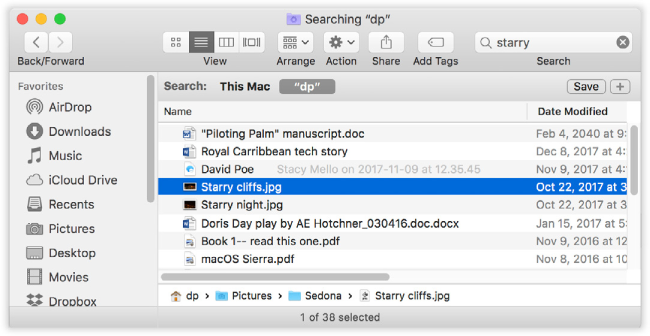
Figure 4-10. Click a result to see where it sits (shown at bottom). If the window is too narrow to reveal the full folder path, then run your cursor over the folders without clicking. As your mouse moves, the Mac reveals each folder’s name. (You can drag icons into these folders, too.)
You can work with anything in the results window exactly as though it were in a regular Finder window: Drag something to the Trash, rename something, press the space bar for a Quick Look at it, drag something to the desktop to move it there, drag something onto a Dock icon to open it with a certain program, Option-![]() -drag it to the desktop to create an alias, and so on.
-drag it to the desktop to create an alias, and so on.
You can move up or down the list by pressing the arrow keys, scroll a “page” at a time with the Page Up and Page Down keys, and so on. You can also highlight multiple icons simultaneously, the same way you would in a Finder list view: Highlight all of them by choosing Edit→Select All, highlight individual items by ![]() -clicking them, drag diagonally to enclose a cluster of found items, and so on.
-clicking them, drag diagonally to enclose a cluster of found items, and so on.
Or you can proceed in any of these ways:
Change the view (list, column, and so on) by clicking one of the View icons or choosing from the View menu (see Chapter 2). Actually, Cover Flow is a great view for search results; since this list is culled from folders all over the computer, you otherwise have very little sense of context as you examine the file names.
Sort the results by clicking the column headings (in list and Cover Flow views).
Arrange the results by using the Arrange pop-up menu button (
 ). That way, you group the results as described in “Use as Defaults”. It can be especially useful to clump them by Kind, so that similar file types are clustered together (Documents, Images, Messages, and so on), or to sort by Last Opened, so that the list is chronological.
Change the view options. Press
-J (or choose View→Show View Options) to open the View Options panel for the results window. Here you can add a couple of additional columns (Date Modified, Date Created); change the icon size or text size; or turn on the “always” checkbox at the top, so that future results windows will have the look you’ve set up here.Get more information about a result by selecting it and then choosing File→Get Info (
-I). The normal Get Info window appears, complete with date, size, and location information.Find out where it is. It’s nice to see all the search results in one list, but you’re not actually seeing them in their native habitats: the Finder folder windows where they physically reside.
If you click once on an icon in the results, the bottom edge of the window becomes a folder map that shows you where that item is.
For example, in Figure 4-10, the notation in the Path strip means: “The ‘Starry cliffs’ icon you found is in the Sedona folder, which is in the Pictures folder, which is in dp’s Home folder.”
To get your hands on the actual icon, choose File→Show in Enclosing Folder (
-R). MacOS highlights the icon in question, sitting there in its window wherever it happens to be on your hard drive.Open the file (or open one of the folders it’s in). If one of the found files is the one you were looking for, then double-click it to open it (or highlight it and press either
-O or -). In many cases, you don’t know or care where the file was—you just want to get into it.
Tip
You can also double-click to open any of the folders in the folder map at the bottom of the window. For example, in Figure 4-10, you could double-click the “Starry cliffs” file to open it, or the Sedona folder to open it, and so on.
Move or delete the file. You can drag an item directly out of the found-files list and into a different folder, window, or disk—or straight to the Dock or the Trash. If you click something else and then re-click the dragged item in the results list, the folder map at the bottom of the window updates itself to reflect the file’s new location.
Start over. If you’d like to repeat the search using a different search phrase, just edit the text in the search box. (Press
-F to empty the search box and the Searching window.)Give up. If none of these avenues suits your fancy, you can close the window as you would any other (
-W).
Customizing Spotlight
You’ve just read about how Spotlight works fresh out of the box. But you can tailor its behavior, both for security reasons and to fit it to the kinds of work you do.
Here are two ways to open the Spotlight preferences center:
Use Spotlight itself. Hit
-space bar, type spotl, and press Return.Choose
 →System Preferences. Click Spotlight.
In any case, you wind up face to face with the dialog box shown in Figure 4-11.
You can tweak Spotlight in two ways here, both very useful:
Turn off categories. The list of checkboxes identifies what Spotlight tracks. If you find that Spotlight uses up valuable menu space listing, say, web bookmarks or fonts—stuff you don’t need to find very often—then turn off their checkboxes. Now the Spotlight menu’s limited precious slots are allotted to icon types you care more about.
This trick can be especially useful if you don’t use Spotlight’s Internet-searching features. “I’m perfectly capable of looking up movies online,” you might say. “I don’t need to clutter my Spotlight results list with movie names.” Fine—turn off Movies.
Change the keystroke. Ordinarily, pressing
-space bar highlights Spotlight in your menu bar, and Option--space bar opens the Searching window. If these keystrokes clash with some other key assignment in your software, though, you can reassign them to almost any other keystroke you like.To do that, click Keyboard Shortcuts; you jump directly to the System Preferences→Keyboard→Shortcuts tab. Here you can specify a new keystroke, as described in “Redefining a Keystroke”.
Apple assumes no responsibility for your choosing a keystroke that messes up some other function on your Mac.
-S, for example, would not be a good choice.On the other hand, if you choose a Spotlight keystroke that macOS uses for some other function, a little yellow alert icon appears in the Spotlight pane. This icon is actually a button; clicking it brings you to the Keyboard pane, where you can see exactly which keystroke is in dispute and change it.
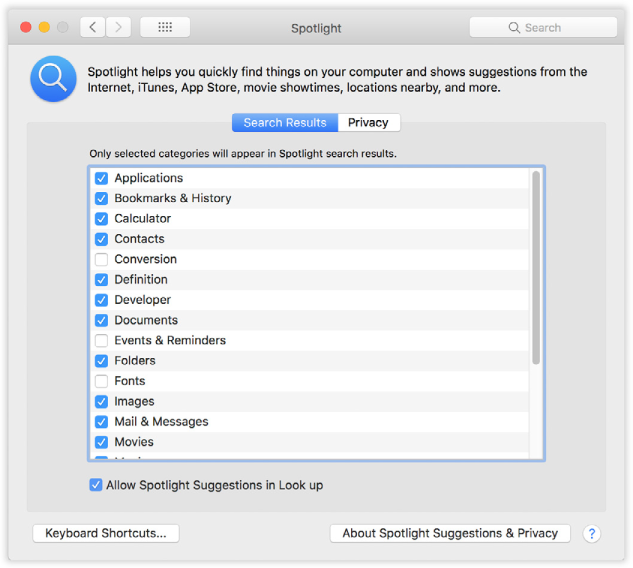
Figure 4-11. Here’s where you can specify what categories of icons you want Spotlight to search, and what keystroke you want to use for highlighting the Spotlight search box.
(You can no longer drag these items up and down to control how the categories appear in the Spotlight results, as you could in some recent versions.)
Privacy Settings
You can hide certain folders from Spotlight searches. Maybe you have privacy concerns—for example, you don’t want your spouse Spotlighting your stuff while you’re away from your desk. Maybe you just want to create more focused Spotlight searches, removing a lot of old, extraneous junk from its database.
Either way, the steps are simple. Open the Spotlight panel of System Preferences, as described previously. Click the Privacy tab. Figure 4-12 explains the remaining steps.
Tip
When you mark a disk or folder as non-searchable, Spotlight actually deletes its entire index (its invisible card-catalog filing system) from that disk. If Spotlight ever seems to be acting wackily, you can use this function to make it rebuild its own index file on the problem disk. Just drag the disk into the Privacy list and then remove it again. Spotlight deletes, and then rebuilds, the index for that disk.
(Don’t forget the part about “remove it again,” though. If you add a disk to the Privacy list, Spotlight is no longer able to find anything on it, even if you can see it right in front of you.)
Once you’ve built up the list of private disks and folders, close System Preferences. Spotlight now pretends the private items don’t even exist.
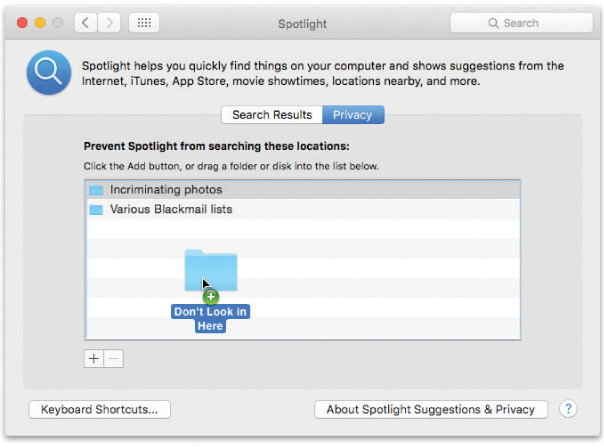
Figure 4-12. You can add disks, partitions, or folders to the list of non-searchable items by dragging them into this window. Or, if the private items aren’t visible at the moment, click +, navigate to your hard drive, select the item, and then click Choose. To remove something from this list, click it and then press the Delete key or click the — button.
Smart Folders
A smart folder is a self-updating folder. It always contains exactly the items that match criteria you’ve specified in advance. (Smart folders are a lot like smart albums in iTunes, smart mailboxes in Mail, and so on.)
The key to creating one, as it turns out, is the little Save button in the upper-right corner of the Searching window when you’ve built a search request.
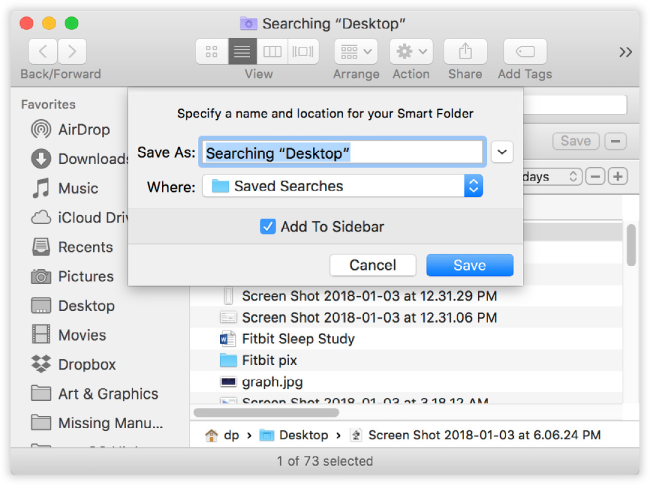
Here’s a common example. You choose File→Find. You set up the pop-up menus to say “last opened date” and “this week.” You click Save. You name the smart folder something like Current Crises, and you turn on Add to Sidebar (Figure 4-13).
Tip
Behind the scenes, smart folders are special files in your Home→Library→Saved Searches folder.
From now on, whenever you click that smart folder, it reveals all the files you’ve worked on in the past week or so. These items’ real locations may be all over the map, scattered around your Mac and your network. But through the magic of the smart folder, they appear as though they’re all in one neat folder.
Tip
If you decide your original search criteria need a little fine-tuning, click the smart folder. From the ![]() menu, choose Show Search Criteria. You’re back on the original setting-up-the-search window. Use the pop-up menus and other controls to tweak your search setup, and then click the Save button once again.
menu, choose Show Search Criteria. You’re back on the original setting-up-the-search window. Use the pop-up menus and other controls to tweak your search setup, and then click the Save button once again.
To delete a smart folder, just drag its icon out of the Sidebar. (Or if it’s anywhere else, like on your desktop, then drag it to the Trash like any other folder.)