Chapter 6. Documents, Programs & Mission Control
The whole point of owning a computer, of course, is to run programs—or, as Apple likes to call them, apps. And in macOS these days, Apple wants programs to look and work like they do on the iPad: simply. As full-screen, autosaving worlds. You’re supposed to open them from a simple Home screen arrayed with app icons, and you’re supposed to switch among them by swiping with your fingers on a trackpad or mouse.
This radical new vision of running programs is actually possible—sort of. The hitch is that a lot of the iPaddy features, including Full Screen mode and autosaving, don’t work in all programs.
In any case, this chapter covers Apple’s Way of Running Programs, and all its Capitalized Elements: the Mac App Store, Launchpad, Mission Control, Full Screen, Auto Save, Versions, and more.
The Mac App Store
For years, people installed software onto their computers by buying disks: floppies, CDs, and, later, DVDs.
But starting with the iPhone, people installed software onto their phones by downloading it directly from the Internet. Once everybody saw how convenient (and profitable) that system was, it didn’t take Apple long to realize it could bring the same convenience to the Mac.
So now there’s the Mac App Store—or, as the program is called in your Applications folder, just App Store (Figure 6-1). It’s an online catalog of software from huge software companies, tiny one-person software companies, and everything in between. You can read about the programs, check out customer reviews, and download them directly to your Mac. (As you probably know, High Sierra itself is an App Store download.)
There are some huge advantages to this system. Since there’s no box, disc, registration card, shipping, or stocking, the software can cost a lot less; Apple’s own programs certainly reflect this price advantage. Plenty of programs in the App Store are actually free.
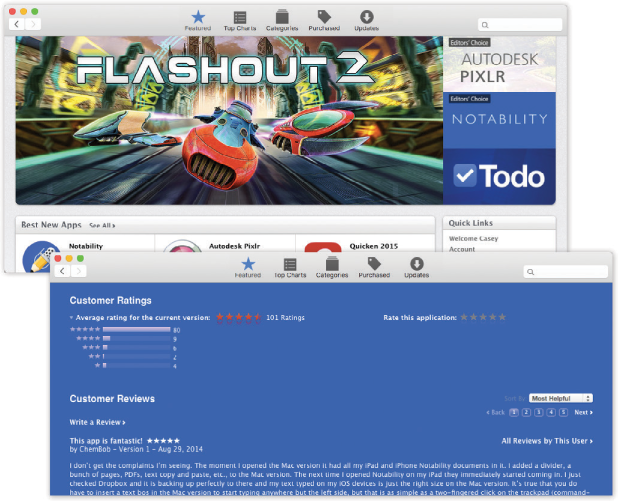
Figure 6-1. Top: Mastering the App Store won’t take you long; just about everything you need is in the toolbar at the top, including a search box and buttons like Featured, Top Charts, and Categories, which are meant to help you dive into the catalog of Mac software. The Purchased tab shows everything you’ve bought, for easy re-downloading. The final button, Updates, is where you’ll find new versions of your apps.
Bottom: You can read reviews of each piece of software, written by other people who’ve tried it.
Furthermore, Apple controls the transaction on both ends—it knows who you are—so there are no serial numbers to type in. The installation no longer interrupts you with warnings like “Please enter your password to install this software” or “This software appears to have been downloaded from the Internet.” Once you click Buy, the software downloads and installs itself automatically, without any interaction from you.
And there are no discs to store and hunt down later. If you ever get a new Mac, or if you ever need to reinstall a program from the App Store, you just re-download it from the Purchases tab; the App Store remembers that you’re a legitimate owner. Better yet, you’ll be downloading the latest version of that program; you won’t have to install all the “.01” patches that have come along since.
Tip
To hide an app you’ve bought so it no longer appears in Purchased, right-click its icon and choose Hide Purchase. (To unhide it later, click the Account link on the main page of the App Store; under the “iTunes in the Cloud” heading, choose View Hidden Purchases.)
And speaking of updates: Since Apple knows what programs you have, it can let you know when new versions are available. And it does: A numbered badge appears next to the ![]() → App Store command. The updates are small files, so they download quickly; the App Store delivers only the pieces that have actually changed.
→ App Store command. The updates are small files, so they download quickly; the App Store delivers only the pieces that have actually changed.
Some details:
You can opt to have new versions of your programs quietly and automatically downloaded and installed in the background, so you’re never bugged about their arrival. (Open System Preferences→App Store. “Download newly available updates in the background” downloads new versions but asks your permission before installing them. “Install app updates” goes the next step and installs them without consulting you further.)
“Automatically download apps purchased on other Macs” (also in System Preferences→App Store) ensures that when you download an app on one Mac, it auto-downloads on all your other ones, too (assuming they’re logged in with the same iCloud account). Handy, really.
If the App Store app indicates that new versions of your programs are available, then click the pop-up menu next to the Update All button. There, for your time-shifting pleasure, is a shortcut menu containing options like Install Now, Try in an Hour, Try Tonight, and Remind Me Tomorrow. The point is to set up a downloading session for a time when (a) you’re in a Wi-Fi hotspot or (b) you’re asleep and those big downloads won’t slow down anybody’s Internet work.
One final advantage of the App Store concept: If you decide to use Launchpad, described starting in “Launchpad”, then anything you’ve bought from the App Store is easy to delete with a single click.
In general, the App Store works exactly like the iPhone/iPad App Store. Click a program’s icon to open its details page. Here you’ll find reviews and ratings from other people, a description, pictures (screenshots) of the program, and much more information to help you make a good buying decision. See Figure 6-1 for more details.
When you buy an app, Launchpad opens automatically, so you can see where it went.
Other Ways to Get Mac Software
In general, new programs arrive on your Mac via one of two avenues: as a download (whether from the App Store or not) or, rarely, on a CD or DVD.
Downloading Compressed Files
Programs you download from the web (not the App Store) generally arrive in a specially encoded, compressed form (Figure 6-2). And unless you’ve changed the settings, they arrive in the Downloads folder on your Dock.
The downloaded file’s name usually has a file name extension like .zip (the standard compression file format for Windows and Mac files) or .dmg (a disk image file, described below).
You may occasionally run into .tar files (tape archive, an ancient Unix utility), .gz (gzip, a standard Unix compression format), or combo formats like .tar.gz or .tgz.
Fortunately, you generally don’t have to worry about any of this; most web browsers, including Safari, automatically unzip and unstuff downloads of all types.
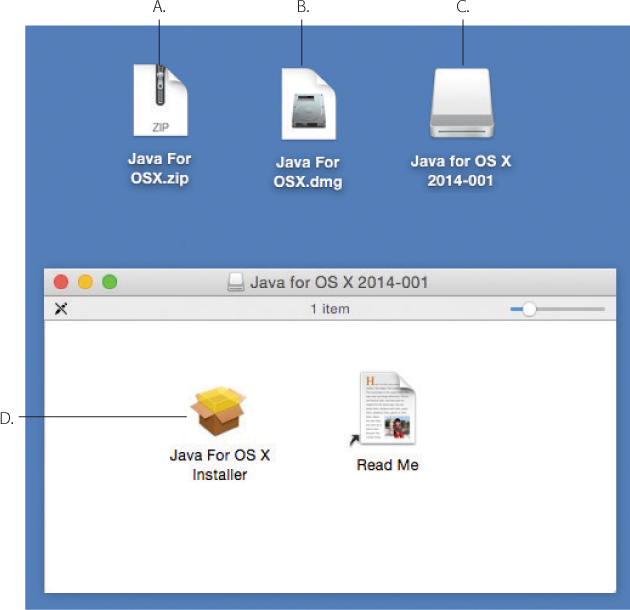
Figure 6-2. A: This is the downloaded compressed file. Double-click to get…
B: The .dmg (disk image) file. Double-click it to “mount” the disk image.
C: And now, the disk image itself. Double-click to open the installer window. (Dismiss the warning that the software came from the Internet.) “Eject” it after the installation is complete.
D: Here’s the actual installer.
After the installation, you can delete all this stuff (except maybe the .dmg file, if you think you might want to install the software again later).
Disk images (.dmg files)
Once you’ve downloaded a program, it often takes the form of a disk image file, whose name ends with the letters .dmg (middle top in Figure 6-2).
Disk images are common in macOS. All you have to do is double-click the .dmg icon. After a moment, it magically turns into a disk icon on your desktop, which you can work with just as though it were a real disk (top right in Figure 6-2). For example:
Double-click it to open it. The software you downloaded is inside.
Remove it from your desktop by dragging it to the Trash (whose icon turns into a big silver
 key as you drag), selecting it and pressing
  -E (the shortcut for File→Eject), clicking its
  button in the Sidebar, or right-clicking or two-finger clicking it and then choosing Eject from the shortcut menu.
You’ve still got the original .dmg file you downloaded, so you’re not really saying goodbye to the disk image forever.
When you’ve finished unzipping or unstuffing a downloaded file, you may have several icons on your desktop or in the Downloads folder. It’s generally safe to throw them away—the .sit, .tar, .gz, or .tgz file you originally downloaded, for example, or the .dmg icon.
The disk image icon, the one that contains the actual software or its installer (top right in Figure 6-2), is a phantom drive, held in memory, that will go away by itself when you log out. So after installing its software, feel free to drag it to the Trash (or select it and press ![]() -E to “eject” it).
-E to “eject” it).
Performing the installation
Once you’ve got a disk icon on your desktop—either a pseudo-disk from a disk image or a CD or DVD you’ve inserted—you’re ready to install the software. You can install many macOS programs just by dragging their icons or folders to your hard drive (usually the Applications folder). Others offer a traditional installer program that requires you to double-click, read and accept a license agreement, and so on.
Uninstalling Software
If you got a program from the App Store, it’s easy to delete from the Launchpad (“Launchpad”).
If you got it from some other source, well, there’s generally no Uninstall program. To uninstall a program, you just drag it (or its folder) to the Trash.
Some programs leave harmless scraps of themselves behind; to check for them, look for preference files or folders bearing the dearly departed program’s name in your Library folders (especially in Application Support) and in your Home→Library→Preferences folder.
Opening macOS Programs
You can launch (open) an application in any of several ways:
Single-click an icon on the Launchpad, described on the following pages.
Single-click a program’s icon on the Dock, the Sidebar, or the Finder toolbar.
Use Spotlight. Hit
-space bar, type the first letters of the program’s name, and then press Return.Double-click an app’s icon in the Finder.
If you’ve added the Applications folder to your Dock, then click the Dock icon to open the pop-up fan, grid, or list of icons. Then click the program you want (or even type the first few letters of its name and then press Return).
Select an application icon and then press
-O (short for File→Open) or - .
.Use the submenus of the
 menu’s Recent Items→Applications command.
Tip
Once you’ve opened the Recent Items→Applications submenu, you can hold down the ![]() key to witness a startling sight: All the program names (Preview, Photoshop, and so on) change to say “Show Preview in Finder,” “Show Photoshop in Finder,” and so on. The Recent Items command, in other words, now gives you a direct way to jump to the icon of a program you might want to open, huddling in Applications or whatever window it’s in.
key to witness a startling sight: All the program names (Preview, Photoshop, and so on) change to say “Show Preview in Finder,” “Show Photoshop in Finder,” and so on. The Recent Items command, in other words, now gives you a direct way to jump to the icon of a program you might want to open, huddling in Applications or whatever window it’s in.
Open a document icon in any of these ways, or drag a document onto the icon of a program that can open it (whether in the Dock, the Finder toolbar, the Sidebar, or a folder window).
Tip
If you press Option as you open an application (or anything else) in the Finder, you automatically close the window that contains its icon. Later, when you return to the Finder, you find a neat, clean desktop—no loitering windows.
Launchpad
The Launchpad app presents a dark background with evenly spaced icons that represent all your programs (Figure 6-3). You can open one with a single click.
Why did Apple feel the need to create yet another way to open programs?
First, because Launchpad fits right into the general theme of making the Mac look and work more like the iPad. Launchpad is a dead ringer for the Home screens of an iPad, iPhone, or iPod Touch.
Second, it’s a much less intimidating place for technophobes to learn to love than, say, the Applications folder.
And, third, it’s a lot quicker to get to than the Applications folder. You can summon it instantly, using any of these methods:
Put four fingers on your trackpad and pinch them together. The Launchpad appears instantly, no matter what program you were in; you don’t have to duck back into the Finder, navigate to the Applications folder, and so on.
Press the Launchpad key. Recent Macs have a special Launchpad icon painted right on the F4 key (
 ).
).Click its icon on the Dock. It’s the one resembling a rocket (
 ).
).Press a keyboard shortcut of your choice. To set that up, choose
→ System Preferences→Keyboard. Click the Shortcuts tab, and then click Launchpad & Dock in the left-side list. On the right, make sure Show Launchpad is turned on—and then double-click in the blank space to the right of it and press the key combination you want.Move the cursor into one of the screen’s four corners. To set up these options, open
→ System Preferences→Mission Control. Click Hot Corners to choose a corner of the screen for Launchpad.Open it as you would any other program. It’s in your Applications folder.
Figure 6-3. You can open Launchpad by clicking its Dock icon or by using a four-finger pinching gesture on your trackpad. Launchpad covers your entire main monitor, hiding everything else.
Use the arrow keys to navigate a page; press -arrow to move between pages; press Option to make the icons start wiggling, ready for deletion.
One thing’s for sure: Sooner or later, you’ll wind up in Launchpad. Only three visual elements appear there:
Icons. Each icon represents one of your programs. Apple’s programs are listed first, in alphabetical order: App Store, Automator, Calculator, and so on. Then come all your other programs, again in A-to-Z order. Click one to open that program.
Sparkly animated twinkles surround any new app you’ve installed. (You can see them at bottom in Figure 6-3.)
Note
The only program icon that doesn’t appear in Launchpad…is Launchpad’s. That’s a good thing. You wouldn’t want to wind up in an infinite loop.
Search box. This box at the top of the screen lets you pluck one needle from your haystack of apps, no matter what page it’s on. You don’t have to click there first—just start typing when Launchpad is before you. With each letter you type, Launchpad hides everything but the matching app icons.
Home-page dots. As you install more and more programs, Launchpad makes room for them by creating additional screens. You can spread your new programs’ icons across an unlimited number of launch screens.
The little white dots are your map. Each represents one Launchpad screen. If the third one is “lit up,” then you’re on the third screen.
To move among the screens, press
-arrow keys, or swipe horizontally with two fingers on the trackpad (Magic Mouse: one finger). Or tap directly on one of the little dots to jump to the corresponding screen.
Tip
To exit Launchpad without opening anything, click a blank spot, tap the Esc key, or—most fun of all—spread the same four fingers on the trackpad.
Redesigning the Launchpad Screens
If you use Launchpad a lot, it’s worth taking a moment to arrange its icons into logical categories or a sensible sequence. As it turns out, you can freely drag them into new spots; the other icons scoot aside to make room.
Tip
You can even drag an icon directly to the Dock to install it there for quicker access.
You can create additional screens, too. To do that, drag an icon to the right edge of the screen; keep your mouse button down. The first screen slides off to the left, leaving you on a new, blank one where you can deposit the icon.
You can organize your icons on these Home pages by category, frequency of use, color, or whatever tickles your fancy.
Folders
The Launchpad just wouldn’t be like the iPad if it didn’t also let you organize your apps into folders. Folders let you organize your apps, de-emphasize the ones you don’t use often, and restore order to that horribly flat, multipage display of icons.
To create a folder, drag one app’s icon on top of another. MacOS puts both of them into a single new folder (Figure 6-4). If they’re the same kind of app, it even tries to figure out what category they both belong to—and names the new folder accordingly (“Music,” “Photos,” “Games,” or whatever). This new name is only a proposal; an editing window also appears so that you can type a custom name that you prefer.

Figure 6-4. Open a folder by clicking once, or by pressing -. A panel sprouts from the folder icon, revealing its contents; the rest of the screen goes away. Now you can drag the icons around inside it. You can also edit the folder’s name (click it first).
A folder can hold several rows’ worth of icons; if you add more apps than that, Launchpad adds additional “pages” that you scroll horizontally. (Little white dots indicate which page you’re on.)
Take an app out of a folder by dragging its icon anywhere else on the screen. The other icons scoot aside to make room. If you remove all but one app from a folder, the folder disappears.
Move a folder around by dragging, as you would any other icon.
Deleting App Store Programs
If you’ve downloaded some apps from the App Store, you’ll find a bonus feature here in Launchpad: They’re especially fun to delete.
Start by holding the mouse down on any icon until, after about a second, all the icons begin to—what’s the correct term?—wiggle. (If you have an iPhone, iPad, or iPod Touch, this should look familiar.)
Tip
You can also just press the Option key to trigger the wiggling. Sometimes, every second counts.
At this point, you may notice that some of them have sprouted little red ![]() ’s. Those are the ones you downloaded from the App Store.
’s. Those are the ones you downloaded from the App Store.
To delete an App Store program you don’t need anymore, click that ![]() to make it say bye-bye—instantly and for good. It doesn’t even have a layover in the Trash.
to make it say bye-bye—instantly and for good. It doesn’t even have a layover in the Trash.
Note
You can’t delete non–App Store apps this way, so no ![]() appears on those icons. Why not? Because this deletion method is so fast and permanent. It’s not much of a risk for App Store apps, because you can always download them again—but that would not be true of other apps.
appears on those icons. Why not? Because this deletion method is so fast and permanent. It’s not much of a risk for App Store apps, because you can always download them again—but that would not be true of other apps.
Windows That Auto-Reopen
For decades, opening a program on the Mac presented exactly the same thing every time: a blank screen, or maybe a welcome screen. It was up to you to specify what document you then wanted to work on.
Now, though, whatever documents were open when you last quit that program magically reopen, ready for you to get back to work. Everything is exactly as it was, including your window and palette positions. Incredibly, any text that was highlighted when you last quit the program is still highlighted, and the insertion point is just where you left it.
This is all handy if you tend to work on the same documents day after day; the auto-reopened document serves as a refresher on what you were in the middle of doing. You can skip fussing with the Open command, remembering what you were doing, rearranging the windows the way you like them, and so on.
Then again, maybe you can’t stand this feature.
Fortunately, it’s easy to turn it off, either globally, on a per-program basis, or on a per-Quit basis:
Turn off auto-reopen for good. Open System Preferences→General, and click “Close windows when quitting an app.”
Prevent your current setup from being memorized. You can also prevent just one particular program from reopening its documents the next time—at the time you’re quitting it. To do that, press Option while you quit the program (for example, when you choose Safari→Quit or press
-Q). The Quit command magically changes to Quit and Close All Windows. The next time you open the program, it will have forgotten all about your window setup.(On the other hand, if you’ve turned off the “Restore windows” feature in System Preferences, then pressing the Option key makes the Quit command say Quit and Keep Windows.)
Make a program forget its window setup as you reopen it. If it’s too late for the tip in the previous paragraph, you can force a program to start up in its empty, virginal state by pressing the Shift key as it opens. That forces the program to forget the previous window setup.
Turn off auto-open for one program. Suppose you like the auto-window-reopening feature in most programs. But there’s one particular program that you never want to memorize your window setup—maybe for security reasons, or maybe because you use that app for something different every day.
Before long, some shareware program will crop up to make that easy. For now, though, you can do the job manually. It’s a quick, one-time step, but it does involve mucking around with one of the Mac’s invisible folders. See the box below.
The Application Menu
In every app, the very first menu (to the right of the ![]() menu) appears with bold lettering and identifies the program you’re using. It might say iTunes, or Microsoft Word, or Stickies.
menu) appears with bold lettering and identifies the program you’re using. It might say iTunes, or Microsoft Word, or Stickies.
This Application menu (Figure 6-5) offers a number of commands pertaining to the entire program and its windows, including About, Quit, and Hide.
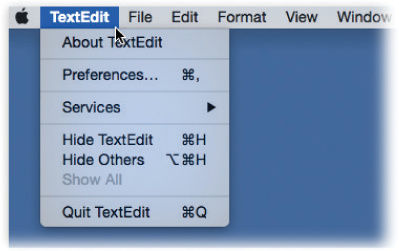
Figure 6-5. The first menu in every program lets you know, at a glance, which program you’re actually in. It also offers overall program commands like Quit and Hide.
Quitting Programs
You quit a program by pressing ![]() -Q, the keyboard equivalent of the Quit command. (The Quit command is always at the bottom of the Application menu.)
-Q, the keyboard equivalent of the Quit command. (The Quit command is always at the bottom of the Application menu.)
But macOS offers two much more fun ways to quit a program:
Right-click or two-finger click a program’s Dock icon to make its shortcut menu appear. Then choose Quit. (Or, if you do the click-and-hold thing on a program’s Dock icon, a Quit button appears just above your cursor.)
When you’ve pressed
-Tab to summon the “heads-up display” of open programs, type the letter Q without releasing the key. The highlighted program quits without further ado.
Force-Quitting Programs
MacOS is a rock-solid operating system, but that doesn’t mean that programs never screw up. Individual programs are as likely as ever to freeze—or, rather, to hang (lock up and display the “spinning beachball of death” cursor). In such cases, you have no choice but to force-quit the program—the computer equivalent of terminating it with a blunt instrument.
Doing so doesn’t destabilize your Mac; you don’t have to restart it. In fact, you can usually reopen the very same program and get on with your life.
You can force-quit a stuck program in any of several ways:
Click-and-hold on the program’s Dock icon, or two-finger click it, or right-click it. A Quit button appears just above your cursor. Press the Option key to make the button say Force Quit. Click it. Bingo—that program is outta here.
Press Option-
-Esc, the traditional Mac force-quit keystroke, or choose →Force Quit. Either way, proceed as shown in Figure 6-6.
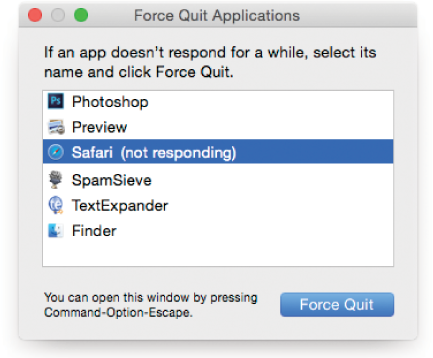
Figure 6-6. When you press Option--Esc or choose Force Quit from the menu, a tidy box listing all open programs appears. Just click the one you want to abort, click Force Quit, and click Force Quit again in the confirmation box. (Using more technical tools like the Unix kill command, there are other ways to jettison programs. But this is often the most convenient.)
The only downside to force-quitting a program is that you lose any unsaved changes to your open documents, along with any preference settings you may have changed while the program was open.
The “Heads-Up” Program Switcher
Only one program can be in front, or active, at a time.
To switch to a different program, you could click or double-click its icon (in the Dock, the Applications folder, Launchpad, or wherever). But the fastest method is often to use the ![]() -Tab keystroke (Figure 6-7).
-Tab keystroke (Figure 6-7).
You can use this feature in three different ways, which are well worth learning:
If you keep the
key pressed, then each press of the Tab key highlights the Dock icon of another program, in left-to-right Dock order. Release both keys when you reach the one you want. MacOS brings the corresponding program to the front. (To move backward through the open programs, press Shift--Tab.)If you leave the
key pressed, you can choose a program by clicking its icon with your mouse or by pressing the  or
or  keys.
keys.A single press of
-Tab takes you to the program you used most recently, and another, separate -Tab bounces back to the program you started in.Imagine, for example, that you’re doing a lot of switching between two programs, like your web browser and your email program. If you have five other programs open, you don’t want to waste your time
-tabbing your way through all the open programs just to get back to your web browser.
Tip
Here’s a related keystroke, equally awesome. If you press ![]() -~ (the tilde key next to the number 1), you switch to the next window in the same program.
-~ (the tilde key next to the number 1), you switch to the next window in the same program.

Figure 6-7. Apple calls this row of open program icons a “heads-up display,” named after the projected data screen on a Navy jet windshield that lets pilots avoid having to look down at their instruments.
Full Screen Mode
Features are great and all. But the more of them your software accumulates, the more toolbars and icon panels fill the screen, and the bigger the clutter problem becomes. After a while, all that “chrome” (as software designers call it) winds up crowding out the document you’re actually trying to work on.
That’s why Apple invented Full Screen mode. It’s not available in all programs, but it’s showing up in more and more of them—including almost all Apple programs: App Store, Calendar, Chess, Final Cut Pro, Font Book, GarageBand, iBooks, iMovie, iTunes, Keynote, Mail, Maps, Messages, Notes, Photo Booth, Photos, Preview, Safari, and so on.
To take a program into Full Screen mode, click the Full Screen button: the round, green dot in the upper-left corner of the document window. (And how do you know if your program even offers Full Screen mode? As your cursor approaches the green dot button, a tiny double-arrow logo appears inside: ![]() . If it’s a
. If it’s a ![]() instead, then the app isn’t eligible for Full Screening.)
instead, then the app isn’t eligible for Full Screening.)
When you click the green ![]() , the Mac hides the menu bar, scroll bars, Dock, status bars, and any other bars or palettes surrounding your work area. The window’s edges expand all the way to the edges of the screen (Figure 6-8, bottom).
, the Mac hides the menu bar, scroll bars, Dock, status bars, and any other bars or palettes surrounding your work area. The window’s edges expand all the way to the edges of the screen (Figure 6-8, bottom).
Tip
You may as well learn the keyboard shortcut to enter Full Screen mode: Control-![]() -F. The same keystroke leaves Full Screen mode, but you can also tap the Esc key for that purpose.
-F. The same keystroke leaves Full Screen mode, but you can also tap the Esc key for that purpose.
The menu bar is available—it’s just hidden. Move the pointer to the top of the screen to make it reappear.
To exit Full Screen mode, make the menu bar appear, and then click that green dot in the upper-left corner of the window (which now looks like this: ![]() ).
).
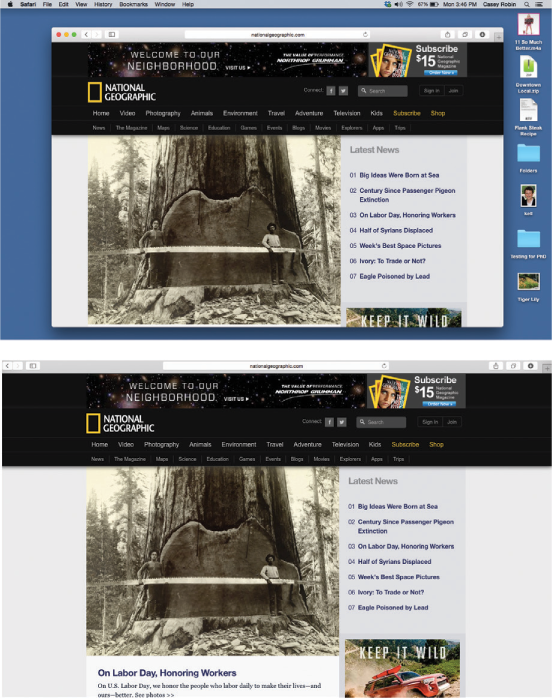
Figure 6-8. Top: So much for the glorious web. You’re seeing a web page segment, swimming in an ocean of toolbars, scroll bars, status bars, menu bars, and distracting desktop.
Bottom: In Full Screen mode, Safari stretches to the very edges of your screen, and everything else disappears. (Your address bar and tab bars are still available in this case.)
Each full-screen app becomes its own desktop in Mission Control. And you can put a full-screen app on each of your monitors, too.
To leave Full Screen mode, move your cursor to the top of the screen so that the menu bar reappears. Click the green dot once again (top left of your document window).
Split Screen Mode
Once Apple gave us Full Screen mode, the next step was obvious: split Full Screen mode. In this arrangement, two windows fill the screen, edge to edge and top to bottom. Just as in Full Screen mode, the menu bar, Dock, and all other cluttery extras are hidden to maximize screen space; the only difference is that two apps are now sharing that big monitor canvas.
This combination works very well when you want to keep a continuously updating app visible—Twitter, Mail, or FaceTime, for example—while continuing to do work in a second app. It’s also handy when you’re referring to one app (a recipe in your web browser) and making notes in another (an ingredients list in Notes).
Once again, though, Split Screen doesn’t work in all apps—only the ones that work in Full Screen mode.
Starting Split Screen Mode, Method 1
There are two ways to get in and out of Split Screen mode, but this one is quickest:
Click-and-hold the green
 button at the top-left corner of Window #1. (See Figure 6-9, top.)
The weirdest thing now happens: Whichever half of your monitor contains this window (usually the left side) becomes shaded blue (Figure 6-9, second from top). That’s the Mac’s way of telling you: “When you release your mouse or trackpad, this window will snap to fill only this half of the screen.”
Tip
At this point, you could, if you liked, drag the window to the opposite side of the screen—still holding down the mouse or trackpad—to make it fill that half.

Figure 6-9. Here’s the complete tutorial for turning on Split Screen mode.
Top: Hold down the green button in the first app.
Second from top: That half of your screen gets a blue tint.
Third from top: Release the mouse; that window now fills half your entire screen. Meanwhile, all other open windows appear in miniature so that you can choose the one you want to fill the other half of your screen. (There may even be a little pile of additional window cards at the bottom corner. These are apps whose software companies have been too lazy to make them compatible with the Full Screen/Split Screen feature.)
Bottom: And voilà: Two apps, perfectly splitting your screen’s full height and width. Feel free to drag the divider line sideways to adjust the proportions.Release the mouse or trackpad.
And sure enough: Window #1 now fills exactly half the screen (Figure 6-9, third from top). Meanwhile, all other open windows shrink down into miniature cards. That’s the Mac’s way of telling you: “Please choose Window #2, the one you’d like to fill the rest of the screen.”
Click the miniature window you want to fill the remaining half of the screen.
Now you’ve got two windows sharing your screen space 50-50 (Figure 6-9, bottom).
If you like, you can now grab the divider line and drag it, thereby adjusting the proportion of the screen occupied by each app.
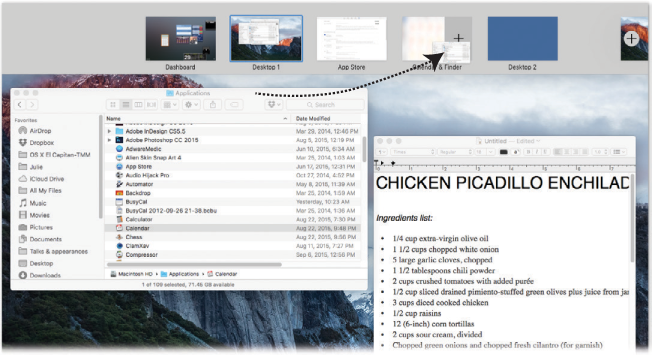
Figure 6-10. Drag a window onto an existing Full Screen–mode window’s thumbnail. The + shows you which side of the screen this new window will occupy in Split Screen mode. Release the mouse, and then click the split thumbnail to make it fill your screen.
Starting Split Screen Mode, Method 2
The second method makes sense only after you’ve read about Mission Control and Spaces, starting on the next page. Bookmark this spot, go read that, and then return here.
Back so soon? OK, great!
Now that you know what the Spaces bar is, here’s the tip: You can drag a second window onto an existing full-screen app’s thumbnail in the Spaces bar; see Figure 6-10 for details.
Exiting Split Screen Mode
Just as there are two ways to enter Split Screen mode, there are also two ways to exit it.
The title-bar method. Move your cursor to the top edge of either window and pause; its title bar appears. Now click the green
 button.
That window becomes a normal floating window. (The other window remains in Full Screen mode, on its own desktop; you can switch to it as described in “Switching Spaces”.)
Mission Control method. Enter Mission Control, as described next. (For example, press the
 key on your keyboard.) Move your cursor to the top of the screen to make the Spaces bar expand. Point to the desktop icon that contains the split screen; click the
  in the top left.
In this case, both windows exit Full Screen and become floating windows again.
Mission Control: Death to Window Clutter
These days, managing all the open windows in all the open programs can be like herding cats. Off you go, burrowing through the microscopic pop-up menus of your Dock, trying to find the window you want. And heaven help you if you need to duck back to the desktop—to find a newly downloaded file, for example, or to eject a disk. You have to fight your way through 50,000 other windows on the way to the bottom of the “deck.”
Mission Control tackles this problem in a fresh way. The concept is delicious: With one mouse click, keystroke, or finger gesture, you shrink all windows in all programs to a size that fits on the screen (Figure 6-11), like index cards on a bulletin board. Now you feel like an air-traffic controller, with all your screens arrayed before you. You click the window you want, and you’re there. It’s efficient, animated, and a lot of fun.
Tip
If you use Mission Control a lot, the zooming animation might get a little tiresome. Fortunately, you can turn that off. Open System Preferences→Accessibility→Display, and turn on Reduce Motion. From now on, Mission Control simply pops to the screen instead of zooming.
The window miniatures are scattered all over your screen. The placement isn’t entirely random; macOS tries to place the thumbnails on the screen relative to their full-size windows’ positions, relative to the top, bottom, and sides of your monitor.
You can impose a little more order on all of this, though. Open System Preferences→Mission Control, and turn on “Group windows by application.” The windows still don’t overlap, but at least the windows of each program are laid out near one another in Mission Control.
Starting and Stopping Mission Control
Mission Control is a program, just like any other. So you can open it with a click on its Dock icon, from Launchpad, from the Applications folder, and so on.
But it’s really meant to be opened quickly, fluidly, naturally, whenever the mood seizes you—with a gesture. On the trackpad, that’s a swipe upward with three fingers. (On the Magic Mouse, it’s a double-tap with two fingers—taps, not clicks.)
Note
You can change this gesture so that it requires four fingers, if you like, in System Preferences→Trackpad (or Mouse)→More Gestures→Mission Control. Use the pop-up menu.
Or you can press the dedicated ![]() key (formerly the Exposé key), if you have one, on the top row of your keyboard.
key (formerly the Exposé key), if you have one, on the top row of your keyboard.
Or you can press Control-![]() .
.
And even that’s just the beginning of the ways you can open Mission Control; read on.
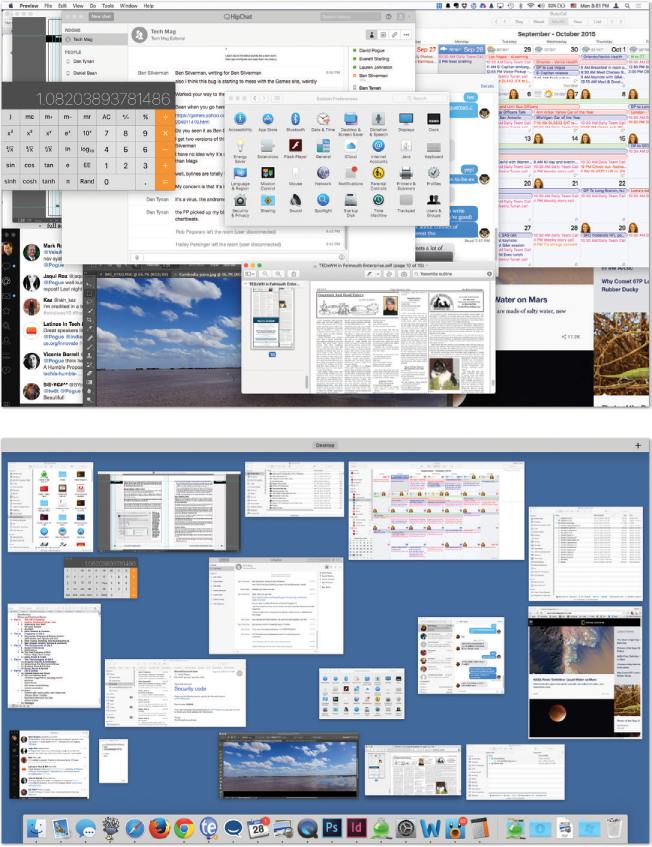
Figure 6-11. Top: Quick! Where’s the Finder in all this mess?
Bottom: With a three- or four-finger upward swipe on the trackpad, you can open Mission Control and spot every window, shrunken but not overlapped. These aren’t static snapshots of the windows at the moment you Mission Controlled them. They’re live, still-updating windows, as you’ll discover if one of them contains a QuickTime movie or a web page that’s still loading.
Note
To exit Mission Control without clicking any of your windows or virtual screens, swipe down with three fingers. Or tap the Esc key. Or click a spot in the empty background.
Mission Control keystrokes
You can reassign the Mission Control functions to a huge range of other keys, with or without modifiers like Shift, Control, and Option. To view your options, choose ![]() → System Preferences and then click the Mission Control icon.
→ System Preferences and then click the Mission Control icon.
Here you’ll find four pop-up menus (Figure 6-12). The first, Mission Control, lets you specify how you want to open Mission Control. The other three—Application windows, Show Desktop, and Show Dashboard—correspond to the three functions of the older Exposé and Dashboard features, described later in this chapter.
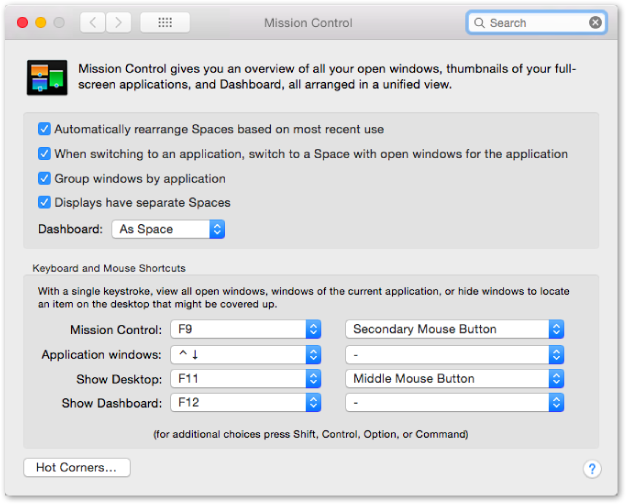
Figure 6-12. You can trigger Mission Control in any of five ways: by clicking its icon, with a finger gesture, by twitching your cursor into a certain corner of the screen (Hot Corners), by pressing a key (bottom half of this box), or by clicking the extra buttons on a multibutton mouse, including the Apple Mouse. Of course, there’s nothing to stop you from setting up all of these ways, so you can press or swipe in some situations and twitch or click in others.
Within each pop-up menu, for example, you’ll discover that all your F-keys—F1, F2, F3, and so on—are available as triggers. If, while the pop-up menu is open, you press one or more of your modifier keys (Shift, Option, Control, or ![]() ), then all these F-key choices change to reflect the key you’re pressing; now the pop-up menu says Shift-F1, Shift-F2, Shift-F3, and so on. That’s how you can make Shift-F1 trigger Mission Control, for example.
), then all these F-key choices change to reflect the key you’re pressing; now the pop-up menu says Shift-F1, Shift-F2, Shift-F3, and so on. That’s how you can make Shift-F1 trigger Mission Control, for example.
These pop-up menus also contain choices like Left Shift, which refers to the Shift key on the left side of your keyboard. That is, instead of pressing F9 to open Mission Control, you could simply tap the Shift key.
Note
This is only an example. Repeat: This is only an example. Actually using the Shift key to open Mission Control is a terrible, terrible idea, as you’ll quickly discover the next time you try to type a capital letter. This feature is intended exclusively for hunt-and-peck typists who never use the Shift key on one side.
If you have a laptop, you’ll also find out that you can tap the fn key alone for Mission Control—and this time, it’s a great choice, because fn otherwise has very little direction in life.
If your mouse has more than one button, you’ll see a second column of pop-up menus in System Preferences (Figure 6-12). Each pop-up menu offers choices like Right Mouse Button and Middle Mouse Button. Use these pop-up menus to assign Mission Control (or Exposé or Dashboard) to the various clickers on your mouse: Right-click to hide all windows, middle-click to reveal the desktop, and so on.
Note, by the way, that on a laptop, the wording isn’t “right mouse button”—it’s “secondary mouse button.” Which means “right-click.” Which means that on a laptop, you can set it up so that a “right-click” trackpad gesture triggers one of these functions. See “Notes on Right-Clicking” for all the different ways you can trigger a right-click.
Screen corners
If you click Hot Corners, you see something like Figure 10-13 (“Activating the screen saver”). The four corners here represent the corners of your screen. Using these menus, you can assign a window-management feature to each corner; for example, if you choose Mission Control from the first pop-up menu, then when your pointer hits the upper-left corner of the screen, you’ll open Mission Control. (Launchpad and Notification Center are options here, too.)
Depending on the size of your screen, this option can feel awkward at first. But if you’ve run out of keystrokes that aren’t assigned to other functions, be glad that Apple offers you this alternative.
Note
In previous versions of the operating system, whipping the pointer into a corner was one good way to turn on your screen saver. Apple hasn’t forgotten about that, which is why you’ll also find commands called Start Screen Saver and Disable Screen Saver in the pop-up menus. Apple wants to make sure you don’t get confused and assign two different functions to the same corner.
Managing Windows in Mission Control
Once you open Mission Control, you can click any window’s thumbnail to open it.
Tip
Try holding down the Shift key as you do it. You’ll enjoy watching all your windows shift around with macOS’s patented slow-motion animation, which can be quite a sight.
Or, if you decide to abandon ship and return to whatever you were doing, swipe downward with three fingers on the trackpad (two on the Magic Mouse), or press the Esc key.
The trouble with miniaturized windows is that, well, they’re miniaturized. The more windows you have open, the smaller they are, and the harder it is to see what’s in them.
If you need a little help identifying a window miniature, you have three options:
Point to a window thumbnail without clicking. MacOS displays a label for that window.
If that’s not enough information, press the space bar. That, of course, is the Quick Look keystroke, and it works here, too. It magnifies the window you’re pointing to, making it full size—big enough for you to read its contents and identify it.
Press
-~. That keystroke takes you into Exposé, described later in this chapter.
Spaces (Virtual Desktops)
Mission Control’s other star feature, Spaces, gives you up to 16 full-size monitors. Ordinarily, of course, attaching so many screens to a single computer would be a massively expensive proposition, not to mention detrimental to your living space and personal relationships.
Fortunately, Spaces monitors are virtual. They exist only in the Mac’s little head. You see only one at a time; you switch using Mission Control or a gesture.
But just because the Spaces screens are simulated doesn’t mean they’re not useful. You can dedicate each one to a different program or kind of program. Screen 1 might contain your email and chat windows, arranged just the way you like them. Screen 2 can hold Photoshop, with an open document and the palettes carefully arrayed. On Screen 3: your web browser in Full Screen mode.
You can also have the same program running on multiple screens—but with different documents or projects open on each one.
These desktops are also essential to macOS’s full-screen apps feature, because each full-screen app gets its own Spaces desktop.
Now, virtual screens aren’t a new idea—this sort of software has been available for years. But the Mac was the first to make it a standard feature of a consumer operating system.
It’s still what most people would consider an advanced feature, and it’s definitely confusing at first. But it’ll be here when you’re ready for it.
Creating a Desktop
Mission Control generally starts you off with just one Space (or “desktop,” as it’s labeled)—the one you’ve been using all along. If you’ve clicked the ![]() button in an app to make it full screen, it fills an additional desktop unto itself.
button in an app to make it full screen, it fills an additional desktop unto itself.
To create another desktop, enter Mission Control. At the top edge of the screen, the gray strip—the Spaces bar—is the command center for creating, deleting, rearranging, and configuring your virtual desktops.
Note
To save space, the Spaces bar starts out as a very thin strip bearing only the names of your desktops (Figure 6-13, top). Move your cursor into this strip to expand it vertically, so you can now see the actual thumbnail images of your desktops (Figure 6-13, bottom).
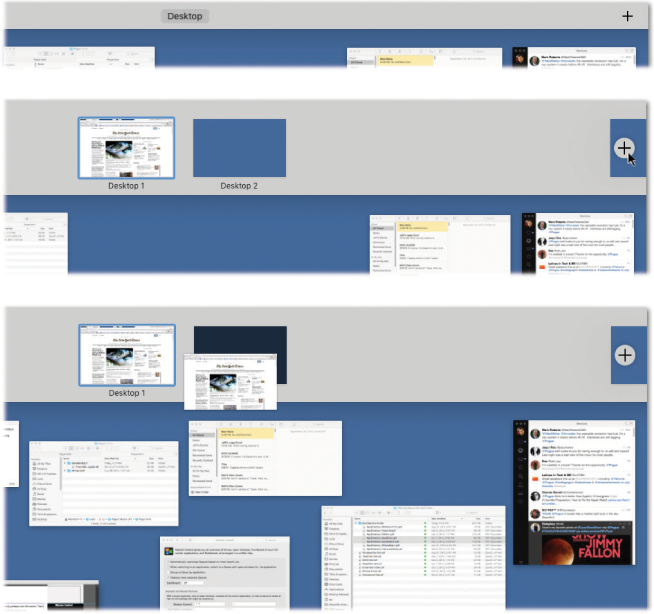
Figure 6-13. Top: When you enter Mission Control, the Spaces bar is thin and collapsed.
Middle: Click the  button to create a new blank desktop, numbered sequentially.
Bottom: Drag one of the window miniatures onto this new desktop. Or several.
Once you’re in Mission Control, you can proceed in either of two ways:
The long way. See Figure 6-13 for the step-by-steps of clicking the + button in the upper-right corner.
Note
If you’ve positioned your Dock against the right side of the screen, then the + button appears when you point to the upper-left corner. And to create a new screen by dragging a window’s icon (see “The short way,” next), drag to the upper-left corner of the screen.
The short way. Drag one window thumbnail onto any blank spot on the Spaces bar. The Mac creates a new desktop to hold it.
Switching Spaces
Once you’ve got Spaces set up and turned on, the fun begins. Start by moving to the virtual screen you want; it’s like changing the channel. Here are some ways to do that:
Swipe horizontally on your trackpad with three fingers. (On the Magic Mouse, it’s two fingers.) If you have a trackpad or a Magic Mouse, this is definitely the method to learn; it’s fast, fluid, and happy.
You can change this gesture so that it requires an additional finger, if you like, in System Preferences→Trackpad (or Mouse)→More Gestures.
Tip
If you perform this swipe slowly, you can drag the next Space only partway onto the screen. That’s sometimes handy when you want to get your bearings or to just peek into the next screen.
While pressing the Control key, type the number of the desktop you want. For example, hit Control-3 to jump to your third screen. (You have to turn on this feature first, though. See Figure 6-14.)
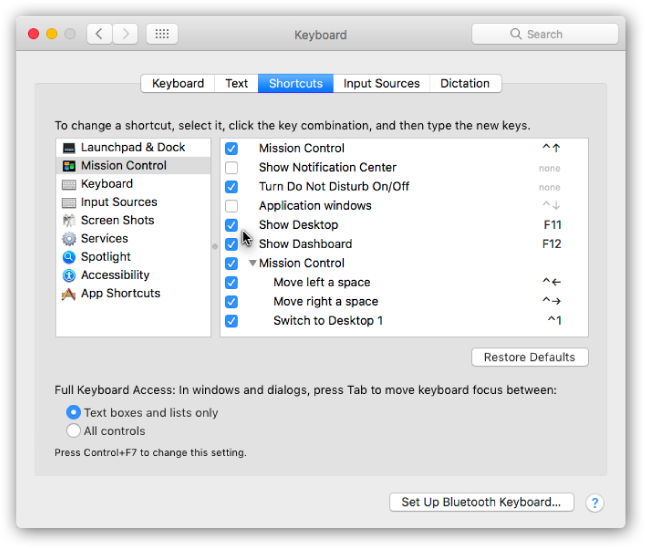
Figure 6-14. To control Spaces from the keyboard, open
→ System Preferences→Keyboard. Click Keyboard Shortcuts and then Mission Control. As shown here, Apple has preassigned keyboard shortcuts to your various Spaces—but they’re not turned on yet. Turn on the checkboxes for the shortcuts you want. (You can change those shortcuts here, too.)Enter Mission Control, and then click the desktop you want.
Press Control-
or Control- to rotate to the previous or next desktop.
When you make a switch, you see a flash of animation as one screen flies away and another appears. Now that you’re “on” the screen you want, open programs and arrange windows onto it as usual.
Tip
What if you’re using Spaces, and you want to drag something from one screen (like a photo in Photos) into a window that’s on a different screen (like an outgoing email message)?
There are two ways; take your pick. First, you can start dragging whatever it is—and then, in mid-drag, press the keystroke for Mission Control (usually fn-F9); complete the drag directly onto the other Space, and even into the relevant window in that Space.
Another approach: Start dragging. With the mouse button still down, press ![]() -Tab to open the application switcher. Continue the drag onto the icon of the receiving program, and still keep the mouse button down. MacOS switches to the appropriate virtual screen automatically.
-Tab to open the application switcher. Continue the drag onto the icon of the receiving program, and still keep the mouse button down. MacOS switches to the appropriate virtual screen automatically.
Deleting a Desktop
To delete a desktop, enter Mission Control. Point to one of the screen thumbnails without clicking until a ![]() appears in its corner; click it. The desktop disappears, and whatever windows were on it get shoved onto your main desktop.
appears in its corner; click it. The desktop disappears, and whatever windows were on it get shoved onto your main desktop.
Tip
If you don’t have the 1½ seconds to wait for the ![]() to appear, then press Option as you point. The Close button appears instantly.
to appear, then press Option as you point. The Close button appears instantly.
In apps using Full Screen mode, the symbol is different; instead of ![]() , it looks like this:
, it looks like this: ![]() . When you click, the desktop flies off the Spaces bar into the main part of your screen. That app is now a plain-vanilla window thumbnail , just like all the others in Mission Control.
. When you click, the desktop flies off the Spaces bar into the main part of your screen. That app is now a plain-vanilla window thumbnail , just like all the others in Mission Control.
The Finer Points of Spaces
Yes, Spaces is an advanced feature. But there are actually advanced features within this advanced feature. For example:
Rearrange your Spaces. Open Mission Control, and then drag the Space thumbnails around horizontally.
Note
If you’ve decided to turn on the Dashboard as a Space, as described later in this chapter, you can even drag the Dashboard out of its traditional left-side position. Put it off to the right of the other Spaces, for all Apple cares.
Multiple monitors. If you have a second monitor connected to your Mac (or even several), each one can have its own set of Spaces.
If “Displays have separate Spaces” is turned on in the Mission Control panel of System Preferences (Figure 6-12), then each monitor has its own set of Spaces. When you use one of the gestures or keystrokes for switching Spaces, you affect the Spaces on only one monitor: the one that contains your cursor at the moment.
Move a window to a different Space. Of course, you can always move a window to a different Space by dragging its tiny icon within Mission Control. But there are two faster ways.
First, you can drag a window (using its title bar as a handle) all the way to the edge of the screen. Stay there with the mouse button still down. After about a second, the adjacent screen slides into view; you’ve just moved the window.
Second, switch to the new Space. Hold your mouse down on the app’s Dock icon; from the shortcut menu, choose Options→Assign To→This Desktop. The Mac whisks that app’s windows from whatever other screen they’re on to this screen.
Move a window to all Spaces. Usually, you slap each app (or each window) onto only one Spaces desktop. Your web browser on Space 1. Email on Space 2. And so on.
Sometimes, though, you might want one app’s windows on all your desktops—perhaps because you use it so often, you want it always with you. The Finder and System Preferences are great examples. Or maybe your calendar app, your browser, or your email program.
To do that, hold the mouse button down on the program’s Dock icon until the shortcut menu appears. From this menu, choose Options→Assign To→All Desktops.
Wallpaper for every desktop. Coolly enough, though, you can set a different wallpaper photo (desktop photo) to each Space. You might find it easier to get your bearings that way. When you restart the computer, the Mac will remember not just which Spaces you had open and what was on them, but also what pictures lay behind them.
You can go about assigning desktop pictures in two ways. First switch to the Space whose picture you want to change. Then either open System Preferences→Desktop & Screen Saver→Desktop, or right-click or two-finger click a blank spot on the existing desktop background, and choose Change Desktop Background.
Note
In both cases, you may have to move the System Preferences window onto your current Space. You can do that by popping into Mission Control.
Either way, you wind up in the Preferences panel for choosing desktop wallpaper. Click the backdrop you want for this screen. Then switch to the next Space and repeat.
Two Eccentric Spaces Settings
In System Preferences→Mission Control, two settings govern the way Spaces works:
Automatically rearrange Spaces based on most recent use. If this option is turned on, then macOS will constantly rearrange your virtual desktops so that the most recently used ones are first. (The most recent one becomes Desktop #2, since Desktop #1 is always your main desktop.)
The point, of course, is to make it quick and easy to return to whatever you were doing most recently. But if you find it disorienting to have your desktops constantly changing their sequence, you can turn this option off.
When switching to an application, switch to a Space with open windows for the application. There must be some clearer way to write this checkbox.
In any case, it means that when you click the Dock icon for a running program, you jump to the Space that contains that program’s open windows already, instead of leaving you on the current Space.
For example, suppose you’re working in your browser on Desktop #3. Then you click the Mail icon on the Dock. If this option is turned on, you jump to Desktop #2 (or wherever you’ve been already working in Mail). If it’s not turned on, Mail jumps to the foreground, but you won’t see any windows—they’re stranded back on Desktop #2.
Dashboard
As you know, the essence of using a computer is running programs, which often produce documents. In macOS, however, there’s a third category: a set of weird, hybrid entities that Apple calls widgets. They appear, all at once, on a virtual desktop called the Dashboard (Figure 6-15).
Truth is, the Dashboard’s days are numbered. For one thing, this feature comes turned off in High Sierra. For another, the information modules of your Today panel (Figure 6-15) are also called widgets—and they feel a lot newer and more immediate than the Dashboard’s.

Figure 6-15. The Dashboard is a fleet of miniprograms that convey or convert all kinds of useful information, on a Spaces screen all their own. You get rid of the Dashboard either by pressing the same key again (F4 or whatever), by swiping three fingers to the right on your trackpad, or by clicking anywhere except on a widget.
But if you’re still interested, here’s how the Dashboard works.
Turn on the Dashboard Feature
Open System Preferences→Mission Control. From the Dashboard pop-up menu, choose either As Space (the Dashboard will appear on its own desktop) or As Overlay. That option makes the Dashboard widgets float on top of whatever you’re doing.
Opening the Dashboard
Once you’ve brought the Dashboard back from the dead, here’s how you open it:
If you’ve set up the Dashboard as a Space, well, it’s one of your virtual desktops. Swipe to the left with three fingers on your trackpad—repeatedly, if necessary—until you reach the far-left “desktop.” (On a Magic Mouse, swipe with two fingers.)
Or just open Mission Control, and then click the Dashboard thumbnail at the top left of the screen.
If you’ve set up the Dashboard as an overlay, press the Dashboard keystroke.
On older Macs, that would be F4, bearing the Dashboard logo (
 ). On more recent Macs, where the F4 key bears a Launchpad icon (
 ) instead, the keystroke is F12. (If F12 adjusts the volume when you press it, then you must hold down the fn key as you press F12.) In all of these cases, you can change the Dashboard keystroke to whatever you like, as described in “Dashboard Preferences”.
Tip
Dashboard is an actual program, with an icon of its own in your Applications folder. If you’re desperate, you can always open it with a double-click or by using any of the usual program-opening tricks.
Using Dashboard
If you do, in fact, manage to open Dashboard, you now see the display shown in Figure 6-15. Welcome to the Dashboard.
These weird, hybrid entities are like little web pages. They’re meant to display information, much of it from the Internet, and they’re written using web programming languages like HTML and JavaScript.
Mastering the basics of Dashboard won’t take you long at all:
To move a widget, drag it around the screen. (Click anywhere except on a button or a control.)
To close a widget, press the Option key as you move the mouse across the widget’s face. You’ll see the
 button appear at the widget’s top-left corner; click it.
To open a closed widget, click the big
 button at the bottom of the screen. Now the Widget Browser appears (Figure 6-16), as described in the next section. Open the widget you want by clicking its icon.
To hide one of Apple’s widgets, or to delete one you’ve installed yourself, use the Widget Browser described next.
The Widget Browser
The Widget Browser screen appears when you click the big ![]() button at the bottom of the Dashboard. As shown in Figure 6-16, it’s simply a master collection of every widget on your Mac, even the ones that you haven’t dragged onto the main Dashboard screen. Its goal in life: managing all your other widgets.
button at the bottom of the Dashboard. As shown in Figure 6-16, it’s simply a master collection of every widget on your Mac, even the ones that you haven’t dragged onto the main Dashboard screen. Its goal in life: managing all your other widgets.
For example, you can enter icon-deleting mode by holding your cursor down on any one of them; they all start wiggling—and displaying the ![]() button at the top-left corner.
button at the top-left corner.
Note
Even in wiggling-icon mode, you’re not allowed to delete Apple’s widgets—only ones you’ve downloaded and installed yourself.
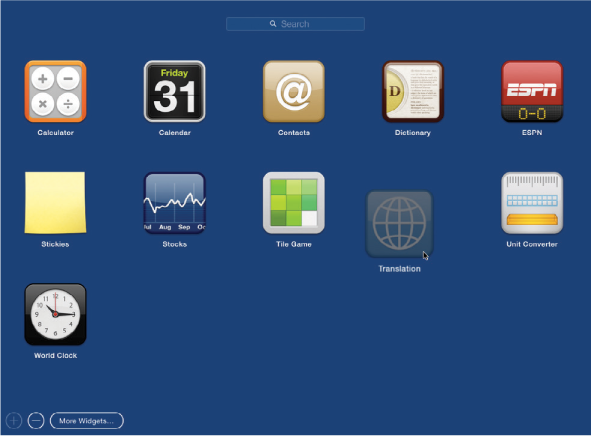
Figure 6-16. The Widget Browser works exactly like the Launchpad. Move widget icons around by dragging. Drag one widget on top of another to create a folder. Search using the box at the top of the screen. Start them wiggling, for ease of mass deletion, by holding your cursor down on any icon, or by clicking the big  button. Read “Launchpad”–“Windows That Auto-Reopen” again, taking care to mentally substitute the word “widget” for “app.”
But what you’ll do here most often is simply click a widget’s icon to install it onto the main Dashboard screen.
(To close the browser without pulling a new icon out of it, click anywhere on the background.)
The Widget Browser also harbors the godlike power of the More Widgets button, described in Figure 2-2.
Dashboard Tips
Dashboard is crawling with cool tips and tricks. Here are a few of the biggies:
To refresh a certain widget—for example, to update its information from the Internet—click it and press
-R. The widget instantly twist-scrambles itself into a sort of ice-cream swirl (you’ve got to see it to believe it) and then untwists to reveal the new data.You can open more than one copy of the same widget. Just click its icon more than once in the Widget Browser. You wind up with multiple copies of it on your screen: three World Clocks, two Stock Trackers, or whatever. That’s a useful trick when, for example, you want to track the time in more than one city, or when you maintain two different stock portfolios.
If you keep the Shift key pressed when you click the big
button, the Widget Browser fades in, in gorgeous slow motion. Aren’t you just glad to be alive?
Dashboard Preferences
To change the Dashboard keystroke to something other than F4 or F12, open System Preferences→Mission Control.
Here you’ll discover that you can choose almost any other keyboard combination to summon and dismiss the Dashboard, or even choose a screen corner that, when your mouse lands there, acts as the Dashboard trigger. This works exactly as described in “Mission Control keystrokes”.
Note
Yes, you can also change the Dashboard keystroke on the Keyboard→Shortcuts pane of System Preferences. But if you use the Mission Control pane instead, then you can set up a screen corner or a mouse button to trigger Dashboard—not just a keyboard combo.
Widget Catalog
Apple starts you off with 15 standard widgets: Calculator, Calendar, Contacts, Dictionary, ESPN, Flight Tracker, Movies, Stickies, Stocks, Tile Game, Translation, Unit Converter, Weather, Web Clip, and World Clock. They look awfully simple, but some of them harbor a few secrets.
For a detailed guide to each of these widgets, see the free downloadable appendix, “Dashboard Widgets,” on this book’s “Missing CD” page at www.missingmanuals.com.
More Widgets
Thousands of new widgets, written by other people, are available on the web: games, chat and email notifiers, gas-price reporters, calculators and translators, news and sports updaters, finance and health trackers, and on and on.
To see Apple’s current list of goodies, use one of these tactics:
The short way. Right-click or two-finger click the Dashboard icon in the Dock. From the shortcut menu, choose More Widgets.
The long way. In Dashboard, open the Widgets browser; click More Widgets.
Either way, you go to the Apple Dashboard downloads page. Here you’ll find offerings like the Yahoo Local Traffic widget (gives you the traffic conditions in your area), Air Traffic Control (identifies wireless AirPort base stations within range of your laptop), and TV Tracker (shows what you could be watching on TV right now instead of working). There are also FedEx package trackers, joke-of-the-day widgets, comic-strip-of-the-day widgets, and many other varieties.
When you download a widget, macOS asks if you’re sure you want to install it. If you confirm, macOS downloads it and then displays it proudly in the Widget Browser. Click it to open. (Behind the scenes, it’s been copied into your Home→Library→Widgets folder. Only you will see that Dashboard widget, because it’s been copied into the Widgets folder of your account. Anyone else who has an account on this Mac won’t see it.)
Exposé
Before Mission Control, there was Exposé. It was flexible, it was novel, it was a little confusing. A few years ago, Apple incorporated the main functions of Exposé into Mission Control—but Apple didn’t want to break all those Exposé fans’ hearts. So Exposé is still there, for the benefit of old-timers who don’t like change.
Well, it’s mostly there. There used to be three different Exposé modes. One showed you miniatures of all windows in all programs, one showed you miniatures of all windows in just one program (Figure 6-17, top), and one hid all windows in all programs so you could see the desktop (Figure 6-17, bottom).
These days, only the second and third Exposé functions still exist. (The first one—showing all windows in all programs—is what Mission Control is for.)
You can trigger both of these modes using different combinations of the mouse and keyboard. The following pages cover all of them, but of course you’re not expected to learn all that. Just find the one trigger that seems most convenient, and stick with it.
One-App Exposé
When you trigger Mission Control, you see the thumbnails of all windows in all apps.
But sometimes it’s useful to see only the windows of one app arrayed before you—the app you’re using.
That’s great when you’re web browsing or word processing. This Exposé function makes the program’s windows spread out, and shrink if necessary, so you can click the one you want (Figure 6-17, top).
Here’s how Apple intends for most people to trigger this option:
Swipe down on your trackpad with three fingers. You’re shown the miniatures of your current app’s windows. If you point to an icon on the Dock before you swipe, you trigger Exposé for that app instead. (There’s no equivalent on the Magic Mouse—although if you install the free BetterTouchTool, you can dream up a gesture of your own.)
Note
You have to turn this feature on in System Preferences→Trackpad→More Gestures. Once you’ve done that, you can change this gesture to four fingers on the trackpad using the pop-up menu—handy if you find yourself triggering the function by accident.
Press Control-F3 (
). That’s the keystroke on aluminum keyboards. (If you have a plastic keyboard, press F10.)
Tip
As noted in the box on the facing page, you can also press fn-F10 or, with some tweaking, F10 alone. Or you can change the keystroke altogether, as described in “Redefining a Keystroke”.
Enter Exposé from the heads-up display. The heads-up display is the macOS application switcher—the row of “These are your open programs” icons—which appears when you press
-Tab.
Figure 6-17. Top: When you trigger one-app Exposé, you get a clear shot at any window in the current program (TextEdit, in this example). In the meantime, the rest of your screen attractively dims. In model Apple apps, like TextEdit and Preview, you even get a little row of icons at the bottom. They represent recently opened files, ready for clicking.
Bottom: Trigger desktop Exposé when you need to duck back to the desktop for a quick administrative chore. Here’s your chance to find a file, throw something away, eject a disk, or whatever, without having to disturb your application windows.
Tap the same key again to turn off Exposé.The cool thing is that once you’ve got that heads-up display open, you can press
 or to enter Exposé for whatever program’s icon is highlighted! From there, release the keys and hit Tab to cycle through your open apps.
Use Dock Exposé. Click the program’s Dock icon and hold the button down for half a second. (Or, for faster service, right-click or two-finger click the program’s Dock icon.)
This feature has one chief advantage over the keystroke method: You can Exposé-ize any program’s windows, not just the one you’re using at the moment.
Shove your mouse into whatever corner of the screen you’ve chosen. See “Screen corners” for instructions.
Once you’ve triggered Exposé, you’re not quite finished yet. As shown in Figure 6-17, beneath the window thumbnails, you get to see the icons of documents you’ve worked on recently in this app (at least in enlightened Apple programs like TextEdit).
Desktop Exposé
The other flavor of Exposé is surprisingly handy. It sends all windows in all programs cowering to the edges of your screen, revealing the desktop beneath in all its uncluttered splendor (Figure 6-17, bottom).
Here’s the keystroke scheme:
Current keyboards: Press
-F3 (). That’s the trigger for current aluminum keyboards and laptops.
Note
Once again, you can also press fn-F11, or (if you set it up) F11 by itself. See the box on the previous page. You can also install a Show Desktop button on the Touch Bar, if you have one (“The Complicated Story of the Function Keys”).
Plastic keyboards: Press F11.
The windows fly off to the edges of the screen, where they remain—forever or until you tap the keystroke again, click a visible window edge, double-click an icon, or take some other window-selection step.
This trick saves headache and hassle in situations like these:
You’re writing an email message, and you want to attach a file. Tap the desktop Exposé keystroke, and then root around in the Finder until you locate the file you want. Begin to drag it, and then, without releasing the mouse button, tap the desktop Exposé keystroke again to bring back your email window. (Or drag the attachment directly onto your email program’s icon on the Dock and pause until its window thumbnails appear.)
Move your cursor, with the file in mid-drag, directly over the outgoing message window; release the cursor to create the attachment. You’ve just added an attachment from the desktop in one smooth motion.
Tip
You can apply the same life-changing shortcut to dragging a graphic into a page-layout program, a folder of photos into Photos, a sound or graphic into iMovie, and so on.
You want to open a different document. For many people, having access to the entire Finder beats having to use the Open dialog box. Double-clicking the icon you want automatically opens it and turns off Exposé.
You’re on the web, and you want to see if some file has finished downloading. Trigger desktop Exposé to survey the situation on your desktop.
If the layer of open programs is the atmosphere, the Finder is the earth below—and the ability to teleport back and forth is a huge time-saver.
Exposé Tip-O-Rama
Just having your world o’ windows spread out like index cards is magic enough. But these windows are live. You can work with them. Let us count the ways:
Tab through Exposé’d apps. Once you’ve started one-app Exposé and a program’s windows are arrayed before you, press the Tab key. With each tap, you cycle through the open apps, each getting the Exposé treatment in turn. It’s an informative way to inspect what’s happening in each open program without losing your way. (Pressing
-~ does the same thing.) Shift-Tab, as usual, cycles through the programs in the opposite direction.
Tip
You can also switch to another app’s microwindows by clicking its Dock icon.
Hold down instead of two presses. Most of the time, you’ll probably use Exposé in two steps. You’ll tap the keystroke once to get the windows out of the way and tap it again to bring them back (if, indeed, you haven’t clicked a window to bring them back).
In some cases, though, you may find it easier to hold down the relevant key. For example, hold down
-F3 (Show Desktop) to see if a file is finished copying to the desktop, and then release the keys to bring back all the windows. (Actually, you can let go of the key as soon as you’ve entered Exposé.) For quick window-clearing situations, that method saves you the step of having to press the keystroke a second time to turn off Exposé.Use the spring-loaded Dock. This trick is great when you want to drop a file from one program into a particular window belonging to another.
The most common example: You want to add an attachment to an outgoing email message. In the Finder, locate the file’s icon. Drag it directly onto your email program’s Dock icon—and pause with your finger still on the button. After a half-second, Exposé happens, showing all your email program’s open windows. Now continue your drag onto the miniaturized window of the outgoing message so it’s highlighted, tap the space bar to open it, and then release. Presto! The file is attached.
This trick also works great when you want to drop a photo into a newsletter, for example, or a text clipping into a word-processing document.
Dip into Quick Look. Once you’ve got shrunken windows on the screen, tap your arrow keys to highlight a window (or point with your mouse at one without clicking). A bright-blue border moves from window to window.
At any point, you can press the space bar to make that one window return to life size. You haven’t really activated it—you can’t edit it—but at least you can see it at full size.
And here’s the very cool part: Once you’ve triggered Quick Look like this, you can press the arrow keys to zap other miniwindows back to full size, without having to exit Quick Look. Or, again, point to other windows without clicking. Each zooms in to 100 percent size. (All of this is much easier to do than to imagine.)
You can keep examining your windows at full size until you spot the one you’re after; now tap Return (or click the mouse in the window) to exit Quick Look and Exposé. You’ve just opened that window, and you’re ready to roll.
Tip
Keep in mind that you can change all of these Exposé triggers—keyboard shortcuts, hot corners, and so on. See “Mission Control keystrokes”.
Hiding Programs the Old-Fashioned Way
When it comes to getting windows out of your way, nothing can touch Mission Control and Exposé for speed and entertainment value. Once you’ve mastered those features, the traditional rituals of hiding windows will seem charmingly quaint. “When I was your age,” you’ll tell your grandchildren, “we used to have to hold down the Option key to hide windows!”
But you know the drill at software companies: They giveth, but they never taketh away. All the old techniques are still around for the benefit of Mac fans who use them by force of habit.
Hiding the Program You’re Using
For the purposes of this discussion, when a program is hidden, all its windows, tool palettes, and button bars disappear. You can bring them back only by bringing the program to the front again (by clicking its Dock icon, for example).
If your aim is to hide only the frontmost program, macOS offers a whole raft of approaches. Many of them involve the Option key, as listed here:
Option-click any visible portion of the desktop. The program you were in vanishes, along with all its windows.
Option-click any other program’s icon on the Dock. You open that program (or bring all its windows to the front) and hide all the windows of the one you were using.
Option-click any visible portion of another program’s windows. Once again, you switch programs, hiding the one you were using.
From the Application menu, choose Hide Photos (or whatever the program is). The Application menu is the boldfaced menu that bears the program’s name.
From the program’s Dock icon shortcut menu, choose Hide. You open the shortcut menu, of course, by right-clicking or two-finger clicking. You also get a Hide button if you click-and-hold on the Dock icon for half a second.
When you’ve highlighted a program’s icon by pressing
-Tab to rotate through the running programs, press the letter H key. The program hides itself instantly. Leave the key down the whole time and, after pressing the H, press Tab again to move on to the next program. If you release the keys while “stopped” on the program instead, you’ll bring it forward rather than hiding it.Press
-H. This may be the easiest and most useful trick of all (although it doesn’t work in a few oddball programs). Doing so hides the program you’re in; you then “fall down” into the next running program.
Tip
Consider this radical time-saving proposal: Never quit the programs you use frequently. Instead, simply hit ![]() -H whenever you’re finished working in a program. That way, the next time you need it, the program launches with zero wait time.
-H whenever you’re finished working in a program. That way, the next time you need it, the program launches with zero wait time.
In general, macOS’s virtual-memory scheme is so good that there’s almost no downside to leaving your programs open all the time.
To unhide a program and its windows, click its Dock icon again, choose the Show All command in the Application menu, or press ![]() -Tab to summon the heads-up application display.
-Tab to summon the heads-up application display.
Tip
The Dock continues to display the icons of all running programs without any indication that you’ve hidden them. Fortunately, that’s easy enough to fix. All you need is the free program TinkerTool, which is available on this book’s “Missing CD” page at www.missingmanuals.com. It offers a simple checkbox that makes hidden programs appear with transparent Dock icons.
Hiding All Other Programs
Choosing Hide Others from your program’s Application menu means, of course, “Hide the windows of every program but this one.” It even hides your Finder (desktop) windows, although desktop icons remain visible.
Better yet, there’s a keystroke for this command: Option-![]() -H. That’s one small step for keystrokes, one giant leap for productivity geeks.
-H. That’s one small step for keystrokes, one giant leap for productivity geeks.
Tip
If you right-click or two-finger click a program’s Dock icon, you get its shortcut menu, including a Hide command. If you press Option, it changes to say Hide Others. It’s a lot more work than the methods described already, but…you know. One strives for thoroughness.
If this trick interests you, then you might also enjoy its corollary, described next.
The Bring-Forward, Hide-All-Others Trick
Here’s a terrific technique that lets you bring one program to the front (along with all its open windows) and hide all other windows of all other open programs—with one click.
You might think of it as Hero mode, or Front-and-Center mode, or Clear My Calendar mode.
In any case, the trick is to Option-![]() -click the lucky program’s icon on the Dock. As it jumps to the fore, all other windows on your Mac are instantly hidden. (You can bring them back, of course, by clicking the appropriate Dock icons.)
-click the lucky program’s icon on the Dock. As it jumps to the fore, all other windows on your Mac are instantly hidden. (You can bring them back, of course, by clicking the appropriate Dock icons.)
Hiding (Minimizing) Individual Windows
You can also hide or show individual windows of a single program. In fact, Apple must believe that hiding a window will become one of your favorite activities, because it offers at least three ways to do it:
Choose Window → Minimize Window, if your program offers such a command, or press
-M.Click the Minimize button on the window’s title bar.
Double-click the window’s title bar. (If this doesn’t work, choose
→ System Preferences→Dock. Make sure “Double-click a window’s title bar to minimize” is turned on.)
In any case, the affected window shrinks down until it becomes a new icon on the right side of the Dock. Click that icon to bring the window back.
How Documents Know Their Parents
Every operating system needs a mechanism to associate documents with the applications that created them. When you double-click a Microsoft Word document icon, for example, it’s clear that you want Microsoft Word to launch and open the document.
So how does macOS know how to find a document’s mommy? It actually has two different mechanisms:
File name extensions. A file name extension is a suffix following a period in the file’s name, as in Letter to Mom.doc. (It’s usually three letters long, but it doesn’t have to be.) These play a role in determining which documents open into which programs.
That’s how Windows identifies its documents, too. If you double-click something called memo.doc, it opens in Microsoft Word. If you double-click memo.wri, it opens in Microsoft Write, and so on.
Note
MacOS comes set to hide most file name extensions, on the premise that they make the operating system look more technical and threatening. If you’d like to see them, however, then choose Finder→Preferences, click the Advanced button, and then turn on “Show all filename extensions.” Now examine a few of your documents; you’ll see that their names display the previously hidden suffixes.
You can hide or show these suffixes on an icon-at-a-time basis, too (or a clump-at-a-time basis). Just highlight the icon or icons you want to affect, and then choose File → Get Info. In the resulting Info window, proceed as shown in Figure 6-18.
Your preferences. If you’ve used the Always Open With command to specify which program opens your document, then that’s the one that opens; this preference overrides the file name extension system. MacOS memorizes that new pairing.
It’s possible to live a long and happy life without knowing anything about these suffixes and relationships. But if you’re prepared for a little bit of technical bushwhacking, you may discover that understanding document-program relationships can be useful in troubleshooting, keeping your files private, and appreciating how macOS works.
Reassigning Documents to Programs
Unfortunately, file name extensions aren’t always especially specific. Suppose you’ve downloaded a graphic called Sunset.jpg. Well, almost any program these days can open a JPEG graphic—Photoshop, Pages, Word, Preview, Safari, and so on. How does macOS know which of these programs to open when you double-click the file?
Fortunately, you can decide. You can reassign a document (or all documents of its kind) to a specific program. Here’s the rundown.
Reassigning a certain document—just once
Double-clicking a graphics file generally opens it in Preview (“Preview”). Most of the time, that’s a perfectly good arrangement. But Preview has limited editing powers. What if you decide to edit a graphics file more substantially? You’d want it to open, just this once, into a different program—Photoshop Elements, for example.
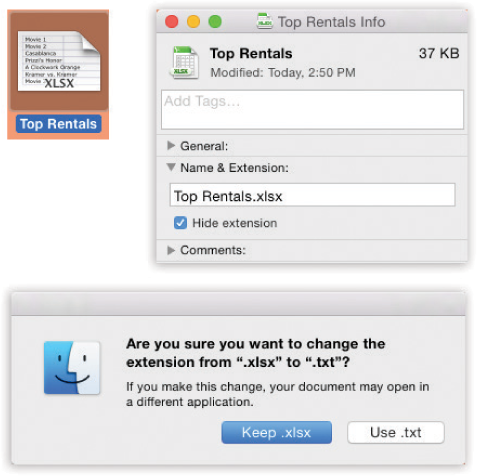
Figure 6-18. Top: In the Info window, open the Name & Extension pane. Now you can see what macOS really thinks your file is called. Turn on “Hide extension” if you’d rather not see the file name suffix in the Finder.
Bottom: If you try to add a suffix of your own, macOS objects, in effect saying, “Hey—I’ve already got a file name extension for this, even if you can’t see it. Are you sure you know what you’re doing?” (And you can turn off this warning, if you like. Choose Finder→Preferences→Advanced pane. Turn off “Show warning before changing an extension.”)
To do so, you must access the Open With command. You can find it in three places:
Highlight the icon and then choose File → Open With (Figure 6-19).
Highlight the icon and then open the
 menu. In the menu, choose Open With.
Right-click or two-finger click the file’s icon. From the shortcut menu, choose Open With.
Study the submenu for a moment (Figure 6-19, top). The program whose name says “(default)” indicates which program usually opens this kind of document. From this pop-up menu, choose the name of the program you’d rather open this particular file, right now, just this once.
Reassigning a certain document—permanently
After opening a TIFF file in, say, Photoshop Elements for editing, you haven’t really made any changes in the fabric of your Mac universe. The next time you double-click that file, it opens once again in Preview.
If you wish this particular file would always open in Photoshop Elements, the steps are slightly different. In fact, there are three different ways:
In the Choose an Application dialog box (the one that appears when you double-click a document whose “parent” program isn’t clear), turn on Always Open With (shown at bottom in Figure 6-19).
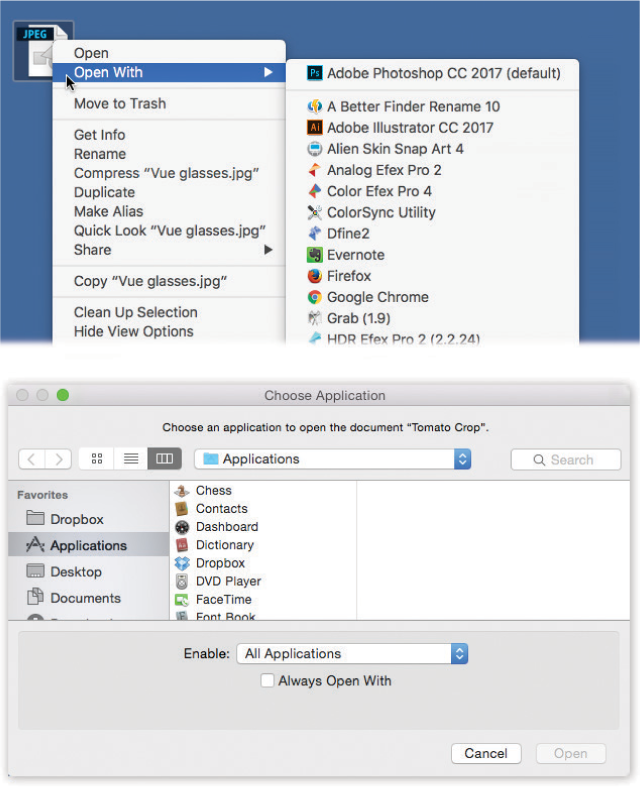
Figure 6-19. Top: The shortcut menu offers a list of programs capable of opening an icon. If you were to press the Option key right now, the words “Open With” would suddenly change to say “Always Open With.”
Bottom: If you choose Other, you’re prompted to choose a different program. Turn on Always Open With if you’ll always want this document to open in the new parent program. Otherwise, this is a one-time reassignment.Start out with one of the previously described techniques (for example, File → Open With, or right-click the file’s icon and choose Open With)—but after you see the menu, press the Option key, too. Before your very eyes, the Open With command changes to say Always Open With.
Highlight the icon, and then choose File → Get Info. Open the “Open with” panel. Choose a new “parent” program’s name from the pop-up menu. You’ll see that the word “(default)” changes position, now tacking itself onto the name of the program you’ve chosen.
Tip
You can use a similar trick to reassign the parenthood of a whole flock of selected icons at once. Once you’ve selected them, keep the Option key pressed as you choose File → Show Inspector. In the “Open with” section of this specialized Get Info window, choose a new program from the pop-up menu. The message at the top of the window—“22 items,” for example—reminds you that you’re changing the whole batch at once.
Reassigning all documents of one type
So much for reassigning one document (or a group of documents) at a time. What if you’re writing, say, a book about macOS, and you’ve been taking a lot of screenshots? MacOS saves each captured screen illustration as a graphics file in something called PNG format. That’s all fine, except that every time you double-click one of these, it opens into Preview, where you can’t paint out unwanted details.
You could reassign all these files, one at a time, to a different program, but your grandchildren would have grandchildren by the time you finished. In this case, you want to tell macOS, “For heaven’s sake, make all PNG files open in Photoshop from now on!”
To make it happen, start by highlighting any PNG file. Choose File → Get Info. (The shortcut menus won’t help you in this case.) Open the “Open with” panel.
From its pop-up menu, choose the program you want to open this kind of document from now on.
Tip
If the one you prefer isn’t listed, use the Other option, which opens the “Choose an application” dialog box so you can navigate to the one you want, as shown in Figure 6-19. Find and double-click the program.
Or, instead of choosing Other, you can also choose App Store. It’s Apple’s way of saying, “Hey—if you don’t have a program that can open this document, maybe you should just go buy one right now!”
This time, follow up by clicking Change All beneath the pop-up menu. (This button is dimmed until you’ve actually selected a different program from the pop-up menu.) Confirm by clicking Continue or pressing Return.
From now on, double-clicking any similar kind of document opens it in the newly selected program.
Keyboard Control
MacOS offers a fantastic feature for anyone who believes life is short: keyboard-controllable menus, dialog boxes, pop-up menus, and even Dock pop-up menus. You can operate every menu in every program without the mouse.
In fact, you can operate every control in every dialog box from the keyboard, including pop-up menus and checkboxes. And you can even redefine many of the built-in macOS keystrokes, like Shift-![]() -3 to capture the screen as a graphic.
-3 to capture the screen as a graphic.
In fact, you can add or change any menu command in any program. If you’re a keyboard-shortcut lover, your cup runneth over.
Here are some of the ways you can control your Mac mouselessly. In the following descriptions, you’ll encounter the factory settings for the keystrokes that do the magic—but as you’ll see in a moment, you can change these key combos to anything you like. (The System Preferences → Keyboard → Shortcuts tab contains the on/off switches for these features.)
Note
On modern-day aluminum keyboards, the keystrokes described below may not work unless you also press the fn key simultaneously.
If that seems clumsy, you can eliminate the fn-key requirement either by using the “Use all F1, F2, etc. keys as standard function keys” option described in the box in “Desktop Exposé”—or by choosing a different keystroke altogether (“Redefining a Keystroke”).
Control the Menus
When you press Control-F2, the ![]() menu is highlighted. At this point, you can “walk” to another menu by pressing the
menu is highlighted. At this point, you can “walk” to another menu by pressing the ![]() or
or ![]() keys (or Tab and Shift-Tab). When you reach the menu you want, open it by pressing
keys (or Tab and Shift-Tab). When you reach the menu you want, open it by pressing ![]() , space, or Return.
, space, or Return.
Walk down the commands in the menu by pressing ![]() or
or ![]() , or jump directly to a command in the menu by typing the first couple of letters of its name. Finally, “click” a menu command by pressing Return or the space bar.
, or jump directly to a command in the menu by typing the first couple of letters of its name. Finally, “click” a menu command by pressing Return or the space bar.
You can also close the menu without making a selection by pressing Esc or ![]() -period.
-period.
Control the Dock
Once you’ve pressed Control-F3, you can highlight any icon on the Dock by pressing the appropriate arrow keys (or, once again, Tab and Shift-Tab).
Then, once you’ve highlighted a Dock icon, you “click” it by pressing Return or the space bar. Again, if you change your mind, press Esc or ![]() -period.
-period.
Tip
Once you’ve highlighted a disk or folder icon, you can press the ![]() or
or ![]() keys to make its shortcut menu appear. (If you’ve positioned the Dock vertically, then use
keys to make its shortcut menu appear. (If you’ve positioned the Dock vertically, then use ![]() or
or ![]() instead.)
instead.)
Cycle Through Your Windows
Every time you press Control-F4, you bring the next window forward, eventually cycling through every window in every open program. Add the Shift key to cycle through them in the opposite order.
You may remember that macOS offers a different keystroke for cycling through the different windows in your current program (it’s ![]() -~, the tilde symbol at the upper left on your keyboard). Control-F4, on the other hand, tours all windows in all programs. Both keystrokes are useful in different situations.
-~, the tilde symbol at the upper left on your keyboard). Control-F4, on the other hand, tours all windows in all programs. Both keystrokes are useful in different situations.
Control Tool Palettes
In a few programs that feature floating tool palettes, you can highlight the frontmost palette by pressing Control-F6. At this point, use the arrow keys to highlight the various buttons on the palette. You can see the effect when, for example, you’re editing text in TextEdit and you’ve also opened the Font palette. Pressing Control-F6 highlights the Font palette, taking the “focus” off your document.
Control Menulets
Here’s a gem you may not have heard about: You can operate menulets—those menu-bar status indicators for your speaker volume, wireless networks, and so on—from the keyboard, too.
This time, the trick is to hit Control-F8. That highlights the leftmost Apple menulet. Now you can use your ![]() and
and ![]() arrow keys to move around the menu bar; when you’ve highlighted the one you want, press Return or the space bar to “click” that menu and open it.
arrow keys to move around the menu bar; when you’ve highlighted the one you want, press Return or the space bar to “click” that menu and open it.
Control Dialog Boxes
You can also navigate and manipulate any dialog box from the keyboard.
See the dialog box shown in Figure 6-20? If you turn on “All controls” at the bottom, then pressing the Tab key highlights the next control of any type, whatever it may be—radio button, pop-up menu, and so on. Press the space bar to “click” a button or to open a pop-up menu. Once a menu is open, use the arrow keys (or type letter keys) to highlight commands on it, and use the space bar to “click” your choice.
Changing a Menu Keyboard Shortcut
Suppose you love Photos (and who doesn’t?). But one thing drives you crazy: The Revert to Original command, which discards all the changes you’ve ever made since taking the photo, has no keyboard shortcut. You must trek up to the menu bar every time you need that command.
This is why macOS lets you add keyboard shortcuts to menu commands that lack them—or change the commands in programs whose key assignments break with tradition. (It works in any program that uses the standard macOS menu software, which rules out older versions of Microsoft Office.) Here’s the routine:
Choose
→ System Preferences→Keyboard. Click the Shortcuts tab, and then click App Shortcuts in the left-side list.You’re shown a list of any keyboard assignments you’ve created so far.
Click the + button just beneath the list.
The dialog box shown in Figure 6-20 appears.
Indicate which program needs behavior modification.
In this example, you’d choose Photos from the Application pop-up menu. (If the program’s name doesn’t appear in the pop-up menu, then choose Other; navigate to, and double-click, the program you want.)
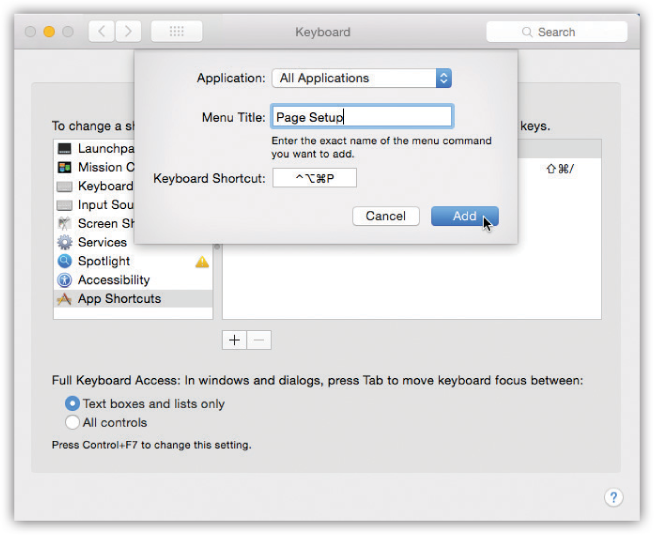
Figure 6-20. If you choose All Applications from the top pop-up menu, you can change the keyboard combo for a certain command wherever it appears. You could, for example, change the keystroke for Page Setup in every program at once. (Beware the tiny yellow triangles; they let you know if a chosen keystroke conflicts with another macOS keystroke.)
Carefully type in the name of the menu command whose keyboard shortcut you want to change or add.
Type it exactly as it appears in the menu, complete with capitalization and the little ellipsis (…) that may follow it. (You make the ellipsis character by pressing Option-semicolon.)
Click in the Keyboard Shortcut box. Press the new or revised key combo you want.
For example, press Control-R for Photos’ Revert to Original command. You’ll see the Mac’s notation of your keystroke appear in the Keyboard Shortcut box—unless, of course, the combo you selected is already in use within that program. In that case, you hear only an error sound that means “Try again.”
Click Add.
The dialog box closes. By scrolling down in your Keyboard Shortcuts list, you see that the keystroke you selected has now been written down for posterity under the appropriate program’s flippy triangle. (To get rid of it, click its name and then click the — button beneath the list.)
The next time you open the program you edited, you’ll see that the new keystroke is in place.
Tip
To delete or change one of your custom menu shortcuts, open System Preferences→Keyboard→Shortcuts. Click App Shortcuts in the list at left. Click the command you’d like to edit. Press Delete to get rid of it; or, to try a different key combo, click where the existing keyboard shortcut appears and then press a new one.
Redefining a Keystroke
As you’ve no doubt become painfully aware, there are hundreds of keyboard combinations for the various macOS functions and settings. That’s good, because keyboard shortcuts are efficient and quicker than using the mouse. But that’s also bad, because there’s no way you’ll be able to remember all of them—and some of the most useful shortcuts are ridiculous, multikey affairs that you’ll never remember at all.
In the keyboard-shortcut center, shown in Figure 6-21, you can look over all the common macOS hidden keyboard functions—for Mission Control, Exposé, Spotlight, Dashboard, the Dock, and many others—and change them.
Here’s how it goes:
Choose
→System Preferences. Click Keyboard. Click the Shortcuts tab.You arrive at the dialog box shown in Figure 6-21.
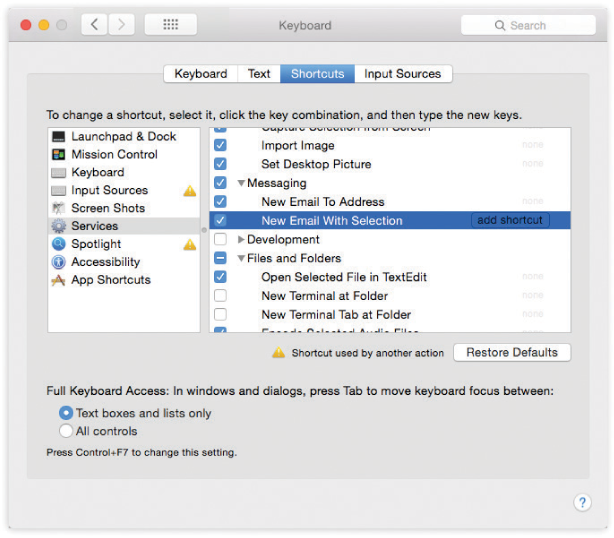
Figure 6-21. The keyboard-shortcut center lets you redefine the keystrokes that trigger many basic macOS features, menu commands in your programs, and software you’ve built yourself using Automator.
In the left-side list, click the category or function you want.
Your choices include Launchpad & Dock, Mission Control, Keyboard, and so on. When you click a category name, you see the available shortcuts.
Tip
You don’t have to be content with changing one of these keyboard shortcuts. You can also turn it off by clicking the corresponding checkbox. That’s great if one of Apple’s predefined keystrokes—for a function you don’t even use—is interfering with one in a program you like.
Click the command you want to change. Then click the current keyboard combination (or the “add shortcut” button, if there is no existing shortcut).
Suppose, for example, that you wish the Show Desktop Exposé keystroke were something easier to remember, like Control-D. So in step 2, you’d click Mission Control. In this example, you’d click Show Desktop. Then you’d click where it currently says “F11.”
Press a new key combination.
In this example, you’d press Control-D.
Be careful, though. MacOS keystrokes take precedence over all others. So if you choose a keystroke like
-P for something, well, by golly, you’ll no longer be able to use -P to print anything in any of your programs. Think before you assign. Run a couple of tests afterward.
The Save and Open Dialog Boxes
When you choose File→Save, you’re asked where you want the new document stored on your hard drive, what you want to call it, and what Finder tags (“POWER USERS’ CLINIC Designing Your Own Icons”) you want applied to it. The resulting dialog box is a miniature Finder. All the skills you’ve picked up working at the desktop come into play here.
To give it a try, launch any program that has a Save or Export command—TextEdit, for example. Type a couple of words, and then choose File→Save. The Save sheet appears (Figure 6-22).
Tip
In most programs, a quick glance at the Close button in the upper-left corner of a document window tells you whether it’s been saved. When a small dot appears in the red button, it means you’ve made changes to the document that you haven’t saved yet. (Time to press ![]() -S!) The dot disappears as soon as you save your work.
-S!) The dot disappears as soon as you save your work.
In programs that offer the Auto Save and Versions features described later in this chapter, like TextEdit, the red-dot convention has been retired. Instead, when you’ve made changes to a document since saving it, you see the light-gray word Edited in the title bar.
Sheets
In the days of operating systems gone by, the Save dialog box appeared dead center on the screen, where it commandeered your entire operation. Moreover, because it seemed stuck to your screen rather than to a particular document, you couldn’t actually tell which document you were saving—a real problem when you quit out of a program that had three unsaved documents open.
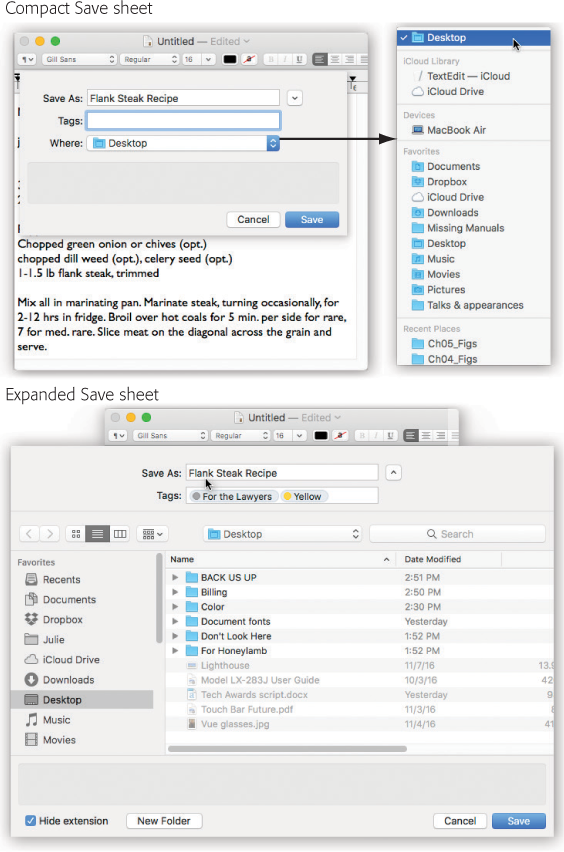
Figure 6-22. Top left: The Save dialog box, or sheet, often appears in its compact form.
Top right: If you open the Where pop-up menu, you’ll find that macOS lists all the places it thinks you might want to save your new document: online (iCloud), on the hard drive, in a folder you’ve put into your Sidebar (“Favorites”), or into a folder you’ve recently opened.
Bottom: If you want to choose a different folder or to create a new folder, click the ∨ button (next to the Save As box) to expand the dialog box. Here you see the equivalent of the Finder—with a choice of icon, list, or column view. Even the Sidebar is here, complete with access to other disks on the network.
Tip: In most programs, you can enlarge the Save or Open dialog box by dragging one of its edges. You can also adjust the width of the Sidebar by dragging its right edge.
In most Mac programs, there’s no mystery regarding which document you’re saving, because a little Save dialog box called a sheet slides directly out of the document’s title bar.
Better still, this little Save box is a sticky note attached to the document. It stays there, neatly attached and waiting, even if you switch to another program, another document, the desktop, or wherever. When you finally return to the document, the Save sheet is still there, waiting for you to type a file name and save the document.
The Mini-Finder
Of course you, O savvy reader, have probably never saved a document into some deeply nested folder by accident, never to see it again. But millions of novices (and even a few experts) have fallen into this trap.
When the Save sheet appears, a pop-up menu shows you precisely where the Mac proposes to put your newly created document: usually in the Documents folder of your own Home folder. For most people, this is an excellent suggestion. If you keep everything in your Documents folder, it will be extremely easy to find, and you’ll be able to back up your work just by dragging that single folder to a backup disk.
As shown at top in Figure 6-22, the Where pop-up menu gives you direct access to some other places where you might want to save a newly created file. (The keystrokes for the most important folders work here, too—Shift-![]() -H for your Home folder, for example.)
-H for your Home folder, for example.)
In any case, when you save a file, the options in the Where pop-up menu have you covered 90 percent of the time. Most people work with a limited set of folders for active documents.
But when you want to save a new document into a new folder, or when you want to navigate to a folder that isn’t listed in the Where pop-up menu, all is not lost. Click the ∨ button identified in Figure 6-22. The Save sheet expands into a very familiar sight: a miniature version of the Finder.
Tip
You can switch back and forth between the compact and expanded versions of this dialog box by pressing the undocumented shortcut ![]() -=.
-=.
You might be shocked to find out just how many Finder features are available, all within this little Save dialog box. The whole Save box is getting to be more Findery every year. For example:
Navigate with the Sidebar. It’s here, complete with access to the other computers on your network and your iCloud Drive.
Navigate with keystrokes. All the usual keyboard shortcuts for navigating your Mac work within the Open and Save boxes. You can press
-D to see what’s on your desktop, Shift--H for your Home folder, Shift--A for your Applications folder, and so on.Switch views with the toolbar buttons, like
/ and icon, list, column, and even Cover Flow views.
Tip
In column view, your first instinct should be to widen this window, making more columns available. Do so by carefully dragging either edge of the dialog box. The Mac remembers the size for this Save sheet independently in each program.
And in list view, how’s this for a tip? If you right-click or two-finger click one of the column headings, like Name or Date Modified, you get a secret pop-up menu of column names: Last Opened, Size, Kind, Label, and so on. That’s right: You can customize the list view within an Open or Save dialog box. You can sort, too, by clicking one of the column headings, just as at the desktop.
Search for files. The search box at the top of the Open or Save dialog box is a clone of the Finder’s search box (Chapter 4). Press
-F to make your insertion point jump there. Type a few letters of the name of the file or folder you’re looking for, and up it pops, regardless of its actual hard-disk location.Delete a document or folder right from this list. Just right-click or two-finger click it and choose Move to Trash.
Rename a document or folder. Right-click or two-finger click it; from the shortcut menu, choose Rename.
Create a new folder. Click New Folder (or press the usual New Folder keystroke, Shift-
-N) to create a new folder inside the folder you’re looking at.You’re asked to type the new name for the folder. After you’ve done so, click Create (or press Return). The new folder appears and opens before you, empty. You can now proceed with saving your new document into it, if you like.
Use Quick Look (“Quick Look”). Select a file or folder in the list and tap the space bar to view it in a full-size window.
Add folders to the left-side Favorites list. Drag them into the Sidebar here, either from the desktop, if it’s visible, or right out of the dialog box in front of you. You can remove things from the Sidebar, too; just drag them away.
Navigate from the keyboard. Most of the familiar Finder navigation shortcuts work here, too. Press the
and keys to navigate the columns, or the and keys to highlight the disk and folder names within a column. Once you’ve highlighted a column, you can also type to select the first letters of disk or folder names.Get Info. Even in the Save or Open dialog box, you can highlight an icon (or several) and then press
-I. You switch back to the Finder, where the Get Info box is waiting with the date, size, and other details about the selected icons.
When you’re finished playing around, open the folder where you want to save your newly created document and then click Save to store it there.
Tip
Here’s one of the weirdest tricks yet. When the Open or Save dialog box is open before you, you can press Shift-![]() -period to make all your Mac’s hidden files appear. (As a Unix-based outfit, macOS is crawling with these invisible files, which are of interest primarily to technical types.) Press that keystroke again to re-hide the hidden files. Fun for geeks! If you use a non-American number-formatting system (where one thousand is 1.000, for example), use Shift-
-period to make all your Mac’s hidden files appear. (As a Unix-based outfit, macOS is crawling with these invisible files, which are of interest primarily to technical types.) Press that keystroke again to re-hide the hidden files. Fun for geeks! If you use a non-American number-formatting system (where one thousand is 1.000, for example), use Shift-![]() -comma instead.
-comma instead.
The next time you save a new document, the Save sheet reappears in whatever condition you left it. That is, if you used column view the last time, it’s still in column view. You can collapse it into simplified view, shown at top in Figure 6-22, by clicking the ∧ button to the right of the Save As pop-up menu.
Tip
For years, there’s been a keyboard shortcut for the Don’t Save button that appears when you close a new document without saving it: ![]() -D. But in many modern Apple programs, including TextEdit, Preview, Grab, Pages, and Keynote, the button says Delete instead of Don’t Save. In those cases, press
-D. But in many modern Apple programs, including TextEdit, Preview, Grab, Pages, and Keynote, the button says Delete instead of Don’t Save. In those cases, press ![]() -Delete to “click” it instead of using the mouse.
-Delete to “click” it instead of using the mouse.
Insta-Jumping to a Folder Location
Whether you’re using the mini-sheet or the expanded view, you can save yourself some folder-burrowing time by following this very weird tip: You can specify a folder location by dragging the icon of any folder or disk from your desktop directly into the Save or Open sheet. MacOS instantly displays the contents of that folder or disk. This feature is totally undocumented—but well worth learning.
Tip
If, when the Save box is in its expanded condition, you click the name of an existing file, macOS thoughtfully copies the name of the clicked file into the Save As text box (which otherwise said “Untitled” or was blank).
This trick can save you time when you’re saving a second document with a slightly modified name (“Oprah and Me: The Inside Story, Chapter 2” and then “Oprah and Me: The Inside Story, Chapter 3”). It’s also useful if you want to replace the original file with the new one you’re saving. Instead of having to type out the entire name of the file, you can just click it.
The Open Dialog Box
The dialog box that appears when you choose File→Open is almost identical to the expanded Save File sheet. Because you encounter it only when you’re opening an existing file, this dialog box lacks a Save button, a Tags box, a file name field, and so on.
Note
Furthermore, the Open dialog box gives you access only to disks, folders, and documents that you can actually open at this moment. For example, when you’re using GarageBand, picture files show up dimmed.
But the Open box adds a special Sidebar category called Media (see Figure 6-23), which gives you direct access to all your photos, music, and movies. Apple figures you might want to import these items into a document you’re working on.
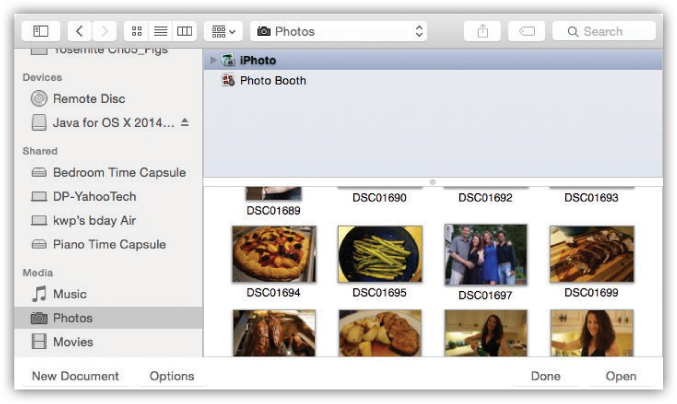
Figure 6-23. The Media Browser is built right into the Open box. You get miniature listings of your iTunes, Photos, and movie files right in the Sidebar, for convenience in importing them into (for example) Keynote, PowerPoint, or a web design program.
Most of the other Save File dialog box controls are equally useful here. That handy Spotlight search bar is still there, only a ![]() -F away. Once again, you can begin your navigation by seeing what’s on the desktop (press
-F away. Once again, you can begin your navigation by seeing what’s on the desktop (press ![]() -D) or in your Home folder (Shift-
-D) or in your Home folder (Shift-![]() -H).
-H).
Once again, you can find a folder or a disk by beginning your quest with the Sidebar and then navigate using icon, list, or column view. And, once again, you can drag a folder, disk, or file icon off your desktop and directly into the dialog box to specify where you want to look. (If you drag a file icon, then you’re shown the folder that contains it.)
When you’ve finally located the file you want to open, double-click it or highlight it (which you can do from the keyboard), and then press Return or ![]() -O.
-O.
In general, most people don’t encounter the Open File dialog box nearly as often as the Save File dialog box. That’s because the Mac offers many more convenient ways to open a file—double-clicking its icon in the Finder, choosing its name from ![]() →Recent Items, and so on—but only a single way to save a new file.
→Recent Items, and so on—but only a single way to save a new file.
Auto Save and Versions
In the beginning, Jobs created the Save command—because computers were slow.
Every time you saved, your work was interrupted for a few seconds (or a lot of seconds) as the very slow program on your very slow computer saved your work onto a very slow floppy disk.
And that, ladies and gentlemen, is why most programs still don’t autosave: because the interruptions were just too annoying.
Apple figured it was high time the world revisit that scenario. Computers now have plenty of horsepower. They could be saving your work continuously, and you’d never even know it. Why shouldn’t all programs save your work as you go, automatically and invisibly? As long as you also have the option to rewind and take your document in a different direction, what could possibly be the harm?
And so it is that, in macOS today, Auto Save is here. Unfortunately, it’s available in only a few programs. You’ll find it in Apple’s showcase programs: Pages, Keynote, Numbers, Preview, and TextEdit.
In these programs, your document is saved every time there’s even the tiniest pause in your typing or working—in the background. No progress bar, no interruption. If you quit or close the document without remembering to save, no problem: Your work will be there when you open the document again later.
Note
“But wait a minute,” cry the masses, “I like being able to close a document without saving changes! Sometimes all I wanted to do was fool around, play ‘what-if’ games—and then close it without saving changes!”
Just for you, Apple offers a pair of sneaky little checkboxes in System Preferences→General. First, “Ask to keep changes when closing documents.” If that’s turned on, then when you close a document with unsaved changes, the Mac asks if you want to keep the edits, just as it does in all other programs.
But if you quit the program without saving, your changes are auto-preserved; Auto Save apps autosave your documents when you quit their programs, so you can pick up where you left off the next time. You can override that, too, if you like; turn on “Close windows when quitting an app,” also in System Preferences→General. Now you’ll get the “Save changes?” box when you quit the app with unsaved changes.
Versions
In those enlightened programs that work with Auto Save, there’s a more complicated but more powerful feature at work: Versions. It’s an invisible paper trail of every in-progress condition of your document—and you can return to any earlier version at any time. You can even return to an earlier version and copy just a chunk of it into the current version, which is great when one paragraph of your previous draft was gold but the rest was junk.
The Versions world of document management is quite a bit different from the old setup. Here’s what you need to know:
All the version information is stored in the same original document file. (It’s not like there’s a rat’s nest of icons for each thing you’re working on.) But when you send the document to somebody else (by email or network, for example), the Mac sends only the current version, stripping out all the history. Nobody will ever know how much you labored over your work (or how little).
Note
Behind the scenes, the various versions of each document are saved in an invisible folder on your hard drive called .DocumentRevisions-V100. But you probably guessed that.
MacOS creates a new snapshot of your document once an hour. You can also create new snapshots manually at even shorter intervals—by using the File→Save command (
-S), as you always have.These snapshots, or versions, represent rewind points that you can return to later, even months or years after you first created the document. Thoughtfully enough, the Mac records, invisibly, only what’s changed between versions, so your files don’t get all big and bloated.
Note
All right, you don’t have total time-rewinding control. MacOS stores hourly versions for a day, daily versions for a month, and weekly versions for all previous months.
There’s a secret menu in the title bar. Point to the name of your document. In Auto Save–compatible files, a little ∨ appears in the title bar (Figure 6-24).
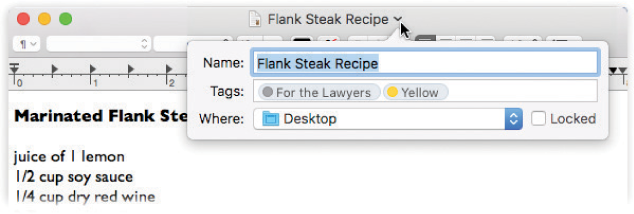
Figure 6-24. Point to the title of your document to see this secret menu. It lets you rename the document, change its tags, or file it into a new folder, without ever leaving the window.
The Save As command is hidden in these programs. It appears in the File menu only when you hold down the Option key.
Apple is hoping that you’ll learn to use the new way. When you want to spin off a different version of a document—to experiment with taking it into a radical new direction, for example—choose File→Duplicate. Before your very eyes, a copy of the open window springs into existence. If the original was called “Kumquat Tarts,” then the new one is called “Kumquat Tarts copy”—but that name is highlighted, selected, right in the title bar.
To leave your duplicated document in the same folder as the original, just type a new name and press Return. To file it in a different folder, choose File→Save. You get the standard Save dialog box, where you can choose a name and a folder for it.
Tip
You can also choose to move a document to a different folder later right there in the program. Just choose File→Move To and choose a new storage bin for it. (You can even store it in iCloud at this point; see “Revert”.) Or use the secret menu-bar menu shown in Figure 6-24.
Rewinding to an earlier version
The point of all this, of course, is to make it easy to go back in time—to undo the mediocre work you’ve done, or to resurrect some genius work that you later deleted.
The quick way is to choose File→Revert to→Last Saved (or Last Opened). That command restores the document to the last snapshot version (or to the way it was when you most recently opened it, if no new versions have been created). You can revert your document to any snapshot, even an ancient one from weeks or months ago.
To do that, choose File→Revert to→Browse All Versions.
After a moment, you see the stunning display shown in Figure 6-25. On the left, you see your document in its current condition. On the right, you see a stack of windows that represent all the different snapshots of your document, going back in time.
You can have all kinds of productive fun in this version browser:
Compare the current version (on the left) with the next-most-recent one (on the right). These are live documents, so you can scroll through them as necessary. If you decide to stick with the latest edition on the left, just click Done. You leave the version-history world and go back to editing.
Zoom back in time to inspect older versions (snapshots) of your document. On the right side of the screen, you see earlier versions of the document—maybe even dozens of them, stretching back in time.
You can click individual windows’ title bars to see what’s in them. You can also click or drag your cursor through the notches at the right side. It’s like a time ruler that flies through the windows into the past. (As you go, the time/date stamp below the right-side window identifies where you are in time—that is, which version you’re examining.)
Restore an earlier version. If you finally find the incarnation of the document you consider superior to your current one, click Restore. You leave Blurry Versionland and return to your document, which has now been rewound to its earlier condition.
If you later decide you should not have gone back to that earlier version, no problem. Your later version—the one you started out with—is still in the version browser, too. So you can fast-forward back to it, if necessary.
Tip
If you press Option, the Restore button changes to say Restore a Copy. In other words, you’ll create a previous-version duplicate of the document, without disturbing the current condition of the one you’ve just been working on.
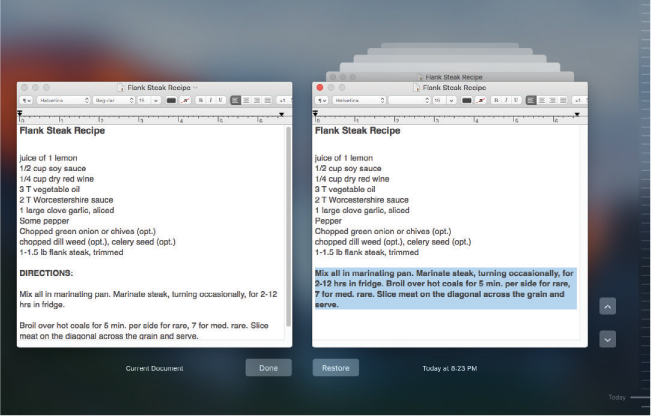
Figure 6-25. If you’ve ever used macOS’s Time Machine feature, this display should look familiar. It’s your chance to go back in time to recover an earlier, better version of your document (or just a part of it).
Restore part of an earlier version. Often, the current version of your work is generally good, but you really wish you could recover one magical sentence or paragraph or section—something you’ve since edited or deleted.
You can do that in Blurry Versionland, too, because Copy and Paste work here!
Use the time ruler to find the earlier edition of your document, the one containing the good stuff. Then drag through the desired text or graphics in the window on the right, as shown in Figure 6-25. Now copy the highlighted material (either press
-C, or move your mouse to the top of the screen so that the menu bar appears, and choose Edit→Copy). Click in the current version of the document, the one at left, and now paste (-V, or use the menu bar). Click Done to complete this astonishing act of salvation.Delete a version. Once you’ve found a draft you never want to see again, move your cursor to the top of the screen; the menu bar appears. Choose File→Revert To→Delete This Version.
Tip
If you press Option, the command changes to Delete Old Versions; it gets rid of all old versions of the file.
Revert
Even though Auto Save is constantly backing up your document, it also remembers how the file looked the moment you opened it. And you want to know what’s crazy? It can revert to that condition even if you’ve been manually saving your work all along! That’s better than the old Revert command ever was. Just choose File→Revert to→Last Saved (or Last Opened).
iCloud Drive
Truth is, “cloud” is an annoying buzzword. Most of the time, when people say “in the cloud,” they mean “online” or “on the Internet”—terms that have served us perfectly well for years.
In any case, you can save your files online, into an online “hard drive” called iCloud Drive. The advantage here is that your files are now available for opening or editing from any computer or gadget you use, including iPhones, iPads, and iPod Touches.
iCloud Drive Defined
iCloud Drive, part of Apple’s iCloud suite of services, is like a magic folder. In the Finder, it’s represented by an iCloud Drive icon (![]() ) in the Sidebar of every window.
) in the Sidebar of every window.
Whatever you put into it appears, almost instantly, in the iCloud Drive folders on all your other machines: Macs, iPhones, iPads, and even Windows PCs. In fact, your files are even available at iCloud.com, so you can grab them when you’re stranded on a desert island with nothing but somebody else’s computer. (And Internet access.)
(If this concept reminds you of the popular free program Dropbox, then you’re very wise.) Figure 6-26 shows the idea.
This is an incredibly useful feature. No more emailing files to yourself. No more carrying things around on a flash drive. After working on some document at the office, you can go home and resume from right where you stopped; the same file is waiting for you, exactly as you left it.
iCloud Drive also makes a gloriously simple, effective backup disk. Anything you drag into this “folder” is instantly copied to all your devices and computers. And, as you know, the more copies that exist of something (and in the more locations), the better your backup. Even if your main Mac is stolen or burned to aluminum dust, your iCloud Drive files are safe.
Your drive holds 5 gigabytes of files for free. You can pay extra for more space: $1 a month for 50 gigs, $3 a month for 200 gigs, or $10 for 2 terabytes (2,000 gigs).
Putting Files onto the iCloud Drive
On the Mac, you use the iCloud Drive just as you would a folder or a flash drive. Click its name in the Sidebar to see what’s in there. Drag files into its window to copy them there. Make folders, add files, delete files, rename them—whatever. Any changes you make are reflected on your other Apple (and Windows) gadgets within seconds. Inside a program, you can choose File→Save in the usual way. When the Save box appears, click iCloud Drive in the Sidebar. Or choose an iCloud Drive folder’s name, if you’ve made one.
Tip
The window shown in Figure 6-26 shows your iCloud Drive documents and lets you open them, even when you’re offline. How? Turns out your Mac stores a secret “local” copy. The changes you make won’t update the online copy until you’re online again, but at least you’re never cut off from your own files.
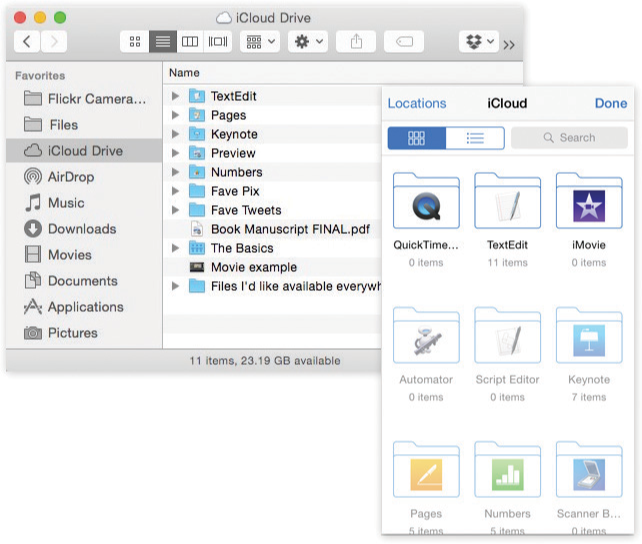
Figure 6-26. Left: The iCloud Drive icon appears in the Sidebar of every Finder window and Save/Open dialog box.
Right: It also appears on every iPhone, iPad, or iPod Touch you have. (Assuming they’re running iOS 8 or later and are signed into the same iCloud account.)
Sharing iCloud Drive Files
It’s new in macOS High Sierra, and it’s super-handy: You can now share individual files in your iCloud Drive with other people electronically, so that you can collaborate across the Internet. It’s exactly like the same feature in popular services like Dropbox and Google drive, except that, inconveniently, it limits your collaborators to other people using High Sierra (or iOS 11).
In the Finder, in the iCloud Drive, click the file (not a folder); from the ![]() menu, choose Add People. (That option also appears when you right-click or two-finger click the document and, from the shortcut menu, choose Share.) The box shown in Figure 6-27 appears. Here you have three decisions to make:
menu, choose Add People. (That option also appears when you right-click or two-finger click the document and, from the shortcut menu, choose Share.) The box shown in Figure 6-27 appears. Here you have three decisions to make:
How to invite people. You can welcome your collaborators to this document by Messages, Email, AirDrop (if they’re nearby)—or using the Copy Link button. That command puts a web link on your Clipboard, so that you can share it in any other electronic way—in a Facebook post, in Slack, or whatever.
Who can access. Of course, if you post the invitation link online somewhere, you might wind up with hundreds of people descending on your document. If you’re posting a flier advertising a garage sale, maybe that’s just what you want. But if you’re sharing the first draft of your screenplay, maybe you want to be more selective. That’s why, in Share Options, you can specify either that “Only people you invite” have access, or “Anyone with the link.”
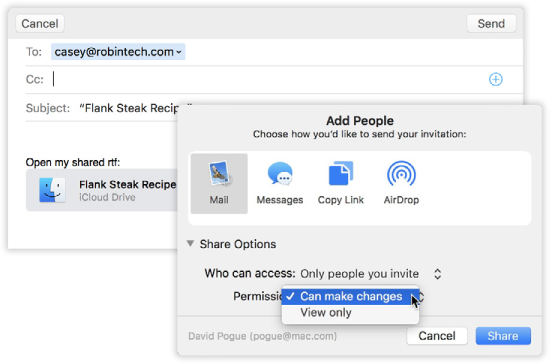
Figure 6-27. Sharing a document from your iCloud Drive means that you can either publish a document to the entire web from the convenience of a desktop folder, or collaborate with coworkers on a single document.
What they can do. If, from the Permission pop-up menu, you choose “Can make changes,” then your document is editable on both ends, and both of you see the changes the other makes. Great for party planning, coauthoring papers, and editing novels. If you choose “View only,” well, they can see your document but can’t touch it.
Once you click Share, the ball is rolling. An email, text message, or AirDrop notification goes out to your lucky colleagues. Next to the document on your iCloud Drive, the legend “Shared by me” appears, for your reference. As long as you’re all online, anyone can make changes to the shared document, and you all see the results almost immediately.
At any time, you can revisit the list of invitees or how much access they have. Right-click or two-finger click the document’s icon; this time, choose Share→Show People (that command has nothing to do with Broadway performers). You’re right back at the box shown in Figure 6-27, so you can amend the settings or shut off sharing altogether (click Stop Sharing).
iCloud Drive on Other Devices
If the iCloud Drive behaves just like a folder on your Mac, how does it appear on iPhones, iPads, and Windows computers? Like this:
On the iPhone, iPad, or iPod Touch. iCloud Drive is an app in iOS 9 and 10; in iOS 11, it’s called Files. Just open it to see a list of the folders and files on your iCloud Drive (including the Desktop and Documents folders from your Macs).
On another Mac. Click the iCloud Drive icon in the sidebar of any Mac (to which you’ve logged in with your iCloud ID), and there’s your stuff.
On the web. You can pull up iCloud.com, log in, and click the iCloud Drive icon. Presto: a list of the files and folders on your Drive. (Including Desktop and Documents folders, if you’ve turned that on.)
On a Windows PC. Your computer needs Windows 7 or later, and it requires the iCloud control panel. (You can download it from this book’s “Missing CD” page at www.missingmanuals.com.) It does just what you’d expect: It creates an iCloud Drive icon in your File Explorer windows, exactly as on the Mac.
iCloud Desktop & Documents
An optional feature makes everything on your desktop and in your Documents folder accessible everywhere—on every Mac you own, every iOS device, every Windows PC, and even online, at iCloud.com.
If you think about it, those are the two places that most people, most of the time, leave their stuff: on the desktop or in the Documents folder. The point of this feature is that you no longer have to remember to copy some file or folder you’ll need onto the iCloud Drive; if you left it on your desktop or in your Documents folder, it’ll just be there. When you need a file you don’t have with you, you’ll be able to grab it from wherever you are.
Of course, you get only 5 gigabytes of iCloud Drive storage, which is shared by all of iCloud’s features. So to use this system, you’ll almost certainly have to pay for additional storage, month after month.
If you didn’t turn on iCloud Desktop & Documents when you installed macOS High Sierra, you can also turn it on at any time:
In System Preferences→iCloud. Next to the first checkbox, iCloud Drive, click Options; in the resulting dialog box, on the Documents tab, turn on Desktop & Documents Folders. (See Figure 6-28, top.)
In
→About This Mac→Storage→Manage→Store in iCloud (Figure 3-16). Turn on “Store files from Desktop and Documents in iCloud Drive.”
If you don’t have enough iCloud Drive space, you’re cheerfully offered a list of price plans at this moment. The cheapest plan available that will fit your documents is highlighted.
Once that’s all set up, you’ll discover a few alarming changes to your Mac universe:
Everything on your desktop has disappeared. It’s all been swept into a new folder on your desktop called “Desktop - MacBook Air” (or whatever your Mac’s name is).
So why does macOS create a new Desktop folder bearing your Mac’s name? Because you might turn on this feature on a second Mac that you own, or even a third. The folder-naming system is designed to separate what’s on the desktop of this Mac from what’s on the desktops of those other Macs. If you have two computers, then, you might see folders on your desktop called Desktop - MacBook Air and Desktop - Kitchen iMac. (Figure 6-28, middle right, shows this effect.)
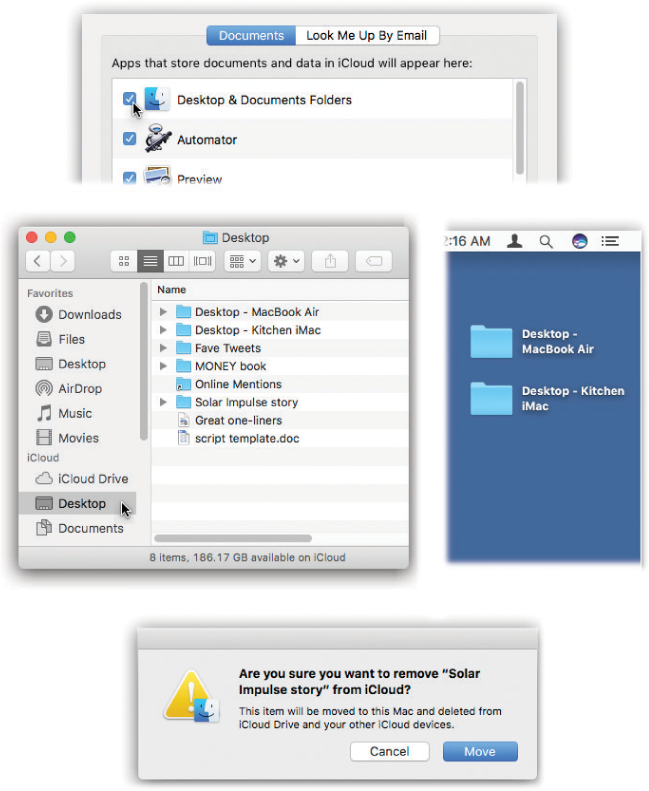
Figure 6-28. Top: Here’s how you enter the rabbit hole known as iCloud Desktop & Documents.
Middle left: Desktop and Documents are now listed under iCloud Drive. The actual folders have moved, too.
Middle right: You see a separate Desktop folder for each Mac for which you’ve turned this feature on. (Documents, too.)
Bottom: If you move something from Desktop or Documents into any other folder, you get a warning that you’re actually deleting it from your iCloud Drive (assuming that checkbox is turned on in Finder→Preferences→Advanced).Of course, if you primarily use only one Mac, the icons you once kept on your desktop are now in a desktop folder that seems to be on your desktop, which seems silly.
Fortunately, there’s nothing to stop you from dragging the contents of “Desktop - MacBook Air” right back onto your actual desktop. The only caution here is that, if you do that on more than one Mac, you wind up with a commingled desktop. All the icons from your laptop desktop and all the icons from your iMac desktop are now on the desktops of both machines. You’ve just duplicated them. And any changes you make—any new icons you save to any desktop—get likewise duplicated to your other Macs.
That may be exactly what you want. Just watch out for disk space.
Note
What you see on your iPhone and at iCloud.com, meanwhile, is identical to what you see on your Mac.
Everything in your Documents folder disappears, too. All those icons get shunted into a new folder in your Documents folder called “Documents - MacBook Air.”
The real Desktop and Documents folders are no longer in your Home folder. And in the Finder sidebar, they’re no longer listed under the Favorites heading; now they’re listed under iCloud Drive (Figure 6-28, middle left), to remind you that their new home is online, in the iCloud Drive.
You get a warning if you drag something out of Documents or off your desktop. The warning is alarming (Figure 6-28, bottom), but it’s perfectly logical: If you move an icon out of the Documents folder or from your desktop into another folder, you’re removing it from the iCloud Drive. (The iCloud Drive’s only responsibility is to mirror what’s in your Documents and Desktop folders.)
If you turn off iCloud Desktop & Documents, you get an alarming message. It says: “If you continue, documents on your Desktop and in your Documents folder will be visible in iCloud Drive only. No documents will be deleted from iCloud Drive.”
What this means is that the icons on your desktop, and in your Documents folder, will disappear!
OK, be confused, but don’t be hysterical; your files are on your Mac. The message makes it sound like you’ll have to re-download them from iCloud, but that’s not true. They’re already on your Mac—in the iCloud Drive folder.
Turning off iCloud Desktop & Documents leaves only an empty Desktop folder on your desktop, and an empty Documents folder in your Documents folder. If you want to put your files back where they belong, you have to drag them there manually—out of the iCloud Drive folders.
The Cocoa Advantage
MacOS can run two different kinds of programs, each with different characteristics: Cocoa and Carbon.
These were the two kinds of apps that software companies could create for the Mac when OS X first appeared. Those companies could either update their existing programs, using a conversion kit called Carbon, or they could rewrite their programs from scratch, using Apple’s Cocoa tools.
The two resulting kinds of programs look identical, but Cocoa apps offer a number of special features that Carbonized programs don’t offer. (Almost all of Apple’s own included apps are Cocoa apps, including the Finder, TextEdit, Mail, and so on.)
Here are some of the advantages that only Cocoa programs offer. May it clear up any confusion you have about why certain features seem to be present only occasionally.
The Fonts Panel
When you use a Carbon program, you usually access fonts the same way as always: using a Font menu. But when you use a Cocoa program, you get the Fonts panel, which makes it far easier to organize, search, and use your font collection. Chapter 15 describes fonts, and the Fonts panel, in more detail.
Retina Friendliness
In general, Cocoa programs automatically sharpen up their text when you view it on a Retina Display—Apple’s name for super-high-resolution screens like the one on its latest MacBook laptops. Text in Carbonized programs, on the other hand, looks blotchy and awful until software companies make the effort to make their programs Retina-friendly.
Title Bar Tricks
You may remember from Chapter 2 that the title bar of every Finder window harbors a secret pop-up menu. When you Control-click it (or right-click it, or two-finger click it, or ![]() -click it), you’re shown a little folder ladder that delineates your current position in your folder hierarchy. You may also remember that the tiny icon just to the left of the window’s name is actually a handle you can drag to move a folder into a different window.
-click it), you’re shown a little folder ladder that delineates your current position in your folder hierarchy. You may also remember that the tiny icon just to the left of the window’s name is actually a handle you can drag to move a folder into a different window.
In Cocoa programs, you get the same features in document windows, as shown back in Figure 3-6 (“Dragging from the Title Bar”). By dragging the tiny document icon next to the document’s name, you can perform stunts—like dragging that little icon to the desktop or to the Dock icon of a different program for opening—right from your document’s title bar.
Background Window Control
The ![]() key unlocks a slick trick in Cocoa programs: It lets you operate the buttons and controls of an inactive background window without bringing it to the front. You can operate a background window’s resize box, buttons, pop-up menus, and scroll bars, all while another window is in front of it. In fact, you can even drag through text in a background window—and then drag-and-drop it into the foreground window. (Freaky!) In every case, the secret is simply to keep
key unlocks a slick trick in Cocoa programs: It lets you operate the buttons and controls of an inactive background window without bringing it to the front. You can operate a background window’s resize box, buttons, pop-up menus, and scroll bars, all while another window is in front of it. In fact, you can even drag through text in a background window—and then drag-and-drop it into the foreground window. (Freaky!) In every case, the secret is simply to keep ![]() pressed as you click or drag.
pressed as you click or drag.
Cool Text-Selection Tricks
By holding down certain keys while dragging through text in a Cocoa program, you gain some wild and wacky text-selection powers (especially useful in, for example, TextEdit and Pages):
Highlight only one column out of several by Option-dragging. Instead of highlighting margin to margin, you get only the text within your selection rectangle.
Highlight several passages simultaneously by
-dragging. Each time you -drag, you highlight another block of text, even though the earlier blocks are still selected.
Tip
In most Cocoa programs, you can combine these two tricks. That is, you can select multiple, arbitrary (not full-page-width) blocks of text by pressing both Option and ![]() as you drag.
as you drag.
Secret Keyboard Shortcuts
Most Cocoa apps respond to certain keystrokes left over from the NeXT operating system, which was macOS’s ancestor. If you’re a card-carrying member of KIAFTMA (the Keyboard Is Always Faster Than the Mouse Association), you’ll love these strokes:
Control-A. Moves your insertion point to the beginning of the paragraph. (Mnemonic: A = beginning of the Alphabet.)
Control-E. Jumps to the end of the paragraph. (Mnemonic: E = End.)
Control-D. Forward delete (deletes the letter to the right of the insertion point).
Control-K. Instantly deletes all text from the insertion point to the right end of the line. (Mnemonic: K = Kills the rest of the line.)
Control-O. Inserts a paragraph break, much like Return, but leaves the insertion point where it was, above the break. This is the ideal trick for breaking a paragraph in half when you’ve just thought of a better ending for the first part.
Control-T. Moves the insertion point one letter to the right—and, along with it, drags whichever letter was to its left. (Mnemonic: T = Transpose letters.)
Option-Delete. Deletes the entire word to the left of the insertion point. When you’re typing along in a hurry and discover that you’ve just made a typo, this is the keystroke you want. It’s much faster to nuke the previous word and retype it than to fiddle around with the mouse and the insertion point just to fix one letter.
Four additional keystrokes duplicate the functions of the arrow keys. Still, as long as you’ve got your pinky on the Control key…
Control-B, Control-F. Move the insertion point one character to the left or right, just like the left and right arrow keys. (Mnemonic: Back, Forward.)
Control-N, Control-P. Move the insertion point one row down or up, like the down and up arrow keys. (Mnemonic: Next, Previous.)