Chapter 16. Movies & Sound
Macs have been capable of handling sound and graphics from Day One, years before the word multimedia was even coined. MacOS’s QuickTime technology, for example, plays digital movies and live “streaming” broadcasts from the Internet. This chapter covers it all: how to record video and sound, edit it, and play it back.
QuickTime Player
A QuickTime movie is a video file you can play from your hard drive, a CD or DVD, or the Internet. Like any movie, it creates the illusion of motion by flashing many individual frames (photos) per second before your eyes, while also playing a synchronized soundtrack.
The cornerstone of macOS’s built-in movie-playback software is QuickTime Player, which sits in your Applications folder. Despite its name, QuickTime Player also lets you edit movies and even record new ones, either using your Mac’s built-in camera or by recording screen activity. Finally, when everything looks good, you can post your masterpiece to YouTube, Facebook, Vimeo, or another online site.
You can open a movie file by double-clicking it. When QuickTime Player opens, you get a very cool, borderless playback window. Just hit the space bar to play the movie.
There’s a control toolbar at the bottom of the window (Figure 16-1), but it fades away after a few seconds—or immediately, if you move the cursor out of the frame. The toolbar reappears anytime your mouse moves back into the movie frame. These are the controls:
Volume slider (
 …
… ). Click in the slider, or drag the dot, to adjust the volume—although it’s actually easier to just tap the
  or
or  keys.
keys.
Tip
To mute the sound, click the ![]() icon or press Option-
icon or press Option-![]() . Press Option-
. Press Option-![]() to make the volume slider jump to full-blast position.
to make the volume slider jump to full-blast position.
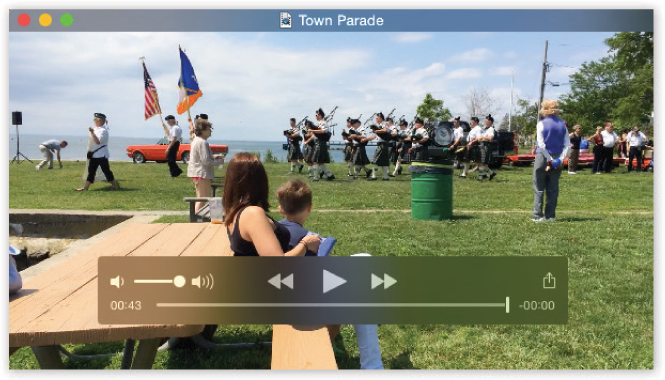
Figure 16-1. QuickTime Player displays this control bar only when you move your mouse into its window, or whenever playback is stopped.
Rewind, Fast-Forward (
 ,
,  ). By clicking one of these buttons, you get to speed through your movie at double speed, backward or forward, complete with sound. Click again for 5x speed, again for 10x.
Tip
You don’t have to keep your mouse button pressed on these. Just click once and let QuickTime Player do the work. Click ![]() or tap the space bar to stop scanning.
or tap the space bar to stop scanning.
Play/Pause (
 /
/ ). Click to start playback, to pause/stop. Or just tap the space bar for both functions.
Scroll bar. Drag the little vertical bar, or just click inside its track, to jump to a different spot in the movie. The counters at the beginning and end of the scroll bar tell you, in “hours:minutes:seconds” format, how far your playhead cursor has moved into the movie and how far you are from the end. (Click the right-hand readout to see the total movie duration.)
Tip
You can also press the ![]() and
and ![]() keys to step through the movie one frame at a time. If you press Option-
keys to step through the movie one frame at a time. If you press Option-![]() or Option-
or Option-![]() , you jump to the beginning or the end of the movie. That’s important to know, since there are no longer dedicated Jump to Start/Jump to End buttons on the control bar.
, you jump to the beginning or the end of the movie. That’s important to know, since there are no longer dedicated Jump to Start/Jump to End buttons on the control bar.
Window edges. Drag any edge, or the lower-right corner, to make the window bigger or smaller. QuickTime Player always maintains the same aspect ratio (relative dimensions) of the original movie, so you won’t accidentally squish it.
Share button (
 ). Click for a pop-up menu of choices for passing on this video to your adoring fans: via Email, Messages, AirDrop, Facebook, YouTube, Vimeo, or Flickr. All of these options are described later in this chapter.
Full Screen (the green
 , top left). Click to make the video fill your entire monitor, just as though you’d chosen View→Enter Full Screen. And what if the proportions of the movie don’t quite match your screen? If you make the menu bar return by pointing to the top of your screen, you can handle this problem using one of the choices in the View menu, described next.
Note
When you enter Full Screen mode, the movie doesn’t begin playing automatically (unless it was already playing, of course). You have to tap the space bar to get the show underway.
Fancy Playback Tricks
Playing one movie, start to finish, is kid stuff. Here’s what else QuickTime Player can do:
Rotate or flip. The Edit menu contains commands for Rotate Right, Rotate Left, Flip Horizontal, and Flip Vertical. Those commands can be handy when a movie turns out to be flipped or rotated—or when you want to flip or rotate it for creative purposes.
Change the screen size. As noted already, you can drag the window to any size using the edges as handles. But the View menu commands are handy, too.
Actual size represents the movie on your screen at its real size—no larger. (If it’s truly huge, larger than your screen, then it may be scaled smaller to fit. But that’s a rarity.)
Fit to Screen fills your screen without cropping or distorting; the menu bar and other windows remain visible.
Fill Screen is especially satisfying, because it turns your entire monitor into a movie playback area.
Panoramic squishes the outer edges of the video, distorting them slightly, so that nothing gets chopped off and the movie fills the screen. (These last two options are available only in Full Screen mode.)
Tip
These same options are available via keyboard shortcuts: ![]() -1,
-1, ![]() -3,
-3, ![]() -4, and
-4, and ![]() -5. There’s even a little button on the control bar, second from right, that switches back and forth between Fit to Screen and Fill Screen. (This button appears only when you’re already in Full Screen mode.)
-5. There’s even a little button on the control bar, second from right, that switches back and forth between Fit to Screen and Fill Screen. (This button appears only when you’re already in Full Screen mode.)
Making the window larger may also make the movie coarser, because QuickTime Player simply enlarges every dot that was present in the original. Still, when you want to show a movie to a group of people more than a few feet back from the screen, these larger sizes are perfectly effective.
Tip
You can make the movie window bigger or smaller by pressing ![]() -plus (+) or
-plus (+) or ![]() -minus (-).
-minus (-).
Play more than one movie. You can open several movies at once and run them simultaneously. (Of course, the more movies you try to play at once, the jerkier the playback gets.)
Loop the movie. When you choose View→Loop and then click Play, the movie repeats endlessly until you make it stop.
Navigate chapters. A few movies, like the ones you buy or rent from Apple, come with built-in chapter markers, just like a DVD. They let you jump around in the film at your whim.
Editing Movies
QuickTime Player is also QuickTime Editor. The program doesn’t offer selection handles, so you might think there’s no way to select a portion of the middle of a movie (to chop it out, for example). But in fact, commands for trimming, splitting, and merging video clips let you perform just about any editing trick you can imagine. Read on.
Trimming video from the ends. You can very easily trim dead space off the ends of a video. Figure 16-2 shows how.
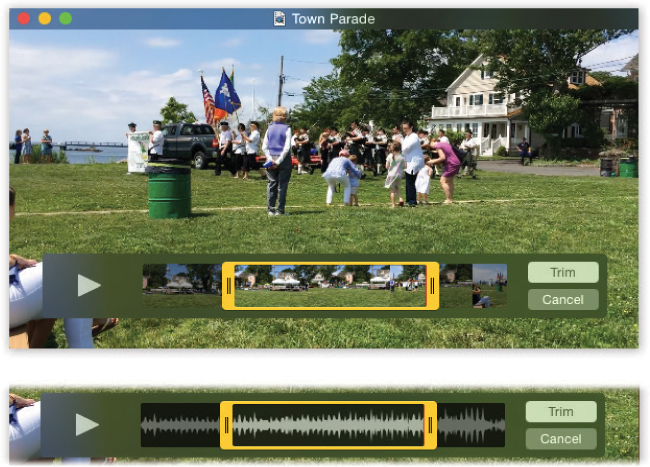
Figure 16-2. Top: To trim a video, choose Edit→Trim or press
 -T. Drag the yellow handles inward to isolate the chunk you want to preserve. (You can click or tap the space bar to check your work.) When everything looks good, click Trim or press Return.
Bottom: If you choose View→Show Audio Track, then you can use the sound waves as a guide to your precision editing.You don’t have to worry about damaging the original video when trimming—you couldn’t modify the original if you tried. The instant you use the Trim command, QuickTime Player peels off the shortened version as a new, untitled movie, which you’ll have to name and save separately (choose File→Export As).
Splitting a clip. Clips are subsections of a movie. To chop a movie in two, move the playhead to the spot where you want the movie to split, and then choose Edit→Split Clip. As shown in Figure 16-3, a clips map appears at the bottom of the window, showing the two resulting clips.
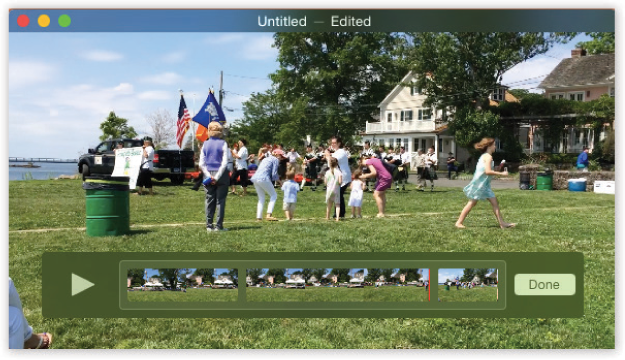
Figure 16-3. The Split Clip command chops the video into two clips—and produces the map shown at bottom. If you click a clip and then press the space bar to play the video, you’ll see the red vertical line that represents the playhead. To chop one of your clips up into further subclips, move that red line into position and then use the Split Clip command again.
Chopping video out of the middle. If you want to trim some video from the middle of a movie, first open up the clips map. Then split the movie as described above. Once you’ve split a movie into a couple of clips, you can double-click one of the clips to produce trim handles just for it. In this way, you can cut unwanted sections from the middle of a video.
Or just split the clip into three chunks—and delete the middle one.
Rearranging clips. Once you’ve chopped up a video into subclips using the Split Clip command, you can drag them around within the map. (If you don’t see the map, shown in Figure 16-3, then choose View→Show Clips.)
You can use the Cut, Copy, and Paste commands in the Edit menu, too, to move chunks around—even among different movies. (Just remember to first split the target movie at the spot where you want to paste the new clip. The pasted material appears just after whatever clip is currently highlighted.)
Combining movies. Combining clips, as described previously, is one way to merge videos together. But you can also merge entire movie files that are sitting in the Finder.
Start by opening the first movie. If you want the second movie to appear at the end of it, just choose Edit→Add Clip to End.
Tip
If you press Option, the command says Add Clip to Beginning. Sneaky!
The Open dialog box now appears. Find and double-click the clip you want to tack on. Repeat as necessary.
You can also drag movie clips’ icons from the desktop right into a movie window. QuickTime Player adds them to the end of the existing movie.
If you want the second movie to appear somewhere in the middle of the first movie, then open up the clip map (View→Show Clips). Click the clip that appears right before the spot where the new movie will go. Choose Edit→Insert Clip After Selection; in the resulting dialog box, find and double-click the movie file you want to bring in.
Or drag a movie file from the Finder directly into the gap between two subclips.
Tip
QuickTime Player automatically shrinks or crops the incoming movies so that they fit the same “screen size” as the original. If they’re not exactly the same size or proportions, you can then use the Edit→Clip Alignment submenu (Top, Left, Center, and so on) to specify which edge of the movie frame the imported video should hug.
Recording Movies with QuickTime Player
QuickTime Player does more than play movies; it can also record them. Yes, your Mac is now a camcorder, and a darned handy one; you can pop out quick video greetings, gross out your roommates, impress your coworkers with a dress rehearsal of your pitch, and so on.
Laptops and iMacs, of course, have a video camera built right in, above the screen. If you have another model, you can attach a webcam, an old iSight camera, or even a FireWire camcorder.
Then open QuickTime Player and choose File→New Movie Recording. The preview window appears. Use the pop-up menu shown in Figure 16-4 to specify what mike and camera you want to use (in the unlikely event that you have more than one) and what video quality you want.
Then, to record, click the red Record button (or press the space bar). Do your schtick. Press the space bar again to stop recording.
Your new video appears in its own playback window. Check it out, trim it if necessary, and then shoot it off to iTunes, Vimeo, YouTube, or whatever.
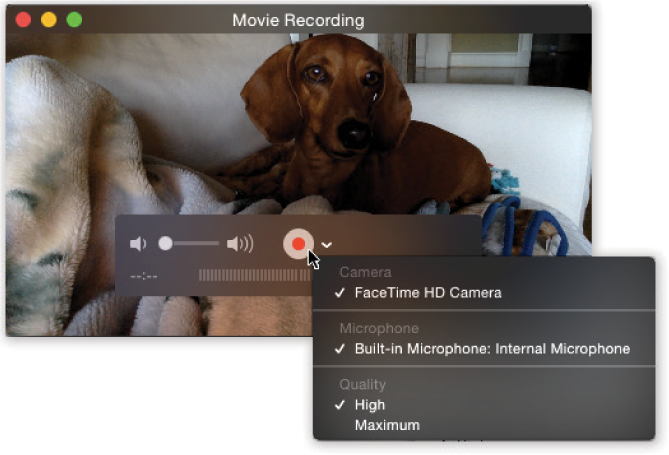
Figure 16-4. Use the pop-up menu to set up your flick; check the audio level (reflected by the dancing “VU-meter” bars at the bottom of the control bar); and choose a camera and mike.
Recording Screen Movies from the Mac
You can also record movies of the screen—either the Mac’s screen or an iPhone’s or iPad’s.
Why is it useful to capture screen activity as a video? Because you can make mini-tutorials for techno-clueless relatives. You can make video podcasts that show how to do things in your software programs. You can preserve web animations that you used to think you had no way to capture.
There are limitations. Your movies don’t include the Mac’s own sounds (game soundtracks and so on), so forget about capturing videos playing on YouTube. (It can record from the mike, though, so you can narrate what you’re doing.)
But who cares? It’s fantastically handy. And you can capture only a portion of the screen—one particular window, for example—instead of being stuck with the entire monitor’s worth.
To record the Mac’s screen, choose File→New Screen Recording. Use the pop-up menu on the resulting Screen Recording panel to turn the microphone on or off.
Tip
This pop-up menu also contains an option called Show Mouse Clicks in Recording. It helps your viewers understand when and where you actually clicked the mouse during the tutorial—by briefly displaying a little circle around the cursor each time you click. (It appears only in playback—not while you’re recording.)
Finally, click the red Record button (or press Return), and then proceed as shown in Figure 16-5.
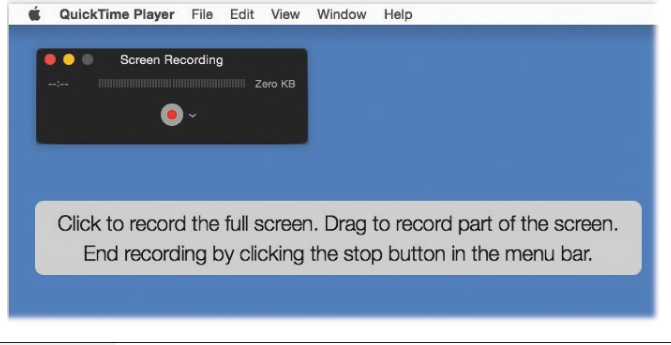
Figure 16-5. This message appears when you tap the Record button. If you just click to start recording, you’ll capture the entire monitor. But if you drag first, defining a rectangle, you’ll capture only that area.
Press Return, or click Start Recording, to begin the capture. When you finally click the Stop button in the menu bar, your finished movie appears in a regular playback window, ready to trim or to send away to your fans.
Recording Movies from an iPhone or iPad Screen
You can also use QuickTime Player to view and record your iPhone’s screen (or your iPad’s, or your iPod Touch’s). Yes, it’s incredibly useful to be able to capture videos of the iPhone/iPad screen activity. But this trick is equally handy when you want to project your iPhone/iPad demonstration for a large crowd, using the Mac as a go-between.
To begin, connect the i-gadget to the Mac with its white USB cable. Open QuickTime Player. Choose File→New Movie Recording.
In the recording palette shown in Figure 16-4, click ∨ to open the pop-up menu; choose the iPhone’s name (or the iPad’s). In just a moment, the live image of the i-gadget now appears on your Mac. You can use this arrangement to show your phone activity to a crowd on the Mac’s screen, or even click Record to record it as a movie.
Internet Streaming QuickTime
QuickTime Player also lets you view “Internet slideshows,” watch a couple of live TV stations, or listen to the radio—all as you work on your Mac.
Streaming Video from Your Browser
With ever-increasing frequency, websites advertise streaming video events, such as Apple keynote speeches and the occasional live rock concert. You’ll find a note on a web page, for example, that says, “Watch the live debate by clicking here on October 15 at 9:00 p.m. EST.”
If you do so, you’ll sometimes be able to watch it in your browser, and sometimes you’ll be transported once again into QuickTime Player, which connects to the appropriate Internet “station” and plays the video in its window. (You can also choose File→Open Location from within QuickTime Player to type in the web address.)
You don’t have much control when watching a live broadcast. You generally can’t rewind, and you certainly can’t fast-forward. You may be able to pause the broadcast, but when you unpause, you wind up at the current broadcast moment—not where you stopped.
Note
QuickTime Player can also play HTTP Live Streaming video, which is catching on for live broadcasts. One advantage: Because it uses the same “language” as ordinary web pages, corporate firewalls and grouchy routers are less likely to block this kind of video.
Ways to Export Your Video
One of QuickTime Player’s most important talents is sharing a video: posting it directly to Facebook, YouTube, Vimeo, Flickr, or your own website; converting it to the right format for an iPod, iPhone, or cellphone; stashing it in iTunes for easy transfer to your iPod/iPhone; handing it off to iMovie for further editing; saving it to the hard drive as a double-clickable movie; and so on.
Let us count the ways.
Post to YouTube, Vimeo, Flickr, Facebook
The Share button ( ![]() ) offers one-click commands for posting to YouTube (the world’s most popular and famous website for short videos), Vimeo (a less well-known, but classier, more high-def video-sharing site), Flickr (mainly a photo-sharing site, but it handles videos, too), or Facebook (the most visited website on earth).
) offers one-click commands for posting to YouTube (the world’s most popular and famous website for short videos), Vimeo (a less well-known, but classier, more high-def video-sharing site), Flickr (mainly a photo-sharing site, but it handles videos, too), or Facebook (the most visited website on earth).
All of these services require that you first sign up for a free account. You do that online, not in QuickTime Player.
Then, with your movie open in QuickTime Player, choose from the ![]() menu. You’re asked for your name and password for the service. If you turn on “Remember this password in my keychain,” then you won’t have to enter it the next time.
menu. You’re asked for your name and password for the service. If you turn on “Remember this password in my keychain,” then you won’t have to enter it the next time.
Finally, click Sign In. On the next screen (Figure 16-6), type a title and description for the movie. Enter keywords (search categories like “funny” or “sports”) so people on that service will find your video when they search.
Work through the remaining upload screens; click Share. In a few minutes, your video will be live for the whole world to see—no charge.
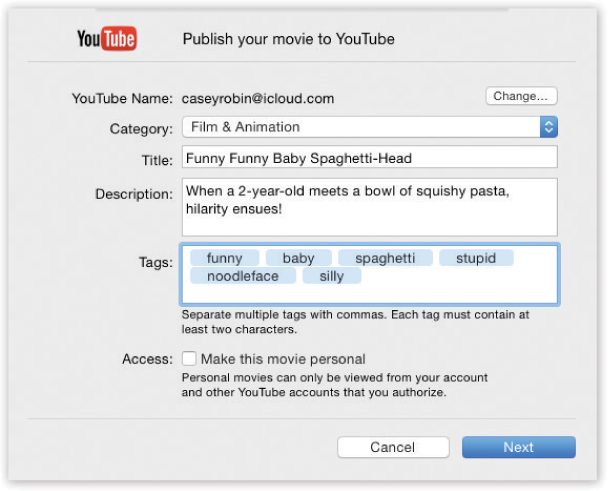
Figure 16-6. If you want to fit in with the rest of the YouTube community, be sure to misspell a lot of words, and never, ever put the apostrophe in the right place. Especially in the word “it’s.”
Send to email, Messages, AirDrop
To email your video, choose Mail from the ![]() menu. QuickTime Player hands the movie file off to your email program, attaches it to an outgoing message, and sits there awaiting the email address and maybe a comment. Of course, many email systems have file-size limits, and movies are big; the recipient’s email system may reject it on those grounds. You’ll get a “bounce-back” message, in that case.
menu. QuickTime Player hands the movie file off to your email program, attaches it to an outgoing message, and sits there awaiting the email address and maybe a comment. Of course, many email systems have file-size limits, and movies are big; the recipient’s email system may reject it on those grounds. You’ll get a “bounce-back” message, in that case.
The ![]() menu also offers commands like Messages (which sends the movie to someone’s Mac, phone, or tablet via Messages, described in Chapter 20) and AirDrop (which sends the movie to someone’s Mac wirelessly, provided that it’s within 30 feet of you; see “AirDrop”).
menu also offers commands like Messages (which sends the movie to someone’s Mac, phone, or tablet via Messages, described in Chapter 20) and AirDrop (which sends the movie to someone’s Mac wirelessly, provided that it’s within 30 feet of you; see “AirDrop”).
Saving the finished movie
After you’ve edited a movie (or not), you can use the Export command to specify a new name for your masterpiece—and, if you wish, to convert it to a different format, depending on what kind of machine will be playing it.
When you choose File→Export As, the Format pop-up menu offers these choices:
4K. You’re creating a video in ultra-high definition using H.264 format, with a resolution of up to 3840 × 2160 pixels.
1080p. You’re creating a high-def video in H.264 format, with a resolution of up to 1920 × 1080 pixels.
720p. You’re creating a high-def video in H.264 format, with a resolution of up to 1280 × 720 pixels.
480p. You’re creating a standard-definition video in H.264 format.
Audio Only. This option lets you export just the audio from a movie. That’s handy if you want to listen on your phone or iPod, post an interview online, or use the audio track in another movie.
Playing Sounds
You can have a lot of fun with digital sounds—if you know where to find them, where to put them, and how to edit them. You can play almost any kind of digitized sound files, even MP3 files, right in the Finder—if you put their windows into column view or Cover Flow view (or use Quick Look). But that’s just the beginning.
Controlling the Volume
Adjusting the volume of your Mac’s speakers couldn’t be easier: Tap the ![]() and
and ![]() keys on your keyboard. (The
keys on your keyboard. (The ![]() key next to them is the Mute button, which instantaneously cuts off all the Mac’s sound—a wonderful feature when you find yourself trying to use the Mac surreptitiously in a library or a church.)
key next to them is the Mute button, which instantaneously cuts off all the Mac’s sound—a wonderful feature when you find yourself trying to use the Mac surreptitiously in a library or a church.)
Alternatively, you can use the ![]() menulet on your menu bar (Figure 16-7).
menulet on your menu bar (Figure 16-7).
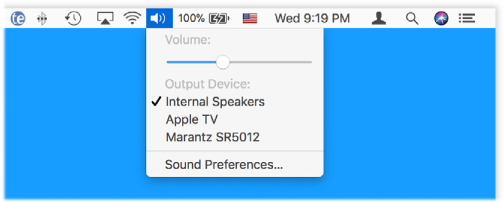
Figure 16-7. The tiny speaker silhouette in the upper-right corner of your screen turns into a volume slider when you click it. To make this sound menulet appear or disappear, open the Sound pane of System Preferences and use “Show volume in menu bar.”
The Output tab of the System Preferences→Sound pane, by the way, is designed to let you adjust the left-to-right balance of your stereo speakers, if you have them. The stereo speakers on most Macs that have them (iMacs, laptops) are already perfectly centered, so there’s little need to adjust this slider unless you generally list to one side in your chair. (You might find additional controls here if you have extra audio gear—an old iSub subwoofer system, for example.)
Tip
In the Audio MIDI Setup program (in Applications→Utilities), you can configure much fancier speaker setups, including 5.1 and 6.1 surround-sound systems.
Alert Beeps and You
Alert beeps are the quacks, beeps, or trumpet blasts that say, “You can’t click here.” (Try typing letters into a dialog box where a program expects numbers, for example.)
Choosing an alert beep
To choose one that suits your personal taste, open System Preferences→Sound→Sound Effects. Press the ![]() and
and ![]() keys to walk through the 14 witty and interesting sound snippets you can use as error beeps. You can also drag the “Alert volume” slider to adjust the error-beep volume relative to your Mac’s overall speaker setting.
keys to walk through the 14 witty and interesting sound snippets you can use as error beeps. You can also drag the “Alert volume” slider to adjust the error-beep volume relative to your Mac’s overall speaker setting.
Adding new alert beeps
MacOS’s error beeps are AIFF sound files, a standard Mac/Windows/Internet sound format—which, as a testimony to its potential for high quality, is also the standard sound-file format for music CDs. (The abbreviation stands for audio interchange file format, if you’re scoring at home.)
As with fonts, macOS builds the list of error beeps you see in the Sound pane of System Preferences from several folder sources:
System→Library→Sounds folder. This folder contains the basic macOS set. Because it’s in the System folder, it’s off-limits to manipulation by us meddlesome human beings. You can’t easily delete one of the original macOS error beeps or add to this collection.
Home→Library→Sounds folder. It’s easy enough to add sounds for your own use—just put them in this folder. (Your Home→Library folder is usually invisible; to open it, press Option as you choose Go→Library in the Finder.)
Library→Sounds folder. If you, an administrator, want to make a sound file available to all account holders on your Mac (if there are more than one), create a new Sounds folder in the main hard drive window’s Library folder. Any sound files you put there now appear in every account holder’s list of alert sounds.
The sound files you put into these folders must be in AIFF format, and their names must end with the extension .aiff or .aif.
Note
Any changes you make to these Sounds folders don’t show up in the Sound pane until the next time you open it.
Recording Sounds
If you hope to record new sounds, you need a microphone. Your microphone situation depends on the kind of Mac you have:
Laptop, iMac. You have a built-in microphone, usually a tiny hole near the screen.
Mac Pro, Mac mini. You can plug in an external USB microphone or use an adapter (such as the iMic, www.griffintechnology.com) that accommodates a standard microphone.
The System Preferences→Sound→Input pane lets you choose which sound source you want the Mac to listen to: external USB microphone, built-in microphone, or whatever.
Tip
Actually, there’s a quicker way to change audio inputs—if you know the secret. Option-click the ![]() menulet, if you’ve installed it. The resulting menu lists all your audio inputs and outputs, making it simple to switch.
menulet, if you’ve installed it. The resulting menu lists all your audio inputs and outputs, making it simple to switch.
Making the Recording
Once you’ve got your microphone situation taken care of, you need to get your hands on some sound-recording software—like QuickTime Player, which is in your Applications folder. (You can use GarageBand to record sound, too, but that’s often like using a pneumatic drill to get out a splinter.)
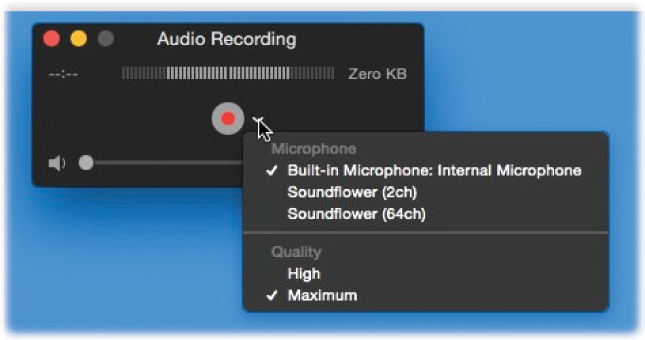
Choose File→New Audio Recording. Use the pop-up menu to specify the audio quality and sound source (Figure 16-8). Click the round, red Record button and begin to speak; click the square Stop button to finish up. Now you can use the volume slider and the ![]() button to listen to your masterpiece.
button to listen to your masterpiece.
Tip
Don’t adjust the tiny volume slider in the Audio Recording window unless you’re wearing headphones. This slider lets you monitor the sound—and turning it up while the Mac’s speakers are live risks producing the hideous shriek known as feedback.
You can record video in QuickTime Player just as easily. See “Recording Movies with QuickTime Player”.