Chapter 5. Dock, Desktop & Toolbars
When you fire up a Mac, the first thing you see is the desktop—the great-great-grandchild of the original Mac’s home-base screen that changed the world in 1984. There’s the Dock, full of unfamiliar icons on a see-through shelf. There are those Finder windows, slick and textureless with their solid-gray title bars. And then there’s the shimmering backdrop of the desktop itself.
This chapter shows you how to use and control these most dramatic elements of macOS High Sierra’s home base.
The Dock
For years, most operating systems maintained two lists of programs. One listed unopened programs until you needed them, like the Start menu (Windows) or the Launcher (Mac OS 9). The other kept track of which programs were open at the moment for easy switching, like the taskbar (Windows) or the Application menu (Mac OS 9).
In OS X, Apple combined both functions into a single strip of icons called the Dock.
Apple’s thinking goes like this: Why must you know whether or not a program is already running? That’s the computer’s problem, not yours. In an ideal world, this distinction should be irrelevant. A program should appear when you click its icon, whether it’s open or not—just as on an iPhone or an iPad.
“Which programs are open” already approaches unimportance in macOS, where sophisticated memory-management features make it hard to run out of memory. You can have dozens of programs open at once.
And that’s why the Dock combines the launcher and status functions of a modern operating system. Only a tiny black dot beneath a program’s icon tells you that it’s open—and you can even hide that, if you want. (Choose System Preferences→Dock, and turn off “Show indicators for open applications.”)
Apple has made it as easy as possible to learn to like the Dock. You can customize the thing to within an inch of its life, use it to control and manipulate windows in elaborate ways, or even get rid of it completely. This section explains everything you need to know.
Setting Up the Dock
Apple starts the Dock off with a few icons it doesn’t want you to miss: Finder, Launchpad, Siri, Mission Control, App Store, Mail, the Safari web browser, and so on. But using your Mac without putting your own favorite icons in the Dock is like buying an expensive suit and then turning down the free alteration service. At the first opportunity, you should make the Dock your own.
The concept of the Dock is simple: Any icon you drag onto it (Figure 5-1) is installed there as a button. You can even drag an open window onto the Dock—a Microsoft Word document you’re editing, say—using its proxy icon (“Full Screen Button”) as a handle.
Tip
If you right-click a folder, or any other icon, in the Sidebar (“Disk icons on the desktop”), you get an Add to Dock command for that icon. Bet you can’t guess what it does.
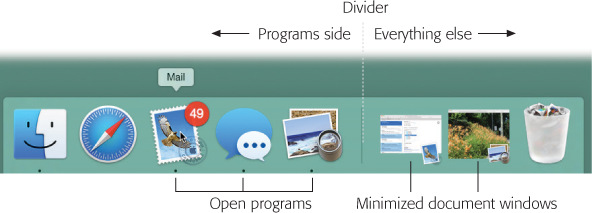
Figure 5-1. To add an icon to the Dock, simply drag it there. You haven’t moved the original file; when you release the mouse, it remains where it was. You’ve just installed a pointer—like a Mac alias or a Windows shortcut.
A single click, not a double-click, opens the corresponding icon. In other words, the Dock is an ideal parking lot for the icons of disks, folders, documents, programs, and Internet bookmarks that you access frequently.
You can even install batches of icons onto the Dock all at once—just drag them as a group. That’s something you can’t do with the other parking places for favorite icons, like the Sidebar and the Finder toolbar.
Here are a few aspects of the Dock that may throw you at first:
It has two sides. See the divider line (Figure 5-1)? Everything on the left side is an application—a program. Everything else goes on the right side: files, documents, folders, disks, and minimized windows.
Remember this division. If you try to drag an application to the right of the line, for example, the Mac teasingly refuses to accept it. (Even aliases observe the distinction. Aliases of applications can go only on the left side, and vice versa.)
Its icon names are hidden. To see the name of a Dock icon, point to it without clicking. You’ll see the name appear above the icon.
Folders and disks sprout stacks. If you click a folder or a disk icon on the right side of the Dock, a list of its contents sprouts from the icon. It’s like X-ray vision without the awkward moral implications. Turn to “GEM IN THE ROUGH Living Icons” for details on stacks.
Tip
If you press Shift as you click, the stack opens in slow motion. Amaze your friends.
Programs appear there unsolicited. Nobody but you (and Apple) can put icons on the right side of the Dock. But program icons appear on the left side of the Dock automatically whenever you open one, even if it’s not listed in the Dock. Its icon remains there for as long as it’s running.
Organizing and Removing Dock Icons
You can move the tiles of the Dock around by dragging them horizontally. As you drag, the other icons scoot aside to make room. When you’re satisfied with its new position, drop the icon you’ve just dragged.
To remove a Dock icon, just drag it away. (You can’t remove the icons of the Finder, the Trash, or any minimized document window.) Once your cursor has cleared the Dock, release the mouse button. The icon disappears. The other Dock icons slide together to close the gap.
Something weird happens if you drag away a Dock program’s icon while that program is running. You don’t see any change immediately, because the program is still open. But when you quit the program, its previously installed icon disappears from the Dock.
Pop-Up Dock Folders (“Stacks”)
When you click a disk or folder icon on the Dock, you witness the effect shown in Figure 5-2. In essence, macOS is fanning out the folder’s contents so you can see all of them. If it could talk, it would be saying, “Pick a card, any card.”

Figure 5-2. What happens when you click a folder in the Dock? You see its contents in one of three views. Here’s how you choose the file you’re looking for in each:
Top left: In list view, the folder contents appear as a menu; you can “drill down” into subfolders, and you can open something by choosing its name.
Top right: In fan view, click an icon to open it.
Bottom: In grid view, many more icons appear than can fit in fan view.
In any of the views, you can get a quick look at a document’s contents by using Quick Look. That is, highlight the icon (point without clicking, or use the keyboard to select it), and then press the space bar. A window sprouts, showing the actual document contents.
Tip
You can change how the icons in a particular stack are sorted: alphabetically, chronologically, or whatever. Use the “Sort by” section of the shortcut menu.
In principle, of course, pop-up folders are a great idea, because they save you time and clicking. Click a folder to see what’s in it; click the icon you want inside; and you’re off and running, without having had to open, manage, and close a window.
Anyway, here’s how to operate pop-up Dock folders.
Fan vs. grid vs. list
When you click a disk or folder icon on the Dock, what happens? You see its contents, arrayed in your choice of four displays:
Fan. The fan is a single, gently curved column of icons that pops out of the disk or folder icon. It’s ideal for folders that contain very few icons, because there’s room for only a handful of items in a fan (the exact number depends on your screen size). After the first few, you see only a “31 more in Finder” button, which you can click to see everything in that folder—but now you’ve wasted time, not saved it.
Note
When your Dock is positioned on a side of the screen instead of the bottom, the fan option isn’t available.
Grid. If you’ve set a folder to open as a grid, you get to see many more icons in a big rectangular window. File names often get abbreviated because there’s not enough horizontal room, but you get to see many more icons this way. Actually, thanks to the scroll bar, you get to see all the icons this way. (You can also type the beginning of an icon’s name to select it.)
Tip
A cool ghostly highlighting effect is available, which makes it easier to see which icon you’re pointing to as you move your mouse around in a grid or a fan. To make it appear, click-and-hold a folder on the Dock—and then, without releasing the mouse, slide onto the grid or fan. The highlighting follows your cursor.
Alternatively, as soon as the grid or fan appears, press the arrow keys on your keyboard to move from icon to icon—complete with ghostly selection square.
List. You can also opt for a simple list of the folder’s contents, like a pop-up menu; you actually see little icons for the files and folders within. The list appears much faster than a fan or a grid does.
There’s no scroll bar, but you can scroll the list nonetheless just by pointing to the top or bottom of it with your mouse.
Tip
The list view also displays a little ![]() to the right of each folder within the Dock folder. That is, it’s a hierarchical list, meaning that you can burrow into folders within folders, all from the original Dock icon, and all without opening a single new window. You can stick your entire Home folder, or even your whole hard drive icon, onto the Dock; now you have complete menu access to everything inside, right from the Dock.
to the right of each folder within the Dock folder. That is, it’s a hierarchical list, meaning that you can burrow into folders within folders, all from the original Dock icon, and all without opening a single new window. You can stick your entire Home folder, or even your whole hard drive icon, onto the Dock; now you have complete menu access to everything inside, right from the Dock.
Automatic. There’s a fourth option in the shortcut menu for a Dock folder, too: Automatic. If you turn this on, then macOS chooses either fan or grid view, depending on how many icons are in the folder.
So how do you choose which display you want? Right-click or two-finger click the Dock folder’s icon, and make a selection from the shortcut menu. Each disk or folder icon remembers its own fan/grid/list setting.
The Finer Points of Pop-Up Dock Folders
Those were the basics of pop-up Dock folders. Here’s the advanced course:
Ever-Changing Folder-Icon Syndrome (ECFIS). When you add a folder or disk icon to the Dock, you might notice something disorienting: Its icon keeps changing to resemble whatever you most recently put into it. Your Downloads folder might look like an Excel spreadsheet icon today, a PDF icon tonight, and a photo tomorrow—but never a folder. You can’t get to know a folder by its icon.
Fortunately, this problem is easy to fix. Right-click or two-finger click the Dock folder. From the shortcut menu, in the “Display as” section, choose either Folder (which looks like a folder forever) or Stack (which changes to reflect its contents).
Ready-made pop-up folders. When you install macOS, you get a couple of starter Dock folders, just to get you psyched. One is Downloads; the other is Documents. (Both of these folders are physically inside your Home folder. But you may well do most of your interacting with them on the Dock.)
The Downloads folder collects all kinds of online arrivals: files you download from the web using Safari, files you receive in a Messages file-transfer session, file attachments you get via Mail, files sent to you using AirDrop (Chapter 14), and so on. Unless you intervene, they’re sorted by the date you downloaded them.
It’s handy to know where to find your downloads—and nice not to have them all cluttering your desktop.
Tip
Once you’ve opened a stack’s fan or grid, you can drag any of the icons right out of the fan or grid. Just drag your chosen icon onto the desktop or into any visible disk or folder. In other words, what lands in the Downloads folder doesn’t have to stay there. (You can’t drag out of a list, however.)
Hierarchical folders. The fans and grids are hierarchical—that is, you can drill down from their folders into their folders. Figure 5-3 makes this concept clearer.
Tip
Figure 5-3 shows you how to open a folder in a grid or a list using the mouse—but you can do it all from the keyboard, too. Once a folder is selected, press Return, ![]() -O, or
-O, or ![]() -
-![]() to see what’s inside it; press
to see what’s inside it; press ![]() -
-![]() to backtrack to the original display. When a folder is highlighted, you can press
to backtrack to the original display. When a folder is highlighted, you can press ![]() -Return to open it in a Finder window; add the Option key to open that Finder window without closing the grid or fan.
-Return to open it in a Finder window; add the Option key to open that Finder window without closing the grid or fan.
Type-selecting. Once a list, fan, or grid is on the screen, you can highlight any icon in it by typing the first few letters of its name. For example, once you’ve popped open your Applications folder, you can highlight Safari by typing sa. (Press Return to open the highlighted icon.)
Tip
Alternatively, you can “walk” through the fan, grid, or list by pressing the arrow keys. A highlighting effect makes it crystal clear which icon you’re selecting. Once an icon is selected, press Return to open it.

Figure 5-3. If you spot a folder inside a list or a grid (left), click it once. You’re now looking at a fan or grid of its contents (right). You can go on burrowing like this as deeply as your folders go. You can also “back out” again by clicking the Back button (”) in the upper-left corner.
Two ways to bypass the pop-up. If you just want to see what’s in a folder, without all the graphic overkill of the fan or the grid, then right-click or two-finger click the Dock folder’s icon and choose the first command—Open “Applications” (or whatever the folder’s name is—from the shortcut menu. You go straight to the corresponding window.
Actually, if you really value your time, you’ll learn the shortcut: Option-
 -click the Dock folder’s icon. That accomplishes the same thing.
Tip
Alternatively, you can ![]() -click a folder on the Dock—or, indeed, any icon on the Dock—to jump to the window that contains that folder’s icon. (Bonus: This same
-click a folder on the Dock—or, indeed, any icon on the Dock—to jump to the window that contains that folder’s icon. (Bonus: This same ![]() -clicking trick also works in the list of Spotlight search results.)
-clicking trick also works in the list of Spotlight search results.)
Three Ways to Get the Dock Out of Your Hair
The bottom of the screen isn’t necessarily the ideal location for the Dock. All Mac screens are wider than they are tall, so the Dock eats into your limited vertical screen space. You have three ways out: Hide the Dock, shrink it, or rotate it 90 degrees.
Auto-hiding the Dock
To turn on the Dock’s auto-hiding feature, press Option-![]() -D. (Or, if it’s a slow day at work, choose System Preferences→Dock, and turn on “Automatically hide and show the Dock.”)
-D. (Or, if it’s a slow day at work, choose System Preferences→Dock, and turn on “Automatically hide and show the Dock.”)
When the Dock is hidden, it doesn’t slide into view until you move the cursor to the Dock’s edge of the screen. When you move the cursor back to the middle of the screen, the Dock slithers away once again. (Individual Dock icons may occasionally shoot upward into desktop territory when a program needs your attention—cute, very cute—but otherwise, the Dock lies low until you call for it.)
On paper, an auto-hiding Dock is ideal; it’s there only when you summon it. In practice, however, you may find that the extra half-second the Dock takes to appear and disappear makes this feature slightly less appealing. Many Mac fans prefer to hide and show the Dock at will by pressing the hide/show keystroke, Option-![]() -D. This method makes the Dock pop on and off the screen without requiring you to move the cursor.
-D. This method makes the Dock pop on and off the screen without requiring you to move the cursor.
Shrinking and enlarging the Dock
Depending on your screen’s size, you may prefer smaller or larger Dock buttons. The official way to resize them is shown in Figure 5-4.
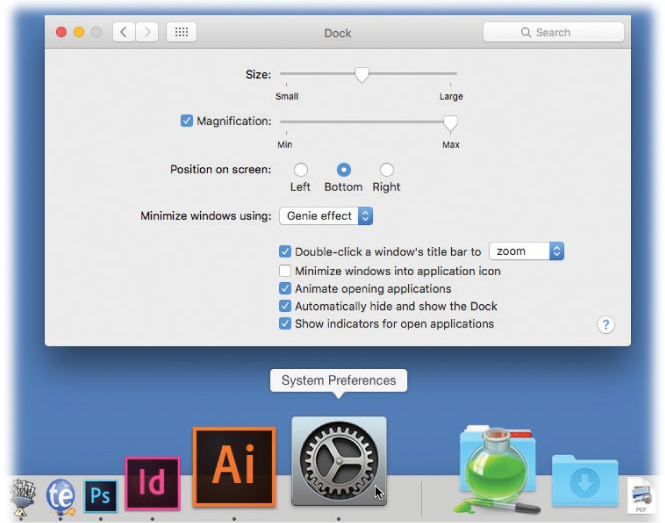
Figure 5-4. To make your Dock icons bigger or smaller, choose System Preferences→Dock. Leave the Dock Preferences window open on the screen, as shown here. After each adjustment of the Dock size slider, try out the Dock (which still works when the Dock Preferences window is open) to test your new settings.
There’s a much faster way to resize the Dock, though: Just position your cursor carefully on the Dock’s divider line so that it turns into a double-headed arrow (shown in Figure 5-5). Now drag up or down to shrink or enlarge the Dock.
Tip
If you press Option as you drag, the Dock snaps to certain canned icon sizes—those that the programmer actually drew. (You won’t see the in-between sizes that macOS generally calculates on the fly.)
You may not be able to enlarge the Dock if it’s already at its size limit. But you can make it almost infinitely smaller. This may make you wonder: How can you distinguish among icons if they’re the size of molecules?

Figure 5-5. Look closely—you can see the secret cursor that resizes the Dock. If you don’t see any change in the Dock size as you drag upward, then you’ve reached the size limit.
The answer lies in the Magnification option (see Figure 5-4). Now your Dock icons balloon to a much larger size as your cursor passes over them.
Tip
You can get Dock magnification à la carte, too. If you press Shift-Control as your cursor approaches the Dock, you temporarily reverse the magnification setting. That is, if magnification is turned off, the icons now swell into magnification mode—and vice versa.
Moving the Dock to the sides of the screen
Yet another approach to getting the Dock out of your way is to rotate it, so that it sits vertically against a side of your screen. You can rotate it in either of two ways:
The long way. Choose System Preferences→Dock, and choose Left, Bottom, or Right, as you see fit.
The mouse way. While pressing Shift, drag the Dock’s divider line, like a handle, to the side of the screen you want.
You’ll probably find that the right side of your screen works better than the left. Most macOS programs put their document windows against the left edge of the screen, where the Dock and its labels might get in the way.
Note
When you position your Dock vertically, the “right” side of the Dock becomes the bottom of the Dock. In other words, the Trash now appears at the bottom of the vertical Dock. So, in this book, mentally substitute the phrase “bottom part of the Dock” when you read references to the “right side of the Dock.”
Using the Dock
Most of the time, you’ll use the Dock as either a launcher (you click an icon once to open the corresponding program, file, folder, or disk) or as a status indicator (the tiny spots identified in Figure 5-1 indicate which programs are running).
But the Dock has more tricks than that up its sleeve. You can use it, for example, to pull off any of the following stunts.
Switch Applications
The Dock isn’t just a launcher; it’s also a switcher. Here are some of the tricks it lets you do:
Jump among your open programs by clicking their icons.
Drag a document (such as a text file) onto a Dock application (such as the Microsoft Word icon) to open the former with the latter. (If the program balks at opening the document, yet you’re sure the program should be able to open it, then add the
and Option keys as you drag.)Hide all windows of the program you’re in by Option-clicking another Dock icon.
Hide all other programs’ windows by Option-
-clicking the Dock icon of the program you do want (even if it’s already in front).Switch windows in one program by pointing to that program’s Dock icon without clicking and then doing a three-finger downward swipe on your trackpad. (This feature, called one-app Exposé, doesn’t work until you turn it on in System Preferences→Trackpad→More Gestures.)
Tip
This trick—the three-finger downswipe—works even on the Dock icons of programs that aren’t running. In those situations, you get the effect shown in Figure 6-17. For some Apple programs, at least, it’s a quick way to get to the icons of recently opened documents.
Operate the Dock by Keyboard Control
If you turn on keyboard navigation, you can operate the Dock entirely from the keyboard; see “Reassigning all documents of one type”.
Secret Menus
If you right-click, two-finger click, or click-and-hold on a Dock icon, you see its very useful shortcut menu (Figure 5-6).
If you’ve clicked a minimized window icon, this shortcut menu says only Open (unless it’s a minimized Finder window, in which case it also says Close).
But if you’ve clicked any other kind of icon, you get some very useful hidden commands. For example:
[Window names]. The secret Dock menu of a running program usually lists one or more tiny, neatly labeled window icons, like those shown in Figure 5-6. This useful feature means you can jump directly not only to a certain program but also to a certain open window in that program.
For example, suppose you’ve been using Word to edit three different chapters. You can use Word’s Dock icon as a Window menu to pull forward one particular chapter, or (if it’s been minimized) to pull it up—even if a different program is in front of Word. (The checkmark indicates the frontmost window, even if the entire program is in the background. A diamond symbol means that the window is minimized and therefore not visible on the screen at the moment.)
In certain Apple showcase programs like TextEdit and the iWork programs, there are actually two lists of documents, separated by a horizontal line. (You can see the effect in Figure 5-6.) The top group lists files you’ve recently opened in that program; the next batch lists currently open documents.
Tip
The Finder tile that’s always at the beginning of the Dock is, in effect, its own Window menu. Its shortcut menu lists all open desktop windows. The Window menu at the top of the Finder screen does the same thing, but the Dock is available no matter what program you’re using.

Figure 5-6. Left: Right-click or two-finger click a Dock icon to open the secret menu. In certain recent programs, the top half of the menu lists recently opened documents, followed by currently open ones.
Right: Right-click or two-finger click the divider bar to open a different hidden menu. This one lists a bunch of useful Dock commands.
Show All Windows/Show Recents. When a program on the Dock is open, this command says Show All Windows; when it’s not running, it says Show Recents. Either way, it takes you to the screen shown in Figure 5-6, where the icons of recently opened documents appear for easy clicking and reopening. (OK, they may appear. Apple programs like TextEdit and Pages show these recent icons, but non-Apple programs have to be updated before they’ll show you the recent-document icons.)
To exit the Recents screen, press Esc or
-period.Options. This submenu contains a bunch of miscellaneous commands:
Options→Keep in Dock. Whenever you open a program, macOS puts its icon in the Dock—marked with a dot—even if you don’t normally keep its icon there. As soon as you quit the program, its icon disappears again from the Dock.
Tip
You can get rid of that “running program” indicator dot, if you like. Open System Preferences→Dock and turn off “Show indicators for open applications.”
If you understand that much, then the Keep in Dock command makes a lot of sense. It means, “Hello, I’m this program’s icon. I know you don’t normally keep me in your Dock, but I could stay here even after you quit my program. Just say the word.” If you find you’ve been using, for example, Terminal a lot more often than you thought you would, then this command may be the ticket.
Tip
Actually, there’s a faster way to tell a running application to remain in the Dock from now on. Just drag its icon off the Dock and then right back onto it—yes, while the program is running. You have to try it to believe it.
If you don’t want a program’s icon to appear on the Dock when it’s not running, then choose this command again so that the checkmark disappears.
Note
If the program is already running, turning off Keep in Dock doesn’t immediately remove its icon from the Dock. That’s because a program always appears in the Dock when it’s open. What you’re doing here is saying, “Disappear from the Dock when you’re not running”—and you’ll see the proof as soon as you quit that program.
Options→Open at Login. This command lets you specify that you want this icon to open itself automatically each time you log into your account. It’s a great way to make sure your email inbox, your calendar, or the Microsoft Word thesis you’ve been working on is fired up and waiting on the screen when you sit down to work.
To make this item stop auto-opening, choose this command again so that the checkmark no longer appears.
Options→Show in Finder. This command highlights the actual icon (in whatever folder window it happens to sit) of the application, alias, folder, or document you’ve clicked. You might want to do this when, for example, you’re using a program that you can’t quite figure out, and you want to jump to its desktop folder in hopes of finding a ReadMe file there.
Hide/Show. You can hide all traces of the program you’re using by choosing Hide from its Dock icon. (You could accomplish the same thing in many other ways, of course; see “Minimize Button”.)
What’s cool here is that (a) you can even hide the Finder and all its windows, and (b) if you press Option, the command changes to say Hide Others. This, in its way, is a much more powerful command. It tells all the programs you’re not using—the ones in the background—to get out of your face. They hide themselves instantly.
Note
Once you’ve hidden a program’s windows, this command changes to say Show, which is how you make them reappear.
Quit. You can quit almost any program directly from its Dock shortcut menu. (Finder, Launchpad, and Mission Control are exceptions.) The beauty of this feature is that you don’t have to switch into a program to get to its Quit command.
(If you get nothing but a beep when you use this Quit command, it’s because you’ve hidden the windows of that program, and one of them has unsaved changes. Click the program’s icon, save your document, and then try to quit again.)
Tip
If you hold down the Option key—even after you’ve opened the pop-up menu—the Quit command changes to say Force Quit. That’s your emergency hatch for jettisoning a locked-up program.
Miscellaneous. You might find other commands in Dock shortcut menus; software companies are free to add specialty options to their own programs.
For example, the Finder icon’s shortcut menu offers direct access to commands like Find, Connect to Server, and New Finder Window. Microsoft Office programs (Word, Excel, and so on) come with an Open Recent command, with a list of documents you’ve opened recently. The Mail icon offers Get New Mail and Compose New Message commands. The Safari icon has a New Window command. The System Preferences icon sprouts a complete list of the preference panes (Sound, Keyboard, Trackpad, and so on). You get the idea.
Tip
If you Control-![]() -click a program’s Dock icon, you get an abbreviated shortcut menu. It lists only the Options, Hide, and Quit commands and maybe some recent documents—not the full list of commands. If all you want to do is quit a program or something, this abbreviated menu is faster and easier to comprehend.
-click a program’s Dock icon, you get an abbreviated shortcut menu. It lists only the Options, Hide, and Quit commands and maybe some recent documents—not the full list of commands. If all you want to do is quit a program or something, this abbreviated menu is faster and easier to comprehend.
Conduct Speed Tests
When you click an application icon in the Dock, its icon jumps up and down a few times as the program launches, as though with excitement at having been selected. The longer a program takes to start up, the more bounces you see. This has given birth to a hilarious phenomenon: counting these bounces as a casual speed benchmark for application-launching times. “InDesign took twelve bouncemarks to open in Mac OS X 10.10,” you might read online, “but only three bouncemarks in 10.12.”
Tip
If you find the icon-bouncing a bit over the top, try this: Choose System Preferences→Dock. Turn off “Animate opening applications.” From now on, your icons won’t actually bounce—instead, the little dot underneath it will simply pulse as the application opens.
Drag and Drop
Dock icons are spring-loaded. That is, if you drag any icon onto a Dock folder or disk icon and pause—or, if you’re in a hurry, tap the space bar—the Dock icon opens to receive the dragged file.
Note
It opens, that is, if the spring-loading delay feature is turned on in System Preferences→Accessibility→Mouse & Trackpad.
This technique is most useful in these situations:
Drag a document icon onto a Dock folder icon. The folder’s Finder window pops open so you can continue the drag into a subfolder.
Drag a document into an application. The classic example is dragging a photo onto the Photos icon. When you tap the space bar, Photos opens automatically. Since your mouse button is still down, and you’re technically still in mid-drag, you can now drop the photo directly into the appropriate Photos album or Event.
You can drag an MP3 file into iTunes or an attachment into Mail or Outlook in the same way.
Do Your Filing
Once you’ve tried stashing a few important folders on the right side of your Dock, there’s no going back. You can mostly forget all the other navigation tricks you’ve learned in macOS. The folders you care about are always there, ready for opening with a single click.
Better yet, they’re easily accessible for putting away files; you can drag files directly into the Dock’s folder icons as though they were regular folders.
In fact, you can even drag a file into a subfolder in a Dock folder. That’s because, again, Dock folders are spring-loaded. When you drag an icon onto a Dock folder and pause, the folder’s window appears around your cursor, so you can continue the drag into an inner folder (and even an inner inner folder, and so on). “Spring-Loaded Folders: Dragging Icons into Closed Folders” has the details on spring-loaded folders.
Tip
When you try to drag something into a folder on the Dock, the Dock icons scoot out of the way; the Dock assumes you’re trying to put that something onto the Dock. But if you press the ![]() key as you drag an icon to the Dock, the existing icons freeze in place. Without the
key as you drag an icon to the Dock, the existing icons freeze in place. Without the ![]() key, you wind up playing a frustrating game of chase-the-folder.
key, you wind up playing a frustrating game of chase-the-folder.
Great Things to Put in Your Dock
Now that you know what the Dock is about, it’s time to set up shop, installing the programs, folders, and disks you’ll be using most often.
They can be whatever you want, of course, but don’t miss these opportunities:
Your Home folder. Many people immediately drag their hard drive icons—or, perhaps more practically, their Home folders—onto the right side of the Dock. Now they have quick access to every file in every folder they ever use.
The Applications folder. Here’s a no-brainer: Stash the Applications folder here so you’ll have quick pop-up menu access to any program on your machine.
Your Applications folder. As an even more efficient corollary, create a new folder of your own. Fill it with the aliases of just the programs you use most often and park it in the Dock. Now you’ve got an even more useful Applications folder that opens as a stack.
The Shared folder. If you’re using the Mac’s accounts feature (Chapter 13), this is your wormhole to all the accounts—the one place you can put files where everybody can access them (Figure 13-11).
A tag. You know those color-coded Finder tags (“POWER USERS’ CLINIC Designing Your Own Icons”)? You can drag one directly out of a Finder window’s Sidebar and onto the left side of the Dock. When you click its Dock icon, you get a window that displays the icons of everything on your Mac you’ve tagged that way.
The Finder Toolbar
At the top of every Finder window is a small set of function icons, all in a gradient-gray row (Figure 5-7). The first time you run macOS, you’ll find only these icons on the toolbar:
Back (<), Forward (>). The Finder works something like a web browser. Only a single window remains open as you navigate the various folders on your hard drive.
The Back button (<) returns you to whichever folder you were just looking at. (Instead of clicking <, you can also press
-[, or choose Go→Back—particularly handy if the toolbar is hidden, as described in the next section.)The Forward button (>) springs to life only after you’ve used the Back button. Clicking it (or pressing
-]) returns you to the window you just backed out of.View controls. The four tiny View buttons switch the current window into icon, list, column, or Cover Flow view, respectively. And, remember, if the toolbar is hidden, you can get by with the equivalent commands in the View menu at the top of the screen—or by pressing
-1 for icon view, -2 for list view, -3 for column view, or -4 for Cover Flow view.Arrange (
 ). This pop-up menu lets you group the files in a window by date, name, or other criteria; see “Use as Defaults”.
Action (
 ). You can read about this context-sensitive pop-up menu in “Shortcut Menus, Action Menus”.
Figure 5-7. If you right-click or two-finger click a blank spot on the toolbar, you get a pop-up menu that offers you a choice of three looks for the buttons here: Icon and Text, Icon Only, or Text Only. (Well, four looks, if you count Hide Toolbar.)
In Text Only mode (bottom), the four View buttons are replaced by a little pop-up menu called View. Furthermore, the search box turns into a one-word button called Search. Clicking it brings up the search window.Share (
 ). You can read about this context-sensitive pop-up menu in “The Share Button”.
Tags (
 ). Here’s the Tags menu described in “POWER USERS’ CLINIC Designing Your Own Icons”.
Search box. This little round-ended text box is yet another entry point for the Spotlight feature described in Chapter 4. It’s a handy way to search your Mac for some file, folder, disk, or program.
Hiding or Shrinking the Toolbar
With the toolbar, the Dock, the Sidebar, and the large icons of macOS, it almost seems like there’s an Apple conspiracy to sell big screens.
Fortunately, the toolbar doesn’t have to contribute to that impression. You can hide it by choosing View→Hide Toolbar or by pressing Option-![]() -T. (That will work only if you don’t have multiple tabs in that Finder window.) That same keystroke, or choosing View→Show Toolbar, brings it back. You can also just make it smaller by hiding the labels (or the icons), as shown in Figure 5-7.
-T. (That will work only if you don’t have multiple tabs in that Finder window.) That same keystroke, or choosing View→Show Toolbar, brings it back. You can also just make it smaller by hiding the labels (or the icons), as shown in Figure 5-7.
Customizing the Icons on the Toolbar
MacOS offers a collection of beautifully designed icons for alternate (or additional) toolbar buttons. But you can also add anything to the toolbar, turning it into a supplementary Dock or Sidebar. This is great news for people who’ve run out of space for stashing favorite icons in the Dock or the Sidebar. (Of course, if that’s your problem, you need a bigger monitor.)
Apple’s toolbar-icon collection
The first step in tweaking the toolbar is choosing View→Customize Toolbar. The window shown in Figure 5-8 appears.

Figure 5-8. While this window is open, you can add icons to the toolbar by dragging them into place from the gallery before you. You can also remove icons from the toolbar by dragging them up or down off the toolbar. Rearrange the icons by dragging them horizontally.
This is your chance to rearrange the existing toolbar icons or delete the ones you don’t use. You can also add any of Apple’s buttons to the toolbar by dragging them from the “gallery” onto the toolbar itself. The existing icons scoot out of your cursor’s way, if necessary.
Most of the options in the gallery duplicate the functions of menu commands. Here are a few that don’t appear on the standard toolbar:
Path. Most of the gallery elements are buttons, but this one creates a pop-up menu on the toolbar. When clicked, it reveals (and lets you navigate) the hierarchy—the path—of folders you open to reach whichever window is open. (Equivalent:
-clicking a window’s title.)Eject. This button ejects whichever disk or disk image is currently highlighted. (Equivalent: the File→Eject command, or holding down the
 key on your keyboard.)
Burn. This button burns a blank CD or DVD with the folders and files you’ve dragged onto it. (Equivalent: the File→Burn [Thing Name] to Disc command.)
Space. By dragging this mysterious-looking item into the toolbar, you add a gap between it and whatever icon is to its left. The gap is about as wide as one icon. (The fine, dark, rectangular outline that appears when you drag it doesn’t actually show up once you click Done.)
Flexible Space. This icon, too, creates a gap between the toolbar buttons. But this one expands as you make the window wider. Now you know how Apple got the search box to appear off to the right of the standard toolbar, a long way from its clustered comrades to the left.
New Folder. Clicking this button creates a new folder in whichever window you’re viewing. (Equivalent: the File →New Folder command, or the Shift-
-N keystroke.)Delete. This option puts the highlighted file or folder icons into the Trash. (Equivalent: the File→Move to Trash command, or the
-Delete keystroke.)
Tip
Weirdly enough, if you highlight an icon in the Trash and then press ![]() -Delete, you trigger the Put Back function—flinging the icon back into the folder it came from (and opening that folder to show you). That is, using the Delete keystroke in this case actually undeletes.
-Delete, you trigger the Put Back function—flinging the icon back into the folder it came from (and opening that folder to show you). That is, using the Delete keystroke in this case actually undeletes.
Connect. If you’re on a home or office network, this opens the Connect to Server dialog box so you can tap into another computer. (Equivalent: the Go→Connect to Server command, or
-K.)Get Info. This button opens the Get Info window for whatever’s selected.
Drag the default set. If you’ve made a mess of your toolbar, you can always reinstate its original Apple arrangement by dragging this rectangular strip directly upward onto your toolbar.
If the window ever gets too narrow to show all the icons you’ve added to the toolbar, the right end of the toolbar sprouts a » symbol. Click it for a pop-up menu that names whichever icons don’t fit at the moment. (You’ll find this toolbar behavior in many macOS programs, not just the Finder: Safari, Mail, and so on.)
Adding your own stuff
Millions of Mac fans never realize that they can drag any icons at all onto the toolbar—files, folders, disks, programs, or whatever—to turn them into one-click buttons. In short, you can think of the Finder toolbar as yet another Dock or Sidebar (Figure 5-9).
Rearranging or Removing Toolbar Icons
You can drag toolbar icons around, rearranging them horizontally, by pressing ![]() as you drag. Taking an icon off the toolbar is equally easy. While pressing the
as you drag. Taking an icon off the toolbar is equally easy. While pressing the ![]() key, just drag the icon clear away from the toolbar. (If the Customize Toolbar sheet is open, you can perform either step without the
key, just drag the icon clear away from the toolbar. (If the Customize Toolbar sheet is open, you can perform either step without the ![]() key. You can also get rid of a toolbar icon by right-clicking or two-finger clicking it and choosing Remove Item from the shortcut menu.)
key. You can also get rid of a toolbar icon by right-clicking or two-finger clicking it and choosing Remove Item from the shortcut menu.)

Figure 5-9. You don’t need to choose View→Customize Toolbar to add your own icons to the toolbar. Just hold down the and Option keys, and then drag an icon from the desktop or any folder window directly onto the toolbar at any time.
To remove the icon later, press as you drag it away from the toolbar.
Designing Your Desktop
In some ways, just buying a Macintosh was already a renegade act of self-expression. But that’s only the beginning. Now it’s time to fashion the computer screen itself according to your personal sense of design and fashion.
System Preferences
Cosmetically speaking, macOS offers two dramatic full-screen features: desktop backgrounds and screen savers. For details, see Figure 10-13.
Graphic Designers’ Corner: The Gray Look
One of the earliest objections to the lively, brightly colored look of the Mac OS came from Apple’s core constituency: artists and graphic designers. Some complained that the bright blues (of scroll-bar handles, progress bars, the ![]() menu, pulsing OK buttons, and highlighted menu names and commands), along with the red, green, and yellow window-corner buttons, threw off their color judgment.
menu, pulsing OK buttons, and highlighted menu names and commands), along with the red, green, and yellow window-corner buttons, threw off their color judgment.
Apple has been de-colorizing the OS ever since. The three-dimensional effects are less drastic, and the button colors are less intense. In Snow Leopard, both the ![]() menu and the Spotlight menu went from colorful to black, and in Lion, the Sidebar lost its color. Today, OK buttons no longer pulse.
menu and the Spotlight menu went from colorful to black, and in Lion, the Sidebar lost its color. Today, OK buttons no longer pulse.
Tip
The Highlight Color pop-up menu in the System Preferences→General panel lets you choose a different accent color for your Mac world. This is the background color of highlighted text, the colored oval that appears around highlighted icon names, and a window’s “lining” as you drag an icon into it.
But in case the color scheme still bothers artists, Apple created what it calls the Graphite look, which turns all those interface elements gray instead of blue. To try out this look, choose ![]() →System Preferences; click General, and then choose Graphite from the Appearance pop-up menu.
→System Preferences; click General, and then choose Graphite from the Appearance pop-up menu.
Desktop Sounds
Desktop sounds are the tiny sound effects that accompany certain mouse drags. And we’re talking tiny—they’re so subdued that you might not have noticed them. You hear a little plink/crunch when you drop an icon onto the Trash, a boingy thud when you drag something into a folder, and so on. The little thud you hear at the end of a file-copying job is actually useful, because it alerts you that the task is complete.
If all that racket is keeping you awake, however, it’s easy enough to turn it off. Open System Preferences, click the Sound icon, and then turn off “Play user interface sound effects.”
And if you decide to leave them turned on, please—use discretion when working in a library, church, or neurosurgical operating room.
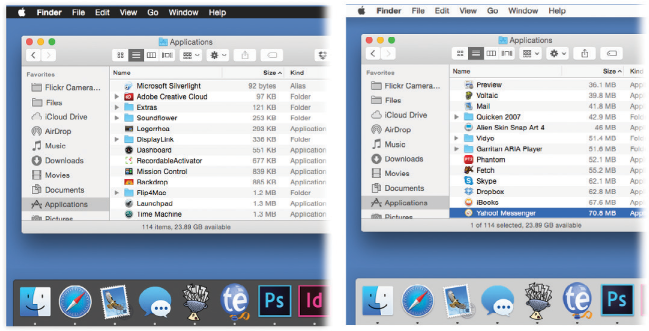
Figure 5-10. “Use dark menu bar and Dock” (left) offers a cool, soothing contrast to the standard color scheme (right).
It’s intended to please the legions of Mac-based artists and designers; the menus and Dock become calmer and less distracting.
Menulets: The Missing Manual
See the menu-bar icons in Figure 5-11? Apple calls them Menu Extras, but Mac fans on the Internet have named them “menulets.” Each is both an indicator and a menu that provides direct access to certain settings: sound, monitor resolution, Wi-Fi, and so on.
To make the various menulets appear, you generally visit a certain pane of System Preferences (Chapter 10) and turn on a checkbox called, for example, “Show volume in menu bar.” Here’s a rundown of the various Apple menulets you may encounter, complete with instructions on where to find the magic on/off checkbox for each.
Along the way, you’ll discover that secondary, hidden features lurk in many of these menulets, if you happen to know the secret: Press the Option key.
Tip
The following descriptions indicate the official, authorized steps for installing a menulet. There is, however, a folder on your hard drive that contains 22 of them in a single window, so you can install one with a quick double-click. To find them, open your hard drive→System→Library→CoreServices→Menu Extras folder.
AirPort (
 ) lets you turn your Wi-Fi (wireless networking) circuitry on or off, join existing wireless networks, and create your own private ones. To find the Show checkbox: Open System Preferences→Network. Click Wi-Fi.
Tip
Once you’ve installed this menulet, you can Option-click it to produce a secret menu full of details about the wireless network you’re on right now. You see its channel number, password-security method (WEP, WPA, None, whatever), speed, and such geeky details as the MCS Index and RSSI.
Battery (
 ) shows how much power remains in your laptop’s battery, how much time is left to charge it, whether it’s plugged in, and more. When you click the icon to open the menu, you see how many actual hours and minutes are left on the charge. You can also choose Show Percentage to add a percentage-remaining readout (43%) to the menu bar.
The Battery menu also shows a list of the most power-hungry open programs (“Apps Using Significant Energy”). That’s handy when you’re trying to eke out every last drop of battery life for your laptop. To find the Show checkbox: Open System Preferences→Energy Saver.
Tip
If you Option-click the Battery menulet, you get to see the status of your battery’s health. A Condition command appears. It might say, for example, “Condition: Normal” or “Service Battery,” “Replace Soon,” or “Replace Now.” Of course, we all know laptop batteries don’t last forever; they begin to hold less of a charge as they approach 500 or 1,000 recharges, depending on the model.
Is Apple looking out for you, or just trying to goose the sale of replacement batteries? You decide.

Figure 5-11. These little guys are the cousins of the controls found on the Windows system tray.
Bluetooth (
 ) connects to Bluetooth devices, “pairs” your Mac with a cellphone, lets you send or receive files wirelessly (without the hassle of setting up a wireless network), and so on. To find the Show checkbox: Open System Preferences→Bluetooth.
Tip
You can Option-click this menulet to see three additional lines of nerdy details about your Bluetooth setup: the Bluetooth software version you’re using, the name of your Mac (which is helpful when you’re trying to make it show up on another Bluetooth gadget), and its Bluetooth MAC (hardware) address.
Clock is the menu-bar clock that sits at the upper-right corner of your screen. Click it to open a menu where you can check today’s date, convert the menu-bar display to a tiny analog clock, and so on. To find the Show checkbox: Open System Preferences→Date & Time. On the Clock tab, turn on “Show date and time in menu bar.”
Displays (
 ) adjusts screen resolution. On Macs with a projector or second monitor attached, it lets you turn screen mirroring on or off—a tremendous convenience to anyone who gives PowerPoint or Keynote presentations. And if you have an Apple TV, this menulet also lets you turn AirPlay on or off—meaning that you can send the Mac’s screen image to a TV. The menulet turns blue when you’re projecting. To find the Show checkbox: Open System Preferences→Displays→Display tab.
Eject (
) is a relic of the days when Macs had DVD drives. There’s no checkbox in System Preferences to make this menulet appear. The fact that it even exists is something of a secret, but if you ever buy an external DVD drive, you’ll be glad to know that it does.To make it appear, open your System→Library→CoreServices→Menu Extras folder as already described, and then double-click the Eject menu icon. That’s it! The
menulet appears.You’ll discover that its wording changes—“Open Combo Drive,” “Close DVD-ROM Drive,” “Eject [Name of Disc],” or whatever—to reflect your particular drive type and what’s in it at the moment.
iChat (
 ) is a quick way to let the world know, via the Messages application (Chapter 20) and the Internet, that you’re away from your keyboard, or available and ready to chat. Via the New Message command, it’s also a quick way to open Messages itself. To install the menulet: Open your hard drive→System→Library →CoreServices→Menu Extras folder. Double-click iChat.menu.
Remote Desktop (
 ) is a program, sold separately, that lets teachers or system administrators tap into your Mac from across a network. In fact, they can actually see what’s on your screen, move the cursor around, and so on. The menulet lets you do things like send a message to the administrator. To find the Show checkbox: Open System Preferences→Sharing, and then click Remote Management and then Computer Settings.
Script Menu (
 ) lists a variety of useful, ready-to-run AppleScript programs. To find the Show checkbox: Open the Script Editor program (in your Applications Utilities folder). Choose Script Editor→Preferences→General.
Text Input (
 ) switches among different text input modes. For example, if your language uses a different alphabet, like Russian, or thousands of characters, like Chinese, this menulet summons and dismisses the alternative keyboards and input methods you need. Details are in “Case Swapping”. To find the Show checkbox: Open System Preferences→Keyboard→Input Sources.
Time Machine (
 ) lets you start and stop Time Machine backups (see Figure 7-17). To find the Show checkbox: Open System Preferences→Time Machine.
Accessibility (
 ) offers on/off status indicators for features designed to help with visual, hearing, and muscle impairments. Chapter 10 has a rundown of what they do. To find the Show checkbox: Open System Preferences→Accessibility.
User (
 ) identifies the account holder (Chapter 13) who’s logged in at the moment. To make this menulet appear (at the far-right end of the menu bar), turn on fast user switching, which is described in Figure 13-11.
Volume (
 ), of course, adjusts your Mac’s speaker or headphone volume. The menu lists all the different speaker sources—like internal speakers, AirPods wireless earbuds, or Apple TV—so that you can choose which should be the Mac’s “voice” at the moment. To find the Show checkbox: Open System Preferences→Sound.
Tip
If you Option-click this menulet, you also get to see a list of input sources, like the built-in microphone or an external one you’ve plugged in.
VPN (
 ) stands for virtual private networking, which allows you to tap into a corporation’s network so you can, for example, check your work email from home. You can use the menulet to connect and disconnect, for example. To find the Show checkbox: Open System Preferences→Network. Click the name of your VPN.
WWAN (
 ) is useful only if you have a cellular modem from Verizon, Sprint, AT&T, or T-Mobile. This menulet lets you start and stop that connection. To find the Show checkbox: Open System Preferences→Network. Click the name of your cellular modem.
Note
A few other items may lurk in the Menu Extras folder: PPPoE, Ink, IrDA, and ExpressCard. Most are relics of an earlier age, when laptops had features like card slots and infrared lenses.
To remove a menulet, ![]() -drag it off your menu bar, or turn off the corresponding checkbox in System Preferences. You can also rearrange menulets by
-drag it off your menu bar, or turn off the corresponding checkbox in System Preferences. You can also rearrange menulets by ![]() -dragging them horizontally. You can even
-dragging them horizontally. You can even ![]() -drag the menulets from other companies to move them around—not just the standard Apple ones.
-drag the menulets from other companies to move them around—not just the standard Apple ones.
These little guys are useful, good-looking, and respectful of your screen space. The world could use more inventions like menulets.