Chapter 7. Data: Typing, Sharing & Backing Up
The original 1984 Mac didn’t make jaws drop because of its speed, price, or sleek looks. What amazed people was the simplicity and elegance of the user interface. At some point in every Apple demo, the presenter copied a graphic drawn in a painting program (MacPaint) and pasted it directly into a word processor (MacWrite), where it appeared neatly nestled between typed paragraphs of text.
Today, the Mac is even more adept at helping you enter, move, and share your hard-won data. MacOS offers several ways to move information within a single document, between documents, between programs, and even between Mac and Windows computers. This chapter leads you through this broad cycle of data: from entering it with the mouse and keyboard, to moving it around, to backing it up.
The Mac Keyboard
All through this book, you’ll find references to certain keys on Apple’s keyboards. “Hold down the ![]() key,” you might read, or “Press Control-F2.” If you’re coming from Mac OS 9, from Windows, or even from a typewriter, you might be a bit befuddled.
key,” you might read, or “Press Control-F2.” If you’re coming from Mac OS 9, from Windows, or even from a typewriter, you might be a bit befuddled.
To make any attempt at an explanation even more complicated, Apple’s keyboards keep changing. The one you’re using right now is probably one of these models:
The current keyboards, where the keys are flat little jobbers that poke up through square holes in the aluminum (Figure 7-1). That’s what you get on current laptops, wired keyboards, and Bluetooth wireless keyboards.
The old, plastic desktop keyboards, or the white or black plastic laptop ones.
Here, then, is a guided tour of the non-typewriter keys on the modern Mac keyboard:
Tip
To see close-ups of Apple’s current wired and wireless keyboards, visit www.apple.com/keyboard.
fn. How are you supposed to pronounce fn? Not “function,” certainly; after all, the F-keys on the top row are already known as function keys. And not “fun”; goodness knows, the fn key isn’t particularly hilarious to press.
What it does, though, is quite clear: It changes the purpose of certain keys. That’s a big deal on laptops, which don’t have nearly as many keys as desktop keyboards. So for some of the less commonly used functions, you’re supposed to press fn and a regular key. (For example, fn turns the
 arrow key into a Page Up key, which scrolls upward by one screenful.)
Note
On most Mac keyboards, the fn key is in the lower-left corner. The exception is the full-size Apple desktop keyboard (the one with a numeric keypad); there the fn key is in the little block of keys between the letter keys and the number pad.

Figure 7-1. On the top row of aluminum Mac keyboards, the F-keys have dual functions. Ordinarily, the F1 through F4 keys correspond to Screen Dimmer ( ), Screen Brighter (
 ), Mission Control (
 ), and either Dashboard (
 ) or Launchpad (
 ). Pressing the fn key in the lower-left corner changes their personalities.
You’ll find many more fn examples in the following paragraphs.
Numeric keypad. The number-pad keys do exactly the same thing as the numbers at the top of the keyboard. But, with practice, typing things like phone numbers and prices is much faster with the number pad, since you don’t have to look down at what you’re doing.
Apple has been quietly eliminating the numeric keypad from most of its keyboards, but you can still find it on some models. And on some old Mac laptops, the numbers 0 through 9 were painted onto a block of letter keys near the right side (1, 2, and 3 were J, K, and L, for example). You could turn those letter keys into their numeric alter egos by pressing the fn key with your left hand.
Eventually, Apple eliminated this embedded-keyboard effect from its laptops, having discovered that almost nobody was using it.
- , (F1, F2). These keys control the brightness of your screen. Usually, you can tone it down a bit when you’re in a dark room or when you want to save laptop battery power; you’ll want to crank it up in the sun.
Tip
If you hold down the Shift and Option keys, tapping the brightness keys adjusts the brightness by just a little bit—a fraction of one of the larger brightness steps. Control freaks, rejoice.
- (F3). This one fires up Mission Control, the handy window-management feature described starting in “Mission Control: Death to Window Clutter”.
- or (F4). Tap the key to open Dashboard, the archipelago of tiny, single-purpose widgets like Weather, Stocks, and Movies. See “Dashboard” for more about Dashboard.
On recent Macs, the F4 key bears a
logo instead. Tapping it opens Launchpad, which is described starting in “Launchpad”.  ,
,  (F5, F6). Most recent Mac laptops have light-up keys, which is very handy indeed when you’re typing in the dark. The key lights are supposed to come on automatically when it’s dark, but you can also control the illumination yourself by tapping these keys. (On most other Macs, the F5 and F6 keys aren’t assigned to anything. They’re free for you to use as you see fit, as described in “Redefining a Keystroke”.)
 ,
,  , and
, and  (F7, F8, F9). These keys work in the programs you’d expect: iTunes, QuickTime Player, DVD Player, and other programs where it’s handy to have Rewind, Play/Pause, and Fast Forward buttons.
Tip
Tap either ![]() or
or ![]() to skip to the previous or next track or chapter. Hold one down to rewind or fast-forward.
to skip to the previous or next track or chapter. Hold one down to rewind or fast-forward.
 ,
,  ,
,  (F10, F11, F12). These three keys control your speaker volume. The key means Mute; tap it once to cut off the sound completely and again to restore its previous level. Tap the repeatedly to make the sound level lower, the key to make it louder.
With each tap, you see a big white version of each key’s symbol on your screen, your Mac’s little nod to let you know it understands your efforts.
Tip
If you hold down the Shift and Option keys, then tapping the volume keys adjusts the volume by smaller increments, just as with the brightness keys.
 . This is the Eject key. When there’s a flash drive or a memory card in your Mac (or, less likely, a CD or a DVD), tap this key to make the computer spit it out. (If you don’t have this key, then choose File→Eject, or press
  -E.)
-E.)
Home, End. The Home key jumps to the top of a window, the End key to the bottom. If you’re looking at a list of files, the Home and End keys jump you to the top or bottom of the list. In Photos, they jump to the first or last photo in your collection. In iMovie, the Home key rewinds your movie to the very beginning. In Safari, it gets you to the top or bottom of the web page.
(In Word, they jump to the beginning or end of the line. But then again, Microsoft has always had its own ways of doing things.)
On keyboards without a dedicated block of number keys, you get these functions by holding down fn as you tap the
 and
and  keys.
keys.Page Up, Page Down. These keys scroll up or down by one screenful. The idea is to let you scroll through word-processing documents, web pages, and lists without having to use the mouse.
On keyboards without a numeric keypad, you get these functions by pressing fn plus the
and  keys.
keys.Clear. Clear (on the old full-size keyboards only) gets rid of whatever you’ve highlighted, but without putting a copy on the invisible Clipboard, as the Cut command would do.
Esc. Esc stands for escape, and it means “cancel.” It’s fantastically useful. It closes dialog boxes, dismisses menus, and exits special modes like Quick Look, slideshows, screen savers, and so on. Get to know it.
Delete. The backspace key.
 . Many a Mac fan goes for years without discovering the handiness of this delightful little key: the Forward Delete key. Whereas Delete backspaces over whatever letter is just to the left of the insertion point, this one (labeled “Del” on older keyboards) deletes whatever is just to the right of the insertion point. It comes in handy when, for example, you’ve clicked into some text to make an edit—but wound up planting your cursor in just the wrong place.
The old full-size Apple keyboard has a dedicated key for this. On all other keyboards, you get this function by holding down fn as you tap the regular Delete key.
Return/Enter. Most Apple keyboards have a single Return/Enter key. On the old-style wide keyboards, there are separate Return and Enter keys (very few programs treat these keys as different, although Microsoft Excel is one of them). In any case, pressing Return wraps your typing to the next line. When a dialog box is on the screen, tapping the Return key is the same as clicking the confirmation button (like OK or Done).
- . This key triggers keyboard shortcuts for menu items.
Control. The Control key (represented by ∧ in software menus) triggers shortcut menus, described on the following pages.
Option. The Option key (sometimes labeled Alt, and represented by
 in menus) is sort of a “miscellaneous” key. It’s the equivalent of the Alt key in Windows. It lets you access secret features—you’ll find them described all through this book—and type special symbols. For example, you press Option-4 to get the ¢ symbol, and Option-Y to get the ¥ (yen) symbol.
Help. In the Finder, Microsoft programs, and a few other places, this key opens up the electronic help screens. But you’d guessed that.
The Complicated Story of the Function Keys
As the previous section makes clear, the F-keys at the top of modern Mac keyboards come with predefined functions: brightness, volume, music playback, and so on.
But they didn’t always. Before Apple gave F9, F10, and F11 to the fast-forward and speaker-volume functions, those keys controlled the Exposé window-management function described starting in Figure 2-2.
So the question is: What if you don’t want to trigger the hardware features of these keys? What if you want pressing F1 to mean “F1” (which opens the Help window in some programs)? What if you want F9, F10, and F11 to control Exposé’s three modes, as they once did?
For that purpose, you’re supposed to press the fn key. The fn key (lower left on small keyboards, center block of keys on the big ones) switches the function of the function keys. In other words, pressing fn and F10 triggers an Exposé feature, even though the key has a Mute symbol (![]() ) painted on it.
) painted on it.
But here’s the thing: What if you use those F-keys for software features (like Cut, Copy, Paste, and Exposé) more often than the hardware features (like brightness and volume)?
In that case, you can reverse the logic, so that pressing the F-keys alone triggers software functions and governs brightness and audio only when you’re pressing fn. To do that, choose ![]() → System Preferences→Keyboard. Turn on the cryptically worded checkbox “Use F1, F2, etc. as standard function keys.”
→ System Preferences→Keyboard. Turn on the cryptically worded checkbox “Use F1, F2, etc. as standard function keys.”
And that’s it. From now on, you press the fn key to get the functions painted on the keys (![]() ,
, ![]() ,
, ![]() ,
, ![]() ,
, ![]() ,
, ![]() ,
, ![]() ,
, ![]() , and so on).
, and so on).
The Touch Bar + Fingerprint Reader
The 2016 MacBook Pro models offered an eye-popping feature, a first on computers: Above the keyboard, where the function keys (F1, F2, F3…) once sat, there’s a colorful strip of touchscreen. Apple calls it the Touch Bar (Figure 7-2).

Figure 7-2. Meet the Touch Bar, shown in just a few of its incarnations. Apple decided that touch might be a useful feature—as part of the keyboard, not the screen.
It’s a half-inch–tall, high-resolution (“Retina”), 2170 × 60 pixel, multitouch, OLED screen. It can display whatever programmers want: buttons for functions you might need right now, or a rainbow of color selections, or a timeline of the video you’re editing. The Touch Bar is designed to give you quick access to commands and features that are usually hidden in menus—but now you don’t have to memorize keystrokes to trigger them.
The controls here change according to what you’re doing at this moment—what program you’re using, and what function within that program.
When you’re typing, you might see QuickType (autocomplete buttons for the three words the Mac thinks you’re most likely to want to type next). When you’re in Safari, you see little buttons for your open page tabs. When you’ve selected text, you get formatting controls. When you’re editing video or reading an iBooks book, you see a horizontal “map” of your movie or book, for quick navigation with a finger touch.
Note
The Touch Bar fades to black if you haven’t used it in a while. Just tap to make the buttons light up again.
All the major programs that come with the Mac have been outfitted with Touch Bar controls: the Finder, Automator, Calculator, Contacts, GarageBand, iBooks, iMovie, iTunes, Keynote, Mail, Maps, Messages, Notes, Numbers, Pages, Photos, Preview, QuickTime Player, Reminders, Safari, Stickies, System Preferences, and TextEdit. (Apple has even blessed some of the utility programs with Touch Bar buttons, like Activity Monitor, Script Editor, Terminal, and Xcode.)
Other software companies, including Adobe and Microsoft, have added Touch Bar buttons to their programs, too.
In many programs, you can customize what’s on the Touch Bar, so that the functions you use most often are always glowing there.
The Touch Bar is especially useful when you’re in Full Screen mode (Figure 6-7), where the whole point is to maximize your document’s area on the screen. Now the editing controls you might need are on the Touch Bar, out of the way of the big screen.
There’s no feedback when you tap the Touch Bar—no little beep or vibration—so you do have to glance at it to see what you’re doing. Fortunately, the Touch Bar image is actually angled, not flat, so it’s looking right at you.
The Touch Bar may not revolutionize your work in every program. But you’ll probably find some situations where it’s a truly helpful work accelerator: navigating a video you’re editing without having to fuss with the onscreen scroll bar, for example, or tapping out emoji symbols in Messages.
Oh—and being able to log in without entering a password 65 times a day (thanks to your fingerprint) is a joy; read on.
Tip
If you miss the old function keys (F1, F2, F3…), you can have them back on command. Just hold down the physical fn key on your keyboard; the Touch Bar buttons change to the old F-keys.
The Fingerprint Sensor
The power button—the rightmost Touch Bar button—is also a Touch ID fingerprint reader. It’s the same sensor that’s on the iPhone and iPad. Once you’ve taught the Mac to recognize your fingerprint in System Preferences→Touch ID, then just resting your finger on this button is enough to unlock the Mac, bypassing the password screen.
In fact, if you’ve set up your Mac with different accounts, the next person can insta-switch to his account just by clicking the Touch ID sensor himself—no logging out, no menu commands, no other steps.
Finally, you can use your fingerprint to approve App Store purchases with a single touch, or to buy stuff on the web without having to enter your name, address, and credit card info over and over again. That part’s called Apple Pay on the Web, and it’s described in “Back to My Mac”.
The Control Strip
Some Touch Bar buttons are always present. At the left end, for example, what Apple calls a System button is always available. Usually, it’s the Esc key, so that you’re always one tap away from being able to close a menu or dialog box from the keyboard (“Reassigning all documents of one type”). Sometimes the System button says Done or ![]() , but you get the idea.
, but you get the idea.
At the right end, Apple offers something called the Control Strip. You’re probably too young to remember the Control Strip (in System 7, which ran Macs from 1991 to 1998). But this is the same idea: a collapsible row of buttons that give you direct access to settings you’re likely to want to change without burrowing into System Preferences.
Out of the box, the Control Strip seeks to restore the most essential functions of the F-keys that the Touch Bar replaces: screen brightness and speaker volume (plus a button for Siri), as shown at top in Figure 7-3.
When the Control Strip is collapsed, you have two ways to adjust the brightness and volume:
Tap the
 or button. A slider springs out to the left of the button. Touch or drag your finger inside the slider to adjust the brightness or volume.
Slide from the
or button. In other words, you can adjust the brightness or volume with one continuous finger move instead of two—just keep your finger down after the initial tap, and drag within the slider (Figure 7-3, bottom).
Now, not everybody likes change. And some people don’t like the way Apple makes changes. Fortunately, the Control Strip is a change you can change.
Bring back the function keys temporarily. If you need the standard full-row set of Mac function keys as described in “Desktop Exposé” and “The Complicated Story of the Function Keys”, you can bring them back. Tap the thin
 button to the left of the button. The collapsed Control Strip now expands to stretch the full length of the keyboard, precisely replicating the function keys that used to be painted on the top row of physical keys (Figure 7-3, second from top).
Tip
You can also set things up so that tapping the physical fn key expands the Control Strip temporarily. Open System Preferences→Keyboard and from the “Press Fn key to” pop-up menu, choose Expand Control Strip.
Bring back the function keys permanently. If you prefer to have the standard function keys at all times, open System Preferences→Keyboard. From the “Touch Bar shows” pop-up menu, choose Expanded Control Strip. At this point, the Touch Bar never changes, never shows you app-specific buttons; it always shows the traditional function keys, pictured second from top in Figure 7-3.

Figure 7-3. Top: The Control Strip is always present on the right—and usually collapsed, to make room for your programs’ buttons in the center of the Touch Bar. To expand the Control Strip to the full width of the keyboard, tap the skinny
button.
Bottom: The Brightness and Volume buttons transform into sliders when you hold your finger down on them.Get rid of the Control Strip. On the other hand, maybe you don’t adjust your brightness or volume much, or you have another way to do it. And you’d rather have the entire width of the Touch Bar dedicated to app-specific buttons.
In that case, open System Preferences→Keyboard. From the “Touch Bar shows” pop-up menu, choose App Controls. Now the Control Strip is always hidden; you’ve got a lot more space available for function buttons within each program.
Change the buttons on the Control Strip. Apple’s probably correct that the functions most people want most of the time are Brightness, Volume, and Mute. (Siri? Well, maybe in time.) But that doesn’t mean you can’t add or delete buttons from the collapsed Control Strip if there are other functions you use more often. In fact, you can even customize the expanded Control Strip (Figure 7-3, second from top).
The key to making these changes: Open System Preferences→Keyboard; click Customize Control Strip. Now you’ve opened the weird, wonderful world of Touch Bar customizing, as described in the next section. Note that, in this case, you can expand or collapse the Control Strip during this process, thereby editing either version. For example, you could get rid of the Siri button (there are, after all, other ways to trigger Siri), which makes more room for app-specific buttons. Or maybe you never use the Launcher button in the expanded Control Strip; this is your chance to replace it with, for example, the Screenshot button or the Show Desktop button.
Customizing the Touch Bar
The key to choosing which buttons you want on your Touch Bar is the View→Customize Touch Bar command. You’ll find that command in the Finder, Mail, Photos, and a few other major programs. (If the program you’re using doesn’t let you customize its Touch Bar, then that command doesn’t appear.)
The dialog box shown in Figure 7-4 shows what you’d see in the Finder.
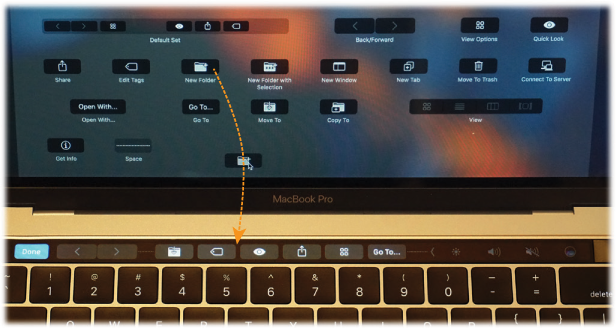
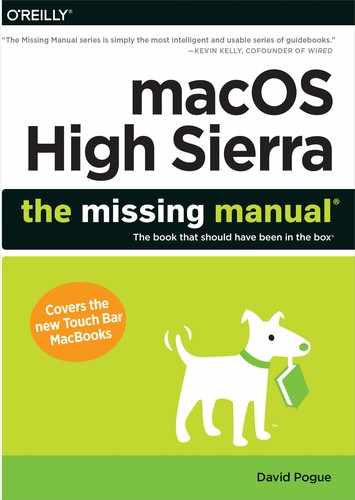
Figure 7-4. When the Customize dialog box is on the screen, you can move, delete, or add buttons on the Touch Bar. All the existing buttons begin gently wiggling to indicate that they’re movable or deletable.
Editing your Touch Bar is a strange, delightful procedure. It goes like this:
Install a new button. Inspect the palette of available Touch Bar buttons on your Mac’s main screen. You can drag one of those buttons downward with your mouse, down off the screen, “through” the laptop’s hinge, and onto the Touch Bar.
If you drag onto a blank spot (anywhere marked by ---- dashes), you can drop it there to install it. If you drag it onto an existing button, then a dotted outline appears; that means that you’ll replace the existing button when you let go.
Rearrange existing buttons. Once the Customize dialog box is open, you can use your finger to drag the existing Touch Bar buttons into a new order.
Tip
Truth is, you can use your mouse, too. No cursor appears on the Touch Bar, which is a little weird. But as you move your mouse, the existing buttons light up to show where the cursor would be. Once a button is lit up, you can drag it horizontally to move it.
Delete a button. Once the Customize dialog box is open, use your finger to drag the unwanted button all the way to the left; release it on top of the Trash icon that appears there.
Tip
Here again, you can use your mouse to drag a button to the Touch Bar Trash, too. The buttons light up to show the invisible cursor’s position.
In each case, hit Done (either at the far left of the Touch Bar, or on your main screen) to wrap it up.
QuickType on the Touch Bar
On a phone, what Apple calls its QuickType keyboard can save you a lot of time, tapping, and errors. As you type a sentence, the software predicts which word you might type next—the three most likely words—and displays them as three buttons above the keyboard. (See Figure 7-5.)
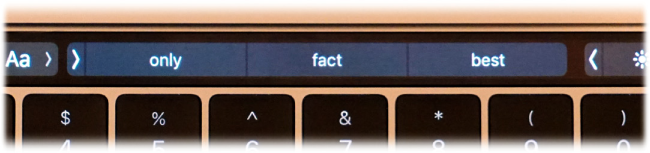
Figure 7-5. QuickType is autocomplete on steroids. Frankly, it’s a rush when it finishes a long word for you.
If you begin the sentence by typing, “I really,” then the three suggestions might be want, don’t, and like.
But what if you intended to say, “I really hope…”? In that case, type the first letter of “hope.” Instantly, the three suggestions change to “h,” hope, and hate. (The first button always shows, in quotes, whatever non-word you’ve typed so far, just in case that’s what you really intend. To place it into your text, you can tap that button or tap the space bar or some punctuation.)
When someone texts you a question that ends with a choice (“Coffee, tea, or me?”), the QuickType buttons cleverly offer those same choices. Before you’ve even typed a single letter, the choices say “coffee,” “tea,” and “you.”
QuickType automatically adds a space after each word you select, so you don’t have to mess with the space bar. And, sometimes, QuickType offers you several words on a single button, to save you even more time (for example, “up to” or “in the”).
Thanks to the Touch Bar, the QuickType suggestions are now on your Mac, too. They’re available in any Touch Bar–enabled program where you can type, like Mail, Notes, and TextEdit. (If you don’t see the suggestions, they may currently be collapsed. Tap the ![]() button to bring them up.)
button to bring them up.)
Of course, on the Mac, you have a real keyboard; you’re not trying to hit keys the size of Tic Tacs on a glass screen. And QuickType means you have to split your focus; you have to pay attention to both the words you’re tapping and the text on the main screen.
You could argue, therefore, that QuickType is less important on the Mac than on the iPhone. It might be useful if you’re unsure of a word’s spelling, or if you’re a very slow typist—but if you can type fairly quickly, it’s usually faster to just use the keyboard.
In that case, you may want to turn off the QuickType feature entirely, or maybe only for one program.
The key is the “Show typing suggestions” checkbox on the Customize Touch Bar screen (Figure 7-4). If you turn it off (for the program whose Touch Bar you’re editing), then the QuickType suggestions no longer appear. There’s that much more space for your app-specific function buttons.
Notes on Right-Clicking
In macOS, shortcut menus are more important than ever (Figure 7-6).
They’re so important, in fact, that it’s worth this ink and this paper to explain the different ways you can trigger a “right-click” (or a secondary click, as Apple calls it, because not all these methods actually involve a mouse button, and it doesn’t have to be the right one):
Control-click. For years, you could open the shortcut menu of something on the Mac screen by Control-clicking it—and you still can. That is, while pressing the Control key (bottom row), click the mouse on your target.

Figure 7-6. A shortcut menu pops out of something you’re clicking—an icon, a button, a folder. The beauty of it is that its commands are contextual. They bring up commands in exactly the spots where they’re most useful.
Right-click. Experienced computer fans have always preferred the one-handed method: right-clicking. That is, clicking something by pressing the right mouse button on a two-button mouse.
Every desktop Mac since late 2005 has come with a two-button mouse—but you might not realize it. Take a look: Is it a white, shiny, plastic capsule with a tiny, gray scrolling track-pea on the far end? Then you have an Apple Mouse. Is it a cordless, flattened capsule instead? Then it’s a Magic Mouse. Each has a secret right mouse button. It doesn’t work until you ask for it.
To do that, choose
 →System Preferences. Click Mouse. There, in all its splendor, is a diagram of the Apple or Magic Mouse.
Your job is to choose Secondary Button from the pop-up menu that identifies the right side of the mouse. (The reason it’s not called a “right button” is because left-handers might prefer to reverse the right and left functions.)
From now on, even though there aren’t two visible mouse buttons, your Apple Mouse does, in fact, register a left-click or a right-click depending on which side of the mouse you push down. It works a lot more easily than it sounds like it would.
Tip
You can also attach any old $6 USB two-button mouse to the Mac, and it’ll work flawlessly. Recycle the one from your old PC, if you like.

Figure 7-7. The Trackpad pane of System Preferences looks different depending on your laptop model. But this one shows all the ways to get a “right-click.”
Use the trackpad. If you have a trackpad (on a laptop, for example), you can trigger a right-click in all kinds of ways.
Out of the box, you do it by clicking the trackpad with two fingers. The shortcut menu pops right up.
Or you can point to whatever you want to click. Rest two fingers on the trackpad—and then click with your thumb.
But even those aren’t the end of your options. In System Preferences→Trackpad, you can also turn on even more right-click methods (and watch little videos on how to do them; see Figure 7-7). For example, you can “right-click” by clicking either the lower-right or lower-left corner of the trackpad—one finger only.
When shortcut menus are mentioned throughout this book, rather than repeat this explanation for “101 ways to right-click” over and over, you’ll find only the two best methods: Right-click (if you have a mouse) or two-finger click (if you have a trackpad).
Power Typing
Something strange has been quietly taking place at Apple: Typing has been getting a lot of attention.
It began when Apple created system-wide spelling and grammar checkers. For the first time in computer history, the operating system took over typos and grammos. You didn’t have to maintain a separate spelling checker for each program you used. Now there’s just one, and it works in most programs: TextEdit, Stickies, Messages, Mail, Calendar, Safari, Pages, Photos, iMovie, and so on. Add a word to the dictionary in one program, and it’s available to all the others.
Today, there’s much more. There’s text substitution, where you type addr and the system types out “Irwina P. McGillicuddy, 1293 Eastport Lane, Harborvilletown, MA 02552.” (The same system autocorrects common typos like teh instead of the.) There’s also a case-flipping feature that can change selected text to ALL CAPS, all lowercase, or First Letter Capped. Both of these features are available in most Apple programs and in any other programs that tap into macOS’s built-in text-processing circuitry (although not, alas, Microsoft programs).
The Spelling and Grammar Checker
Your Mac can give you live, interactive spelling and grammar checking, just as in Microsoft Word and other word processors. That is, misspelled words or badly written sentences or fragments get flagged with a dashed red underline (for grammar problems, a green underline) the moment you type them. Here’s the crash course:
Check the spelling of one word: Highlight the word. Choose Edit→Spelling and Grammar→Show Spelling and Grammar. The spell-check dialog box opens, with the proposed corrections visible.
Check spelling as you type. Choose Edit→Spelling and Grammar→Check Spelling While Typing. (If Check Grammar With Spelling is turned on in the same submenu, you’ll get a grammar check, too.)
Now, as you type, you’ll see those red and green underlines on words the Mac thinks represent spelling or grammar mistakes. To fix one, right-click or two-finger click the underlined word, and proceed as shown in Figure 7-8.
Tip
In TextEdit, the factory setting for error-underlining is On. To turn it off for all new documents, choose TextEdit→Preferences, click New Document, and then turn off “Check spelling as you type.”
Figure 7-8. Top: You’re never more than a right-click or two-finger click away from more accurate spelling. Once you right-click a questionable word, the suggestions of Apple’s built-in dictionary appear right in the shortcut menu, along with the Ignore Spelling and Learn Spelling commands.
Bottom: If you’ve opted for autocorrected spelling, you get the little iPhoney suggestion bubble when you pause after typing a word. Ignore it to accept the suggestion; click the × in the bubble to keep what you typed.
Check spelling after the document is finished. Choose Edit→Spelling and Grammar→Show Spelling and Grammar (or press
-:). The Spelling dialog box appears. The first error it spots appears in the top box, with the proposed corrections in the bottom one.If you like one of Apple’s proposals, then click it and click Change. If the word was correct already (for example, the guy’s last name really is Teh), then click Find Next (“Leave the word as I typed it”), Ignore (“It’s OK everywhere in this document”), or Learn (“Never flag this word again”).
Handily enough, you can also click Define to look up a highlighted word (one of the spelling suggestions, for example) in the Mac’s built-in Dictionary app. Also handily enough, the spelling checker maintains dictionaries for 15 languages. It’s often smart enough to recognize, within a single document, which language you’re using—but specifying the language in System Preferences→Keyboard→Text→Spelling is generally more reliable.
Fix spelling as you type. Note the difference. Checking your spelling just means “finding the misspelled words.” Fixing means autocorrecting the errors as they occur, as you type. You might not even notice that it’s happening!
This most tantalizing option is found in Edit→Spelling and Grammar→Correct Spelling Automatically. And sure enough, when this option is turned on, common typos like teh and frmo and dont get fixed as you type; you don’t have to do anything to make it happen.
Note
If you’re typing slowly enough, you might see the suggestion bubble illustrated in Figure 7-8. That, of course, is a feature Apple brought to the Mac from the iPhone/iPad. It’s saying, “Here’s the word I think you meant—and if you just keep on typing, I’ll go ahead and make the change I’m proposing. If you disagree, click on the × in the word bubble to make me shut up and leave what you typed, just as you typed it.”
It’s not perfect. It doesn’t correct all errors (or even most of them). It occasionally even corrects a word you didn’t mean to have corrected. (When it makes a mistake, hit ![]() -Z, the Undo command, to restore what you typed.) And sometimes it doesn’t make the change until you’re halfway through the sentence.
-Z, the Undo command, to restore what you typed.) And sometimes it doesn’t make the change until you’re halfway through the sentence.
Still, though. Kind of cool.
Text Substitution (Abbreviation Expansion)
This useful feature autoreplaces one thing you type with something else. Why? Because it can do any of these things.
Insert the proper typographical symbols
For example, the Mac can insert attractive “curly quotes” automatically as you type “straight ones,” or em dashes—like this—when you type two hyphens (-- like that).
You can see the built-in sample substitution (“omw” for “On my way!”)—and create your own—in the System Preferences→Keyboard→Text tab, as shown in Figure 7-9.
Apple doesn’t want to drive you nuts, though, so it makes sure you’re sure you really want these swappings to take place. So you have to turn on each of these features manually, in each program. (These commands are available anywhere you do a lot of typing, like TextEdit, Mail, and Stickies. Look for the Edit→Substitutions submenu.)
Auto-quotes. To make the quotes curlify themselves, choose Edit→Substitutions→Smart Quotes, so that a checkmark appears.
Note
In the System Preferences→Keyboard→Text tab, you can specify which kind of fancy quotation mark you prefer: «this kind,» “this kind,“ or whatever. You international thing, you!
Auto-dashes. To turn double hyphens into these (—) long dashes, choose Edit→Substitutions→Smart Dashes, so that a checkmark appears.
Smart links. There’s also an option to create smart links, where any web address you type turns into a blue, underlined, clickable link to a web page. Turn on Edit→Substitutions→Smart Links.
Tip
You can also choose Edit→Substitutions→Show Substitutions to make a floating panel appear, complete with on/off checkboxes for all these features.
Replace abbreviations with much longer phrases
You can program addr to type your entire return address. Create two-letter abbreviations for big legal or technical words you have to type a lot. Set up goaway to type out a polite rejection letter for use in email. And so on.
This feature has been in Microsoft Office forever (called AutoCorrect), and it’s always been available as a shareware add-on (TypeIt4Me and TextExpander, for example). But now it’s built right into most Apple programs, plus any others that use Apple’s text-input plumbing.
You build your list of abbreviations in the System Preferences→Keyboard→Text tab, shown in Figure 7-9. See the list at left? Click the + to create a new row in the scrolling table of substitutions.

Figure 7-9. This is where you can manage macOS’s typographic substitutions. (They’re in the Keyboard pane of System Preferences—not Language & Region anymore.)
You can add all kinds of auto–typo corrections and even boilerplate text paragraphs.
Click in the left column and type the abbreviation you want (for example, addr). Click in the right column and type, or paste, the text you want macOS to type instead.
Tip
Don’t be shy—you’re not limited to short snippets. The replacement text can be pages long, which is handy if you’re a lawyer and you build your contracts out of boilerplate chunks of canned text.
You can even create multiple paragraphs—but not by hitting Return when you want a new line; no, hitting Return means “I’m finished entering this text” and closes up the box. Instead, press Option-Return when you want a paragraph break.
That’s it! Now, whenever you type one of the abbreviations you’ve set up, the Mac instantly replaces it with your substituted text.
And not just the Mac, either; your abbreviations autosync to iPhones, iPads, iPod Touches, and other Macs. If, that is, you’ve turned on System Preferences→iCloud→iCloud Drive. (Remember, you can turn off the text-replacement feature in individual programs, if you like—TextEdit, Mail, Stickies, and so on. To do that, choose Edit→Substitutions→Text Replacement, so that the checkmark disappears.)
Auto-Periods, Auto-Caps
On the iPhone, the software comes to your rescue every time you reach the end of a sentence. All you have to do is tap the space bar twice. The phone automatically gives you a period and a space and capitalizes the first letter of the next sentence.
Believe it or not, those features have now made their way into macOS. In System Preferences→Keyboard→Text, you can now turn on these options:
Capitalize words automatically. You can give your Shift keys a break. From now on, the Mac can capitalize proper nouns (Ohio, Texas, Pepsi, Bible, Empire State, American Express) and the first words of sentences for you. Just type away, and marvel as those lowercase letters become capitals an instant after you’ve typed them.
Add period with double-space. Truth is, there’s not much point to this feature on the Mac. On an iPhone, it’s a godsend because it saves you from having to swap onscreen keyboard layouts every time you want a period. On the Mac, the period key is always there! Still, for the sake of consistency, here it is: the “type two spaces to get a period” option.
Screamingly important note: Sadly, these features don’t work in all programs. They have an effect in Apple’s apps (Mail, TextEdit, Pages, Notes, and so on), but not in Microsoft or Adobe apps.
Case Swapping
The final feature in macOS’s text-massaging tool chest is case swapping—that is, changing text you’ve already typed (or pasted) from ALL CAPS to lowercase or Just First Letters Capitalized.
This one’s simple: Select the text you want to change, and then choose from the Edit→Transformations submenu. Your options are Make Upper Case (all caps), Make Lower Case (no caps), and Capitalize (first letters, like a movie title).
Keep that in mind the next time some raving lunatic SENDS YOU AN EMAIL THAT WAS TYPED ENTIRELY WITH THE CAPS LOCK KEY DOWN.
Tip
Here’s a sneaky one: You can tap a word with three fingers on your trackpad to get a pop-up dictionary and thesaurus definition. (That’s a light three-finger tap, not a full click.) This trick doesn’t work in all programs, and it requires you to turn it on in System Preferences→Trackpad→Point & Click. And it’s a tad bit finicky.
But once you have it working, check it out: It also works in text documents you’re examining in Quick Look!
The Many Languages of macOS Text
Apple has always taken pride in its language-friendliness. You can shift from language to language on the fly, as you type, even in midsentence—without reinstalling the operating system or even restarting the computer.
MacOS’s facility with language, though, goes the extra overseas mile. It lets you type vertical Japanese and Chinese text; includes fonts for 23 more non-Roman alphabets (including the ones you need for 10 Indian languages); offers “filtering by tones, ordering and filtering by radical or stroke count, and improved pinyin-han conversion accuracy” (you have to be a Chinese speaker to appreciate those tweaks); and much more.
First, tell your Mac which languages you’d like to have available. Open System Preferences→Language & Region. You see a listing of the languages the Mac can switch into, in the corresponding languages—Français, Español, and so on. (If you don’t see the one you want, click the + and choose it from the list.) Just drag one of the languages to the top of the list to select it as your primary language, as shown in Figure 7-10.
Note
You can mix English with right-to-left languages like Hebrew and Arabic. There’s even a split-cursor option that makes the pointer flip directions at the boundary between right-to-left and left-to-right text.

Figure 7-10. Top: You can flip your copy of macOS into any of dozens of languages. Click + to see them all—and add them to the list of Preferred Languages. You can also specify the default temperature unit.
Bottom: Here’s what your Mac looks like running in Dutch. Actually understanding Dutch would be useful at a time like this—but even if you don’t, it can’t help but brighten up your workday to choose commands like Spraakfunctie or Knip.
Now launch Safari, TextEdit, Mail, or Stickies. Every menu, button, and dialog box is now in the new language you selected! If you log out and back in (or restart) at this point, the entire Finder will be in the new language, too.
Formats
Of course, if you’re really French (for example), you’ll also want to make some formatting changes on the System Preferences→Language & Region panel. First, choose your French-speaking country from the Region pop-up menu, so that time and date formats, number punctuation, and currency symbols also conform to your local customs.
For example, the decimal and thousands separator characters for displaying large numbers differ from country to country. (The number 25,600.99, for example, would be written as “25 600,99” in France, and as “25.600,99” in Spain.) And what appears to an American to be July 4 (the notation “7/4”), to a European indicates April 7.
Similarly, for Calendar purposes, you’ll want to specify what you consider to be the first day of the week and which calendar style you observe. (Hint: If you’re reading this book, it’s probably Gregorian.)
Choose the French keyboard layout from the Input Sources tab, as explained next.
Note
MacOS and most Apple apps are localized for only 35 languages, but the Calendar app can display the names of months and days in a huge number of them.
Input Sources
While the Mac can display many different languages, typing in those languages is another matter. The symbols you use when you’re typing in Swedish aren’t the same as when you’re typing in English. Apple solved this problem by creating different keyboard layouts, one for each language. (Apple calls them input sources, because not all of them technically use a keyboard.) Each rearranges the letters that appear when you press the keys. For example, when you use the Swedish layout and press the semicolon key, you don’t get a semicolon (;)—you get an ö.
Apple even includes the famous Dvorak layout and the not-very-famous Colemak layout. Both are scientific rearrangements of the standard layout that put the most common letters directly under your fingertips on the home row. Fans of the Dvorak layout, and the more modern Colemak layout, claim greater accuracy, better speed, and less fatigue. To set up an input source, see Figure 7-11.
Note
The icon of the Input menulet changes. It becomes a colorful flag, or some other symbol, to show the currently selected language.

Figure 7-11. Bottom: Click the + button to view a list of keyboard layouts; choose one to add to this list.
When you do so, “Show Input menu in menu bar” turns on. That option puts a tiny flag in your menu bar (top)—a keyboard menulet that lets you switch layouts just by choosing their names.
If you turn on “Automatically switch to a document’s input source,” then each document stays put with the keyboard you’ve been using in it, even if you’ve switched to a different input source in other documents.
The “Use the Caps Lock key to switch to and from last used Latin input source” option provides a quick way to switch among certain keyboard layouts. (This option appears only if you’ve turned on a non-Roman input source like Arabic, Hebrew, or Chinese.)
The Character Viewer
There you are, two-thirds of the way through your local matchmaker newsletter, when it hits you that you need a heart symbol. Right now.
You can’t help but wish there were an easy way to find those special symbols that hide among your fonts—fancy brackets, math symbols, special stars and asterisks, and so on.
The Keyboard Viewer, described next, can generate a few of them. But to see the full range of symbols available, you need the Characters panel (also called “Emoji & Symbols”). To make it appear, choose Edit→Emoji & Symbols.
Most programs have this command. If yours doesn’t, here’s the long way: Open System Preferences→Keyboard→Input Sources tab, and then turn on “Show Input menu in menu bar.” You’ve just installed the Keyboard menulet.
Then, next time you’re word processing or doing page layout, choose Show Emoji & Symbols from this menu. The resulting window (Figure 7-12, top) rounds up all symbols from all your fonts at once. To find a particular symbol, click the various category headings: Arrows, Bullets/Stars, Math Symbols, and so on.
When you find the symbol you want, double-click it. The correct symbol pops into your document. (If not, you may get the correct character in the wrong font. In that case, change the font of the inserted character manually. To find out what font it came from, click the symbol in the Font Variation panel to see the font name.)
Keyboard Viewer
Keyboard Viewer, which is descended from the Key Caps program of old, consists of a single window containing a tiny onscreen keyboard (Figure 7-12, bottom). When you hold down any of the modifier keys on your keyboard (like ![]() , Option, Shift, or Control), you can see exactly which keys produce which characters. The point, of course, is to help you learn which keys to press when you need special symbols or non-English characters, such as © or ñ, in each keyboard layout.
, Option, Shift, or Control), you can see exactly which keys produce which characters. The point, of course, is to help you learn which keys to press when you need special symbols or non-English characters, such as © or ñ, in each keyboard layout.
Note
Keyboard Viewer shows only the symbols you can produce by typing keystrokes. A font may contain thousands of other characters that can’t actually be typed; the Character Viewer, accessed by clicking Show Emoji & Symbols, is the only way to see these other symbols.

Figure 7-12. Top: You can preview variations of the same symbol in the Font Variation panel. Use the search box to find a symbol by name: “heart,” “yen” or “asterisk,” for example. And if you click the  menu in the top left, you can choose Customize List—and you’ll have access to a staggering array of even more symbol categories, including wacky symbols from other alphabets.
Bottom: How do you make a π? Keyboard Viewer reveals the answer. When you press the Option key, the Keyboard Viewer shows that the pi character is mapped to the P key. To insert one into an open document, just click it in the Keyboard Viewer window.
Keyboard Viewer is a great tool—if you can find it. The secret is to open System Preferences→Keyboard→Keyboard tab. Then turn on “Show keyboard and emoji viewers in menu bar.” You open the Keyboard Viewer by choosing its name from the new menulet that appears.
To see the effect of pressing the modifier keys, either click the onscreen keys or press them on your actual keyboard. The corresponding keys on the onscreen keyboard light up as they’re pressed.
Tip
You’re not stuck viewing the characters in a 12-point font size—a good thing, because some of them are hard to read when displayed that small. You can make the Keyboard Viewer window bigger by dragging its lower-right corner. That will magnify the Keyboard Viewer window and its font size.
Ink: Handwriting Recognition
In the same way that your grandmother turned yesterday’s dinner into today’s sandwich (and tomorrow’s soup), Apple recycled the handwriting technology of its failed Newton handheld and added it to macOS. It’s now called Ink, and it does exactly what it used to: turn your handwriting into “typed” text in any program. Can Ink replace the keyboard? Not for anything more than quick notes, that’s for sure. But it can be handy when you’re web surfing, sketching, filling in database forms, and so on.
Ink appears in macOS only if you have a graphics tablet, one of those stylus-and-pad devices found generally only on the desks of graphic artists. (Wacom is the best-known tablet company, but there are a couple of others.) You could count on one hand the number of people with Wacom tablets who use them for handwriting input. And so, to avoid sacrificing any more old-growth trees than absolutely necessary, the how-to for Ink is available as a free downloadable PDF appendix to this chapter. You’ll find it on this book’s “Missing CD” page at www.missingmanuals.com.
Data Detectors
Here’s a cool step-saver that no other computer operating system offers—a little something Apple likes to call data detectors.
In short, Mac programs like Mail and TextEdit can recognize commonly used bits of information that may appear in your text: a physical address, a phone number, a date and time, and so on. With one quick click, you can send that information into the appropriate program, like Calendar, Contacts, or your web browser.
Here’s how it works: When you spot a name, address, date, or time, point to it without clicking. A dotted rectangle appears around it. Right-click or two-finger click inside the rectangle, or click the ![]() at the right side.
at the right side.
A shortcut menu appears. Its contents vary depending on what you’re pointing to:
A date and time. When you click the
, you get the amazing pop-up menu shown in Figure 7-13. It shows you the actual Calendar day view where macOS is proposing adding the appointment. The logic of this feature is overwhelming; after all, when someone emails you to ask if you’re free for drinks next Thursday at 10, what’s the first thing you usually want to do? Check your calendar, of course.
Tip
If, while working in Calendar, you ever forget where this event came from, double-click it. In the Info panel, you’ll see a link that takes you back to the original Mail message that started it all.
A mailing address. You can choose Open in Maps from the shortcut menu; the app opens automatically and shows you that address.
Alternatively, you can choose Add to Contacts. Like magic, a little editing box sprouts out of the data-detected rectangle, prefilled with the information from the message, so you can create a new Contacts entry or add it to an existing entry.
A phone number. The shortcut menu here offers you things like Add to Contacts, FaceTime, and Message. The Large Type option is great when you want to call this person right now—it displays the phone number in huge type, filling your screen, so you can see it from across your mansion.
A flight number. When you highlight flight information (for example, “AA 152”), the shortcut menu shows you the flight’s departure time, arrival time, and other details. It works only if the airline is represented as a two-letter code.
A web address. When you click the
next to a URL, you get a pop-up balloon that contains the actual web page! You don’t even have to leave your email message.A package tracking number. When you send a package using a service like FedEx, UPS, or the U.S. Postal Service, you usually get a confirmation email. A data detector can recognize such numbers and, when you click the
, show you a pop-up window right there at your cursor, showing the courier company’s tracking page for that package, and thereby letting you know exactly where your package is right now.
Tip
In the unlikely event that you don’t actually care for data detectors and would rather not see those dotted lines and ![]() buttons, you can shut down the whole feature. To do that, open Terminal (“Terminal”). Carefully type this command, and then press Return:
buttons, you can shut down the whole feature. To do that, open Terminal (“Terminal”). Carefully type this command, and then press Return:
defaults write com.apple.mail DisableDataDetectors YES
You can always turn them back on again by repeating that step—and substituting NO for the final word.

Figure 7-13. When a data detector detects a date and time, it can suggest an appointment on your calendar automatically. It even shows you the proposed new Calendar entry (in dotted lines), in context with all your existing appointments, so you’ll know whether to accept or decline the new appointment.
If everything looks good, click Add to Calendar. Or, if Mail’s parsing of the appointment needs a little tweaking, click Details; the box expands so you can edit the details.
Moving Data Between Documents
You can’t paste a picture into your web browser, and you can’t paste MIDI music information into your word processor. But you can put graphics into TextEdit, paste movies into your database, insert text into Photoshop, and combine a surprising variety of seemingly dissimilar kinds of data.
Cut, Copy, and Paste
The original copy-and-paste procedure of 1984—putting a graphic into a word processor—has come a long way. Most experienced Mac fans have learned to trigger the Cut, Copy, and Paste commands from the keyboard, quickly and without even thinking. Here’s how the process works:
Highlight some material in a document.
Drag through some text in a word processor, for example, or highlight graphic, music, movie, database, or spreadsheet information, depending on the program you’re using.
Use the Edit→Cut or Edit→Copy command.
Or press the keyboard shortcuts
-X (for Cut—think of the X as a pair of scissors) or -C (for Copy). The Macintosh memorizes the highlighted material, socking it away on an invisible storage pad called the Clipboard. If you chose Copy, nothing visible happens. If you chose Cut, the highlighted material disappears from the original document.At this point, most Mac fans take it on faith that the Cut or Copy command actually worked. But if you’re in doubt, switch to the Finder (by clicking its Dock icon, for example), and then choose Edit → Show Clipboard. The Clipboard window appears, showing whatever you’ve copied.
Click to indicate where you want the material to reappear.
This may entail switching to a different program, a different document, or simply a different place in the same document.
Choose the Edit→Paste command (
-V).The copy of the material you had originally highlighted now appears at your insertion point—if you’re pasting into a program that can accept that kind of information. (You won’t have much luck pasting, say, a block of spreadsheet numbers into World of Warcraft.)
The most recently cut or copied material remains on your Clipboard even after you paste, making it possible to paste the same blob repeatedly. Such a trick can be useful when, for example, you’ve designed a business card in your drawing program and want to duplicate it enough times to fill a letter-sized printout. On the other hand, whenever you next copy or cut something, whatever was already on the Clipboard is lost forever.
Drag-and-Drop
As useful and popular as it is, the Copy/Paste routine doesn’t win any awards for speed. After all, it requires four steps. In many cases, you can replace that routine with the far more direct (and enjoyable) drag-and-drop method. Figure 7-14 illustrates how this works.
Note
Most Cocoa programs (“The Cocoa Advantage”) require you to press the mouse button for a split second before beginning to drag.
Virtually every Apple program works with the drag-and-drop technique, including TextEdit, Stickies, Mail, QuickTime Player, Preview, iMovie, Photos, and System Information, not to mention other popular programs like Microsoft applications, web browsers, and so on.
When to use drag-and-drop
As shown in Figure 7-14, drag-and-drop is ideal for transferring material between windows or between programs—from a web page into Photoshop, for example. It’s especially useful when you’ve already copied something valuable to your Clipboard, since drag-and-drop doesn’t involve (and doesn’t erase) the Clipboard.
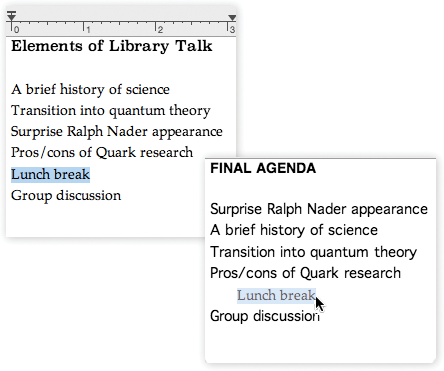
Figure 7-14. To use drag-and-drop, highlight some material. Click anywhere in the highlighted area and press the mouse button for about half a second. Now, with the button still pressed, drag to another place in the document, into a different window, or into a different application. As your cursor enters the target window, a shaded outline appears inside the window’s boundaries—the Mac’s way of letting you know it understands your intention. When you release the mouse, the highlighted material appears instantly in its new location.
Its most popular use, however, is rearranging text within a single document. In Word or Pages, for example, you can rearrange entire sections, paragraphs, sentences, or even individual letters, just by dragging them—a wonderfully efficient editing technique.
Tip
When you use drag-and-drop to move text within a document, the Mac moves the highlighted text, deleting the highlighted material from its original location. If you press Option as you drag, however, you make a copy of the highlighted text.
Drag-and-drop to the desktop
You can also use drag-and-drop in the one program you use every single day: the Finder itself. As shown in Figure 7-15, you can drag text, graphics, sounds, and even movie clips out of your document windows and directly onto the desktop. Graphics and movies generally turn into ordinary graphic or movie files; text becomes an icon called a clipping file.

Figure 7-15. When you drag material out of the document window and onto the desktop or into a folder, you get a clipping file. Its icon depends on the kind of material contained within, like a text clipping, picture clipping, or movie clipping. (For easy identification, macOS conveniently titles text clippings by the first line of the text contained inside.) You can view a clipping just by double-clicking it, so that it opens into its own window (left).
Later, you can examine a clipping’s contents using Quick Look—just select its icon and then tap the space bar. Or you can double-click a clipping file and then select a portion of the text to copy.
When you drag a clipping from your desktop back into an application window, the material in that clipping reappears. Drag-and-drop, in other words, lets you treat your desktop itself as a giant, computer-wide pasteboard—an area where you can temporarily stash pieces of text or graphics as you work.
Tip
When the material you drag to the desktop contains nothing but an Internet address, such as an email address or a web page URL, it gets a special icon and a special function: an Internet location file. You can stash it in a folder, double-click it for quick access, and so on.
Export/Import
When it comes to transferring large chunks of information—especially address books, spreadsheet cells, and database records—from one program to another, none of the data-transfer methods described so far in this chapter does the trick. For these purposes, use the Export and Import commands found in the File menu of almost every database, spreadsheet, email, and address-book program. (In some programs, the Save As command serves this function.)
These Export/Import commands aren’t part of macOS, so the manuals (if any) of the applications in question should be your source for instructions. For now, however, the power and convenience of this feature are worth noting—it means that your four years’ worth of collected addresses in, say, some old email program can find their way into a newer program, like Contacts, in a matter of minutes.
Exchanging Data with Other Macs
Considering how many ways there are to move files back and forth between Macs, it seems almost comical that anybody complained when Apple discontinued built-in floppy disk drives. Here’s a catalog of the different ways you can move your files from one computer to another, including some that might not have occurred to you.
By Network
You can shoot a file to another Mac with a single drag-and-drop operation, thanks to AirDrop or another file-sharing method. You can open files from the other drives, copy stuff back and forth—anything you would do with your own disk. (Step-by-step instructions for AirDrop start in “AirDrop”.)
Best for files of any size, when the computers are in the same building.
Tip
And for $0 you can create an ad hoc network, meaning a tiny wireless network between just two computers (or a handful). Great when you’re in the car somewhere, or in the airport waiting lounge, or a hotel lobby, and someone says, “Hey, can I have a copy of that?” Details are in “GEM IN THE ROUGH Networking Without the Network”.
By Email
High on convenience; computers can be in different countries. Of course, the traditional problem with email was that it couldn’t handle file attachments larger than 5 or 10 megabytes. To get around that limitation, you had to use a free website like sendthisfile.com, which can handle enormous files by sending the recipient only a link to them by email.
The world has changed, though. Nowadays, the Mail program can cheerfully send huge file attachments to anyone, no matter what kind of computer she uses. See “Mail Drop: Sending Huge Attachments” for details.
Using Dropbox
Dropbox is a free service, almost universally adored, that lets you create synchronized folders on multiple computers. Add a file to, say, your New Projects folder on your home Mac, and it appears instantly in the matching folder on your Windows folder at work.
You can use Dropbox to share files with other people, too. Just drag a file into a shared folder, and marvel as your associates get an auto-generated email message letting them know. They open the shared folder on their own desktops, and there is the file, waiting. (Details are at www.dropbox.com/help/19.)
The great thing about services like Dropbox is that you don’t have to worry about the small file-size limits imposed by email. (There’s a 2-gigabyte storage limit on Dropbox’s free accounts, but you can upgrade to larger storage capacities for a fee; you also get more storage granted when you refer a friend to Dropbox.)
Via iCloud Drive
In many ways, iCloud Drive (“Revert”) is identical to Dropbox. It, too, acts as a magic folder that reproduces itself on as many Macs as you own.
It’s a fantastic way to transfer big files among your own computers. And now, thanks to iCloud file sharing, you can even make your big files available to other High Sierra fans with just a couple of clicks (see Figure 6-26).
Via Flash Drive
A flash drive, also called a thumb drive, is one of those keychain-like doodads that plug into your USB jack. Inside is a big chunk of memory that acts like a miniature hard drive. When the flash drive is plugged into your Mac, its icon shows up on the desktop as a disk. Use it as a tiny, 8-gigabyte hard drive (or whatever size you’ve bought).
The beauty of a flash drive is that it works instantly with any Mac or any Windows machine, without software installation or configuration. It’s small and light enough to carry around on your keychain…and it’s so darned cool. If you regularly transfer documents between Macs or between Macs and PCs, a flash drive will change your life.
FireWire Disk Mode/Thunderbolt Disk Mode (Target Disk Mode)
FireWire Disk Mode/Thunderbolt Disk Mode is a brilliant but little-known Macintosh-only feature that lets you turn one Mac into an external hard drive for another. This is by far the fastest method yet for transferring a lot of data—even faster than copying files over a network. It’s extremely useful in any of these situations:
You’re traveling with a laptop. You want to copy your life onto it from your main Mac, including your entire 5 GB email folder and project files, before taking it on a trip, and then unload it when you return.
You have a new Mac. You want to copy everything off the old one, without having to wait all night.
One Mac won’t start up. You want to repair it, using another Mac as a “front end.”
Unfortunately, not all Macs have a FireWire or Thunderbolt jack. If you’re among the lucky, though, you can use the following trick. (In these steps, suppose your main Mac is an iMac and you want to use a MacBook as an external hard drive for it.)
Connect the FireWire (Thunderbolt) jacks of both computers with a cable.
If you have an older Mac with a FireWire 400 jack, you need a 6-pin FireWire cable—not the one that connects a camcorder to a Mac. The one you need has the same large connector on both ends.
Modern Macs have Apple’s FireWire 800 jacks, which require a 9-pin FireWire cable (and give you much greater speed). If only one Mac has a FireWire 800 jack, then use that computer’s traditional FireWire 400 connector instead. Otherwise, you need either a special FireWire 800–to–FireWire 400 cable, or the 400-to-800 adapter that came with your Mac.
On the MacBook, choose
→System Preferences. Click Startup Disk.The Startup Disk panel opens.
Click Target Disk Mode. In the confirmation box, click Restart.
The MacBook turns off and then on again. A giant gray FireWire icon (
 ) or Thunderbolt icon (
 ) bounces around the laptop screen.
Now take a look at the iMac’s screen: Sure enough, there’s the MacBook’s hard drive icon on the desktop. You’re ready to copy files onto or off of it, at extremely high speeds, and go on with your life.
When you’re finished working with the MacBook, eject it from the iMac’s screen as you would any disk. Then turn off the laptop by pressing the power button.
The next time you turn on the MacBook, it’ll start up from its own copy of macOS, even if the cable is still attached. (You can disconnect the cable whenever you please.)
Note
The steps here describe the modern method of setting up Target Disk Mode. But the old way still works, too. Leave the iMac turned on, but shut down the MacBook. (Make sure it’s plugged in. You wouldn’t want the battery to die in the middle of this process.) Now turn the MacBook on again, but hold down the T key immediately after the chime. After a moment, you see the big Y-shaped FireWire icon (![]() ) on the laptop screen, and the laptop’s hard drive shows up on the iMac’s desktop. Finish with step 4 above.
) on the laptop screen, and the laptop’s hard drive shows up on the iMac’s desktop. Finish with step 4 above.
This method is arguably quicker, because you don’t have to open System Preferences. And this method works when the Mac is too sick even to start up.
Via Bluetooth
Bluetooth is a cable-elimination technology. It’s designed to let Bluetooth-equipped gadgets communicate within about 30 feet, using radio signals.
Bluetooth comes built into most computers and cellphones, plus the occasional printer, pocket organizer, and even camera or camcorder.
Bluetooth is built into all recent Macs. It’s ready, therefore, to connect with Apple’s wireless keyboard and mouse, to get on the Internet using a Bluetooth cellphone as a cordless modem, to listen to music through wireless headphones or speakers, and to transfer files through the air to similarly equipped gear.
Bluetooth is pretty slow. (You get transfer speeds of 30 to 150 K per second, depending on the distance.) But when you consider the time you’d have taken for wiring, passwords, and configuration using any other connection method, you may find that Bluetooth wins, at least in casual, spur-of-the-moment, airport-seat situations.
And Bluetooth works no matter what the gadget—Mac, Windows, smartphone—so it’s great as a universal file-exchange translator, too.
Note
For more details on configuring your Mac for Bluetooth connections, see “Bluetooth”.
Sending a file
To shoot a file or two across the airwaves to a fellow Bluetooth-equipped Mac fan, first pair your Mac with the other Bluetooth machine. In System Preferences→Bluetooth, make sure your Mac is Discoverable. Discoverable means “Other Bluetooth gadgets can see me.” (Check the receiving gadget, too, to make sure it’s in Discoverable mode.) Then you’re ready to send:
From the Bluetooth
 menulet, choose the device’s name—and, from the submenu, “Send file to device” (Figure 7-16).
If you don’t have the Bluetooth menulet on your menu bar, then open System Preferences. Click Bluetooth, and turn on “Show Bluetooth status in the menu bar.”
After a moment, the Select File to Send dialog box appears. (You’ve actually succeeded in opening a program called Bluetooth File Exchange, which sits in your Applications→Utilities folder.)
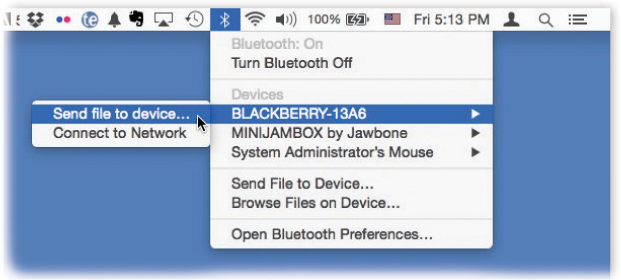
Figure 7-16. Once your Mac is paired with the other gadget, it’s easy to shoot a file to it wirelessly. In this example, you’ll start by choosing “Send file to device.”
Navigate to, and select, the files you want to send.
Click Send.
What happens now depends on how the receiving machine has been set up. In most cases, a dialog box tells the receiver that files are arriving; if he clicks Accept, then the download proceeds. He’s then offered the chance to either (a) open each transferred file or (b) reveal its highlighted icon in the Finder.
Tip
In System Preferences→Sharing→Bluetooth Sharing, you can control what happens when someone sends you files via Bluetooth. Usually, you’ll want your Mac to ask whether to accept these files. (That’s what “Ask What to Do” means.) You can also specify where you want received files to wind up.
Fetching a file
You can also perform this entire procedure in reverse. That is, you can go fishing through your buddy’s files without him explicitly having to send anything.
To make a Mac invadable, the person to be invaded must open System Preferences→Sharing and turn on Bluetooth Sharing. Here’s also where he can specify what folder is available to you for examination (the Mac proposes his Home→Public folder), and what kind of security he wants to set up.
Then all you have to do is choose Browse Files on Device from your own menulet (you can see it in Figure 7-16)—and let the rummaging begin!
Exchanging Data with Windows PCs
Documents can take one of several roads between your Mac and a Windows machine: via disk (such as a CD), flash drive, Dropbox, network, email, Bluetooth, iPod, web page, FTP download, and so on.
Preparing the Document for Transfer
The Mac is more Windows-compatible than ever. Still, before sending a document to a colleague who uses Windows, you must be able to answer “yes” to both of the following questions.
Is the document in a file format Windows understands?
Most popular programs are sold in both Mac and Windows flavors, and the documents they create are freely interchangeable. For example, documents created by recent versions of Word, Excel, PowerPoint, FileMaker, Illustrator, Photoshop, Dreamweaver, and many other Mac programs don’t need any conversion. The corresponding Windows versions of those programs open such documents with nary a hiccup.
Files in standard exchange formats don’t need conversion, either. These formats include JPEG and PNG (digital photos), GIF (cartoon/logo graphics on web pages), HTML (raw web page documents), Rich Text Format (a word-processor exchange format that maintains bold, italic, and other formatting), plain text (no formatting at all), MP3 and AAC files (for audio), MIDI files (for music synthesizers), and so on.
But what about documents made by Mac programs that don’t exist on the typical Windows PC hard drive, like Keynote or Pages? You certainly can’t count on your recipient having the application.
Do your recipients the favor of first saving such documents into one of those exchange formats. In Pages, for example, choose File→Export To →Word; the resulting dialog box will confirm your choice. Click Next. Now name this special version of the document (complete with the .docx suffix), and then click Save.
Does the file have the correct file name suffix?
Every document on your hard drive has some kind of tag to tell the computer what program is supposed to open it: either a pair of invisible four-letter codes or a file name suffix like .docx.
Microsoft Windows uses only the latter system for identifying documents. Here are some of the most common such codes:
| Kind of document | Suffix | Example |
|---|---|---|
| Microsoft Word (old) | .doc | Letter to Mom.doc |
| Microsoft Word | .docx | Letter to Mom.docx |
| Excel | .xls or .xlsx | Profit Projection.xlsx |
| PowerPoint | .ppt or. pptx | Slideshow.pptx |
| JPEG photo | .jpg | Baby Portrait.jpg |
| GIF graphic | .gif | Logo.gif |
| Web page | .htm | index.htm |
The beauty of macOS is that its programs add these file name suffixes automatically and invisibly, every time you save a new document. You and your Windows comrades can freely exchange documents without ever worrying about this former snag in the Macintosh/Windows relationship.
Notes on Disk Swapping
Once you’ve created a document destined for a Windows machine, your next challenge is to get it onto that machine. One way is to put the file on a disk—a CD you’ve burned, for example—which you then hand to the Windows owner.
Macs and PCs format hard drives differently. The Mac can read Windows disks and flash drives (which use unappetizingly named formatting schemes like FAT32 and NTFS), but Windows can’t read Mac hard drives or flash drives. CDs and DVDs use the same format on both kinds of computers, though, so you should have very little problem moving these between machines.
Network Notes
MacOS can “see” shared disks and folders on Windows PCs that are on the same network. Complete instructions are in Chapter 14.
Via the Internet
Chapter 21 offers details on FTP and web sharing, two ways to make your Mac available to other computers—Windows PCs or not—on the Internet. And, of course, you can always email files between Macs and PCs.
The Share Button
In its never-ending efforts to bring the best of the iPad to the Mac, Apple has built the Share button into many spots. It’s a quick, one-click way to send something (text, link, photo, video) to somebody else (by email, Twitter, Facebook, text message, AirDrop).
If you’ve seen an iPhone or iPad, then you’ve probably seen this Share icon: ![]() . On the Mac, this button, or a command that just says Share, pops up in all kinds of programs: the Finder’s shortcut menus. Quick Look panels. The Open File dialog box in Apple programs. Mac programs like Contacts, Notes, Preview, Safari, Photo Booth, TextEdit, Photos, and so on. Other companies can add it to their programs, too, or install new commands into the Share menu for transmitting stuff to new channels.
. On the Mac, this button, or a command that just says Share, pops up in all kinds of programs: the Finder’s shortcut menus. Quick Look panels. The Open File dialog box in Apple programs. Mac programs like Contacts, Notes, Preview, Safari, Photo Booth, TextEdit, Photos, and so on. Other companies can add it to their programs, too, or install new commands into the Share menu for transmitting stuff to new channels.
To use this feature, select or open some text, a photo, a video, a file icon, a web link, or something else that you want to send to friends. When you click this button or command, you’re offered various ways to share the selected item. The choices vary according to the program you’re using, but here are some examples:
Mail. The Mac copies the selected material into a new, outgoing email message, or attaches the selected file to an outgoing message. Just add a few explanatory notes, address the message, and send.
Twitter. Opens up the Twitter share sheet pictured in Figure 7-17, middle. A counter helps you keep your message under the legal limit of 280 characters. Explain what your linked item is about, and then click Send.
Facebook. Attaches the selected photo, video, or text to the Facebook share sheet shown at bottom in Figure 7-17. This tiny box offers two pop-up menus. The one at top left lets you specify who gets to see this post: Only Me, Friends, Friends and Networks, Everyone, or one of your Facebook lists, if you’ve set them up. If you’re posting a photo or video, a second pop-up menu at top right lets you indicate what album you want this item to land in—your Timeline or an existing photo album.
Messages. Puts the selected material into an outgoing message, ready to send as a text message or an iMessage (Chapter 20). Just address and send.
Tip
In the Finder, the Share command offers a brilliantly simple way to send a file to somebody. Just right-click or two-finger click a file icon, choose Share→Message, and then enter the person’s phone number (to send to an iPhone) or Apple ID (to send by iMessage). Click Send—off it goes!
AirDrop. As you can read in “AirDrop”, AirDrop lets you shoot Finder files to nearby Macs, iPhones, and iPads—wirelessly, without having to fuss with passwords, file sharing, mounting disks, and so on.
In the Finder, right-click or two-finger click the file icon (or icons) that you want to send to another Mac. From the shortcut menu, choose AirDrop. In a flash, you get the AirDrop share sheet shown in Figure 7-17, lower right. It lists every nearby Mac, iPhone, or iPad. Click the one you want, and then click Send; if the other guy clicks Accept, then the file is on its way to his Apple gadget.
Notes. Anything you’ve highlighted—text, graphics, links, whatever—gets plopped onto a new page in the beefed-up Notes app (“Flyover Tours”).
Vimeo. When you select a video (in the Finder, for example), you have the option of posting it to Vimeo, which is a lot like YouTube but smaller and with a more mature tone. You’re asked for a name, description, and tags (keywords) for your video, and you’re given the option to keep it private. When you click Send, the movie goes on its way. After the upload, a tiny status box appears, showing you the link that takes you to the newly posted video; click the
 to jump to it in your web browser.
Flickr. You can post a photo from your Mac directly to this popular photo-sharing site, even from the Finder. You’re asked to provide a title and description for the photo, and then off it goes to your online Flickr account. After the upload, the tiny status box shows you the link.

Figure 7-17. Top: Here’s how you might tweet a link to a page from Safari. Choose Twitter from the  button; type a comment; click Post.
Lower right: Here’s what it looks like to send a file using AirDrop. Lower left: posting a photo to Facebook. (Note the tiny pop-up menus. One lets you control who sees this post; the other specifies where it goes—which album, for example.)
Keyboard fans: For Twitter or Facebook, press Shift--D to “click” the Post button.
All the online services mentioned here—Twitter, Facebook, Flickr, Vimeo—require free accounts. And using the Share button assumes you’ve entered your account name and password in System Preferences→Internet Accounts. Once you’ve recorded your account info there, it’s stored; you can use the corresponding Share options in any program without having to log in again.
This list of options in the Share menu isn’t complete; you may find other oddball options in the Share menus of certain programs. For example, in Photo Booth, you also get choices like Add to Photos, Set Buddy Picture, Set Account Picture, or Change Twitter Profile Picture—all handy things to do with a picture you’ve just taken with your Mac’s built-in camera.
Time Machine
There are two kinds of people in the world: those who have a regular backup system—and those who will.
You’ll get that grisly joke immediately if you’ve ever known the pain that comes with deleting the wrong folder by accident, or making changes that you regret, or worst of all, having your hard drive die. All those photos, all that music you’ve ripped over the years, all your email—gone.
Yet the odds are overwhelming that at this moment, you do not have a complete, current, automated backup of your Mac. Despite about a thousand warnings, articles, and cautionary tales a year, guess how many do? About 4 percent. Everybody else is flying without a net.
If you don’t have much to back up—you don’t have much in the way of photos, music, or movies—you can get by with using a free online backup system like iCloud Drive, Dropbox, or CrashPlan. But those methods leave most of your Mac unprotected: all your programs and settings.
What you really want, of course, is a backup that’s rock-solid, complete, and automatic. You don’t want to have to remember to do a backup, to insert a disc, and so on. You just want to know you’re safe.
That’s the idea behind Time Machine, a marquee feature of macOS. It’s a silent, set-it-and-forget-it piece of peace of mind. You sleep easy, knowing there’s a safety copy of your entire system: your system files, programs, settings, music, pictures, videos, document files—everything. If your luck runs out, you’ll be so happy you set up Time Machine.
Setting Up Time Machine
Here’s the bad news: Time Machine requires a second hard drive. That’s the only way to create a completely safe, automatic backup of your entire main hard drive.
That second hard drive can take any of these forms:
An external USB, FireWire, or Thunderbolt hard drive.
An AirPort Time Capsule. That’s an AirPort wireless base station/network backup hard drive in one; it’s available in gigantic capacities.
Another internal hard drive.
A partition of any one of those drives.
The hard drive of another Mac on the network (OS X 10.5 or later) that you’ve mounted on your screen.
Tip
It’s perfectly OK to back up several Macs onto the same external hard drive, as long as it’s got enough room. You can also back up onto a hard drive that has other stuff on it, although of course that means you’ll have less room for Time Machine backups.
In all cases, the backup disk must be bigger than the drive you’re backing up (preferably much bigger).
Here’s what you can’t use as the backup disk: a CD or your startup drive.
Note
The backup drive must be a standard Mac-formatted hard drive—yet many new drives bought by Mac fans come preformatted as Windows disks. Fortunately, Time Machine automatically reformats them to the Mac OS Extended (Journaled) scheme, which it requires. Thoughtful, really.
Sure, it sounds like an Apple plot to sell hard drives. But you’d be surprised at how cheap they are. At this writing, you can buy an external 2-terabyte hard drive (2,000 gigabytes) for $50, for goodness’ sake—and prices-per-gigabyte go only down.
The first time the Mac sees your second hard drive, it invites you to use it as Time Machine’s backup drive (“Do you want to use ‘Seagate 2TB Drive’ to back up with Time Machine?”). That could be the moment you connect an external drive, or the first time you turn on the Mac after installing an internal drive.
Note
Time Machine still works if there’s other stuff on the drive, but life is simpler if you don’t use that drive for anything but Time Machine.
If you click Use as Backup Disk, you’re taken immediately to the Time Machine pane of System Preferences (Figure 7-18). Here’s where you see that Time Machine is turned on and has a drive it can use for backups.
Soon enough, the Mac starts copying everything on your hard drive, including macOS itself, all your programs, and everyone’s Home folders. You know that because you see the ![]() symbol in the Sidebar (next to the backup disk’s name), and the menu-bar Time Machine icon looks like
symbol in the Sidebar (next to the backup disk’s name), and the menu-bar Time Machine icon looks like ![]() .
.
And that, ladies and gentlemen, is the easiest setup for a backup program in history.
Note
Unless you turn on encryption (see the box on the facing page), Time Machine doesn’t use any compression or encoding; it’s copying your files exactly as they sit on your hard drive, for maximum safety and recoverability. On the other hand, it does save some space on the backup drive, because it doesn’t bother copying cache files, temporary files, and other files you’ll never need to restore.

Figure 7-18. Use the Back Up Automatically checkbox to manage Time Machine activity, although it would be hard to imagine why you’d want to risk leaving it off. You can click Select Backup Disk to choose a different hard drive to represent the mirror of your main drive (after the first one is full, for example).
Now go away and let the Mac do its thing. The first backup can take hours, as the Mac duplicates your entire internal hard drive onto the second drive. The Mac may feel drugged during this time.
Tip
You can create multiple backups on different disks—a great feature if you have a laptop you carry between work and home. You can have a backup drive at both places; Time Machine will seamlessly switch between them. To set this up, just choose another backup disk in System Preferences→Time Machine. Time Machine will automatically back up to that drive, too.
How the Backups Work
From now on, Time Machine quietly checks your Mac once an hour. If any file, folder, or setting has changed, it gets backed up at the end of the hour. These follow-up backups are quick; Time Machine backs up only what’s changed. So, should disaster strike, the only files you can lose are those you’ve changed within the past 59 minutes.
Tip
You can force more frequent backups if you want to. Just choose Back Up Now from the Time Machine menulet. Or choose Back Up Now from the shortcut menu of the Dock’s Time Machine icon.
You can pause the backup the same way—if you need to use the backup drive for another quick task, for example. Choose Skip This Backup from the Time Machine menulet, open System Preferences→Time Machine and click the ![]() next to the backup progress bar, or choose Stop Backing Up from shortcut menu of the Dock’s Time Machine icon.
next to the backup progress bar, or choose Stop Backing Up from shortcut menu of the Dock’s Time Machine icon.
By the end of the day, you’ll have 24 hourly backups on that second disk, all taking up space. So at day’s end, Time Machine replaces that huge stash with a single daily backup. You can no longer rewind your system to 3:00 p.m. last Monday, but you can rewind to the way it was at the end of that day.
Similarly, after a month, Time Machine replaces those 30 dailies (for example) with four weekly backups. Now you may not be able to rewind to October 12, but you can rewind to the end of that week. (Apple assumes it won’t take you that long to notice that your hard drive has crashed.)
Tip
You can see these backups, if you want. Open your backup drive, open the Backups.backupdb folder, and then open the folder named for your computer. Inside, you’ll find a huge list of backup folders, bearing names like 2016-07-22-155831. That’s the backup from July 22, 2016, at 15:58 (that is, 3:58 p.m.) and 31 seconds.
The point is that Time Machine doesn’t just keep one copy of your stuff. It keeps multiple backups. It remembers how things were in every folder—not just yesterday, but last week, last month, and so on. It keeps on making new snapshots of your hard drive until the backup drive is full.
At that point, the oldest ones get deleted to make room for new ones.
Tip
Ordinarily, Time Machine alerts you when it has to start deleting old backups. If you’d rather have it just do it without bothering you, open System Preferences, click Time Machine, click Options, and then turn off “Notify after old backups are deleted.”
By the way, if a backup is interrupted—if you shut down the Mac, put it to sleep, or take your laptop on the road—no big deal. Time Machine can keep working on its own, as you’ll see in the next section, and resumes backing up to the backup drive the next time you’re connected.
Local Snapshots
If you’re among the 75 percent of Mac owners with a laptop, Time Machine used to be something of a bust in one regard: Whenever you were away from your backup disk (at home or the office, for example), you lost the benefits of Time Machine.
Today, crazy as this may sound, Time Machine keeps on working even on a laptop that’s far from home. Thanks to a feature called local snapshots, Time Machine works as usual by making its backups right on the laptop’s own hard drive.
Of course, this system won’t help you if your hard drive dies; your backup is on the same drive, so you’ll lose the originals and the backups simultaneously. But what local snapshots do provide is a safety net—a way to recover a file you deleted or changed during this time away. Better yet, once you’re home again, when your laptop rejoins the network, the local snapshots intelligently merge with the master Time Machine backups, as though you’d never been away.
If Time Machine is turned on on your laptop, it makes local snapshots automatically—once an hour, as usual. As time goes on, Time Machine deletes snapshots more than 24 hours old to save disk space.
Note
If your laptop gets really low on disk space, Time Machine stops making new snapshots and may even delete old ones so you can keep using your Mac. When you make more space, snapshots resume automatically.
If you need to recover a file, enter Time Machine as usual. Your local snapshots show up on the same timeline as backups made on your external backup disk, but they’re color-coded: pink tick marks for external backups, gray for local ones. If the pink bars are dimmed, it’s because you’re not hooked up to your Time Machine backup drive.
Tip
To see how much disk space your local snapshots are eating up, choose ![]() → About This Mac. Click the Storage tab. The color-coded graph clearly indicates the space being used for backups.
→ About This Mac. Click the Storage tab. The color-coded graph clearly indicates the space being used for backups.
Changing Time Machine Settings
Time Machine has four faces. There’s the application itself, which sits in your Applications folder; open it only when you want to enter Restore mode. There’s its Dock icon, which also enters Restore mode, but which has a shortcut menu containing useful commands like Back Up Now (and Stop Backing Up).
There’s the Time Machine menulet, which may be the handiest of all. It identifies the time and date of the most recent backup, offers Back Up Now/Skip This Backup commands, and has direct access to Time Machine’s Restore mode and preferences pane.
Tip
If you Option-click the Time Machine menulet, you get two secret commands: Verify Backups (just in case you’re nervous about your backups’ integrity) and Browse Other Backup Disks. Yes, it’s perfectly possible to back up onto multiple hard drives—to keep one offsite in case of fire, flood, or burglary, for example—and this is how. (Right-clicking or two-finger clicking Time Machine’s Dock icon is another way to get this command.)
Finally, there’s its System Preferences pane, where you adjust its settings (Figure 7-18). To see it, choose ![]() → System Preferences→Time Machine. Or choose Time Machine Preferences from Time Machine’s Dock icon or menulet.
→ System Preferences→Time Machine. Or choose Time Machine Preferences from Time Machine’s Dock icon or menulet.
Recovering Lost or Changed Files
All right, you’ve got Time Machine on the job. You sleep easy at night, confident that your life is in order—and your stuff is backed up.
Then, one day, it happens: Your hard drive crashes. Or you can’t find a file or folder you know you had. Or you save a document in some non–Auto Save program and then wish you could go back to an earlier draft. Some kind of disaster—sunspots, clueless spouse, overtired self—has befallen your files. This is Time Machine’s big moment.
Start by pinpointing what you’re looking for, in one of these two ways:
Open the disk or folder window where the missing or changed item was.
Type what you’re looking for into the search box at the top of any Finder window. Click the location button that makes the most sense: “This Mac” or the name of the window you’re in.
In the case of deleted files or folders, the search will probably come up empty; that’s totally OK.
Now click the Time Machine icon on the Dock, or choose Enter Time Machine from the menulet (Figure 7-19, top).
Everything else on your desktop fades away. Front and center is your Finder window—or, rather, dozens of them, stretching back in time (Figure 7-19, bottom). Each is a snapshot of that window at the time of a Time Machine backup.
You have four ways to peruse your backup universe:
Click individual windows to see what’s in them.
Drag your cursor through the timeline at the right side. It’s like a master dial that flies through the windows into the past.
Click one of the two big, flat arrows. The one pointing into the past means “Jump directly to the most recent window version that’s different from the way it is right now.” In other words, it’s often a waste of time to go flipping through the windows one at a time, because your missing or changed file might have been missing or changed for the last 25 backups (or whatever). What you want to know is the last time the contents of this window changed. And that’s what the big, flat arrows do. They jump from one changed version of this window to another. (Or, if you began with a search, the arrow takes you to the most recent backup with a matching result.)
Use the search box in the corner of the window. You can search for whatever you’re missing in the current backup.

Figure 7-19. Top: Choose Enter Time Machine from the menulet. (If you don’t see this menulet, then turn on “Show Time Machine in menu bar,” shown in Figure 7-18.)
Bottom: The starry outer-space background of the old Time Machine is gone, but everything works the same way: You see dozens of copies of the Finder window, representing its condition at each backup, stretching back to the past.
As you go, the very bottom of the screen identifies where you are in time—that is, which backup you’re examining.
Tip
You can let Time Machine take you on a guided tour of folders past, or you can go your own way to find your files. Just open the backup disk itself, whose icon appears on your desktop. Inside, you’ll find nested folders, neatly representing every computer, every backup, every day, and every hour—which you can rummage through by hand.
In many ways, the recovery mode is just like the Finder. You can’t actually open, edit, rename, or reorganize anything here. But you can use Quick Look to inspect the documents to make sure you’ve got the right version. And you can use icon, list, column, or Cover Flow views to sort through the files you’re seeing.
If you’re trying to recover an older version of a file or folder, highlight it and then click the flat arrow button that’s pointing away from you; Time Machine skips back to the most recent version that’s different from the current one.
If you’re trying to restore a deleted file or folder that you’ve now located, highlight it and then click Restore (lower right). Presto: The lost file or folder is back in the window where it belonged.
Note
Time Machine prides itself not just on recovering files and folders, but also on putting them back where they belong. If you recover a different version of something that’s still there, macOS asks if you want to replace it with the recovered version—or to keep both versions.
And if you’re recovering a document whose original folder no longer exists, Time Machine asks if you want to choose another place for the document or recreate the missing folder, perhaps so that the recovered item feels at home. Choose accordingly.
Recovering from Contacts and Mail
The Finder isn’t the only program hooked into Time Machine’s magic. Contacts and Mail work with Time Machine, too. Other software companies can also revise their own applications to work with it.
In other words, if you want to recover certain addresses or email messages that have been deleted, you don’t start in the Finder; you start in Contacts or Mail.
Then click the Time Machine icon on the Dock. Once again, you enter the recovery mode—but this time, you’re facing a strange, disembodied, stripped-down copy of Contacts or Mail.
You’re ready to find your missing data. Click the Jump Back arrow to open the most recent version of your address book file or email stash that’s different from what you’ve got now. (You can also use the timeline on the right if you remember the date when things went wrong.)
Tip
If you’re looking for something particular, specify that before you start clicking. For example, type a name into the Contacts search box first.
At this point, you can select individual Contacts entries or email messages to restore; just click the Restore button. Contacts may discover a lot of duplicate name-and-address entries and invite you to step through them, deciding which ones “win” (the old or the new).
Note
When you finish restoring in Mail, you’ll find the restored messages in the On My Mac→Time Machine→Recovered folder at the left side of the window.
Recovering the entire hard drive
Every hard drive will die at some point. You just hope it won’t happen while you own the computer. But if it does, you, as a Time Machine aficionado, won’t care. You’ll just repair or replace the hard drive, and then proceed as follows.
Connect the Time Machine backup disk to the Mac. Start the recovery mode.
There are actually three ways to recover a dead Mac or a dead hard drive. If the hard drive is fine but it just can’t start up your Mac, hold down
-R during startup. If the hard drive is empty, you can restart from the Internet itself (if it’s a Mac released since Mac OS X Lion came out). And, if all else fails, you can always use the Recovery Disk Assistant that you wisely made long in advance of your horror-story dead-disk day.Appendix B covers these recovery modes in more detail. The point is, however, that all three present “Restore from a Time Machine backup” as one of the options.
Choose “Restore from a Time Machine backup.” Click Continue.
Now you’re shown a list of Time Machine backup disks. You probably have only one.
Click your Time Machine backup disk. In the list, click the most recent backup.
The installer goes about copying everything from the backup disk onto your new, empty hard drive. When it’s all over, you’ll have a perfect working system, just the way it was before your series of unfortunate events.
Beware, however: Restoring your earlier version also erases any files you’ve created or changed. Back them up manually before you proceed! Then, when you’re asked to choose a backup to restore, choose the most recent one. When it’s all over, copy the files that you manually backed up back onto the hard drive.
Recovering to another Mac
Weirdly enough, you can also use Time Machine to bring over some or part of any Time Machine backup to a totally different Mac.
On the new machine, connect your backup disk. In the Applications→Utilities folder, open Migration Assistant. Click “From another Mac, PC, Time Machine backup, or other disk.” The subsequent screens invite you to choose which backup, which Home folder, and which elements (applications, settings, files) you want to bring over.
Frequently Asked Questions
Time Machine is a very different kind of backup program, and a real departure for longtime Mac addicts. A few questions, therefore, are bound to come up—like these:
Can I back up more than one Mac onto the same disk? Yes. Each Mac’s backup is stored in a separate folder on that disk.
Can I use more than one backup disk—like one at the office and one at home? Yes. Just use the Time Machine pane of System Preferences (or the Time Machine Dock icon’s shortcut menu) to select the new backup drive each time you switch.
Can I delete something from all the backups at once? Yes. Click the Time Machine icon on the Dock to enter the Restore mode. Find and select the file or folder you want to obliterate. From the
menu, choose Delete All Backups of [the Thing’s Name]. (Sneaky, huh? That command is never in the menu except when you’re in Time Machine restoring mode.)