
Chapter 20. Messages
Somewhere between email and the telephone lies the joyous communication tool called instant messaging. Plenty of IM programs run on the Mac, but macOS comes with its very own instant messenger program called Messages. (It used to be called iChat.) It’s built right into the system and ready to connect to your friends on the iCloud or Jabber networks.
Note
Messages, in macOS High Sierra, no longer works with the Yahoo or AIM networks—because those networks have been shut down.
This chapter covers how to use Messages to communicate by video, audio, and text with your online pals.
Welcome to Messages
Messages does eight things very well:
Instant messaging. Instant messaging combines the privacy of email and the immediacy of the phone. You type messages in a chat window, and your friends type back to you in real time.
You can keep your text messages, too. They’re not locked onto your phone, like regular text messages, and they don’t scroll away forever, like regular text messages. You can archive them, search them, copy and paste them, print them, forward them, and so on.
Unified chat/text messages with phones (iMessages). This is huge. If you and your conversation partner both have iCloud accounts, then you both can move freely from phone to tablet to Mac. Your conversation appears in real time on all your gadgets simultaneously. If you started texting someone on the train home, you can sit down at your Mac and open Messages—and pick up right where you left off.
The messages, which Apple calls iMessages, are a lot more flexible than regular text messages. They can be much longer than 160 characters. They can include photos, movies, or other kinds of files. They give you feedback that lets you know when a message has arrived on the recipient’s gadget.
And they don’t count as text messages. They’re routed through the Internet rather than the cellphone voice network. As far as your cellphone company is concerned, you’re not texting at all, and therefore you don’t have to pay for a texting plan.
Send text messages. If you have an iPhone, you can also exchange text messages with any cellphone—from Messages, while seated at your Mac. That’s a mind-bending violation of the usual rules that confine text messages to cellphones only.
Send audio clips. Instead of just typing a line or two to somebody, you can speak it. That short recording winds up on the other person’s Mac, iPhone, or iPad. It’s like leaving a voicemail.
Talk long distance. You and a buddy can also chat out loud, by talking, using the Internet as a free long-distance phone. Wait, not just the two of you—the 10 of you, thanks to Messages’ party-line feature.
Free videoconferencing. If you and your buddies all have fast Internet connections and cameras like the ones built into most Mac models, then up to four participants can join in video chats, all onscreen at once, no matter where they happen to be in the world. This jaw-dropping visual stunt can bring distant collaborators face to face without plane tickets—and it costs about $99,900 less than professional videoconferencing gear.
File transfers. Got an album of high-quality photos or a giant presentation file that’s too big to send by email? Forget about using some online file-transfer service or networked server; you can drag that monster file directly to your buddy’s Mac, through Messages, for a direct machine-to-machine transfer. (It lands in the other Mac’s Downloads folder.)
Screen sharing. Next time your parents or neighbors are throwing themselves upon your mercy for tech support, remember this: Messages lets you see their screen, and even control it, from across the Internet. Or you can volunteer your own screen for sharing, so you can demonstrate things to them.
Setting Up Messages
When you open Messages for the first time, you’re invited to sign into (or sign up for) your iCloud or Apple account. Take the opportunity to set this up; you’ll be glad you did. (You may have to authenticate your account—prove it’s really you—by entering a six-digit code that Apple sends to all the other gadgets on your Apple account, like your iPhone.)
But you can also set up a Jabber account (choose Messages→Add Jabber Account). That’s a chat network whose key virtue is its open-source origins. In other words, it wasn’t masterminded by some corporate media behemoth; it’s an all-volunteer effort, joined by programmers all over the world. There’s no one Jabber chat program. There are dozens, available for macOS, Windows, Linux, Unix, iPhone, and so on. They can all chat with one another across the Internet in one glorious frenzy of typing.
Tip
Messages can communicate with the Google Talk chat network—via Jabber. For details, Google it: “make Google Talk work with High Sierra Messages.”
Let the Chat Begin
If you’ve ever corresponded with someone in Messages before, you see that person’s name in the left-side list of conversations, as shown in Figure 20-1. (Or, if you’ve got a lot of conversations listed there, you can use the search box above the list to find that person.) Click the name and then start typing into the message box. The “conversation” with that person continues, even if the last exchange was months or years ago.
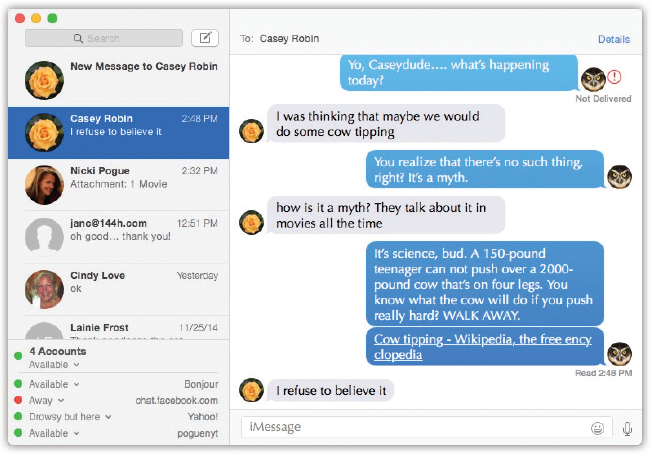
Figure 20-1. Messages keeps tabs on your various simultaneous conversations—literally. Click the different tabs to switch chats. Double-click one to open it into its own window, without the tabs taking up space.
To start chatting with someone you’ve never corresponded with before, click the Compose button (![]() ) next to the search box. The To field appears. As you type your buddy’s name into it, Messages sprouts a list of matching names from your Contacts. (If this person isn’t in your Contacts, see “The Buddies List” in “Filling your buddies list”.)
) next to the search box. The To field appears. As you type your buddy’s name into it, Messages sprouts a list of matching names from your Contacts. (If this person isn’t in your Contacts, see “The Buddies List” in “Filling your buddies list”.)
Some of them probably feature a blue speech bubble (![]() ). Those are people with iCloud accounts—with whom you can exchange iMessages, described next.
). Those are people with iCloud accounts—with whom you can exchange iMessages, described next.
Note
An iMessage address can be either an email address or a phone number. Most people register both of those data bits as part of their iMessages setup, so that any message you send arrives on all your correspondent’s Apple gadgets at once.
You can also click the ![]() button to get a pop-up version of your Contacts, complete with a search bar at the top.
button to get a pop-up version of your Contacts, complete with a search bar at the top.
Once you’ve selected your lucky conversation partner(s), just type what you want to say into the message box at the bottom of the window. As you correspond, the conversation appears in speech bubbles, scrolling up like a screenplay, making it easy to identify who said what—and to scroll back up to see what someone said earlier. (See Figure 20-1.)
If someone invites you to chat, a notification appears. If you point to it in time, you get a Reply button; see Figure 20-2.
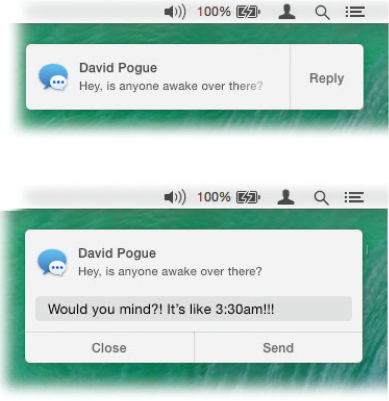
Figure 20-2. When someone messages you, a bubble like this appears in the top-right corner of your screen. If you point to it before it vanishes, the Reply button appears, as shown here.
If you click it, you can type a quick response right there in the notification window, without having to fire up Messages at all (bottom).
If you click the notification instead, Messages opens automatically; click in the message box at the bottom and type your witty reply.
iMessages
Messages is your gateway to Apple’s own chat network, called iMessages. It requires that both you and your chat partner have iCloud accounts (Chapter 17).
If the box where you type says “iMessage” in faint lettering, then you’re about to chat with a fellow iCloud member—and you’ll be sending iMessages. (Another clue: Your speech bubbles will appear in blue, rather than green.)
And you’ll enjoy a long list of extra benefits as you chat (as compared with, for example, standard cellphone text messages).
For example:
Fancier, longer posts. You can type outrageously long messages (unlike standard text messages, which are limited to 160 characters). And iMessages are unlimited and free.
Dressier chats. You can use fonts and colors in your conversation.
Multigadget simulcasting. If you have multiple Apple gadgets, and you’ve set up your iMessages email address or phone number identically in the Settings or System Preferences of each one, then your conversation appears simultaneously on all the gadgets. (“Simultaneously,” however, is relative. If one of your devices has been offline for some time while you’ve been chatting on the other, it may take a few minutes to catch up. You’ll see all the iMessages it missed pouring in.)
That’s extremely useful, because it means that you can (for example) start texting on your phone when you’re out and about and pick up seamlessly on your Mac when you get home, enjoying the real keyboard and big screen.
Paste a link. When you send a web address in an iMessage, it appears on the recipient’s screen as a little preview of the actual web page, for convenient identification. And if you send a video or video link, your buddy can play it right there in Messages, without having to lurch off to a web browser! (Click once to make the tiny video start playing; click a second time to make it stop. There’s no scroll bar.)
Tip
And what if you want to lurch off to a web browser—for example, because you want to see that YouTube video bigger than a Wheat Thin? In that case, click the label beneath the video thumbnail.
Built-in suspense. Whenever the other guy is typing, you see “…” in his balloon, so you know he’s working on a response and not just ignoring you.
Tip
The ellipsis dots appear as soon as the other guy starts typing—and remain on your screen for 60 seconds, even if he stopped typing a long time ago. Conversely, they disappear from your screen after 60 seconds, even if he’s still typing! Often you’ll see the dots disappear shortly before you get a huge, long paragraph—because the other guy took longer than 60 seconds to write it.
Insta-file sending. You can drag photos, movies, or other files (up to 100 megabytes!) into the typing box. They’ll show up on the other guy’s Mac, phone, or tablet just fine.
Easy switching to phone or video. If you find that typing is losing too much emotional nuance, you can jump into a phone call or video call at any point.
For voice calls, you can choose either a FaceTime Audio call or a phone call; for video, the FaceTime app opens, and you can proceed as described in “DVD Player”.
To jump into a voice call, click Details (top right); on the panel, click
 ; click FaceTime. (Or, if you have an iPhone, you can click the person’s phone number and make an actual phone call.) Once your invitation is accepted, you can begin speaking to each other. The bars of the sound-level meter let you know that the microphone—which you’ve specified in the Messages→Preferences→Audio/Video tab—is working.
To switch to a video call, click Details at the upper right of the Messages window, and then click
 . A FaceTime call begins right away.
Tapbacks. How many trillions of times a day do people respond to texts with repetitive reactions like “LOL” and “Awww” and “!!!!!”? Many. It’s how you demonstrate to your chat partner that you appreciate the import of her text.
But if you and your buddy are both using iOS 10 or macOS Sierra—or later—you’ve now got a quicker, less cluttery, more visual way to indicate those sorts of standard emotional reactions: what Apple calls tapbacks. Figure 20-3 shows you the ropes.
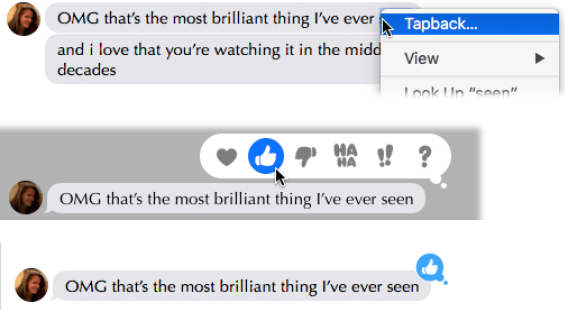
Figure 20-3. In Messages, right-click or two-finger click the bubble you’re reacting to. (It can even be something you’ve said.) From the shortcut menu, choose Tapback (top). Now you’re offered a choice of six reaction icons (middle). Click one to stamp it on the text message (bottom). It appears instantly on your screen and your buddy’s.
Tapbacks take the form of six reaction icons: Heart, Thumbs up, Thumbs Down, Ha Ha, Exclamation Points, and Question Mark. When you choose one, it appears instantly on your screen and your buddy’s.
Tip
What’s cool is that you can change your tapback icon later, if new information affects your reaction; just right-click or two-finger click again, and choose Tapback again, to bring up the same palette.
Incoming fanciness. Messages on the Mac doesn’t let you express yourself in all the ways Messages on an iPhone does in iOS 10 and 11. But it can receive some of the cool effects that your iOS 10 friends send you, like handwriting, invisible ink, and stickers; see Figure 20-4.
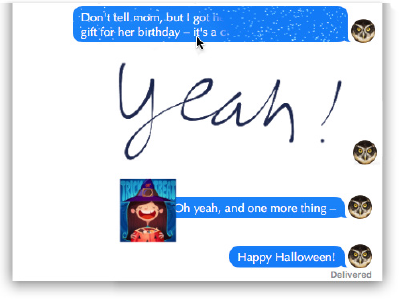
Figure 20-4. From top: Invisible Ink (text that doesn’t appear until you move your mouse across it—useful when the sender doesn’t want to embarrass you), handwriting, and stickers (still or animated images that your pal has dragged onto a message). You can’t create these effects on the Mac, but you can receive them when they’re sent by iPhones and iPads.
Big, plentiful emoji. You can use the emoji pop-up menu (at the right end of the typing box) to insert emoticons and smileys.
If you know the correct codes to produce the emoji you want—typing :) produces a yellow happy face, for example, and <3 produces a red heart—you can save time by typing them instead of using the pop-up menu. Messages converts them into smiley icons on the fly, as soon as you send your reply.
Emoji you transmit appear enormous—at three times their usual size—if you’ve typed three of them or fewer on a single line. (If, that is, your recipient is using an Apple device running iOS 10 or Sierra or later versions.)
Tip
If you have a Touch Bar (“The Complicated Story of the Function Keys”), you’ll find it much easier to enter emoji by tapping. Touch the ![]() button to see a row of frequently used emoji, any of which you can insert by tapping. Or you can tap the
button to see a row of frequently used emoji, any of which you can insert by tapping. Or you can tap the ![]() button to see a row of icons representing the other categories of emoji available to your fingertip.
button to see a row of icons representing the other categories of emoji available to your fingertip.
Real-time feedback. The tiny word “Delivered” appears beneath any message you send to let you know that your recipient’s gadget has received it. If the recipient has turned on “Send read receipts” (in Messages→Settings), you’ll even see the word “Read” to let you know that the person has actually seen the message.
Tip
What about you? Do you want the other guy to know when you’ve seen his texts? You can turn “Send read receipts” on or off in Settings, of course. But you can turn “Send read receipts” on or off for an individual buddy. You might want your primary love interests to know when you’ve seen their texts, for example, but you might not think your kids need to know.
Within a chat, click Details at the top right. And there it is: a Send Read Receipts checkbox for just this conversation partner (visible in Figure 20-5).
See all the attachments. This one’s really cool; see Figure 20-5.
Adjust the type size. Use the commands in the View menu to make all type larger or smaller—or just press
 -plus or -minus.
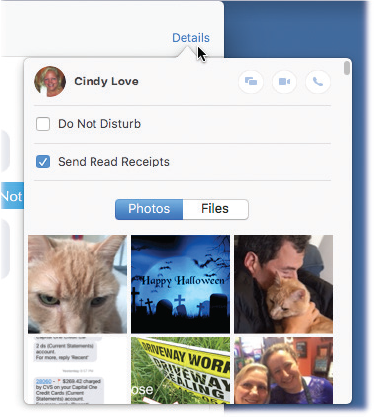
Figure 20-5. If you click the Details button at the top right of the window, you get to see a mosaic of every attachment you’ve ever exchanged with this correspondent—file, photo, video, whatever. Double-click one to open it. No more scrolling back through thousands of pages of typed text to find something you remember getting!
This Details panel also gets you access to buttons that begin screen sharing, phone calling, or video chatting with this lucky individual.
Send a sound clip. A special
 button appears whenever you’re exchanging iMessages, just to the right of the typing box. It lets you quickly shoot over an audio bite as easily as you’d type something.
Just click the
, say what you want to say, and then click the square Stop button. Now you can play it back ( ), Cancel it, or Send it.
What you said is instantly transmitted to your buddy as an audio recording.
If the recipient has an iPhone with iOS 8 or later, he can listen just by lifting the phone to his head. And then, get this: To reply, he doesn’t have to touch anything or look at the screen. He just holds the phone to his head again and speaks! Once he lowers the phone, his recording shoots back to you.
Sometimes, an audio recording is just better than a typed message, especially when music, children, animals, or a lot of emotion in your voice are involved.
Tip
Audio eats up a lot more space than text. If you do a lot of audio messaging, then, over time, those audio snippets can fill up your storage. That’s why Messages comes set to delete each audio message two minutes after you send it—unless you click Keep within that window of time.
See where the other guy is. If you’re chatting with an iPhone owner, that same Details panel might reveal a map that shows her current location in the world. (The map appears only if she’s turned on “Share my location” on his phone.)
Messages blurs the lines between text messages, chats, and email. And it gives birth to this frequently asked question: “Are you on the phone or the Mac?” Now there’s no way to know.
Other Chat Networks
iMessages is all well and good. But astonishing though it may be to believe, not everyone on earth uses Macs and iPhones.
Chatting with people using other computers and phones isn’t quite as rewarding as using iMessages, but the essentials are still in place. Chats over Google Talk or Jabber networks still scroll up the screen like a screenplay.
The Buddies List
For Google Talk or Jabber chats, the Messages app offers a traditional chat-program buddies list. It’s like an address book whose names appear only in Messages—for people you don’t need cluttering up your main Contacts list (Figure 20-6).
A tiny icon appears next to each name in your list, indicating that person’s availability to chat—and what kinds of multimedia chats are available. A ![]() icon means “equipped for an audio chat”; a
icon means “equipped for an audio chat”; a ![]() means “equipped for a video chat.” The little colored dots mean “available” (green), “away” (red), “idle” (orange), and “undetermined—probably on a cellphone” (gray). A little
means “equipped for a video chat.” The little colored dots mean “available” (green), “away” (red), “idle” (orange), and “undetermined—probably on a cellphone” (gray). A little ![]() icon means you’re chatting with someone on a cellphone.
icon means you’re chatting with someone on a cellphone.
Filling your buddies list
If you don’t see your buddies list when you open Messages (Figure 20-6), choose Window→Buddies. Click the + in the bottom-left corner of the Buddies window; from the shortcut menu, click Add Buddy, and then add your correspondent’s account name/address (for example, [email protected]).
Tip
Just to make things more complicated—er, flexible—Messages lets you organize buddies into groups, like Work, Family, and Fantasy Badminton League. Use the “Add to group” pop-up menu here to specify which group you want—or just choose Buddies to leave the new person in the general sloshing bucket of humanity.
When everything looks good, click Add.
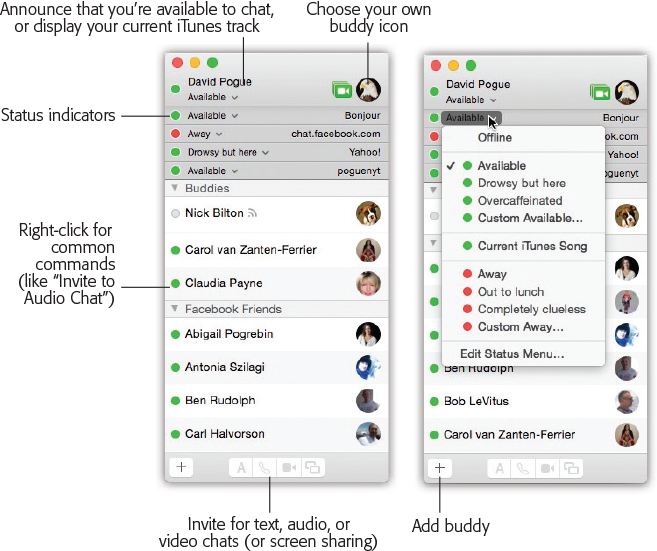
Figure 20-6. Left: The buddies list combines all your contacts from all chat services. Each chat account has its own status menu at the top.
Right: You can also choose Edit Status Menu to set up more creative alternatives to “Available” and “Away.”
Broadcasting your status
Using the pop-up menu just below your name (Figure 20-6, right), you can display your current mental status to other people’s chat programs. You can announce that you’re Available, Away, On the Phone, Drunk, and so on. (You have to choose Edit Status Menu for that last one.)
Tip
You can also add a Messages menulet to the top of your screen. Choose Messages→Preferences→General, and turn on “Show status in menu bar.” From now on, you can change your status even when Messages isn’t running. If other people see you as anything besides Offline or Invisible, they can send you a message—and Messages will open automatically.
Your icons
Messages displays each typed comment next to an icon, which can be a picture the other person added, a picture you added, or a generic silhouette icon.
To choose a graphic to use as your own icon, click the round picture to the right of your name at the top of the buddies list. From the pop-up palette, you can choose, as your avatar, any of Apple’s Defaults (nature shots), Recents (chat photos you’ve used recently), My Photo Stream (your own recently taken pictures), Faces (if you’ve set this feature up in Photos [“Photos”]), or Camera (take a new picture right now).
In most cases, you’re offered an Edit button. It opens a little adjustment window where you can fiddle with the size and centering of your headshot.
Feel free to build an array of graphics to represent yourself—and then to change them in midchat, using this pop-up palette, to the delight or confusion of your conversation partner.
Group Chats
There’s nothing to stop you from inviting several people to a single chat. Just click the Compose button (![]() ) as usual. Enter the desired chat partners’ names one at a time in the To field, pressing Return or adding a space after each one.
) as usual. Enter the desired chat partners’ names one at a time in the To field, pressing Return or adding a space after each one.
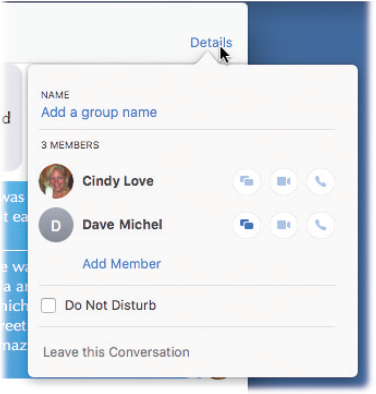
Figure 20-7. If you click where it says Group Name, you can type a new name. That should make it easier to identify this conversation later in the list of chats at the left side of the window. (The Details button doesn’t appear until somebody has actually said something in this chat.)
You can also add or remove participants, even after the group chat is underway. To remove someone, -click his name in the Details panel; choose Remove from Conversation. To add a new member, click Add Member.
Do Not Disturb means that new texts from this group won’t trigger notifications on your Mac. And if the bickering becomes more than you can stand, you can excuse yourself and leave the chat by clicking “Leave this Conversation.”
Tip
If you’ve created a group in Contacts, you can also just enter the group’s name. Everybody in it is instantly part of the chat.
Now you’ve got yourself a party line. Anything anyone types, everybody sees. Be careful what you say, won’t you?
Many of the group-chat features are hiding in the panel that appears when you click Details at top right (Figure 20-7).
Audio and Video Chats
Messages becomes much more exciting when you exploit its AV Club capabilities. You can conduct audio chats, speaking into your microphone and listening to the responses from your speaker, or dive into video conferences. In general, both of you must be using the same service (iMessages or Jabber), and everyone needs pretty high-horsepower computers and Internet connections.
Tip
If you have a fast connection, up to 10 of you can join in one massive, free audio conference call.
To begin a voice call, click Details (top right); on the panel, click ![]() . Once your invitation is accepted, you can begin speaking to each other. The bars of the sound-level meter let you know that the microphone—which you’ve specified in the Messages→Preferences→Audio/Video tab—is working.
. Once your invitation is accepted, you can begin speaking to each other. The bars of the sound-level meter let you know that the microphone—which you’ve specified in the Messages→Preferences→Audio/Video tab—is working.
To begin a video chat, click the ![]() icon next to a buddy’s name, or highlight the name and then click
icon next to a buddy’s name, or highlight the name and then click ![]() at the bottom of the list. Or, if you’re already in a text chat, choose Buddies→Invite to Video Chat.
at the bottom of the list. Or, if you’re already in a text chat, choose Buddies→Invite to Video Chat.
A window opens, showing you. This Preview mode is intended to show what your buddy will see. (You need some light in front of you to avoid being too shadowy.) As your buddies join you, they appear in their own windows.
And now, some video-chat notes:
If your conversation partners seem unwilling to make eye contact, it’s not because they’re shifty. They’re just looking at you, on the screen, rather than at the camera—and chances are you aren’t looking into your camera, either.
Don’t miss the green
 button in the upper-left corner of the window. It takes your video into Full Screen mode.
If you’re the one who started the call, then you can add more people by clicking the + button in the chat window or dragging a buddy’s name into the window. (If that person doesn’t have a camera, she can still enjoy audio or typing privileges.)
You can have video chats with Windows computers, too.
Don’t want to see yourself in the picture-in-picture window during your video chat? Choose Video→Hide Local Video.
This cutting-edge technology can occasionally present cutting-edge glitches. The video quality deteriorates, the transmission aborts suddenly, the audio has an annoying echo, and so on. When problems strike, Messages Help offers a number of tips; the Video→Connection Doctor can identify your network speed. (Messages video likes lots of network speed.)
Tip
For better audio quality during your audio and video calls—both hearing and broadcasting—wear a headset. For example, you can pair a wireless Bluetooth headset with your Mac in Messages→Preferences→Audio/Video→Set Up Bluetooth Headset. This fires up the Mac’s Bluetooth Setup Assistant program to guide you through the process.
After you get your Bluetooth headset married to your Mac, go to ![]() → System Preferences→Output and select your headset in the list.
→ System Preferences→Output and select your headset in the list.
Sharing Your Screen
As you’ve seen already, Messages lets you share your thoughts, your voice, and your image with the people on your buddies list. And now, for its next trick, it lets you share…your computer.
Messages’ screen-sharing feature is a close relative of the network screen-sharing feature described in “More Mac-Windows Connections”. It lets you not only see what’s on a faraway buddy’s screen, but also control it, taking command of the distant mouse and keyboard. (You can share your screen with the other guy, too.)
You can open folders, create and edit documents, and copy files on the shared Mac screen. Sharing a screen makes collaborating as easy as working side by side around the same Mac, except now you can be sitting in San Francisco while your buddy is banging it out in Boston.
And if you’re the family tech-support specialist—but the family lives all over the country—screen sharing makes troubleshooting infinitely easier. You can now jump on your Mom’s shared Mac and figure out why the formatting went wacky in her Word document, without her having to attempt to explain it to you over the phone. (“And then the little thingy disappeared and the doohickey got scrambled…”)
Tip
Once you’re controlling someone else’s screen remotely, your keyboard shortcuts operate his Mac instead of yours. Press ![]() -Tab to bring up the application switcher, hit
-Tab to bring up the application switcher, hit ![]() -Q to quit a program, use all the Mission Control and Spotlight shortcuts, and so on.
-Q to quit a program, use all the Mission Control and Spotlight shortcuts, and so on.
To make Messages’ screen sharing work, you and your buddy must both be using an iCloud or Jabber account, or be on the same Wi-Fi network (the Mac’s Bonjour feature will make your Macs shown up on each other’s screens).
iCloud Screen Sharing
From within an iMessages conversation (that is, a chat between two iCloud members), you can share your whole Mac screen, right there in Messages. Both people have to be using Macs running Yosemite or later (not an iPhone, and not an older Mac).
There are other ways to share screens, of course (“More Mac-Windows Connections”)—but this is by far the easiest to set up.
Once a typed chat is underway, click Details (top right), and then click ![]() (see Figure 20-8, top). If that icon is dimmed gray instead of blue, it’s because the other person isn’t using a Yosemite-or-later Mac.
(see Figure 20-8, top). If that icon is dimmed gray instead of blue, it’s because the other person isn’t using a Yosemite-or-later Mac.
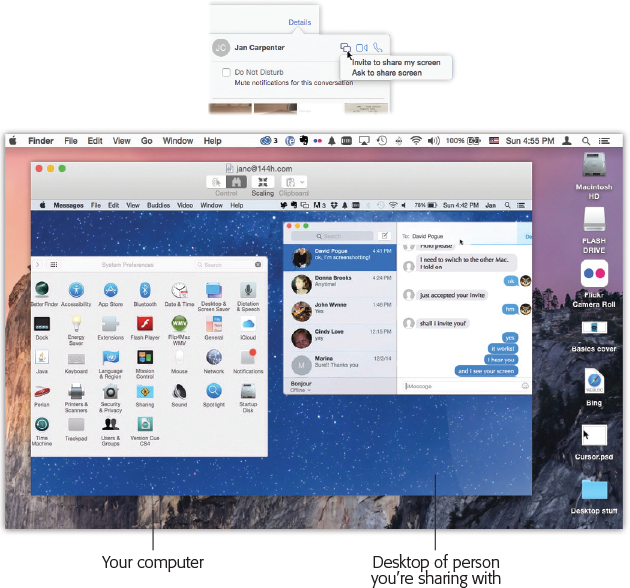
Figure 20-8. Top: You either send or receive an invitation to start sharing your screen, but make sure you know with whom you’re dealing before accepting the offer and starting the sharing process.
Bottom: When you’re sharing someone else’s screen, you have the option to click back and forth between the two Mac screens.
You can move the cursor, click things, and even highlight text on the other guy’s screen. That’s great for explaining to someone, via remote control, how to perform some task.
The icon sprouts two choices: “Invite to share my screen” (meaning the other guy sees your screen) and “Ask to share screen” (you’re going to see his screen). Click the one you want.
He receives an invitation. When he clicks Accept, the sharing is underway. He sees your screen on his Mac, or vice versa, as though some freaky cosmic wormhole has opened up.
Once the screen sharing is going, a new ![]() menu appears at the top of your screen. It offers options like these:
menu appears at the top of your screen. It offers options like these:
Allow [other guy] to control my screen. He can operate your mouse and keyboard—from his Mac, thousands of miles away.
Mute Audio. During a screen share, Messages automatically turns on audio chatting, so you can explain stuff to each other. Mute Audio mutes the audio.
Pause Screen Sharing is like drawing a privacy curtain when you want to duck into your email program to read something. The other guy sees only a “Paused” screen until you unpause.
End Screen Sharing. You guessed it.
Screen Sharing with Non-iCloud Accounts
To begin, click the sharee’s name in your buddies list.
To share your screen, choose Buddies→Share My Screen with [person’s name].
To see his screen, choose Buddies→Ask to Share [person’s name]’s Screen.
Note
Similar commands are available in the Screen Sharing pop-up button—the ![]() at the bottom of the Buddies window.
at the bottom of the Buddies window.
Once the invitation is accepted, the sharing begins, as shown in Figure 20-8. To help you communicate further, Messages politely opens up an audio chat with your buddy so you can have a hands-free discussion about what you’re doing on the shared machine.
If you’re seeing someone else’s screen, you see his Mac desktop in full-screen view, right on your own machine. You also see a small window showing your own Mac; click it to switch back to your own desktop.
Tip
To copy files from Mac to Mac, drag them between the two windows. Files dragged to your Mac wind up in your Downloads folder.
To bail out, press Control-Esc on the Mac’s keyboard.