HOW TO HANG
YOUR SOLO SHOW
Show Your Works
to Their Best Advantage
Installing a solo show of your own work is a challenging and rewarding task. A solo show is probably something you’ve worked toward for a year or more. You have a substantial emotional investment—and often an economic one as well—in its success. If your show is in a museum or commercial gallery, installing the show will most likely be the responsibility of the museum curator or gallery director. But if your show is in a co-op gallery, art association, alternative art space, library, bank, restaurant, office space or your own studio, part or all of the responsibility for arranging and hanging the work will probably fall on your shoulders. Exploring the installation process will help you create a cohesive exhibition that will show your work to its best advantage.
Things to consider
The first challenge is to recognize that, while the works you’ve created for the exhibition are the reason for the show, the exhibition is not about the works. Instead, the exhibition is a work of art unto itself. Your artworks are just one component of that larger work—the exhibition.
Creating an exhibition is a multidimensional process. Among the factors that contribute to a success or failure are the exhibition space, the lighting, the viewers and the way they will move through the space, visual distractions that are unavoidable, attention to your primary purpose for the exhibition, the mechanics of how the artwork will be hung, and the arrangement of the pieces.

Lisa Strazza hangs her works in her artist-owned Strazza Art Gallery in Warwick, New York.
The space
Start by clearing the space as completely as possible. Even if there are pedestals, chairs or other furniture that you imagine you’ll use in setting up your exhibition, remove them at this point so you can see the space with as few distractions as possible.
When the space is empty, examine your surroundings. Is there any natural light? How many entrances and exits are there? Are there any pillars, unmovable dividing walls or other obstructions in the space? Do the walls need to be touched up? Is the ceiling high or low? Is there sufficient lighting? Is there anything in or near the space that will compete with your work for the viewers’ attention?
After you’ve addressed these questions and any others that occur to you, it’s time to bring your works into the space—if possible, into the center of the space. Don’t lean the works against the walls at this point—they’ll become an impediment to envisioning the best possible layout of your show.
The works
Your art is the raw material of the show. Ideally you’ll have more work than you need to fill the space because this will give you options as you create your exhibition.
TIPS
If you need to relocate a hook, using a claw hammer to pull out the nail is likely to dent the wall. Instead use pliers to carefully withdraw the nail.
Avoiding smudges on the wall is almost impossible. Use a gray kneaded eraser to remove smudges and pencil marks.
Here are a few points you may want to consider: Do you have more work than you need or not enough for this particular space? Are any of your artworks in series? If so, must the series be hung together? Are the majority of the works large or small?
The most frequent mistake that artists make when hanging their own shows is including too much work. It’s a natural error. You want to share as much of your art as possible with the public. Perhaps you also think that the more you hang, the more you’ll sell (not true). Quality, not quantity, should govern your decisions. Sometimes less is more. The integrity of the show itself, the success of the arrangement and the visual impact of the works, both collectively and individually, are far more important than the number of pieces on display.

Lean your works informally against the wall to establish an approximate arrangement.
The works & the space
The first step in determining what goes where is to consider how viewers will enter the space and what they’ll see first. If there’s a wall directly opposite the primary entrance, the visitor’s gaze will likely go there first. But if there’s an exit opposite the primary entrance or if the works on the opposite wall are small and far away, viewers are likely to turn to their right.
The next step is to lean works informally against the wall. By doing this, you can establish an approximate arrangement without the commitment of attaching nails or hooks in any specific locations. It’s important to stay flexible during this stage of the process. Pieces initially placed in one location may be moved three, four or even more times before finding their final position.
Create an interesting arrangement. No one wants to see an uninteresting show, and such a show won’t do your works justice. Try to see the exhibition from a visitor’s perspective. Continuity is important, but sometimes grouping similar works together can be boring. Consider creating visual syncopation by breaking large groups into smaller blocks of unequal size and leaving space between them. Consider creating groupings of some works while displaying others singly. A group of smaller works can balance the impact of a larger work that adds power to a particular part of the exhibition. A small work resting on an easel atop a pedestal can draw viewers to a corner that they might otherwise pass by. (See photos A and B.)

In this area of Loel Barr’s solo exhibition at the Woodstock Artists Association and Museum, the preliminary arrangement in picture A is perfectly acceptable, but interest and energy were added for the final installation by replacing some of the hanging works with three-dimensional constructions placed on shelves and a pedestal as shown in picture B.
Don’t forget to stay flexible. Sometimes it may be necessary to move an entire group of works from one wall to another as the arrangement evolves. If you’re hanging works in more than one row, lay them on the floor as you create a grouping and move the entire grouping to the wall only when you believe you’re finished. Even then, be open to the possibility that last-minute changes may be needed.
If you have a friend who’s experienced in hanging exhibitions, consider asking for help in hanging yours. A second opinion is as important in art as it is in medicine, and the fact that someone else sees your work objectively may help to balance your own intimate involvement with it.
The mechanics of hanging
When you’re ready to hang the works on the wall, you’ll need hooks or nails for hanging, a pencil, a hammer, pliers (make sure they also cut wire), a tape measure at least 8 feet long and a kneaded gray eraser. A 4- or 6-foot level and some extra picture wire for emergencies are also good to have handy. You can save considerable time if you make a “hanging gauge.” (See “How to Make and Use a Hanging Gauge.”)
HOW TO MAKE AND USE A HANGING GAUGE
To make this measuring gauge, take an 86-inch length of 1x2-inch lumber and mark a point 62 inches from one end. Attach a 24-inch ruler to the 1x2 so that the beginning of the ruler starts at the 62-inch mark, as shown.
To use the measuring gauge, follow these steps:
1. Measure the total height of the picture including the frame.
2. Divide the height of the picture by 2 to get 1⁄2 the total height of the picture.
3. Measure the distance from the stretched wire to the top of the frame as shown here.
4. Subtract the distance from the stretched wire to the top of the frame from 1⁄2 the total height of the picture.
5. Find the result of your calculations on the ruler. This is the height at which the hook should be placed.
Note: If you choose not to build a measuring gauge, add 62 inches to the result of your calculations in step 4, and measure that number of inches up from the floor with a ruler or tape measure. This marks the proper height at which to position the hook or rail for that particular picture.

![]()
Ruler portion approximately 24 inches long
62 inches from floor to beginning of ruler
The average human eye height is approximately 62 inches, and many galleries and museums try to position works of art with the center of the work, measured vertically, at this level. The easy way to do this is to measure the total height of the framed work, divide that amount by two, and subtract the distance between the wire (stretch it taught with one finger) and the top of the frame. Add the result to 62 inches and measure from the floor upwards to position the hook or nail that will hold that work. Using the gauge—where the ruler starts at 62 inches above the floor—eliminates the last calculation.
Sometimes you may want to hang a group of same-size works in a row. In this case using a level may be more effective than measuring from the floor as the floor itself may not be level. The varying length and tension of the wires on the back of the frames may also make aligning the works difficult. In this case, especially if you’re using contemporary frames with space in the back, it may be useful to ignore or remove the wire and hang the same-size works with the frames themselves resting on pairs of nails driven in on a level line.
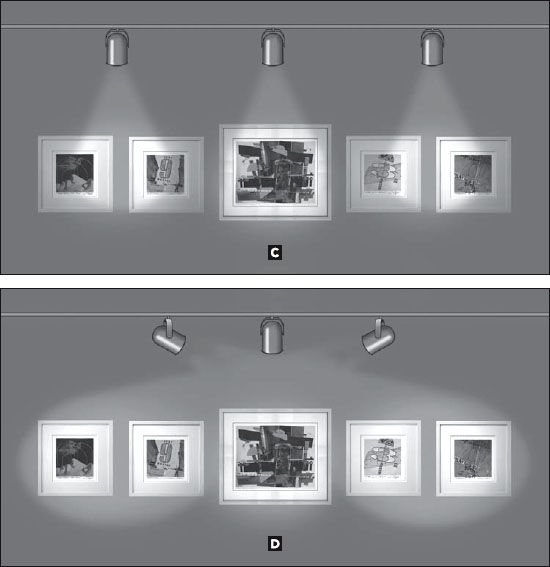
When direct lighting doesn’t spread the light well enough or when there aren’t enough lights (C), cross-lighting the works allows for better coverage and more even, pleasing lighting (D).
In the special case where you’re hanging your works from picture rail moulding, using a continuous loop of wire helps to get the works level at the height you want. Tie the wire to one moulding hook, run it through both screw eyes on the back of the frame, and then tie it to the other picture hook (see “Hanging From Picture Rail Moulding”). If you’re on the ladder, have someone else measure the height of the work. Final leveling requires only sliding the picture up or down on one side or the other.
HANGING FROM PICTURE RAIL MOULDING
When hanging pictures from picture rail moulding, leveling the works will be much easier if you use a single piece of wire. Tie the wire to one hook and thread it through the screw eyes on the back of the frame, as shown. Don’t wind or tie the wire to the screw eyes. Adjust the height of the picture at the other hook and then tie the wire. You’ll be able to level the piece by simply pulling down gently on one side or the other. Note: For clarity, the back of the frame is shown in this illustration.

Adjust height here before tying.
Lighting the work
Most exhibition spaces have track lighting of some kind. Make certain that the lights are directed so they best enhance your work. All too often there aren’t as many lights as there are works. When this happens, lighting from an angle, or cross-lighting, enables you to light more than one work with the same fixture (see photos C and D). In general, using floodlights—rather than spotlights that can create hot spots—is best.
Finishing up
A few things remain to be done before the opening. First, you should photograph your show. Use a tripod and turn off the flash on your camera to avoid reflections from works that have glass or are varnished. Don’t include people in your photographs. What you should create is a photographic document showing the exhibition as a whole.
Second, prepare a guest book. Getting the names and e-mail addresses of the visitors to your exhibition can be a big help in growing your mailing list and your career. Most store-bought guest books don’t include enough room for e-mail addresses, so we’ve designed pages that can be inserted in a clean loose-leaf binder that’s left open, with a pen, on a table or pedestal. These printable pages, in both Microsoft Word and PDF formats, can be found at www.artistsnetwork.com/article/talbot-exhibition-guest-book-page.
Third, think about refreshments; customs vary by location and tradition. Do consider, however, that devoting too much space to food and drink may make the refreshments, rather than your works, the focus of the opening.
Lastly, take a deep breath. Forget all the effort it took to make the work and all the effort it took to hang the show. Have a good time.
Jonathan and Marsha Talbot have been installing solo, group and theme exhibitions together for more than forty years. Visit Jonathan’s website at www.talbot1.com.
Excerpted from the June 2011 issue of The Artist’s Magazine. Used with the kind permission of The Artist’s Magazine, a publication of F+W Media, Inc. Visit www.artistsnetwork.com to subscribe.