
Day 12. Windows Networking and Maintenance
CompTIA A+ 220-902 Exam Topics
![]() Objective 1.6: Given a scenario, install and configure Windows networking on a client/desktop.
Objective 1.6: Given a scenario, install and configure Windows networking on a client/desktop.
![]() Objective 1.7: Perform common preventive maintenance procedures using the appropriate Windows OS tools.
Objective 1.7: Perform common preventive maintenance procedures using the appropriate Windows OS tools.
Key Topics
Today we have a heavier load than usual. We will cover Windows networking and maintenance tasks. We also will cover network configuration, firewall, TCP/IP, and NIC card settings. Maintenance tasks such as data and system backups as well as driver and system updates also will be covered.
Domains Versus Homegroups Versus Workgroups
Domains, workgroups, and HomeGroups are all different methods for sharing resources on a network. The differences between them are their complexity, security settings, and how they are managed.
Workgroups have the following characteristics:
![]() All computers are peers; no one computer controls the rest.
All computers are peers; no one computer controls the rest.
![]() Each computer has an account or multiple accounts.
Each computer has an account or multiple accounts.
![]() No more than 10 computers are recommended.
No more than 10 computers are recommended.
![]() Joining or creating a workgroup does not require a password.
Joining or creating a workgroup does not require a password.
![]() All computers must be on the same local network or IP subnet and have the same workgroup name.
All computers must be on the same local network or IP subnet and have the same workgroup name.
HomeGroups have the following characteristics:
![]() All computers are peers; no one computer controls the rest.
All computers are peers; no one computer controls the rest.
![]() Each computer has an account or multiple accounts.
Each computer has an account or multiple accounts.
![]() No more than 10 computers are recommended.
No more than 10 computers are recommended.
![]() Requires an alphanumeric password that is created by Windows when the HomeGroup is created.
Requires an alphanumeric password that is created by Windows when the HomeGroup is created.
![]() All computers must belong to the same HomeGroup.
All computers must belong to the same HomeGroup.
Domains have the following HomeGroups characteristics:
![]() One or more computers are set as servers, which are used to manage and control security and authentication settings; the rest are clients.
One or more computers are set as servers, which are used to manage and control security and authentication settings; the rest are clients.
![]() Domain users do not need to be set up on each individual computer.
Domain users do not need to be set up on each individual computer.
![]() Requires a username and password created by the administrator of the network.
Requires a username and password created by the administrator of the network.
![]() There can be many computers on a domain.
There can be many computers on a domain.
![]() Users must be authenticated to the server on login.
Users must be authenticated to the server on login.
![]() Computers can be on different networks and belong to the same domain.
Computers can be on different networks and belong to the same domain.
HomeGroup Setup
HomeGroup, first introduced in Windows 7, is an automated networking setup designed to share files and devices on small networks. It is available in Windows 7, Windows 8, and Windows 8.1. In Windows 7 Starter, Windows 7 Home Basic, Windows RT, and Windows RT 8.1, you can join a HomeGroup, but you cannot create one. You also cannot create a HomeGroup if your PC is on a domain, although you can join one. You cannot delete a HomeGroup, but if all computers are removed, it will be gone.
During the installation of Windows, users are asked to set up a location for the network. Three choices are provided: home network, work network, and public network. Homegroup is possible only when the home network option is chosen.
Located in the Network and Sharing Center in Windows 7 is a section named View Your Active Networks. Next to the HomeGroup option is an indicator that shows whether the HomeGroup is ready to be created, available to join, or already joined. To create a HomeGroup, click the link Ready to Create. Then, select items to be shared such as libraries, pictures, videos, music, documents, or printers and devices.
To create or connect to a HomeGroup in Windows 8/8.1, select the Start button and go to the Control Panel > Network and Internet > HomeGroup. If an existing HomeGroup has been discovered, select the Join Now button. You can also type homegroup in the search box, and select it. In Windows 8/8.1, all computers in the HomeGroup must have network sharing turned on, network discovery turned on, each computer have the same workgroup name, and a unique computer name. All computers also must each have the correct date and time set.
Although it is not a published part of the procedure, you will need to have all computers on the network using the same TCP/IP network address. That usually is true for most home networks because they use the DHCP services on the router. Enabling IPv6 can also provide connectivity.
Workgroup Setup
Windows comes preinstalled with a workgroup named Workgroup. Setting up a specific workgroup requires a unique workgroup name and unique computer names. Although there is no benefit to creating multiple workgroups on the same network or to even changing the default workgroup name, the option to do that exists.
To change the name of the workgroup in Windows 7, go to the Computer link on the Start menu, right-click, and select Properties. A Change Settings option opens to a tab that provides a way to change the computer name or to change the network name. Another option provides a means to join a preexisting domain or workgroup.
In Windows 8, open System by swiping in from the right edge of the screen and tapping Search and entering System in the search box. If using a mouse, point to the upper-right corner of the screen, move the mouse pointer down, and then click Search. In System, under the Computer Name, Domain, and Workgroup setting, tap or click Change Settings. In the System Properties box, select the Computer Name tab and then click Change. In the Computer Name/Domain Change box under the Member of option, tap or click Workgroup; then either enter the name of the workgroup you want to join, or create a new workgroup by entering the name you want to create.
To join a workgroup, all computers must be on the same workgroup name, all computers must be on the same TCP/IP subnet, and file and print sharing must be turned on. If connectivity is not realized automatically, try turning on network discovery or rebooting the machine.
Domain Setup
A domain is part of a client/server network—not peer-to-peer as the other two networks discussed here are. Before joining a domain, a domain name, the domain’s DNS IP address, a username, and a password must be set at the domain level. The server controlling the domain is called a domain controller. This domain controller is most often a Windows Server system running Microsoft Active Directory (AD).
To access a domain network in Windows 7, go to the Start menu, go to the Computer link on the Start menu, right-click, and select Properties. A Change Settings option opens to a tab that provides a selection that will add the computer to a domain. In Windows 8 and 8.1, use the Search utility to find System. Under the Computer Name, Domain, and Workgroup settings, click Change Settings. Enter the admin password if asked. Click Network ID and follow the steps on the screen. Figure 12-1 shows the dialog box for changing the computer name and joining either a domain or a workgroup.

![]() Activity 12-1: Match Network Type with the Correct Characteristic
Activity 12-1: Match Network Type with the Correct Characteristic
Refer to the Digital Study Guide to complete this activity.
Setting Up Network Shares
Sharing is a way to set up access to resources in a peer-to-peer network. In a domain, shared resources are set at the server level and available only after a user has authenticated to the domain.
To share resources, file and print sharing must be enabled on the computer. In Windows 8, make sure Find Devices and Content is turned on under PC Settings. This can be done in the Network and Sharing Center or the HomeGroup Advanced Settings. After that is accomplished, use Windows Explorer or File Explorer to select a folder or library that needs to be shared, right-click it, and select Share with on the menu.
You can share a folder in several ways in both Windows 7 and 8/8/1: by opening Windows Explorer, right-clicking the folder you want to share, and selecting Share with or Share from the menu. From here, you will see a list of entities to share the folder with, including groups or specific people. To share a folder by using the Windows interface, open Computer Management, select System Tools, then Shared Folders, and then Shares. On the Action menu, select New Share. To use the command line, open a command prompt as administrator and type the following:
net share <sharename=drive:path>
Administrative Shares—Administrative shares, which are also called hidden shares, can be created by adding a dollar sign ($) to the end of the share name. This hides the share from regular users but allows access by administrators. Windows can enable the following hidden administrative shares:
![]() Root partitions or volumes
Root partitions or volumes
![]() The system root folder
The system root folder
![]() The FAX$ share
The FAX$ share
![]() The PRINT$ share
The PRINT$ share
See Figure 12-2 for an example of shared resources and administrative shares, and see Figure 12-3 for an example of sharing resources with HomeGroup.


Permissions—After it is determined which resources will be shared, permissions must be granted to any users given access. To set the permissions on a shared folder, right-click the folder, select Properties > Sharing > Advanced Sharing > Share This folder > Permissions. Figure 12-4 shows the permissions window of a shared folder.

The following are permissions that define the type of access:
![]() Read—View and navigate files and folders, and run program files.
Read—View and navigate files and folders, and run program files.
![]() Change—In addition to Read, users can add files and folders, change data in files, and delete files and folders.
Change—In addition to Read, users can add files and folders, change data in files, and delete files and folders.
![]() Full Control—In addition to Change and Read, users can change the permission of files and folders in an NTFS partition and take ownership.
Full Control—In addition to Change and Read, users can change the permission of files and folders in an NTFS partition and take ownership.
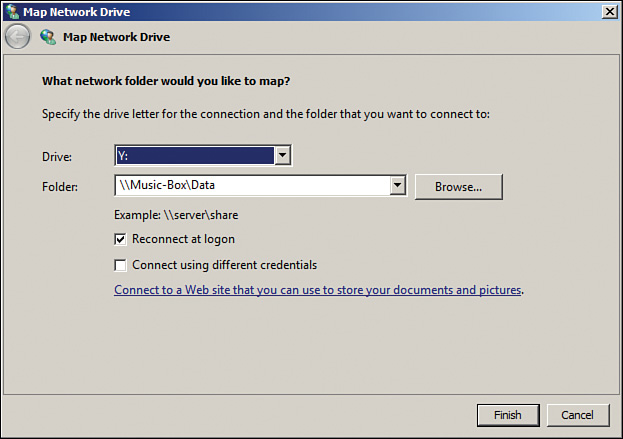
Mapping Drives—Another way to access shared resources on a more permanent basis is to map a network drive. An option exists to allow the local user to map to the drive each time he/she logs in to the machine. Windows/File Explorer then assigns it a drive letter and displays it. To map a drive, right-click on the Computer link, and select Map Network Drive. You can also select the Computer icon from the Start menu and select Map Network Drive. Select a drive letter, type the path to the shared item or select Browse, and then select Reconnect at Logon to make the connection permanent.
In Windows 8/8.1, open the Computer window (navigation pane on the left); then on the Ribbon’s Computer tab, tap or click Map Network Drive. In the drop-down Drive list, select a drive letter. In the Folder box, enter the path of the folder or computer. See Figure 12-5 for a picture of the Map Network Drive window.
You also can map a network drive at the command prompt by using the net use command. Using the command prompt is a little more difficult due to the need for the full uniform naming convention (UNC) path to the share. Open the command prompt by clicking the Start button and typing cmd. Then use the following syntax:
net use x: \computershare
(x represents the drive letter)
If authentication is needed, the user is prompted to input a username and password. After the user reboots, a command-line mapping will only be available if the persistent switch is used (/P:Yes). To make a mapped drive reappear when using the GUI, select Reconnect at Login, as shown in Figure 12-5.
Printer Sharing—A printer that is connected locally can be shared by selecting the printer, right-clicking, selecting Properties, and then selecting the Sharing tab of the printer’s Properties window. The printer must then be given a shared name. Permissions can be assigned in the Security tab of the Properties window. Users and groups can be added with permissions that include printing, managing printers, and managing documents.
Network Printer Mapping—Connecting to a networked printer that is known can be accomplished by typing the name of the printer’s UNC at the Start > search button. It requires knowing the name of the computer hosting the printer and the name of the printer—for example, \print1printername (replace print1 with the name of the host computer and printername with the name of the printer).
You also can go to the Start button and select the Control Panel, click the Hardware and Sound option, and then select Devices and Printers. Click the Add Printer button; select Add a Network, Wireless or Bluetooth Printer; and finally select The Printer That I Want Isn’t Listed. In the next window, enter the full UNC of the printer.
In Windows 8, move the mouse to the right corner, select Search, and enter Control Panel. Go to the Control Panel > Hardware and Sound page, and select Advanced Printer Setup. Click Next when the window pops up to automatically search for printers. In the Select a Shared Printer by Name box enter the full UNC of the printer. If the driver is not detected, the manufacturer and printer type must be known in order to obtain the correct driver.
Establishing Network Connections
There are multiple options for setting up a network connection. The options selected will depend on the type of network connection needed. For example, many times a connection to the Internet can require a different connection type and different security settings than a connection to a remote network or a local area network (LAN) that is trusted.
The Network and Sharing Center provides a method for setting up NICs, protocols, drivers, and network clients and provides tools to accomplish the following: creating a new connection or network, connecting to an existing network, selecting a HomeGroup and sharing options, and troubleshooting network problems.
Before selecting a new connection or network, you need to know what the network is intended to support. The option to set up a new connection or network provides choices for broadband, dial-up, ad hoc, or VPN connections. It is also the place to set up a router or an access point. The four ways provided to set up a connection or network are as follows:
![]() Connect to the Internet—Use wireless broadband or dial-up
Connect to the Internet—Use wireless broadband or dial-up
![]() Set up a new network—Configure a new router or access point
Set up a new network—Configure a new router or access point
![]() Connect to a workplace—Use dial-up or VPN to the workplace
Connect to a workplace—Use dial-up or VPN to the workplace
![]() Set up a dial-up connection—Connect to the Internet using dial-up
Set up a dial-up connection—Connect to the Internet using dial-up
Selecting Change the Adapter Settings takes you to the General tab, which shows you the status of the device, as well as NIC information such as the manufacturer, device type, and location of the card in the PC. It also provides access to items such as the link speed, possible power management, NIC teaming, virtual networks (VLANs), the driver, and many other settings.
Advanced settings provides a method for creating a separate network profile for each type of network you use, such as one for home or work and a different one for public access. Items that can be set are
![]() Network discovery
Network discovery
![]() File and printer sharing
File and printer sharing
![]() Public folder sharing
Public folder sharing
![]() Media streaming
Media streaming
![]() File sharing connections
File sharing connections
![]() Password-protected sharing
Password-protected sharing
For the home and work settings, you also can select how Windows manages connections to other HomeGroup computers.
TCP/IP Settings
For a connection to a LAN, a TCP/IP address and subnet mask are necessary, as well as the name of the workgroup, HomeGroup, or domain. For an Internet or remote connection, additional information is required, such as a gateway address and DNS server information. You can access the TCP/IP settings under the Network and Sharing utility; then select Local Area Network and go to its Properties. Next, select IPv4 or IPv6 from the menu and click Properties. When configuring the IPv4 settings, keep these rules in mind:
![]() IP Address—The network portion of the IP address must match the rest of the computers on the network, and the host portion of the address must be unique.
IP Address—The network portion of the IP address must match the rest of the computers on the network, and the host portion of the address must be unique.
![]() Subnet Mask—This should match the class of the network portion of the IP address.
Subnet Mask—This should match the class of the network portion of the IP address.
![]() DNS Addresses—Two DNS addresses are the norm in case one of them goes down.
DNS Addresses—Two DNS addresses are the norm in case one of them goes down.
![]() Gateway Address—This address is usually the Ethernet connection connecting to the LAN side of the router being used.
Gateway Address—This address is usually the Ethernet connection connecting to the LAN side of the router being used.
Configuring Alternative IP Address—When configuring a computer to obtain an IP address automatically, it will reach out to the nearest DHCP server available and request an address. When this is configured, another tab named Alternate Configuration under the Internet Protocol Version 4 (IPv4) Properties box is automatically added. If the DHCP server is not available or fails to provide an address, the configuration information manually set on the Alternate Configuration tab is automatically used. It is important that the address used be part of the range of addresses the DHCP server usually provides to avoid IP address conflicts.
To set an alternative IP address, go to the Network and Sharing Center; in the Network Connections window, right-click the connection that needs an alternative address and select its Properties. On the Networking tab, scroll down and click Internet Protocol Version 4 (TCP/IPv4). Next, select Properties again. Select the Alternate Configuration tab and then either insert a static IP address or select Automatic Private IP address (APIPA) so the computer can obtain an APIPA (169.254.xxx.xxx) address.
Remote Assistance
Remote Desktop software included with Windows enables a user with administrative privileges to view and control a remote computer. To configure Remote Desktop or Remote Assistance, you must configure the software. For Windows 8, right-click This PC (Windows 8.1) or Computer (Windows 8) and select Properties. Finally, select Allow Remote Assistance Connections to This Computer. For Windows 7, open the System utility by clicking the Start button. Next, right-click the Computer and then go to Properties. In the left pane, click the Remote Settings option and allow the connection.
Remote Assistance—Allowing remote assistance is enabled by default. This means that connections can be made to this computer using a Remote Assistance invitation, by e-mail, or by instant messaging. To use Remote Assistance, the Windows firewall must allow the Remote Desktop Procotol (RDP), which uses TCP port 3389 to pass through the firewall.
Remote Desktop Connection—Select whether other users can connect to or control a computer at any time without an invitation. The following options are available:
![]() Don’t allow connections to this computer
Don’t allow connections to this computer
![]() Allow connections from computers running any version of Remote Desktop
Allow connections from computers running any version of Remote Desktop
![]() Allow connections only from computers running Remote Desktop with Network Level Authentication
Allow connections only from computers running Remote Desktop with Network Level Authentication
The option Don’t Allow Connections is selected by default. An option to select specific users who are allowed access also is available. For the remote user to connect, he/she must have an identical authentication account as the one selected on the computer.
When you are the one making a Remote Desktop connection, you must first ensure that the remote computer has the Remote Desktop program enabled. Then, open the program by typing the word remote in the Search field. Select Remote Desktop Connection. You also can click Start > All Programs > Accessories and then select Remote Desktop Connection. To make the connection, you will need either the remote computer’s name or the TCP/IP address of the remote computer. You also will need a username and password of an account with administrative access on the remote computer.
Proxy Settings
A proxy server allows clients to make connections to outside resources without the client experiencing any risk. Proxy servers can cache website information and provide it to internal clients. With this scenario, the client does not need to ever leave the local network. Proxy servers also can filter web page content. In addition, some proxies allow users to access a site through them to bypass security restrictions.
For a computer to use a proxy, the web browser must be configured. Under the Control Panel, the Internet Options applet can be used for access to the Internet Explorer browser settings, or use the browser itself. Go to the Connections tab and select LAN Settings. Select the option to use a proxy server for the LAN, and then fill in the address of the proxy server. Advanced proxy settings include additional servers to use for different ports and exceptions. If other browsers are installed, they also must be configured to use the proxy server.
Home/Work/Public Settings
The first time a computer is connected to a network it is prompted to choose a network location. This setting automatically sets the appropriate firewall and security settings. You also can go to the Network and Sharing Center by clicking the Start button and then selecting the Control Panel, then scrolling down to Network and Sharing Center for Windows 7/Vista. Use the search box and type network for Windows 8/8.1. The four network locations to choose from are as follows:
![]() Home network—For home networks or where all users are known and trusted.
Home network—For home networks or where all users are known and trusted.
![]() Work network—Network discovery is turned on and other computers and devices are shown; no HomeGroup option.
Work network—Network discovery is turned on and other computers and devices are shown; no HomeGroup option.
![]() Public network—Designed to keep the computer from being visible to other computers and help protect from malicious software. HomeGroup is not available and network discovery is turned off. It is recommended to select this option if connecting to the Internet without a router or if using a mobile broadband connection.
Public network—Designed to keep the computer from being visible to other computers and help protect from malicious software. HomeGroup is not available and network discovery is turned off. It is recommended to select this option if connecting to the Internet without a router or if using a mobile broadband connection.
![]() Domain network—This typically is used for enterprise workplaces. To join a domain, you must know the domain name and have an account on the domain.
Domain network—This typically is used for enterprise workplaces. To join a domain, you must know the domain name and have an account on the domain.
Firewall Settings
Windows Firewall provides protection from network attacks, such as Trojan horses, worms, or any other type of malicious program spread through incoming traffic. The firewall inspects and filters all traffic, determining whether the traffic is allowed or blocked. Traffic must be requested by the host or be specifically allowed before it is permitted to come through.
Two separate types of networks are listed under the firewall: Home or work (private) networks, which is considered private, and Public networks, which means you are on the Internet. You can configure firewall settings for either network type.
Several options are available to provide additional configuration on the left panel:
![]() Allow a Program or Feature Through Windows Firewall—Use this setting to add, change, or remove programs or ports allowed through the firewall.
Allow a Program or Feature Through Windows Firewall—Use this setting to add, change, or remove programs or ports allowed through the firewall.
![]() Change Notification Settings—Use this option to customize the notification settings for the type of network location you use (Home or work [private] networks, or public networks).
Change Notification Settings—Use this option to customize the notification settings for the type of network location you use (Home or work [private] networks, or public networks).
![]() Turn Windows Firewall On or Off—Based on the type of network location used, turn the firewall on or off.
Turn Windows Firewall On or Off—Based on the type of network location used, turn the firewall on or off.
![]() Restore Defaults—Reverts settings back to original default settings.
Restore Defaults—Reverts settings back to original default settings.
![]() Advanced Settings—Use this setting to view, create, or change inbound or outbound rules; set connection security rules; and monitor the firewall.
Advanced Settings—Use this setting to view, create, or change inbound or outbound rules; set connection security rules; and monitor the firewall.
To access the Firewall utility (shown in Figure 12-6), in Windows 7/Vista, open the Control Panel from the Start menu and select Windows Firewall. In Windows 8/8.1, display the Charms bar, click Search, and type Firewall. After the firewall program is selected, use the left panel to change settings or turn the Windows Firewall on or off.

Network Card Settings
Network cards or interfaces are used to connect a computer or device to the local network. Typically, they use Ethernet RJ45 connectors connecting to unshielded twisted pair (UTP) cabling. A network card also can be referred to as a network adapter, network interface controller (NIC), or Ethernet card. Most NICs, even those integrated on the motherboard, have light-emitting diode (LED) lights that will indicate the connectivity status and the activity.
Network connection status and current activity also can be shown in the operating system (OS). On the left panel of the Network and Sharing Center is a Change Adapter Settings option. Double-clicking a connection opens a status window. At the top of the screen are options for disabling, diagnostics, renaming, viewing the status, and changing the settings. Another way to access these settings is to select the Local Area Connection in the Network and Sharing Center and then click Properties. At the top of the Networking tab, select the Configure button to access these configuration options for the NIC:
![]() Properties—Right-clicking a connection or selecting the Local Area Connection in the Network and Sharing Center provides access to the Properties settings. Two tabs display in the resulting windows: Networking and Sharing. At the top of the Networking tab is an option to configure the network card.
Properties—Right-clicking a connection or selecting the Local Area Connection in the Network and Sharing Center provides access to the Properties settings. Two tabs display in the resulting windows: Networking and Sharing. At the top of the Networking tab is an option to configure the network card.
![]() Speed—Also called Link Speed or Link Speed and Duplex Settings depending on the card, the speed status will be shown for the currently selected NIC card. There is also an option for diagnostics, adapter identification, and speed and duplex settings.
Speed—Also called Link Speed or Link Speed and Duplex Settings depending on the card, the speed status will be shown for the currently selected NIC card. There is also an option for diagnostics, adapter identification, and speed and duplex settings.
![]() Half and Full Duplex—By default, most adapters are set to automatically detect and negotiate speed and duplex settings with the switch it is connected to. Full duplex means the network hardware is sending and receiving packets at the same time. Half-duplex means it is not, which results in a much slower connection.
Half and Full Duplex—By default, most adapters are set to automatically detect and negotiate speed and duplex settings with the switch it is connected to. Full duplex means the network hardware is sending and receiving packets at the same time. Half-duplex means it is not, which results in a much slower connection.
![]() Wake-On-LAN—A protocol that can wake up a computer from a sleep power state, it does not work on all network cards. Wake-on-LAN must be enabled in the BIOS and NIC configuration. Wake on Magic Packet, Wake from Shutdown, or something similar should be enabled. Configure the NIC card to use the Power Management settings. The motherboard should be hooked up to an ATX-compatible power supply. Note that some expansion slot NIC cards need a 3-pin cable attached to the motherboard to get this feature to work.
Wake-On-LAN—A protocol that can wake up a computer from a sleep power state, it does not work on all network cards. Wake-on-LAN must be enabled in the BIOS and NIC configuration. Wake on Magic Packet, Wake from Shutdown, or something similar should be enabled. Configure the NIC card to use the Power Management settings. The motherboard should be hooked up to an ATX-compatible power supply. Note that some expansion slot NIC cards need a 3-pin cable attached to the motherboard to get this feature to work.
![]() QoS—A method for controlling traffic by setting the traffic priority based on port numbers over the network, which can help when a bottleneck occurs. Prioritizing which traffic is more important makes a difference in speed.
QoS—A method for controlling traffic by setting the traffic priority based on port numbers over the network, which can help when a bottleneck occurs. Prioritizing which traffic is more important makes a difference in speed.
Preventive Maintenance Procedures
Protecting data from loss means preventive maintenance procedures are a critical part of technical support. The most important and expensive part of a computer is the data it holds. Protecting it should be the number-one priority when working on computers.
Best Practices
The best maintenance plans include regularly scheduled maintenance procedures. How often should a business or user use maintenance tools? It depends on the business requirements. In some cases, backing up data several times a day is critical. In other cases, backing up daily is enough. Many times there are no hard and fast rules about when to perform the maintenance, and in these cases, common sense is the only guide. There are tools and even some activities that can be done to implement good maintenance practices and extended the lifespan of the computer, such as:
![]() Turn off the computer when not in use.
Turn off the computer when not in use.
![]() Test the backup with a restore once a month.
Test the backup with a restore once a month.
![]() Plan, test, implement, and audit all patches and Windows updates.
Plan, test, implement, and audit all patches and Windows updates.
![]() Clean out the computer with forced air once a year.
Clean out the computer with forced air once a year.
Performing scheduled data backups should vary based on the organizational needs. Performing a complete system backup should be completed whenever a major change has been made to the configuration of the computer. Other backup methods are available and can be scheduled as needed.
For scheduled disk maintenance, use the computer’s system tools to run the hard drive cleanup tool every three months. If you are not using a solid state drive, defrag the drive once a month, and be sure to scan for malware weekly.
Setting Windows Updates to automatic ensures that the computer will get the update immediately after it is available. Important updates should be mandatory. Recommended updates are those that address noncritical problems and can be installed automatically. Optional updates are installed manually, and you can install individual updates directly from the Microsoft website.
To access the Windows Update program in Windows 7, go to the Start button and select the Control Panel. Select Windows Update. From here, you can see whether any updates are waiting to be installed. You also can check for updates, change the update settings, view the update history, and restore hidden updates. In Vista, go to Start > All Programs > Windows Update.
In Windows 8/8.1, you can access the Windows Update program by moving the mouse to the bottom-right side of the screen. Use the Search feature to open the Control Panel. Select System and Security from the Control Panel, and access the Windows Update option. In addition, you can get to the updates by searching for settings and then selecting Change PC settings. Next, click Update and Recovery, and then click Windows Update.
Organizations might need to update many systems, which is best controlled from a central location. Servers with System Center Configuration Manager (SCCM) or Windows Server Update Services (WSUS) can be configured to test updates before pushing them out to users.
Driver and firmware updates are optional and should be performed only when the situation calls for it or additional functionality is needed.
Settings for antivirus software should be set to automatic and be implemented immediately upon receipt. Antivirus software should be set to run daily. Anti-malware software, on the other hand, should be set to run at least once a week.
To keep a system performing at peak efficiency, periodic maintenance on drives is necessary. Tools include disk check, disk defrag, and disk cleanup. Windows provides options to schedule these tasks at regular intervals:
![]() Disk Check—Disk errors like bad sectors, cross-linked files, and directory errors can be fixed.
Disk Check—Disk errors like bad sectors, cross-linked files, and directory errors can be fixed.
![]() Disk Defrag—Periodically moving files into a single location can increase the performance on mechanical drives.
Disk Defrag—Periodically moving files into a single location can increase the performance on mechanical drives.
![]() Disk Cleanup—Removes temporary and unused files on the disk and deletes them to free up space.
Disk Cleanup—Removes temporary and unused files on the disk and deletes them to free up space.
Backup and Restoration Tools
Part of the system maintenance for a computer is backing up system and data files in case something happens to the hard drive. It is important that the backup strategy used matches how the computer is used and the importance of the data.
Individual files and folders—and even entire systems—can be backed up to another drive, optical disks, tape, or the cloud. Each version of Windows covered in the 220-902 exam has its own backup utility:
![]() Vista—Backup Status and Configuration can back up individual files or an entire image of the system using the Complete PC Backup option.
Vista—Backup Status and Configuration can back up individual files or an entire image of the system using the Complete PC Backup option.
![]() Windows 7—The Backup and Restore utility in Windows 7 provides options for backing up data files and restoring them. Backups can be scheduled to run automatically, with the contents manually changed when desired. The default setting is to run a backup once each month.
Windows 7—The Backup and Restore utility in Windows 7 provides options for backing up data files and restoring them. Backups can be scheduled to run automatically, with the contents manually changed when desired. The default setting is to run a backup once each month.
An option is available to create a system image, which is an exact duplicate of the entire drive(s) holding the Windows OS. It can be used to restore your computer if the hard drive stops working. You also can select an option to create a system repair disk that can be used to boot your computer. It contains Windows system recovery tools that can help recover from a severe system error.
![]() Windows 8/8.1—File History is located under the Control Panel. With Windows 7, you could back up any files on the computer and create full system images used to restore the computer. In Windows 8, you can no longer create full system images or back up anything you choose from your hard drive. By default, File History will select Libraries, Desktop, Contacts, and Favorites. File History can be turned off. Another aspect of this utility is that you are restricted from using an internal drive for backups, so you will need an external or network location. File History is designed to back up on a continuous basis to build a history of your files over time. This allows the recovery of a specific version of a file.
Windows 8/8.1—File History is located under the Control Panel. With Windows 7, you could back up any files on the computer and create full system images used to restore the computer. In Windows 8, you can no longer create full system images or back up anything you choose from your hard drive. By default, File History will select Libraries, Desktop, Contacts, and Favorites. File History can be turned off. Another aspect of this utility is that you are restricted from using an internal drive for backups, so you will need an external or network location. File History is designed to back up on a continuous basis to build a history of your files over time. This allows the recovery of a specific version of a file.
![]() System Restore—This provides a method to revert back to an earlier point in time and reverse registry changes, driver and software updates, or any major changes to the OS. Restore points are created automatically but can be created manually. To work with System Restore in Windows 7/Vista, select the Configure button on the System Protection tab of the System Properties dialog box for the computer.
System Restore—This provides a method to revert back to an earlier point in time and reverse registry changes, driver and software updates, or any major changes to the OS. Restore points are created automatically but can be created manually. To work with System Restore in Windows 7/Vista, select the Configure button on the System Protection tab of the System Properties dialog box for the computer.
In Windows 8, use the Search utility to go to the Control Panel > System and Security > System Protection. You can configure restore settings, manage disk space, and delete restore points. You also can access the System Restore to revert the computer to a previous point in time.
![]() Recovery Environment (Windows RE)—This is a set of tools designed to recover from errors that prevent Windows from booting. In Windows 8, it is accessed through the Boot Options menu. To reach this menu, right-click the Start button, select Shut Down or Sign Out, hold the Shift key, and select Restart. Additionally, Windows RE can be selected from the Charms bar under Settings/Change PC Settings/General and then under Advanced Startup.
Recovery Environment (Windows RE)—This is a set of tools designed to recover from errors that prevent Windows from booting. In Windows 8, it is accessed through the Boot Options menu. To reach this menu, right-click the Start button, select Shut Down or Sign Out, hold the Shift key, and select Restart. Additionally, Windows RE can be selected from the Charms bar under Settings/Change PC Settings/General and then under Advanced Startup.
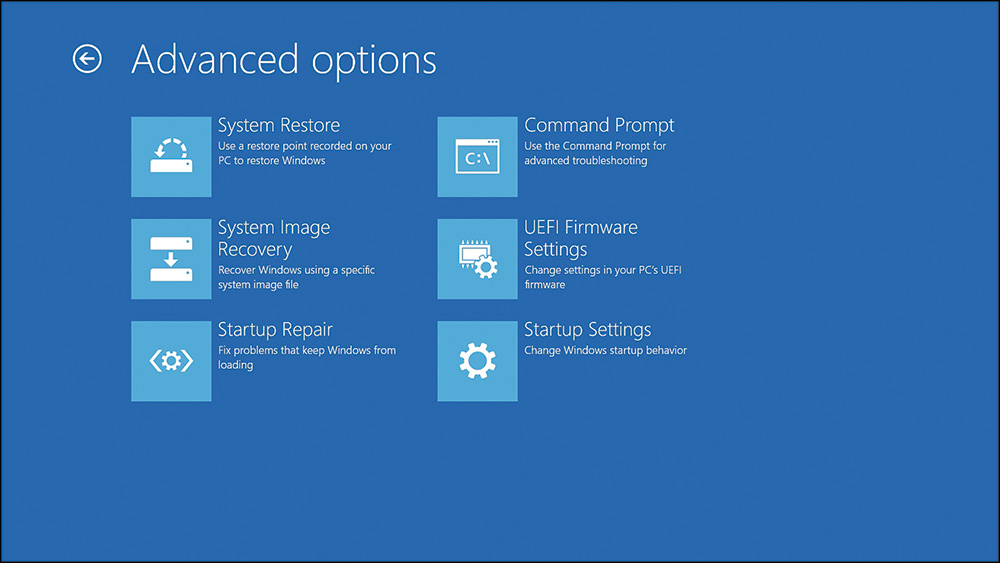
Select one of the Windows 8 troubleshooting options:
![]() Refresh Your PC—Saves personal files, removes all programs installed to the desktop, and resets PC settings
Refresh Your PC—Saves personal files, removes all programs installed to the desktop, and resets PC settings
![]() Reset Your PC—Removes all files and performs a factory reset
Reset Your PC—Removes all files and performs a factory reset
![]() Advanced Options—Provides access to tools that technicians use to troubleshoot the computer
Advanced Options—Provides access to tools that technicians use to troubleshoot the computer
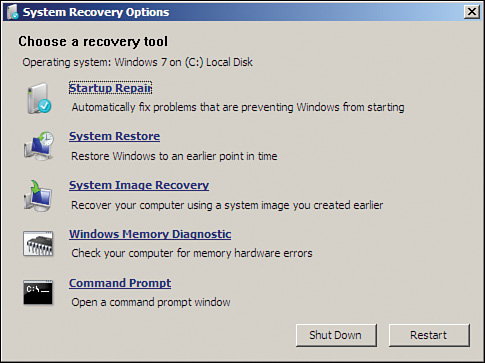
For Windows 7 and Vista, you can press F8 during bootup, boot to the installation media, boot to a reserved partition on the hard drive, boot to a previously created Windows RE media, or use a recovery media that comes from the PC manufacturer. When booting to the installation media, select the Language Settings and then select Repair Your Computer. Select the Use Recovery Tools button, and then select from the following options:
![]() Startup Repair—Automatically fixes problems such as missing or damaged system files
Startup Repair—Automatically fixes problems such as missing or damaged system files
![]() System Restore—Restores system files to an earlier point in time and has no effect on data files
System Restore—Restores system files to an earlier point in time and has no effect on data files
![]() System Image Recovery—Restores a hard drive from a backup in select versions of Windows
System Image Recovery—Restores a hard drive from a backup in select versions of Windows
![]() Windows Memory Diagnostic—Scans memory for errors
Windows Memory Diagnostic—Scans memory for errors
![]() Command Prompt—Performs operations and runs command-line tools for diagnosing and troubleshooting
Command Prompt—Performs operations and runs command-line tools for diagnosing and troubleshooting
In Windows 7 and Vista, the Advanced Boot Options menu is accessed by pressing the F8 key after the computer starts. The following options are included:
![]() Safe Mode—Minimal set of drivers.
Safe Mode—Minimal set of drivers.
![]() Safe Mode with Networking—Minimal set of drivers and network support.
Safe Mode with Networking—Minimal set of drivers and network support.
![]() Safe Mode with command prompt—Starts with a minimal set of drivers with no graphical user interface (GUI).
Safe Mode with command prompt—Starts with a minimal set of drivers with no graphical user interface (GUI).
![]() Enable Boot Logging—Creates the ntbtlog.txt file.
Enable Boot Logging—Creates the ntbtlog.txt file.
![]() Enable Low-resolution Video (640×480)—Standard VGA driver.
Enable Low-resolution Video (640×480)—Standard VGA driver.
![]() Last Known Good Configuration—Last configuration known to work. If a login occurs after the problem, this option will not provide a viable return to the last working configuration.
Last Known Good Configuration—Last configuration known to work. If a login occurs after the problem, this option will not provide a viable return to the last working configuration.
![]() Directory Services Restore Mode—Used to restore a domain controller’s Active Directory.
Directory Services Restore Mode—Used to restore a domain controller’s Active Directory.
![]() Debugging Mode—Use the debug program on the system kernel.
Debugging Mode—Use the debug program on the system kernel.
![]() Disable Automatic Restart on System Failure—Prevents Windows from automatically restarting if an error causes Windows to fail.
Disable Automatic Restart on System Failure—Prevents Windows from automatically restarting if an error causes Windows to fail.
![]() Disable Driver Signature Enforcement—Enables drivers without proper signatures to be installed.
Disable Driver Signature Enforcement—Enables drivers without proper signatures to be installed.
![]() Start Windows Normally—Boots to regular Windows and ignores advanced settings.
Start Windows Normally—Boots to regular Windows and ignores advanced settings.
![]() Disable Early Launch Antimalware Protection (Windows 8 only)—Used to diagnose and fix systems attacked by a rootkit.
Disable Early Launch Antimalware Protection (Windows 8 only)—Used to diagnose and fix systems attacked by a rootkit.
In Windows 8, it is more complicated. The F8 key still might work, but if the system uses the Unified Extensible Firmware Interface (UEFI), the F8 option might be disabled. To enable the Advanced Boot in Windows 8, type the following at the command prompt:
bcedit /set {default} bootmenupolicy legacy
Use the System Configuration Tool (msconfig), and select the Boot tab. Select Safe boot and then restart the computer.
![]() Activity 12-2: Match the Recovery Tool with the Correct Description
Activity 12-2: Match the Recovery Tool with the Correct Description
Refer to the Digital Study Guide to complete this activity.
Study Resources
For today’s exam topics, refer to the following resources for more study.
