
14
Cryptography
I carry my unwritten poems in cipher on my face!
—George Eliot
This chapter introduces you to algorithms related to cryptography. We will start by presenting the background, then we will discuss symmetric encryption algorithms. We will then explain the Message-Digest 5 (MD5) algorithm and the Secure Hash Algorithm (SHA) and present the limitations and weaknesses of symmetric algorithms. Next, we will discuss asymmetric encryption algorithms and how they are used to create digital certificates. Finally, we will present a practical example that summarizes all of these techniques.
By the end of this chapter, you will have a basic understanding of various issues related to cryptography.
The following topics are discussed in this chapter:
- Introduction to cryptography
- Understanding the types of cryptography techniques
- Example – security concerns when deploying a machine learning model
Let’s start by looking at the basic concepts.
Introduction to cryptography
Techniques to protect secrets have been around for centuries. The earliest attempts to secure and hide data from adversaries date back to ancient inscriptions discovered on monuments in Egypt, where a special alphabet that was known by only a few trusted people was used. This early form of security is called obscurity and is still used in different forms today. In order for this method to work, it is critical to protect the secret, which would be the secret meaning of the alphabet in the above example. Later in time, finding foolproof ways of protecting important messages was important in both World War One and World War Two. In the late 20th century, with the introduction of electronics and computers, sophisticated algorithms were developed to secure data, giving rise to a whole new field called cryptography. This chapter discusses the algorithmic aspects of cryptography. One of the uses of these algorithms is to allow secure data exchange between two processes or users. Cryptographic algorithms find strategies for using mathematical functions to ensure the stated security goals.
First, we will look at the importance of “the weakest link” in the infrastructure.
Understanding the importance of the weakest link
Sometimes, when architecting the security of digital infrastructure, we put too much emphasis on the security of individual entities and don’t pay the necessary attention to end-to-end security. This can result in us overlooking some loopholes and vulnerabilities in the system, which can later be exploited by hackers to access sensitive data. The important point to remember is that a digital infrastructure, as a whole, is only as strong as its weakest link. For a hacker, this weakest link can provide backdoor access to sensitive data in the digital infrastructure. Beyond a certain point, there is not much benefit in fortifying the front door without closing all the back doors.
As the algorithms and techniques for keeping digital infrastructure become more and more sophisticated, attackers keep upgrading their techniques as well. It is always important to remember that one of the easiest ways for attackers to hack digital infrastructure is by exploiting these vulnerabilities to access sensitive information.
In 2014, a cyber attack on a Canadian federal research institute—the National Research Council (NRC)—is estimated to have cost hundreds of millions of dollars. The attackers were able to steal decades of research data and intellectual property material. They used a loophole in the Apache software that was used on the web servers to gain access to the sensitive data.
In this chapter, we will highlight the vulnerabilities of various encryption algorithms.
Let’s first look at the basic terminology used.
The basic terminology
Let’s look at the basic terminology related to cryptography:
- Cipher: An algorithm that performs a particular cryptographic function.
- Plain text: The plain data, which can be a text file, a video, a bitmap, or a digitized voice. In this chapter, we will represent plain text as P.
- Cipher text: The scrambled text that is obtained after applying cryptography to the plain text. In this chapter, we will represent this as C.
- Cipher suite: A set or suite of cryptographic software components. When two separate nodes want to exchange messages using cryptography, they first need to agree on a cipher suite. This is important in ensuring that they use exactly the same implementation of the cryptographic functions.
- Encryption: The process of converting plain text, P, into cipher text, C, is called encryption. Mathematically, it is represented by encrypt(P) = C.
- Decryption: The process of converting cipher text back into plain text. Mathematically, it is represented by decrypt(C) = P.
- Cryptanalysis: The methods used to analyze the strength of cryptographic algorithms. The analyst tries to recover the plain text without access to the secret.
- Personally Identifiable Information (PII): PII is information that can be used to trace an individual’s identity when used alone or with other relevant data. Some examples include protected information, such as a social security number, date of birth, or mother’s maiden name.
Let us first understand the security needs of a system.
Understanding the security requirements
It is important to first understand the exact security needs of a system. Understanding this will help us use the correct cryptographic technique and discover the potential loopholes in a system.
One way of developing a better understanding of the security needs of a system is by answering the following four questions:
- Which individuals or processes need to be protected?
- Who are we protecting the individuals and processes from?
- Where should we protect them?
- Why are we protecting them?
Let us take the example of a Virtual Private Cloud (VPC) in the AWS cloud. A VPC allows us to create a logical isolation network where resources like virtual machines are added to it. In order to understand the security requirements of a VPC, it is important to first identify the identities by answering those four questions:
- How many individuals are planning to use this system?
- What sort of information needs to be protected?
- Should we protect the VPC only, or we are passing a message to the system that needs to be encrypted and communicated to the VPC?
- What is the security classification of the data? What are the potential risks? Why would anyone have an incentive to try to hack the system?
Most of the answers to these questions will come by performing the following three steps:
- Identify the entities.
- Establish the security goals.
- Understand the sensitivity of the data.
Let’s look at these steps one by one.
Step 1: Identifying the entities
An entity can be defined as an individual, a process, or a resource that is part of an information system. We first need to identify how users, resources, and processes are present at runtime. Then, we will quantify the security needs of these identified entities, either individually or as a group.
Once we better understand these requirements, we can establish the security goals of our digital system.
Step 2: Establishing the security goals
The goal of designing a security system is to protect information from being stolen, compromised, or attacked. Cryptographic algorithms are typically used to meet one or more security goals:
- Authentication: Authentication is a mechanism by which we ascertain the identity of a user, device, or system, confirming that they are indeed what or who they claim to be.
- Authorization: Authorization is the process of giving the user permission to access a specific resource or function.
- Confidentiality: Data that needs to be protected is called sensitive data. Confidentiality is the concept of restricting sensitive data to authorized users only. To protect the confidentiality of sensitive data during its transit or in storage, you need to render the data so that it is unreadable except by authorized users. This is accomplished by using encryption algorithms, which we will discuss later on in this chapter.
- Integrity: Integrity is the process of establishing that data has not been altered in any way during its transit or storage. For example, TCP/IP (Transmission Control Protocol/Internet Protocol) uses checksum or Cyclic Redundancy Check (CRC) algorithms to verify data integrity.
- Non-repudiation: Non-repudiation is the ability to produce unforgeable and irrefutable evidence that a message was sent or received. This evidence can be used later to prove the receipt of data.
Step 3: Understanding the sensitivity of the data
It is important to understand the classified nature of data. Data is categorized by regulatory authorities such as governments, agencies, or organizations based on how serious the consequence will be if it is compromised. The categorization of the data helps us choose the correct cryptographic algorithm. There is more than one way to categorize data, based on the sensitivity of the information it contains. Let’s look at the typical ways of classifying data:
- Public data or unclassified data: Anything that is available for consumption to the public, for example, information found on a company’s website or a government’s info portal.
- Internal data or confidential data: Although not for public consumption, exposing this data to the public may not have damaging consequences. For example, if an employee’s emails complaining about their manager are exposed, it may be embarrassing for the company but this may not have damaging consequences.
- Sensitive data or secret data: Data that is not supposed to be for public consumption and exposing it to the public could have damaging consequences for an individual or an organization. For example, leaking the details of a future iPhone may harm Apple’s business goals and could give an advantage to rivals, such as Samsung.
- Highly sensitive data: Also called top-secret data. This is information that, if disclosed, would be extremely damaging to the organization. Examples of highly sensitive data include proprietary research, strategic business plans, or internal financial data.
Top-secret data is protected through multiple layers of security and requires special permission to access it.
In general, more sophisticated security designs are much slower than simple algorithms. It is important to strike the right balance between the security and the performance of the system.
Understanding the basic design of ciphers
Designing ciphers is about coming up with an algorithm that can scramble sensitive data so that a malicious process or an unauthorized user cannot access it. Although, over time, ciphers have become more and more sophisticated, the underlying principles that ciphers are based on remain unchanged.
Let’s start by looking at some relatively simple ciphers that will help us understand the underlying principles that are used in the design of cryptographic algorithms.
Presenting substitution ciphers
Substitution ciphers have been in use for hundreds of years in various forms. As the name indicates, substitution ciphers are based on a simple concept—substituting characters in plain text with other characters in a predetermined, organized way.
Let’s look at the exact steps involved in this:
- First, we map each character to a substitute character.
- Then, we encode and convert the plain text into cipher text by replacing each character in the plain text with another character in the cipher text using substitution mapping.
- To decode, we bring back the plaintext by using substitution mapping.
The following are examples of substitution-based ciphers:
- Caesar cipher
- Rotation 13
Let us look into them in more detail.
Caesar cipher
Caesar ciphers are based on substitution mapping. Substitution mapping changes the actual string in a deterministic way by applying a simple formula that is kept secret.
The substitution mapping is created by replacing each character with the third character to the right of it. This mapping is described in the following diagram:

Figure 13.1: The substitution mapping of Caesar ciphers
Let’s see how we can implement a Caesar cipher using Python:
rotation = 3
P = 'CALM'; C=''
for letter in P:
    C = C+ (chr(ord(letter) + rotation))
We can see that we applied a Caesar cipher to the plaintext CALM.
Let’s print the cipher text after encrypting it with the Caesar cipher:
print(C)
FDOP
Caesar ciphers are said to have been used by Julius Caesar to communicate with his advisers.
A Caesar cipher is a simple cipher and is easy to implement. The downside is that it is not too difficult to crack as a hacker could simply iterate through all the possible shifts of the alphabet (all 2626 of them) and see if any coherent message appears. Given the current processing abilities of computers, this is a relatively small number of combinations to do. It should not be used to protect highly sensitive data.
Rotation 13 (ROT13)
ROT13 is a special case of the Caesar cipher where the substitution mapping is created by replacing each character with the 13th character to the right of it. The following diagram illustrates this:
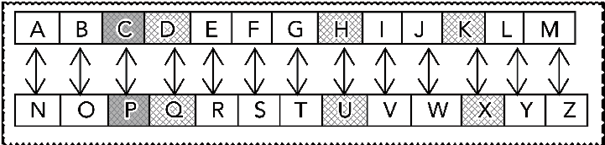
Figure 14.2: Workings of ROT13
This means that if ROT13() is the function that implements ROT13, then the following applies:
rotation = 13
P = 'CALM'; C=''
for letter in P:
    C = C+ (chr(ord(letter) + rotation))
Now, let’s print the encoded value of C:
print(c)
PNYZ
ROT13 is actually not used to accomplish data confidentiality. It is used more to mask text, for example, to hide potentially offensive text. It can also be used to avoid giving away the answer to a puzzle, and in other similar use-cases.
Cryptanalysis of substitution ciphers
Substitution ciphers are simple to implement and understand. Unfortunately, they are also easy to crack. Simple cryptanalysis of substitution ciphers shows that if we use the English language alphabet, then all we need to determine to crack the cipher is how much we are rotating by. We can try each letter of the English alphabet one by one until we are able to decrypt the text. This means that it will take around 25 attempts to reconstruct the plain text.
Now, let’s look at another type of simple cipher—transposition ciphers.
Understanding transposition ciphers
In transposition ciphers, the characters of the plain text are encrypted using transposition. Transposition is a method of encryption where we scramble the position of the characters using deterministic logic. A transposition cipher writes characters into rows in a matrix and then reads the columns as output. Let’s look at an example.
Let’s take the Ottawa Rocks plain text (P).
First, let’s encode P. For that, we will use a 3 x 4 matrix and write in the plaintext horizontally:
|
O |
t |
t |
a |
|
w |
a |
R |
o |
|
c |
k |
s |
The read process will read the string vertically, which will generate the cipher text—OwctaktRsao. The key would be {1,2,3,4}, which is the order in which the columns are read. Encrypting with a different key, say, {2,4,3,1}, would result in a different cipher text, in this case, takaotRsOwc.
The Germans used a cipher named ADFGVX in the First World War, which used both transposition and substitution ciphers. Years later, it was cracked by George Painvin.
So, these are some of the types of ciphers. In general, ciphers use a key to code plain text. Now, let’s look at some of the cryptographic techniques that are currently used. Cryptography protects a message using encryption and decryption processes, as discussed in the next section.
Understanding the types of cryptographic techniques
Different types of cryptographic techniques use different types of algorithms and are used under different sets of circumstances. As different situations and use-cases have different requirements of security based on the business requirements and the data classification, the selection of the right technique is important for a well-designed architecture.
Broadly, cryptographic techniques can be divided into the following three types:
- Hashing
- Symmetric
- Asymmetric
Let’s look at them one by one.
Using the cryptographic hash function
The cryptographic hash function is a mathematical algorithm that can be used to create a unique fingerprint of a message. It creates an output, called a hash, from plain text. The size of the output is usually fixed but can vary for some specialized algorithms.
Mathematically, this looks as follows:
C1 = hashFunction(P1)
This is explained as follows:
- P1 is the plain text representing the input data
- C1 is a fixed-length hash that is generated by the cryptographic hash function
This is shown in the following diagram. The variable-length data is converted into a fixed-length hash through a one-way hash function:

Figure 14.3: One-way hash functions
A hash function is a mathematical algorithm that transforms an arbitrary amount of data into a fixed-size string of bytes. It plays a vital role in ensuring the integrity and authenticity of data. Below are the key characteristics that define a cryptographic hash function:
- Deterministic: A hash function is deterministic, meaning that the same input (or “plaintext”) will always produce the same output (or “hash”). No matter how many times you hash a particular piece of data, the result will remain consistent.
- Uniqueness: Ideally, different inputs should always produce unique hash outputs. If two distinct inputs produce the same hash, this is known as a collision. Quality hash functions are designed to minimize the likelihood of collisions.
- Fixed length: The output of a hash function has a fixed length, regardless of the size of the input data. Whether you’re hashing a single character or an entire novel, the resulting hash will be of the same size, specific to the hash algorithm used (e.g., 128 bits for MD5, 256 bits for SHA-256).
- Sensitive to input changes: Even a minor alteration in the plaintext leads to a significant and unpredictable change in the resulting hash value. This property ensures that it is not feasible to derive the original input or find a different input that produces the same hash, enhancing the security of the hash function. The effect is such that even changing a single letter in a large document will result in a hash that appears entirely different from the original.
- One-way function: Hash functions are one-way, meaning that it is computationally infeasible to reverse the process and generate the original plaintext (P1) from the hash (C1). This ensures that even if an unauthorized party obtains the hash, they cannot use it to determine the original data.
If we have a situation where each unique message does not have a unique hash, we call it a collision. In other words, a collision is when the hash algorithm produces the same hash value for two different input values. For security applications, a collision is a potential vulnerability and its probability should be very low. That is, if we have two texts, P1 and P2, in the case of collision, it means hashFunction(P1) = hashFunction(P2).
Regardless of the hashing algorithm used, collisions are rare. Otherwise, hashing wouldn’t be useful. However, for some applications, collisions cannot be tolerated. In those cases, we need to use a hashing algorithm that is more complex but much less likely to generate hash values that collide.
Implementing cryptographic hash functions
Cryptographic hash functions can be implemented by using various algorithms. Let’s take a deeper look at two of them:
- MD5
- Secure Hashing Algorithm (SHA)
Understanding MD5-tolerated
MD5 was developed by Poul-Henning Kamp in 1994 to replace MD4. It generates a 128-bit hash. Generating a 128-bit hash means that the resulting hash value is made up of 128 binary digits (bits).
This translates to a fixed length of 16 bytes or 32 hexadecimal characters. The fixed length ensures that no matter the size of the original data, the hash will always be 128 bits long. The purpose of this fixed-length output is to create a “fingerprint” or “digest” of the original data. MD5 is a relatively simple algorithm that is vulnerable to collision. In applications where a collision cannot be tolerated, MD5 should not be used. For example, it can be used to check the integrity of files downloaded from the internet.
Let’s look at an example. In order to generate an MD5 hash in Python, we will start by using the hashlib module, which is part of the Python Standard Library and provides a range of different cryptographic hashing algorithms:
import hashlib
Next, we define a utility function called generate_md5_hash(), which takes input_string as a parameter. This string will be hashed by the function:
def generate_md5_hash(input_string):
    # Create a new md5 hash object
    md5_hash = hashlib.md5()
    # Encode the input string to bytes and hash it
    md5_hash.update(input_string.encode())
    # Return the hexadecimal representation of the hash
    return md5_hash.hexdigest()
Note that hashlib.md5() creates a new hash object. This object uses the MD5 algorithm and md5_hash.update(input_string.encode()) updates the hash object with the bytes of the input string. The string is encoded to bytes using the default UTF-8 encoding. After all data has been updated in the hash object, we can call the hexdigest() method to return the hexadecimal representation of the digest. This is the MD5 hash of the input string.
Here we use the generate_md5_hash() function to get the MD5 hash of the string "Hello, World!", and print the result to the console:
def verify_md5_hash(input_string, correct_hash):
    # Generate md5 hash for the input_string
    computed_hash = generate_md5_hash(input_string)
    # Compare the computed hash with the provided hash
    return computed_hash == correct_hash
# Test
input_string = "Hello, World!"
hash_value = generate_md5_hash(input_string)
print(f"Generated hash: {hash_value}")
correct_hash = hash_value
print(verify_md5_hash(input_string, correct_hash))# This should return True
Generated hash: 65a8e27d8879283831b664bd8b7f0ad4
True
In the verify_md5_hash function, we take an input string and a known correct MD5 hash. We generate the MD5 hash of the input string using our generate_md5_hash function and then compare it to the known correct hash.
When to use MD5
Looking back at history, weaknesses with MD5 were discovered in the late 1990s. Despite several issues, MD5 usage is still popular. It is ideal to be used for integrity checks for data. Note that the MD5 message digest does not uniquely associate the hash with its owner as the MD5 digest is not a signed hash. MD5 is used to prove that a file has not been changed since the hash was computed. It is not used to prove the authenticity of a file. Now, let’s look at another hashing algorithm—SHA.
Understanding Secure Hashing Algorithm (SHA)
SHA was developed by the National Institute of Standards and Technology (NIST). It’s widely used to verify the integrity of data. Among its variations, SHA-512 is a popular hash function, and Python’s hashlib library includes it. Let’s see how we can use Python to create a hash using the SHA algorithm. For that, let us first import the hashlib library:
import hashlib
Then we will define the salt and the message. Salting is the practice of adding random characters to a password before hashing. It enhances security by making hash collisions more challenging:
salt = "qIo0foX5"
password = "myPassword"
Next, we will combine the salt with the password to apply the salting procedure:
salted_password = salt + password
Then, we will use the sha512 function to create a hash of the salted password:
sha512_hash = hashlib.sha512()
sha512_hash.update(salted_password.encode())
myHash = sha512_hash.hexdigest()
Let us print myHash:
myHash
2e367911b87b12f73b135b1a4af9fac193a8064d3c0a52e34b3a52a5422beed2b6276eabf9
5abe728f91ba61ef93175e5bac9a643b54967363ffab0b35133563
Note that when we use the SHA algorithm, the hash generated is 512 bytes. This specific size isn’t arbitrary, but rather a key component of the algorithm’s security features. A larger hash size corresponds to an increased number of potential combinations, thereby reducing the chances of “collisions”—instances where two different inputs produce the same hash output. Collisions compromise the reliability of a hashing algorithm, and SHA-512’s 512-byte output significantly reduces this risk.
An application of the cryptographic hash function
Hash functions are used to check the integrity of a file after making a copy of it. To achieve this, when a file is copied from a source to a destination (for example, when downloaded from a web server), a corresponding hash is also copied with it. This original hash, horiginal, acts as a fingerprint of the original file. After copying the file, we generate the hash again from the copied version of the file—that is, hcopied. If horiginal = hcopied—that is, the generated hash matches the original hash—this verifies that the file has not changed and none of the data was lost during the download process. We can use any cryptographic hash function, such as MD5 or SHA, to generate a hash for this purpose.
Choosing between MD5 and SHA
Both MD5 and SHA are hashing algorithms. MD5 is simple and fast, but it does not provide good security. SHA is complex compared to MD5 and it provides a greater level of security.
Now, let’s look at symmetric encryption.
Using symmetric encryption
In cryptography, a key is a combination of numbers that is used to encode plain text using an algorithm of our choice. In symmetric encryption, we use the same key for encryption and decryption. If the key used for symmetric encryption is K, then for symmetric encryption, the following equation holds:
EK(P) = C
Here, P is the plain text and C is the cipher text.
For decryption, we use the same key, K, to convert it back to P:
DK(C) = P
This process is shown in the following diagram:
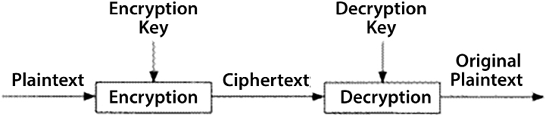
Figure 14.4: Symmetric encryption
Now, let’s look at how we can use symmetric encryption with Python.
Coding symmetric encryption
In this section, we’ll explore how to work with hash functions using Python’s built-in hashlib library. hashlib comes pre-installed with Python and provides a wide array of hashing algorithms. First, let us import the hashlib library:
import hashlib
We’ll use the SHA-256 algorithm to create our hash. Other algorithms like MD5, SHA-1, etc., can also be used:
sha256_hash = hashlib.sha256()
Let’s create a hash for the message "Ottawa is really cold":
message = "Ottawa is really cold".encode()
sha256_hash.update(message)
The hexadecimal representation of the hash can be printed with:
print(sha256_hash.hexdigest())
b6ee63a201c4505f1f50ff92b7fe9d9e881b57292c00a3244008b76d0e026161
Let’s look at some of the advantages of symmetric encryption.
The advantages of symmetric encryption
The following are the advantages of symmetric encryption:
- Simple: Encryption and decryption using symmetric encryption are simpler to implement.
- Fast: Symmetric encryption is faster than asymmetric encryption.
- Secure: One of the most widely used symmetric key encryption systems is the U.S. government-designated Advanced Encryption Standard (AES). When using a secure algorithm such as AES, symmetric encryption is at least as secure as asymmetric encryption.
The problems with symmetric encryption
When two users or processes plan to use symmetric encryption to communicate, they need to exchange keys using a secure channel. This gives rise to the following two problems:
- Key protection: How to protect the symmetric encryption key
- Key distribution: How to share the symmetric encryption key from the source to the destination
Now, let’s look at asymmetric encryption.
Asymmetric encryption
In the 1970s, asymmetric encryption was devised to address some of the weaknesses of symmetric encryption that we discussed in the previous section.
The first step in asymmetric encryption is to generate two different keys that look totally different but are algorithmically related. One of them is chosen as the private key, Kpr, and the other one is chosen as the public key, Kpu. The choice of which one of the two keys is public or private is arbitrary. Mathematically, we can represent this as follows:
EKpr(P) = C
Here, P is the plain text and C is the cipher text.
We can decrypt it as follows:
DKpu(C) = P
Public keys are supposed to be freely distributed and private keys are kept secret by the owner of the key pair. For instance, in AWS, key pairs are used to secure connections to virtual instances and manage encrypted resources. The public key is used by others to encrypt data or verify signatures, while the private key, securely stored by the owner, is used to decrypt data or sign digital content. By adhering to the principle of keeping the private key secret and the public key accessible, AWS users can ensure secure communication and data integrity within their cloud environment. This separation between public and private keys is a cornerstone in the security and trust mechanisms within AWS and other cloud services.
The fundamental principle is that if you encrypt with one of the keys, the only way to decrypt it is by using the other key. For example, if we encrypt the data using the public key, we will need to decrypt it using the other key—that is, the private key.
Now, let’s look at one of the fundamental protocols of asymmetric encryption—the Secure Sockets Layer (SSL)/Transport Layer Security (TLS) handshake—which is responsible for establishing a connection between two nodes using asymmetric encryption.
The SSL/TLS handshaking algorithm
SSL was originally developed to add security to HTTP. Over time, SSL was replaced with a more efficient and more secure protocol, called TLS. TLS handshakes are the basis of how HTTP creates a secure communication session. A TLS handshake occurs between the two participating entities—the client and the server. This process is shown in the following diagram:

Figure 14.5: Secure session between the client and the server
A TLS handshake establishes a secure connection between the participating nodes. The following are the steps that are involved in this process:
- The client sends a
client hellomessage to the server. The message also contains the following:- The version of TLS that is used
- The list of cipher suites supported by the client
- A compression algorithm
- A random byte string, identified by
byte_client
- The server sends a
server hellomessage back to the client. The message also contains the following:- A cipher suite selected by the server from the list provided by the client.
- A session ID.
- A random byte string, identified by
byte_server. - A server digital certificate, identified by
cert_server, containing the public key of the server. - If the server requires a digital certificate for client authentication or a client certificate request, the client-server request also includes the following:
- The distinguished names of the acceptable CAs
- The types of certificates supported
- The client verifies
cert_server. - The client generates a random byte string, identified by
byte_client2, and encrypts it with the public key of the server provided throughcert_server. - The client generates a random byte string and identifies and encrypts it with its own private key.
- The server verifies the client certificate.
- The client sends a
finishedmessage to the server, which is encrypted with a secret key. - To acknowledge this from the server side, the server sends a
finishedmessage to the client, which is encrypted with a secret key. - The server and client have now established a secure channel. They can now exchange messages that are symmetrically encrypted with the shared secret key. The entire methodology is shown as follows:
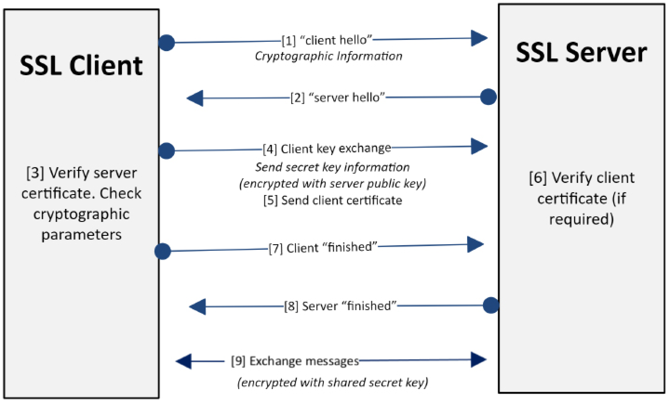
Figure 14.6: Secure session between the client and the server
Now, let’s discuss how we can use asymmetric encryption to create Public Key Infrastructure (PKI), which is created to meet one or more security goals for an organization.
Public key infrastructure
Asymmetric encryption is used to implement PKI. PKI is one of the most popular and reliable ways to manage encryption keys for an organization. All the participants trust a central trusting authority called a Certification Authority (CA). CAs verify the identity of individuals and organizations and then issue them digital certificates (a digital certificate contains a copy of a person or organization’s public key and its identity), verifying that the public key associated with that individual or organization actually belongs to that individual or organization.
The way it works is that the CA asks a user to prove their identity. The basic validation is called domain validation, which could involve simply verifying ownership of a domain name. The extended validation, if needed, involves a more rigorous process that involves physical proof of identity, depending on the type of digital certificate that a user is trying to obtain. If the CA is satisfied that the user is indeed who they claim to be, the user then provides the CA with their public encryption key over a secure channel.
The CA uses this information to create a digital certificate that contains information about the user’s identity and their public key. This certificate is digitally signed by the CA. The certificate is a public entity as the user can then show their certificate to anyone who wants to verify their identity, without having to send it through a secure channel, as the certificate doesn’t contain any sensitive information itself. The person receiving the certificate does not have to verify the user’s identity directly. That person can simply verify that the certificate is valid by verifying the CA’s digital signature, which validates that the public key contained in the certificate does, in fact, belong to the individual or organization named on the certificate.
The private key of the CA of an organization is the weakest link in the PKI chain of trust. If an impersonator got hold of Microsoft’s private key, for example, they could install malicious software on millions of computers around the world by impersonating a Windows update.
Blockchain and cryptography
There is no doubt that in recent years there has been a lot of excitement around blockchain and cryptocurrency. Blockchain is said to be one of the most secure technologies ever invented. The excitement about blockchain started with Bitcoin and digital currencies. Digital currencies were first developed in 1980, but with Bitcoin, they became mainstream. The rise of Bitcoin was due to the widespread availability of distributed systems. It has two important characteristics that made it a game-changer:
- It is decentralized by design. It uses a network of miners and a distributed algorithm called blockchain.
- Bitcoin is based on inherent incentives for miners to compete to add a block to the blockchain by attempting to answer a very complex computational puzzle. The winning miner is eligible to claim different bitcoins as a reward for their effort.
Although blockchain was developed for Bitcoin, it has found broader use and applications. Blockchain is based on a distributed consensus algorithm, using Distributed Ledger Technology (DLT). It has the following characteristics:
- Decentralization: It is based on distributed not centralized architecture. There is no central authority. Each node in a blockchain system is involved in maintaining the integrity of the DLT. There is a consensus among all the participating nodes. In this distributed architecture, the transactions are stored on the nodes of the constituent nodes, forming a P2P network.
Note that the term “P2P” stands for “Peer-to-Peer,” which means that each node, or “peer,” in the network communicates directly with the others without needing to go through a central server or authority.
- Chain-like formations: All transactions of blockchain are accumulated in a list of blocks. When several blocks are added, it creates a chain-like formation, which is the reason for its name, blockchain.
- Immutability: The data is secure, replicated, and stored in immutable blocks.
- Reliability: A lineage or history is maintained for each transaction. Each transaction is verified and recorded using cryptographic techniques.
Under the hood, blockchain transactions use cryptographic hashes from each of the previous blocks in the chain. Hash functions are used to create a one-way fingerprint of an arbitrary chunk of data. A Merkle tree or hash tree is used to verify data stored, handled, and transferred between different participating nodes. It uses SHA-2 for hashing. A diagram of a particular transaction is shown below:
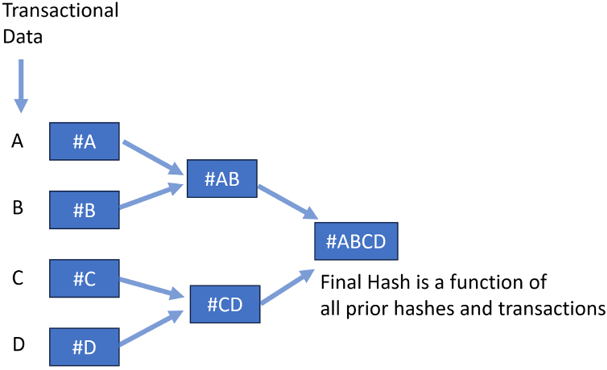
Figure 14.7: The Merkle tree of blockchain
Figure 13.7 summarizes the workings of blockchain. It shows how transactions get converted into blocks, which are, in turn, converted into chains. On the left-hand side, four transactions, A, B, C, and D, are shown. Next, the Merkle root is created by applying a hash function. The Merkle root can be considered a data structure that forms part of the block header. As transactions are immutable, the previously recorded transactions cannot be changed.
Note that the hash value of the previous block header also becomes part of the block, thus incorporating transaction records. This creates chain-like processing structures and is the reason for the name blockchain.
Each blockchain user is authenticated and authorized using cryptography, eliminating the need for third-party authentication and authorization. Digital signatures are used to secure transactions as well. The receiver of a transaction has a public key. Blockchain technology eliminates the involvement of third parties for transaction validation and relies on cryptographic proof for this. Transactions are secured using a digital signature. Each user has a unique private key that establishes their digital identity in the system.
Example: security concerns when deploying a machine learning model
In Chapter 6, Unsupervised Machine Learning Algorithms, we looked at the Cross-Industry Standard Process for Data Mining (CRISP-DM) life cycle, which specifies the different phases of training and deploying a machine learning model. Once a model is trained and evaluated, the final phase is deployment. If it is a critical machine learning model, then we want to make sure that all of its security goals are met.
Let’s analyze the common challenges faced in deploying a model such as this and how we can address those challenges using the concepts discussed in this chapter. We will discuss strategies to protect our trained model against the following three challenges:
- Man-in-the-Middle (MITM) attacks
- Masquerading
- Data tempering
Let’s look at them one by one.
MITM attacks
One of the possible attacks that we would want to protect our model against is MITM attacks. A MITM attack occurs when an intruder tries to eavesdrop on a supposedly private communication.
Let’s try to understand MITM attacks sequentially using an example scenario.
Let’s assume that Bob and Alice want to exchange messages using PKI:
- Bob is using {PrBob, PuBob} and Alice is using {PrAlice, PuAlice}. Bob has created a message, MBob, and Alice has created a message, MAlice. They want to exchange these messages with each other in a secure way.
- Initially, they need to exchange their public keys to establish a secure connection with each other. This means that Bob uses PuAlice to encrypt MBob before sending the message to Alice.
- Let’s assume that we have an eavesdropper, commonly referred to as Eve X, who is using {PrX, PuX}. The attacker is able to intercept the public key exchanges between Bob and Alice and replace them with its own public certificate.
- Bob sends MBob to Alice, encrypting it with PuX instead of PuAlice, wrongfully thinking that this is Alice’s public certificate. Eavesdropper X intercepts the communication. It intercepts the MBob message and decrypts it using PrBob.
This MITM attack is shown in the following diagram:
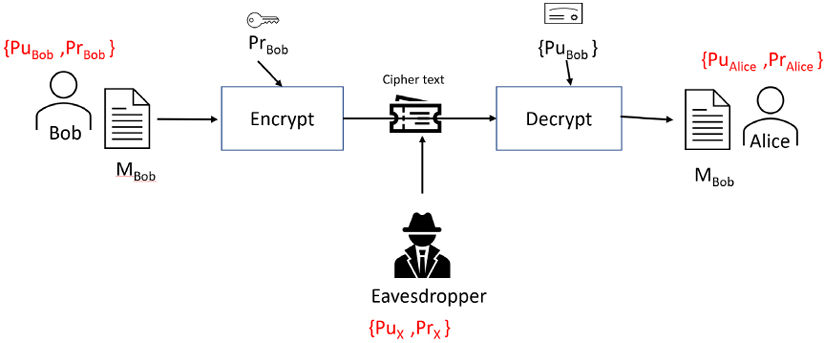
Figure 14.8: MITM attack
Now, let’s look at how we can prevent MITM attacks.
How to prevent MITM attacks
Let’s explore how we can prevent MITM attacks by introducing a CA to the organization. Let’s say the name of this CA is myTrustCA. The digital certificate has its public key, named PumyTrustCA, embedded in it. myTrustCA is responsible for signing the certificates for all of the people in the organization, including Alice and Bob. This means that both Bob and Alice have their certificates signed by myTrustCA. When signing their certificates, myTrustCA verifies that they are indeed who they claim to be.
Now, with this new arrangement in place, let’s revisit the sequential interaction between Bob and Alice:
- Bob is using {PrBob, PuBob} and Alice is using {PrAlice, PuAlice}. Both of their public keys are embedded into their digital certificates, signed by myTrustCA. Bob has created a message, MBob, and Alice has created a message, MAlice. They want to exchange these messages with each other in a secure way.
- They exchange their digital certificates, which contain their public keys. They will only accept the public keys if they are embedded in the certificates signed by the CA they trust. They need to exchange their public keys to establish a secure connection with each other. This means that Bob will use PuAlice to encrypt MBob before sending the message to Alice.
- Let’s assume that we have an eavesdropper, X, who is using {PrX, PuX}. The attacker is able to intercept the public key exchanges between Bob and Alice and replace them with its own public certificate, PuX.
- Bob rejects X’s attempt, as the bad guy’s digital certificate is not signed by the CA that Bob trusts. The secure handshake is aborted, the attempted attack is logged with a timestamp and all details, and a security exception is raised.
When deploying a trained machine learning model, instead of Alice, there is a deployment server. Bob only deploys the model after establishing a secure channel, using the previously mentioned steps.
Avoiding masquerading
Attacker X pretends to be an authorized user, Bob, and gains access to sensitive data, which is the trained model, in this case. We need to protect the model against any unauthorized changes.
One way of protecting our trained model against masquerading is by encrypting the model with an authorized user’s private key. Once encrypted, anyone can read and utilize the model by decrypting it through the public key of the authorized user, which is found in their digital certificate. No one can make any unauthorized changes to the model.
Data and model encryption
Once the model is deployed, the real-time unlabeled data that is provided as input to the model can also be tampered with. The trained model is used for inference and provides a label for this data. To protect data against tampering, we need to protect the data at rest and in communication. To protect the data at rest, symmetric encryption can be used to encode it.
To transfer the data, SSL-/TLS-based secure channels can be established to provide a secure tunnel. This secure tunnel can be used to transfer the symmetric key and the data can be decrypted on the server before it is provided to the trained model.
This is one of the more efficient and foolproof ways to protect data against tampering.
Symmetric encryption can also be used to encrypt a model when it has been trained, before deploying it to a server. This will prevent any unauthorized access to the model before it is deployed.
Let’s see how we can encrypt a trained model at the source, using symmetric encryption with the help of the following steps, and then decrypt it at the destination before using it:
- Let’s first train a simple model using the Iris dataset:
import pickle from joblib import dump, load from sklearn.linear_model import LogisticRegression from sklearn.model_selection import train_test_split from sklearn.datasets import load_iris from cryptography.fernet import Fernet iris = load_iris() X = iris.data y = iris.target X_train, X_test, y_train, y_test = train_test_split(X, y) model = LogisticRegression(max_iter=1000) # Increase max_iter for convergence model.fit(X_train, y_train) - Now, let’s define the names of the files that will store the model:
filename_source = "unencrypted_model.pkl" filename_destination = "decrypted_model.pkl" filename_sec = "encrypted_model.pkl" - Note that
filename_sourceis the file that will store the trained unencrypted model at the source.filename_destinationis the file that will store the trained unencrypted model at the destination, andfilename_secis the encrypted trained model. - We will use
pickleto store the trained model in a file:from joblib import dump dump(model, filename_source) - Let’s define a function named
write_key()that will generate a symmetric key and store it in a file namedkey.key:def write_key(): key = Fernet.generate_key() with open("key.key", "wb") as key_file: key_file.write(key) - Now, let’s define a function named
load_key()that can read the stored key from thekey.keyfile:def load_key(): return open("key.key", "rb").read() - Next, let’s define an
encrypt()function that can encrypt and train the model, and store it in a file namedfilename_sec:def encrypt(filename, key): f = Fernet(key) with open(filename,"rb") as file: file_data = file.read() encrypted_data = f.encrypt(file_data) with open(filename_sec,"wb") as file: file.write(encrypted_data) - We will use these functions to generate a symmetric key and store it in a file. Then, we will read this key and use it to store our trained model in a file named
filename_sec:write_key() key = load_key() encrypt(filename_source, key)
Now the model is encrypted. It will be transferred to the destination where it will be used for prediction:
- First, we will define a function named
decrypt()that we can use to decrypt the model fromfilename_sectofilename_destinationusing the key stored in thekey.keyfile:def decrypt(filename, key): f = Fernet(key) with open(filename, "rb") as file: encrypted_data = file.read() decrypted_data = f.decrypt(encrypted_data) with open(filename_destination, "wb") as file: file.write(decrypted_data) - Now let’s use this function to decrypt the model and store it in a file named
filename_destination:decrypt(filename_sec, key) - Now let’s use this unencrypted file to load the model and use it for predictions:
loaded model = load(filename_destination)
result = loaded_model.score(X_test, y_test)
print(result)
0.9473684210526315
Note that we have used symmetric encryption to encode the model. The same technique can be used to encrypt data as well, if needed.
Summary
In this chapter, we learned about cryptographic algorithms. We started by identifying the security goals of a problem. We then discussed various cryptographic techniques and also looked at the details of the PKI. Finally, we looked at the different ways of protecting a trained machine learning model against common attacks. Now, you should be able to understand the fundamentals of security algorithms used to protect modern IT infrastructures.
In the next chapter, we will look at designing large-scale algorithms. We will study the challenges and trade-offs involved in designing and selecting large algorithms. We will also look at the use of a GPU and clusters to solve complex problems.
Learn more on Discord
To join the Discord community for this book – where you can share feedback, ask questions to the author, and learn about new releases – follow the QR code below: