
12. Setting Up a Database in Quattro Pro
In This Chapter
• Defining terms
• Adding information to a Quattro Pro database
• Editing database information
• Performing simple database searches
A database is a collection of similar information; think of your local telephone book as a database containing names, addresses, and phone numbers. In this chapter, you’ll begin working with databases in Quattro Pro. I’ll define the terminology you commonly use when working with databases, and then we’ll look at the different ways you can add information to a Quattro Pro database.
Understanding Databases, Fields, and Records
There are hundreds of examples of databases in everyday life. In addition to the phone book, your personal address book is a database. Mailing lists that you rent or buy are also databases. Lists of items you stock in inventory to sell are databases. Each database contains a collection of related information.
In three of the examples I cited, the information in each database is similar—name, address, and phone number information. The difference between the databases is the way in which the information is related. In a telephone book, all the entries are of people who live in the same city. Your personal address book contains entries for people you know. Each mailing list shares some common denominator; perhaps the people listed all signed up for a seminar or all purchased a toaster oven.
Identifying the relationship of the information in the database becomes important when you need to find an entry in a database. Because you keep different databases for different purposes, recognizing the relationship of the information in the database will help you search the correct database for the entry. Searching a mailing list of those who purchased toaster ovens for the phone number of your friend in Seattle will not help you find your friend’s phone number unless your friend happened to purchase a toaster oven.
In addition to the relationship of the information in the database, a database has an identifiable structure to it. Each entry in the database contains the same type of information. For example, the typical entry in an address book contains, at a minimum, a name, address, and telephone number. Each entry in the address book is, in database parlance, a record. Each piece of information in the entry—the name, the telephone number—is called a field. So, in the terminology of databases, the database is composed of records, and each record is composed of fields.
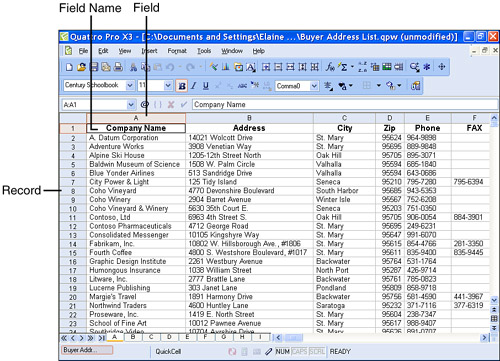
Databases stored in spreadsheets, such as the one shown in Figure 12.1, make it easy to identify records and fields. In a spreadsheet database, each database record is stored on one row and each column heading represents a field and describes one piece of information that you are storing in the record.
Figure 12.1. In a spreadsheet database, each record appears on a single row, and each field appears in a single column.
A Word of Caution Concerning Spreadsheet Databases
Back in Chapter 1, “Getting Started,” I told you that each spreadsheet in a Quattro Pro notebook contains 1,000,000 rows and 256 columns. So, theoretically, you could create a Quattro Pro database that contains up to 1,000,000 records, with each record containing up to 256 fields. I wouldn’t recommend that you store a database that big in Quattro Pro, though.
While setting up a database, it’s easy to lose sight of the reason you decided to collect the information in the first place. Most people don’t spend hours entering information into a spreadsheet database if they don’t intend to actually use the information for something. And, in most cases, that “something” involves searching for the information. In some cases, it also involves building reports from the information.
Spreadsheet databases were never intended to store large amounts of data. I’ve seen cases where loading a large spreadsheet was so slow that more memory was needed in the computer. And that was just to open the notebook file—not to use it to find information.
If you are trying to enter the Chicago area telephone book into a database, don’t use Quattro Pro. In general, if you have more than 1,000 records composed of 10 or more fields, consider using a program other than Quattro Pro; you’ll be happier in the long run. Instead, use a program that was designed to handle large databases, like Corel’s Paradox, Microsoft Access or FileMaker Pro. If, however, the size of your database fits within the parameters I suggest, read on.
Adding Information to a Spreadsheet Database
Quattro Pro provides you with two ways to enter information into a spreadsheet database:
• You can enter information manually
• You can use a data form
The major difference between a spreadsheet database and any other spreadsheet is that databases don’t contain headings in column A. Before you enter any of your database records, you should type the field names into row 1. Each field name should be unique; for example, if you want to set up two fields for two lines of an address, don’t name both fields “Address.” Instead, name one “Address 1” and the other “Address 2.” Although field titles can be multiple words, make sure that you don’t have any blank spaces before or after the field title.
The following are some rules you should know about spreadsheet databases:
• The records in a database should appear in contiguous rows; don’t leave any rows blank. The first record in the database should appear immediately below the row containing the field titles.
• A single database cannot expand beyond one sheet in a notebook.
• The shape of the spreadsheet database is rectangular. If you don’t have data for some of the fields in a record, leave blank cells for the fields.
• The information in a single column should be either text or values, but not both (an address, such as 1234 Main Street, is text in Quattro Pro). If, in a particular field, you find that you need to fill in values for one record and text for another, you probably need to create two separate fields for the data.
Adding Records Manually
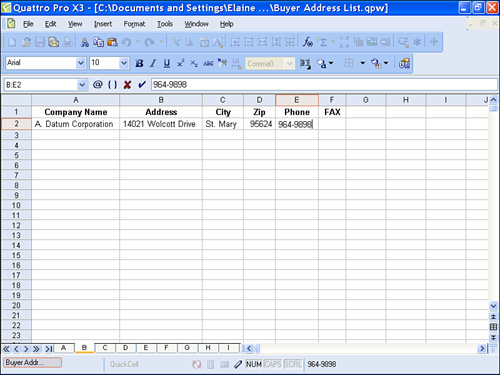
Adding records to a Quattro Pro database is as easy as adding any information to any Quattro Pro spreadsheet. Simply type the information for each database entry on a single row, making sure that you type the proper information for the entry into the proper column (see Figure 12.2).
Figure 12.2. Type the information for each database entry on a single row of the spreadsheet database.
Tip

If you don’t have the information for a particular field, leave that field blank.
Using a Data Form to Add Records
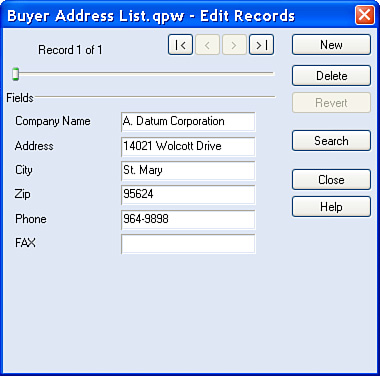
If you prefer, you can easily use a data form to enter information into the spreadsheet database. The data form window, shown in Figure 12.3, simply prompts you, on a field by field basis, for the information needed for each record.
Figure 12.3. A data form prompts you for each field of the record you are entering.
To use the data form window to add records to a database, follow these steps:
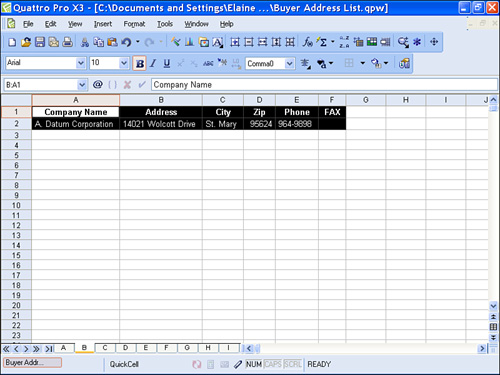
- Select the cells containing the field names in row 1 and the cells below it in row 2 (see Figure 12.4).
Figure 12.4. Select the cells containing the field names and the cells immediately below the field names.
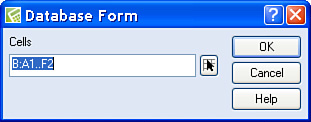
- Open the Tools menu, point to Data Tools, and click Form. Quattro Pro displays the Database Form dialog box shown in Figure 12.5.
Figure 12.5. Use this dialog box to confirm that you selected the first two rows of the spreadsheet database.
Tip
You don’t need to select all the cells in rows 1 and 2; you can select one cell in each row, and Quattro Pro will do the rest for you.
- Confirm that the selection contains at least the cells in row 1 that contain field names and the cells in row 2 below the field names.
- Click OK. Quattro Pro displays the data form window shown previously in Figure 12.3.
- Click the New button to display a blank data form window and fill in the blanks with the information for the new record.
- Repeat step 5 to add more records; when you finish adding records, click Close.
Navigating and Editing in a Notebook Database
You can use the Data Form window to easily move around in your spreadsheet database and to edit records. In Figure 12.6, I’m viewing record 7 of 125 records. Use the navigation buttons to display different records in the database. Click the Record Forward and Record Back buttons to move through the database one record at a time. Or, view the initial or final record in the database using the First Record or the Last Record buttons.
Figure 12.6. Use the Data Form window to navigate through the records in a database.
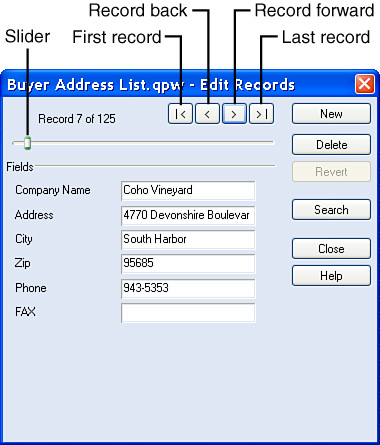
I can also drag the slider to the right or left to find a particular record in the database.
Searching a Database Using a Data Form Window
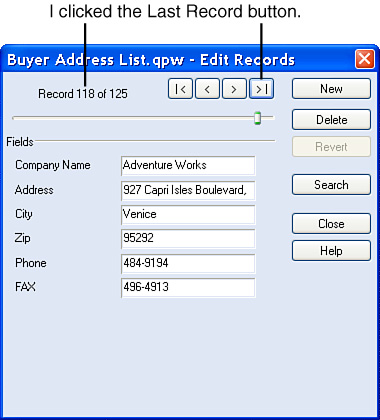
Using the data form window, you can quickly and easily perform simple searches. Click the Search button, and Quattro Pro presents a blank window. Type some letters into the field on which you want to base the search; in Figure 12.7, I typed two letters into the Company name field, indicating that I want to search for all companies with names beginning with Ad.
Figure 12.7. Type the search criteria into the appropriate field.

Tip
To reduce the number of records Quattro Pro finds, fill in as many of the search fields as possible. The more information you provide, the fewer records Quattro Pro will find.
When I click any of the navigation buttons, Quattro Pro navigates to and displays only those records that match the search criteria (see Figure 12.8).
Figure 12.8. The last record in the database that meets the criteria is record 118.
Creating Database Queries
When your search needs are more complicated than you can set up in the data form window, you can create more complicated searches using queries that contain search formulas. Suppose, for example, that I want to search the database shown in Figure 12.9 for everyone with a last name of Martin or a first name of Andrea. Or, suppose that I wanted to search for everyone with a last name of Sandler and a first name of Andrea. These are searches you can’t perform using the data form window.
Figure 12.9. You can create queries for databases like this one.
To make searches like these, you set up queries. Setting up a query is a three-part process:
• Set up a criteria table
• Set up an output range
• Set up the search criteria and formula
Creating a Criteria Table
A criteria table is, at a minimum, two rows long. The first row contains field names that must exactly match one or more fields in the database cells. I suggest that you simply copy the row containing all the field names to the area you plan to designate as the criteria table.
Tip
Although you can define the criteria table and the search output range on the same sheet as the database, I separate the criteria table and the search output range so that I always know what I’m viewing.
The second row and subsequent rows contain search criteria. You should not leave any blank rows between the field names and the criteria you enter. You must set up the entire criteria table on one spreadsheet, but you don’t have to set up the criteria table on the same spreadsheet as the database.
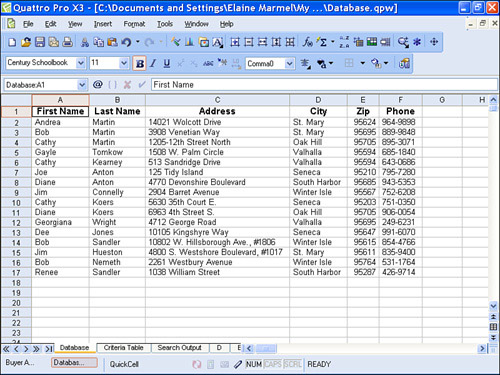
In Figure 12.10, I’ve renamed sheets A, B, and C to reflect the information they hold, naming sheet A “Database”, sheet B “Criteria Table”, and sheet C “Search Output.” To set up the criteria table for the database you saw in Figure 12.9, I copied field names from the database sheet into row 1 of the Criteria Table sheet; later in this chapter, I’ll enter criteria starting in row 2 of the Criteria Table sheet.
Figure 12.10. The field labels in the criteria table must exactly match one or more field labels in the database.

Creating the Search Output Range
You define search output cells in an area of the notebook where Quattro Pro can copy database records that match your search criteria; you view the results of your query in the search output range.
Because Quattro Pro copies database records that match the search criteria you establish to the search output range, be sure that you don’t place your output cells in an area that overlaps with either the database cells or the criteria table.
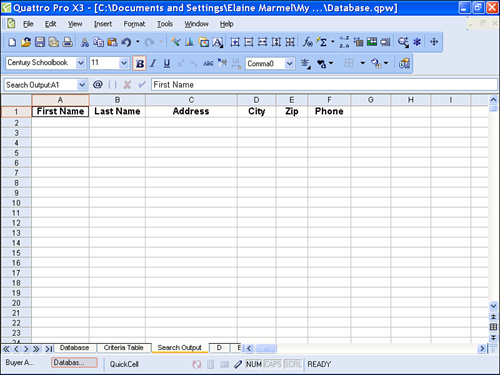
You set up the search output range the same way that you set up the criteria table, only in a different location. In Figure 12.11, I copied the database field titles onto the Search Output sheet.
Figure 12.11. Set up the search output range so that it is separated from the database and the criteria table.
Setting Up Queries
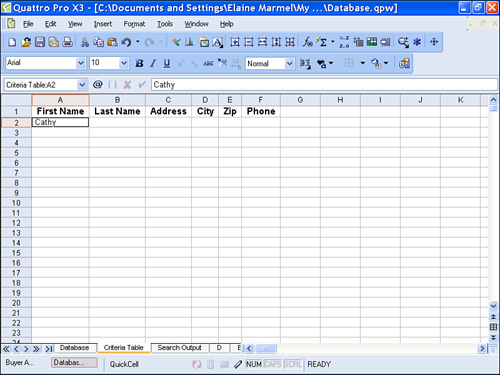
You set up database queries by typing criteria in row 2 and subsequent rows of the criteria table. In Figure 12.12, I set up a simple query to display all the records in the database where the First Name field contains “Cathy.”
Figure 12.12. This criteria table tells Quattro Pro to search the database for all records where the First Name field contains “Cathy.”

Make sure that the output range you select is equal to or larger than the database range so that all selected records will appear.
To tell Quattro Pro to make the search, follow these steps:
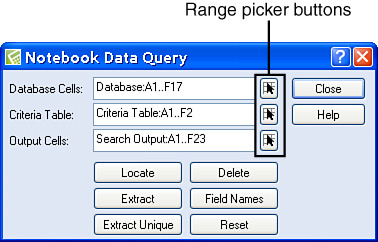
- Open the Tools menu, point to Data Tools, and click Notebook Query. Quattro Pro displays the Notebook Data Query window.
- Click the Database Cells Range Picker button. Quattro Pro collapses the Notebook Data Query window so that you can you select the range for the database; when you finish selecting the cells, click the Maximize button to redisplay the Notebook Data Query window.
- Repeat step 2 using the Criteria Table Range Picker button and the Output Cells Range Picker button. When you finish, the Notebook Data Query window should resemble the one shown in Figure 12.13.
Figure 12.13. Use the Range Picker buttons to establish ranges for the database, the criteria table, and the search output range.
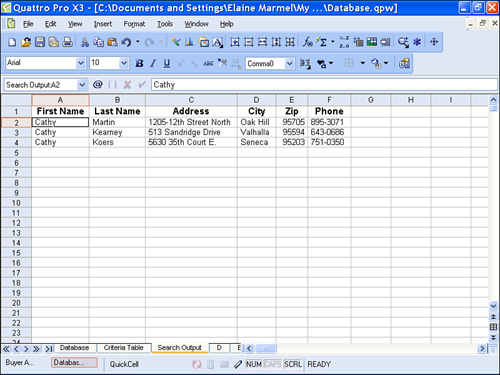
- To copy records that match the search criteria to the output range, click the Extract button.
- Click Close.
- Display the output range onscreen; it will contain all database records that match the search criteria (see Figure 12.14).
Figure 12.14. The results of the search.
You can use the same steps to create more complicated searches, changing the criteria table. For example, you can search for all records where the first name is Cathy or the last name is Martin by setting up the criteria table listing one criterion on row 2 and the other on row 3, as I did in Figure 12.15.
Figure 12.15. To set up an “Or” search, specify criteria on two rows of the criteria table.
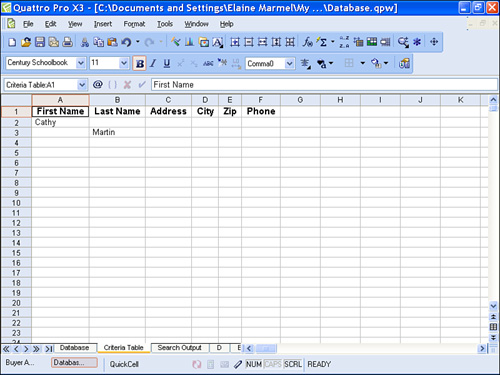
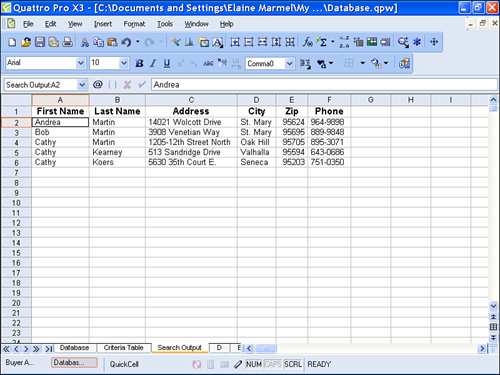
Reopen the Notebook Data Query window by opening the Tools menu, pointing to Data Tools, and clicking Notebook Query. In the Notebook Query window, be sure to change the rows included in the criteria table to include rows 1 through 3; then, click Extract to copy matching records to the output range. When you complete the query, Quattro Pro copies all records where the first name is Cathy or the last name is Martin to the output range (see Figure 12.16).
Figure 12.16. The results of the “Or” search.
If you place the criteria on the same line of the criteria table, Quattro Pro performs an “And” search and displays only those records where the first name is Cathy and the last name is Martin.
There are lots of other, powerful ways you can search a spreadsheet database, but they are beyond the scope of this book. Be aware, though, that you can combine “And” and “Or” queries. And you can use math in a query to search, for example, for customers with balances that exceed $500. I hope that the taste of database querying that I’ve offered here encourages you to explore the Help system in Quattro Pro to set up additional queries.
Creating CrossTab Reports
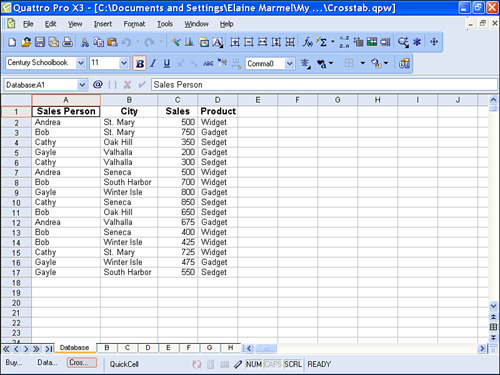
CrossTab reports are most useful when your database contains information that you want to analyze in more than one way. Suppose that you have a database like the one shown in Figure 12.17, which lists sales of three different products made by four different salespeople to customers located in six different cities.
Figure 12.17. The records in this database represent sales of several products by several salespeople to customers in a variety of cities.
Analyzing this data to determine who sold what to customers in which cities would be mind-boggling if you had several hundred records—unless you use a CrossTab report. In Figure 12.18, I created a CrossTab report using the data shown in Figure 12.17 that shows total sales for each product, each city, and totals by product for each salesperson. This report helps me focus on sales by city, and I can use the drop-down arrow in cell B1 to change the report when I want to focus on sales for a selected salesperson.
Figure 12.18. A CrossTab report helps you evaluate database information in a variety of ways.

To create a CrossTab report, follow these steps:
- Click any cell in a database.
- Open the Tools menu, point to Data Tools, point to CrossTab, and click Report. Quattro Pro displays the Source Data Type dialog box, from which you can select data to use in the CrossTab report from the current notebook, an OLAP source, or an external data source. For this example, click Current Notebook.
- Click Next. Quattro Pro displays the CrossTab report dialog box shown in Figure 12.19.
Figure 12.19. Drag the fields in this dialog box to a report location.
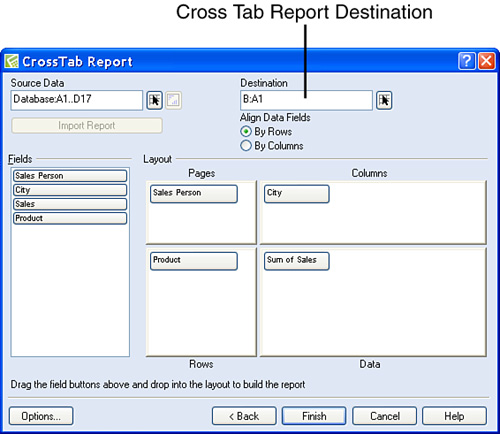
- Drag the items listed in the Fields column to places in the Layout section.
- Note (and change if necessary) the location where Quattro Pro intends to place the CrossTab report using the Range Picker button in the Destination box.
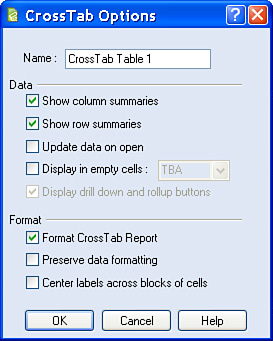
- To add totals to the report, click the Options button. Quattro Pro displays the CrossTab Options dialog box (see Figure 12.20). Place checks in the Show Column Summaries and Show Row Summaries boxes and click OK to redisplay the CrossTab Report dialog box.
Figure 12.20. Use this dialog box to add totals to a CrossTab report.
- Click Finish in the CrossTab Report dialog box to create the report.
The trickiest part of creating a CrossTab report is identifying which fields to drag to which portions of the layout in step 4. For the most part, you’ll find that you learn best by trial and error, but I can offer you the following bits of guidance:
• Place the field you want to analyze in the Data portion of the Layout section; typically, you want to analyze numeric data, and, in the example, I placed the Sales field—my only numeric field—in the Data section.
• Quattro Pro uses the fields you place in the Columns and Rows portions of the Layout section to determine which values from the database appear at the intersection of row and column labels. In my example, I wanted to evaluate, first and foremost, product sales by city, so I placed Product and City in the Row and Column portions respectively. I could have just as easily reversed them and gotten the same information, with the cities appearing down the side of the report and the products across the top.
• Think of the Pages portion of the Layout section as a third intersection of data. In Figure 12.19, the report shows total sales by city for each product, regardless of who made the sales. But, I can instantly view an individual salesperson’s information using the list box in cell B1 because I really created a report that contains a “page” for each salesperson.
• If the report you produce isn’t the report that you want, select a cell in the CrossTab report and repeat step 2 above. When Quattro Pro redisplays the CrossTab Report dialog box, drag fields from the Layout section completely out of dialog box. Then, you can complete steps 3 through 6 to drag fields from the Fields list to different positions in the Layout section, creating an entirely different report.