
1. Getting Started
In This Chapter
• Opening the program and selecting a working mode
• Opening menus and using toolbars and dialog boxes
• Understanding the spreadsheet window
• Exploring ways you can use a spreadsheet
Some say I can be pretty funny in person, but that doesn’t seem to carry through to my writing; I know—I’ve tried. So, out of respect for you, I won’t crowd this book with my feeble attempts at humor. Instead, I will try my best to keep from boring you silly by remembering that I’m not writing Computer Books: the $29.95 Cure for Insomnia, and I will focus on helping you understand how to use Quattro Pro.
Quattro Pro is a spreadsheet program; like their paper counterparts, spreadsheet programs enable you to work with rows and columns of data in a variety of ways. Later in this chapter, in the section “Understanding Spreadsheets and Notebooks,” I’ll introduce you to some of the ways that you might find a spreadsheet program useful.
As the title of this chapter implies, this is the place where you’ll learn the basics about opening the program and using menus, toolbars, and dialog boxes. Then we’ll explore the concepts that define a spreadsheet, how the Quattro Pro window uses those concepts, and general ways in which you can use a spreadsheet program. Finally, I’ll show you how to get help within the program and how to close the program.
Opening the Program
This book assumes that you have installed Quattro Pro; to open the program, double-click the Quattro Pro icon that appears on your desktop, or click the Start button, point to All Programs, point to the WordPerfect Office 13 folder, and click Quattro Pro.

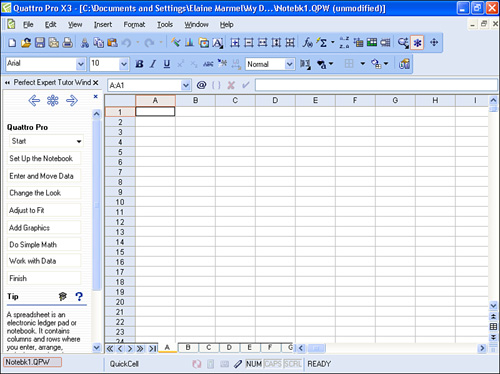
When you first open Quattro Pro, you may see the Perfect Expert Tutor window as a pane on the left side of the screen. Later in this chapter, you’ll find an explanation of the Perfect Expert. To make the screen more readily understandable, I closed the pane by clicking the X in the upper right corner of the pane. If you prefer, you can hide (and then redisplay) the Perfect Expert pane by clicking the double carats immediately to the left of Perfect Expert Tutor window.
Selecting a Mode
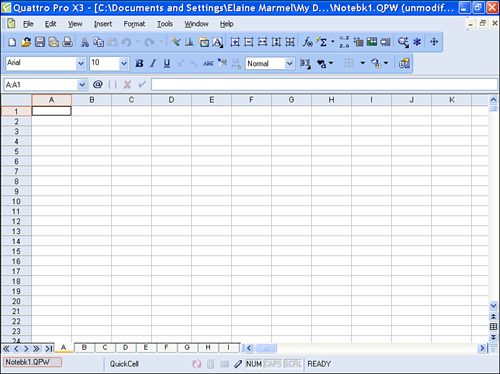
When the program first opens, you have the opportunity to select a mode in which to work. The mode you select determines the menus, menu commands, and toolbars available while you work. If, for example, you are familiar with the menu and toolbar commands of Microsoft Excel, you can select Microsoft Excel mode; when you work in Quattro Pro, you’ll find Quattro Pro commands and toolbar buttons positioned where their Microsoft Excel counterparts would appear. Using the mode feature, you can work in Quattro Pro as if it were Microsoft Excel or Lotus 1-2-3. In Figure 1.1, you see Quattro Pro running in Microsoft Excel mode; in Figure 1.2, you see Quattro Pro running in Lotus 1-2-3 mode; and in Figure 1.3, you see Quattro Pro running in Quattro Pro mode. Compare the menus and toolbars in each figure.
Figure 1.1. In Excel mode, Quattro Pro uses Excel menus and toolbars.
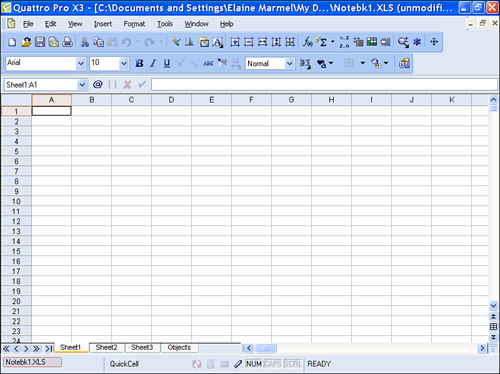
Figure 1.2. In Lotus 1-2-3 mode, Quattro Pro uses Lotus 1-2-3 menus and toolbars.

Figure 1.3. As you’d expect, in Quattro Pro mode, Quattro Pro uses Quattro Pro menus and toolbars.
Each time you open Quattro Pro, you’ll see the dialog box that enables you to select a mode in which to work. When you have decided upon the mode in which you want to work on a regular basis, you can remove the check from the Show at Startup box that appears in the dialog box where you select a mode. You can switch modes inside Quattro Pro; you don’t need the dialog box that appears when you start the program.
Caution

If you select Lotus 1-2-3 mode when you start Quattro Pro, be sure that you want to work in that mode each time you start the program before you remove the check from the Show at Startup box. Although you can easily switch modes between Quattro Pro and Excel from inside Quattro Pro, switching from Lotus 1-2-3 mode to any other mode is tricky because you must add the Workspace Manager command to the menu bar. For more information on adding commands to the menus, see “Customizing Menus” in Chapter 15, “Customizing Menus and Toolbars.”
Using the Menus
In Figure 1.4, you see the menus that appear across the top of your screen, just below the name of the program, which appears in the title bar. When you click a menu, it opens to show you the commands available on that menu, and clicking a command makes some action happen in Quattro Pro.
Figure 1.4. Menus are most useful when you aren’t sure where to find the command you want; you can click each menu to view the commands on it.
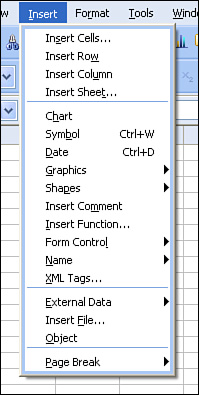
Whenever you click a command whose name is followed by an ellipsis (...), Quattro Pro will display a dialog box, from which you make selections. I’ll tell you more about dialog boxes later in this chapter, in the section, “Understanding Dialog Boxes.”
You will also notice commands on menus with a right pointing arrow, such as the Graphics command in Figure 1.4. When you point at these commands, a submenu appears, displaying additional commands you can select. Submenus are nothing more than a way for the program to add more organization to the commands.
Have you ever wondered why they’re called “menus”? The concept is simple, actually. When you go to a restaurant, you peruse a menu to determine what choices are available to you. In a computer program, a menu serves exactly the same purpose; it provides you with a list of choices. And, restaurants may use different menus to segregate sets of choices; for example, a restaurant may have a lunch and dinner menu to segregate choices available only at certain times of the day. Similarly, computer programs also use different menus to segregate choices; typically computer program menus group related commands onto a single menu. For example, the commands on the View menu all relate to viewing your data in different ways.
Using the Toolbars
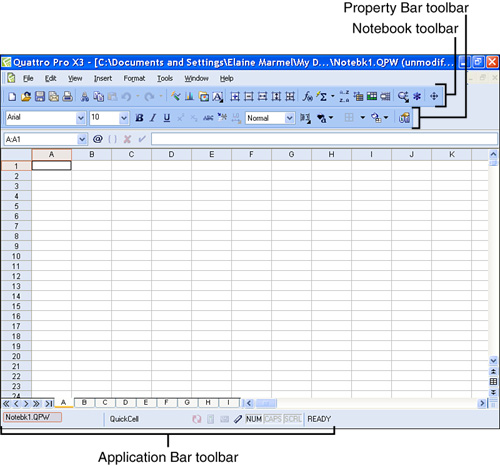
Toolbars contain tools that are graphical representations of the commands that appear on menus, and, while most toolbars appear at the top of the program, some toolbars float and others appear at the bottom of the screen. In Figure 1.5, the Notebook and Property Bar toolbars appear at the top of the screen, just below the menu bar, and the Application Bar toolbar appears at the bottom of the screen.
Figure 1.5. Toolbars can appear almost anywhere onscreen, but most often, they appear at the top of the screen.
You can click a toolbar button to select a command, reducing the steps needed to select a command to one mouse click. Because using a toolbar button requires only one mouse click, you can significantly reduce your effort to accomplish a task. For example, to apply boldface to an entry in a spreadsheet, you can open the Format menu, click the Selection Properties command and, in the dialog box that appears, click the Bold check box. Or, you can take the quick and easy way—click the Bold toolbar button (the one with the B on it) on the Property Bar toolbar.
Understanding Dialog Boxes
Dialog boxes appear whenever you click a menu command whose name is followed by an ellipsis; dialog boxes also appear when you click some toolbar buttons. In Figure 1.6, you see the dialog box you use to assign properties to a selection in the spreadsheet; for example, you can apply a double underscore to an entry in the spreadsheet by clicking the Double Line option in the Accounting Style section.
Figure 1.6. Use dialog boxes to describe actions you want to take in your spreadsheet.

You can open this dialog box by clicking the Format menu and then clicking Selection Properties, or by clicking the rightmost button on the Property Bar toolbar. Taking the path of least resistance, clicking the toolbar button opens the box faster.
Understanding Spreadsheets and Notebooks
Before we dive further into using Quattro Pro, you’ll find it most useful to be able to identify the parts of a spreadsheet and understand the basic language people use when working in electronic spreadsheets.
Reviewing the Construction of a Spreadsheet
A spreadsheet, in the traditional sense, is a piece of paper laid out in rows and columns; many people think of ledger sheets when they hear the term “spreadsheet.” Typically, the first column on the left and the top row of a spreadsheet contain labels that identify the types of information in the spreadsheet, and information such as numbers appears at the intersection of rows and columns on the rest of the page.
Quattro Pro is an electronic spreadsheet. As you can see in Figure 1.7, Quattro Pro uses numbers for row labels and letters for column labels. Most people use Row 1 or column A for labels that describe the information in each spreadsheet they create. Each spreadsheet contains 1,000,000 rows and 256 columns. Column names run through the alphabet; the column after column Z is column AA, followed by column AB, column AC, and so on. The last column is column IV, so, you have lots of space in which to store information.
Figure 1.7. Identifying the Parts of the Quattro Pro window.
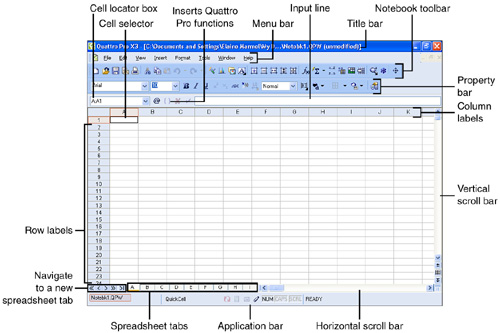
The unit that appears at the intersection of a row and column is called a cell, and when the border of a particular cell appears a little darker than the rest of the cell borders, that darker-bordered cell is selected; we also say that the cell selector is resting in that cell. To move to different cells, you use the arrow keys on your keyboard to move the cell selector.
Each cell has a specific address, made up of its column letter and row number. In Figure 1.7, the cell selector is resting in cell A1. Cell addresses are an important concept because they help you identify where a particular piece of information is stored.
In all likelihood, you’ll never come close to using all the available space in a spreadsheet. If you have that much information to store, you will probably choose to use a database program instead of a spreadsheet program because database programs handle large quantities of data much better than spreadsheet programs.
Although spreadsheet is the generic term used to describe paper collections of data laid out in rows and columns, spreadsheet software programs introduce their own terminology to describe the electronic version of a spreadsheet. Lotus 1-2-3 calls them “worksheets,” Excel calls them “sheets,” and Quattro Pro calls them “spreadsheets.” From this point forward, I’ll use Quattro Pro terminology. All three programs enable you to store multiple spreadsheets in a single file—and, as you’d expect, each program uses its own terminology when referring to a file containing a collection of spreadsheets: Excel and Lotus 1-2-3 call the file a “workbook,” and Quattro Pro calls it a “notebook.”
A Quattro Pro notebook contains 18,000 spreadsheets on which you can store information and, if you want, perform calculations using data stored on different spreadsheets. Each spreadsheet has a letter for a name, and the spreadsheet names begin with A and end with ZZZ. At the bottom of the Quattro Pro window, you see tabs that represent each spreadsheet, and you can simply click a spreadsheet letter to display the data on that spreadsheet.
Understanding Spreadsheets and Math
Most commonly, people use spreadsheets to perform calculations. And much of the power of an electronic spreadsheet lies in its ability to perform calculations.
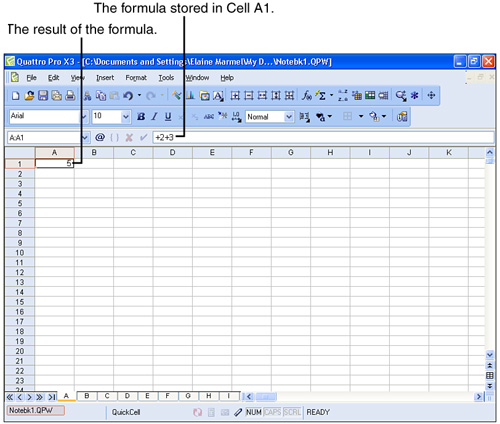
In Quattro Pro, you can type a formula, such as 2+3, into any cell, and Quattro Pro will display the results of the formula in the cell where you typed it. However, if you look at the Input Line (see Figure 1.8), you’ll see that Quattro Pro actually stores the formula while displaying its result in the cell.
Figure 1.8. Although Quattro Pro displays the results of a formula in spreadsheet cells, you can see the formula stored in a cell by selecting the cell and looking at the Input Line.
An even more powerful feature is Quattro Pro’s ability to perform calculations using cell addresses. Suppose that cell A1 contains the value 4 and cell A2 contains the value 5. In cell A3, you can store a formula that adds the contents of cell A1 and cell A2; the result, 9, will appear in cell A3 (see Figure 1.9).
Figure 1.9. Quattro Pro can perform calculations using cell addresses instead of numbers.
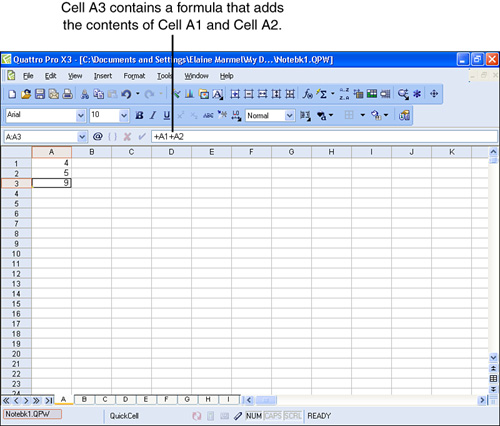
The beauty of this capability to perform calculations using cell addresses lies in the fact that you can change one of the values in cell A1 or cell A2, and Quattro Pro will recalculate. If you change the value of A1 to 6, Quattro Pro will automatically update cell A3 to display 11, the result of adding 6+5, the values stored in cells A1 and A2 respectively.
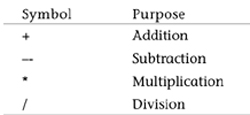
In the math examples I’ve presented, I’ve used addition, but Quattro Pro behaves the same way if you use subtraction, multiplication, or division. In Chapter 10, “Working with Calculations,” you can read more about the details of calculating in spreadsheets. For now, be aware that you precede a formula with a plus sign (+) so that Quattro Pro knows that you’re entering a formula, and you use the symbols shown in Table 1.1 to represent their associated operations.
Table 1.1. Mathematical Operators
Tip

You can view all the formulas in a spreadsheet by opening the View menu and clicking Formulas. QuickBooks then displays formulas instead of formula results in cells. To switch back to viewing formula results in cells, open the View menu and click Formulas again.
Also be aware that Quattro Pro contains some built-in calculations—Quattro Pro calls them functions—for calculations you perform commonly, such as summing a column of numbers. You’ll also read more about these functions in Chapter 10.
Using Spreadsheets to Create Charts
Although the saying may be a little tired, it is still true: a picture is worth a thousand words. And, the saying is particularly true when you can use a picture to demonstrate numbers. Suppose that you have a year’s worth of sales figures for three different products your company produces, and you want to compare the sales of the products. If you try to make the comparison using a spreadsheet like the one shown in Figure 1.10, your eyes will probably cross. On the other hand, if you chart those same numbers, you gain instant insight. And, Quattro Pro can easily and quickly chart those numbers (see Figure 1.11).
Figure 1.10. Trying to make detailed, month-by-month comparisons between three sales divisions over a year’s time can be difficult using raw numbers.
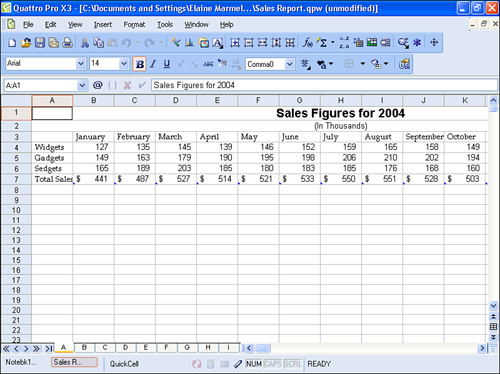
Figure 1.11. Using a chart to display the data makes the comparison easy to see.
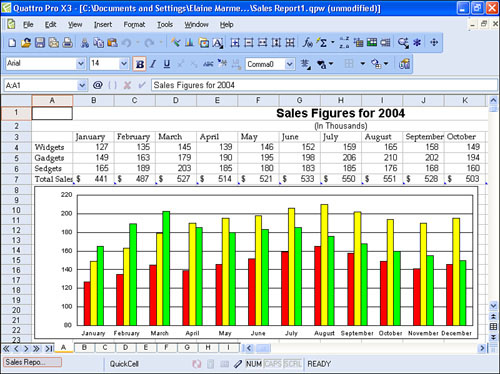
And, charts are interactive like formulas. If you change a number in the data that you used to create the chart, Quattro Pro automatically updates the chart to reflect the change. See Chapter 11, “Graphing Data,” for information on creating charts in Quattro Pro.
Getting Help
Quattro Pro comes with an extensive Help system. You can use the traditional Help system or you can use the CorelTUTOR to show you examples of some specific tasks. Or, you can let the PerfectExpert walk you through creating and working in a notebook. And, if you run into a problem for which you cannot find an answer in the Help system, you can visit the Corel website for technical support. Using the Knowledge Base, you can find the answers to many of your questions, or you can visit the newsgroups and ask others for help.
Using the Help System
You can use the Help system to search for help in one of four ways:
• Search the way you would search a book’s table of contents
• Search the way you would search a book’s index
• Search for Help topics using a key word or phrase
• Search the Corel Knowledge Base using a keyword
The first three methods search the Help file that Quattro Pro places on your computer when you install the program, and the fourth method searches the Corel Knowledge Base located on the Corel website on the Internet.
Using the Contents Tab
To open the Help file that ships with Quattro Pro, open the Help menu and click Help Topics. The Contents tab of the Help Topics window appears (see Figure 1.12). Preceding each entry on this tab, you see either a book icon or a page icon containing a question mark.
Figure 1.12. Using the Contents tab, you can search for help using the concepts you use when you search the table of contents of a book.
When you click the plus sign (+) beside a book icon, as I did in Figure 1.12, the icon changes from a closed book to an open book. You’ll see either additional closed books or entries preceded by page icons containing question marks—or a combination of book icons and page icons.
When you click a book icon or a page icon containing a question mark, Quattro Pro displays the help information associated with that topic.
Working in the Help Topic Window
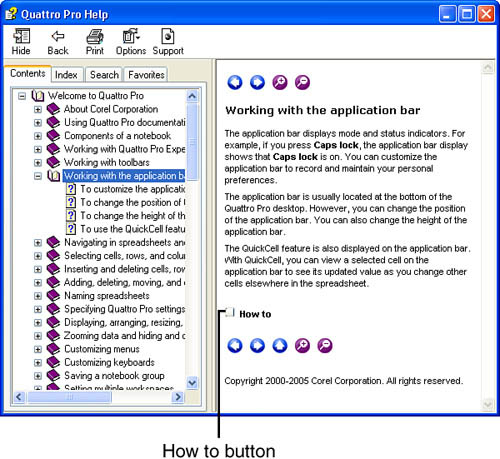
If you click a book icon, Quattro Pro Help displays general help on the topic. At the bottom of the information, you’ll find a How to button that you can click; Quattro Pro displays a window of related topics that correspond to the page icon topics. Click one and then click the Display button. The topic appears in the Quattro Pro Help window (see Figure 1.13).
Figure 1.13. You can find additional related help using the How To button.

Or, you can simply click a page icon to display the help information related to it.
In the window containing the Help information of a page icon, you’ll see a Related Topics button at the bottom that behaves just like the How To button behaves, giving you access to more related help topics.
Using the Index
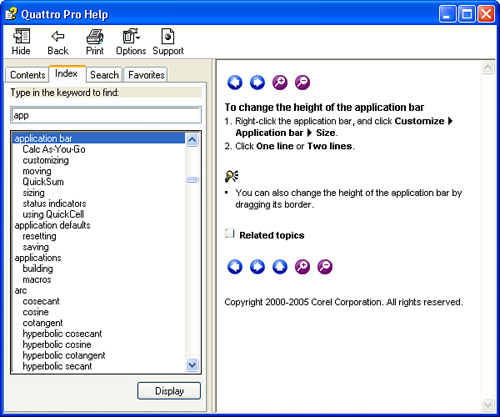
From the Index tab (open the Help menu and click Help Topics; in the window that appears, click the Index tab), you can search the Quattro Pro Help file using the same techniques that you use when you search the index of a book. In a book, you turn to the back and look up topics organized in alphabetical order. On the Index tab (see Figure 1.14), you type the first few letters of the topic for which you want information, and Quattro Pro scrolls in the list of topics to display the ones that begin with the letters you typed.
Figure 1.14. Type a few letters of the topic on which you want help, and Quattro Pro shows you topics that begin with the letters you typed.
When you find a topic that interests you, double-click it, or select it and click the Display button. Quattro Pro displays the Help topic. At this point, Help behaves the same way I described in the preceding section, “Working in the Help Topic Window”; you can read the topic, click the How To button at the bottom and view related topics, and, if you select a related topic, click the Related Topics button in the bottom of that window to view more related topics.
Using the Search Tab
The Search tab and the Index tab work similarly; on the Search tab, however, you’ll have better luck if you type more than just a few letters of the topic on which you want help. Open the Help menu and click Help Topics; in the window that appears, click the Search tab.
At the top of the tab (see Figure 1.15), type the phrase on which you want help and click the List Topics button; Quattro Pro displays topics.
Figure 1.15. Search for Help topics by typing a phrase on which you want help.
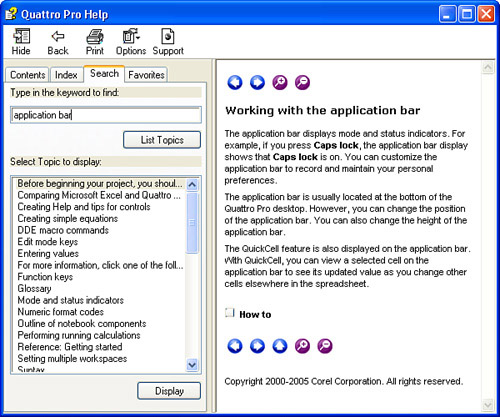
Scroll through the topics that appear; when you see one that you think will help you, double-click it or select it and click the Display button. Quattro Pro displays the Help topic. For details on working with the Help topic, see the section “Working in the Help Topic Window” earlier in this chapter.
Tip
If you think you’re going to need a Help topic frequently, display it. Then, click the Favorites tab and click the Add button. To return to the topic later, reopen Help, click the Favorites tab, and double-click the topic in the list of favorite topics you have saved.
Using the Corel Knowledge Base
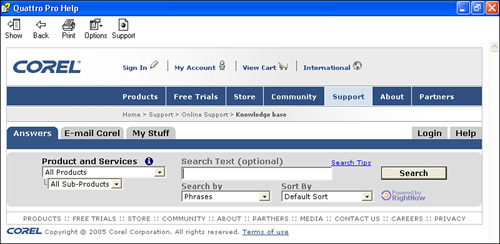
When you use the Corel Knowledge Base, you search the Corel Knowledge Base on the Internet. Open the Help menu, click Help Topics and, in the dialog box that appears, click the Support button (see Figure 1.16).
Figure 1.16. Use the Support button to search Corel’s website for help.
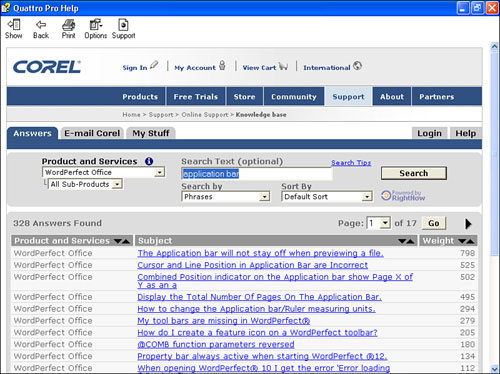
Type the phrase on which you want help, select the product and, if appropriate, the subproduct, and click the Search button; in a few moments, the Corel website lists the topics that match the phrase you typed (see Figure 1.17).
Figure 1.17. The topics that match the keywords you typed appear.
Click a topic to read about it, and use the Back button to return to the list of topics. When you’re ready to return to Quattro Pro, you can close the Help window or you can click the Restore button and the Show button to restore the Help window to its original appearance.
Tip
To effectively use the Corel Knowledge Base, I suggest that you also click the Hide button to hide the left pane of the window. Then, enlarge the Help window by maximizing it; see Chapter 2, “Working with Windows,” for details on maximizing a window.
Using the CorelTUTOR
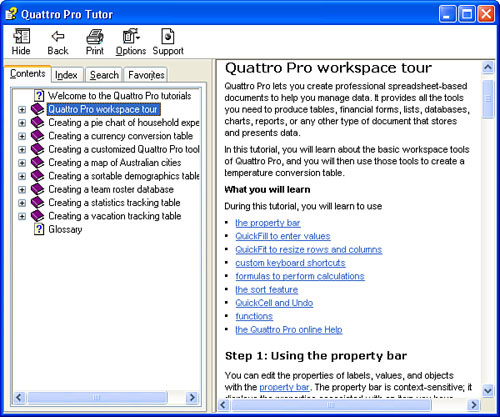
The CorelTUTOR provides a series of tutorials that you can run to learn how to perform specific actions. Open the Help menu and click CorelTUTOR, and the Help Topics dialog box appears. Click the Contents tab, and you see the available tutorials (see Figure 1.18).
Figure 1.18. Quattro Pro contains nine tutorials and a glossary that helps you with specific tasks.
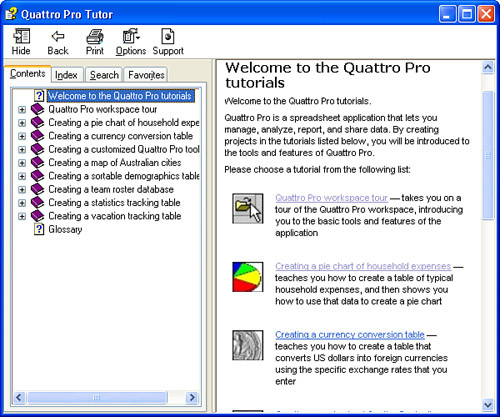
Click a tutorial and information appears in the Help Topics window (see Figure 1.19). You can work through the topic by scrolling down; when you reach the bottom of the window, you see arrows pointing right and left. To proceed to the next tutorial, click the right-pointing arrow.
Figure 1.19. Tutorial information appears in the Help topics window.
PerfectExpert
The PerfectExpert is another form of tutor available in Quattro Pro; you can let the PerfectExpert lead you through the construction of a notebook.
Open the Help menu and click PerfectExpert; the Perfect Expert Tutor Window appears on the left side of the Quattro Pro window (see Figure 1.20).
Figure 1.20. Use the PerfectExpert to let Quattro Pro walk you through setting up a notebook.
You can type in the notebook and, when you need help with a particular action, click the appropriate button on the PerfectExpert. The PerfectExpert will either take the action suggested by the button or display another list of buttons from which you choose an action. The PerfectExpert is particularly useful when you don’t use Quattro Pro often enough to really learn it. If you plan to work with the program frequently, you should focus on learning to use the commands on the menus and toolbars.
Corel on the Web
At the Corel website, you can use the Corel Knowledge Base (see “Using the Corel Knowledge Base” earlier in this chapter for details) or you can visit the newsgroups, a community of users who share a similar interest in Quattro Pro, and read or post questions to which you need answers.
Open the Help menu, point to Corel on the Web, and click Technical Support. The Corel website appears, where you can click the appropriate link to get the type of help you want.
Exiting the Program
When you’re finished using Quattro Pro, you can close the program by clicking the X in the upper-right corner or by opening the File menu and clicking the Exit command.
If you have made any changes to any open notebooks, Quattro Pro will prompt you to save them; see Chapter 3, “Navigating in a Notebook,” for details on saving notebooks.