
16. Customizing Quattro Pro
In This Chapter
• Controlling Quattro Pro’s behavior
• Setting locations to store files
To help you work the way that suits you best, Chapter 15, “Customizing Menus and Toolbars,” showed you how to customize toolbars and menus. In this final chapter, we’ll continue exploring some additional ways to customize Quattro Pro using Workspaces and describing ways you can control Quattro Pro’s behavior.
Using Workspaces
In Chapter 15, you saw that you could customize menus and toolbars in a variety of ways. The “workspace” concept takes that customization a step further. A workspace contains a particular set of menus and toolbars, each arranged in a way that you specify. In Quattro Pro, you can define different workspaces, each with different variations of menus and toolbars, and save each workspace. Then, you can switch between workspaces, using the one that works best at a particular moment.
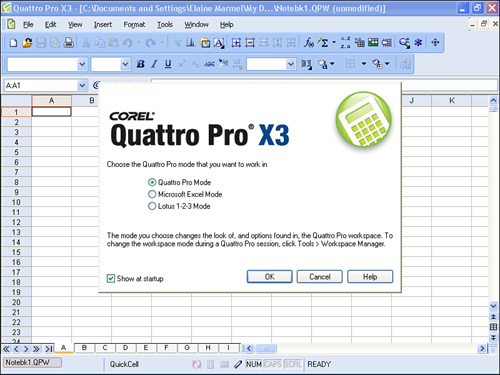
I think that the best example of the workspace concept comes from the window that appears when you start Quattro Pro (see Figure 16.1). This window presents you with the option of choosing between three predefined workspaces; each workspace contains menus and toolbars arranged as you would find them in Quattro Pro, Excel, or Lotus 1-2-3.
Figure 16.1. When you make a choice in this window, you select a workspace.
“That’s nice,” you say, “but I often share files with Excel users and, to be able to speak the same language as these Excel users, I want to be able to see and even use the same commands that they see and use. But I don’t want to close and open Quattro Pro to make the switch.”
Enter the Workspace Manager. The Workspace Manager enables you to switch between workspaces whenever you want. It also enables you to create your own workspaces.
Switching Between Predefined Workspaces
Suppose that you have opened Quattro Pro using the Quattro Pro workspace, and a friend using Lotus 1-2-3 calls and asks you a “How do you do this” question. You can switch to the Lotus 1-2-3 workspace by following these steps:
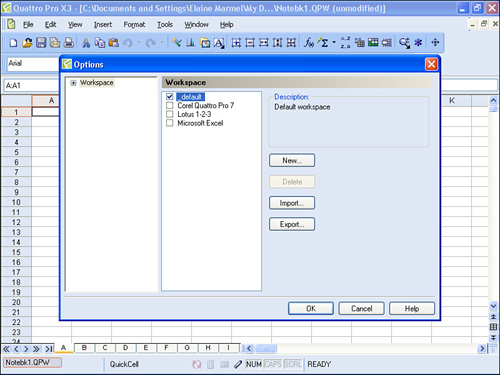
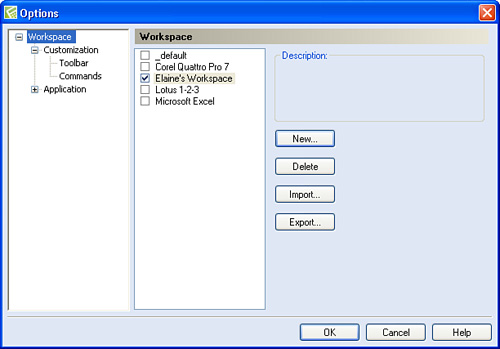
- Open the Tools menu and click Workspace Manager. Quattro Pro displays the Options dialog box shown in Figure 16.2.
Figure 16.2. Use this dialog box to switch to a different workspace.
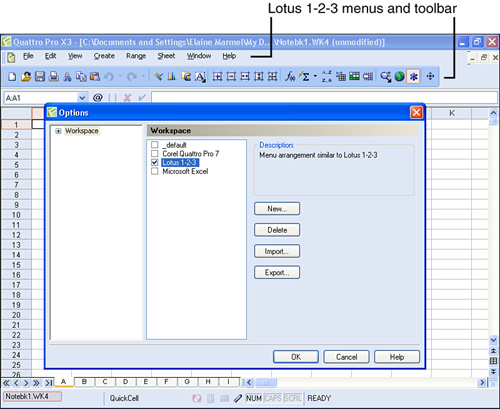
- Click the check box beside the workspace you want to use. Quattro Pro immediately changes the menus and toolbars to match the settings of the selected workspace (see Figure 16.3).
Figure 16.3. You can see the results of changing workspaces immediately.
- Click OK to use the menus and toolbars in the new workspace.
Quattro Pro remembers the workspace that you select even after you close the program. Quattro Pro opens using the last workspace you select until you use the Workspace Manager to switch to a different workspace. To switch back to the Quattro Pro workspace, repeat these steps, choosing _default in step 2.
Creating a Workspace
You also can create your own workspace; in fact, you can create as many different workspaces as you want and switch between them using the steps in the previous section. To create a workspace, follow these steps:
- Open the Tools menu and click Workspace Manager. Quattro Pro displays the Options dialog box shown previously in Figure 16.2.
- Click the New button. Quattro Pro displays the New Workspace dialog box shown in Figure 16.4.
Figure 16.4. Use this dialog box to assign a name and starting point for your new workspace.
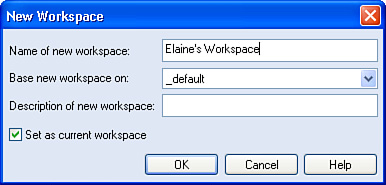
- Type a name for the workspace.
- Open the Base New Workspace On list and select the predefined workspace that most closely matches the workspace that you want to set up.
- Click OK. Quattro Pro automatically selects the new workspace as the current workspace.
- Click the plus sign (+) beside Workspace in the Options dialog box. Quattro Pro displays the Customization and Application options (see Figure 16.5).
Figure 16.5. Expand the choices in the Options dialog box to add and remove toolbars and menus and make other customization selections.
- Click the plus sign (+) beside Customization. Quattro Pro displays the areas you can customize.
- Click Toolbar and add or remove any toolbars you want or don’t want in your new workspace.
- Click Commands and add or remove any menu commands you want or don’t want in your workspace.
- Click OK to save your new workspace.
Tip

A workspace can become corrupted if Quattro Pro does not shut down properly, which can occur, for example, as the result of a power outage. In this case, Quattro Pro will not open. To open Quattro Pro with the default Workspace setup, press and hold the Shift key as you double-click the Quattro Pro icon to start Quattro Pro. A dialog box appears, giving you to the option to overwrite the current workspace with the factory default. Click Yes to reopen Quattro Pro using the default settings. Try this before you need it and before you have customized Quattro Pro and you’ll be prepared for such an event if it happens.
Controlling Quattro Pro’s Behavior
In addition to controlling menus, toolbars, and workspaces, you can control other facets of Quattro Pro’s behavior using the options available when you click the plus sign (+) beside Application in the Options dialog box (see Figure 16.6). Open the Tools menu and click Settings to display the Application choices in the Options dialog box. Table 16.1 lists the categories of options available and describes the types of choices you can make to control Quattro Pro’s behavior.
Figure 16.6. You can control Quattro Pro’s behavior using the options available under Application in the Options dialog box.
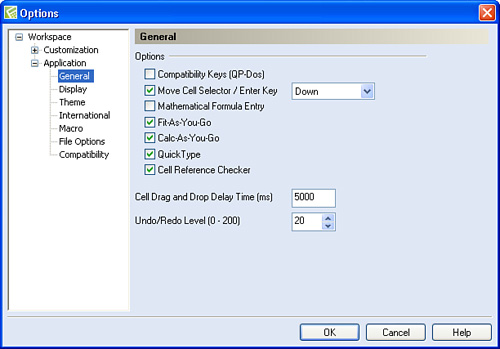
Table 16.1. The Kinds of Application Behavior You Can Control
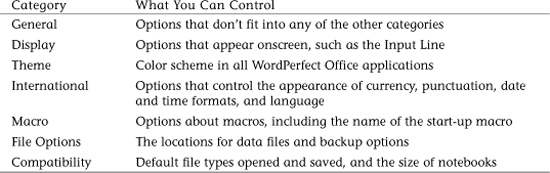
Let’s look at a just a few examples of the types of behavior you can control.
Controlling Mathematical Formula Entry
Suppose that you’re working on a spreadsheet and you need to enter a lot of dates. You want to use the slash as a date separator so that, when you type 12/4, Quattro Pro displays 12/04 in the cell.
By default, however, Quattro Pro uses the slash to divide values you type. So, if you type 12/4, Quattro Pro displays 3, the results of the division.

Use caution when working with dates. 12/04 usually means a date format in the form of MM/DD (Month/Day) for the current year, depending on your settings for dates in both Windows and Quattro Pro. For this example, if you look at the Input Line, you’ll see the number 38690, assuming the current year is 2005. Quattro Pro assigned 1 to January 1, 1900 and sequentially numbered all successive days. A more detailed discussion of dates and settings is beyond the scope of this text.
You can change this behavior. If you place a check in the Mathematical Formula Entry box under General settings (refer to Figure 16.6), Quattro Pro will assume that you mean to divide when you enter 12/4, and Quattro Pro will display the result of 3 instead of a date. If you remove the check, Quattro Pro will assume you want to see a date and display 12/04.
Setting Folder Locations
You know where you want to store all of your Quattro Pro data files and you don’t want to have to navigate to the folder every time you save a new notebook. You can set a default folder for your Quattro Pro data files.
Open the Tools menu and click Settings to display the Application choices in the Options dialog box. Then, click File Options (see Figure 16.7).
Figure 16.7. You can control where Quattro Pro stores your notebooks.
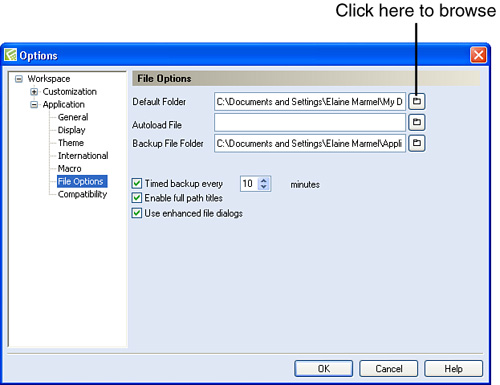
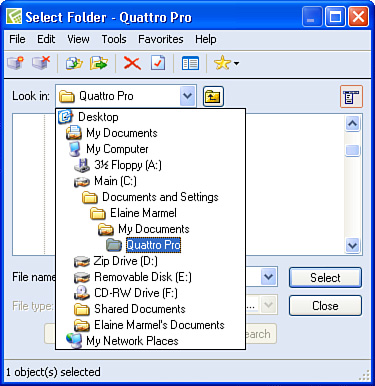
Click the icon beside the Default Folder box to browse for a location where you can store your Quattro Pro notebooks. Quattro Pro displays the Select Folder window (see Figure 16.8). Use the Look In list to navigate to the folder where you want to save your Quattro Pro notebooks. After you highlight the folder, click Select. Quattro Pro saves your choice and redisplays the Options dialog box.
Figure 16.8. Select a folder in which to store Quattro Pro notebooks.
Tip
If you want to create a new folder, navigate to the folder in which you want to place the new folder—such as My Documents—open the File menu in the Select Folder dialog box, and click New Folder.