
Chapter 14. Building a Navigation System
Throughout the last 13 chapters, you’ve assembled all the pieces for a first-rate database. But without a good way to bring them all together, they’re just that—a pile of unorganized pieces.
The best Access databases include some way for people to jump from one part of the database to another. The goal is to make the database more convenient and easier to use. Rather than forcing you to hunt through the navigation pane for the right object, these databases start with some sort of menu form and let you work your way from one task to another by clicking handy buttons. This sort of design is particularly great for people who aren’t familiar with Access’s kinks and quirks. If the navigation system is built right, these people don’t need to know a lick about Access—they can start entering data without learning anything new.
You already know most of what you need to create a first-rate navigation system. Now you need a new perspective on databases—namely, that they can (and should) behave more like ordinary Windows programs, and less like intimidating forts of data. In this chapter, you’ll learn different ways to add user-friendly navigation tools to a database. You’ll learn how to show related information in separate forms, make a form appear when you first start the database, and create navigation forms (that is, forms that direct people to other forms). But first, you’ll start by taking a closer look at the navigation pane to learn how you can control navigation without creating anything new.
Mastering the Navigation Pane
Chapter 1 introduced the navigation pane, and you’ve used it ever since to breeze around the database. However, the navigation pane starts to get congested as your database grows. Depending on your monitor size, once you hit about 20 database objects, they don’t fit into view all at once. As a result, you need to scroll from top to bottom to find what you need, which can be a major pain in the wrist.
One way you can combat this confusion is by designing your own menu forms that let you move around the database. But before you jump to that solution, it’s worth considering some of the features built right into the navigation pane. These features may solve the problem with less work.
Configuring the Navigation List
For starters, consider using filtering to cut down the amount of information shown in the navigation pane. You might have a database with three dozen objects, only ten of which you use regularly. In this case, there’s no reason to show the objects you don’t use.
Essentially, Access lets you make two decisions with the navigation pane:
The confusing part is that you make both these choices using the same menu. To open this menu, click the drop-down arrow in the navigation pane’s title region. Figure 14-1 explains how it works.
You can choose to categorize the navigation pane in five ways:
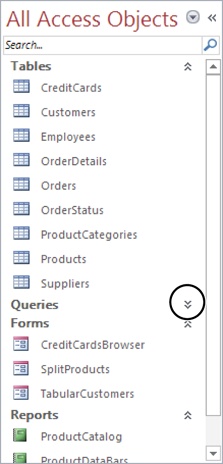
Object Type groups database objects based on the type of object. This method clearly distinguishes tables from forms, reports, and other sorts of objects, imposing order on the unruliest database. This viewing mode also works particularly well if you don’t remember the exact name of the object you want. For example, if you know you need to print a report that shows a list of classes, you can head straight to the Reports group.
When you use Object Type, the filtering list lets you see just a single type of object. If you’ve created forms for every task you need, select Forms to see your forms and hide everything else.
Tables and Related Views groups database objects based on the table they use. If you’ve created two forms, three queries, and a report for a Students table, you’ll see all these objects together in one group (under the heading “Students”). The challenge with this option is that you can have a hard time telling the difference between the different types of database objects, particularly if you use similar names. You need to look carefully at the icon to determine whether a given item is a form, a report, or something else.
Figure 14-1. When you’re ready to tell Access how to arrange objects in the navigation pane, make your selection in the menu’s top portion (named Navigate To Category). The current choice—Object Type—groups tables, queries, forms, and reports into separate sections. To decide which objects appear, make a selection in the menu’s bottom portion (named Filter By Group).Note
Many database objects use more than one table. If you create a query that uses a join (Joining Tables in a Query) to show products with category information, then your query uses both the Products and Product-Categories tables. In “Tables and Related Views” mode, you see this query in two places—under the Products heading and under the ProductCategories heading.
When you use “Tables and Related Views,” the menu’s Filter By Group section includes every table in your database. If you choose a specific table, you see only the objects that are related to that table. You can also choose Unrelated Objects to see any objects that don’t fit into one of the table-specific categories, like code files.
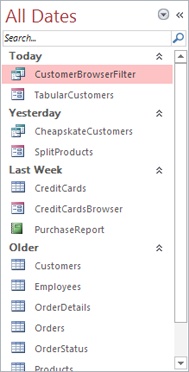
Created Date groups database objects based on the time they were created. Access creates a group for Today, groups for the recent days of the week (Monday, Sunday, and so on), and groups for longer intervals (Last Week, Two Weeks Ago, and so on). You probably won’t use this view mode regularly, because as time passes, the objects move from one group to another. However, it’s a good way to hunt down recent work.
When you use Created Date, the filtering options let you pick out just those object that were created today, yesterday, last week, last month, and so on (as shown in Figure 14-2). If you remember when you created an important form or report, but don’t know its name, this ability can save serious time.
Modified Date works like the Created Date option, except it lets you pick out database objects that have been changed recently. This option is handy if you want to ignore tables and other objects that you rarely use.
When you use Modified Date, you get all the same filtering options you do with Created Date.
Custom lets you choose exactly what database objects are shown and which ones are hidden. This choice is good if you have certain commonly used objects, and others that you want to tuck out of sight. You’ll try out custom groups on Using Custom Groups.

Tip
You can quickly apply filtering. Right-click a group heading, and then choose Show Only [GroupName]. To show just tables when grouping by Object Type, right-click the Tables group, and then choose Show Only Tables. To remove the filtering, right-click the navigation pane again, and then choose Show All Groups.
When you apply filtering in the navigation pane, Access completely hides whatever you don’t want to see. But as you probably already know, Access gives you another option. You can click the collapse arrows next to a specific section to shrink it so that only the section title is visible (Figure 14-3). You can then pop it back into display when you need it.

Better Filtering
The filtering system has one limitation—it lets you choose only one category at a time. If you’ve chosen “Tables and Related Views,” you can filter the list down to the objects that are related to a single table. However, you can’t choose to include two (or more) table groups. Similarly, if you choose Object Type, you can show all the forms or all the reports in your database, but you can’t show forms and reports without including everything else (although the collapsing trick shown in Figure 14-3 helps to reclaim most of the space).
You can use an easy way around this restriction. To get more control over filtering, follow these steps:
Right-click the navigation pane’s title bar, and then choose Navigation Options.
The Navigation Options window appears (Figure 14-5).
Choose the category you want to customize—either “Tables and Related Views” or Object Type.
The list on the right shows all the groups in that category.
If you don’t want a category to appear in the navigation list, clear the checkmark next to it.
If you want your navigation pane to show only reports and forms, choose the Object Type category, and then clear the checkmark next to Tables, Queries, Macros, and Modules.
If you’re customizing the “Tables and Related Views” category, you can also change the order of the groups, as shown in Figure 14-6.
The only item you can’t move is Unrelated Objects, which always appears at the bottom. And you can’t change the order of the groups in the Object Type category at all.
Click OK to close the window.


Hiding Objects
Hiding the groups you don’t want to see is all well and good—but what if there’s a single object you want to tuck out of sight? Maybe you want to make sure other people who use your database aren’t distracted by a few potentially risky action queries (Chapter 8) that they really shouldn’t use. No problem. Just right-click the query in the navigation pane, and then choose “Hide in this Group.”
Note
When you hide an object, it’s hidden in the current view mode, in the current group. (Remember, in “Tables and Related Views” mode, some objects may appear in more than one group.) If you want to hide an object everywhere, you need to track it down in each group, and hide it there.
To reveal a hidden object, you first need to configure the navigation pane so that it shows hidden objects. To do so, right-click the title bar, choose Navigation Options, add a checkmark in the Show Hidden Objects box, and then click OK. Now, hidden objects appear in the navigation pane, but they’re slightly faded so you can distinguish them from the other non-hidden objects. To unhide an object, right-click it, and then choose “Unhide in this Group.”
All of these approaches—filtering, custom groups, hidden objects—are designed to make your database easier to use. These approaches don’t provide any security. (A person who really wants to use a database object can just change the navigation settings to get to it.)
Note
On Preparing Your Database, you’ll learn how to divide a database into separate files, which gives you the best way to keep some database objects out of the wrong hands. However, no matter what you do, Access is not bulletproof. Access is designed to be intuitive, capable, and easy to use. Unlike server-side databases like SQL Server, it’s not designed to lock out bad guys if they get hold of your database files.
Using Custom Groups
Ordinary people don’t think in terms of tables and database objects. Instead, they think about the tasks they need to accomplish. But none of the readymade grouping options fit this approach. Fortunately, you can build your own groups that do. Here’s how:
Click the drop-down arrow in the navigation pane’s title bar, and then choose Custom.
In a new database, you start out with two groups in the Custom view. The first, Custom Group 1, is empty. The second, Unassigned Objects, contains all the objects in your database.
Create the groups for your objects.
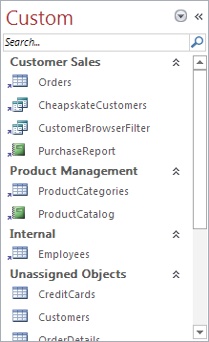
You can create a new group and move an object into it in one step. To do so, right-click the object you want to relocate (in the Unassigned Objects section), and then choose Add To Group→New Group. Enter the group name, and then press Enter. Figure 14-7 shows the results.
Repeat this step to create all the groups you need. If you want to move an object into an existing group, right-click it, choose Add To Group, and then pick the corresponding group name.
Figure 14-7. It’s often a good idea to create groups that reflect specific types of tasks, as in this database. You’ll notice that in Custom view, the items have slightly different icons, with a superimposed arrow in the bottom-left corner. This feature is Access’s attempt to highlight the fact that they are shortcuts to your database objects, and their arrangement doesn’t reflect any intrinsic property of the objects themselves.Optionally, you can also rename, remove, and reorder your groups now.
The easiest way to do this is to use the Navigation Options window. Right-click the navigation pane’s title, and then choose Navigation Options. When the Naivgation Options window appears, you can carry out the following tasks:
Select a group, and then click Rename Group to apply a new name.
Remove your group—just select it, and then click Delete Group.
Add a group, by clicking Add Group. It starts with no objects.
Rearrange your groups. Just click one, and then use the arrow icons that appear to move it up or down.
Move your custom category to a different place in the list, which affects how the menu appears when you click the drop-down arrow in the navigation pane.
Hide a group (temporarily, or for the long term). Just remove the checkmark next to the group.
The only thing you can’t do with groups in the Navigation Options window is change the objects that each group contains. (To change them, you need to drag your objects around the navigation pane, as described in step 2.)
You can also change the name of the view that contains all your groups. Initially, this category is named Custom, but you can change it to something more descriptive by selecting it in the Navigation Options window, and then clicking the Rename Item button. And if you’re more ambitious, you can create more than one top-level custom view mode. Click Add Item to add a new one, and Delete Item to remove it. Figure 14-8 shows an example with several custom categories.
Click OK when you’re finished making your changes.

Searching the Navigation List
If you just can’t bear to have anything out of your sight, you may need to put up with a cumbersomely long list of objects in the navigation pane. However, Access still provides you with one convenient feature that can save you hours of scrolling.
It’s the search box, and it lets you jump to an object almost instantaneously, provided you know its name.
To show the search box, follow these steps:
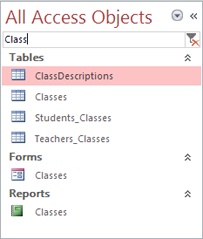
The search box appears at the top of the list in the navigation pane. As you type, Access filters the list so it includes only matching objects (Figure 14-9).
Building Forms with Navigation Smarts
The navigation pane is an invaluable tool for getting around your database, but it doesn’t suit everyone. People who’ve never used Access before might find it a little perplexing, and there’s nothing stopping someone from changing the navigation options (and opening objects they shouldn’t).
To get more control and to add a friendly veneer, many Access experts build navigation features into their forms (and occasionally their reports). After all, a form gives you virtually unlimited possibilities for customization. You can add a paragraph of text, throw in a hot pink background and a company logo, and reduce confusing options to a few fat, friendly buttons.
If you do decide to use forms for navigation, your first decision is what kind of form to build. Access gives you a wide range of options, and you’ll explore them in the following sections.
Custom Menu Forms
A menu form has just one purpose—to transport people to other forms (usually, when they click a button). A typical menu form doesn’t display any information—it simply provides a stack of buttons that lead to different places. It serves as both a starting place and the central hub of activity for your database.
Building a custom menu form is one of the simplest and most effective ways to provide navigation for your database. You simply create a series of buttons and configure each one to show the appropriate form (as described on Performing Actions with Command Buttons). You can even place a background picture on your form, or add an effect to make your buttons stand out. Figure 14-10 shows an example.

This menu form presents a clean blank surface along with an image control that shows a snazzy graphic. It also includes several ordinary button controls that were created with the Command Button Wizard (Performing Actions with Command Buttons). Each button’s Back Style property is set to Transparent, to give it a more modern flat look. The Cursor On Hover property is set to “Hyperlink hand” so that the mouse pointer changes to a pointing hand when you move over a button, which lets you know that you can click there.
Another approach is to use a picture as the background for the whole form and to put other controls on top of the background. To do this, you need to set these properties on the form: Picture (the picture file you want to show), Picture Tiling (whether the image should be repeated to fill the available space), Picture Alignment (use Top Left so that it starts from the form’s top-left corner), and Picture Size Mode (use Clip, so the picture isn’t stretched, resized, or otherwise mangled). All the controls you place on top of a form with a background picture should have their Back Style property set to Transparent so that the picture shows through.
Note
Before you invest a lot of effort building your own menu forms, check out Access’s navigation form feature later in this chapter (Navigation Forms). It’s a simple menu-making approach that may be just the ticket if you can make do with a little less flexibility.
Designating a Startup Form
Since a custom menu form is the gateway to your Access database, it’s a good starting point for folks who are going to use your database. You can tell Access to open any form automatically when someone first opens your database. Here’s how:
Choose File→Options.
The Access Options window appears.
In the list on the left, click Current Database.
The settings for the current database appear.
Under the Application Options heading, look for the Display Form box. Choose your custom menu form in the list.
Now, whenever you open the database, Access launches your form immediately.
Optionally, if your custom menu completely eliminates the need for the navigation pane, look under the Navigation heading, and clear the checkbox next to the Display Navigation Pane setting.
Compound Forms
Alternatively, you could forget about designing a way to jump from form to form, and instead create a form that brings everything you need into one place. This trick, called a compound form, uses the subform control you learned about on The Subform Control.
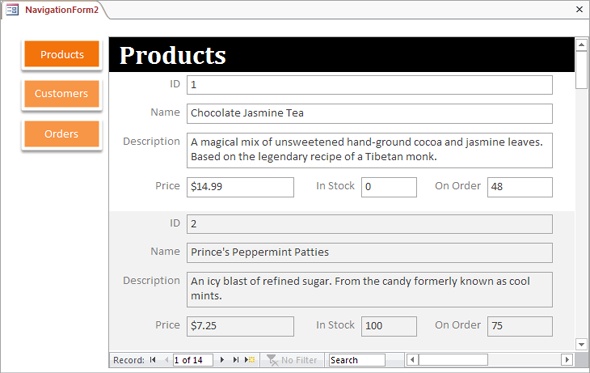
In Chapter 13, you learned how the subform control lets you show related data (like a list of products for the current product category). However, the subform also makes sense if you want to show several unrelated tables in one place. Just leave the Link Master Fields and Link Child Fields properties of the subform empty—that way the subform shows all the records without filtering. Figure 14-11 shows an example.
Tip
You can use a shortcut to create a compound form. First, choose Create→Forms→Form Design to create a blank new form. Find a form you want to use in the subform, and then drag it from the navigation pane to your new form’s design surface. Access creates a subform control that shows that form. You can also drag a table onto your form, in which case Access creates a subform for that table (and asks you to pick a name for it).
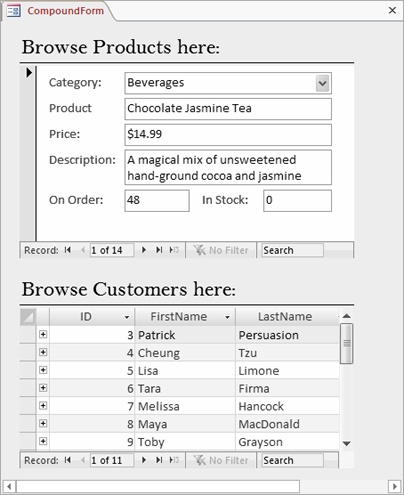
When creating a compound form like the one in Figure 14-11, you should set the form’s Navigation Buttons property to false (because the real navigation buttons are in the subforms, not the main form). You can also set the Record Selectors property to No to prevent the record selection margin from appearing at the left.
If you’re using “Tables and Related Views” mode in the navigation pane, a compound form usually appears in the Unrelated Objects area. That’s because the form itself doesn’t use any tables. Instead, it contains subforms, and these subforms use the various tables you’re displaying.
Showing All Your Forms in a List
You may find one last trick useful when building a navigation hub. Rather than create a button for each form you want to use, you can create a list control that has them all. When the person using the database picks a form from the list, Access jumps to that form. This approach works well if you have a large number of forms, which would irredeemably clutter the button-only approach.
The first step is to put the form names in a list box. Access gives you three ways to do this:
Type the names in by hand. Just drop a combo box control onto your form. When the wizard starts, choose “I will type in the values that I want,” and then enter the form names in the appropriate order.
Note
Navigating with Lists has more about the List Wizard. Just remember, at the end of the wizard, you need to choose “Remember the value for later use.” Your list is used for navigation, not record editing.
Pull the names out of a custom table you create. Create a new table, and then fill it with the names of the forms you want to show in the list. Then, when you create the combo box, choose “I want to look up the values in a table or query,” and then specify your custom table.
Pull the names out of the system table. For a really nifty trick, you can get the full list of forms straight from your database. The trick is to use one of the hidden system tables. These system tables are tables that Access uses to keep track of database objects. Every Access database has these tables, but tucked out of sight.
The first two options are straightforward. The third option is more impressive, but it takes a little more work. Ordinarily, the system tables are hidden from sight. You can pop them into view (see Figure 14-12) by choosing Show System Objects from the Navigation Options window. Showing the system tables isn’t a good choice for the long term, because any change you make in these tables could damage your database and confuse Access.
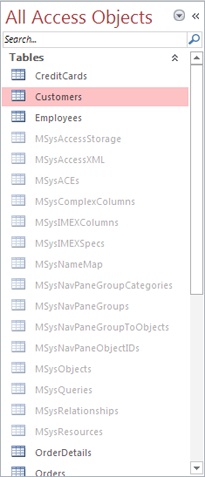
Even if you don’t show the system tables, you can still use them. The most interesting system table is MSysObjects, which lists all the objects in your database. You can get a list of all the forms in your database by querying this table with an SQL command (see Analyzing a Query for a refresher on how queries use SQL). The Name field provides the database objects’ name. The Type field contains a numeric code that identifies the type of object. Table 14-1 lists the types in which you may be interested.
Based on this information, you can get a list of forms by retrieving the Name field, and then filtering out those records with a Type value of –32768.
You can most easily build this bit of logic into your list control by adding your list to the form and skipping out of the wizard (press Esc when it starts). Then, you can configure the control using the Property Sheet. In the Data tab, find the Row Source property, and then enter the following SQL statement, which performs the query you need:
SELECT Name FROM MSysObjects WHERE MSysObjects.Type=-32768
You now have a list that shows all the forms in the database. You can substitute the number –32764 for –32768 to get reports instead; Figure 14-13 shows the results.
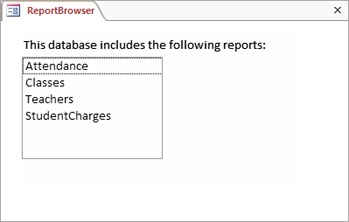
So far, you’ve seen only half of the solution you need. You’ve learned how to get the list into the right control, but at the moment nothing happens when you use the control. You really need a way to jump to the selected form or report.
It turns out that this solution is a bit more advanced than the examples you’ve seen so far. To make it work, you need to customize a macro. (A macro is a list of one or more instructions stored as a database object so you can use it anytime.)
As you learned in Chapter 13, when you create a command button, the Button wizard asks you a few questions, and then builds the macro you need. However, the Button wizard is woefully underpowered. For instance, while it can create a macro that navigates to a specific form, it can’t create a macro that can go to any form. But with just a little more work, you can create a simple macro with the wizard, and then fix it up to really suit your needs. Here’s how:
Drop the button onto your form.
Place it next to the combo box control. The Button wizard launches.
Choose the Report Operations category and the Open Report action, and then click Next.
Or, if you’re showing a list of forms, choose the Form Operations category and the Open Form action.
Pick any report (or form), and then click Next.
It doesn’t matter what you choose here, because you’ll change this part later.
Complete the wizard.
Make sure you give your button a suitable caption, like “Go,” “Open Form,” or “Show Report.”
Once the wizard is finished, it’s time to take a closer look at the button in the Property Sheet.
In the Property Sheet, select your newly created button, and then switch to the Event tab.
Events are occurrences that can trigger your macros. For example, every button has an
OnClickevent that takes place when you click the button.Find the OnClick property, and then click inside the property box, where it says “[Embedded Macro].”
An ellipsis (…) appears at the corner of the box.
Click the ellipsis to edit the macro.
A macro-editing window appears. It shows a single action (named either
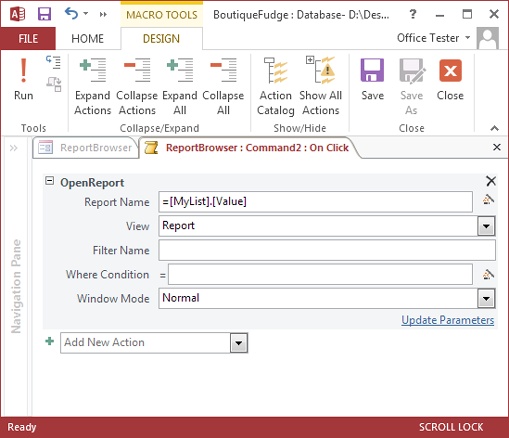
Open-ReportorOpenForm, depending on what you chose in step 2). Click to select this action. Each configurable piece of information turns into a text box (Figure 14-14).In the Report Name (or Form Name) text box, type the expression
=MyList.Value.This expression finds your combo box and pulls out the currently selected value. It assumes your combo box is named MyList. If not, change the expression accordingly. (If you don’t remember the name of your list control, click to select it, and then look at what name appears in the drop-down list at the top of the Property Sheet.)
Close the macro window, and then choose Yes to save your changes when prompted.
You return to the form design window.
Switch to Form view, and then try out your new list mojo.
You should be able to select a form in the list, and then click the button to open the form you chose.
Navigation Forms
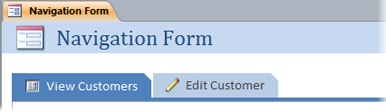
If you’re tired of building navigation forms on your own, you’ll be happy to learn about Access’s navigation forms. This feature lets you create a form that has a tab-based menu built right into it. Figure 14-15 shows an example.

Behind the scenes, navigation forms use some of the same techniques you’ve already learned about. For example, when you choose a new form from the menu, the navigation form brings it into view using a subform. But the best part is that you can create a fairly complex navigation form just by dragging and dropping your forms into the navigation menu. In a few short minutes, you can build a complete menu for your database.
As great as they are, navigation forms have two limitations:
You can’t completely change the way they look. Even though you can make the individual navigation buttons look different with colors and shape effects, they’re always arranged the same basic way—as a strip along one of the sides of your form.
They force you to work on one form at a time. Whenever you click a navigation button, the current subform is closed and a new subform is loaded. But in certain editing situations, you might want to have two forms open at once, so you can edit two different records at the same time. One way to accomplish this is to create buttons that open forms in separate tabs (as you’ll see on Linking to Related Data). You can then move back and forth between the tabs at will. Another option is to include both forms as subforms in a single superform (a technique that’s demonstrated on Designating a Startup Form). Either way, these techniques don’t neatly fit into navigation forms.
If you can live with these restrictions, navigation forms are a great way to give your database an attractive navigation system with minimal work.
Creating a Single-Level Navigation Form
Here’s how to create a navigation form like the one shown in Figure 14-15.
To create your navigation form, pick one of the top three options from the Create→Forms→Navigation menu (see Figure 14-16).
Access gives you six different navigation forms to choose from, which vary in two ways. First, there’s the location of the navigation menu—the most common choices are on the top or side. Second, the menu can be either a simple single-level menu or a more complex two-level menu. (You’ll learn about two-level menus in the next section.)
Figure 14-16. The bottom three options use two-level menus. The person using the form must first click one of the top-level buttons, and then click another sub-level button to see a form. Two-level menus aren’t quite as convenient as single-level menus, but they’re the only way to go if you have a huge number of forms, or if you want to arrange forms according to specific types of tasks.When your navigation form first appears, you’ll see a linked combination of two controls: a large, blank subform, and a navigation control (a thin strip of buttons) off to one side. These two pieces are connected by a layout table.
To add a navigation button for one of your forms, click the form in Access’s navigation pane, and drag it onto the navigation control (Figure 14-17).
When you release the form onto the navigation control, Access adds a new navigation button for it.
If you want to change the navigation button caption, double-click the caption and type the new name.
For example, you might prefer the button for TaxReportsYearEnd to read “View Tax Reports.” You can also drag the right or bottom edge of the new navigation button to make it larger, so you can fit more text.
Repeat steps 2 and 3 until you’ve added all the forms you want.
To remove a form that you don’t want, click it once and then press Delete.
When you’ve finished, you can switch to Design view and try out your form. A simple click of a button takes you to the matching form—and best of all, you didn’t need to write any code or work your way through any wizards.


Creating a Two-Level Navigation Form
Creating a two-level menu is almost as easy as creating a simple single-level menu. Here’s how to do it:
To create your navigation form, pick one of the bottom three options from the Create→Forms→Navigation menu.
Your navigation form gets a linked combination of three controls: a large, blank subform, and two navigation controls.
The navigation control at the top is the top-level menu. The navigation control underneath or off to the side is the submenu. The person using your navigation form will choose a category from the top-level menu, and then pick one of the forms listed in the submenu.
Begin by adding a heading for your top-level menu. Click “[Add New] text in the top level” and type in a new caption.
You might create headings for different tasks (like Sales, Stock Management, and Reporting) or for different form users (like Sales Department, Warehouse, and Admin). Figure 14-19 shows an example.
To add the submenu for this heading, drag a form from the navigation pane onto the submenu.
When you release the form onto the navigation control, Access adds a new navigation button for it.
Repeat step 3 to add more forms to this group. Or, repeat step 3 to add a new top-level category.
If you want to change a submenu, just click the top-level heading to select it (at which point the corresponding submenu appears). You can then add new forms or remove existing ones.

Note
The example in these steps uses the top-level menu exclusively for categories, and the submenu for forms and reports. However, you can drag forms into the top-level menu too, although it can be a bit confusing. For example, if you drag a Customers form into a top-level menu, Access creates a button that shows the Customers form directly, rather than showing a submenu.
Fine-Tuning Your Navigation Buttons
Ordinary navigation buttons don’t look bad, but with a little more effort you can replace them with something a bit more stylish.
Your first option is to add a picture to a navigation button, which can either replace your text or sit alongside it (Figure 14-20). Before you do so, open the Property Sheet by choosing Form Layout Tools | Design→Tools→Property Sheet. Then, select a button and set the following properties:
Picture. Click in this box and then click the ellipsis (…) to pick your picture file. Make sure you use a small picture (a tiny icon-sized image is best), otherwise you’ll obliterate the button caption text.
Picture Caption Arrangement. This determines how your picture and text share the button space. Choose No Picture Caption to display the picture only. The other options set where the text should go, which means that Left puts the text on the left side of the picture, Top puts it above the picture, and so on. Depending on your arrangement, you may need to enlarge the button, which you can do easily by dragging its edge.
Your second option is to alter the button’s appearance by using the formatting commands in the Form Layout Tools | Format→Control Formatting section of the ribbon, just as with ordinary buttons. Here’s a quick review:
Shape Fill. Changes the color of your button, even giving it a smoothly blended gradient.
Shape Outline. Changes the thickness, color, and style (for example, dashed or solid) or the border around the edge of your button.
Shape Effects. Adds a shadow, glow, blurred edge, or beveled edge to your button.
Quick Styles. Gives you a choice of snazzy, readymade button designs that change the fill, outline, and effect all at once. Figure 14-18 features an example with stylized buttons.
Change Shape. You may not have noticed it, but the navigation buttons automatically use a slightly different shape than normal buttons, with a gently rounded top edge that makes them look more like tabs.
Access’s designers added the Change Shape feature so you can give your buttons this distinctive shape, too. If you don’t want the standard tab titles, you have a few other choices to choose from, including circles, ordinary rectangles, tabs with even more rounding on the top edge, and rectangles with a chip off the top-right corner (Figure 14-20).
Linking to Related Data
A menu or navigation form providing a bird’s-eye view of your database. However, your work doesn’t end here. A well-designed navigation system lets you move easily from one form to the next, so you can move efficiently through your entire database.
The secret to form-to-form navigation is thinking about your workflow (that is, the order in which you move between tasks when working on your database). Suppose you’re a furniture company selling hand-painted coffee tables. What happens when you receive a new order? Probably, you start by creating or selecting the customer (in one form), and then you add the order information for that customer (in another form). The menu doesn’t need to go directly to the order form. Instead, you should start with a customer form. That form should provide a button (or some other control) that lets you move on to the order form.
You need to go through a similar thought process to create forms for, say, the customer service department. In their case, they need a way to pick a customer and to see, at a glance, the billing and payment details, the order information, and the shipping records. The best solution in this scenario could be to create a compound form that pulls everything together.
Getting from one form to another is easy. All you need is the right button. The following two sections walk you through two common examples.
Showing Linked Records in Separate Forms
In Chapter 13, you learned how a subform control can show linked records in one place (The Subform Control). However, subforms don’t always give you enough room to work. Depending on the way you work and the sheer volume of information you’re facing, you may prefer to show the related records in a different place. You could add a button to your form that pops open another form with the linked records. The trick to making this work is using filtering in the second form so that it shows only the related records. Figure 14-21 and Figure 14-22 show an example with the Cacophoné Studios database.
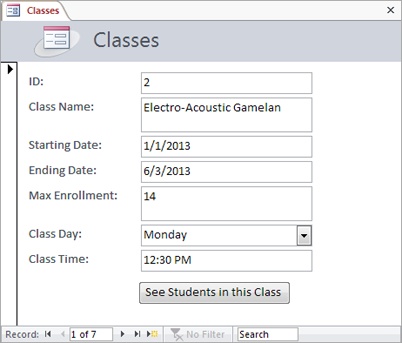
You can create the two forms that appear in Figure 14-21 and Figure 14-22 without much effort. The tricky bit is creating the “See Students in this Class” button.
Here’s what you need to do to wire up a button that opens another form to show related records:
Open the parent form in Design view (or Layout view).
Here, you start with the Classes form.
Find the control gallery in the ribbon. Then click the Button icon, and draw the button onto your form.
In Design view, you can find all the controls in the Form Design Tools | Design→Controls section. In Layout view, they’re in the Form Layout Tools | Design→Controls section.
Once you add the button to your form, the Button wizard springs into action.
Choose the Form Operations category, choose Open Form, and then click Next.
The next step in the wizard shows all the forms in your database.
Choose the child form that has the related records, and then click Next.
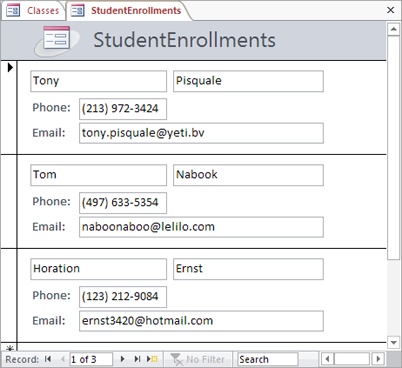
In this case, choose the StudentEnrollments form.
Choose “Open the form and find specific data to display,” and then click Next.
The next step appears, with a list of fields in both forms (Figure 14-23). It’s now up to you to tell Access how to filter the second form based on the first.
In the list on the left, choose the unique identifying field from the first table.
In this case, it’s the ID field from the Classes table.
In the list on the right, choose the matching field from the second table.
It’s the ClassID field from the StudentEnrollments table.
Click the two-way arrow button.
The two fields appear in the Matching Fields box. In the Cacophoné Studios example, you’ll see the text “ID <-> ClassID.” This tells Access to show an enrollment record only if the ClassID value in the StudentEnrollments form matches the ID value in the Classes form. In other words, you’re getting the student enrollments for the current class.
Click Next.
From this point on, the Button Wizard shows the standard steps you learned about earlier (Performing Actions with Command Buttons).
Supply a name for the button, and then click Finish.
To try your link, switch to Form view and then click your link. When you click the “See Students in this Class” button and the StudentEnrollments form appears, your filtering takes effect.

Note
Nothing stops someone from removing your filtering by using the ribbon’s Home→Sort & Filter→Toggle Filter command (or clicking the Filtered button that appears at the bottom of the form, next to the navigation buttons). If you don’t want to allow this flexibility, you can configure the StudentEnrollments form so it doesn’t let anyone change its filtering settings. To do so, open the form in Design view, select the Form item in the Property Sheet list, and then change the Allow Filters property from Yes to No.
Showing More Detailed Reports with Links
You can use a similar technique to allow navigation in reports. If you want, you can create a way to jump from one report to another, related report. In fact, the macro you need to create is almost identical to the one in the previous example.
Usually, Access experts use this technique to start with a general report and let people click their way to a more detailed report that highlights part of the data. Figure 14-24 and Figure 14-25 show an example.
![Here’s the CustomerPurchases report that profiles the selected individual’s spending habits. A string-building expression =“Products Purchased By” & [FirstName] & “” & [LastName] puts the current customer’s name into the title.](http://imgdetail.ebookreading.net/data/56/9781449359447/9781449359447__access-2013-the__9781449359447__httpatomoreillycomsourceoreillyimages1607043.png.jpg)
Note
Reports are designed to be printed. For that reason, big gray buttons look a little out of place. Your other option—linking—as shown in this example, is much more common because it shows the data you need to print and adds interactivity at the same time.
To create this navigation, you need to begin by creating a text box that looks like a hyperlink. (You can’t use the bonafide hyperlink control, because it displays only fixed, unchanging text. Instead, you need a way to display a field’s content as a link—in this example, the customer ID.) You can then create a macro that, when the text field is clicked, springs into action to move you to the new report. This macro’s job is to open the detailed report that you want, and then apply filtering so that only the related records appear.
You can easily format the text box. You can select any control, and then change its color, font, and so on, using the commands in the ribbon. However, you don’t even need to perform this work. That’s because every text box has an odd property named Is Hyperlink—set this to Yes, and the text box morphs into a blue underlined piece of text, which is just what you want.
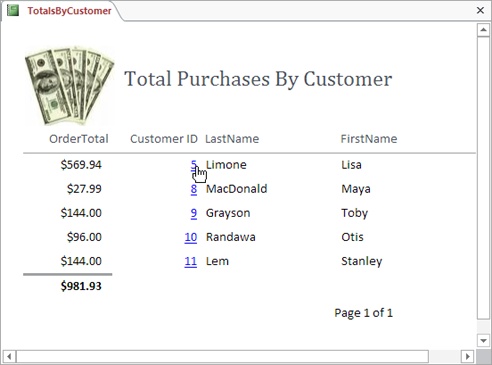
Once that’s out of the way, it’s time to add the macro you need. You can use the following steps with the Boutique Fudge database (included with the downloadable content for this chapter) to add the link to the TotalsByCustomer report (which opens the CustomerPurchases report).
Note
A macro is a list of actions that you want Access to perform. In the next chapter, you’ll explore macros in depth. For now, you’ll learn just enough to create the navigation feature you need.
Open the report you want to use in Design view (or Layout view).
In this example, everything starts at the TotalsByCustomer form.
If the Property Sheet isn’t visible, then choose Report Design Tools | Design→Tools→Property Sheet.
In Layout view, the tab title is different, so the full command is actually Report Layout Tools | Design→Tools→Property Sheet.
Decide what field you want to use to create the link and then select it.
Usually, you’ll want to use the unique ID value that links two tables together. Here, you use the ID field that stores the customer ID. If you haven’t already, you should format this field to look like a link using the Is Hyperlink property.
Now it’s time to create and attach your macro.
In the Property Sheet, switch to the Event tab, and then click the On Click box. Click the ellipsis (…) button.
The Choose Builder window appears and asks you how you want to create the code that runs when the link is clicked.
Choose Macro Builder and then click OK.
The macro-editing window appears. Initially, it’s blank except for a single drop-down list with the text “Add New Action.”
In the Add New Action list, click the drop-down arrow and choose
Open-Report.You can also use
OpenFormto launch a form (for editing) when the report link is clicked.Once you choose an action, a bunch of text boxes with related settings appears. Access also moves the Add New Action list down so it’s under your newly added action.
Click in the Report Name box, and type the name of the report you want to use.
In this example, that’s CustomerPurchases.
Click in the Where Condition box, and type in your filter expression.
This filter expression needs to select the linked records. In the current example, your filter needs to select order records that match the current customer ID.
Your expression needs to pick the right field in the report you’re opening (the CustomerID field in the CustomerPurchases report), and then match it to the field where you clicked the link (the ID field in the TotalsByCustomers report). Here’s the expression you need:
[CustomerID]=[Reports]![TotalsByCustomer]![ID]
The syntax
[Reports]![TotalsByCustomer]![ID]is just a fancy way to tell Access to go looking for the ID value it needs on a currently open report named TotalsByCustomer. Once it finds that value, Access uses it to filter the new report that you’re opening (the CustomerPurchases report) so it only shows records that have a matching value in the CustomerID field. In other words, you’re telling Access to show the purchases made by this customer only.Close the macro window, and then choose Yes to save your changes when prompted.
You return to the report design window.
Switch to Report view and then try out your link.
Now you can click the link to drill down to the more detailed report.
As always, you can try this example for yourself by using the sample databases for this chapter.
Note
As written, this example has one minor problem. To see it, leave the CustomerPurchases report open, go back to the TotalsByCustomer report, and click a different customer link. Access won’t refresh the CustomerPurchases report. To get around this problem, just close the CustomerPurchases report before you pick a new customer. Or, get your macro to call the CloseWindow action before it calls the OpenReport action, which quietly and seamlessly corrects this quirk. (Download the sample code to take a look for yourself.)