
Chapter 19. Sharing a Database on Your Network
Now that you’ve created the perfect database, you’d probably like to share it with friends and colleagues. In the hands of a single person, Access is a top-notch tool for managing information. But when you share the love with a group of people, it becomes an even better way to work together.
Sharing databases is particularly important if your database plays a behind-the-scenes role in an organization. Imagine you create a database that tracks company projects and their due dates. (Often, a database like this starts out as a timesaving convenience in the hands of an Access fan with a little too much free time.) Before long, other departments want in so they can keep track of their own projects. And the possibilities don’t stop there; if you share the database with a wide enough audience, you can link together all sorts of related tasks. Employees can log the hours they work on each project. Product testers can submit outstanding issues that affect a project. Team leaders can identify time-taxing projects, head honchos can calculate salary bonuses, and the CEO can get a bird’s-eye view of all the work that’s taking place in the company. Before long, it becomes difficult to imagine life without your Access database.
In this chapter, you’ll learn how to share your database with a small team. You’ll consider the potential pitfalls, and you’ll learn what you need to do to keep everything running smoothly.
Opening Up Your Database to the World
When you decide to share your data, the first decision you need to make is whether other people need to change any of the information. As you’ll see, passing copies of your database around is easy. But getting people to work on the same database file at the same time is a trickier proposition.
If all you need to do is distribute a copy of your database for other people to review, you might try one of these two super-simple approaches:
Copy your database. You can give others a copy of your database file. For example, if Uncle Earl has a copy of Access, you can email him your list of family addresses. The limitation with this approach is that there’s no easy way to sync up the changes in different copies. If Uncle Earl adds a few new people to your database, your original remains the same. If you change the original, Uncle Earl’s copy is out of date.
Export your data. You can take the data in your database and export it to another format (like an HTML web page or an Excel spreadsheet). This is the way to go if the people who need to see your data don’t have Access. You’ll learn how to export data in Chapter 23.
On the other hand, if you want a crowd of people to be able to enter data and see each other’s changes, all in real time, you need to step up your game. There are several potential solutions, and each one has its own drawbacks:
Use the multiuser features in Access. You can place your database in a shared location (like a network drive) so several people can use it simultaneously. This way, everyone’s working with the same set of data (and Uncle Earl’s changes don’t get lost). With this method, Access has to keep everyone’s work coordinated. If your group is small—say, with no more than 40 people using your database at once—multiuser sharing should work. But if your group is large, Access isn’t the best choice. Instead, you need a server product that’s built from the ground up for high volume, multiuser access. (The next section gives you a handy checklist to help you decide if this approach is for you.)
Create a web app. Here’s the good news: with web apps, you can let other people view and edit your database over the Web, from any location, using any web browser. And here’s the bad news: web apps are limited to a subset of Access’s full feature set, and you’ll need a SharePoint server or one of Microsoft’s Office 365 hosting plans to get your work online. Web apps are Microsoft’s preferred choice for solving the challenges of a multiuser database, but they aren’t for everyone. You’ll learn more about them in the next chapter.
Store your data somewhere else, and link to it. Here, the idea is to use an industrial-strength server product like SQL Server or SharePoint to store all your data. You then use Access as a tool for retrieving and editing your data. The advantages of this approach are significant: first, you can keep using all your favorite Access tools, including forms, reports, and VBA code; and second, your database can stand up to a virtually unlimited number of users without a hiccup. The drawback is complexity—setting up either SQL Server or SharePoint is an ambitious task, even for technically savvy people. You’ll try them out in Chapter 21 (SQL Server) and Chapter 22 (SharePoint).
This chapter focuses exclusively on the first item in the list—the multiuser support that’s hardwired into Access. But before you get started, it’s important to understand the limits you’ll face so you can assess whether Access sharing can meet your needs.
How Access Sharing Works
The database-sharing features in Access are easy to understand. First, you place your database file in a location where everyone can get to it—like a folder you’re sharing on your computer, or (better yet) a spot on a server computer on your company network. Now, anyone who wants to use the database simply needs to open the database file.
Sounds easy, right? Not so fast. Before you rearrange your entire company around a single database file, you need to crunch a few numbers. Here are some indications that suggest Access sharing will work for you:
No more than 40 people use the database at once. The key part is how many people are using the database at once. You’re free to share the same database with hundreds of users, so long as they don’t all open it at the same time.
No more than 15 people change the database at the same time. Reading the database is easy, but updating it presents some serious challenges. One obvious problem occurs if more than one person tries to change the same record at the same time, but in different ways. And because of the way Access is designed, even changes that shouldn’t clash with one another can slow down your overall performance. You’ll tackle this issue later in this chapter when you consider locks (Using Locks to Stop Overlapping Edits).
Note
This number (15) is just a conservative guideline. If different people are making changes in completely different tables, you may be able to squeeze in more updates at once. Conversely, if everyone wants to change the same few records, you may run into trouble even earlier. If in doubt, try it out.
The structure of the database changes infrequently. In other words, you don’t expect to regularly redesign your tables, add new fields, or tweak relationships. Ideally, you’ll perfect all your tables before you share the database. And for best results, only one person should have the role of Chief Table Designer and be responsible for changing the database structure when needed.
Different people tend to work with different tables. If everyone who uses the database is performing the same task (and accessing the same table), you’ve got a problem. But if one person maintains the product catalog, five more enter orders, and another six log shipments, you’re in a much better situation. Even though everyone’s using the same database at once, their work doesn’t overlap.
Your database isn’t mission-critical. Data is always important. But if you’re running an e-commerce company with a website that’s live 24 hours a day, you can’t afford even a momentary glitch. Unfortunately, Access can’t guarantee that kind of stability. Although it’s rare, a sudden network problem or a computer failure that happens while someone’s in the middle of making a change could conceivably damage your database.
Tip
All Access fans should perform regular database backups throughout the day. You can use a scheduling tool (like Windows Task Scheduler) to automate this process.
It’s no exaggeration to say that shared Access databases are the backbone of many small companies. But if you’ve reviewed the limitations of Access sharing and decided that Access can’t fill your needs, it’s time to step up to web apps (Chapter 20) or SQL Server (Chapter 21).
On the other hand, if Access does fit your needs, congratulations—you’re moments away from transforming your lonely, single-person database into a resource your entire company can use. Just read on.
Preparing Your Database
If you’ve made it this far, you’ve decided that the multiuser features in Access are everything you need. However, before your database goes public, you may want to make a few changes. The most important of these is splitting the database—a critical but often overlooked step that gives your shared database extra reliability.
Tip
When you’re sharing your data, it’s essential to use a split database. Sharing an ordinary database can lead to all sorts of odd quirks that will make your database go wonky.
Understanding Split Databases
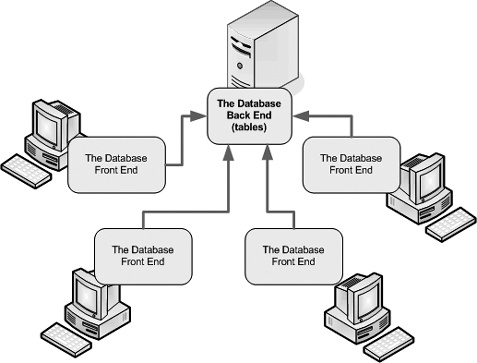
A split database is a database that has its objects divided into two separate files:
The back-end database contains the raw data—in other words, the tables and nothing but.
The front-end database contains everything you use to work with the tables. This includes all the other types of database objects, like queries, reports, forms, and macros.
Once you’ve split your database, you place the back-end database in a shared location (like a network drive). However, the front-end database works a little differently. You copy it to every computer that’s going to use the back-end database. Figure 19-1 shows how it works.
Split databases offer several advantages:
Performance. When you use a split database, each client has a copy of the objects they need to use—like forms—ready and waiting on their computer. That means you don’t need to retrieve the same information from the shared database, which would take more time (and generate more traffic on your network). Instead, the only thing you need to get from the shared database is the data you want to work with.
Easier updating. It’s relatively safe for people to change the data in a shared database, but Access isn’t as good at sorting out the confusion if multiple people try to change the design of your database objects. A split database avoids this problem, because the objects that need to be tweaked most often, like queries, reports, and forms, are located in the front end. If you want to modify these objects (or add new ones), you can safely change the front end on one computer, and then distribute it to everyone who needs it. This approach isn’t just easier—it’s also more reliable, because there’s no chance of an unsettling phenomenon called data corruption occurring (Data Corruption).
Different people, different front ends. When you use a shared database, you can create different front ends for different types of people—for example, the marketing department needs reports that show sales information, and the warehouse people need a form that shows outstanding orders. You can even use this approach to make sure people don’t see forms, reports, and tables that don’t apply to them, which reduces the risk of minor errors (like when the CEO accidentally wipes out the entire product catalog). But don’t go too wild—the more front ends you create, the more you’ll need to maintain.
Note
Technically speaking, you won’t make your database more secure by giving people less capable front ends. After all, savvy Access users could just create their own front ends and use them to get unlimited access to the back-end database. However, even though the front end can’t stop a malicious attacker, it can minimize the danger of a careless or overly curious user.
You have two ways to split a database. You can use a wizard, or you can do it by hand using the importing and exporting features in Access. The next sections describe both methods.
Splitting a Database with the Wizard
The easiest way to split a database is to use the handy wizard that Access includes for just this purpose. The wizard creates a new back-end database and moves all the tables out of the current database and into the back end. The current file is left with all the other database objects, so it becomes the front end.
Here’s how to use the wizard:
Open any database that has both tables and some other objects (like queries, reports, or forms).
You can try these steps with the Boutique Fudge and Cacophoné Studios databases you used in previous chapters.
Before you begin, it’s a good idea to make a database backup.
Hey, you never know when something could go wrong. To make your backup, choose File→Save & Publish and double-click Back Up Database.
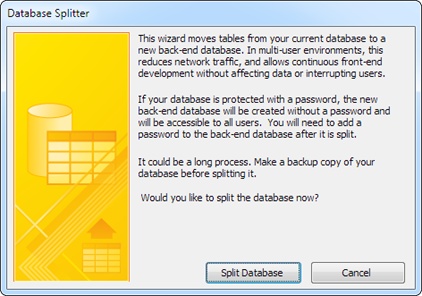
Choose Database Tools→Move Data→Access Database.
The first window of the Database Splitter wizard appears (see Figure 19-2).
Click Split Database.
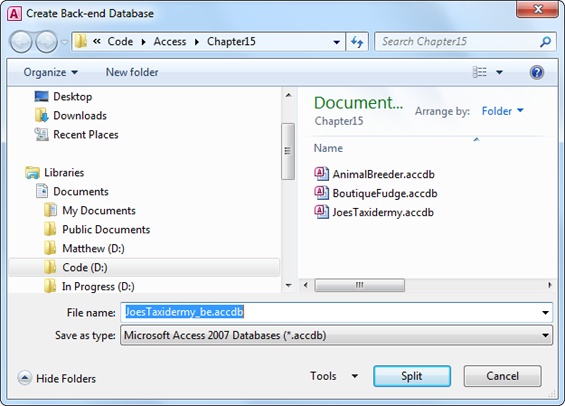
A window appears that prompts you to pick a location and file name for the back-end database.
Remember, you need to choose a location that everyone in your company or organization can access. (See the box on Pointing to a Network Location for some tips.)
Note
Alternatively, you can save the back end on your computer for the time being, and then move it to the shared location later on (at which point you’ll need to update the table links, as described on How Linked Tables Work).
Choose a file name for the back-end database, and then click Split (Figure 19-3).
Access begins exporting the tables—in other words, copying them from the current database to the new back-end database file. This could take some time.
When Access is finished, it shows the message “Database successfully split.” It has successfully created the back-end database. The database that you started with (the one that’s currently open) is now the front-end database. It no longer contains the tables with all the data; instead, it has a set of table links that let you pull the data out of the back-end database. (You’ll learn how these table links work in the following section.)
Now it’s time to distribute the front end to everyone who needs to use the database.
It’s up to you how you want to share your front end. You could email it, burn it on a CD and hand it out, or just pop it in a shared location. However, it’s important that everyone understand they need to copy the front end to their computer before they use it.
Note
If you distribute the front end by placing it on the network, you run the risk that people will launch the front end straight from the network, without copying it to their computers first. Left unchecked, this introduces all the problems of ordinary (non-split) databases, like hampered performance and greater risk for errors.
How Linked Tables Work
The concept of a split database seems straightforward enough. One file (the back end) stores the raw data, while another (the front end) gives you the tools for working with it. But there’s one detail that you haven’t considered yet—namely, how does the front end get access to the tables in the back end? The secret is table linking.
Linking lets one database see a table in another database file. You can use linking in any database—in fact, you can choose to use it even if you won’t be sharing your database. For example, you can divide your tables into two or more database files to get around the size limit, which is 2 GB (gigabytes), per database file. Or, you can use it to help you organize a sprawling database with dozens of tables. Finally, you may also find it helps you separate public information from supersecret details. If you put the tables with the secret information in a separate database, you’re free to share copies of your main database without worrying about sensitive data getting into the wrong hands.
Thanks to linking, all the back-end tables still appear in the front-end database (see Figure 19-4). However, the actual data is in a separate file. When you open or otherwise interact with a linked table, Access heads to the linked file to get the information you need.
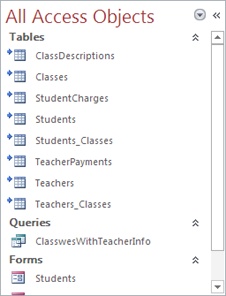
The only disadvantage to linked tables is that Access might go looking for a linked table in another database file but not be able to find it. This happens if the back-end database file is moved to another folder or if it’s renamed.
Note
If your database has a bad link, when you attempt to open the table (or another object that uses the table, like a query or a report), you get a message informing you that Access can’t find the file you need.
Fortunately, it’s easy to update your links. Here’s how:
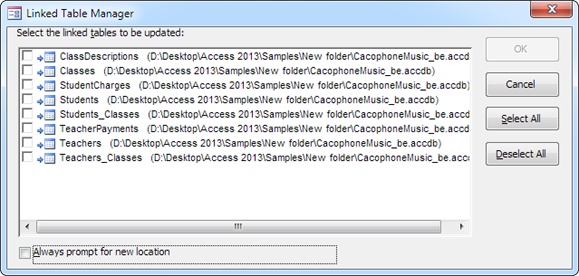
Choose External Data→Import & Link→Linked Table Manager (or right-click any linked table, and then choose Linked Table Manager).
The Linked Table Manager window appears, with a list of all the linked tables in your database (Figure 19-5).
Place a checkmark next to each link you need to change.
If you need to update all your links, click Select All.
In most cases, all your links will point to the same database file. But if you need to point your tables to different files, select “Always prompt for new location.”
Click OK.
Access pops open the familiar file selection window. Browse to the database file that has your linked tables, select it, and then click OK.
If you choose “Always prompt for new location,” Access shows a separate file selection window for each link. Look at the window title to find out what table you’re updating. If you didn’t choose “Always prompt for new location,” you can update all your links in one step.
Manually Splitting a Database
You don’t need to use the wizard to split your database. You can move tables into a separate database file on your own, and then create links by hand. The main reason that you’d use this approach is because you want to split your database into more pieces—for example, you want one front-end and four back-end files.
There are some good reasons for subdividing your back end. They include:
Better reliability. Essentially, if one file is damaged, the others will still live on unaffected.
Better security. Using the tools of the Windows operating system, you can control who can open a specific file. You can use this to your advantage with split databases to lock people out of parts of the back end where they don’t belong.
Leaving room to grow. As mentioned earlier, Access limits databases to 2 GB. If you plan to store large numbers of records with attachments (like pictures), it’s a good idea to make sure plenty of space is available now and for the foreseeable future.
To split a database by hand, you need to use the importing and exporting features in Access. The following steps show you how to split the Boutique Fudge database into three separate pieces so you can keep the credit card information separate from the rest of the data. (If you want to follow along, you can find the database with the sample content on the Missing CD page at www.missingmanuals.com/cds/access2013mm.)
Create the back-end databases that you need.
In this example, you need two back ends: one for the credit card details (call this BoutiqueFudgeSecrets_be.accdb) and one for all the other details (named BoutiqueFudge_be.accdb). Before you go any further, create both of these databases in Access and place them in the shared location, but leave them empty for now.
Open the back-end database file.
The next task is to add the correct tables to each back-end database. You do this by using Access’s Import wizard.
Start with BoutiqueFudgeSecrets_be.accdb. It’s easy because it requires just a single table.
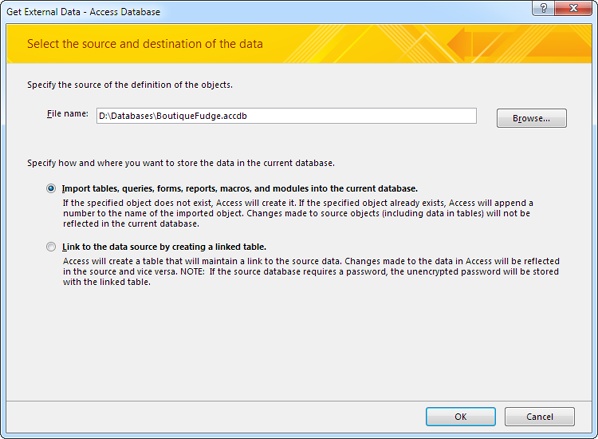
Choose External Data→Import & Link→Access.
The Import wizard begins (see Figure 19-6).
Specify the location of your front-end database in the “File name” box.
In this example, that’s BoutiqueFudge.accdb, which currently contains the whole shebang (tables, queries, forms, and reports).
Choose the first option, “Import tables… into the current database.”
The second option lets you create linked tables. You’ll use it later in this process.
Click OK.
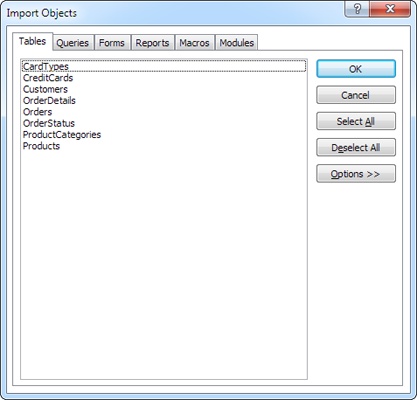
The Import Objects window appears, with a list of everything in your database (see Figure 19-7).
Select the tables you want to import, and then click OK.
The BoutiqueFudgeSecrets_be database needs just a single table: CreditCards.
Once you click OK, Access copies the tables into your database. You can now close the database file.
Repeat steps 2 to 7 for any other back-end database files.
In this example, you need to open BoutiqueFudge_be.accdb, and import all the tables except CreditCards.
Once you’ve finished transferring the data to your back ends, its time to update the front end.
Open the front-end database.
In this example, that’s BoutiqueFudge.accdb.
Delete all the tables.
Don’t be shy—after all, you’ve already copied them to their new homes in the back-end files. Once you’re finished, it’s time to take the last step and create the links you need in your front end. (Remember, if you’re deleting tables that use relationships, then you need to delete the child tables first.)
Choose External Data→Import & Link→Access.
The Import wizard starts again.
Point the Import wizard to your first back-end file, choose “Link to the data source,” and then click OK.
Start with the BoutiqueFudgeSecrets_be.accdb file.
Choose all the tables and then click OK.
Access creates the corresponding linked tables in your database. Each table appears with the telltale arrow icon next to it in the navigation pane to let you know it uses a link.
Repeat steps 11 to 13 for every back-end database.
If you started with BoutiqueFudgeSecrets_be, it’s time to move on to BoutiqueFudge_be, which contains all the other tables you need.
If you follow all these steps, you wind up with three database files that work together: BoutiqueFudgeSecrets_be.accdb with the credit card information, BoutiqueFudge_be.accdb with the rest of the tables, and BoutiqueFudge.accdb with the queries, forms, and reports. If you want to see the finished product, check out the downloadable samples for this chapter. And jump ahead to Securing Your Database to learn how you can apply different security settings to the different back ends.
Locking Down Your Front End
Before you let your database out into the wild, you need to think about what can go wrong. In the hands of less savvy Access users, your lovingly crafted forms and reports can get scrambled. It’s a common complaint with multiuser Access databases: Sooner or later, a curious or careless person changes something that’s better left alone, and that person’s front end stops working.
Although you can’t look over everyone’s shoulder, you can prevent mischief by locking down your front end. That way, other folks won’t be allowed to modify the design of forms and reports. (Of course, they can still use the front end to review and edit data.)
The secret to locking down your front end is to change the front-end database from an .accdb file to an .accde file. Although there’s only one letter of difference, the .accde format restricts people in several ways:
They can’t modify forms or reports. In fact, they can’t even open these objects in Design view.
They can’t create new forms and reports.
They can’t rename existing forms and reports (although they can delete them).
They can’t edit or even look at your VBA code and macros. In fact, all code is compiled, which means it’s converted from the code statements you learned about in Chapter 17 and Chapter 18 to a shorthand that only the computer can understand.
Note
Access gives you the same feature for the older .mdb database format. To lock down changes in an .mdb, you create an .mde file.
Making an .accde file is as easy as can be. Just follow these steps:
Open your front-end database.
Your database must be running in full trust mode. (Usually, that means you clicked Enable Content the first time you opened the database on your computer. Trusted Databases has the full details about trusted databases.)
Choose File→Save & Publish and double-click Make ACCDE.
The Save As window appears.
Supply the file name for your .accde file.
Access won’t change your original database—instead, it makes a copy in the new format.
When you create an .accde file, make sure you keep the original .accdb. That’s because sooner or later you’ll need to make changes. Access doesn’t give you any way to change an .accde file back to its original format, so your only choice is to go back to the original format, make your changes, and then export a new .accde file.
Sharing a Database with People Who Don’t Own Access
Wouldn’t it be nice if people could work with your data and use your forms and reports without needing the full Access software on their computers? It may seem like just a dream, but there are actually two possible solutions.
One option is to use the web app feature, described in Chapter 20, which makes your database available to anybody on almost any type of computer. The drawbacks are the hosting requirements (Preparing for Web Apps), and the fact that web apps don’t let you use all of Access’s features
The other option is to ask the people who want to use your database to install a scaled-down version of Access that’s called the Access runtime engine. The good news is that the Access runtime engine is free; the bad news is that they still need to go through the effort of downloading and installing it. Using Access runtime, other people can load up your database and use its forms and reports to review and edit data.
The Access runtime engine lets you use macros, Visual Basic code, and anything you can stuff in a form or report. However, Access runtime doesn’t include the ribbon or the navigation pane. In fact, it doesn’t provide any way for people to change the configuration or design of the database. (That’s a job for you, the database designer.) The only thing they can do with the Access runtime is use the forms and reports that you’ve included in your front end. In fact, when using a well-designed front end with the Access runtime, people may not even realize that they’re running Access. The Access runtime engine is a truly useful way to share your databases without buying a zillion Access licenses and confusing people with all the features of the full Access user interface. If you’re using Access to coordinate life in a small business, check it out.
So how can you get your hands on the Access runtime engine? At the time of this writing, it was only available in beta version. But the quickest way to track it down is to head to the Microsoft Download Center at www.microsoft.com/downloads and type access runtime in the search box.
Note
Microsoft typically releases the Access runtime about six months after it releases Access. At the time of this writing, the Access 2013 runtime wasn’t yet available, although the Access 2010 runtime was. Because both Access 2013 and Access 2010 use the same database format, and because Access 2013 hasn’t introduced any new features for desktop databases, you can use the Access 2010 runtime for an Access 2013 database in a pinch.
In the meantime, you can see what a database looks like when it’s in the hands of the runtime engine. Here’s how:
Open your database and make sure it has a startup form (Designating a Startup Form).
The Access runtime engine doesn’t have a navigation pane, so you need to have a startup form in order for the user to be able to do anything. That startup form will probably be a navigation form (Navigation Forms) with buttons that lead to other forms.
To set the startup form, choose File→Options. Pick the Current Database section on the left. Finally, set the Display Form setting to the form you want to show automatically when the database is opened.
The Current Database section has two other options you may want to use with .accdr files. Use Application Text to set the text that Access shows in the title bar, and use Application Icon to set the tiny icon graphic that Access shows in the top-left corner of the window.
Rename your database’s file extension from .accdb to .accdr.
Presumably, the r stands for runtime.
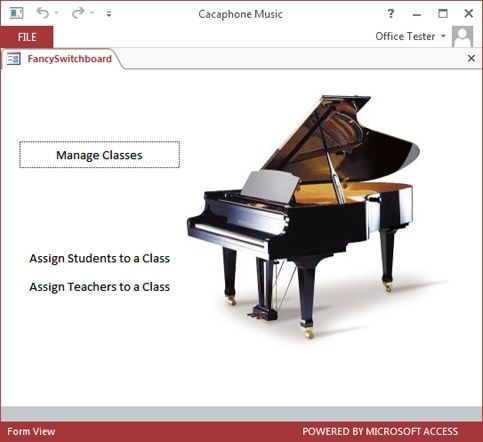
Double-click your database to run it in Runtime mode.
You’ll see your startup form, but no ribbon or navigation pane (Figure 19-8).
Don’t worry. You can rename your Access file to .accdb to get it back to normal.
Tip
Access doesn’t use the trusted database system with .accdr files. Every time you open one, you get a stern security message, and you must click Open to continue. Fortunately, if the security message is wasting your time or intimidating other people, you can remove it. The trick is to designate the folder that holds the .accdr file as a trusted location, using the steps described on Setting Up a Trusted Location. That way, Access automatically trusts all the databases in that folder, no matter what specific file type they use.
Playing Well with Others
Multiuser access is a perpetual juggling act. If all people want to do is read information, life is easy. But some significant challenges appear the moment people want to make changes. For example, what happens when two people try to change the same record at the same time? Or when you try to change a record while someone else tries to delete it? Or, if you want to read the latest information while an update is in progress?
Clearly, Access needs a way to manage the chaos. In this section, you’ll learn what Access does to keep everything under control, and how you can adjust its settings. You’ll also learn how to stave off the dangers of data corruption.
Seeing Changes as They Happen
Picture the following scenario. You’re on the phone with a big-spending customer of Boutique Fudge. Using your trusty Access database, you run through the products that are available, giving your customer the price of each one. But unbeknownst to you, the head chef is looking at the same table at the same time—and raising the prices on the most popular dishes. The question is this: When do you notice the price increase?
Access deals with situations like this by using automatic refreshes. Once every 60 seconds, Access checks the back-end database to find out what’s changed. Access then updates the corresponding information on your screen, whether you’re looking at a form, a query, or directly at a table. In the Boutique Fudge example, the new prices appear the next time Access performs a refresh—and no later than 60 seconds after the changes are made.
A few exceptions to the refresh rule:
When you start editing a record (by clicking inside one of the fields), Access immediately refreshes just that record. This ensures that you always start with the most up-to-date copy of a record before you begin making changes.
If you can’t wait 60 seconds, and you’re getting nervous that something has changed since the last refresh, you can trigger an immediate refresh using the Home→Records→Refresh All command. And, if you click the down arrow part of this button, you can choose to refresh only the current record where your cursor is positioned (choose Refresh instead of Refresh All).
Reports don’t use automatic refreshes. If you run a report, wait, and then decide you want to update your results, you have two choices. You can close the report and reopen it, or you can use the Refresh button.
If you don’t like the 60-second rule, you can fine-tune how often Access performs its automatic refreshes. To do so, choose File→Options. In the Access Options window, choose the Client Settings category, scroll down to the Advanced section, and look for the “Refresh interval” box (Figure 19-9).
Note
The refresh interval is an Access setting that affects all the shared databases you open on that computer. If you want everyone to use the same refresh interval, you need to tell them all to update their Access settings.
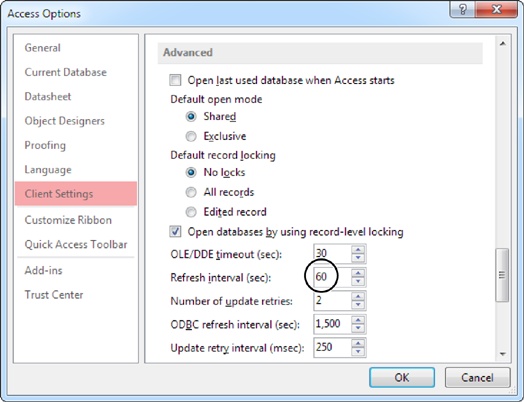
The shorter the refresh interval, the faster you’ll see other people’s changes. However, shorter refresh intervals also create more network traffic. Most Access fans find they can safely lower the refresh interval without a problem, unless they’re using a slow network. But keep in mind that the refresh interval affects all databases, not just the one that’s currently open.
Dealing with Editing Conflicts
Shared databases are a bit of a free-for-all. Ordinarily, Access doesn’t impose any limits on multiuser changes. If you’re lucky, people will make their changes in an orderly fashion, one after the other. But sooner or later, changes will overlap, with potentially frustrating consequences.
Here’s an example that shows what happens when two changes overlap:
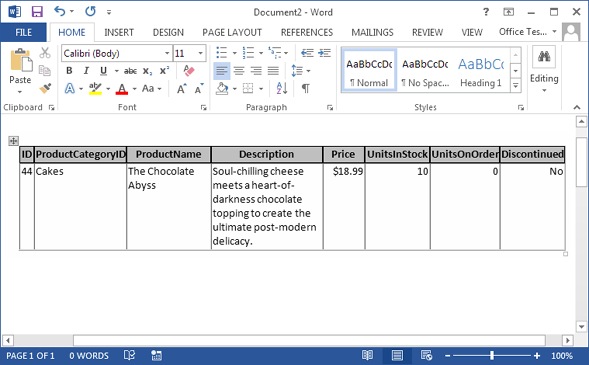
You open a query that shows all the products in the Boutique Fudge database.
You find a record—a top-selling cheesecake known as The Chocolate Abyss—that needs changing. You click inside the Description field to start your edit.
At the same time, Bill Evans in the sales department fires up a form that also uses the Products table. He browses to the same record, and—realizing the potential for better profits—starts to change the price. Now two people are currently working with the same record. What happens next depends on who commits their change first.
Assume Bill gets the job done first. Quick as a flash he raises the price, and then heads on to another record.
Back on your computer, you’ve finished touching up the Description field. You move to another record. Ordinarily, this is the point where Access commits your edit, saving it to the back-end database. But in this case, Access notices a conflict—namely, the version of the record you’re working with isn’t the same as the version that’s currently in the database.
Access warns you about the problem, and gives you three options (see Figure 19-10).
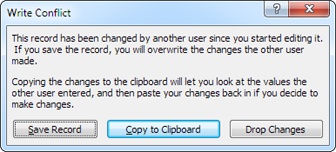
You have three ways to resolve a conflict:
Save Record is the easiest and most reckless option. If you choose it, Access overwrites the record in the database with your version. The problem is that this option obliterates the changes that the other person made. In the previous example, the new description is saved in the database, but the price change is lost because Access reapplies your old, out-of-date price.
Drop Changes cancels your edit. Access will refresh the record to show the most recent information, and then you can try making your change all over again. This option is reasonable if you can repeat the edit easily—it’s not as good an option if you’ve finished a detailed revision of a large text field.
Copy to Clipboard cancels your edit, just like Drop Changes. However, the values you changed are copied to the Clipboard, which makes it easier to reapply them, as shown in Figure 19-11.
The best of the three choices is usually to copy changes to the Clipboard and try to repeat the edit. Unfortunately, you can’t force people to do the right thing. Lazy workers may choose the quicker Save Record option, which quietly wipes out someone else’s work. Worst of all, the person who made the original change has no way of knowing it’s been thrown away. If you have a high number of overlapping edits in your organization, you’ll need to spend a good bit of time teaching everyone the right way to handle them.
Note
Access fans often wish they had a way to merge changes—that is, to update only the fields you changed. In the previous example, this option would let you apply a new description without disturbing the previous user’s price change, because both updates affect different fields. However, Access doesn’t provide this option. One reason is that there’s no way to know if the two sets of changes will be consistent. And there’s nothing worse than having a record that contradicts itself.
Using Locks to Stop Overlapping Edits
If overlapping changes are causing too many headaches, you have an option. You can use a software trick called a lock to prevent overlapping edits.
Essentially, a lock uses the same concept that protects two people from ending up in the same bathroom stall. When one person enters, she switches on the lock, and everyone else has to wait until the deed is done. Similarly, when a person attempts to change a record, Access starts by grabbing a lock on that record. Anyone else who wants to make a change is forced to wait until the first operation is finished.
The easiest way to use locks is to switch them on through the Access settings. To do so, choose File→Options. Then, choose the Client Settings category, scroll down to the Advanced section, and look for the “Default record locking” setting. You have three choices:
No locks is the standard setting in Access. When you use this option, Access won’t use locking at all, and overlapping edits are possible.
All records tells Access to lock the entire table whenever someone begins editing a record. This setting is extremely rare. Because it locks every record, it prevents anyone else from working with the table when just one edit is taking place. This limitation can bring any organization to a grinding halt.
Edited record locks individual records as they’re being edited. This prevents overlapping edits.
The last option is the most common locking choice. When you use individual record locking, Access won’t let you begin editing a record if someone else is currently modifying it. When you try, Access displays an icon that indicates the record is locked, as shown in Figure 19-12.

Locks prevent your database from becoming a mess of scrambled information, but they impose other headaches. It takes extra work for Access to keep track of everyone’s lock—it has to play the role of an overworked washroom attendant who doles out the washroom keys. Access keeps track of locks by creating a .laccdb file. For example, the first time someone opens the shared database BoutiqueFudge_be.accdb, Access creates a file named BoutiqueFudge_be.laccdb. (The “l” stands for locking.) When the last person closes the database, Access removes the locking file.
Tip
If you look in the shared folder and don’t see a .laccdb file, you know that no one is currently using the database, or someone’s opened it in Exclusive mode (Opening a Database in Exclusive Mode).
Locks also slow other people down, forcing them to wait for the information they want. A careless user can tie up a record indefinitely, leaving it in Edit mode.
Note
If you head out for a lunch break, you could tie up the entire company without even knowing it. Even worse, although other would-be editors will see that the record is locked, they have no way of knowing who the culprit is. Their only recourse is to wait…and wait.
If you decide to use locking, it’s a much better idea to apply it through individual forms, rather than switch it on for every database, by using the Access options. You could use the standard “No locks” setting for your entire database, but configure all the forms that use a particularly important table—say, Invoices—to use locking. To change the way a form works with locking, open the Property Sheet and look for the Record Locks property. It supports the same three settings: No Locks (the default), All Records, and Edited Record.
Opening a Database in Exclusive Mode
One of the limitations of shared databases is that you can’t change the design of your tables while other people are using the database. Before you can make more radical alterations, you need to open the database in Exclusive mode.
Exclusive mode temporarily restricts a shared database to a single person. While you have the database open in Exclusive mode, no one else is able to access it, no matter what front-end database they use. You have a few precious moments to make the more radical changes that you wouldn’t normally be able to do.
Here’s how to open a database in Exclusive mode:
Tell everyone else to close the database.
You can’t open a database in Exclusive mode if it’s currently in use. In a big company, this is the hardest part. System administrators sometimes resort to mass emailing to let everyone know that it’s time to shut down. Another choice is to teach the people who use your database to close it every night before they leave, which lets you slip in a late-night update without disruption.
Choose File→Open.
The Open window appears.
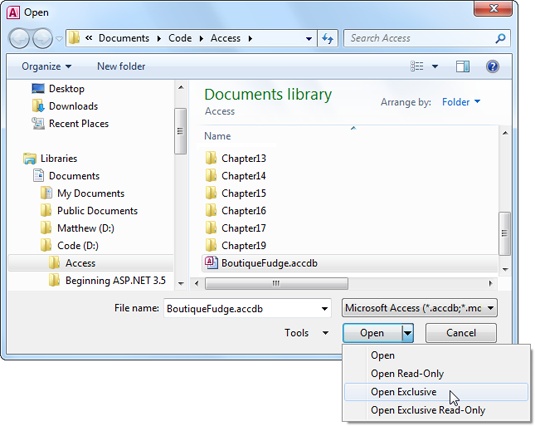
Select the database file you want to open, and then click the drop-down arrow on the Open button.
A list of specialized options appears for opening your file, as shown in Figure 19-13.
Choose Open Exclusive.
Access opens the database. You can now make changes with no restrictions. But work fast—the longer you keep the database open in Exclusive mode, the longer other people will need to wait to get on with their work.
Data Corruption
Data corruption—the term strikes fear into the heart of the hardiest Access guru. Hopefully, the people who use your database will be well behaved, the network it sits on will remain reliable, and your database will never be in danger. But just in case life isn’t that kind to you, it’s important to be prepared.
Data corruption is a catch-all term that describes what happens when part of a database file is damaged. Imagine Jessica Baxter is in the middle of applying a large update when a power failure hits (or an office prankster pulls out her network cable). The back-end database will be left in an invalid state, because only part of Jessica’s information will have been successfully received. As a result, the record she was working with may be scrambled beyond recognition. And if you’re particularly unlucky, the problem can affect more than one record or even make the whole database act a little odd.
Diagnosing (and Fixing) Corrupt Databases
Every Access expert should have basic data corruption survival skills. First, you need to be able to spot when a database has gone bad. Here are some telltale signs:
Cryptic error messages that appear for no good reason, like “out of memory.” (Keep in mind that you shouldn’t confuse this with the always-common category of cryptic error messages that appear for a legitimate reason, like the “file already in use” error described on Manually Splitting a Database.)
Rows that contain gibberish, like ### or ???. Often, you’ll find these values in the last few rows of a corrupted database, which indicates that the rest of the data is probably kosher—it’s just the new additions that ran into trouble.
A complete inability to use the database. If you get the dreaded “unrecognizable database format” error, you know disaster has struck.
Once you identify that a database is corrupted, it’s time to nurse it back to health. The first resort is always the compact and repair feature, which cleans up a host of problems and shrinks large, bloated databases back to more reasonable sizes. To try out this feature, open your database in Exclusive mode (Opening a Database in Exclusive Mode), and then choose File→Info and click Compact & Repair Database. The process could take some time, particularly with a large database.
The compact and repair feature fixes only tables, not forms or reports. However, if you’ve been sensible and have created a split database, the back end won’t have any of these types of objects anyway.
Tip
Before you try to fix a corrupt database, make an immediate backup. That way you can try several repair strategies.
Sometimes, the compact and repair feature won’t solve the problem, or it may just partly rehabilitate your database file. At this point, it’s time to try other repair techniques. If the remaining problems are relatively minor (like a few rows with suspicious data), you may be able to simply delete the offending information and recreate it. But sometimes Access refuses to show corrupted records without bombarding you with error messages. If this is the case, select all the good records and copy them to another table. Then, delete the table with the corrupt data and rename your copy to take its place.
Finally, you can create a new blank database, and try to import the tables from the back end, using the importing technique described on Importing Data. This forces Access to recreate each object and rebuild every index. Even if this doesn’t work completely, you may find that you can import most of the tables.
If all else fails, you’ll need to revert back to the last backup. You do keep backups, right?
Preventing Corruption
As scary as data corruption is, following a few guidelines can ensure it remains a rare occurrence:
Stick to the sensible guidelines described on How Access Sharing Works. If dozens of people try to make changes at once, you multiply the chances of a problem.
Always split your database (Preparing Your Database) to lighten the load on your back end and to keep forms and reports out of harm’s way.
Use a reliable network. If your network connection isn’t dependable, an update can get interrupted, which is a prime cause of data corruption.
Protect your server with an uninterruptible power supply (UPS). This relatively cheap device acts like a giant battery, supplying emergency power for several minutes or more in the case of an outage.
Teach people to close the database when they’re finished using it—or even when they’re taking a lunch break.
Use the compact and repair feature on your back-end database regularly (choose File→Info and click Compact & Repair Database). As more and more people make changes, database files grow larger and more disorganized. The compact and repair command rearranges your database to be more efficient, smaller, and less likely to run into trouble.
Make backups as often as possible. Depending on how quickly you make changes, a daily backup may be sufficient. But you can make a backup every hour or even more often if needed.
Securing Your Database
In most shared databases, different people perform different tasks. The easiest way to keep everyone on the right track is to create several distinct front ends, one for each group of people. This lets you gently guide people along in the tasks they perform.
However, customizing the front end doesn’t restrict the abilities of a determined troublemaker. In a large company that relies on a multiuser database, you don’t just think about guiding people—you also worry about restricting them.
Sadly, Access provides a limited security model. You have the ability to lock strangers out of a database with a password, but you don’t have the more fine-grained features you need to restrict a single user from using certain tables or performing certain actions. As you’ll see in the following sections, you can use some workarounds, but none works as well as the security provided by a server-side database product like SQL Server.
Note
Once again, Access gives you just enough to make shared databases work, but not much more. It’s up to you to decide whether Access works for your organization. Small outfits are likely to find that it’s perfectly fine, while large organizations may want a server product.
Password-Protecting Your Database
The password protection feature in Access offers simple, no-frills security. You choose a single password for your database, and from that point on it can’t be opened without the password. Even better, the data in your database file is scrambled using a key that’s generated from your password. This ensures that even if high-tech hackers peer directly into your database file with a specialized tool, they won’t be able to retrieve any data.
Note
Access is serious about password protection. Access uses state-of-the-art encryption to ensure that skilled hackers can’t crack open your files with specialized tools—at least not unless they’re willing to devote a huge amount of time to the task.
It’s ridiculously easy to apply a password. Here’s how:
Choose File→Open.
To apply a password, you need to open your database in Exclusive mode. This step is necessary because Access can’t encrypt a database while it’s in use.
Select the file you want to open, click the drop-down arrow on the Open button, and then choose Open Exclusive.
Access opens the database in Exclusive mode.
Choose File→Info and click Encrypt with Password.
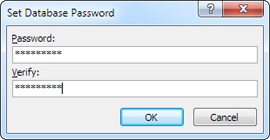
Access asks you to supply a password (Figure 19-14).
Enter your password, verify it, and then click OK.
To ensure that your database is secure, you need to choose a strong password. Good passwords are long (10 letters or more), can’t be found in the dictionary (because attackers use dictionaries to launch automated attacks), use mixed case, and include special characters (like numbers, punctuation, and other symbols). The password hellodata is a poor choice, while w0nDER_wh@t_32 is much more reliable.
Access uses the password to encrypt your database and then saves the modified database automatically. Now, the next time you open your database you’ll be asked to supply the password first.
If you decide later that you don’t need password protection, choose File→Info and click Decrypt Database.
Passwords and Split Databases
It’s fairly obvious how passwords work with ordinary databases, but a few interesting quirks are at work with split databases.
The first step is to decide which of the two database files you’ll encrypt. Usually, you’ll choose to encrypt both the front-end database and the back-end database. Here’s why:
If you encrypt only the front-end database, people can still muck up all the data by opening the back-end database directly. And even if you trust their intentions, it’s amazing what people can do by accident.
If you encrypt only the back-end database, people can still access the database through the front end. That’s because when a front-end database links to a password-protected back end, Access quietly and automatically stores the back-end password in the front-end file.
Note
Depending on your goal, you might choose to password-protect the back-end database only. This works well if you simply want to force people to use the front end, and prevent them from directly opening the back end. But if you’re after stricter security, and you want to make sure that unauthorized people can’t make any changes to your database, you need to password-protect both files.
There’s no point in applying the password before you split the database—if you do, Access uses that password for the front end but not the back end, which isn’t what you want. Instead, follow these steps:
Split the database.
Follow the same process you used on Splitting a Database with the Wizard.
Close the front-end and open the back-end database in Exclusive mode. Encrypt it with a password.
Use the same steps you applied on Password-Protecting Your Database.
Now close the back-end database and open the front-end database in Exclusive mode.
Here’s where things get a bit ugly. Adding a password to the back-end database has broken all your front-end links. If you try to open a linked table, you’ll receive an “invalid password” error message. The only way to correct this problem is to remove your linked tables from the front end, and add them again. Sadly, the Database Splitter wizard doesn’t have an elegant way to handle this problem.
In your front-end database, delete all the linked tables.
Don’t delete any other database objects—keep your queries, reports, forms, and macros.
Choose External Data | Import & Link→Access.
The Import wizard starts up.
Enter the file name of your back-end database.
You can type the file name, but it’s easier to click Browse, find your back-end database file, select it, and then click Open.
Click the “Link to the data source by creating a linked table” option, and then click OK.
Access prompts you to enter the back-end database password.
Type the password and Click OK.
The Import Objects window appears.
In the Tables tab, click Select All to grab all the tables, and then OK.
Access adds the linked tables to your database. It uses the same names, which ensures that your front-end database objects (queries, reports, and forms) will work properly.
After all the linked tables have been created, the final step of the Import wizard appears.
Click Close.
If you only want to protect the back-end database, you can stop here. People who don’t know your password won’t be able to open the back-end database, but they will be able to open and use the frontend database. That’s why this technique is good for forcing ordinary people to stick with your front-end, preventing accidental disasters. However, this model doesn’t provide industrial-strength security, since a crafty hacker could steal the password by digging through the front-end database file.
If you want to stop sneaky hackers, you can follow the next step to add a second password to your front-end database file. This part is easy.
Close the back-end database and open the front-end database in Exclusive mode. Encrypt it with a password.
Again, use the steps you applied on Password-Protecting Your Database. Make sure you choose a different password than the one you used for your back-end database. This way, you can authorize people to use your front end without giving them unfettered access to your back end.
Using Windows File Security
Password protection isn’t your only security choice. You can also use Windows security to specifically set which users and groups can access a file.
With an ordinary database (or a basic split database), this technique is a bit clumsy. The problem is that you have just two choices: Give someone complete control over your database file, or stop them from using it altogether. But you can apply more nuanced security settings. The trick is to split your back end into more than one file. Then, once the files are in the shared folder, you can configure exactly who is allowed to access each one. Presto—you can lock some people out of specific tables.
For best results, you’ll need to have a network administrator help you set up the security settings you need. The basic process works like this:
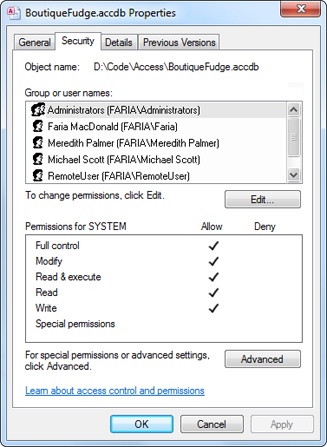
Using Windows Explorer, right-click the database file you want to protect, and then choose Properties.
The Properties window appears, with several tabs of information about the file.
Choose the Security tab (Figure 19-15).
Windows keeps track of people in two ways—it identifies them uniquely by user name, and it categorizes entire groups of people by group name. For example, you can log in as MarkHamlon and be a member of several groups, including Users, Administrators, SalesDepartment, and so on. That gives an administrator the ability to change the security settings for a single individual or for a whole crowd of people with one rule.
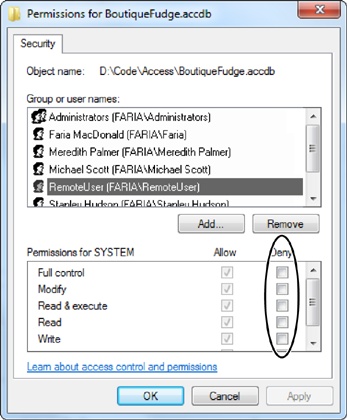
To change permissions, click Edit.
To change what a person or group can do with the file, select them in the list, and then change the Allow or Deny options (Figure 19-16).
Say you don’t want the people in the Users group to be able to use this file; select the Users group in the list, and then place a checkmark in the Deny column next to each permission.
If you want to add a new group or person to the list, click the Add button, fill in the user or group name, and then click OK.
You may decide you don’t want to lock out an entire group but you want to single out a specific person.
Windows file security gives you a very basic level of security. It isn’t really designed to work with Access databases. To use it at all, you need to split your database into smaller and smaller pieces, which can be difficult to manage. You also can’t control what actions a person is allowed to perform—the file security either locks people out entirely or gives them full control to add, delete, update, and redesign the information in your database.
If you need real user-level security, you’re better off with a server product like SQL Server. However, if you just need the ability to keep some sensitive information out of reach, the Access file-based security features can help you out.