
Chapter 20. Building an Access Web App
A web app is a database that lives in the great Internet cloud. People who need to view or change the information in a web app database do so using an ordinary web browser, with no Access required. In fact, they can even use a tablet computer like the iPad.
Access web apps are hosted by Microsoft SharePoint, the server-based software that many companies use to collaborate, store documents, and host simple web applications. The web app’s data is stored by SQL Server, the industrial-strength database software that NASDAQ uses to power thousands of transactions per second. But you don’t need to be seasoned SQL Server administrator, because Access and SharePoint take care of all the details for you. All you need to provide is a server running the latest and greatest version of SharePoint (that’s SharePoint 2013), or a SharePoint hosting plan (typically, through Microsoft’s Office 365 hosting program).
In this chapter, you’ll explore the features and limitations of web apps and their inherent compromises. You’ll see why web apps just might be the boldest step forward for Access in years—and why they won’t satisfy everyone.
Note
Microsoft probably would have called the web app feature web databases, but it had already used the term for a now-abandoned feature that it introduced in Access 2010 (see the box on Web Databases, Take Three for the full scoop).
Assessing Web Apps
Web apps are the most hyped new feature in Access 2013. In fact, aside from the occasional bit of fine-tuning and error-fixing, web apps are the only new feature that Access 2013 offers.
On the face of it, the web app feature sounds great. Its advantages are obvious:
Portability. You can get at your web app anywhere that has a web connection. Folks can even use your web app on a Mac or in an Internet café. Best of all, the web app feature doesn’t require plug-ins, browser extensions, or an extra download.
Manageability. When you update the data or design of your web app, everyone sees the changes immediately. There’s no need to send everyone an Access front end (a file that has the queries, forms, and reports for your database).
Performance. Because web apps use SQL Server, they’re guaranteed to be blazingly fast, no matter how much data you store or how many people want to use it at once. Get a few hundred people working on an ordinary Access database, and you have no such guarantee.
Future-proofing. Because your data is in a SQL Server database, hotshot programmers can create applications that access it in a variety of languages, from Java to C#. And if you need to chew through the ginormous mountains of data in your web app, you can use some of the sophisticated analysis and reporting tools that are built for SQL Server. You could even transition away from your Access front end to a custom-programmed solution, some day in the distant future.
Despite all these benefits, the web app feature is far from perfect. Nothing comes for free, and hardcore Access fans will discover that the web app feature has two potentially deal-breaking limitations:
Missing features. Traditional Access databases, which are sometimes called desktop databases, have features aplenty. But in order to make web apps work in everyone’s browser, on every web-connected computer, with no extra help, Microsoft had to sacrifice many of these capabilities. Reports, VB code, and form customization are just a few features that are absent in the web app world.
Web hosting. For a web app to work, it must be hosted on a specially equipped computer. Ordinary web servers—the sort that you can use to host a website—can’t host Access databases because they don’t have a properly configured SharePoint 2013 server. Web apps will be out of your reach unless your company is using a SharePoint server (and has a qualified person to manage it), Microsoft’s Office 365 subscription service (which isn’t cheap), or a SharePoint hosting service from another company. You’ll get the full details in the next section.
This combination of benefits and drawbacks adds up to a bit of a foggy future for web apps. Web app aficionados believe that web apps are the future of Access. Microsoft touts them on its Access blog (http://blogs.office.com/b/microsoft-access) and puts them front-and-center in the Access interface. As you may have already noticed, the “Custom web app” button appears before the “Blank desktop database” button in Access’s backstage view.
Old-hand Access pros, however, are reluctant to abandon their favorite Access features. And they know web apps aren’t an option for clients who don’t have a SharePoint server or who don’t want to use SharePoint in their business.
Perhaps the best way to see web apps is as a useful tool that lets you dramatically expand the reach of an Access database. If your database needs to support hundreds of people or needs to be available across the country, web apps are the easiest and most practical choice. In this situation, an ordinary Access desktop database won’t cut it, and the alternatives that you’ll consider in later chapters—storing your data in SharePoint or SQL Server and linking to it in Access—have plenty of headaches of their own.
Preparing for Web Apps
Before you can create a web app, you need to have a place to host it. Unfortunately, Access won’t allow you to build even a trial web app unless you have a SharePoint server to help you out.
There are three ways to get the SharePoint hosting you need for a web app:
Use a SharePoint server in your company. Access requires the full version of SharePoint 2013 (not the free, feature-reduced SharePoint Foundation 2013 or the older SharePoint 2010). Unfortunately, the licensing system for SharePoint is complex and expensive, and setting it up requires the work of a skilled network administrator. If your company isn’t using SharePoint, you’re probably out of luck.
Use an Office 365 subscription plan. The cheapest Office 365 plans don’t include SharePoint, but if your company uses the small business plan or one of the enterprise plans, you have everything you need to create web apps. However, everyone who needs to access your web app (either to review data or to edit it) will also need an Office 365 subscription. (If you have no idea what an Office 365 hosting plan, read the brief overview on About This Book.)
Get SharePoint 2013 hosting from another company. This option is far easier than setting up your own SharePoint server, and cheaper than paying for a pile of Office 365 subscriptions. However, you need to have full confidence in the hosting company you use, because it has the responsibility of storing your data. One company that specializes in SharePoint 2013 hosting for Access databases in Access Hosting (http://accesshosting.com).
No matter which approach you use, you’ll need three pieces of information before you continue. First, you need the web address of your SharePoint site. This Internet location is where you’ll host your web apps. Second, you need to know the user name and password to log into that site (which you get from your network admin or hosting company). Once you have these details, you’re ready to read the next section.
Building a Simple Web App
There are two ways to create a web app. The most common way is to do it from inside Access. The other way is to do it in your browser when you visit the SharePoint site. Both approaches are equivalent, and usually you’ll use the Access method, because you need to design the database in Access anyway—SharePoint doesn’t have any tools that let you do that job online.
On the other hand, there are some situations where you may want to create your web app by using the SharePoint web interface. For example, the person creating the database may not be the same as the person who’s designing it, and the database creator may not have a copy of Access handy. Also, in SharePoint you can easily create several web apps at once, without having to pause and edit each one. And, occasionally, some SharePoint web hosts require you to use the SharePoint approach for creating web apps; they may not allow you to create a web app through Access.
Creating a Web App in Access
Creating a web app in Access is much like creating a desktop database. You can create a web app from the welcome page, which appears when you first start Access, or by choosing File→New if you’re currently working on another database. Either way, you’ll see a list of templates that you can use to create new web apps and desktop databases. To create a web app, click the “Custom web app” template instead of “Blank desktop database.”
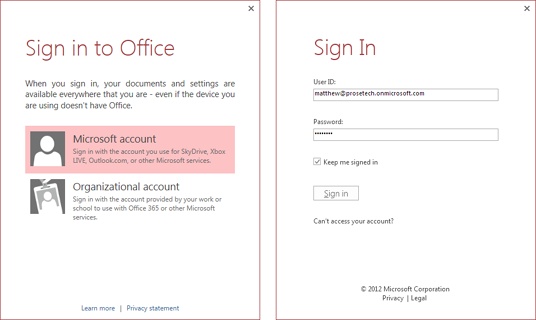
When you click “Custom web app,” Access asks you for two key details (Figure 20-1):
The app name. Provide a descriptive name that will identity your database to other people (like “SalesTracker” or “Premium Toy Catalog”).
The web address. Fill in the URL that points to your SharePoint site (for example, http://tigersharpinc.sharepoint.com). This part differs slightly depending on exactly how Access is configured. For example, if you installed Access with Office 365, or if you’ve successfully created a web app in the past, you’ll probably see the location you want in the Available Locations list. You can then click to select it. If Access doesn’t show you the Available Locations list, or the list doesn’t have the address of your SharePoint site, you’ll need to type the address into the Web Location box underneath.

Once you’ve filled in these two details, click Create. At this point, Access will ask for your login credentials (Figure 20-2).
Once you’ve provided the right user name and password, Access creates the web app. It will take a few seconds to get the job done, because Access needs to communicate with the SharePoint server while it creates the web app.
Once Access is finished creating your web app, it opens it in the main Access window. Skip ahead to Adding a Table to learn how to add your first table.
Note
Web apps are always online, which means you never need to upload your work. Instead, every time you make a change or add a record, it’s automatically reflected in the online copy of your database that everyone else sees. The disadvantage to this system is that you’re always working without a safety net. The situation is quite different from when you’re developing a desktop database, where you can test your changes (on a master copy of the database front end) before you go live with them (by distributing the new front end to everybody else).
Creating a Web App in SharePoint
It’s just as easy to create a web app using the SharePoint web interface. Here’s how:
In a web browser, go to your SharePoint site and log in.
If you know very little about SharePoint, you may appreciate the quick Share-Point site tour on Understanding SharePoint. Read it to get your bearings, and then return back here.
Click the Site Content link in the navigation menu (on the left).
A page appears with a list of items you can add to the site.
Click the first icon, “add an app.”
SharePoint shows a list of different apps you can add.
In the “Find an app” search box, type access app. Click the magnifying glass.
Rather than hunt through the long list of potential apps, it’s easier to search for what you need.
When the Access App picture appears, click it.
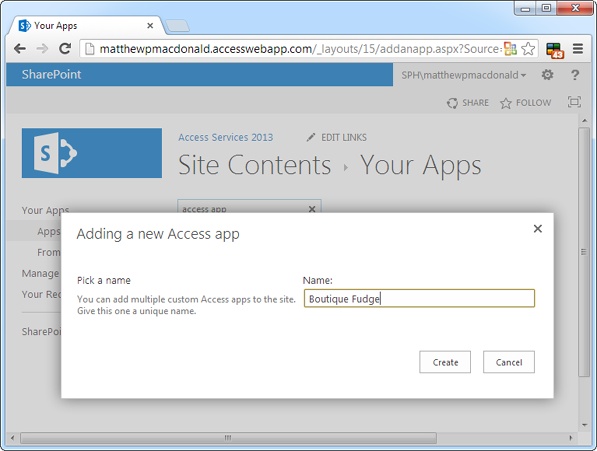
Access pop up a box that asks for the name of your new app (Figure 20-3).
Fill in a name for your web app, and then click Create.
SharePoint takes you back to the Site Contents page. In the meantime, your app is being created in the background. You’ll see an icon for it in the list, followed by the text “We’re adding your app” (Figure 20-4).
When the app icon turns solid red, click it.
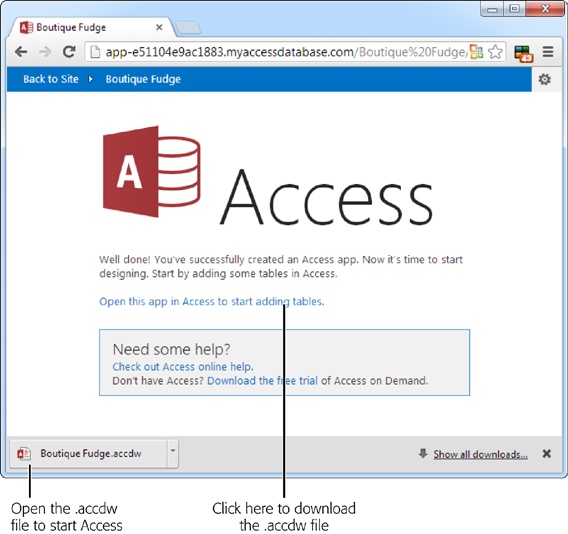
You’ll see a welcome page that informs you that your app is ready but doesn’t have any tables yet (Figure 20-5).
To open your web app in Access, click the link “Open this app in Access to start adding tables.”
Your browser will ask you to download a small file with the extension .accdw. This file is small because it doesn’t contain any data—just the URL that points to the SharePoint web app. When you open this file, Access reads the URL, contacts the SharePoint server, downloads all the information it needs, and opens your web app. You can then begin designing the database.

Adding a Table
The first thing you’ll notice when you create a new web app is the startlingly stripped-down Access interface. The ribbon has just a single tab, named Home. Underneath is the web app’s home tab, where you begin creating your first table (Figure 20-6).

Access gives you three ways to add a table to a web app:
From scratch. The same way you design the tables in desktop databases.
From a template. You search for the type of data you want to store (customers, products, clients, and so on), and Access suggests a ready-made table that fits the bill.
From another data source. You import a table that you’ve already designed. Usually, you’ll load a batch of tables from an Access desktop database, but you can also pull a table out of an Excel file, a text file in CSV format (Importing from a Text File), a SQL Server database, or a SharePoint list.
The best way to get started is to create a blank table from scratch. To do that, click the “add a new blank table” link shown in Figure 20-6. Access loads up a new tab for your table in Design view, so you can add the fields you want (Figure 20-7).
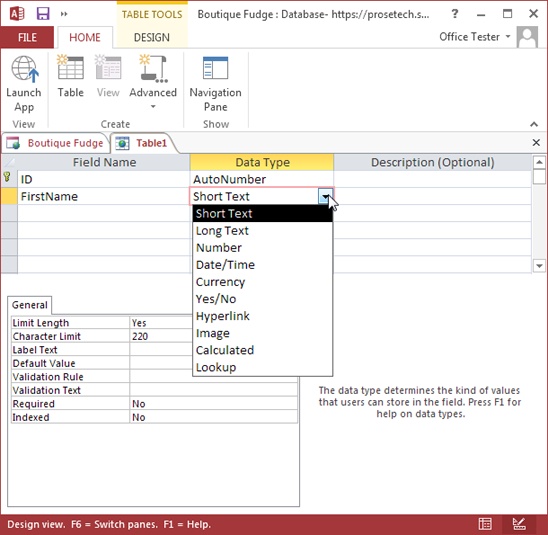
Initially, you’ll start with just one field: an AutoNumber field named ID, which uniquely identifies each row in the table. You’re already in the habit of adding an ID field to your own tables, but web apps require this best practice. Every table in a web app includes an ID field, and you can’t delete or modify it.
As you add more fields, you’ll find that you can choose from a similar set of data types as when creating a desktop database. However, because your data is actually stored in a SQL Server database, the data types need to play by the rules of SQL Server. This requirement introduces a few subtle differences—for example, the Attachment data type is replaced with the less-powerful Image data type, and the old-fashioned OLE Object data type is gone altogether. You’ll also notice that the list of field properties you can customize for each data type is far smaller than with a desktop database. For example, you can’t use the nifty custom format string feature (Currency) for any data type.
Table 20-1 details the most important difference and tells you what data type SQL Server is really using to store each type of data, behind the scenes.
DATA TYPE | ACTUAL SQL SERVER DATA TYPE | KEY DIFFERENCES |
Short Text | nvarchar | This field works the same in desktop databases and web apps. |
Long Text | nvarchar(MAX) | Web apps don’t offer the option of storing formatted HTML text. (Of course, you could store HTML markup in a Long Text field, but the formatting won’t have any effect when someone views or edits the data—it’ll just show up as extra tags sandwiched inside your field.) |
Number | int, float, or decimal | In a web app, the exact data type depends on the Number Subtype setting, which lets you choose between whole numbers, floating point numbers that can have any number of decimal places, and decimal numbers that are allowed exactly six decimal places. The Display Format setting lets you choose how the number appears to someone using the database—for example, you can show a fixed number of decimal places or display the number as a percent value. |
Date/Time | date, time, or datetime | In a web app, the exact data type depends on the subtype setting, which lets you to store just the date information, just the time information, or both. Unfortunately, you’re limited to just two date formats, which you set using the Display Format property. You can use the standard short date format, which appears like 11/22/2013 on a computer with U.S. regional settings (Date/Time) or the standard long format, which appears like November 22, 2013. |
Currency | money | As with desktop databases, web apps let you set how many decimal places are shown for a currency value. Web apps also include a property named Currency Symbol, which lets you choose from an exhaustive list of different countries’ currency symbols. |
Yes/No | bit | Once again, web apps lock down your format choices. With Yes/No fields, you don’t get any other display options (which isn’t a big deal, because most people don’t bother to change the Format field for a Yes/No field in a desktop database anyway). |
Hyperlink | nvarchar | Web apps and desktop databases treat hyperlinks the same way—they assume they’re URLs and turn them into clickable links when they display them as part of a record. But in the database, a hyperlink is just an ordinary piece of text. |
Image | varbinary(MAX) | The web app Image field actually uses a SQL Server varbinary field, which gives it the ability to store an arbitrarily big block of binary data—in other words, any content from a picture to a video file. However, web apps assume the Image field is used for images. (When a web form has an Image field on it, the web app attempts to convert the data inside the field into a picture, which it then shows on the page. And when you edit a record that contains an Image field, the web app lets you upload a new picture file, which it then stores in the field.) The closest desktop equivalent is the attachment field, which is far more freewheeling—it allows any type of file and accepts multiple files in a single field. |
Calculated | Web apps and desktop databases work the same way, letting you create an expression that performs a calculation (Calculated). | |
Lookup | As in desktop databases, a Lookup is a feature, not a data type. It lets you provide a set of possible choices for a field or, more commonly, create a relationship between tables. Because Access web apps don’t use the Relationships window, creating a lookup is the only way to create a relationship. |
As with a desktop database, you can write field validation rules that reject bad data (Validation Rules). You can also write data macros that perform more complex error checking. Macros work essentially the same as in a desktop database—you check for an error with the If action, and then cancel the insert, update, or delete operation with the RaiseError action, as explained on Validation with Before Events. The chief difference is that you use the On Insert, On Update, and On Delete data macros in a web app, while a desktop database performs the same logic with the Before Change and Before Delete data macros.
Once you’ve finished entering all the fields for your table, it’s time to save it. Press Ctrl+S or click the Save icon the Quick Access toolbar. Then, enter a name for your table and click OK.
When you save a table in a web app, Access communicates with the SharePoint server and pushes your new creation online. After a slight delay Access shows its friendly “Hang on while we save your changes message.” Once the process is complete, your app will be live on the SharePoint server. You (or anyone else) can now log into SharePoint and start entering data.
Entering Data in a Table
As with an Access desktop database, you can use Datasheet view to add or edit the records in your table. To switch into Datasheet view, right-click the tab for your table (for example, the Customers tab) and choose Datasheet View. Or, you can use the familiar View button in the ribbon. Either way, once you switch to the Datasheet view, you’ll notice that it doesn’t look quite the same as it does for a desktop database (Figure 20-8).
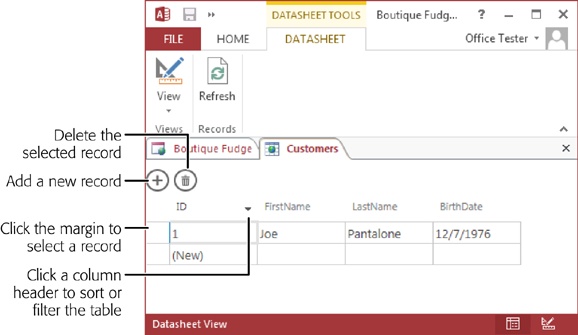
Now’s a good time to try adding a record. You’ll find that the web app datasheet behaves much like the datasheet for a desktop database. Here are some examples:
You can adjust the width of columns.
You can rearrange the order of columns. Just hover over one until you see the four-way-arrow pointer; then drag.
You can hide a column. Hover over the column header until you see the drop-down arrow, click it, and then choose Hide Column.
You can sort by any field. Hover over a column header, click the drop-down arrow, and choose Sort Ascending or Sort Descending.
You can show or hide records that have specific values. Hover over a column header, click the drop-down arrow, and add a checkmark next to the items you want to see (or choose Remove Filter to see everything).
A calendar icon appears when you move to a field that uses the Date/Time data type (like BirthDate field in Figure 20-8). Click it to pop up a month-by-month calendar view, where you can find exactly the date you want.
One notably missing feature is the ability to search for a record. But as you’ll see later, web apps have another way to accomplish that (Editing Data in a Web App).
Given that the features of the Datasheet view are so similar in web apps as they are in desktop apps, you might wonder why the Datasheet view looks so different. The reason is that the Datasheet view in a web app is actually a piece of a web page. When you edit your table online, you use the same grid of records, with all the same buttons and features, except your interaction takes place inside your favorite web browser. (You’ll see this happen a bit later, on Running Your Web App.)
This minor miracle works because of a subtle shift in the way the Datasheet view is created. In a desktop database, Access creates the grid of records. But in a web app, SharePoint generates the Datasheet view. It uses a mixture of HTML markup and some carefully crafted JavaScript code to simulate the desktop editing experience. In fact, even when you’re working with your web app inside Access, exactly the same process is taking place—SharePoint is creating the Datasheet view, and Access is simply showing that bit of web content inside its main window.
Back to the Home Tab
Every web app has a built-in navigation system. As you add tables, your web app creates a menu that includes a link to each one. SharePoint shows this menu on the home page for your web app. Access shows what this menu looks like on the web app’s home tab—the same place where you started out before you added your first table.
Initially, the home tab showed the helpful Add Tables page (Figure 20-6). But now that you’ve added a table, Access uses the home tab to show the home page of your web app (Figure 20-9).

Few databases have just a single table, and web apps are no exception. To add a new table, choose Home→Create→Table from the ribbon. This action doesn’t actually create a table; instead it takes you back to the home tab and loads up the Add Tables page that you used earlier. Now you can click the “add a new blank table” link to create another new table, which Access will open in another new tab. Each time you create a new table, Access adds it to the list of tables, which it shows on the left of the home tab.
As you’ll soon see, you can change the menu on your web app home page, and you can change the controls it uses to let people edit data. But before you start changing the web app home page, you need to get a better feel for how it works, and to do that you need to view your web app in a browser. The next section shows you how.
Running Your Web App
A web app with a single table may not seem like much (and, truthfully, it isn’t that impressive yet). But before you ramp up your efforts, you need to see what your web app looks like to other people.
Launching your web app is easy. In Access, choose Home→View→Launch App. Access opens your default browser and sends it to the web app home page. If you aren’t already logged in to your SharePoint site, you might be asked to enter your user name and password now.
Once you’re logged in, you’ll see the live version of your web app. It looks a lot like the web app’s home tab in Access (Figure 20-10). Get comfortable—you’ll spend the next few pages decoding this compact data display.

Editing Data in a Web App
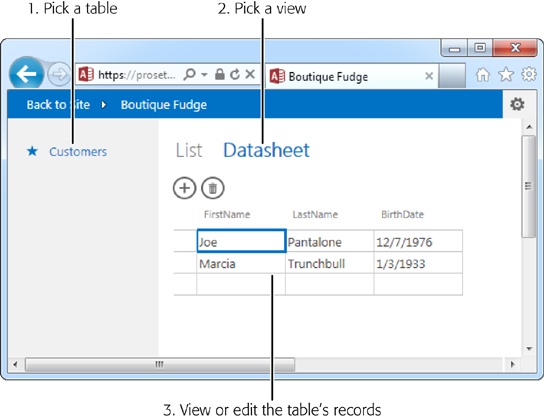
At first glance, the home page may seem a bit puzzling. However, it makes more sense once you break it down into the series of steps you follow when you use a web app. Here’s how the process unfolds:
Pick the table you want to work on from the list on the left.
On the right, Access loads the views for that table. At the top, above the editing controls, you’ll see the links for different views. Every new table in a web app starts its life with two views: List and Datasheet.
Pick the view you want to use by clicking the corresponding link.
You start at the List view, but you can switch to the Datasheet view with a single click (Figure 20-12).
Use the controls underneath to review and edit your data.
As soon as you make changes, SharePoint commits them to its SQL Server database so everyone else can see them. This process is nearly instantaneous, unlike with shared desktop databases, which refresh themselves every 60-or-so seconds (Seeing Changes as They Happen).
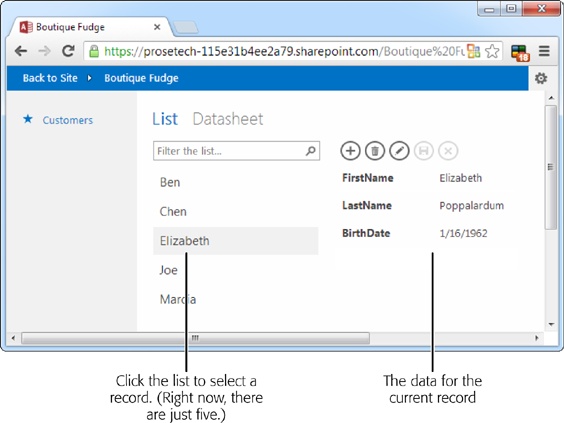
When you create a new table, Access creates a List view and a Datasheet view to help you edit it. If you choose to do your work in the Datasheet view (Figure 20-12), you won’t have any trouble interpreting its compact grid of records. In fact, you’ve already seen this view in Access, where you used it to add the first record to your table (Entering Data in a Table). Using the Datasheet, you can edit, delete, and create records, and you can resize and rearrange columns. If you hover over a column header and click the drop-down arrow, you get a menu that lets you apply basic sorting and filtering.
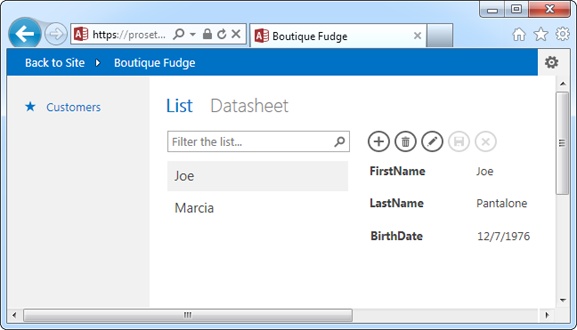
If you choose the List view (Figure 20-13), you may need a bit of help finding your way around. List view lets you view and edit just one record at a time. That means it can present the data more effectively, especially if the database contains pictures, long text descriptions, or a huge number of fields. To pick which record you see, you find it in the list, which runs along the left side of view. To add, edit, or delete records, you use the icons that appear just above the record data (Figure 20-14).
Note
By default, the list uses the first field in your table (not including the ID number). In the case of the Customers table, that means you see a list of first names, which isn’t nearly as useful as seeing a list of full names. Fortunately, you’ll find that it’s easy to change the data in the list when you start editing your view (Changing the List).

Understanding the Web App Navigation System
As you know, you can add as many tables as you want to a web app; you simply choose Home→Create→Table and then click the “add a new blank table” link. Every time you create a table, Access adds a matching link to the navigation menu on the left side of the home page. So if you add three tables to your web app, Access creates three links, and the person using your database can skip from one table to another by clicking these links.
You can also use the navigation menu when you’re editing your web app in Access. On the home tab, right-click the table you want to work with. Access gives you several options: Choose View Data to open a Datasheet view on your table; use Edit Table to open the table in Design view; or click Delete to remove the table altogether.
You can customize the navigation menu, but only slightly. If you yearn to give it a new look, move it to a new place, or change the way it works, you’re out of luck. But here are several less dramatic but still practical changes you can make to your navigation menu:
Change the order of menu items. It makes sense to group related tables together and put the most commonly edited ones at the top. To change the menu order, just drag items up or down. When folks load up your app, SharePoint starts out showing them the first table in the list.
Change a menu item’s text. Right-click the item, choose Rename, and then type whatever you want to use. Unfortunately, you can’t change the navigation menu’s width, and SharePoint can only accommodate about 15 letters in its fixed layout, so don’t use long names like “New Product Catalog.”
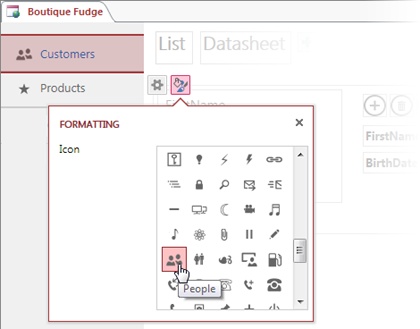
Change the icon that appears next to the menu item. Ordinarily, each table has a star on the left side, but you can replace this with a different tiny picture. You can’t use your own handcrafted icon, but you can choose from over 150 readymade icons, including such mystifying choices as a miniature snowman and a soccer ball. To change the icon, select the menu item, and then click the tiny Formatting icon that appears to the right of it (Figure 20-15).
Hide a menu item. If you’ve created a table that you don’t want people to edit, right-click it and choose Hide. You’ll still see the menu item in the home tab in Access, with a dashed line around it to indicate its hidden status. But when you run the web app online, you won’t see the link at all.
Note
Hiding is a handy way to guide people to the right tables, but it isn’t a bulletproof way to protect your data. For example, if someone adds a bookmark to one of your tables, and then you hide the link to that table, that person can still use the bookmark to return to the table and edit it.
Currently, web apps don’t provide any user-level security to ensure that different groups of people can only perform certain types of tasks or edit certain types of tables. This is a clear limitation of the web app model, and possibly one that Microsoft will address in the future.
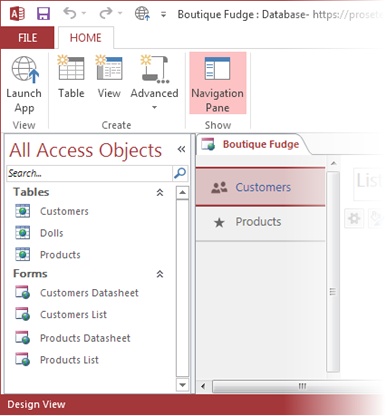
At this point, you might be wondering what happened to the traditional navigation pane, which shows all the database objects in a desktop database. When you create a web app, Access hides the navigation pane, to prevent less experienced Access users from confusing it with the navigation menu. However, you can show the navigation pane whenever you need it by choosing Home→Show→Navigation Pane (Figure 20-16).
One reason to reveal the navigation pane is so you can see, at a glance, all the views that Access has created for your web app, without browsing through every table in the home tab. You can also use the pane to rename a table. (When you right-click the table in the navigation menu and choose Rename, you rename the navigation link, not the table.) And there are other good reasons to call up the navigation panel, like viewing the queries you’ve created and finding views and macros that aren’t linked to any table. You’ll use the navigation panel later in this chapter when you create a filtering query (Views That Use Queries).
Customizing Views
You now have a simple web app that lets other people view data and edit it online. However, the editing experience falls short from what most hardcore database-crafters expect. Access’s automatically generated list view is a nice enough starting point, but it’s rarely perfect. For example, Access won’t necessarily put related fields close together, because Access follows the order in which table fields are defined. And Access often fails to give each field the best size, making some boxes unnecessarily big (for example, dates), while placing long text values in cramped boxes. Fortunately, it’s easy to fix these problems by taking control of your views.
Modifying a View
To modify a view, you need to open it up in Access. Here’s how:
In Access, switch to the web app’s home tab.
Remember, the home tab uses the web app’s name—in the current example, the home tab is named Boutique Fudge.
In the list on the left, click the table.
In this example, that’s the Customers table.
Choose the view you want to edit by clicking the view button at the top.
Access lets you modify the List view and the Datasheet view. You might choose to make minor changes in the Datasheet view (for example, removing columns or changing their order), but you’re likely to spend most of your time perfecting the more detailed List view.
Click the floating Edit button to open the view.
Alternatively, you can double-click the view button. Either way, Access opens the view in a new tab (Figure 20-17).
Edit the view.
The following sections explore the changes you can make when editing a view.
When you’re finished, press Ctrl+S or click the Save button in the Quick Access toolbar.
Access publishes your changes to the SharePoint server. If you already have the view open in a web browser, refresh your page to see your changes.

Rearranging Controls
Editing a view in a web app is like editing a form in Layout view, but simpler. There’s no Property Sheet of settings, for example, and there’s no way for you to actually see the layout that Access is using. Instead, Access creates the layout automatically as you move your fields around.
The best way to understand how view editing works is to give it a whirl. Here are a few basic tasks to try:
To resize a control, move the mouse over one of the edges. The mouse pointer will turn into a two-way arrow. Then, drag the edge up, down, or to the side. The resizing process doesn’t affect other controls, which is different from the way forms work in a desktop database. In a desktop database, most forms use layouts. If you change the width of one control in a layout, Access then resizes all the other controls that are in the same layout to match.
Note
You can widen an ordinary single-line text box, but you can’t make it any taller—for that, you need a multiline textbox. Access automatically uses a single-line text box for Short Text fields and a multiline text box for Long Text fields, but Adding and Removing Controls explains how you can change a field to use a different type of control.
To move a control, position your mouse over the control so the pointer changes into a four-way arrow. Then, drag the control to a new place. As long as you don’t overlap controls, you can place them almost anywhere. Access creates new rows and columns as needed (Figure 20-18).
To move a whole bunch of controls, click in an empty space inside the view, and then drag to draw a selection box. When you release the mouse button, you’ve selected all the controls that are inside the box and you can drag them around en masse. If you find this technique too tricky to master, you can select specific controls one after the other by holding down the Ctrl key as you click them.

Tip
In a web app, fields and their associated labels don’t stick together. If you want to move both at once, hold down Ctrl, click both, and then drag the pair where you want them.
Rearranging controls is the simplest improvement you can make to any view. You can do helpful things like putting related fields (say, FirstName and LastName) close together, and enlarging image fields and text fields so you have enough room to read long text and view big pictures.
Configuring Controls
When you get tired of moving the controls around your view, you might want to start changing them. Access doesn’t provide anywhere near the level of control-customization in a web app view as it does in a desktop database form, but there are still plenty of useful modifications you can make. Here are two of the most basic:
To change the text in a label, double-click it and then type the new text you want. Ordinarily, Access uses the unvarnished field names from the underlying table. You may prefer to replace a field name like “BirthDate” with a caption like “Birth Date” or “Date of Birth.”
To format the text in a control, select it and use the buttons in the View | Design→Font section of the ribbon. This trick works equally well with label controls (which are used for field captions) and text box controls (which are used to show field values). You can change the color, size, and justification of the text, and you can add bold, italic, and underlining. But that’s it—so give up hope of ever getting exotic typefaces, fancy borders, or background fills.
Every control also has a small set of configurable settings that are tucked out of view. To see them, start by clicking the control you want to change. You’ll see three tiny icons appear next to it (Figure 20-19):
Data. Click this icon to link the control to a data field or change the control’s name (which might be useful if you want to use a clearly descriptive name when you refer to it in a macro). You can also set a default value for your field.
Formatting. Click here to change the control’s tooltip, hide it, or disable it. If you’re looking for fancier styling options, you’ll need to use the View | Design→Font section of the ribbon instead.
Actions. Click here to attach a data macro to the
On Clickevent (which occurs when someone clicks the control) or theAfter Updateevent (which occurs when someone edits the value in the field).

One of the most useful ways to improve a view is to add some user guidance, which you can do via tooltips and input hints. Tooltips are the brief pop-up messages that explain an onscreen item. You can use them, for example, to provide more details about what kind of information a field should hold. An input hint is the text that SharePoint displays in a text box when the corresponding field is empty and awaiting some data. You can use an input hint to suggest the proper format for a text value, as Figure 20-20 demonstrates (bottom). To add both these details, select a field, click the Formatting icon, and then type some text in the Tooltip and Input Hint boxes.

Changing the List
The list in List view is a special case. It’s a control that does double-duty: not only does it display a list of values, but it also lets you jump from one record to another by clicking those values.
When Access creates the List view for a table, it grabs the first field (not including the ID field), and uses that to fill the list. As a result, the list may not have enough information to properly identify each record. For example, it may show the FirstName field, even though first names aren’t unique and there may be many people with the same first name in your table. The list may even use a field that has blank values, in which case you’ll need to click the blank spaces in the list to load those records. Clearly, this situation is far from ideal.
To configure the list control, select it and click the Data icon. (This is the only icon that appears, because you can’t change the appearance of the record-selection list or react to its events.) When you click Data, you’ll see a panel with several useful settings, including Primary, Secondary, and Thumbnail (all of which set the data that appears in the list) and Sort Field and Sort Order (which control how the items in the list are ordered).
There are three different approaches you can use to improve your list:
Set both a Primary and a Secondary field. In the current Customers view, Primary is set to FirstName, and Secondary is not set. But if you set Primary to LastName and Secondary to FirstName, you’ll see both bits of information in the list, one on top of the other (Figure 20-21).
Use an expression for the Primary field. This is the standard approach you’d use in a desktop database. Click the ellipsis (…) next to the Primary setting, and type in an expression like
FirstName + “” + LastName(if you want names to show up as “Matthew Malone”) orLastName + “,” + FirstName(for “Malone, Matthew”). Don’t set a Secondary field, unless you want to list to show even more information.Add a thumbnail. If your table includes a field with the Image data type, you can set it for the Thumbnail setting. Then, SharePoint will show a tiny thumbnail of your picture in the list, next to each item. This approach works best with pictures that are small and distinctive, like company logos.

Tip
Even if you only need the primary field to identify your items, you can still put the secondary field to good use by showing some other information that lets users figure out which records they want to review. For example, if your view shows a list of projects, you might use the primary field to provide the unique project name, and the secondary field to show some important information, like the project’s current status or its due date.
Once you make sure the list includes the data you want, you can set the Sort Field and Sort Order settings to make sure your list puts its values in the right order. The Sort Field is the field Access uses to sort the list (like LastName) and Sort Order lets you choose between an ascending or descending order. To avoid confusion, you should sort on the same field that you display. For example, if you show last names first, it makes sense to sort on LastName, whereas if you show first names first it’s clearer to sort on FirstName. If the sort order isn’t obvious by looking at the list, the people using your view may assume the list isn’t sorted at all.
Adding and Removing Controls
As you may expect, you can easily add or delete the controls in a view.
To delete a control, click it and then press the Delete key. Alternatively, you can hide the control. That way it isn’t visible (or usable) online, but you can unhide it if you want to add it back in the future. To hide a control, select it, click the Formatting icon, and change the Visible setting to Hidden.
Access gives you two ways to add a control. The quickest approach is to drag the field in from the Field List panel. Access adds a label for the caption and adds a control that matches the field type. For example, you get a text box for a field with the Short Text data type, a hyperlink control for a field with the Hyperlink data type, a checkbox for a Yes/No field, and so on.
The other way to add a control is to double-click the exact control you want in the View | Design→Controls section of the ribbon. Access then adds it to your layout. You’ll need to drag it to the right place, and (optionally) connect it to a field in your database. To do that, select it, click the Data icon, and pick the field you want to use.
Now that you know how to add and delete controls, you also know how to replace one control with another. It’s simply a matter of deleting the control you have now, adding a different control to take its place, and connecting it to the right field. Strange as it may seem at first, there are several good reasons to replace a control. Here are some examples:
You want to show a field but not let anyone edit it. You could click the Formatting icon and turn off the Enabled checkbox. But another approach is to replace your text box with a label. When you edit a record, disabled fields appear faded, while labels stay the same, looking like ordinary pieces of text.
You want to restrict editing choices for a field to a few known values. In this case, swap your text box for a combo box, click the Data icon, set Row Source Type to Value List, and enter the list of acceptable values in the Row Source box. Now when someone edits the record, he’ll need to pick one of the values you’ve defined. But be careful—if you need to add more than a few values, you’re probably better off putting your values in a separate table and creating a lookup (Creating a Simple Lookup with Fixed Values).
You want to show a web page in your view. As you already know, you can place web addresses in a Hyperlink control. They then become clickable links in your view. However, if you replace your Hyperlink control with a Web Browser control, SharePoint will show the referenced web page in the view, using a box that you can make as big or as small as you want. The only caveat—and it’s a significant one—is that for security reasons, this trick only works with secure addresses that start with https://, not regular URLs that begin with http://.
Using the techniques you’ve learned up to this point, you can polish a view into sparkling form. You don’t have the fine control of a desktop database for things like exact grid placement and heavy formatting, but you do have enough to get by, most of the time. Figure 20-22 shows a customized view that uses many of the tricks you’ve considered.

Creating More Advanced Views
So far, you’ve spent your time customizing a single view. However, there’s no reason to stop there. Access lets you create as many views as you want. For example, you might create different views to satisfy different editing tasks or to suit different users. Each view can show a different subset of your data, arranged in a different way, and with only certain fields editable. In this section, you’ll learn how to create a new view, and then you’ll see how you can use these skills to filter data, deal with linked tables, and launch simple macros.
Adding a New View
To add a new view, follow these steps:
Click the web app’s home tab, and then choose the table you want to work with from the list on the left.
The table appears in the main part of the window.
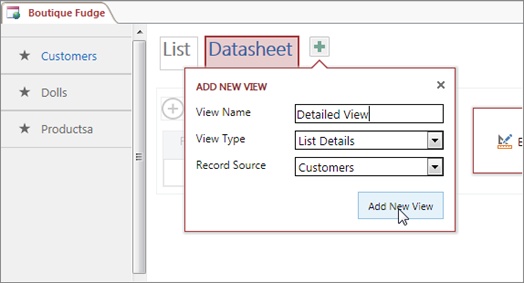
Click the green plus (+) icon, which is just to the right of the list of views.
Access pops open a panel where you can enter the settings for your new view (Figure 20-23).
Give your view a name.
The convention that SharePoint uses when it names its views is to use the name of the table, followed by a space, followed by the name of the view, as in “Dolls List” and “Dolls Datasheet.” However, you’re free to use any name you’d like.
The view link (the text the user clicks to see the view) doesn’t need to match the view name (the name of the object you’re creating now). You’ll see how to change the view name in step 8.
Choose the View Type.
You can start with a completely blank slate (choose Blank), a view that resembles the standard List view (List Details), a view that resembles the standard Datasheet view (Datasheet), or a view that’s tailored for grouping records and showing totals (Summary).
Choose the Record Source.
This is where the view gets its data. You aren’t limited to the current table—a new view can use any table for its data source. You can also create queries (as you’ll see on Views That Use Queries) and use them as the foundation for views.
Click Add New View.
Access creates the view and adds a link for your view next to links for the prebuilt List and Datasheet view.
If you want to change the text of the view link, right-click it and choose “rename.”
Initially, the view link matches the view name, but you can use whatever you want. You can also rearrange the order of view links (by dragging them), delete a view you don’t want (right-click and choose Delete), and create a copy of a view to use as a starting point for a new view (right-click and choose Duplicate). You can’t change the appearance of view links, move the group of view links to another place, or hide a view link without deleting the associated view, so don’t bother trying.
Once you’ve created a view, you can edit it.
Open your new view in the normal way: by double-clicking the view link.
Using a View to Create a Welcome Page
Here’s a novel use for a custom view: creating an introductory message that welcomes people to your web app.
Right now, new visitors begin in the thick of things. SharePoint loads up the views for the first table in the navigation menu, creating a dense display that can be dizzying at first glance. Compare that to the web app in Figure 20-24, which uses a special screen to explain what’s going on.

Custom views make this frill possible, although it’s a bit more work than you’d expect (and much more awkward than in a desktop database). The following list of steps takes you through the whole process:
Create a new table named Welcome.
Each link in the navigation menu must correspond to a real table. So, to show a welcome message, you need a table, even though you don’t plan to store any data in it. What you name this table doesn’t matter, because you can rename the navigation menu link, but it makes sense to use a name that indicates its purpose.
Add a field named Message to the Welcome table, with the data type Long Text.
This field will hold the welcome message that’s shown on the welcome page. Strictly speaking, you don’t need to use this approach; instead, you could type the text you want directly into your view. However, your Welcome table does need at least one row, because otherwise SharePoint will show a “no items” message instead of your view. So seeing as you need a record in the Welcome table, you may as well use it for something.
Switch the Welcome table to Datasheet view. Then, add a single record, and type the welcome text in the Message field.
In this example, that’s the two italicized paragraphs shown in Figure 20-24. Because you’re using the Long Text data type, you can press Enter once to start a new paragraph and twice to add a blank line.
Go to the home tab, and then drag the navigation link for the Welcome table to the top of the list.
That way, SharePoint will load it up first.
Delete the two automatically created views for the Welcome table.
Simply select the view link for each one and press Delete.
Add a new view named Boutique Fudge. Choose Blank for the View Type and Welcome for the Record Source.
Or, you can use a different name, in which case you’ll simply need to rename the view link text to Boutique Fudge, as shown in Figure 20-24.
It makes sense to use a blank view, because you don’t want a list or any other automatically generated controls.
Double-click the view link to edit your new view.
You’ll see that the view has just one ingredient: the action bar (the toolbar with editing icons).
Delete the icons in the action bar.
Click one, press Delete, and then repeat the process until all the buttons are gone.
Drag the Message field from the Field List panel (on the left) and drop it onto the view.
This field shows the welcome message you created in step 3.
Perfect your form.
You can edit or remove the caption that comes with the Message field, add more labels with additional text, and change the color and size of each bit of text. When it’s perfect, save it and view the results in the browser. You’ll probably need several tries to get it right.
Views That Use Queries
Custom views become more interesting when you combine them with another database ingredient—queries. Your query can filter out specific records, join tables together, and use expressions to manipulate individual fields. Your view shows the data that the query retrieves.
For example, consider the records in the Orders table from the desktop version of the Boutique Fudge database. You may want to create a view that shows only those orders that are currently in progress. On its own, a view can’t accomplish this feat. But with a query, it’s Access 101. You simply need to write a filter condition that matches records that have a status of In Progress.
To create a query, choose Home→Create→Advanced→Query. Access opens the familiar query designer, where you can create your query in the formal way, by picking fields and typing in your filters (Figure 20-25).

When you’re finished creating your query, press Ctrl+S to save it or close the query tab, in which case Access will prompt you to save changes. Choose a descriptive name for your query, like InProgressOrders.
Note
Make sure your query include the unique ID field of the table. Without this detail, SharePoint won’t allow you to edit any of the data in the query results, because it won’t know which record to update.
The web app query designer looks strikingly similar to the query designer in a desktop database. As with a desktop database, you can create a query that groups data, calculates totals, joins tables, requires parameters, and uses expressions. However, certain features are missing, such as action queries, Datasheet view (for testing a query), and SQL view (for editing the underlying SQL command).
Queries don’t appear in the home tab. If you want to edit a query, or just reassure yourself that it’s stored in your database, you need to show the navigation pane by choosing Home→Show→Navigation Pane.
Once you’ve created a query, you can use it as the basis for a new view. Follow the normal instructions for creating a view (Creating More Advanced Views), but in the Record Source setting, choose the query you just created. Using the query from Figure 20-25, you can create a list-style view that lets users review and edit in-progress orders.
Views That Use Related Tables
Web apps are surprisingly adept at dealing with table relationships. If there’s a relationship between your tables, Access pays attention, and uses that relationship to create a better view (Figure 20-26).

Tip
When you use relationships, you display the data from multiple tables in one place. In many cases, there’s no reason to show the child table separately. For example, it makes sense to view and edit Orders and OrderDetails records together, but there’s probably no need to edit the OrderDetails table directly. To streamline your database, you should hide the OrderDetails table from the navigation menu (Understanding the Web App Navigation System).

To show related records, Access uses the Related Items control—a new control that’s available only in web apps. And although Access’ automatically created List views make good use of the Related Items control, you’ll often want to tweak your views to improve the way your data is displayed. Here are some reasons to crack open a view and fine-tune the Related Items control:
To show different fields from the related table. In the OrderDetails example shown in Figure 20-26, the Related Items control has room to show every field from the OrderDetails table. But if the OrderDetails record had more fields, Access would choose to show only some of them, and they might not be the ones you want.
To show records from a different table. The Order table is the parent table in just one relationship, so it’s obvious that the Related Items control should use the OrderItems table. But other tables are not so simple. For example, a customer can be linked to order records and invoice records. When Access creates a view for the Customers table, it may use the Related Items control to show linked records from the Orders table, when you would prefer to see linked records from the Invoices table.
To show records from multiple tables. In much the same way that you add views for a table, you can add pages to the Related Items control. Each page can then show the related records from a different table.
To try out these techniques, open a view that uses the Related Items control, like the List view for the Orders table. You’ll see the Related Items control, which looks like a big blank box (Figure 20-28).
Note
You can the Related Items control to an existing view by choosing View | Design→Controls→Related Items Control. When added in this way, the Related Items control starts out completely empty, and you need to click the plus (+) icon to add the first page.
To fine-tune the settings for the Related Items control, start by clicking the heading inside it, which corresponds to the child table. In the orders example, the heading is named OrderDetails. Three icons will appear.

Out of the three icons, the Data icon is the most important. It lets you choose the table that the Related Items control uses, and the fields that it shows (Figure 20-29). The Formatting tab lets you change the page title (for example, you could rename OrderDetails to “Order Contents”). The Calculation tab lets you pick a field that will be added, counted, or averaged—the result is displayed at the bottom of the list of related records. Unfortunately, the Calculation tab isn’t nearly as useful as it seems, because it doesn’t support expressions. That means there’s no way to calculate the total cost of an order, for example, by multiplying the cost and quantity of each item.

If you don’t need four fields, it helps to be strategic about where you place your fields. Each field is given the same fixed amount of space, so if you have a long value, you can give it more space if you don’t use the slot that follows it. The example in Figure 20-29 uses this technique to give extra space to product names (the first field) by leaving the second field unoccupied.
Adding Child Records
The Related Items control has another trick in store. While you’re viewing a parent table (like Orders), you can use the Related Items control to add a record to the child table (in this case, OrderDetails). The secret is the tiny link that appears at the bottom of the Related Items control. You’ll recognize it because it starts with the word “Add” (like “Add OrderDetails” in Figure 20-26).
When you click the record-adding link, the Related Items control opens a popup window with a new view that lets you add a record to the child table (Figure 20-30).
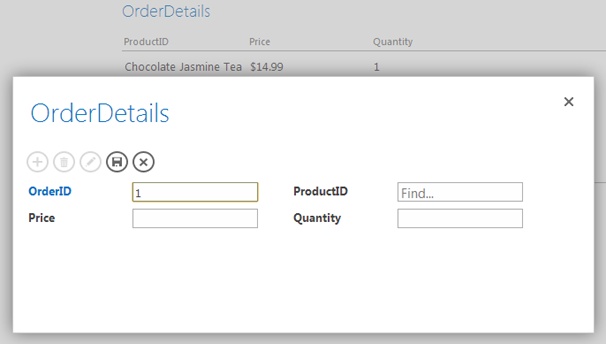
By default, Access uses the List view for the corresponding table. So if you click Add OrderDetails, you’ll see the OrderDetails List view. However, you can choose a different view by configuring the Related Items control and changing the “Popup view” setting (Figure 20-29).
This convenience does a lot to centralize the functionality in a web app, and it reduces the number of times you need to hop around from view to view while you’re editing data. In the current example, it lets someone add a new order and fill out all the linked order items in one place, rather than having to edit two separate tables.
Access pros often create a new custom view—one that’s not explicitly linked to any table in the navigation list—to use with the Related Items popup. Choose Home→Create→Advanced and pick Blank View or List View. Once you save the view, you’ll be able to pick it in the “Popup view” setting. If you need to edit or delete the view later, you can find it in the navigation pane (choose Home→Show→Navigation Pane).
Adding Parent Records
Web apps introduce a second new control that simplifies editing with related tables: the Autocomplete control.
The Autocomplete control takes the place of the traditional Combo Box control. In a desktop database, you see plenty of Combo Box controls, because they let you pick a parent record when editing a child record. For example, you might use a Combo Box to choose the product for a given order item, as shown in Figure 20-31.
Web apps also support the Combo Box. But when Access creates a view, it assumes you would prefer to use the new Autocomplete control, which works a little differently. In the Autocomplete control, you begin typing part of text from the item you want to match (in this case, the product name). As you type, SharePoint shows potential matches, which you can click to select. But if you don’t find what you want, you can make use of an additional option, “< Add a new item >,” which appears at the top of the list (Figure 20-31). Click that, and SharePoint opens another popup view where you can add the parent record you want.

In some cases, you may not want to use the Autocomplete control that Access has given you. Perhaps you worry that it may lead novice users to accidentally create new products rather than pick the one correct record that already exists in the table. The solution in this case is easy—edit the view, delete the Autocomplete control, and add a Combo Box control in its place.
Tutorial: Creating a Web App from an Access Database
You’ve covered a lot of ground in your web app exploration. Throughout, the theme has been the same: web apps are a gently scaled down version of desktop databases. They don’t provide the same features—in fact, sometimes their omissions are downright maddening. But, overall, they give you the features you need put your data online. Even better, when they work, they’re easy. Because of their strict limits on customization, there isn’t much chance to spend hours fiddling with finicky details or debugging an intricate code routine.
By the same token, if you need to use a web app with a larger, more complex database, you may run into some headaches. In the final section of this chapter, you’ll see an example with the sprawling Cacophoné Studios database. You’ll learn how to use the tables in the desktop version of the database as the starting point for a web app (easy) and how to deal with the challenges of many-to-many relationships (more difficult). Along the way, you’ll learn about a final web app feature—macros.
Creating a Web App Based on a Desktop Database
If you already have the perfect set of tables in a desktop database, there’s no need to recreate them by hand in a web app. Instead, you can use a nifty import feature to transfer their tables to your web app, with or without their data. Obviously, some tables can cause problems (for example, ones that use the unsupported Attachment data type) and other database objects, like queries, forms, and reports, won’t come along for the ride. But overall, the database import feature works surprisingly well.
To import the tables from a database, follow these steps:
Choose Home→Create→Table from the ribbon.
This brings you to the Home tab and shows you the Add Tables page. At the bottom of the Add Tables page, you’ll find a series of icons for importing data from different sources.
In this example, you’ll import data from an Access desktop database, which is the most useful option. However, you can import data from several other locations, such as a text file or an Excel spreadsheet. When importing these types of data, Access uses the Import wizard described in Chapter 23.
Note
When importing from SharePoint or SQL Server, Access lets you create linked tables—tables that are permanently connected to the SharePoint list or SQL Server database you specify. Linked tables fetch the most recent data every time you open them. (You’ll learn about linking to SQL Server and SharePoint in Chapter 20 and Chapter 21, respectively.) However, there’s a significant limitation. In a web app, linked tables are always read-only, which means you can’t modify any of the linked data.
Click the Access icon.
Access opens the Get External Data window.
Pick your desktop database file.
You can type it into the “File name” box, or you can click the Browse button and navigate to it.
Click OK.
Access opens the Import Objects window (Figure 20-32).
Select the tables you want to import.
By importing multiple tables at once, you can keep their relationships intact. (You can always delete unwanted tables from your web app after you import them.)
Optionally, you can choose to import the tables but not the data.
To do that, click the Options button and then click Definition Only.
Click OK to begin the import process.
Access transfers the tables to the web app and adds them to the navigation list, exactly as though you were creating each one from scratch. When Access finishes, it informs you of any issues.
The database import process works without a hitch for the Cacophoné Studios database. However, if you attempt to import a table that causes a problem (for example, one with unsupported data types or table validation rules), Access ignores the details it doesn’t support, imports the table as best as it can, and then informs you of what it left out.

Dealing with a Many-to-Many Relationship
The Cacophoné Studios database uses several many-to-many relationships. For example, there’s a many-to-many relationship between teachers and classes—one teacher may teach several classes, and the same class may be taught by more than one teacher. Similarly, there’s a many-to-many relationship between students and classes, because one student can be enrolled in multiple classes and a single class holds a number of students.
To create many-to-many relationships, you create a junction table that sits between the two tables you want to link (Many-to-Many Relationship). For example, to link teachers and classes, you can create a table named Teachers_Classes. Each record pairs up one teacher with one class. (To review how junction tables work in closer detail, and to review all the relationships in the Cacophoné Studios database, refer to Relationship Practice.)
The problem with many-to-many relationships is that they confuse the Related Items control. It displays the related records from the junction table, but it doesn’t get any of the information from the table that sits on the other side of the relationship. That means if you’re looking at a teacher record, you’ll see a list of all classes taught by that teacher, but you won’t see the rest of the class information, such as the start date, class description, and so on (Figure 20-33).

There’s no way to solve this problem by using the Related Items control, because you can’t control what data it shows. However, there are two approaches that work around this problem:
Use the Subview control. The Subview control is the web app equivalent of the Subform control (The Subform Control). It shows another view of your choice, inside the current view, and with the filtering criteria you choose.
Create a Popup. As you’ve already seen (Adding Child Records), a popup is a view that appears on top of your current view, temporarily obscuring it. To show a popup view, you need to create a macro.
Either way, you follow essentially the same steps. First, you create a query that fetches all the data you want to display (not just the limited details that the Related Items control shows on its own). Second, you create a view that uses your query. Third, you show your view as a popup or with the help of the Subview control. This example uses the popup approach, which requires slightly more work but provides a nicer viewing experience.
Creating a Query to Get Related Data
The first step is to create a query that gets the data you need. This query needs two join two tables: the junction table (like Teachers_Classes) and the table on the other side of the relationship (Classes). You use the Teachers_Classes table to get the TeacherID field, and you use the TeacherID field to filter out the classes that belong to a specific teacher. Then, you use the Classes table to get the class data that you want to show.
Creating a query like this is a quick bit of work. Just choose Home→Create→Advanced→Query, add the two tables you need, and choose the fields you want to show (Figure 20-34). Don’t worry about the filter criteria yet—that part will be set by your view. Instead, save your query with a name that communicates its role (like ClassesByTeacher).

Creating a View for Your Query
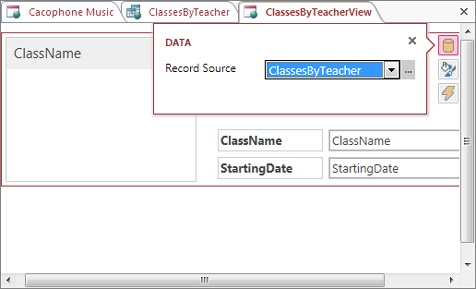
The next step is to build a view that uses this query, so you can show your data when you need it. You don’t want this view to be linked to any of the tables in the navigation menu, so you should create it using the Home→Create→Advanced→List View command.
Initially, your view is empty, but you can quickly attach it to your query (Figure 20-35). After that it’s simply a matter of dragging the fields you want to show from the Field List pane onto your new view, and arranging them. Save your view with a name that matches the query (like ClassesByTeacherView).
Now it’s time to return to the original view that started this odyssey. In this example, it’s the Customers List view. Delete the Related Items control, so you have room to implement your improved solution.
You can then put your newly created view to work in a Subview control or using a popup window, as explained in the next section.
Showing Your View in a Popup
To show your view, you need two ingredients that work together: a button and a macro. The button sits on your form, waiting for someone to click it. When it’s clicked, the button triggers your macro, which opens a popup window and shows ClassesByTeacherView.
Adding a button is easy: it’s one of the small set of controls you can find in the View | Design→Controls section of the ribbon. Once you’ve added the button, click the tiny Actions icon to show the events you can react to. In the case of a button, there’s just one: the On Click event that fires when the button is clicked (Figure 20-36).

The final step is to create the macro that shows the popup window. Creating a macro in a web app is identical to creating one in a desktop database, except you have far fewer commands to work with. In this case, you need to use the OpenPopup command, and specify two arguments. The first argument is View, the view that you want to open (in this case, that’s ClassesByTeacherView). The second argument is Where, which sets a filter condition that cuts the results down to just the matching records. What’s needed here is an expression that matches the current teacher ID (provided by the ID field) with the TeacherID that’s stored in the Teachers_Classes table and returned by the ClassesByTeacher query. Here’s the expression that does the trick:
TeacherID=ID
Figure 20-37 shows the finished macro.

This example is notable because it takes you through all the features of a web app. You create a custom query that’s shown in a custom view, and you call that custom view into action with a macro. The end result is a polished experience, and a decent impersonation of an Access database in a browser.
