
Chapter 2. Building Smarter Tables
In the previous chapter, you learned how to dish out databases and pop tables into them without breaking a sweat. However, there’s bad news. The tables you’ve been creating so far aren’t up to snuff.
Most significantly, you haven’t explicitly told Access what type of information you intend to store in each field of your table. A database treats text, numbers, dates, and other types of information differently. If you store numeric information in a field that expects text, you can’t do calculations later on (like find the average value of your bobblehead dolls), and you can’t catch mistakes (like a bobblehead with a price value of “fourscore and twenty”).
To prevent problems like these, you need to define the data type of each field in your table. You’ll tackle this important task in this chapter. Once you’ve mastered data types, you’re ready to consider some of the finer points of database design.
Understanding Data Types
All data is not created equal. Consider the Dolls table you created in Chapter 1 (Building Your First Table). Its fields actually contain several different types of information:
Text. The Character and Manufacturer fields
Numbers. The ID and PurchasePrice fields
Dates. The DateAcquired field
You may naturally assume that the PurchasePrice field always includes numeric content and that the DateAcquired field always includes something that can be interpreted as a date. But if you haven’t set the data types correctly, Access doesn’t share your assumptions and doesn’t follow the same rules.
When you create a new field by typing away in Datasheet view, Access makes an educated guess about the data type by examining the information you’ve just typed in. If you type 44, Access assumes you’re creating a number field. If you type Jan 6, 2013, Access recognizes a date. However, it’s easy to confuse Access, which leads to the problems shown in Figure 2-1.

To prevent invalid entries, you need to tell Access what each field should contain. Once you set the rules, Access enforces them rigorously. You put these requirements in place using another window—your table’s Design view.
Design View
When you create a new database, Access starts you off with a single table and shows that table in Datasheet view. (As you learned last chapter, Datasheet view is the grid-like view where you can create a table and enter data.) To switch to Design view, right-click the tab name (like “Dolls”), and then choose Design View. (Or you can use the Home→Views→View command or the View buttons at the bottom of the Access window. Figure 2-2 shows all your options. All of these commands do the same thing, so pick whichever approach seems most convenient.)
Note
If you’ve opened a truly old Access 2003 database, you won’t see any tabs. Instead, you’ll get a bunch of overlapping windows. You can remedy this problem and get your tabs back by following the instructions on The Navigation Pane. Or, if you want to keep the overlapping windows, just use the View buttons or the ribbon to change views (instead of the right-click-the-tab-title approach described above).

If you switch to Design view on a brand-new table that you haven’t saved yet, Access asks you for a table name. Access then saves the table before switching you to Design view.
Tip
For a handy shortcut, you can create a new table and automatically start in Design view. To do this, choose Create→Tables→Table Design. However, when you take this route, your table doesn’t include the very important ID column, so you need to add one yourself, as you’ll see shortly.
While Datasheet view shows the content in your table, Design view shows only its structure (see Figure 2-3).

You can use Design view to add, rearrange, and remove fields, but you can’t use it to add new records. In the Dolls table, you can use Design view to add a Quantity field to keep track of doll duplicates. However, you can’t add your newly purchased Bono bobblehead without switching back to the Datasheet view. Design view isn’t intended for data entry.
If the Property Sheet box is open on the window’s right side, you may want to close it to reclaim more space. (The Property Sheet lets you set a few highly technical table settings, none of which you need to consider right now.) To banish it, choose Table Tools | Design→Show/Hide→Property Sheet. To bring it back later, just repeat the same command.
Organizing and Describing Your Fields
Design view lets you rearrange the order of your fields, add new ones, rename the existing ones, and more. You can also do all these things in Datasheet view, but Access gurus usually find it’s easier to make these changes in Design view, without being distracted by the data in the table.
Here are a few simple ways you can change the structure of your table in Design view:
Add a new field to the end of your table. Scroll to the last row of the field list, and then type in a new field name. This action is equivalent to adding a new field in Datasheet view.
Add a new field between existing fields. Move to the field that’s just under the place where you want to add the new field. Right-click the field, and then choose Insert Rows. Then, type a field name in the new, blank row.
Move a field. Click the gray square immediately to the left of the field you want to move, and release the mouse button. This selects the field. Then, click the gray square, and drag the field to the new position.
Delete a field. Right-click the gray square immediately to the left of the field you want to remove, and then choose Delete Rows. Keep in mind that when you remove a field, you also wipe out any data that was stored in that field. This action isn’t reversible, so Access prompts you to confirm that it’s really what you want to do (unless the table is completely empty).
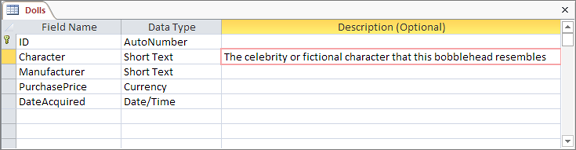
Add a description for a field. Type in a sentence or two in the Description column next to the appropriate field. (You might use “The celebrity or fictional character that this bobblehead resembles” as the description for the Character field in the Dolls table, as shown in Figure 2-4.)
Note
Previous versions of Access used the description for another purpose. When someone was editing a record, the description of the corresponding field appeared in the status bar. Access 2013 discontinues this practice, which was found to be relatively useless, because most people never think to look down in the status bar.
How Updates Work in Design View
Access doesn’t immediately apply the changes you make in Design view. Instead, it waits until you close the table or switch back to Datasheet view. At that point, Access asks whether you want to save the table. (The answer, of course, is Yes.)
Sometimes, you may apply a change that causes a bit of a problem. You could try to change the data type of a field so that it stores numbers instead of text. (The box on Changing the Data Type Can Lose Information discusses this problem in more detail.) In this situation, you won’t discover the problem until you close the table or switch back to Datasheet view, which may be a little later than you expect.
If you’ve made a potentially problematic change and you just can’t take the suspense, you’re better off applying your update immediately, so you can see if there’s a problem before you go any further. To do so, click the Quick Access toolbar’s Save button (it’s the diskette icon in the Access window’s top-left corner), or just use the keyboard shortcut Ctrl+S. Access applies your change and saves the table. If it runs into a problem, Access tells you about it (and lets you choose how you want to fix it) before you do anything else with the table.
Access Data Types
Design view is a powerful place for defining a table. Design view lets you tweak all sorts of details without jumping around the ribbon (as you would if you were creating a table in Datasheet view).
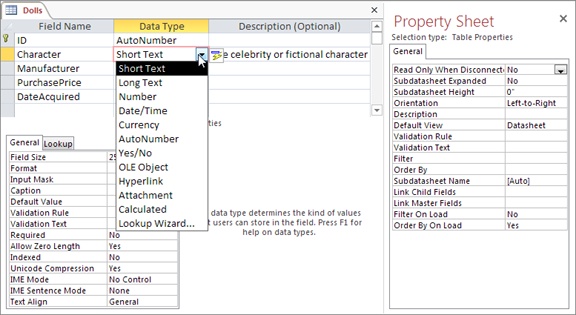
One of the details is the data type of each field—a setting that tells Access what type of information you’re planning to store in it. To change the data type, make a selection in the Data Type column next to the appropriate field (Figure 2-5). Here’s where you separate the text from numbers (and other data types). The trick is choosing the best data type from the long list Access provides—you’ll get more help for that in the following section.
Depending on the data type you choose, you can adjust other field properties to nail down your data type even more precisely. If you use a text data type, you use field properties to set the maximum length. If you choose a decimal value, you use field properties to set the number of decimal places. You set field properties in the Field Properties part of the Design view, which appears just under the field list. You’ll learn more about field properties throughout this chapter (and you’ll consider them again in Chapter 4).
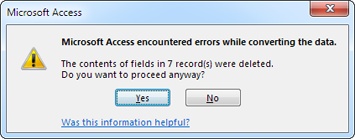
The most important decision you make for any field is choosing its data type. The data type tells Access what sort of information you plan to store in that field. Access uses this information to reject values that don’t make sense (see Figure 2-6), to perform proper sorting, and to provide other features like calculations, summaries, and filtering.

Note
A field can have only one data type. You can’t create a field that can store two or three different data types, because Access wouldn’t have enough information to manage the field properly. (Instead, in this situation, you probably need two separate fields.)
As you learned earlier, there are three basic types of data in the world: text, numbers, and dates. However, Access actually provides a whopping 12 data types, which include many more specialized choices. Before you pick the right data type, it’s a good idea to review all your choices. Table 2-1 shows an overview of the menu options in the Data Type list. (The Lookup wizard choice isn’t included, because it isn’t a real data type. Instead, this menu option launches the Lookup wizard, which lets you set a list of allowed values. You’ll learn more about this on Lookups in Chapter 4.)
DATA TYPE | DESCRIPTION | EXAMPLES |
Short Text | Numbers, letters, punctuation, and symbols, up to a maximum of 255 characters (an average-sized paragraph). | Names, addresses, phone numbers, and short product descriptions. This is one of the most commonly used data types. |
Long Text (previously called Memo) | Large amounts of unformatted text, up to 65,536 characters (an average-sized chapter in a novel). | Long descriptions, articles, letters, arrest warrants, and other short documents. Unlike the Short Text data type, you can’t sort records based on the data in a Long Text field. |
Number | Different kinds of numbers, including negative numbers and those that have decimal places. | Any type of number except currency values (for example, dollar amounts). Stores measurements, counts, and percentages. |
Currency | Similar to Number, but optimized for numbers that represent values of money. | Prices, payments, and expenses. |
Date/Time | A calendar date or time of day (or both). Don’t use this field for time intervals (the number of minutes in a song, the length of your workout session)—instead, use the Number data type. | Birthdates, order dates, ship dates, appointments, and UFO sighting times. |
Yes/No | Holds one of two values: Yes or No. (You can also think of this as True or False.) | Fields with exactly two options, like male/female or approved/unapproved. |
Hyperlink | A URL to a website, an email address, or a file path. | www.FantasyPets.com, [email protected], C:DocumentsReport.doc. |
Attachment | One or more separate files. The content from these files is copied into the database. | Pictures, Word documents, Excel spreadsheets, sound files, and so on. |
AutoNumber | Stores a unique, identifying number that Access generates when you insert a new record. | Used to uniquely identify each record; typically set as the primary key (The Primary Key). Usually, every table has a single AutoNumber field named ID. |
Calculated | Generates the value automatically, based on an expression you supply. You can perform simple math and combine the values from other fields. | Values that depend on other fields. For example, if you already have a UnitCost and a Quantity field, you can add a TotalCost calculated field that multiplies them together. |
OLE Object | Holds embedded binary data, according to the Windows OLE (object linking and embedding) standard. Rarely used, because it leads to database bloat and other problems. The Attachment field is almost always a better choice. | Some types of pictures and documents from other programs. Mostly used in old-school Access databases. Nowadays, database designers use the Attachment data type instead of the OLE Object data type, or they store the data in separate files outside of the database, and record the file name in a Short Text field. |
The following sections describe each data type except for OLE Object, which is a holdover from the dark ages of Access databases. Each section also describes any important field properties that are unique to that data type.
Short Text
Short Text is the all-purpose data type. It accepts any combination of letters, numbers, and other characters. So you can use a Short Text field for a word or two (like “Mary Poppins”), a sentence (“The candidate is an English nanny given to flights of song.”), or anything else (“@#$d sf_&!”).
Sometimes it seems that the Short Text data type is just too freewheeling. Fortunately, you can apply some stricter rules that deny certain characters or force text values to match a preset pattern. For example, Access usually treats phone numbers like text, because they represent a series of characters like 123-4444 (not the single number 1,234,444). However, you don’t want to let people put letters in a phone number, because they obviously don’t belong. To put this restriction into action, you can use input masks (Input Masks) and validation (Validation Rules), two features discussed in Chapter 4.
Note
Because Short Text fields are so lax, you can obviously enter numbers, dates, and just about anything else in them. However, you should use Short Text only when you’re storing some information that can’t be dealt with using another data type, because Access always treats the contents of a Short Text field as plain, ordinary text. In other words, if you store the number 43.99 in a Short Text field, Access doesn’t realize you’re dealing with numbers, and it won’t let you use it in a calculation.
Text Length
Every Short Text field has a maximum length. This trait comes as a great surprise to many people who aren’t used to databases. After all, with today’s gargantuan hard drives, why worry about space? Can’t your database just expand to fit whatever data you want to stuff inside?
The maximum length matters because it determines how densely Access can pack your records together. For performance reasons, Access needs to make sure that an entire record is stored in one spot, so it always reserves the maximum amount of space a record might need. If your table has four fields that are 50 characters apiece, Access can reserve 200 characters’ worth of space on your hard drive for each record. On the other hand, if your fields have a maximum 100 characters each, Access holds onto twice as much space for each record, even if you aren’t actually using that space. The extra space isn’t a major issue (you probably have plenty of room on your computer), but a spread-out database may experience slightly slower searches.
The most a Short Text field can hold, ever, is 255 characters. If you need to store a large paragraph or an entire article’s worth of information, you need the Long Text data type instead (Long Text).
When you add a new Short Text field, Access gives it a maximum capacity of 255 characters. This is a safe choice, but if you don’t need that much space you can reduce the maximum of your field to something more fitting. (The box on Maximum Length Guidelines has some guidelines.) To set the maximum length, go to the Field Properties section, and enter a number in the Field Size box (Figure 2-8).

Long Text
Microsoft designed the Long Text data type to store large quantities of text. If you want to place a chapter from a book, an entire newspaper article, or just several paragraphs into a field, you need the Long Text data type.
Note
In previous versions of Access, the Long Text data type was called Memo. The old name was a little odd—although a Long Text field can certainly store the information from an interoffice memorandum, it’s useful anytime you have large blocks of text.
When creating a Long Text field, you don’t need to supply a maximum length, because Access stores the data differently from other data types. Essentially, it stuffs Long Text data into a separate section, so it can keep the rest of the record as compact and efficient as possible, but accommodate large amounts of text.
A Long Text field tops out at 65,536 characters. To put it in perspective, that’s about the same size as this chapter. If you need more space, add more than one Long Text field.
Note
Technically, the 65,536-character limit is a limitation in the Access user interface, not in the database. If you program an application that uses your database, it could store far more—up to a gigabyte’s worth of information in a Long Text field.
If you need to edit a large amount of text while you’re working on the datasheet, you can use the Zoom box (Figure 2-9). Just move to the field you want to edit, and then press Shift+F2.

Formatted Text
Like a Short Text field, the Long Text field stores unformatted text. However, you can also store rich text in a Long Text field—text that has different fonts, colors, text alignment, and so on. To do so, set the Text Format field property to Rich Text (rather than Plain Text).
To format part of the text in a field, you simply need to select it (while editing the record in Datasheet view) and then choose a formatting option from the Home→Text Formatting section of the ribbon. However, most of the time you won’t take this approach, because it’s difficult to edit large amounts of text in the datasheet’s narrow columns. Instead, use Shift+F2 to open a Zoom box, and then use the minibar (Figure 2-10).
Tip
There’s another, even easier way to get formatted text into a Long Text field. Create the text in a word processing program (like Word), format it there, and then copy and paste it into the field. All the formatting comes with it.

Note
The minibar is sometimes a little finicky, and you may need to reselect the text more than once to get it to appear. If you can’t get the minibar to appear at all, you are probably attempting to format a Short Text field, or a Long Text field that has the Text Format property set to Plain Text.
As neat as this feature may seem at first glance, it’s rarely worth the trouble. Database purists believe that tables should store raw information and let other programs (or fancy forms) decide how to format it. The problem is that once you’ve created your formatted text, it can be quite a chore to maintain it. Just imagine having to change the font in 30,000 different records.
If you really do want to store formatted content, consider linking your database to a separate document, like a Word file. In Access, you can do this in two ways:
Create a field that points to the file. For example, you can place a value like C:myfileBonoBobbleheadDescription.docx in a field. For this trick, use the Short Text or Hyperlink data type (Hyperlink).
Embed the file inside your database. This way, it’s impossible to lose the file (or end up pointing to the wrong location). However, you’ll need to pull the file out every time you want to update it. To do this, you need to use the Attachment data type (Attachment).
Number
The Number data type includes a wide variety of differently sized numbers. You can choose to allow decimal numbers, and you can use negative values (just precede the value with a – sign). You should use the Number data type for every type of numeric information you have—except currency amounts, in which case the Currency data type (Currency) is a better match.
When you use numeric fields, you don’t include information about the units you’re using. You may have a field that represents a Weight in Pounds, a Height in Meters, or an Age in Years. However, these fields contain only a number. It’s up to you to know what that number signifies. If you think other people may be confused, consider explaining the units in the description (Organizing and Describing Your Fields), or incorporate it into the field name (like HeightInMeters).
Note
Your field should never, ever contain values like “44 pounds.” Access treats this value as a text value, so if you make this mistake, you can’t use all the important number-crunching and validation tools you’ll learn about later in this book.
Number Size
As with a Short Text field, when you create a numeric field, you need to set the Field Size property to make sure Access reserves the right amount of space. However, with numbers, your options are a little more complicated than they are for ordinary text.
Essentially, numbers are divided into several subgroups, depending on whether they support non-integer values (numbers to the right of a decimal point) and on how many bytes of space Access uses to store them.
Note
A byte is a group of eight bits, which is the smallest unit of storage in the computer world. For example, a megabyte is approximately one million bytes.
Table 2-2 lists the different Field Size options you can choose for the Number data type and explains when each one makes most sense. Initially, Access chooses Long Integer for all fields, which gives a fair bit of space but requires whole numbers.
Note
Table 2-2 doesn’t include Replication ID, because you almost always use that option with the AutoNumber data type (AutoNumber).
Number Formatting
The Field Size determines how Access stores your number in the table. However, you can still choose how it’s presented in the datasheet. For example, 50, 50.00, 5E1, $50.00, and 5000% are all the same number behind the scenes, but people interpret them in dramatically different ways.
To choose a format, you set the Format field property. Your basic built-in choices include:
General Number. Displays unadorned numbers, like 43.4534. Any extra zeroes at the end of a number are chopped off (so 4.10 becomes 4.1).
Currency and Euro. Both options display numbers with two decimal places, thousands separators (the comma in $1,000.00), and a currency symbol. These choices are used only with the Currency data type.
Fixed. Displays numbers with the same number of decimal places, filling in zeroes if necessary (like 432.11 and 39.00). A long column of numbers lines up on the decimal point, which makes your tables easier to read.
Standard. Similar to Fixed, except it also uses thousands separators to help you quickly interpret large numbers like 1,000,000.00.
Percent. Displays numbers as percentages. For example, if you enter 0.5, that translates to 50%.
Scientific. Displays numbers by using scientific notation, which is ideal when you need to handle numbers that range widely in size (like 0.0003 and 300). Scientific notation displays the first nonzero digit of a number, followed by a fixed number of digits, and then indicates what power of ten that number needs to be multiplied by to generate the specified number. For example, 0.0003 becomes 3.00 x 10⁻⁴, which displays as 3.00E–4. The number 300, on the other hand, becomes 3.00 x 10², or 3E2.
A custom format string. This cryptic code tells Access exactly how to format a number. You type the format string you need into the Format box. For example, if you type in the weird-looking code
#,##0, (including the comma at the end) Access hides the last three digits of every number, so 1,000,000 appears as 1,000 and 15,000 as 15.
Note
Custom number formats aren’t terribly common in Access (they’re more frequently used with Excel). Later on, you’ll learn about expressions (Calculated Fields), which let you do pretty much the same thing.
Currency
Currency is a slight variation on the Number data type that’s tailored for financial calculations. Unlike with the Number data type, here you can’t choose a Field Size for the Currency data type—Access has a one-size-fits-all policy that requires eight bytes of storage space.
Tip
The Currency data type is better than the Number data type because it uses optimizations that prevent rounding errors with very small fractions. The Currency data type is accurate to 15 digits to the left of the decimal point, and 4 digits to the right.
You can adjust the number of decimal places that Access shows for currency values on the datasheet by setting the Decimal Places field property. Usually, it’s set to 2.
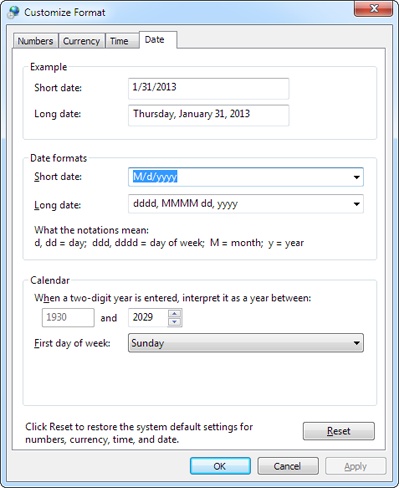
The formatting that Access uses to display currency values is determined by the “Region and Language” settings on your computer (see the box on Dating Your Computer). However, these settings might produce results you don’t want—for example, say you run an artisanal cereal business in Denmark that sells all its products overseas in U.S. dollars (not kroner). You can control exactly how currency values are formatted by setting the Format field property, which gives you the following options:
Currency. This option is the standard choice. It uses the formatting based on your computer’s regional settings.
Euro. This option always uses the Euro currency symbol (€).
A custom format string. This option lets you use any currency symbol you want (as described below). You need to type the format string you need into the Format box.
There’s a simple recipe for cooking up format strings with a custom currency symbol. Start by adding the character for the currency symbol (type in whatever you want), and then add #,###.##, which is Access code for “give me a number with thousands separators and two decimal places.”
For example, the Danish cereal company could use a format string like this to show the U.S. currency symbol:
$#,###.##
Whereas a U.S. company that needs to display a Danish currency field (which formats prices like kr 342.99) would use this:
kr #,###.##
Date/Time
Access uses the Date/Time data type to store a single instant in time, complete with the year, month, day, and time down to the second. Behind the scenes, Access stores dates as numbers, which lets you use them in calculations.
Although Access always uses the same amount of space to store date information in a field, you can hide some components of it. You can choose to display just a date (and ignore time information) or just the time (and ignore date information). To do this, you simply need to set the Format field property. Table 2-3 shows your options.
FORMAT | EXAMPLE |
General Date | 2/23/2013 11:30:15 PM |
Long Date | February 23, 2013 11:30:15 PM |
Medium Date | 23-Feb-13 |
Short Date | 2/23/2013 |
Long Time | 11:30:15 PM |
Medium Time | 11:30 PM |
Short Time | 23:30 |
The format affects only how the date information is displayed—it doesn’t change how you type it in. Access is intelligent enough to interpret dates correctly when you type any of the following:
To add date and time information, just follow the date with the time, as in 23-Feb-13 5:06 PM. Make sure to include the AM/PM designation at the end, or use a 24-hour clock.
If it’s too much trouble to type in a date, consider using the calendar smart tag instead. The smart tag is an icon that appears next to the field whenever you move to it, as shown in Figure 2-11. You can turn this feature off by setting the Show Date Picker field property to Never.

Custom Date Formats
If you’re not happy with the seven standard date options that Access provides, you can craft your own date format string and type in the Format property. This format string tells Access how to present the date and time information.
A date format string is built out of pieces. Each piece represents a single part of the date, like the day, month, year, minute, hour, and so on. You can combine these pieces in whatever order you want. For example, consider the following format string:
yyyy-mm-dd
This string translates as the following instructions: “Display the four-digit year, followed by a dash, followed by a two-digit month number, followed by another dash, followed by a two-digit day number.” You’re free to put these components in any order you like, but this example defines them according to the ISO date standard.
If you apply this format string to a field that contains the date January 1, 2013, you see this in the datasheet:
2013-01-01
You can control how to display the year, day, and month components. For example, if you replace mm with mmm, your dates will show three-letter month abbreviations instead of the month number:
2013-Jan-01
Remember that regardless of what information you choose to display or hide, Access stores the same date information in your database.
Table 2-4 shows the basic placeholders that you can use for a date or time format string.
CODE | DESCRIPTION | DISPLAYS (JANUARY 1, 2013, 1:05:05 P.M.)… |
d | The day of the month, from 1 to 31, with the numbers between 1 and 9 appearing without a leading 0. | 1 |
dd | The day of the month, from 01 to 31 (leading 0 included for 1 to 9). | 01 |
ddd | A three-letter abbreviation for the day of the week. | Tue |
dddd | The full name of the day of the week. | Tuesday |
m | The number value, from 1 to 12, of the month (no leading 0 used). | 1 |
mm | The number value, from 01 to 12, of the month (leading 0 used for 01 to 09). | 01 |
mmm | A three-letter abbreviation for the month. | Jan |
mmmm | The full name of the month. | January |
yy | A two-digit abbreviation of the year. | 13 |
yyyy | The year with all four digits. | 2013 |
h | The hour, from 0 to 23 (no leading 0 used). | 13 |
hh | The hour, from 00 to 23 (leading 0 used for 00 to 09). | 13 |
:n | The minute, from 0 to 59 (no leading 0 used). | 5 |
:nn | The minute, from 0 to 59 (leading 0 used for 00 to 09). | 05 |
:s | The second, from 0 to 59 (no leading 0 used). | |
:ss | The second, from 0 to 59 (leading 0 used for 00 to 09). | 05 |
AM/PM | Tells Access to use a 12-hour clock, with an AM or PM indication. | PM |
am/pm | Indicates a 12-hour clock, with an am or pm indication. | pm |
A/P | Tells Access to use a 12-hour clock, with an A or P indication. | P |
a/p | Tells Access to use a 12-hour clock, with an a or p indication. | p |
Yes/No
A Yes/No field is a small miracle of efficiency. It’s the leanest of Access data types, because it allows only two possible values: Yes or No.
When using a Yes/No field, imagine that your field poses a yes or no question by adding an imaginary question mark at the end of your field name. You could use a field named InStock to keep track of whether a product is in stock. In this case, the yes or no question is “in stock?” Other examples include Shipped (in a list of orders) or Male (to separate the boys from the girls).
Tip
Don’t make the mistake of using the Yes/No data type for a field that may expand to accept more than two options in the future, because that change will force you to edit every record in your database. Instead, use a Lookup (Lookups), which lets you limit a field to a small set of distinct values.
Although every Yes/No field is essentially the same, you can choose to format it slightly differently, replacing the words “Yes” and “No” with “On” and “Off” or “True” and “False.” You’ll find these three options in the Format menu. However, it doesn’t make much difference because on the datasheet, Yes/No fields are displayed with a checkbox, as shown in Figure 2-13.

Hyperlink
The Hyperlink data type comes in handy if you want to create a clickable link to a web page, file, or email address. You can mix and match any combination of the three in the same table.
Access handles hyperlinks a little differently in Datasheet view. When you type text into a hyperlink field, it’s colored blue and underlined. And when you click the link, Access pops it open in your browser (Figure 2-14).
Note
Access doesn’t prevent you from entering values that aren’t hyperlinks in a Hyperlink data field. This trait leads to problems if you click the hyperlink. If you put the text “saggy balloons” in a hyperlink field and click it, Access tries to send your browser to http://saggyballoons, which obviously doesn’t work.

One hyperlink field feature isn’t immediately obvious. Hyperlink fields actually store more than one piece of information. Every hyperlink includes these three components:
The text you see in the cell
The text you see when you hover over the link with your mouse (the tooltip)
The destination you go to when you click the cell (the URL or file path)
When you type a link into the datasheet, the first two are set to the same value—whatever you’ve just typed in. For example, when you type www.FantasyPharmacologists.com, the text you see and the tooltip are both set to hold the same content, which is www.FantasyPharmacologists.com.
To set the third piece of information—the URL or file path—Access examines your entry and makes a reasonable guess. For example, if you type www.FantasyPharmacologists.com, Access assumes you want the URL to be the web location http://www.FantasyPharmacologists.com, so it adds the http:// sequence at the beginning. Similarly, if you type an email address like [email protected], Access creates the full email link mailto:[email protected]. When you click a link like this in Access or in a web browser, your email program starts a new message. Finally, if you enter a file path or a URL that already starts with http:// (or some other URL prefix), Access doesn’t make any changes.
Most of the time, Access’s approach gives you the result you want. However, you aren’t limited to this strategy. You can set these three components to have different values—for example, so your URL has a website address (like www.zyqcorp.com) but your display text has a more approachable name (“The ZYQ Corporation”). To do so, move to the value, and then press Ctrl+K to pop up the Edit Hyperlink window (see Figure 2-15). Or right-click it, and then choose Hyperlink→Edit Hyperlink.

Attachment
The Attachment data type lets you add one or more files to your database record in much the same way that you tack on attachments to your email messages. Access stores the files you add to an attachment field as part of your table, embedded inside your database file.
The Attachment data type is a good choice if you need to insert a picture for a record, a short sound file, or even a document from another Office application like Word or Excel. You could create a People table with a picture of each person in your contact list, or a product catalog with pictures of the wares you’re selling. In these cases, attachments have an obvious benefit—because they’re stored inside your database file, you never lose track of them.
However, attachments aren’t as graceful with large files, or files you need to modify frequently. If you place a frequently modified document into an Access database, it isn’t available on your hard drive for quick editing, printing, and searching. Instead, you need to fire up Access and then find the corresponding record before you can open your document. If you want to make changes, you also need to keep Access open so it can take the revised file and insert it back into the database.
Warning
Think twice before you go wild with attachments. An Access database is limited to two gigabytes of space. If you start storing large files in your tables, you may run out of room. Instead, store large documents in separate files, and then record the file name in a field that uses the Short Text or Hyperlink data type.
When you use the Attachment data type, make sure you set the Caption field property, which determines the text that appears in the column header for that field. (Often, you’ll use the field name as the caption.) If you don’t set a caption, the column header shows a paper clip but no text.
You’ll recognize an attachment field in the datasheet because it has a paper-clip icon next to it (Figure 2-16).

To attach a file or review the list of attached files, double-click the paper-clip icon. You’ll see the Attachments window (see Figure 2-17).

Here’s what you can do in the Attachments window:
Add a new attachment. Click the Add button. Then browse to a new file and click OK. You’ll see the file appear at the bottom of the list.
Delete an attachment. Select the attachment in the list and then click Remove.
Save a copy of an attachment. Select the attachment, click Save As, and then browse to a location on your computer. Or, click Save All to save copies of all the attachments in this field. If you change these copies, you don’t change the attachment in the database.
Open an attachment. Select the attachment and then click Open. Access copies the attachment to a temporary folder on your computer, where Internet content is cached, and then opens it in the associated program. For example, .doc files get opened in Microsoft Word.
When you open an attachment, Access copies it to the same place where it temporarily stores web pages while you surf. (The exact location depends on your user name and includes a randomly generated sequence of characters, but expect something like C:UsersmatthewAppDataLocalMicrosoftWindowsTemporary Internet FilesACC4589.)
Here’s something nifty. If you keep the Attachments window open while you change, save, and close the temporary copy of your file, Access notices the update. Then, when you switch back to Access and close the Attachments window, Access offers to update your database by copying the updated file back into your database, and replacing the original (Figure 2-18). This feature sounds great, but it doesn’t always work. For example, Word’s security settings don’t let you update the temporary file—instead, Word forces you to save a new copy of it somewhere else, which means Access won’t notice any updates you make. To make sure your attachment gets updated, you need to remove the original and add the new version in the Attachments window. Or, avoid these headaches altogether by attaching only files that you don’t plan to edit.)

Unfortunately, the Attachment data type doesn’t give you a lot of control. Here are some of its limitations:
You can’t restrict the number of attachments allowed in an attachment field. All attachment fields allow a practically unlimited number of attachments (although you can’t attach two files with the same name).
You also can’t restrict the types of files used for an attachment.
You can’t restrict the size of the files used for an attachment.
AutoNumber
An AutoNumber is a special sort of data type. Unlike with all the other data types you’ve seen, you can’t fill in the value for an AutoNumber field. Instead, Access does it automatically whenever you insert a new record. Access makes sure that the AutoNumber value is unique—in other words, it never gives two records the same AutoNumber value.
Ordinarily, the AutoNumber field looks like a sequence of numbers—Access tends to give the first record an AutoNumber value of 1, the second an AutoNumber of 2, and so on. However, the truth isn’t so straightforward. Sometimes, Access skips a number. This skipping could happen when several people are using a database at once, or if you start adding a new record, and then cancel your action by pressing Esc. You may also delete an existing record, in which case Access never reuses that AutoNumber value. As a result, if you insert a new record and you see it’s assigned an AutoNumber value of 401, you can’t safely assume that there are already 400 records in the table. The actual number is probably less.
An AutoNumber value doesn’t represent anything, and you probably won’t spend much time looking at it. The AutoNumber field’s sole purpose is to make sure you have a unique way to point to each record in your table. Usually, your AutoNumber field is also the primary key for your table, as explained on The Primary Key.
Using AutoNumbers without Revealing the Size of Your Table
AutoNumber values have one minor problem: They give a clue about the number of records in a table. You may not want a customer to know that your brand-new food and crafts company, Better Butter Sculptures, hasn’t cracked 12 customers. So you’ll be a little embarrassed to tell him he’s customer ID number 6.
The best way to solve this problem is to start counting at a higher number. You can fool Access into generating AutoNumber values starting at a specific minimum. For example, instead of creating customer IDs 1, 2, and 3, you could create the ID values 11001, 11002, 11003. This approach also has the advantage of keeping your IDs a consistent number of digits, and it lets you distinguish between IDs in different tables by starting them at different minimums. Unfortunately, to pull this trick off, you need to fake Access out with a specially designed query, which you’ll see on Getting AutoNumbers to Start at Values Other Than 1.
Alternatively, you can tell Access to generate AutoNumber values in a different way. You have two choices:
Random AutoNumber value. To use random numbers, change the New Values field property from Increment to Random. Now you’ll get long numbers for each record, like 212125691, 1671255778, and -1388883525. You might use random AutoNumber to create values that other people can’t guess. (For example, if you have an Orders table that uses random values for the OrderID field, you can use those values as confirmation numbers.) However, random AutoNumbers are rarely used in the Access world.
Replication IDs. Replication IDs are long, obscure codes like 38A94E7B-2F95-4E7D-8AF1-DB5B35F9700C that are statistically guaranteed to be unique. To use them, change the Field Size property from Long Integer to Replication ID. Replication IDs are really used only in one scenario—if you have separate copies of a database and you need to merge the data together in the future. The next section explains that scenario.
Both of these options trade the easy-to-understand simplicity of the ordinary AutoNumber for something a little more awkward, so evaluate them carefully before using these approaches in your tables.
Using Replication IDs
Imagine you’re working at a company with several regional sales offices, each with its own database for tracking customers. If you use an ordinary AutoNumber field, you’ll end up with several customers with the same ID, but at different offices. If you ever want to compare data, you’ll quickly become confused. And you can’t combine all the data into one database for further analysis later on.
Access gives you another choice—a replication ID. A replication ID is a strange creation—it’s an extremely large number (16 bytes in all) that’s represented as a string of numbers and letters that looks like this:
38A94E7B-2F95-4E7D-8AF1-DB5B35F9700C
This ID is obviously more cumbersome than an ordinary integer. After all, it’s much easier to thank someone for submitting Order 4657 than Order 38A94E7B-2F95-4E7D-8AF1-DB5B35F9700C. In other words, if you use the AutoNumber value for tracking or bookkeeping, the replication ID is a bad idea.
However, the replication ID solves the problem described earlier, where multiple copies of the same database are being used in different places. That’s because replication IDs are guaranteed to be statistically unique. In other words, there are so many possible replication IDs that it’s absurdly unlikely that you’ll ever generate the same replication ID twice. So even if you have dozens of separate copies of your database, and they’re all managing hundreds of customers, you can rest assured that each customer has a unique customer ID. Even better, you can periodically fuse the separate tables together into one master database. (This process is called replication, and it’s the origin of the term “replication ID.” You’ll learn more about transferring data from one database to another in Chapter 23.)
Note
A replication ID is also called a GUID (short for “globally unique identifier”). In theory, the chances of two GUIDs being identical are one in 2128, which is small enough that you could set one billion people to work, ask them to create one billion GUIDs a year, and still be duplicate-free for the next decade or two. In practice, the real limitation is how good the random number generator is in Access.
Figure 2-19 shows a table that uses replication IDs.

Calculated
A calculated field is one that shows the result of a calculation. You provide the formula (known as the expression) that produces the result. Access does all the calculating work. For example, imagine you have a table of products with a Price field and a CostToManufacture field. You can add a calculated field named Profit that uses the expression [Price] – [CostToManufacture] to arrive at its result. (Technically, the square brackets are required only for field names that have spaces in them, but Access likes to add them in every expression just to be safe.) When you create a calculated field, you type the expression into the Expression field property. It’s impossible to create a calculated field without an expression—if you try it, Access won’t let you save the table.
Like an AutoNumber field, a calculated field is a hands-off affair. In the current example, whenever you update a record’s Price or CostToManufacture, Access automatically performs the profit calculation and stores the result in the Profit field. You don’t need to—and can’t—edit the Profit field by hand.
When you choose the Calculated data type, the Expression Builder window appears. You’ll look at this window more closely on The Expression Builder. For now, all you need to know is that you can type your expression into the topmost text box, and click OK to seal the deal.
Before you get too excited and start adding calculated fields all over the place, here’s a word of caution. Calculated fields like the Profit example usually aren’t a good idea. If you need to have this sort of information easily at hand (and often you do), you’re better off creating a query that can run the calculation. Using a query helps you avoid bulking up your table with unnecessary information. Instead, your query calculates the information whenever you need it. (Calculated Fields describes this technique in much more detail and shows you how to write many more advanced expressions for queries or tables.)
Note
So if calculated fields make more sense in queries than in tables, why does Access offer the Calculated data type? It’s for special situations where calculations are extremely slow, you have lots of records, and performance is critical. In this situation, it may make sense to use a calculated field to avoid the time-consuming calculating query when you need the calculated result. But unless you’re a database pro and you’re certain you need this frill, you’re better off keeping your tables for raw data and letting other database objects handle the number crunching.

The Primary Key
Design view also lets you set a table’s primary key, which is a field (or a combination of fields) that’s unique for each record. Every table should have a primary key.
The purpose of a primary key is to prevent duplicate records (that is, records with exactly the same information) from slipping into your table. Databases are notoriously fussy, and they definitely don’t like this sort of sloppiness.
The challenge of preventing duplicates isn’t as easy as it seems. Access is designed to be blisteringly fast, and it can’t afford to double-check your new record against every other record in the table to see if there’s a duplicate. So instead, it relies on a primary key. As long as every record in a table has a unique, never-duplicated primary key, you can’t have two identical records. (At worst, they’ll be two almost-identical records that have the same information in all their other fields, but have different primary keys. And this is perfectly acceptable to Access.)
Choosing a primary key is trickier than it seems. Imagine you have a list of friends (and their contact information) in a table named People. You may logically assume that you can create a primary key by using a combination of first and last name. Unfortunately, that just won’t do—after all, many are the address books that have two Sean Smiths.
Your best solution is to invent a new piece of information. For example, you can label every individual in your contact list with a unique ID number. Best of all, you can get Access to automatically create this number for you (and make sure that no two people get the same number), so you don’t even need to think about it. That way, if you have two Sean Smiths, each one has a different ID. And even if Ferris Wheel Simpson decides to change his first name, the ID remains the same.
This approach is exactly the one Access uses when you create a table by using Datasheet view. Consider the Dolls table you built in Chapter 1. Notice that it includes a field named ID, which Access fills automatically. You can’t set the ID value in a new record, or change it in an existing record. Instead, Access takes complete control, making sure each bobblehead has a different ID number. This behavior is almost always what you want, so don’t try to change it or delete the ID field.
However, there’s one exception. If you create a table in Design view by choosing Create→Tables→Table Design, Access assumes you know what you’re doing, and it doesn’t create an ID field for you. You need to add an ID field (or something like it).
Creating Your Own Primary Key Field
If your database doesn’t have an ID field (perhaps because you created it using the Create→Tables→Table Design command), it’s up to you to create one and set the primary key. Here’s how to do it:
Create a new field by typing a name in the Field Name column.
For automatically generated values, the name “ID” is a good choice. Some people prefer to be a little more descriptive (for example, BobbleheadID, CustomerID, and so on), but it’s unnecessary.
In the Data Type column, choose AutoNumber.
By choosing the AutoNumber data type, you make sure that Access generates a unique ID value for every new record you insert. If you don’t want this process to happen, you can choose something else (like the Short Text or Number data type). You’ll be responsible for entering your own unique value for each record, which is more work than it seems.
Right-click the field and then choose Primary Key.
This choice designates the field as the primary key for the table. Access doesn’t allow duplicate values in this field.
Six Principles of Database Design
With great power comes great responsibility. As a database designer, it’s up to you to craft a set of properly structured tables. If you get it right, you’ll save yourself a lot of work in the future. Well-designed databases are easy to enhance, simpler to work with, and lead to far fewer mind-bending problems when you need to extract information.
Sadly, there’s no recipe for a perfect database. Instead, a number of recommendations can guide you on the way. In the following sections, you’ll learn about a few of the most important.
Note
Few database rules can’t be broken. Sometimes, there’s tension between clear, logical design and raw performance. Other times, database designers adopt personal quirks and conventions that make their lives a little easier. But even though an experienced database designer can bend, warp, and—on occasion—limbo right under some of these rules, they’re still an excellent starting point for newbies. If you follow them, they’ll never steer you into a bad decision. Finally, remember this: Building a good database is an art that takes practice. For best results, read these guidelines, and then try building your own test databases.
1. Choose Good Field Names
Access doesn’t impose many rules on what field names you can use. It lets you use 64 characters of your choice. However, field names are important. You’ll be referring to the same names again and again as you build forms, create reports, and even write code. So it’s important to choose a good name from the outset.
Here are some tips:
Keep it short and simple. The field name should be as short as possible. Long names are tiring to type, more prone to error, and can be harder to cram into forms and reports. (Of course, you don’t want a table name that’s been abbreviated into nothingness either. The cryptic name FinCSalesReg isn’t good for anyone.)
CapitalizeLikeThis. It’s not a set-in-stone rule, but most Access fans capitalize the first letter of every word (known as CamelCase), and then cram them all together to make a field name. Examples include UnitsInStock and DateOfExpiration.
Avoid spaces. Spaces are allowed in Access field names, but they can cause problems. In SQL (the database language you’ll use to search for data), spaces aren’t kosher. That means you’ll be forced to use square brackets when referring to a field name that includes spaces (like “[Number Of Guests]”), which gets annoying fast. If you really must have spaces, consider using underscores instead.
Be consistent. You have the choice between the field names Product_Price and ProductPrice. Either approach is perfectly reasonable. However, it’s not a good idea to mingle the two approaches in the same database—doing so is a recipe for certain confusion. Similarly, if you have more than one table with the same sort of information (for example, a FirstName field in an Employees table and in a Customers table), use the same field name.
Don’t repeat the table name. If you have a Country field in a Customers table, it’s fairly obvious that you’re talking about the Country where the customer lives. The field name CustomerCountry would be overkill.
Don’t use the field name “Name.” Besides being a tongue-twister, Name is an Access keyword. Instead, use ProductName, CategoryName, ClassName, and so on. (This is one case where it’s OK to violate the previous rule and incorporate the table name in the field name.)
Also give careful thought to naming your tables. Once again, consistency is king. For example, database nerds spend hours arguing about whether to pluralize table names (like Customers instead of Customer). Either way is fine, but try to keep all your tables in line.
2. Break Down Your Information
Be careful that you don’t include too much information in a single field. You want to have each field store a single piece of information. Rather than have a single Name field in a table of contacts, it makes more sense to have a FirstName and a LastName field.
There are many reasons for breaking down information into separate fields. First of all, it stops some types of errors. With a Name field, the name could be entered in several different ways (like “Last, First” or “First Last”). Splitting the name avoids these issues, which can create headaches when you try to use the data in some sort of automated task (like a mail merge). But more importantly, you can more easily work with data that’s broken down into small pieces. Once the Name field is split into FirstName and LastName, you can perform sorts or searches on just one of these two pieces of information, which you couldn’t otherwise do. Similarly, you should split address information into columns like Street, City, State, and Country—that way, you can far more easily find out who lives in Nantucket.
The top of Figure 2-21 shows an example of proper separation; the bottom shows a dangerous mistake—an attempt to store more than one piece of information in a single field.

Notice that it’s technically still possible to take the information in the top table in and break it down still further. For example, the street address information in the Street field could be split into StreetNumber, StreetName, and StreetType fields. However, that added bit of complexity doesn’t add anything, so database gurus rarely go to the extra trouble.
3. Include All the Details in One Place
Often, you’ll use the same table in many different tasks. You may use the Dolls table to check for duplicates (and avoid purchasing the same bobblehead twice), to identify the oldest parts of your collection, and to determine the total amount of money you’ve spent in a given year (for tax purposes). Each of these tasks needs a slightly different combination of information. When you’re calculating the total money spent, you aren’t interested in the Character field that identifies the doll. When checking for a duplicate, you don’t need the DateAcquired or PurchasePrice information.
Even though you don’t always need all these fields, it’s fairly obvious that it makes sense to put them all in the same table. However, when you create more detailed tables, you may not be as certain. It’s not difficult to imagine a version of the Dolls table that has 30 or 40 fields of information. You may use some of these fields only occasionally. However, you should still include them all in the same table. As you’ll see in this book, you can easily filter out the information you don’t need from the datasheet, as well as from your forms and printed reports.
4. Avoid Duplicating Information
As you start to fill a table with fields, it’s sometimes tempting to include information that doesn’t really belong. This inclusion causes no end of headaches, and it’s a surprisingly easy trap to fall into. Figure 2-22 shows this problem in action with a table that tries to do too much.
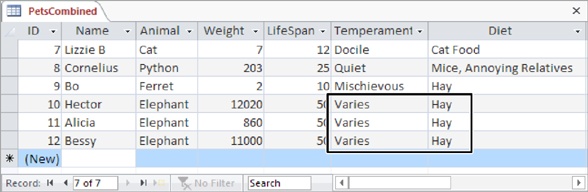
Duplicate data like that shown in Figure 2-22 is inefficient. You can easily imagine a table with hundreds of similar records, needlessly wasting space repeating the same values over and over again. However, this concern is minor compared to the effort of updating that information, and the possibility of inconsistency. What happens if you want to update the life expectancy information for every elephant based on new studies? Based on the current design of the table, you need to change each record that has the same information. Even worse, it’s all too easy to change some records but leave others untouched. The overall result is inconsistent data—information in more than one spot that doesn’t agree—which makes it impossible to figure out the correct information.
This problem occurs because the information in the Pets table doesn’t all belong. To understand why, you need to delve a little deeper into database analysis.
As a rule, every table in a database stores a single thing. In the Pets table, that thing is pets. Every field in a table is a piece of information about that thing.
In the Pets table, fields like Name, Animal, and Weight all make sense. They describe the pet in question. But the LifeSpan, Temperament, and Diet fields aren’t quite right. They don’t describe the individual pet. Instead, they’re just standards for that species. In other words, these fields aren’t based on the pet (as they should be)—they’re based on the animal type. The only way to solve this problem is to create two tables: Pets and AnimalTypes (Figure 2-23).

It takes experience to spot fields that don’t belong. And in some cases, breaking a table down into more and more subtables isn’t worth the trouble. You could theoretically separate the address information (contained in fields like Street, City, Country, and PostalCode) from a Customers table, and then place it into a separate Addresses table. However, it’s relatively uncommon for two customers to share the same address, so this extra work isn’t likely to pay off. You’ll consider how to define formal relationships between tables like Pets and AnimalTypes in Chapter 5.
Tip
Many database gurus find the best way to plan a database is to use index cards. To do this, start by writing down all the types of information you need in your database. Then, set aside an index card for each table you expect to use. Finally, take the fields you wrote on the scrap paper, and write them down on the appropriate index cards, one at a time, until everything is set into neat, related groups.
5. Avoid Redundant Information
Another type of data that just doesn’t belong is redundant information—information that’s already available elsewhere in the database, or even in the same table, sometimes in a slightly different form. As with duplicated data, this redundancy can cause inconsistencies.
Calculated data is the most common type of redundant information. An Average-OrderCost field in a Customers table is an example. The problem here is that you can determine the price of an average order by searching through all the records in the Orders table for that customer and then averaging them. By adding an Average-OrderCost field, you introduce the possibility that this field may be incorrect (it may not match the actual order records). You also complicate life, because every time a customer places an order, you need to recalculate the average, and then update the customer record.
Here are some more examples of redundant information:
An Age and a DateOfBirth field (in a People table). Usually, you’ll want to include just a DateOfBirth field. If you have both, the Age field contains redundant information. But if you have only the Age field, you’re in trouble—unless you’re ready to keep track of birthdays and update each record carefully, your information will soon be incorrect.
A DiscountPrice field (in a Products table). You should be able to calculate the discount price as needed based on a percentage. In a typical business, markups and markdowns change frequently. If you calculate 10 percent discounts and store the revised prices in your database, you’ll have a lot of work to do when the discount drops to 9 percent.
Note
As you’ve already learned, Access gives you a more acceptable way to use calculated data: by creating a calculated field (Calculated). This dodges the problems of inconsistency and maintenance, because Access maintains the calculated data for you. However, calculated data still makes for awkward database design. As a general rule, don’t use calculated fields unless you’re absolutely sure you need this particular compromise to boost performance, and you’ve ruled out the alternatives (like queries).
6. Include an ID Field
As you learned on Building Your First Table, Access automatically creates an ID field when you create a table in Datasheet view and sets it to be the primary key for the table. But even now that you’ve graduated to Design view, you should still add an ID field to all your tables. Make sure it uses the AutoNumber data type so Access fills in the numbers automatically, and set it to be the primary key.
In some cases, your table may include a unique field that you can use as a primary key. Resist the temptation. You’ll always buy yourself more flexibility by adding an ID field. You never need to change an ID field. Other information, even names and Social Security numbers, may change. And if you’re using table relationships, Access copies the primary key into other tables. If a primary key changes, you’ll need to track down the value in several different places.
Tip
It’s a good idea to get into the habit of using ID fields in all your tables. In Chapter 5, you’ll see the benefits when you start creating table relationships.