
Chapter 18. Writing Smarter Code
In Chapter 17, you dove headfirst into the world of Visual Basic code, writing routines that could show messages, respond to events, and modify forms. Along the way, you learned a fair bit about the Visual Basic language and the object-based system that gives VB its mojo.
There’s still more to explore. In this chapter, you’ll learn how to use VB code to solve some of the most common problems Access experts face. You’ll focus on improving the Boutique Fudge database, which you’ve worked with throughout this book. However, the solutions you’ll use are so useful that you’ll want to incorporate them into your own databases.
But first, before you tackle these more advanced examples, you’ll start by brushing up on the Visual Basic language, learning how to defang errors, and taking a closer look at objects. These topics complete the Visual Basic picture and prepare you to become a true Access programmer.
Exploring the VB Language
Although you now know enough to react to events and change control properties, there’s still a lot to learn about the Visual Basic language itself. In the following sections, you’ll learn how to use variables, conditional logic, and loops to write more powerful code. Finally, you’ll see how to use these features to build a more complex code routine that checks for invalid credit card numbers.
Storing Information in Variables
Every programming language includes the concept of variables, which are temporary storage containers where you can keep track of important information.
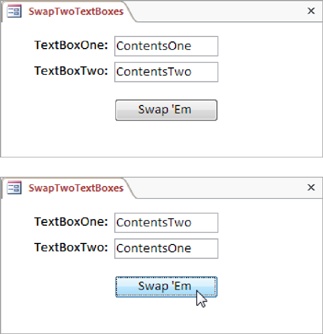
Suppose you want to swap the content in two fields. On the surface, this operation seems fairly straightforward. All you need to do is take the text from one text box, place it in the other, and then insert the second box’s text in the first box. Here’s a first crack at a solution:
TextBoxOne.Value = TextBoxTwo.Value
TextBoxTwo.Value = TextBoxOne.Value
To make this code work, you need to put it in the right subroutine. In this example, the code runs when someone clicks a button in a form. You can create the subroutine you want for the On Click event using the Property Sheet. (See Responding to a Form Event for a refresher.)
Sadly, this code is doomed from the start. Figure 18-1 illustrates the problem.
The easiest way around this problem is to use a variable to keep track of the information you need. To create a variable in VB, you use the oddly named Dim keyword (short for dimension, which is programmer jargon for “create a new variable”). After using Dim, you enter the variable’s name.
Here’s how you’d create a variable named TextContent:
Dim TextContent
Once you’ve created the variable, you’re free to put information in it and to take information out. To perform both these operations, you use the familiar equal sign, just as you would with properties.
Here’s an example that stores some text in a variable:
TextContent = "Test text"
The following code puts all these concepts together. It uses a variable to swap the content of two text boxes.
Dim TextContent
' Copy the text from the first text box for later use.
TextContent = TextBoxOne.Value

' Change the text in the first text box.
TextBoxOne.Value = TextBoxTwo.Value

' Change the text in the second text box, using the variable.
TextBoxTwo.Value = TextContent
Mistyping a variable’s name is a serious mistake. For example, if you write TextContents instead of TextContent, Access will quietly create a new variable named TextContents, while ignoring the data you actually want in TextContent. This issue can cause plenty of mysterious glitches in your VB code. Fortunately, the solution is simple. Just add Option Explicit on a separate line at the top of every code file (right after Option Compare Database). This tells Access to complain whenever you use a variable name that you haven’t defined with Dim. So if you type TextContents, Access catches the error and forces you to fix it right away, before it causes your code to start acting unpredictably.
To make your life even easier, tell the Visual Basic edit to add Option Explicit to every new code file. To do that, choose select Tools→Options in the Visual Basic window, check the Require Variable Declaration option, and click OK.
Making Decisions
Conditional logic, another programming staple, is code that runs only if a certain condition is true. There’s no limit to the number of ways you can use conditional logic. You may want to prevent an update if newly entered data doesn’t check out. Or you may want to configure the controls on a form differently, depending on its data. You can do all this, and more, using conditional logic.
All conditional logic starts with a condition: a simple expression that can turn out to be true or false (programmers call this process evaluating to true or false). Your code can then make a decision to execute different logic depending on the condition’s outcome. To build a condition, you need to compare a variable or property by using a logical operator like = (equal to), < (less than), > (greater than), and <> (not equal to). For example, Price = 10 is a condition. It can be true (if the Price field contains the number 10), or false (if Price contains something else). You’ve already used conditions to create validation rules (Writing a Field Validation Rule), to filter records in a query (Defining a Calculated Field), and to build smarter macros (Reading Arguments from a Form). Visual Basic conditions follow a very similar set of rules.
On its own, a condition can’t do anything. However, when used in conjunction with other code, it can become tremendously powerful. Once you’ve created a suitable condition, you can put it inside a special structure called the If block. The If block evaluates a condition and runs a section of code if the condition is true. If the condition isn’t true, Access completely ignores the code.
Here’s an If block that checks whether the Price field’s value is greater than 100. If it is, Access displays a message:
If Price > 100 Then
    MsgBox "I hope you budgeted for this."
End If
Note that the If block always starts with If and ends with End If. Inside the If block, you can put as much code as you want. This is the conditional code—it runs only if the condition is true.
An If block can also evaluate several different conditions. Here’s an example that calculates the fully taxed price of a product, and then displays that in a label. The trick is that the tax rate depends on another field (the Country), which is where the conditional logic comes into play.
' Store the tax rate you want to use in this variable.
Dim TaxRate

If Country = "U.S.A." Then
    ' Taxes are charged for U.S. customers (7%).
    TaxRate = 1.07
ElseIf Country = "Canada" Then
    ' Even more taxes are charged for Canadian customers (14%).
    TaxRate = 1.14
Else
    ' Everyone else gets off with no tax.
    TaxRate = 1
End If

' Display the final total in a label.
TotalWithTax.Caption = Price * TaxRate
Only one segment of code runs in an If block. In this example, Access works its way through the block, testing each condition until one matches. As soon as it finds a match, it runs the conditional block of code, jumps down to the closing End If, and then continues with any other code that’s in the subroutine. If no condition matches, Access runs the code in the final Else clause (if you’ve added it). Figure 18-2 shows this code in action.

These examples only scratch the surface of what careful conditional logic can do. You can use And and Or keywords to combine conditions, put one conditional block inside another, and much more.
In Chapter 16, you saw an example that performed a specific type of validation with customer records (Validating Data with Conditions). This validation worked using two fields: WantsEmail and EmailAddress. If the WantsEmail field was set to Yes, the EmailAddress field couldn’t be empty. However, if WantsEmail was set to No, a blank EmailAddress was completely acceptable. You can implement the identical validation logic by using VB code, but there’s a twist—it uses two If blocks (a line-by-line explanation follows the code):
1 Private Sub Form_BeforeUpdate(Cancel As Integer)
      ' Check if this person wants the email.
2     If WantsEmail = True Then

          ' Make sure the EmailAddress isn't blank or null.
3         If EmailAddress = "" Or IsNull(EmailAddress) Then
              ' This is considered invalid.
              ' Cancel the change and show a message.
4             MsgBox "You can't be notified without an email address."
5             Cancel = True
6         End If

7     End If
8 End Sub
Here’s how it works:
Line 1 declares a code routine that handles the
Before Updateevent of the form. Notice that this event handler gets one piece of information—a true or false value namedCancel, which you can set to stop the update.Line 2 starts an
Ifblock that checks if the WantsEmail checkbox has a checkmark in it.Line 3 performs a second check. It’s a bit more complex because there are two things that can cause the conditional code to run. It runs if the email address is a blank value (which happens if someone enters an email address and then deletes it) or if the email address is null (which means that an email was never entered in the first place; see Blank Values and Empty Text for a discussion of null values).
Line 4 shows an explanatory error message. Remember, the code gets to this spot only if both the
Ifblocks evaluate to true. If either check turns out false (the WantsEmail checkbox isn’t turned on, or the EmailAddress is supplied), Access breezes right on past.Note
Technically, you could combine both these
Ifblocks into a singleIfblock by writing a more complex condition that checks for everything at once. However, getting this right (and understanding what you’ve written later on) is more difficult. Veteran programmers know that it’s always better to write code clearly, even if that makes the code a little more verbose.Line 5 cancels the update using the
Cancelparameter that theOn Before Updateevent provides. That way, the change doesn’t go ahead, and the record remains in Edit mode.Lines 6–8 finish up by closing both
Ifblocks, and ending the subroutine.
Access has many events you can cancel, like On Before Update. Look for the Cancel parameter between the parentheses after the subroutine name. If it’s there, you can set it to True to stop the action that’s about to occur.
Repeating Actions with a Loop
A loop is a tool that lets you repeat an operation as many times as you want. Visual Basic has several types of loops you can use. The most popular are the Do/Loop block and the For/Next block, both of which you’ll see in this section.
Here’s an example Do/Loop block that’s sure to infuriate people:
Do
    MsgBox "Ever ever get that nagging deja vu feeling?"
Loop
When Access enters this block of code, it starts by displaying the message box and pausing your code. Once you click OK, the code continues until Access reaches the final Loop statement at the bottom of the loop. At this point, Access automatically jumps back to the beginning (the Do statement) and repeats your code, showing a second message box. However, there’s one problem—this process continues forever! If you make the mistake of running this piece of code, your database will lock up indefinitely (until you press the emergency-stop key combination, Ctrl+Break).
To avoid this situation, you should build all loops with an exit condition, a condition that signals when the loop should end. Here’s a rewritten version of the same loop that stops after it’s shown a message five times:
' Keep track of how many times you've looped.
Dim NumberOfTimes

' Start the count at 0.
NumberOfTimes = 0

Do
    MsgBox "Ever ever get that nagging deja vu feeling?"

    ' Up the count by 1.
    NumberOfTimes = NumberOfTimes + 1
Loop Until NumberOfTimes = 5
The important bit is the final clause at the end of the loop block, Until NumberOfTimes = 5. This clause defines a condition, and as soon as it’s true (the NumberOfTimes variable reaches 5) and Access reaches the end of the loop, it jumps out and continues running the rest of your subroutine.
If you have this type of code, where you’re looping a fixed number of times, you may be interested in the For/Next loop. The For/Next loop is exactly the same as the Do/Next loop, except that it has a built-in counter, which it increments for you.
Here’s how you could rewrite the previous example in a more compact form with a For/Next loop:
Dim NumberOfTimes

For NumberOfTimes = 1 To 5
    MsgBox "Ever ever get that nagging deja vu feeling?"
Next
The important part is NumberOfTimes = 1 To 5, which tells Access to start NumberOfTimes at 1, to increment it by 1 at the beginning of each pass through the loop, and to stop after the fifth pass.
The Do/Loop block works well when you need to move through a collection of data. You can use the loop to keep going until you run out of information, even though you don’t know how much information there is when you first start the loop. You’ll see an example of this technique at the end of this chapter (Updating Stock Numbers), when you perform a batch update on your database by using code.
On the other hand, the For/Next loop shines when you can determine at the outset exactly how many times you want to repeat a loop. You’ll see an example where this is true later in this chapter (Putting It All Together: A Function for Testing Credit Cards), when you test credit card numbers.
Creating Custom Functions
You’ve already learned how to create your subroutines. But you haven’t yet seen how to create their big brother, functions.
Like a subroutine, a function is a self-contained piece of code that can hold as many or as few statements as you want. And as with subroutines, you add functions to modules. In fact, any number of subroutines and functions can exist side by side in a module.
Function DoSomething()
    ' Function code goes here.
End Function
The key difference between functions and subroutines is that a function produces a final result. In other words, functions give you a piece of information that you may need.
You set the result by writing a line of code that assigns the result value to the function name. (Essentially, you pretend that the function name is a variable where you can stuff some data.) Here’s an example:
Function GetMyFavoriteColor()
    GetMyFavoriteColor = "Magenta"
End Function
This function is named GetMyFavoriteColor. The result is the text string “Magenta”.
Calling a function is slightly different than calling a subroutine. To call a subroutine, you use the module name, followed by a period, followed by the subroutine name. You can use the same technique with a function, as shown here:
MyModule.GetMyFavoriteColor
However, there’s a problem. This step triggers the GetMyFavoriteColor function, causing its code to run, but it tosses away the result (the string with the text “Magenta”).
If you’re interested in the result, you can call your function as part of an assignment statement. The following code creates a variable, uses it to store the result, and then displays the result in a message box:
' Create a variable to store the result in.
Dim Color

' Call the function and hold on to the result in the variable.
Color = MyModule.GetMyFavoriteColor

' Show the result in a message box.
MsgBox "Your favorite color is " & Color
If you’re really clever, you can shorten this code to a single line and avoid using the Color variable altogether:
MsgBox "Your favorite color is " & MyModule.GetMyFavoriteColor
The GetMyFavoriteColor function is particularly simple because it doesn’t use any arguments. But you can get a little fancier. Consider the following custom function, which takes two arguments—Length and Width—and calculates the total area by multiplying them together:
Function Area(Length, Width)
    Area = Length * Width
End Function
The two parameters are defined in the parentheses after the function name. You can add as many parameters as you want, as long as you separate each one with a comma.
Here’s how you call this function and show the result. In this example, fixed numbers are used for the Length and Width parameters. However, you can substitute a field name, variable, or property that you want to use instead with the Area function instead.
MsgBox "The area of a 4x4 rectangle is " & Area(4, 4)
This displays the message “The area of a 4x4 rectangle is 16.”
Neither the GetMyFavoriteColor nor Area function shows you anything particularly impressive. But in the next section of this chapter, you’ll build a much more powerful custom function that tests credit card numbers.
Putting It All Together: A Function for Testing Credit Cards
Now that you’ve made your way around the Visual Basic language, it’s time to wrap up with an example that demonstrates everything you’ve learned about VB (and a little bit more).
In this example, you’ll consider a custom function called ValidateCard that examines a credit card number. The ValidateCard function returns one of two results: True (which means the card number is valid) and False (which means it’s not).
It’s important to understand that a valid credit card number is simply a number that meets all the not-so-secret rules of credit card numbering (the box on The Luhn Algorithm tells you more). This number may be attached to a real credit card, or it may not. The ValidateCard function is just smart enough to catch inadvertent errors and not-so-bright computer hackers. Truly sneaky people can find programs that let them generate potentially valid credit card numbers.
Here’s the full code for the ValidateCard function. Each code statement is numbered so you can break it down one piece at a time (a line-by-line explanation follows the code):
1 Function ValidateCard(CardNumber As String)

       ' This is the running total (created using Luhn's algorithm).
2      Dim SumOfDigits
3      SumOfDigits = 0

       ' This keeps track of whether you're at an odd or even position.
       ' You start on an odd number position (1).
4      Dim OddNumbered
5      OddNumbered = True

6      Dim i
7      For i = Len(CardNumber) To 1 Step -1
8          Dim CurrentNumber
9          CurrentNumber = Mid(CardNumber, i, 1)

10         If OddNumbered = False Then
               ' Double the digit.
11             CurrentNumber = CurrentNumber * 2
12             If CurrentNumber >= 10 Then
                   ' If this number is two digits, add them together.
                   ' This is the wacky part, because you need to use
                   ' string conversion functions.
13                 Dim NumText As String
14                 NumText = CurrentNumber
15                 CurrentNumber = Val(Left(NumText, 1)) + _
16                   Val(Right(NumText, 1))
17             End If
18         End If

           ' Add the number to the running total.
19         SumOfDigits = SumOfDigits + CurrentNumber

           ' Switch from odd to even or even to odd.
           ' This line of code changes True to False or
           ' False to True
20         OddNumbered = Not OddNumbered
21     Next

       ' If the sum is divisible by 10, it's a valid number.
22     If SumOfDigits Mod 10 = 0 Then
23         ValidateCard = True
24     Else
25         ValidateCard = False
26     End If

27 End Function
Here’s how it works:
Line 1 declares the function. Notice that the function takes one parameter, which is the text with the credit card number. This parameter is explicitly identified as a string with the
As Stringclause. This way, you avoid errors where someone might try to pass in an actual number.Lines 2–3 create the variable that stores the running total during the whole process.
Lines 4–5 create the variable that keeps track of whether you’re on an odd-numbered position or an even-numbered position. Remember, all second numbers must be doubled.
Lines 6–7 start a
For/Nextloop. This loop looks a little different from the ones you saw earlier, because it has theStep –1clause at the end. This clause tells the loop to subtract 1 from the counter after every pass (rather than adding 1, which is the standard behavior). You can work your way from the end of the number to the front.Note
The
For/Nextloop uses another trick. The lower limit is set by using the Len function (Text Functions), which gets the length of a piece of text. In other words, if the credit card is 11 digits, this code runs 11 times (once for each digit).Lines 8–9 grab the number at the current position, as indicated by the loop counter. The
Midfunction lets you snip out a single digit. (You learned about theMidfunction on Text Functions.)Line 10 checks if you’re on a second number.
Lines 11–17 run only if you’re on a second number. In this case, the number needs to be doubled (line 11). If the doubled number has two digits, these digits must then be combined (lines 13–15).
Line 19 adds the current number to the running total. If you were in an even-numbered position, the number hasn’t been changed. If you were in an odd-numbered position, it’s been doubled and combined.
Line 20 makes sure that if you just processed an even-numbered position, you’re switched to an odd-numbered position (and vice versa).
Line 21 returns to line 6 and repeats the loop for the next digit in the credit card number.
Lines 22–26 check the final total. If it’s divisible by 10, it’s valid. To find out, this code uses the
Modoperator, which performs division, and then gets the remainder. (If there’s no remainder when you divide a number by 10, you know it divided evenly without a problem.)
It may take some time to work through the function and figure out exactly what’s going on, but in the end it’s all about VB basics like conditions, loops, and variables. If you really want to study this example, you can watch it in action, using the debugging techniques that are covered on Debugging.
Once you’ve finished creating a function like ValidateCard, you can call it to test whether a credit card checks out. Here’s an example that reacts when credit card information is entered into a text box named CardNumber:
Private Sub CardNumber_BeforeUpdate(Cancel As Integer)

    If ValidateCard(CardNumber) Then
        MsgBox "Your card is valid."
    Else
        MsgBox "Your card is invalid. " & _
         "Did you forget a number, or are you trying to cheat us?"
        Cancel = True
    End If

End Sub
To try it out, run this code and supply one of your credit card numbers in the CardNumber field, as shown in Figure 18-3. Or send your credit card numbers to the author so he can conduct his own extensive testing.

Dealing with Trouble
It would be nice to pretend that Access always sails through your code without the slightest hiccup. But the truth is, errors do occur, and they occur often. This fact shouldn’t frighten you. After all, one of the reasons you’re using Visual Basic code instead of ordinary macros is so that you can detect and respond to errors gracefully.
You’ll face two types of errors with your code:
Mistakes. These errors are coding errors that you introduce accidentally. Usually, you catch these while testing your database. (If you’re lucky, the Visual Basic editor spots the problem as soon as you type it in and then warns you with a message.)
Unexpected limitations. These errors arise under specific circumstances that you may not have anticipated. Say you create two forms: Order, and Order_Subform. Order_Subform is designed to be used as a subform in Order, and it includes code that accesses the controls in Order. However, if someone opens Order_Subform directly, the Order form isn’t available, and this code fails.
As a conscientious programmer, it’s your job to correct all your mistakes and deal with unforeseen limitations in the best possible way. Visual Basic gives you two tools to help out. You can use debugging to diagnose bizarre problems and fix them, and you can use error-handling code to catch unexpected problems and to alert other people.
Debugging
Debugging is a nifty feature that lets you walk through your code, watch what it does, and spot errors. Code debugging is similar to macro debugging (Solving Macro Problems) in that it lets you run your logic one statement at a time. However, code debugging is much more powerful, because it lets you make your way through complex routines, loops, and conditional statements. It even lets you see what’s currently stored in your variables.
Note
Debugging’s real benefit is that it helps you test your assumptions. Every programmer has assumptions about how a piece of code works. However, if code did exactly what you expected, you wouldn’t ever have an error. With debugging, you can find the exact point where code does something that you don’t expect—when a calculation provides a strange result, a conditional statement sends you the wrong way, a loop is repeated one time too many, and so on. Then you can correct the mistake.
The easiest way to perform debugging is to set a breakpoint—a special marker that tells Access where you want to start debugging. When Access reaches a line of code that has a breakpoint, it pauses your code. Access then lets you step through the code at your own pace, one line at a time.
Here’s how to use a breakpoint:
Find the first line in your code that you want to debug.
If you want to debug an entire routine, start with the opening Sub or Function statement. If you want to look at a specific section of your code, go there.
Click the margin on the left to place a breakpoint on this line (Figure 18-4).
Each breakpoint is a signal that tells Access you want to start debugging here.
Some lines can’t accommodate a breakpoint: for example, lines that don’t contain executable code, line blank spaces, comments, and variable declarations. Everything else is fair game.
You can get your code to run in the normal way. If you’re debugging an event handler for a button click, open the appropriate form, and then click the button.
When Access reaches your breakpoint, it pauses and switches into Break mode. Everything in your application is put on hold.

Once you’re in Break mode, you have several options:
You can single-step through your code. That means you run one statement at a time, pausing after each statement. To try this, press the F8 key. This action runs the current statement (which is highlighted with the yellow arrow), moves to the next executable statement, and then pauses again (Figure 18-5). You can continue for as long as you want, pressing F8 to run each line of code.
Note
Single-step debugging lets you follow how your code works. If you try it with the
ValidateCardfunction shown earlier, you’ll see how Access moves through the loop several times, and how it branches into different conditional sections depending on whether it’s processing a number in an odd or even position.You can stop running your code. Click the Stop button (it looks like a square) in the Visual Basic toolbar to shut down your code.
You can make changes. If you find what’s wrong, you can edit your code, and then keep running with the new changes. Of course, certain types of edits force Access to stop debugging. If you make one of these changes, you see a message box that warns you that “This action will reset your project.” If you click OK, Access stops your code just as if you had clicked the Visual Basic toolbar’s Stop button.
You can see what’s stored inside a variable. To do so, just hover over the variable name somewhere in your code (Figure 18-6).
You can resume normal execution. If you’ve found the source of your problem and you don’t want to keep debugging, just press F5 (or click the Visual Basic toolbar’s Play button). Access runs the current line and then continues on its merry way (at least until it meets another breakpoint).


Tip
You can pull off a wacky trick with the yellow arrow. You can use it to run code in a completely different place. Just drag the yellow arrow to the line you want to run next, and then press F5 to switch out of Debug mode, and resume running your code normally.
The Visual Basic editor has many more debugging tools. However, breakpoints are really all you need to start exploring what’s taking place under the hood when you run your code.
Error Handling
Some errors occur through no fault of your own. Perhaps you’re trying to perform a task with information someone else gave you, and that information just isn’t valid. Imagine what happens if someone calls ValidateCard and passes in a credit card number that contains letters and punctuation!
Although this sort of error can occur as a result of somebody else’s carelessness, it’s up to you to deal with it in the best way possible. You need to explain the problem with a helpful message box, and end the current task (or jump ahead to the next step). You can take care of this job with error-handling code.
Tip
The best way to perfect a piece of code is to use debugging to find and fix all its problems. Once you’ve finished this process, you can add error-handling code to deal with the unexpected problems. If you add error-handling code earlier, you may find it a bit harder to debug your application.
Ordinarily, when Access encounters an error, it jumps to the offending code, enters Break mode, and shows you an error message. This behavior is helpful if you’re planning to debug the problem, but it’s a bit traumatic for the ordinary people who may be using your database. Not only have they never seen code before, they’re in danger of changing it and introducing a new problem.
Instead, you need a way to deal with the error the way you want, using code. Visual Basic has a special statement that tells Access how to deal with errors. It’s the On Error statement.
The On Error statement gives you several options. You can tell Access to skip over any errors and try to run the next line of code like this:
On Error Resume Next
This option is almost always a bad idea. If one error has occurred, more are likely to follow. At worst, this could cause your program to do something you don’t intend it to do.
You can also tell Access to jump to a specific place in your code. Here’s an example:
On Error Goto ErrorHandlingCode
This example tells Access to jump to the section named ErrorHandlingCode as soon as it encounters any problem. You need to identify this section by adding the section name, followed by a colon (:) on a separate line, like this:
ErrorHandlingCode:

 ' If an error occurs, Access starts running your code here.
You can most easily understand how this error-handling system works when you consider how you can use it in the ValidateCard function:
Function ValidateCard(CardNumber As String)

 On Error Goto ErrorHandlingCode

    ' (The code for Luhn's algorithm goes here.)

    Exit Function

 ErrorHandlingCode:
    MsgBox "Oops. Did your credit card number have letters?"
    ValidateCard = False

End Function
Here are several important details. First, the On Error statement is placed at the very beginning of the code routine, so you can catch mistakes in any of the code that follows. Second, notice that after the number-checking code finishes, an Exit Function statement ends the routine. That statement prevents Access from drifting into the error-handling code that follows if an error hasn’t happened. Finally, the error-handling code shows a message box that explains that something went wrong and returns a result that clearly indicates the problem. People most often handle errors this way. Just remember to always use an Exit Sub or Exit Function statement to make sure you don’t run your error-handling code by accident.
Note
As written, the person using the AddCreditCard form may get two error messages—one explaining the letters-or-punctuation problem, and the second stating the obvious fact that validation failed. If this message seems like unnecessary punishment, you can move the error-handling code out of the ValidateCard function and into the On Update event handler code, which is where it really belongs. That way, the On Update event handler can choose exactly how to deal with the problem. To see the slightly rearranged code, check out the downloadable samples for this chapter (www.missingmanuals.com/cds/access2013mm).
You have only one other option for handling errors. You can tell Access to stop immediately and enter Debug mode by using this statement:
On Error Goto 0
Of course, this behavior is already the standard error-handling behavior. You need to use this statement only if you’re switching back and forth between different error-handling approaches in the same routine.
Deeper into Objects
There comes a point in every Access programmer’s life when you realize you’ve learned enough about the VB language to get by. From that point on, you spend most of your time learning about different objects, which is a much larger task.
Access has several dozen built-in objects which, taken together, make up what programmers call an object model. Along with the control and form objects you know so well, it has objects representing queries, projects, reports, smart tags, printers, and much more. You can’t cover all these objects in a single chapter. Even if you could, you’d find that many of them just don’t interest you. However, you need to know enough so that you can hunt down the features you need when you’re tackling a particularly sticky VB challenge.
You can explore the Access object model by using Microsoft’s online VBA (Visual Basic for Applications) reference at http://tinyurl.com/accessVBA. Click “How do I” in the table contents to read how-to topics for a variety of Access tasks, with copious code. Or, click “Access object model reference” to get a lower-level look at the Access objects you can manipulate in code.
Even if you work your way through the sprawling Access object model, many more objects are still out there. If you’re a black-belt VB programmer, then you may choose to create your own objects. And even if you aren’t, you may decide to use another component that gives you even more objects to play with.
Note
In programmer-speak, a component is just a file that has some objects you can use in your code. The file acedao.dll has the objects you can use to interact directly with your database (see Updating Stock Numbers).
Later in this chapter, you’ll learn how to use DAO (the data access objects) to interact with your database. DAO is such a common part of Access programming that most people treat it as a built-in part of the Access object model. But technically, DAO consists of a set of objects provided by a separate component, which Access provides. Many more components are waiting for you to discover them.
To use a new component, you need to add a reference to that component in your database. To do so, in the Visual Basic editor’s menu, choose Tools→References. You’ll see the References window shown in Figure 18-7.

The problem with the References window is that you need to know exactly what component you want to use. The Available References list is full of neat-sounding components that aren’t designed for use in Access and that won’t work right with your code. Among the components you can use are ones from Microsoft that let you interact with files, show web pages, and interact with other Office applications. However, you won’t get far experimenting on your own. Instead, you’ll need to find sample code on the Web.
The DoCmd Object
The DoCmd object is perhaps the single most useful object in the Access programming world. It provides one-stop shopping for a variety of tasks, like opening forms and reports, launching other programs, finding records, and running macros.
Unlike the objects you’ve seen so far, the DoCmd object doesn’t have any properties. Instead, it’s made up of methods that perform different actions. If you want to open a form named ProductCatalog, you can use the OpenForm method like this:
DoCmd.OpenForm "ProductCatalog"
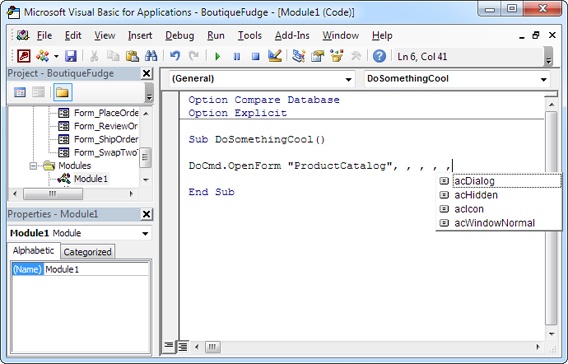
Like most of the DoCmd methods, OpenForm can use several optional parameters. Visual Basic prompts you by showing the list of possible parameters as you type. Here’s an example that skips over the second and third parameters (note the commas with no values in between) but supplies a filter in the fourth parameter, and a data mode in the fifth parameter:
DoCmd.OpenForm "ProductCatalog", , ," ID=5", acFormReadOnly
This command opens the ProductCatalog form, applies a filter to show only the record with the ID of 5, and uses read-only mode to prevent any changes.
Note
This example uses an acFormReadOnly, which is a constant. Constants are numeric values that are given more helpful names. So instead of remembering that the number represents read-only mode, you can use the more readable acFormReadOnly constant. Anytime you see a variable that starts with ac or vb and you haven’t created it yourself, the odds are that it’s a constant. Of course, you still need to know the constant names to use them, but IntelliSense can help you, as shown in Figure 18-8.
If the OpenForm method looks familiar, that’s because you’ve already seen the same functions with the OpenForm macro action (Three Macro Recipes). In fact, all the methods of the DoCmd object line up with the macro actions you learned about in Chapter 15. Table 18-1 lists the most useful ones.
DESCRIPTION | |
| Applies a filter to a table, form, query, or report, to focus on the records you’re interested in. |
| Makes some noise. Usually, you use this to get attention if a problem occurs. |
| Closes the current database object (or a specific one you indicate). |
| Gives you a quick way to make a database backup. |
| Gives you different ways to search for the record you want. |
| Switches on or off the “please-wait” mouse pointer, which looks more like a swirl than an hourglass in modern versions of Windows. You can use this method to let someone know there’s a time-consuming task underway, and she should chill. |
| Opens the appropriate database object, in whatever view mode you want, with filter settings and other optional details. As you learned in Chapter 15, you can also use |
| Offers one way to print the data from the current database object. |
| Exits Access. |
| A fill-in-the-gaps command that lets you run various Access commands available on the ribbon. You just need to supply the right constant. Managing Order Fulfillment shows an example that uses |
| Runs a macro. |
| Executes a raw SQL statement (see Analyzing a Query). You can’t use this command to get information out of your database. Instead, it lets you run commands that change records or tables. |
| Removes the current filter settings so you can see all the records in a table, form, query, or report. |
Converting a Macro to VB Code
If you want to learn a little more about Visual Basic and the DoCmd object, you can take an existing macro and convert it into a pure code subroutine. Here’s how:
In the navigation pane, right-click the macro you want to use and choose Design.
This opens the macro in Design view.
Choose File→Save As.
This takes you to backstage view.
In the list on the left, choose Save Object As, then click the Save As button on the right.
A simplified Save As window appears, with two settings. Ordinarily, you use this window to create duplicate copies of database objects.
In the second box, choose Module (rather than Macro, which is the only other option).
The Module setting tells Access that you want to perform a macro conversion, not create a macro copy. Don’t worry about the name in the first text box—it’s used when copying a macro object, and has no effect when you’re converting a macro to code.
Click OK.
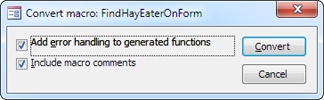
A window with two options appears (Figure 18-9).
If you want to add basic error-handling (as described on Error Handling), make sure “Add error handling to generated functions” is turned on.
A little bit of error handling is always a good idea.
If you want to turn your macro comments into VB comments, make sure “Include macro comments” is selected.
If you’ve taken the time to add some explanatory text, it’s worth keeping it around.
Click Convert.
Access creates a new module for the converted code and gives it a name like “Converted Macro-[YourMacroName].” Inside the module, Access creates a function with the same name as your macro. If you convert a macro that contains submacros (Submacros), Access adds one function for each submacro.
Once the conversion process is complete, Access opens your module in the Visual Basic editor so you can review the code.
The following example shows the result of converting a macro from Chapter 15 (shown on Three Macro Recipes) that searches for specific text in the AnimalTypes table:
Function FindHayEater()

 On Error GoTo FindHayEater_Err

    DoCmd.OpenForm "AnimalTypes", acNormal, "", "", , acNormal
    DoCmd.GoToControl "Diet"
    DoCmd.FindRecord "=""hay""", acAnywhere, False, , _
      False, acCurrent, False

 FindHayEater_Exit:
    Exit Function

 FindHayEater_Err:
    MsgBox Error$
    Resume FindHayEater_Exit

End Function
You’ll notice that the converted code makes heavy use of the DoCmd object—in fact, almost every line uses the DoCmd object. First, it uses the OpenForm method to open a form, then it uses the GoToControl method to switch to the Diet field, and finally it looks for the first record that has the text “hay.” This line looks a little weird because it doubles up its quotation marks (to make “=” “hay”“”). Quotation marks have a special meaning to Visual Basic (they show where text begins and ends). If you actually want to insert a quotation mark in your text, you need to put two quotation mark characters in a row. Strange, but true.
The code ends with an error-handling routine named FindHayEater_Err, which simply shows the problem in a message box and then ends the routine.
Note
When you convert a macro into code, Access always generates a function (Creating Custom Functions), not a subroutine. However, the function doesn’t return a result, so it’s not really necessary. (Presumably, Access works this way to give you the flexibility to decide later on that you want to return a value.)
Using VB to Run a Better Business
Over the last 17 chapters, you’ve come to know and love the Boutique Fudge database, which demonstrates a practical sales database that tracks customers, products, and orders. However, although the Boutique Fudge database stores all the information you need, it still doesn’t integrate seamlessly into company life. And before you can fix it, you need to understand why it comes up short.
Most people who work in a business like Boutique Fudge aren’t thinking about tables and data operations (like inserting, updating, and deleting records). Instead, they’re thinking about tasks, like placing an order, shipping an order, and handling a customer complaint.
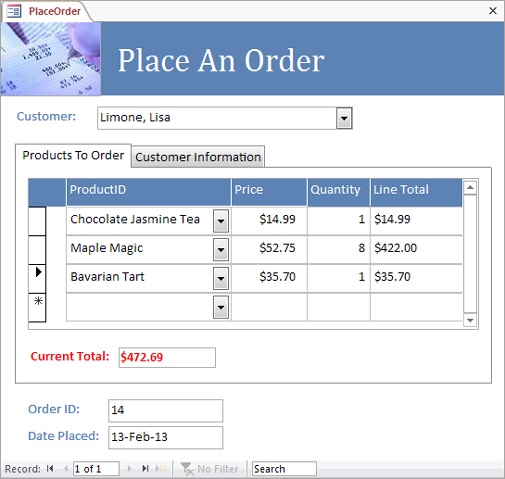
Many tasks match quite closely with a data operation, in which case you really don’t have a problem. The “register a new customer” task is clearly just a matter of opening the Customers table, and then inserting a new record. You can take care of it with a simple form. However, the “place an order” task is a little trickier. This task involves inserting records in more than one table (the Orders and OrderDetails tables), and using data from related tables (the Products and Customers tables) to complete the order. You can create an ordinary form to do the job, but the form doesn’t quite work the way salespeople want (see Figure 18-10).

The same is true when it comes to the “ship an order” task. This task requires several steps—changing the status of the order, logging the shipment, and updating the units-in-stock numbers. You could deal with this task as several separate data operations, but it’s a lot nicer if you create a single form that takes care of the whole process.
Now your VB skills are truly useful. With the right code, you can design an intelligent form that fits the way people work. An intelligent form isn’t just a way to add, edit, and insert records in a table—it’s a tool that helps run your business.
In the following sections, you’ll consider how to build better forms with some code-powered features. The following forms are covered:
PlaceOrder lets you create a new order. It works in conjunction with the PlaceOrder_Subform, which lets you add individual items to the order.
AddProduct lets you create a new product. You can use it directly from the PlaceOrder form to add a product in mid-order.
ShipOrders lets you update an order with shipment information. It also works with a form named ReviewOrderDetails to show the items in the order.
You can check out the final result with the downloadable databases for this chapter.
Tip
It’s always a good idea to name your form according to the task it performs (placing an order, shipping a task, and so on), rather than the table it uses. This design helps you remember who’s using each form, so you can tailor it to the right audience.
Keeping a Running Total
Few souls are brave enough to place an order without knowing exactly how much it costs. A typical order form shows how much each line item costs (by multiplying the price and quantity information) and the ever-important grand total (Figure 18-11).
Note
The PlaceOrder form also introduces a few refinements you already know about, like putting customer address information on a separate tab, moving the automatically generated fields (the order ID and the order date) to the bottom of the window where they won’t distract anyone, and setting their Locked property to Yes to prevent changes. The form also has its Data Entry property set to Yes, so you start creating a new order as soon as you open the form.
The line total is the only detail that doesn’t require code. In fact, you can solve this problem by adding a text box that uses the following expression to the PlaceOrder_Subform:
=Quantity * Price
This expression works because the fields you need (Price and Quantity) are located on the same form as the calculated field. However, the grand total isn’t as straightforward.
You can combine the line total expression with the Format function (Formatting Numbers) to make sure you get the right number of decimal places and a currency symbol ($):
=Format(Quantity * Price, "Currency")
To calculate the grand total, you can use the Quantity and Price information in the OrderDetails table. Unfortunately, the PlaceOrder form doesn’t have any easy way to get this information. Not only is this information shown somewhere else (in a subform), but it also involves several separate records. Even if you retrieve the Quantity and Price information from the subform, you can get only the values for the current record, not for the whole list of ordered items.
To solve this problem, you need to use a specialized Access function called a domain function. A domain function can process an entire table and return a single piece of information. (To learn more, see the box below.)
To calculate the total of all the items in an order, you use the DSum function. The information you need is in the OrderDetails table, but you want to select only those records where the OrderID field matches the current order. Finally, you need to add together the cost of each item. And as you know from before, you calculate the cost of a line by multiplying together the Price and Quantity fields.
With this information in mind, you can create the following calculated field:
=DSum("Price*Quantity","OrderDetails","OrderID=" & [ID])The first argument is the calculated field that you’re taking from each record. The second argument is the name of the table you’re using. The third argument filters out just those records that match the current order. If the current order has an ID of 455, the final parameter matches all OrderDetails records where OrderID=455. Once again, you can wrap the whole thing with the Format function if you want the final number to look like a currency value.
This calculated field does the trick, but you need one more enhancement. Ordinarily, Access computes calculated fields the first time a record is shown. However, you need to make sure that the grand total is recalculated and redisplayed every time you make a change in the list of ordered items. To accomplish this, you need to call the Forms.Recalc method when an OrderDetails record is inserted, updated, or deleted. Here’s the code that does the trick:
Private Sub Form_AfterInsert()
    Forms("PlaceOrder").Recalc
End Sub

Private Sub Form_AfterUpdate()
    Forms("PlaceOrder").Recalc
End Sub

Private Sub Form_AfterDelConfirm(Status As Integer)
    Forms("PlaceOrder").Recalc
End Sub
This code uses a new technique. Specifically, it runs in one form (PlaceOrder_Subform) but triggers an action in another form (PlaceOrder). In order to pull off this feat, it needs the object that represents the PlaceOrder form. The code finds the object it needs by searching inside the Forms collection for a form named “PlaceOrder.” The box on Interacting with Other Forms analyzes this technique in closer detail.
Getting Price Information
As you learned in Chapter 5, sometimes a table needs to store point-in-time data—information that’s copied from one table to another because it might change over time. A good example is product prices, which evolve over time. (“Evolve” is a polite way to say, “increase relentlessly.”) So a product’s current price isn’t necessarily the price at which you ordered it last week. To keep track of how much you owe the company, the selling price of a product needs to be stored in the OrderDetails table.
However, this system creates a headache when you fill out an order. Choosing an order item is easy enough—you just need to select the product from a lookup list. However, the lookup list sets the ProductID field only for the OrderDetails record. It’s up to you to figure out the correct price, and then copy it from the Products table to your new record.
Fortunately, you can make this much easier. You can react to the On Change event in the ProductID list, which is triggered every time a product is selected. Then, you can use the DLookup domain function to find the corresponding price, and insert it in the Price field automatically. Here’s the code that does it:
Private Sub ProductID_Change()
    Price = DLookup("Price", "Products", "ID=" & ProductID)
    Quantity = 1
End Sub
This code also sets the Quantity field to 1, which is a reasonable starting point. If necessary, you can edit the Price and Quantity fields after you pick your product. Or, to create a more stringent form, you can set the Locked property of the Price control to Yes, so that no price changes are allowed (as in the Boutique Fudge database). This way, when you create an order, you’re forced to use the price that’s currently in effect, with no discounting allowed.
Tip
You can use the same technique to fill in other point-in-time data. For example, you can grab the address information for the current customer, and use that as a starting point for the shipping address. And you can even use the DLookup function to create more sophisticated validation routines. You could use this technique with the Cacophoné Music School database, to look up prerequisites and maximum class sizes before letting a student enroll in a class.
Adding a New Product During an Order
Boutique Fudge is a customer-driven company. If someone wants an innovative product that’s not yet in the product catalog (like fudge-dunked potatoes), the company’s willing to create it on demand.
Ordinarily, the ProductID lookup list doesn’t allow this sort of on-the-fly product creation. If you try to type in a product that doesn’t exist, you get a stern reprimand from Access. However, adding new list items on the go is a common Access programming technique, and there’s a dedicated event that’s designed to help you out: the On Not In List event.
If you type in a product that doesn’t exist and you’re using the On Not In List event, Access starts by running your event-handling code. You can create the item if you want, show a different message, or correct the problem before Access complains.
The On Not In List event has two parameters: NewData and Response. NewData is the information that was typed into the list box that isn’t found in the list. Response is a value you supply to tell Access how to deal with the problem.
Here’s the basic skeleton of the subroutine that Access creates if you choose to handle the On Not In List event for the field named ProductID:
Private Sub ProductID_NotInList(NewData As String, Response As Integer)
End Sub
When the On Not In List event occurs, you should first ask the person using the form if they meant to enter a product that doesn’t exist. You can take this step using the familiar MsgBox function in a slightly different way. First, you need to add a second parameter that tells Access to create a message box with Yes and No buttons. Then, you need to get hold of the return value from the MsgBox function to find out which button was clicked:
Dim ButtonClicked
ButtonClicked = MsgBox("Do you want to add a new product?", vbYesNo)
This code creates a variable named ButtonClicked and then shows the message. When the person closes the message box (by clicking Yes or No), Visual Basic puts a number into the ButtonClicked variable that tells you what happened. The number is 6 if Yes was clicked, or 7 if No was clicked. But rather than deal directly with these numbers and risk making a mistake, you can use the helpful constants vbYes (which equals 6) and vbNo (which equals 7).
Here’s the partially completed code for the On Not In List event handler. It shows the message asking if a new item should be added (Figure 18-12), and then cancels the edit if the person using the form chooses No:
Private Sub ProductID_NotInList(NewData As String, Response As Integer)

    ' Show a Yes/No message and get the result.
    Dim ButtonClicked
    ButtonClicked = MsgBox("Do you want to add a new product for " & _
      NewData & "?", vbYesNo)

    ' Visual Basic gives you vbYes and vbNo constants
    ' that you can use to find out what button was clicked.
    If ButtonClicked = vbNo Then

        ' Cancel the edit.
        ProductID.Undo

        ' Tell Access not to show the error message.
        ' You've already dealt with it.
        Response = acDataErrContinue

     Else
        ' (Put some code here to add a new product.)
    End If
End Sub
Then you supply the code that adds the new product. In this example, it doesn’t make sense for your code to add the product completely on its own—after all, a product needs other information (like price and category details) before it’s considered valid. Instead, you need to show another form for adding products. The DoCmd.OpenForm method is the key:
' Tell Access not to worry, because you're adding the missing item.
Response = acDataErrAdded

' Open the AddProduct form, with three additional arguments.
DoCmd.OpenForm "AddProduct", , , , , acDialog, NewData
The two additional arguments you use with the OpenForm method are quite important:
acDialogopens the form in Dialog mode, which means Access puts the code in theProductID_NotInListon hold until the AddProduct form is closed. That step is important because once the adding process is finished, you’ll need to run more code to update the PlaceOrder form.NewDatatakes the newly typed-in information and sets it in theAddProduct.OpenArgsproperty. That way, the AddProduct form can retrieve this information when it starts up, and then adjust itself accordingly.

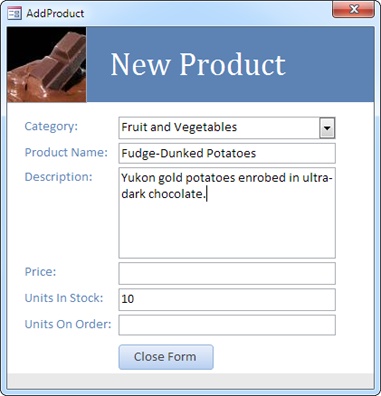
Here’s the code you need in the AddProduct form to copy the newly entered product name (the value you passed using the NewData variable in the previous code snippet) into the ProductName field when AddProduct first loads:
Private Sub Form_Open(Cancel As Integer)
    ProductName = Form.OpenArgs

End Sub
Figure 18-13 shows what this form looks like.
Once you finish entering all the product information, you can close the AddProduct form. At that point, a little more code runs in the ProductID_NotInList subroutine. This code is placed immediately after the DoCmd.OpenForm statement. Its job is to update the new order item to use the product you’ve just entered:
' Cancel the edit. That's because you need to refresh the list
' before you can select the new product.
ProductID.Undo

' Refresh the list.
ProductID.Requery

' Now find the ProductID for the newly added item using DLookup.
ProductID = DLookup("ID", "Products", "ProductName='" & NewData & "'")
Note
This code works even if you cancel the new product in the AddProduct form by pressing the Esc key. In this case, the DLookup function can’t find anything, so it returns a null (empty value) to the ProductID field. As a result, you get the familiar Access warning message telling you the product you picked isn’t in the list.
There’s one more detail. By the time the On Not In List event occurs, the On Change event has already taken place. So you just missed your chance to run the code you used earlier to insert the corresponding price into the Price field in the list of order items.
Fortunately, you can solve this problem quite easily. You just need to add one more line of code that tells Access to go ahead and run the event handler (the ProductID_Change subroutine) again:
ProductID_Change
To see the complete code for this example in one place, refer to the sample Boutique Fudge database for this chapter.
Managing Order Fulfillment
Now that you’ve perfected the ordering process, you can turn your attention to what happens next.
In the Boutique Fudge database, every record in the Orders table has an Order-Status field that keeps track of the, well, status. Newly created order records have a New status. In the stock room, the warehouse workers look for orders with the New status and pick one to start working on. At that point, they change the status of this order to In Progress, so nobody else tries to ship it at the same time. Finally, when the order is complete, they change it to Shipped, and then record the exact time in the ShipDate field.
Logically, this model makes sense. However, it’s a bit tricky using ordinary tables and forms. To follow this workflow, the warehouse staff needs to modify the status of an order record several times, remember to record the ship date, and avoid changing other details. If they miss a step—say they never put the order into In Progress status—it’s possible that more than one employee could try to complete the same order.
The solution is to create a ShipOrders form that guides the warehouse workers through the right steps. Initially, this form shows a list of orders with minimal information (Figure 18-14).

When someone clicks the Process button, several steps need to take place. Here’s a step-by-step walkthrough of the code, one chunk at a time.
First, your code needs to refresh the record. That step catches whether someone else has started processing the order on another computer:
Private Sub ProcessOrder_Click()

    Form.Refresh
Next, your code needs to check the record’s status. If it’s anything other than New, that order isn’t available for processing:
' The StatusID for New is 2.
If StatusID <> 2 Then
    MsgBox "This order is not available."
Otherwise, you need to switch the status to In Progress and save the record right away, to make sure no else tries to get it:
Else
    ' The StatusID for In Progress is 3.
    StatusID = 3

    ' Save the change.
    DoCmd.RunCommand acCmdSaveRecord
Note
It’s extremely important to save the record (using the DoCmd.RunCommand method, as shown here) in this sort of situation. Otherwise, the order record remains in Edit mode, and the new status isn’t saved in the database. Other people might start processing it, because they have no way of knowing that you’ve changed the status.
Now it’s time to launch the ReviewOrderDetails form, which displays a read-only view of all the items in the order (Figure 18-15). The form is opened in Dialog mode, which locks up the ShipOrders form until the order fulfillment process is complete:
        DoCmd.OpenForm "ReviewOrderDetails", , , _
          "OrderID =" & ID, , acDialog
    End If

End Function
The ReviewOrderDetails form gives the warehouse staff two choices. If they click Ship, Access changes the order status to Shipped, and the process is complete:
Private Sub Ship_Click()
    ' Close this form.
    DoCmd.Close

    ' Switch back to the ShipOrders form.
    DoCmd.OpenForm "ShipOrders"

    ' Update the order.
    ' The StatusID for Shipped is 4.
    Forms("ShipOrders").StatusID = 4
    DoCmd.RunCommand acCmdSaveRecord
End Sub
In the ReviewOrderDetails form, the properties Control Box and Close Button are both set to No. That way, the window doesn’t give the warehouse staff any way to close it except to click the Ship or Cancel buttons. (If you don’t use this approach, you need to write extra code that resets the order’s status if someone clicks the X icon in the top-right corner to close the ReviewOrderDetails form.)
Tip
This spot is also a good place to use DoCmd.OpenReport to print a report that creates a shipping insert with a list of all the products in the order.
But if they click Cancel (perhaps because they’ve discovered they don’t have the right items in stock), similar code is used to return the order to New status:
Private Sub Cancel_Click()
    ' Close this form.
    DoCmd.Close

    ' Switch back to the ShipOrders form.
    DoCmd.OpenForm "ShipOrders"

    ' Update the order.
    Forms("ShipOrders").StatusID = 2
    DoCmd.RunCommand acCmdSaveRecord
End Sub
This part completes the code you need to coordinate order processing. Like the forms you learned about in Part 4 of this book, the forms in this example draw all their information from your database’s tables. But unlike those examples, these use code to perform some of the work automatically. This difference changes your forms from mere data-entry tools into supercharged workflow tools.
Tip
You could also create a special status value to denote orders that have been attempted but couldn’t be completed (like On Hold or Waiting For Stock). That way, the warehouse employees would know not to keep trying the same orders. If you take this step, make sure you modify the code in the ProcessOrder_Click subroutine so people can process orders with this status.
Updating Stock Numbers
Thanks to the ever-so-smart ShipOrders form you saw in the previous section, business is running smoothly at Boutique Fudge. However, suppose one day the warehouse employees come to senior management with a complaint. Although orders are sailing through without a hiccup, the product inventory information isn’t keeping up. No one remembers to adjust the UnitsInStock information, so it’s becoming increasingly useless. This challenge is entirely unlike the other problems you’ve solved in this chapter, because it forces you to make a change in a completely different set of records—records that aren’t being displayed in any form.
You already know that you can use the domain functions (Keeping a Running Total) to retrieve information from other tables. Unfortunately, Access doesn’t have a similar set of functions that lets you make changes. Instead, you need to turn to a completely new set of objects, called the data access objects (DAO for short).
DAO lets you perform any data task you want, independent of your forms. However, DAO is a bit complex. If you use the DAO methods in the wrong order or leave out a step, you’ll run into an error. Often, it’s easiest to start with an example that works (like the sample code included with this chapter), copy it, and then alter it as needed. Usually, you’ll use DAO in conjunction with SQL statements that fetch your data and update your tables. (For a quick refresher on how to write basic SQL commands, see Analyzing a Query.)
DAO involves two essential techniques. First, there’s the CurrentDb.Execute method, which lets you run a direct SQL command by supplying it in a string:
CurrentDb.Execute MyUpdateCommand
This method is a quick and dirty way to make database changes, like sweeping update, delete, or insert operations.
The second essential technique is to retrieve records by using a specialized object called the Recordset. To use a Recordset, you must begin by using the CurrentDb.OpenRecordset method, and supplying a string with a SQL select command:
Dim Recordset
Set Recordset = CurrentDb.OpenRecordset(MySelectCommand)
The Recordset represents a group of records, but it lets you access only one at a time. To move from one record to the next, you use the Recordset.MoveNext method. To check if you’ve reached the end, you examine the Recordset.EOF property (EOF stands for “end of file”). When this property is True, you’ve passed the last record.
You most often use a Recordset in a loop. You can use Recordset.EOF as the loop condition, so that the loop ends as soon as Access reaches the end of the Recordset. Inside the loop, you can retrieve field values for the current record. At the end of each pass, you must call MoveNext to move on:
Do While Recordset.EOF = False

 ' Display the value of the ProductName field.
 MsgBox Recordset("ProductName")

 ' Move to the next record.
 Recordset.MoveNext

Loop
With these bare essentials in mind, you can make your way through the following code, which adjusts the product stock values based on a recently shipped order. (A line-by-line analysis follows the code.)
1 Sub UpdateStock()

      ' If an error occurs, jump down to the DataAccessError section.
2     On Error GoTo DataAccessError

      ' Create a SELECT command.
3     Dim Query
4     Query = "SELECT ProductID, Quantity FROM OrderDetails WHERE OrderID=" & ID

      ' Get a recordset using this command.
5     Dim Recordset
6     Set Recordset = CurrentDb.OpenRecordset(Query)

      ' Move through the recordset, looking at each record.
      ' Each record is a separate item in the order.
7     Do Until Recordset.EOF

          ' For each item, get the product ID and quantity details.
8         Dim ProductID, Quantity
9         ProductID = Recordset("ProductID")
10        Quantity = Recordset("Quantity")

          ' Using this information, create an UPDATE command that
          ' changes the stock levels.
11        Dim UpdateCommand
12        UpdateCommand = "UPDATE Products SET UnitsInStock = UnitsInStock-" & _
13          Quantity & " WHERE ID=" & ProductID

          ' Run the command.
14        CurrentDb.Execute UpdateCommand

          ' Move to the next order item (if there is one).
15        Recordset.MoveNext
16    Loop

      ' Time to clean up.
17    Recordset.Close
18    CurrentDb.Close

19    Exit Sub

20  DataAccessError:

      ' You only get here if an error occurred.
      ' Show the error.
21    MsgBox Err.Description

22 End Sub
Here’s what takes place:
Line 1 declares a new subroutine. Because this code is fairly complex, it makes sense to put it in a separate subroutine, which you can call when the Ship button is clicked and the order is shipped.
Line 2 tells Access to head down to the end of the subroutine if an error takes place. Errors are always possible with data access code, so it’s good to be on guard.
Lines 3–4 create the SQL command you need to select the OrderDetails records for the current order. (See Analyzing a Query for more about the SQL select command.)
Lines 5–6 execute that command and get all the matching records in a
Recordset.Line 7 begins a loop that moves through the entire
Recordset.Lines 8–10 get the ProductID and Quantity fields for the current OrderDetails record (the first one in the
Recordset).Lines 11–13 use this information to build a SQL update command. The command subtracts the number of items ordered from the total number in stock. A sample completed command looks like this:
UPDATE Products SET UnitsInStock = UnitsInStock-4 WHERE ID=14. This subtracts 4 units from product 14.Line 14 performs the update.
Lines 15–16 move to the next record and repeat the update process (until no more order items remain in the
Recordset).Lines 17–18 perform cleanup.
Line 19 exits the procedure. If you made it here, congratulations—everything worked without a hitch!
Lines 20–22 are only processed if an error occurs somewhere. In this case, the error description is shown in a message box.
This code is a fair bit more ambitious than anything you’ve seen so far. However, it builds on all the skills you’ve honed over the last three chapters. Once again, the best way to get comfortable with this code is to download the sample database, see it in action, and try changing it. Happy experimenting!