Chapter 4
Reconciling Accounts and Closing Journal Entries
In This Chapter
![]() Reconciling accounts and making adjustments
Reconciling accounts and making adjustments
![]() Confirming that your journals are correct
Confirming that your journals are correct
![]() Gathering journal information for closing
Gathering journal information for closing
![]() Posting adjustments to the general ledger
Posting adjustments to the general ledger
![]() Examining your journals in a computerized system
Examining your journals in a computerized system
As the old saying goes, “The devil is in the details.” When it comes to your bookkeeping, especially if you keep your books manually, those details are in the accounts and journals you keep. And any errors in those tiny details can lead to big problems down the road. To ensure accuracy, you must reconcile your accounts and prove out your journals and close them at the end of an accounting period, which is what this chapter is all about. Within these pages, you also find out how to post all corrections and adjustments to the general ledger after you make them in the appropriate journal. (To find out how to set up your journals, see Book I, Chapter 3.)
Reconciling Bank Accounts
Reconciling bank accounts involves verifying whether the cash balance in your accounting records agrees to the cash balance on your bank statement. Accountants use the phrase balance per book to refer to the cash balance in the accounting records. Balance per bank refers to your cash balance according to the bank statement.
Table 4-1 walks you through the bank reconciliation process. You've probably reconciled your personal checking account at least a few times over the years, and you'll be happy to hear that reconciling business accounts is a similar process that goes something like this:
- Set up bank reconciliation template. Set up a template with two columns. The bank statement column represents bank activity and the cash account column lists information from your accounting records. Post the beginning balances at the top. The bank balance is taken from the bank statement. The cash balance is the ending balance from your cash account.
- Mark cleared transactions. Compare the transactions in your cash accounting records with the bank statement and mark cleared transactions — transactions that appear both in the bank records and in your records. Because your book balance (accounting records) agrees with the bank statement, you don't need to do anything further with these transactions. Note, however, that you're not finished with the reconciliation process.
- Note deposits in transit. Deposits in your cash account that aren't listed in the bank statement are called deposits in transit. Post the total dollar amount as an addition to the bank column. In Table 4-1, deposits in transit total $300.
- Post outstanding checks. Checks that aren't posted to the bank statement are considered outstanding checks. Post the total dollar amount as a subtraction from the bank column. In Table 4-1, outstanding checks total $600.
- Review the bank activity that isn't posted to the cash account. Some transactions in your bank statement may not be posted to the cash account. In Table 4-1, $20 in bank interest is added to the cash balance — because the interest isn't yet posted to the cash account. If you have bank fees, you subtract those fees from the cash account column.
- Compare the bank and cash balances. If you have properly reconciled, the bank balance should agree with the cash balance. In the table, both ending balances are $720. Your cash account is reconciled with the bank statement. If the balances don't agree, you have more reconciling items to investigate.
Table 4-1 Bank Reconciliation
|
Bank Statement |
Cash Account | |
|
Starting balance |
$1,020 |
$700 |
|
Deposits in transit (not shown on statement) |
300 |
|
|
Outstanding checks (not shown on statement) |
(600) |
|
|
Interest (on statement but not posted to books) |
20 | |
|
Adjusted balance |
720 |
720 |
Table 4-1 shows a common format for reconciling a bank account.
Table 4-1 includes three reconciling items (entries accounted for on the statement but not on the books or vice versa): outstanding checks, deposits in transit, and bank interest.
Tracking down reconciling items
Often, your book balance and the bank statement balance don't agree. That's okay, because reconciling items are common. You just need to adjust for uncleared transactions. Here's a more complete list of reconciling items:
- If the adjusted bank balance is higher than your balance, check to be sure that all the deposits listed by the bank appear in the cash account in your books. If you find that the bank lists a deposit that you don't have, do some detective work to figure out what that deposit was for and add the detail to your accounting records. Also, make sure you've recorded all outstanding debits and added those amounts (as negative values) to the ending balance on the bank statement.
- If the bank balance is lower than your balance, check that all checks listed by the bank are recorded in your cash account. You may have missed one or two checks that were written but not properly recorded. You also may have missed a deposit that you have listed in your cash account but that the bank hasn't listed on the statement yet. If you notice a missing deposit on the bank statement, be sure you have your proof of deposit and confirm with the bank that the cash is in the account.
- If all deposits and checks are correct but you still see a difference, your only option is to make sure all checks and deposits were entered correctly (and not entered twice by mistake or for a different dollar amount) and check your calculations.
Using a computerized system
If you use a computerized accounting system, reconciliation should be much easier than if you keep your books manually. In QuickBooks, for example, when you start the reconciliation process, a screen pops up in which you can enter the ending bank statement balance and any bank fees or interest earned. Figure 4-1 shows you that screen.

Intuit.com
Figure 4-1: Displaying the reconciliation process in QuickBooks.
After you click Continue, you get a screen that lists all checks written since the last reconciliation as well as all deposits. You put a check mark next to the checks and deposits that have cleared on the bank statement, as shown in Figure 4-2, and then click Reconcile Now.

Intuit.com
Figure 4-2: To reconcile checking by using QuickBooks, you put a check mark next to all the checks and deposits that have cleared the account and click Reconcile Now.
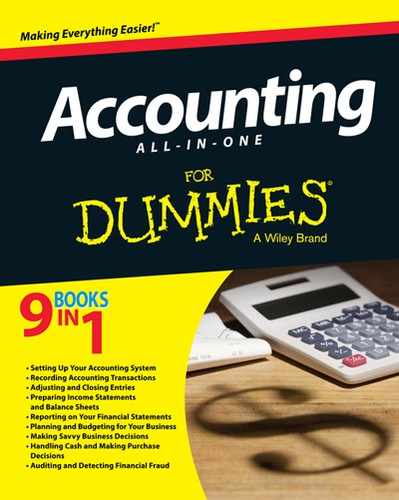
QuickBooks automatically reconciles the accounts and provides reports that indicate any differences. It also provides a reconciliation summary, shown in Figure 4-3, that includes the beginning balance, the balance after all cleared transactions have been recorded, and a list of all uncleared transactions. QuickBooks also calculates what your check register should show when the uncleared transactions are added to the cleared transactions.
Intuit.com
Figure 4-3: After reconciling your accounts, QuickBooks automatically provides a reconciliation summary.
Posting Adjustments and Corrections
After you close out the cash receipts and cash disbursements journals and reconcile the bank account with your accounting system, you need to post any adjustments or corrections that you uncover to accounts that may be impacted by the change. For example, Table 4-1 lists a reconciling item of $20 for bank interest. That interest isn't yet posted to your books. To post the item, debit (increase) cash $20 and credit (increase) other income $20.
If you find that several customer payments haven't been entered in the cash receipts journal, you need to post those payments to the cash receipts journal, the accounts receivable journal, and the customers’ accounts. The same is true if you find payments on outstanding bills that haven't been entered into the books. In such cases, post the payments to the cash disbursements journal and the accounts payable journal as well as to the individual vendors’ accounts.
Prepping to Close: Checking for Accuracy and Tallying Things Up
Closing the books is the process of finishing up all your accounting activity for the period (month or year). Said another way, closing the books ensures that your accounting records are ready to start the next accounting period. As you prepare to close the books, you first need to total what's in your journals, which is called summarizing the journals. During the process, it's a good idea to look for errors and be sure that the entries accurately reflect the business transactions during the accounting period.
 Even the smallest error in a journal can cause a lot of frustration when you try to run a trial balance and close out your books, so it's best to do a thorough search for errors as you close out each journal for the month. Finding an error at this point in the closing process is much easier than trying to track it back through all your various accounts.
Paying attention to initial transaction details
Do a quick check to be sure the transaction details in your journals are accurate. The prior section explains how to do this type of check with the cash journals. When you follow the rules of accrual accounting, however, not all transactions involve cash. In accrual accounting, noncash transactions can include customer purchases made on store credit (which you track in the accounts receivable journal) and bills you will pay in the future (which you track in the accounts payable journal). You may also create other journals to track transactions in your most active accounts, and you probably also keep details about sales in the sales journal and payroll in the payroll journal.
In the payroll journal, make sure that all payroll for the month has been added with all the proper details about salaries, wages, and taxes. Also verify that you've recorded all employer taxes that need to be paid. These taxes include the employer's portion of Medicare and Social Security as well as unemployment taxes. (For more about payroll and payroll taxes, see Book II, Chapters 4 and 5.)
Summarizing journal entries
When you close your books at the end of the month, you summarize all the journals — that is, you total the columns and post the totals to the general ledger. Journals are temporary holding accounts for transactions. Eventually, all accounting activity must be posted to the general ledger. The general ledger, after all, is used to create financial statements.
Summarizing a journal is a four-step process:
- Number each journal page at the top if it isn't already numbered.
- Total any column that's not titled general debit or general credit. Any transactions recorded in the general debit or general credit columns need to be recorded individually in the general ledger.
- Post the totals to the general ledger account. Each transaction in the general credit or general debit column must be posted separately. Enter the date and journal page number as well as the amount of the debit or credit, so you can quickly find the entry for the original transaction if you need more details. Keep in mind that total debits in the general ledger should equal total credits.
- In the post reference (PR) column of the journal, record information about where the entry is posted. If the entry to be posted to the accounts is summarized and totaled at the bottom of the page, you can just put a check mark next to the entry in the PR column. For transactions listed in the general credit or general debit columns, you should indicate an account number for the account into which the transaction is posted. This process helps you confirm that you've posted all entries in the general ledger.
Figure 4-4 shows a summarized journal page, specifically the cash receipts journal. You can see that entries listed in the sales credit and cash debit columns on the cash receipts journal are just checked. Only one entry was placed in the general credit column, and that entry has an account number in the PR column. Although Figure 4-4 doesn't list all the transactions for the month, which would of course be a much longer list, it does show how you summarize the journal at the end of the month.

©John Wiley & Sons, Inc.
Figure 4-4: Summary of cash receipts journal entries after the first five days.
As you can see in Figure 4-4, after summarizing the cash receipts journal, there are only four general ledger accounts (general credit, accounts receivable credit, sales credit, and cash debit) and three customer accounts (S. Smith, J. Jones, and P. Perry) into which you need to post entries. Even better, the entries balance: $2,900 in debits and $2,900 in credits! To verify the credit total, add the totals at the bottom of each credit column.
The customer accounts total $500, which is good news because it's the same amount credited to accounts receivable. The accounts receivable account is decreased (credited) by $500 because payments were received, as is the amount due from the individual customer accounts.
Summarizing the accounts receivable journal gives you a grand total of all transactions for that period that involved customer credit accounts. Figure 4-5 shows a summary of an accounts receivable journal. The accounts receivable journal includes transactions from the sales journal (where customer purchases on store credit first appear) and the cash receipts journal (where customers’ payments toward their store credit accounts first appear) as well as any credit memos for customer returns. The example in Figure 4-5 is only a few lines long, but, in most companies, the accounts receivable journal is very active with transactions posted every day the business is open during the month. When you summarize the accounts receivable journal, you get a closing balance that shows the total of all financial activity recorded in that journal. Figure 4-5 shows a closing balance of $2,240, which is the amount outstanding from customers.

©John Wiley & Sons, Inc.
Figure 4-5: A sample accounts receivable journal summary.
Each transaction in the journal should have a reference number next to it, which tells you where the detail for that transaction first appears in the books. Each line item in Figure 4-5 has a journal page reference.
When you check for errors in the journal, you may need to review the original source information used to enter some transactions in order to double-check that entry's accuracy. In Chapter 3, you go over how to prove out cash, which includes a review for errors. In addition to the accounts receivable journal, you also have individual journal pages for each customer; these pages detail each customer's purchases on store credit and any payments made toward those purchases. At the end of an accounting period, accountants prepare an aging summary detailing all outstanding customer accounts. This report shows you what money is due from customers and how long it has been due. (See Book II, Chapter 3 for more about managing customer accounts.)
For the purpose of proving out the books, the aging report is a quick summary that ensures that the customer accounts information matches what's in the accounts receivable journal. Table 4-2 shows what an aging summary would look like as of March 31, 2015.

In this sample accounts receivable aging summary, the total amount outstanding from customers matches the balance total in the accounts receivable journal ($2,240) in Figure 4-5. To compute the total, add the total receivable amount in each column above ($1,300 + $740 + $200 = $2,240). Therefore, all customer accounts have been accurately entered in the books, and the bookkeeper shouldn't encounter any errors related to customer accounts when running a trial balance, as explained in Chapter 5.
If you find a difference between the information in your journal and your aging summary, review your customer account transactions to find the problem. An error may be the result of:
- Recording a customer purchase in the accounts receivable journal without recording the details of that transaction in the customer's account.
- Recording a customer purchase directly into the customer's account without adding the purchase amount to the accounts receivable journal.
- Recording a customer's payment in the customer's account without recording the cash receipt in the accounts receivable journal.
- Recording a customer's payment in the accounts receivable journal without recording the cash receipt in the customer's account record.
The process of summarizing and closing out the accounts payable journal is similar to that of the accounts receivable journal. For accounts payable, you can prepare an aging summary for your outstanding bills as well. That summary should look something like Table 4-3.

The total of outstanding bills on the accounts payable aging summary should match the total shown on the accounts payable journal summary for the accounting period. If yours match, you're ready for a trial balance. If they don't, you must figure out the reason for the difference before closing out the accounts payable journal. Keep in mind that the vendor is the company that sold you the product or service on credit. The problem may be the result of:
- Recording a bill due in the accounts payable journal without recording it in the vendor's account.
- Recording a bill due in the vendor's account without recording it in the accounts payable journal.
- Making a payment to the vendor in the vendor's account without recording it in the accounts payable journal.
- Making a payment to the vendor and recording it in the accounts payable journal but neglecting to record it in the vendor's account.
 Correct any problems you find before closing out the journal. If you know that you may be working with incorrect data, you don't want to try to do a trial balance. A trial balance with errors can't be used to generate accurate financial reports. Generating a trial balance without checking for errors is wasted effort.
Analyzing summary results
You may be wondering how you can find problems in your records by just reviewing a page in a journal. Well, that skill comes with experience and practice. As you summarize your journals each month, you'll become familiar with the expected level of transactions and the types of transaction that occur month after month. If you don't see a transaction that you expect to find, take the time to research the transaction to find out why it's missing. Perhaps the transaction didn't occur or someone forgot to record it.
For example, suppose that when summarizing the payroll journal, you notice that the payroll for the 15th of the month seems lower than normal. As you check your details for that payroll, you find that the amount paid to hourly employees was recorded, but someone didn't record the amount paid to salaried employees. For that particular payroll, the payroll company experienced a computer problem after running some checks and as a result sent the final report on two separate pages. The person who recorded the payroll numbers didn't realize there was a separate page for salaried employees, so the final numbers entered into the books didn't reflect the full amount paid to employees.
As you close the books each month, you'll get an idea of the numbers you can expect for each type of journal. After a while, you'll be able to pick out problems just by scanning a page — no detailed research required!
Planning for cash flow
The process you go through each month as you prepare to close your books helps you plan for future cash flow. Reviewing the accounts receivable and accounts payable aging summaries tells you what additional cash you can expect from customers during the next few months and how much cash you'll need in order to pay bills for the next few months.
If you notice that your accounts payable aging summary indicates that more and more bills are slipping into past-due status, you may need to find another source for cash, such as a credit line from the bank. For example, the accounts payable aging summary reveals that three key vendors — Helen's Paper Goods, Henry's Bakery Supplies, and Plates Unlimited — haven't been paid on time. Late payments can hurt your business's working relationship with vendors; they may refuse to deliver goods unless cash is paid upfront. And if you can't get the raw materials you need, you may have trouble filling customer orders on time. The lesson here is to act quickly and find a way to improve cash flow before your vendors cut you off. (For more on accounts payable management, check out Book II, Chapter 2.)
You may also find that your accounts receivable aging summary reveals that certain previously good customers are gradually becoming slow or nonpaying customers. For example, J. Doe's account is past due, and at least some portion of his account is overdue by more than 60 days. The bookkeeper dealing with these accounts may need to consider putting a hold on that account until payment is received in full. (For more on accounts receivable management, check out Book II, Chapter 3.)
Posting to the General Ledger
An important part of closing your books is posting to the general ledger any corrections or adjustments you find as you close the journals. This type of posting consists of a simple entry that summarizes any changes you found. For example, suppose you discover that a customer purchase was recorded directly in the customer's account record but not in the accounts receivable journal. You have to research how that transaction was originally recorded. If the only record was a note in the customer's account, both the sales account and the accounts receivable account are affected by the mistake — both balances are understated. The correcting entry looks like this:
|
Debit |
Credit | |
|
Accounts receivable |
$100 |
|
|
Sales |
$100 | |
|
To record sale to J. Doe on 3/15/2015 — corrected 3/31/2015. |
If you find this type of error, the sales transaction record for that date of sale isn't accurate, which means that someone bypassed your standard bookkeeping process when recording the sale. You may want to research that part of the issue as well because there may be more than just a recording problem behind this incident. Someone in your company may be allowing customers to take product, purposefully not recording the sale appropriately in your books, and pocketing the money instead. It's also possible that a salesperson recorded a sale for a customer that never took place. If that's the case and you bill the customer, he would likely question the bill, and you'd find out about the problem at that point.
 The process of proving out your journals, or any other part of your bookkeeping records, is a good opportunity to review your internal controls as well. As you find errors during the process of proving out the books, keep an eye out for exceptions (probably similar errors that appear frequently) that may indicate bigger problems than just bookkeeping mistakes.
Repeat errors may call for additional staff training to be sure your bookkeeping rules are being followed to a T. Unfortunately, such errors may be evidence that someone in the company is deliberately recording false information. Whatever the explanation, you need to take corrective action. (See Book IX, Chapter 2 for coverage of internal controls.)
Checking Out Computerized Journal Records
Although you don't have to close out journal pages if you keep your books by using a computerized accounting system, running a spot-check (at the very least) of what you have in your paper records versus what you have on your computer is a smart move. Simply run a series of reports by using your computerized accounting system and then check to be sure that those computer records match what you have in your files.
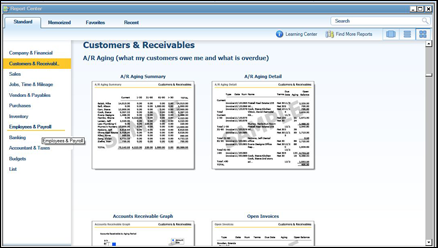
For example, in QuickBooks, go to the Report Navigator and click on Vendors & Payables. The first section of the navigator page, shown in Figure 4-6, is called A/P Aging (due and overdue bills). This section offers three possible reports: Summary, which shows how much is due for each vendor; Detail, which gives a list of bills due and overdue; and an Accounts Payable Graph that illustrates your outstanding bills.

Intuit.com
Figure 4-6: QuickBooks allows you to run a number of reports concerning vendors and payables. Essentially, these reports tell you how much money your company owes to others.
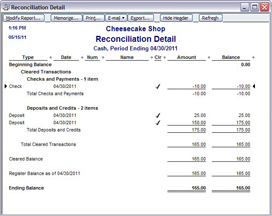
Figure 4-7 shows you the kind of detail you get when you select the Detail report. The Detail report is divided into:
- Current bills
- Bills overdue by 1 to 30 days
- Bills overdue by 31 to 60 days
- Bills overdue by 61 to 90 days
- Bills overdue by more than 90 days
Intuit.com
Figure 4-7: When you run an Accounts Payable Detail report in QuickBooks, you get a listing of all outstanding bills, the dates the bills were received, and the dates they're due.
Obviously, anything in the last two sections — overdue by more than 60 days — is bad news. You can expect a supplier or vendor whose bills appear in these columns to soon cut you off from additional credit until your account is up-to-date.
In addition to locating your bill-paying problem areas, you can also use the information in the Detail report to verify that the paper bills you have waiting to be paid in vendor files match what you have on your computer. You don't need to check every bill, but doing a spot-check of several bills is good practice. The goal is to verify the accuracy of your records as well as make sure that no one's entering and paying duplicate or nonexistent bills.
When it comes to cash flow out of the business, keep tight controls on who can actually sign checks and how the information that explains those checks is recorded. See Book II, Chapter 2 for more about the importance of separating duties to protect each aspect of your bookkeeping system from corruption.
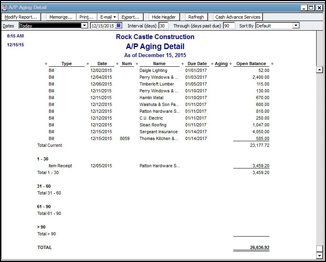
You can also run reports showing the information recorded in your accounts receivable account. Figure 4-8 shows you a list of possible reports to run from the Customers & Receivables page. In addition to the Summary, Detail, and Accounts Receivable Graph, you can also run a report for Open Invoices, which lists outstanding customer invoices or statements, and Collections, which lists not only overdue customers but also how much they owe and their contact information.
Intuit.com
Figure 4-8: In QuickBooks, you can run a series of reports that summarize customer accounts.
Again, running spot-checks on a few customer accounts to be sure your paper records of their accounts match the information in your computerized system is a good idea. There's always a chance that a customer's purchase was entered in error in the computer, and you could end up sending the bill to the wrong person.
Some companies double-check their accounts receivable bookkeeping for accuracy by sending surveys to customers periodically (usually twice a year) to see whether their accounts are correct. If you choose to do this, include with the customer's bill a postage-paid card asking whether the account is correct and giving the customer room to indicate any account problems before mailing the card back to your company. You can also send a survey by e-mail. In most cases, a customer who has been incorrectly billed will contact you soon after getting that bill — especially if he or she has been billed for more than anticipated.
In addition to keeping actual accounts, such as accounts payable or accounts receivable, your computerized accounting system keeps a journal of all your company's transactions. This journal contains details about all your transactions over a specified time period and the accounts that were impacted by each transaction. Figure 4-9 is a sample computerized journal page.
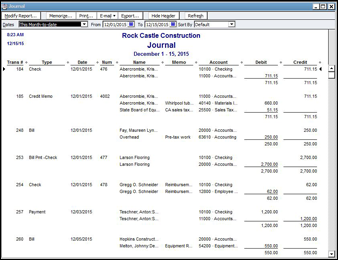
Intuit.com
Figure 4-9: A computerized accounting system keeps a journal of all transactions, which you can review during the closing process.
If you need to be reminded of how you recorded a transaction into your computerized accounting system, run the journal report by date, isolating all transactions that took place at a particular time. Running a report by date can be a helpful tool if you're trying to locate the source of an error in your books; if you find a questionable transaction, you can open the detail of that transaction and see how it was entered and where you can find the original source material.