
Chapter 5
Checking Your Accuracy
In This Chapter
![]() Checking your math with a trial balance
Checking your math with a trial balance
![]() Finding and correcting errors
Finding and correcting errors
![]() Preparing a worksheet
Preparing a worksheet
![]() Generating reports from your computerized system
Generating reports from your computerized system
After you close all your journals and do your best to catch any and all errors (flip to Chapter 4 for instructions on how to do this), the time comes to test your work. If you've entered all double-entry transactions into the books correctly, the books balance out, and your trial's a success!
Unfortunately, few bookkeepers get their books to balance on the first try. And in some cases, the books balance, but errors still exist. This chapter explains how you do a trial balance of your books and gives tips on finding any errors that may be lurking. You also find out how to take your first step toward developing financial reports (see Books IV and V) by creating a worksheet.
Working with a Trial Balance
When you first start entering transactions in a dual-entry accounting system, you may think, “This is a lot of work, and I don't know how I'm ever going to use all this information.” You enter all your transactions, using debits and credits, without knowing whether they'll actually produce useful financial information that you can use to gauge how well your business is doing. It's not until after you close your journals and prepare your first set of financial reports that you truly see the value of double-entry accounting.
The first step toward producing useable reports that help you interpret your financial results is doing a trial balance — a worksheet prepared manually or spit out by your computer accounting system that lists all the accounts in your general ledger and each account balance at the end of an accounting period.
 The purpose of the trial balance is to prove that, at least mathematically, your debits and credits are equal. If any errors exist in your calculations or in the way you summarized the journals or posted the summaries to the general ledger, they're uncovered in the trial balance when total debits and total credits don't come out equal.
Conducting your trial balance
If you've entered transactions manually, you create a trial balance by listing all the accounts with their ending debit or credit balances. (See Book I, Chapter 2 for more about debits and credits.) After preparing the list, you total both the debit and credit columns. If the totals at the bottom of the two columns are the same, the trial is a success, and your books are in balance. Following are step-by-step instructions for developing a trial balance:
- Prepare a worksheet with three columns: one for account titles, one for debits, and one for credits.
- Fill in all the account titles and record their balances in the appropriate debit or credit columns.
- Total the dollar amounts in the debit column and write the total at the bottom of the column.
- Total the dollar amounts in the credit column and write the total at the bottom of the column.
- Compare the debit and credit column totals.
Figure 5-1 shows a sample trial balance for a company as of May 31, 2014. Note that the debit column and the credit column both equal $57,850, making this a successful trial balance.
 A successful trial balance is no guarantee that your books are free of errors; it just means that all your transactions have been entered in balance. The books may still contain errors related to how you entered your transactions, including:
- You forgot to put a transaction in a journal or in the general ledger.
- You forgot to post a journal entry to the general ledger.
- You posted a journal entry twice in either the general ledger or in the journal.
- You posted the wrong amount.
- You posted a transaction to the wrong account.
- Your account doesn't display a normal balance, as explained in the next section.

©John Wiley & Sons, Inc.
Figure 5-1: A sample trial balance.
Understanding normal balances for your accounts
Every account should consistently display either a debit or credit balance, depending on the type of account. Accountants refer to these balances as normal balances. Asset accounts normally display debit balances. Cash, an asset account, should have a debit balance at any point in time. Expense accounts in the income statement also have a normal debit balance.
Liability and equity accounts have normal credit balances. Accounts payable, a liability account, should have a credit balance. Revenue (or sales) in the income statement also has a normal credit balance.
During your trial balance review, if you notice an account that doesn't have a normal balance, that could be the sign of an error. You should consider making a journal entry to adjust the account. Every account should have a normal balance, or a balance of zero.
Adjusting an account to properly reflect a normal balance
Assume that you compile your trial balance and notice that your ending balance in cash is a credit balance of $100. A normal balance for cash, an asset account, is a debit balance. The credit balance in cash is a negative balance. If you have a negative balance in the bank, that means the bank has given you a loan. The negative amount (or overdraft) must be paid back to the bank.
As mentioned in the previous section, you need to post a journal entry to adjust the cash balance to zero. In this case, you would debit cash $100 and credit loans payable (a liability account) $100. Your cash balance is now zero, and you have properly set up a loan balance for the amount you owe the bank.
 If, by chance, the errors listed here slip through the cracks, there's a good chance that the discrepancy will become evident in the financial reports.
Dealing with trial balance errors
If your trial balance isn't correct, you need to work backward in your closing process to find the source of the mathematical error. And remember, bookkeepers and accountants work with pencils instead of pens for this reason — pencils make correcting errors much easier. When you need to find errors after completing a trial balance that fails, follow these four basic steps to identify and fix the problem:
- Check your math. Keep your fingers crossed and total the debits and credits in your trial balance again to be sure the error isn't just one of addition. That's the simplest kind of error to find. Correct the addition mistake and re-total your columns.
- Compare your balances. Double-check the balances on the trial balance worksheet by comparing them to the totals from your journals and your general ledger. Be sure you didn't make an error when transferring the account balances to the trial balance. Correcting this type of problem isn't very difficult or time-consuming. Simply correct the incorrect balances, and total the debits and credits in your trial balance again.
- Check your journal summaries. Double-check the math in all your journal summaries, making sure that all totals are correct and that any totals you posted to the general ledger are correct. Running this kind of a check, of course, is somewhat time-consuming, but it's still better than rechecking all your transactions. If you do find errors in your journal summaries, correct them, reenter the totals correctly, change the numbers on the trial balance worksheet to match your corrected totals, and retest your trial balance.
- Check your journal and general ledger entries. Unfortunately, if Steps 1, 2, and 3 fail to fix your problem, all that's left is to go back and check your actual transaction entries. The process can be time-consuming, but the information in your books isn't useful until your debits equal your credits.
If Step 4 is your last resort, scan through your entries looking specifically for ones that appear questionable. For example, if you see an entry for office supplies that's much larger or much smaller than usual, check the original source material for that entry to be sure it's correct. If you carefully proved out the accounts payable and accounts receivable journals as explained in Chapters 3 and 4, you can concentrate your efforts on accounts with separate journals. After you find and correct the error(s), run another trial balance. If total debits and total credits still don't match up, repeat the steps listed here until your debits and credits equal out.
You can always go back and correct the books and do another trial balance before you prepare the financial reports. Don't close the books for the accounting period until the financial reports are completed and accepted. See Books IV and V for more about preparing financial reports.
Testing Your Balance by Using Computerized Accounting Systems
If you use a computerized accounting system, it automatically generates your trial balance for you. Because the system enables you to enter only transactions that are in balance, the likelihood that your trial balance won't be successful is pretty slim. But that doesn't mean your accounts are guaranteed error-free.
Remember the saying, “Garbage in, garbage out?” If you make a mistake when you enter transaction data into the system, even if the data's in balance, the information that comes out will also be in error. Although you don't have to go through the correction steps covered in the earlier section “Dealing with trial balance errors” to reach a successful trial balance, you still may have errors lurking in your data.
Accountants frequently run an automated trial balance report at the end of every period. You'll get in the habit of reviewing the trial balance, making corrections, and running a new trial balance. In addition to the trial balance, automated systems can generate a report showing the general ledger, transaction detail by account, journal detail, voided transactions, and transactions by date. In QuickBooks, you can assess the Accountant & Taxes page, as shown in Figure 5-2, to find these reports.
A business's accountant is likely to use many of the report options to double-check that transactions were entered correctly and that no one is playing with the numbers. In particular, the accountant may use a report option called Audit Trail, which reveals what changes impacted the company's books during an accounting period and who made those changes. This type of report is available in most automated accounting systems.
Although it doesn't match the trial balance done manually in Figure 5-1, the QuickBooks trial balance shown in Figure 5-3 gives you an idea of what a computerized accounting trial balance looks like.

Intuit.com
Figure 5-2: The Accountant & Taxes page of QuickBooks's Report Navigator provides the option of creating many useful reports.
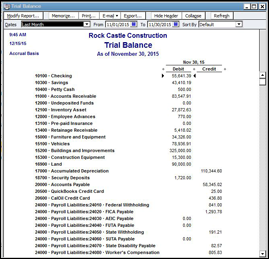
Intuit.com
Figure 5-3: A sample trial balance report produced by QuickBooks.
Developing a Financial Statement Worksheet
After your accounts successfully pass a trial balance test (see “Conducting your trial balance” earlier in this chapter), you can take your first stab at creating financial statements, including a balance sheet and an income statement. The first step in producing these statements is using the information from the trial balance and its corrections to develop a worksheet that includes the initial trial balance, the accounts that would normally appear on a balance sheet, and the accounts that would normally appear on an income statement.
You create the worksheet that includes these seven columns:
- Column 1: Account list
- Columns 2 and 3: Trial balance (one column for debits, one column for credits)
- Columns 4 and 5: Balance sheet (one column for debits, one column for credits)
- Columns 6 and 7: Income statement (one column for debits, one column for credits)
Figure 5-4 shows a sample of a worksheet developed from trial balance numbers. Note that the numbers of the trial balance are transferred to the appropriate financial statement; for example, the cash account, which is an asset account, is shown in the debit column of the balance sheet. (See Books IV and V for more about creating financial statements.)

©John Wiley & Sons, Inc.
Figure 5-4: This sample worksheet shows the first step in developing a company's financial statements.
After you transfer all the accounts to their appropriate balance sheet or income statement columns, you total the worksheet columns. Don't panic when you see that the totals at the bottom of your columns aren't equal, because the net income hasn't been calculated yet. However, the difference between the debits and credits in both the balance sheet and the income statement totals should be the same. That amount should represent the net income that will appear on the income statement. (See Book IV, Chapter 2 for more about the income statement.)
In Figure 5-4, the $4,500 difference for the balance sheet is shown as a credit, representing an increase in retained earnings. The retained earnings account reflects the profits that have been reinvested into the company's assets in order to grow the company. You can find more about retained earnings in Book IV, Chapter 5.
In some companies, earnings are taken out in the form of dividends paid to stockholders. Dividends are a portion of the earnings divided among stockholders. The board of directors of the corporation establishes that a certain amount per share be paid to stockholders. A company must have earnings (either from the current year or in retained earnings) to pay a dividend. If a company has no earnings at all — either in the current year or accumulated in retained earnings from past years — payments to shareholders are considered to be return of capital.
Many other small companies that haven't incorporated pay earnings to their owners by using a drawing account, which tracks any cash taken out by the owners. Each owner should have his or her own drawing account so that you have a history of how much each owner withdraws from the company's resources.
Replacing Worksheets with Computerized Reports
If you use a computerized accounting system, you don't have to create a worksheet. Instead, the system gives you the option of generating many different types of reports to help you develop your income statement and balance sheet.
One of the advantages of your computerized system's reports is that you can easily look at your numbers in many different ways. To get the report you want, all you do is click on the report title.
A typical computerized accounting system can generate a number of different reports within the following categories:
- Profit and loss (income statement): Some key reports in this section include
- A standard report that shows how much the company made or lost during a specific period of time
- A detail report that includes all the year-to-date transactions
- A report that compares year-to-date figures with the previous year (provided you kept the accounts by using the computerized system in the previous year)
- Income and expenses: Some key reports in this section include
- Income by customer (both a summary and a detailed report)
- Expenses by vendor (both a summary and a detailed report)
- Balance sheet and net worth: Some key reports in this section include
- A standard balance sheet showing a summary of assets, liabilities, and equity
- A detail report of assets, liabilities, and equity
- A report that compares the assets, liabilities, and equity levels with those of the previous year
- Cash flow: Some key reports in this section include
- A statement of cash flows for the year
- A forecast of cash flows during the next few weeks or months based on money due in accounts receivable and money to be paid out in accounts payable
Computerized accounting systems provide you with the tools to manipulate your company's numbers in whatever way you find useful for analyzing your company's results. And if a report isn't quite right for your needs, you can customize it. For example, if you want to see the profit and loss results for a particular week during an accounting period, you can set the dates for only that week and generate the report. You can also produce a report looking at data for just one day, one month, one quarter, or any combination of dates.
Most computerized accounting systems, including QuickBooks, enable you to custom design reports that meet your company's unique financial information needs. Many companies customize reports to collect information by department or division. You're limited only by your imagination!
As you work with your computerized system, you'll be asked for information not easily found by using standardized reports. The first few times you pull that information together, you may need to do so manually. But as you get used to your computerized accounting system and its report functions, you'll be able to design customized reports that compile and present information in just the way you need it.