Quite simply, redaction is the deletion of information from a document. You may want to use redaction to remove sensitive information for security purposes, to protect rights and privacy information, to eliminate classified information, to delete names of minors in legal documents, or to delete any other information you don't want viewed by others.
Redaction is much different from blotting out or hiding text, graphics, handwriting, or any other kind of marks. If you use tools like some of the comment tools in Acrobat to create markups that blot out some text and graphics in a document, the items are not permanently deleted. The document appears fine onscreen where you can't see items marked for deletion on a document page, but the PDF document still contains the original items. If the file is distributed, other users can access marked text and other data.
To understand why redaction tools are needed to permanently delete content from a PDF document, see the following steps.
STEPS: Understanding the need for redaction
Open a PDF document in Acrobat. Convert any InDesign CS file or an MS Office document to PDF, and open it in Acrobat.
Open the Comment & Markup tools. Open a context menu on the Toolbar Well, and select Comment and Markup. The Comment & Markup tools open in a floating toolbar.
Mark out some text. Select the Rectangle tool in the Comment & Markup toolbar. Draw a rectangle around some text. Alternately, you can use the Highlight tool so select text and hide it with a dark highlight color.
Open the Rectangle Properties dialog box. Right-click (Windows) or Control+click (Macintosh) to open a context menu on the rectangle. Select Properties from the context menu.
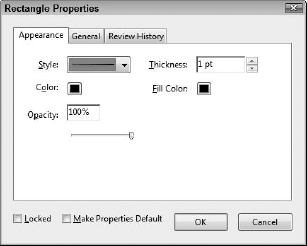
Edit the properties. Click the Color swatch for both Color and Fill Color. From the color choices select Black, as shown in Figure 29.1. Click the Make Properties Default check box. The next time you draw a rectangle, the rectangle will have the same style and fill color.
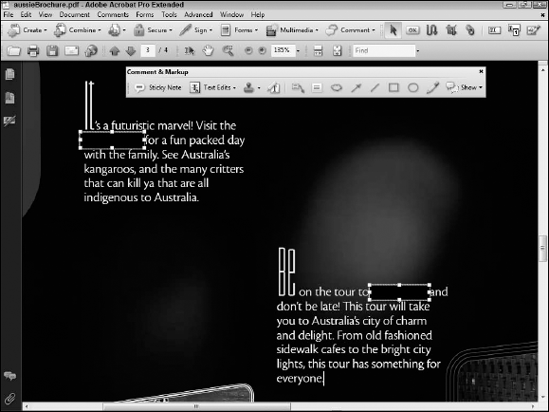
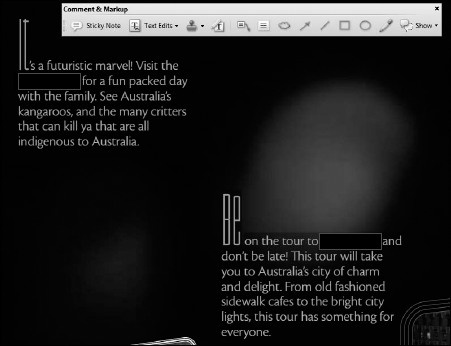
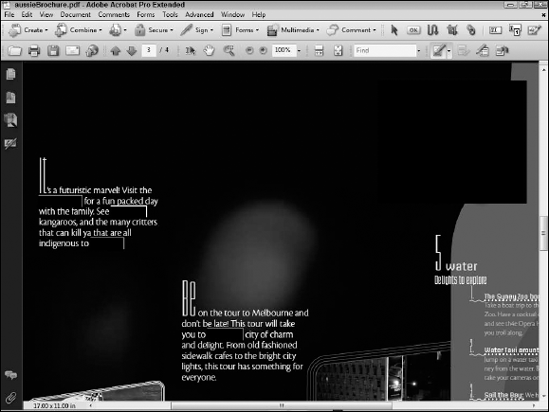
Draw additional rectangles. Using the rectangle comment tool, draw some additional rectangles to block out more text. Figure 29.2 shows a text document with several markings where I don't want the text to be seen. Onscreen this is fine, but the text is not deleted and can be extracted by other users.
Copy the text. Click the Select tool, and drag through the text to select it. Select Edit

Paste the text into a word processor. In my example, I opened Microsoft Word and selected Edit

As shown in Figure 29.4, this form of redacting a document doesn't delete the marked text. You need another method to mark and eliminate data from PDFs. This is where the Redaction tools in Acrobat 9 come into play.
Redaction is permanently deleting text, graphics, signatures, handwriting, and any other data you desire to remove from a document. In addition to marking and deleting text and other data that you can see, a good redaction tool also provides you a means for deleting certain metadata and hidden information in a file so that all the content you decide you want to eliminate cannot be retrieved by anyone viewing your PDF files.
Acrobat 9 offers a few solutions for marking content for deletion, applying the redactions, eliminating metadata, and eliminating any hidden text. You first start a redaction session using the Redaction tools. When you open the Redaction toolbar by either selecting View
The tools on the Redaction toolbar are as follows:
Mark for Redaction. Use this tool to mark text and other data that you want to delete from a document. Marking the content does not yet delete it from the file.
Apply Redactions. When you are ready to permanently delete content that you marked for deletion, click the Apply Redactions tool.
Redaction Properties. Use this tool to set the redaction marking properties. You can mark content using the Mark for Redaction tool, and the markings can be adjusted for color and other attributes in the Redaction Properties dialog box. Click the tool, and the Redaction Properties dialog box shown in Figure 29.6 opens.
As you can see in the Redaction Properties dialog box, you can select a color for your redaction marks, use text as an overlay, specify the font for the overlay text, set a number of different font attributes for the overlay text, and select from some redaction code standards. When you change the properties in this dialog box, the properties remain in effect for all redaction marks you make on a document until you again adjust settings in the Redaction Properties dialog box.
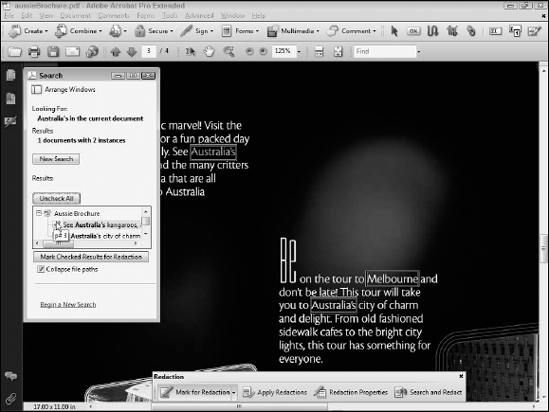
Search and Redact. This tool is a powerful addition to the Redaction tools. Click the Search and Redact tool and an information dialog opens. Click OK and the Search window opens as shown in Figure 29.7. Type a word or phrase in the first field text box, and choose a location. Your options include searching the open document or a folder location on your hard drive or network server. You can mark content for redaction in a collection of PDF documents contained in a common folder. Select the All PDF Documents in radio button. From the pull-down menu below the radio button, select Browse for Location. The Browse For Folder dialog box opens, and you select a folder containing files you want to redact.
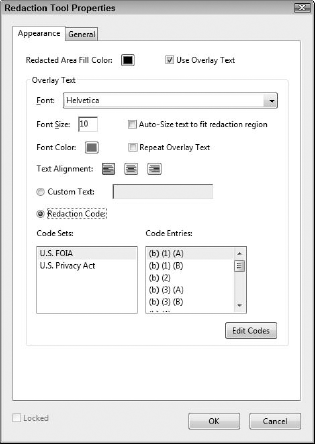
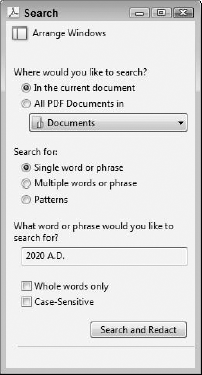
Figure 29.7. Click the Search and Redact button, and the Search window opens. Type a word or phrase, and select either the open document or a folder of PDFs to mark for redaction.
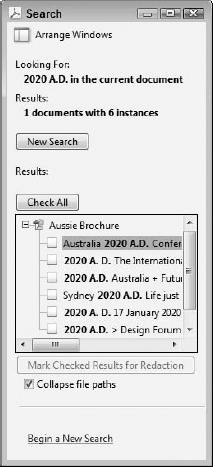
Click the Search and Redact button in the Search window, and the Search window reports results of your search, as shown in Figure 29.8. As yet, no items have been marked for redaction. In the results list, you see the reported results appearing next to check marks. If you want all items in the list to be redacted, click the Check All button. If you want to individually mark the results items, scroll the list checking the boxes adjacent to the items you want to redact.
The tool set and options for redaction are very straightforward and intuitive. In the first section of this chapter, you looked at marking files to hide content that didn't remove the items you marked. Let's compare that first effort with a true redaction that Acrobat 9 provides you by following some steps.
STEPS: Redacting a PDF document
Open a file from which you want to eliminate some content by using the Redaction tools.
Click the Mark for Redaction tool.
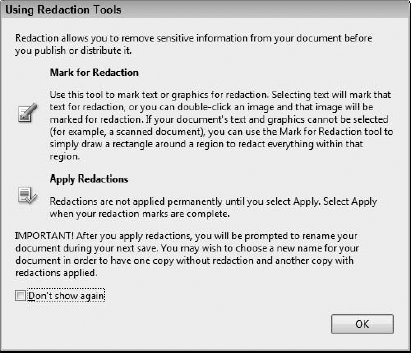
When you first click the Mark for Redaction tool, the Using Redaction Tools help dialog box opens, as shown in Figure 29.9. This dialog box provides you some instructions on redacting documents. If you don't want the dialog box to open in future redaction sessions, click the Don't show again check box.
Mark a graphic for redaction. If you have a graphic in the file either as a vector object or an image file, you can remove it just like removing text. In my example, the logo is a vector graphic object. Clicking the Mark for Redaction tool changes the cursor to a crosshair when positioned over a graphic or an I-beam cursor when positioned over text. Draw a marquee around the object, as shown in Figure 29.10, or drag the I-beam cursor through text you want to redact.
Tip
If you want to quickly mark a graphic object for redaction, select the Mark for Redaction tool and double-click the graphic.
Mark text for redaction. Drag the I-beam cursor through the first occurrence of text you want to redact. In our example, we dragged through a country name we want to remove from the file.
Click the Search and Redact tool. The Search window opens. Type any other occurrence of the text you want to redact. In our example, we typed the same name as the first text marked for redaction. Click the Search and Redact button, and the first occurrence of the word to be redacted is highlighted.
Check all occurrences for redaction. In the Search window, click the Check All button and all occurrences of the search results are now marked for redaction.
Mark the search results for redaction. After clicking the Check All button, the Mark Checked Results for Redaction button appears in the Search window. Click this button, and all occurrences of the search results are now marked for redaction, as shown in Figure 29.11.
Continue marking all the content you want to eliminate in your document. If you have other text or graphics you want to redact, follow Steps 3 through 7 for each redaction.
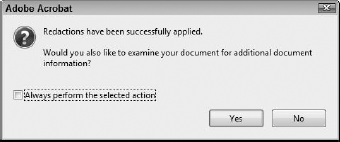
Apply redactions. Click the Apply Redactions tool. A warning dialog box opens. Click Yes, and the redactions are applied.
Redact additional content. After Acrobat redacts the items you marked, a dialog box opens confirming your action and prompts you to examine the document for additional content. Click Yes in the dialog box shown in Figure 29.12.
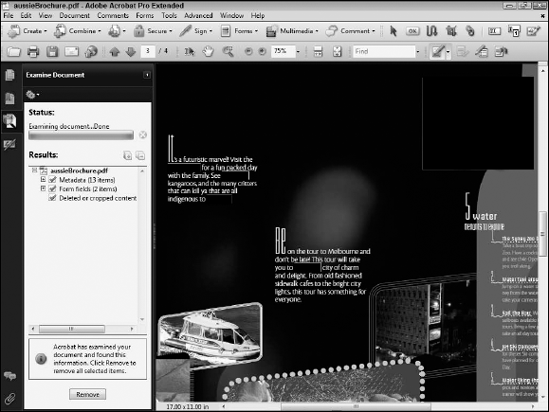
Examine the document. When you click Yes in the confirmation dialog box, the Examine Document panel opens in the Navigation pane. A number of different items that don't appear on the document pages can appear in your file. You may have metadata, hidden text, file attachments, hidden layers, bookmarks, and other items that use the same text you want to delete. To be certain that all information is deleted from the document, the Examine Document panel provides a list of found items matching the items you deleted. Click the Remove button at the bottom of the panel, as shown in Figure 29.13, and all the selected items are removed.
Verify that the redactions were made. If you used objects with fills to redact the document, these objects are selectable and you can delete them. Select Tools
You should see that the text beneath the redaction frames truly has been deleted from your document. When you use the select tool and drag through the text, you'll notice that no selection appears where you redacted text (and/or objects), as shown in Figure 29.14. Alternately, you can verify redactions by opening the Search window and invoking a search for the words you redacted. You should see no results reported for all redacted text.
Redaction involves permanently removing data from a file.
Only Acrobat 9 Professional and Professional Extended contain tools for redacting content, searching and redacting, applying redactions, and examining documents for content not visible on pages.
Using tools other than the Redaction tools won't delete data from PDF files.
Redaction marks can be modified for color changes, the use of text, and formatted text used to replace deleted data.