
Patterns are designs that repeat themselves over and over. They are commonly used in the place of a solid fill within objects. Using the various features for working with patterns, you can position and orient patterns within an object.
Symbols are simple design elements that are stored in libraries. They have the advantage of being easily reused without requiring extra memory. Styles are collections of design properties that are stored where they can be applied easily from a library to an object.
In addition to colors and gradients, Photoshop and Illustrator can use patterns to fill objects or paint onto images. Patterns are used differently in both of these applications.
Patterns may be selected from the Swatches palette and applied as an object fill. Any artwork may be used as a new pattern by simply dragging the artwork to the Swatches palette or by selecting the artwork and choosing Edit

To add some spacing behind the pattern, drag a rectangle with its fill and stroke colors set to None, arrange this object as the backmost object, and include it as part of the pattern.
If the pattern fills an object that is larger than the pattern, then the pattern is tiled to fill the entire shape.
STEPS: Creating a Custom Pattern in Illustrator
Create a new Illustrator document. With Illustrator open, choose File

Create a background area. Select the Rectangle tool, and drag in the art board to create a rectangle object that is the size of the pattern that you want to create. With the background object selected, set its Fill and Stroke to None.
Add shapes to the pattern area. Select the Ellipse tool, and drag several small circles within the background square with the Shift key held down to make them perfect circles. Set each circle to have a different fill color, as shown in Figure 9.2.
Resize the background square. After creating all the pattern objects, select the background square object and resize it to fit all the objects within it.
Define the pattern. Drag over all the objects including the background square and all the colored circles, and choose Edit
Test the pattern. Select the Rectangle tool, and drag in the art board to create a rectangle that is larger than the pattern. Then click the pattern swatch in the Swatches palette, and the new pattern is applied to a rectangle, as shown in Figure 9.3.


Note
A pattern also can be scaled, moved in relation to its container, and rotated. This is covered in Chapter 11.
Patterns show up on the Options bar when the Paint Bucket, Pattern Stamp, Healing Brush, and Patch tools are selected. By clicking the Pattern pop-up, you can access several default patterns, shown in Figure 9.4. The pop-up palette also includes a palette menu that you can use to create new patterns, load and save pattern sets, and access different pattern sets.

New patterns are created by selecting a portion of an image with the Rectangular Marquee tool and choosing Edit
Most of the CS5 applications make use of libraries. Open your favorite Creative Suite application, and you'll find libraries of symbols, styles, swatches, and brushes. Libraries are used to store any feature that has lots of settings, allowing you to recall the settings at an instant without having to enter all the settings again. Across the various CS5 applications, creating and using library items are fairly consistent whether you're dealing with brushes, styles, symbols, or swatches.
Many of the CS5 applications include many default libraries that you can open and use. For example, Illustrator's Window menu includes submenus of brushes, styles, swatches, and symbol libraries, and Photoshop includes default libraries of swatches, styles, and brushes that may be selected from the various palette menus.
Symbols in Illustrator and Flash are a special type of object with a key advantage—reuse. If you add a symbol to a document and then reuse it elsewhere in the same document, a new copy isn't required, because the symbol references the first object. This makes symbols very convenient to work with because adding hundreds of symbols to a single document doesn't dramatically increase the overall file size or the size of the compiled SWF file.
Note
Reference symbols are particularly useful for files viewed on the Web, such as SWF files. This file type is discussed in Chapter 21.
Symbols are stored in libraries, and Illustrator includes several default symbol libraries that you may access by choosing Window
In addition to the symbol libraries, the Symbols palette, shown in Figure 9.5, includes several default symbols. All symbols that are included in the current document are displayed in the Symbols palette. These symbols are associated with the current document and are saved as part of the document.
Tip
To remove all symbols that aren't used in the current document from the Symbols palette, choose the Select All Unused palette menu command and then choose the Delete Symbol palette menu command.

You add symbols to the Symbols palette by selecting an object and using the Add to Symbols palette menu command or by dragging the symbol to the Symbols palette. Also, any symbols selected from a symbol library are automatically added to the Symbols palette. You delete symbols from the Symbols palette with the Delete Symbol palette menu command or the trashcan icon at the bottom of the palette. You can save all symbols in the Symbols palette to create a new symbol library using the Save Symbol Library palette menu command.
From a symbol library or the Symbols palette, you can add a symbol to the current document by dragging it from the library to the art board or by selecting the symbol and choosing the Place Symbol Instance palette menu command. Any symbols that are duplicated using the Option/Alt drag or the copy and paste methods are still symbol instances.
You can edit a symbol instance by using the transform tools or by changing its color and style while still maintaining its symbol status. If more drastic editing is required, you can unlink a symbol using the Break Link to Symbol palette menu command. This command causes the symbol to be expanded.
To rename the new symbol, double-click it in the Symbols palette. A Symbol Options dialog box appears, shown in Figure 9.6; here, you can type a new name for the symbol. You also can specify the new symbol as a Graphic or a Movie Clip. The Flash Registration icon lets you specify where the symbol is positioned in Flash.

You may use Illustrator's Symbolism tools to create a large number of symbols very quickly. The various tools let you alter specific object properties such as size, rotation, color, and style while creating a set of symbols.
The Symbolism tools include the following:
Symbol Sprayer: Creates a set of symbols by dragging in the art board.
Symbol Shifter: Moves symbols within a set relative to one another and to adjust the stacking order.
Symbol Scruncher: Changes the density of symbols within a set by pushing them closer together or pushing them farther apart.
Symbol Sizer: Increases or decreases the size of symbols within a set.
Symbol Stainer: Changes the colors of symbols within a set by adjusting their hue.
Symbol Screener: Adjusts the transparency of symbols within a set.
Symbol Styler: Applies a selected graphic style to symbols within a set.
With any of these tools selected, you can double-click the tools to open the Symbolism Tools Options dialog box, shown in Figure 9.7. Using this dialog box, you can set the diameter, intensity, and symbol set density. The Options dialog box also shows any shortcut keys available for the various tools, such as holding down the Option/Alt key to reduce the size, coloring, transparency, and style that is applied.
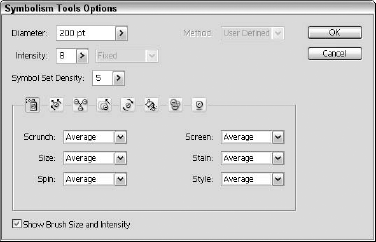
Figure 9.8 shows a simple example of the Symbol Sprayer tool created by selecting the ant symbol (found in the Nature library) and dragging with the Symbol Sprayer. After this set of symbols is created, you can use the other Symbolism tools to change the position, size, rotation, color, transparency, and style of the symbols in the set.

If a symbol is selected within the document, you can choose a new symbol within the Symbols panel and use the Replace Symbol menu to replace the existing symbol with a new one. This lets you quickly replace a whole set of symbols with a new design.
Selecting a symbol and selecting the Edit Symbol menu command opens the symbol in Isolation mode, as shown in Figure 9.9, where you can concentrate on the symbol design without the distractions of the other elements. The document border turns red when in Isolation mode. Clicking the arrow at the left end of the title bar exits Isolation mode and returns the original view.

Styles provide an easy way to reuse unique looks across multiple documents. Styles can be defined to control the fill color and stroke of an object, or they can be applied to a section of text defining its placement, color, and font.
Symbols are easy to grasp. They are simply small nuggets of graphics. Graphic styles are bit trickier. They are a set of styles applied to a standard element. For example, a frame in InDesign can have a two-pixel black line around its outside or it can have a blue dashed line that is five pixels thick. These attributes define a specific style. A graphical style is a way to save these style elements in a library for easy recall.
The concept of graphic styles applies to objects in Illustrator and Photoshop, but it applies equally well in InDesign. InDesign already has features for handling paragraph and character styles, but it also can handle graphical styles. Object styles (as they are called in InDesign) are kept in the Object Styles palette, shown in Figure 9.10. This palette is accessed using the Window

You can add new object styles by selecting an object and choosing the New Object Style palette menu command or by clicking the Create New Style button at the bottom of the palette. This adds the new style to the palette. If you double-click on the new style, it opens the Object Style Options dialog box, shown in Figure 9.11. Using this dialog box, you can select and alter any of the object attributes that are associated with the object including Fill, Stroke, transparency, corner effects, drop shadows, text wrap, and so on.
Defined object styles can be applied to an object by dragging the style from the Object Styles palette and dropping it on the object; an even easier method is to select objects and click the style name in the Object Styles palette. You can also drag the default icons for graphic and text frames to any object style to control the attributes of all new objects.

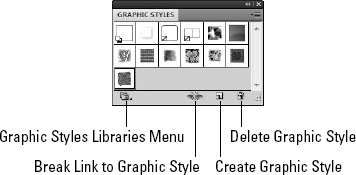
If you've tinkered with the appearance attributes applied to an object until it is perfect, you can save all these settings so they may be easily reapplied to other objects using styles. A graphic style is a collection of appearance settings stored within a library for easy recall. The Graphic Styles palette, shown in Figure 9.12, holds a library of default styles. These styles are applied to objects by simply dragging the style icon from the Graphic Styles palette and dropping it on an object.
Illustrator includes, by default, several additional libraries of styles that you can access by choosing Window
Photoshop also includes several default style libraries that are accessed from the Styles palette menu. To apply a style to the current layer, simply click the style in the Styles palette or drag it to the canvas. Opening a style library presents a dialog box where you can select to replace the current styles in the Styles palette with the new library or append them to the end of the palette.
You add new styles to the Graphic Styles palette by selecting an object with a style that you want to add to the palette and choosing the New Graphic Style palette menu command or by clicking the small New Graphic Style button at the bottom of the palette.
You can add custom styles to the Graphic Styles palette by dragging the Appearance icon at the top-left of the Appearance palette for the selected object to the Graphic Styles palette. Double-clicking the style icon opens a dialog box where you can rename the style.
If you've mixed and selected specific colors that you want to keep, you could write down the values for that color or you could add the color to the Swatches palette. Colors in the Swatches may be selected and applied to the Fill and Stroke boxes.
Note
Swatches palettes are found in most of the various CS5 applications. Swatches in Photoshop are mainly used to hold colors, but Illustrator uses the Swatches palette to hold colors, color groups, gradients, and patterns. InDesign also uses the Swatches palette to save mixed inks and mixed ink groups.
To add the current Fill or Stroke color to the Swatches palette, shown in Figure 9.13, simply drag the color from the Fill or Stroke box in the toolbar to the Swatches palette or select the New Swatch palette menu command. If the New Swatch menu command is used, the New Swatch dialog box opens; here, you can name the new color swatch, specify the color type, and choose the color mode. The New Swatch dialog box also includes the values to specify a color depending on the selected color mode.
Several default Swatch libraries are available in Illustrator by choosing Window
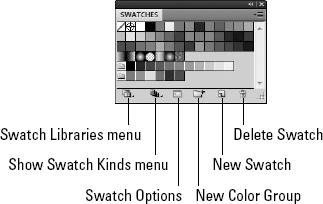
Figure 9.13. The Swatches palette holds colors, but in Illustrator it also may hold gradients and patterns.
Note
Although the discussion of palettes in this section focuses on colors, you also can add and store gradients and patterns within swatch libraries. You use the buttons at the bottom of the Swatches palette in Illustrator to show only a single category of swatches.
You also can drag colors from the various swatch library palettes and drop them on the Swatches palette. Colors in the Swatches palette may be saved as a new swatch library using the Save Swatch Library palette menu command.
If you've spent some time establishing a set of color swatches for your design, you'll be happy to know that you can save color palettes in a format that you can open in the other CS5 applications. This unique format is the ASE format, and you can select to save the current swatch palette in this format using the Save Swatches for Exchange palette menu command. You can find the Save Swatches for Exchange menu command in the Swatch palette in Photoshop, Illustrator, and InDesign.
To keep content organized, InDesign allows you to create libraries of content. To create a new library, which appears as a palette, simply select the File

Figure 9.14. The InDesign Library palette can hold graphics, graphic frames, guides, and text frames that you can reuse as needed.
You can reopen saved library palettes using the File

Figure 9.15. The Item Information dialog box includes information about the selected item and lets you enter a description.
The Show Subset palette menu command and the Show Library Subset button at the bottom of the palette opens a dialog box, shown in Figure 9.16, which allows you to search for specific items using keywords. The palette menu also includes options to sort items by Name, Newest, Oldest, and Type.

Snippets are XML-based content from InDesign that is saved as a separate file. You save snippets into a library or open them into another document. To export the selected items, simply select the item to export and choose the File
Tip
A snippet can be any part of a layout including guides, but you cannot drag guides to make a snippet; you must export guides to create a snippet.
To place a snippet, use the File
Note
Transformations are covered in Chapter 11. Applying filters and effects is covered in Chapter 12.
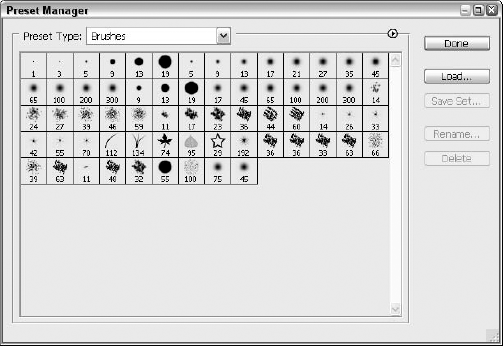
Photoshop includes a clever way to manage all the various presets and libraries using a special dialog box called the Preset Manager, shown in Figure 9.17. This dialog box may be opened from most of the palette menus that include presets or libraries or by choosing Edit
At the top of the dialog box is a drop-down list of the various preset types, including brushes, swatches, gradients, styles, patterns, contours, custom shapes, and tools. When a preset type is selected, its library of items is displayed. Using the palette menu, you can change how the items are displayed or choose one of the default libraries to open. The dialog box also includes buttons to load, save, rename, and delete the current sets.
Patterns provide a alternative to fill objects with solid colors and gradients.
Often-used items are saved in libraries. Libraries include symbols, styles, swatches, and brushes.
Symbols provide an efficient way to work with many duplicate objects.
Defined styles are saved to a palette where they can be quickly recalled and applied.