
Converting slide presentation files
Authoring presentations in CS programs
Using layers with presentations
Creating transitions
Using full-screen views
Slide presentations may be something you want to use in client meetings when proposing new concepts or campaigns, or your clients may ask you to create presentations they want to use at trade shows, meetings, and conferences. Whether for your own needs or your clients' needs, at one time or another design professionals periodically find a need to create slide presentations. If creating slide presentations is not something you usually do, the last thing you'll want to do is try to learn a new program to quickly assemble a presentation for yourself or your client.
Dedicated slide-creation programs like Microsoft PowerPoint and Apple's Keynote are designed specifically for creating presentations. However, if you're not up to speed with these programs and need to design a presentation quickly, you'll find working in programs you know to be much less frustrating. In this chapter, you learn how to use the CS5 programs for creating slide presentations and converting presentations from the dedicated slide-presentation applications to file formats usable with the CS5 programs.
Because slide presentations may exist in a variety of different formats, you may need to convert an existing file that was created by your client to something workable with the CS5 programs. The most popular presentation documents you'll find are Microsoft PowerPoint files—but you're not necessarily limited to PowerPoint. You may find old layouts in QuarkXPress, Adobe PageMaker, or other application documents that were once used for presentations and now need to be updated or refined for current presentations.
In addition to converting existing documents to a format workable with the CS5 programs, you may need to integrate current files created in Illustrator, Photoshop, InDesign, Adobe Flash, and/or Dreamweaver with older presentation documents. Assuming you're not up to speed in a program designed to create presentations, you need to convert files to a format usable as a display tool for presentations. Fortunately, you can convert all files from any authoring program to PDF, and you can use Adobe Acrobat or Adobe Reader as a presentation tool.
Acrobat is not a mere substitute for presentation programs. Acrobat can stand alone as a sophisticated presentation tool where you can add transitions, create links to documents, show multimedia film clips, display presentations in self-running modes for kiosks, add animation, and take advantage of all the other features one would expect from a presentation program. If you've begun to master the CS5 programs, you'll find creating PDF files for presentations a better solution in your workflow if you aren't familiar with creating slides in a presentation program.
Unfortunately, one of the best tools for converting PowerPoint slides is available only on Windows. If you happen to be a Windows user or a Mac Intel user with Windows installed on your computer, you can take advantage of Adobe Presenter that's installed with the Acrobat Professional Extended version of Acrobat 9.0 (Windows only). With Adobe Presenter, you can export an animation from a PowerPoint file that results in an Adobe Flash movie file inside a PDF document.
The de facto standard presentation program on Windows is Microsoft PowerPoint. Microsoft Office users are so familiar with PowerPoint that they tend to create documents ranging from slide presentations to large-format display prints. If you work with corporate clients who supply files to you, you'll definitely see many PowerPoint files.
You can convert PowerPoint slides to PDF and add slide pages to an InDesign document for further development of a presentation, or convert PowerPoint slides to PDF while preserving animation effects created in PowerPoint. Any Acrobat viewer can see the animation exported with the PowerPoint slides.
Note
Knowing you can view the files you convert to PDF in any Acrobat viewer is an important issue. You may author files in Acrobat Professional yet deliver PDF documents to coworkers or clients who use either Acrobat Standard or Adobe Reader. File conversions from PowerPoint can be viewed in any Acrobat viewer, complete with transition effects.
To convert PowerPoint slides to PDF, you can use the Convert to PDF from File command in Acrobat or the PDFMaker in PowerPoint (Windows). On the Mac you print to PDF from PowerPoint. You must have PowerPoint installed on your computer to convert to PDF. Therefore, if you receive PowerPoint files from your clients, be certain you own a copy of Microsoft Office, have your clients send you a PostScript file, or have them convert the PowerPoint PPT files to PDF.
Note
The PDFMaker macro is installed automatically in Microsoft Office applications (Word, Excel, and PowerPoint) when you first install Microsoft Office and then install either Adobe Acrobat or the CS applications that include the Acrobat installation. The order of installation is not critical when installing Acrobat 7, 8, or 9. MS Office can be installed before or after Acrobat. Acrobat's self-healing features can detect MS Office files and automatically install the PDF Maker.
Converting PowerPoint slides to PDF on the Mac has been challenging with each release of Acrobat. The PDFMaker in PowerPoint failed in earlier versions of Acrobat more often than it worked. If you use Print to PDF, you find problems converting the proper page sizes where pages are clipped and problems with page orientation where pages are rotated. You can convert PowerPoint slides on the Mac, but the process is not intuitive and you can experience some problems.
Ideally, if you have access to a Windows machine, your best opportunity for PowerPoint conversion to PDF is in Windows using the PDFMaker. If you don't have access to a Windows machine and you need to convert PowerPoint files to PDF, use the following steps to do the job.
STEPS: Converting PowerPoint to PDF on the Mac
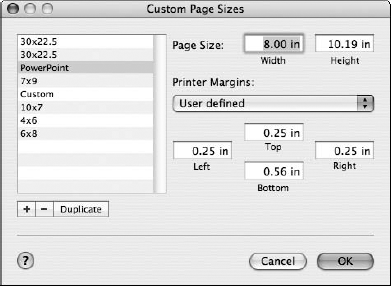
Set up a custom page. In PowerPoint, choose File

Name the custom page size. Click the plus (+) symbol to add the page to the list of custom pages. Double-click on the default untitled name, and type PowerPoint. Click OK in the Manage Page Sizes dialog box. Click OK in the Page Setup dialog boxes, and your new custom page size is ready to use.
Select the custom page size. PowerPoint has a terrible time remembering the last settings made to Page Setup. Each time you covert to PDF, be certain to revisit the Page Setup dialog box. Choose File
Select the orientation. The default orientation is landscape. If you print the PowerPoint slides to PostScript and distill the PostScript file, the PDF opens with all the pages rotated 90 degrees. If you export to PDF using Leopard's PDF export features, the PDF pages open in the proper page orientation. Changing the orientation to Portrait produces unsatisfactory results using either PDF conversion tool. Leave the landscape orientation at the landscape default, and click OK.
Convert to PDF. Choose File

If you select Save PDF as PostScript and distill the resultant PostScript file in Acrobat Distiller, the pages are rotated. When you use the PDF printer driver and Save as PDF, the pages in the PDF appear with the proper orientation.
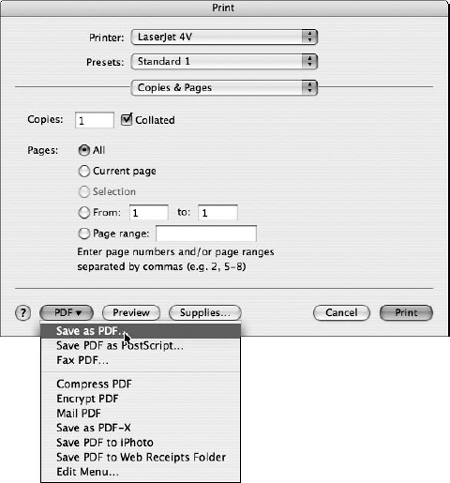
Figure 28.3. Select a PostScript printer or the Adobe PDF printer. Select Save as PDF, and save the file as a PDF document.
Note
Using either Save as PDF or distilling a PostScript file loses all animation in the PDF file. The only way to preserve animated effects added in PowerPoint is to use Adobe Presenter in Acrobat Pro Extended.
On Windows the PDFMaker is your tool of choice, and converting PowerPoint slides to PDF with this tool is both consistent and reliable. Additionally, you have the advantage of editing Conversion Settings by clicking tools in the PowerPoint Ribbon (in Office 2007 applications). Conversion Settings offer you choices for how the PDF is created in terms of file compression, preserving various settings made in PowerPoint including transitions, converting multimedia, adding bookmarks, and a host of options you have available by editing the Adobe PDF settings. To open the Adobe PDF Maker dialog box where Conversion Settings are adjusted, click on the Adobe PDF tab in PowerPoint Ribbon, as shown in Figure 28.4. Select Preferences in the Acrobat tab, and the Acrobat PDFMaker dialog box opens, as shown in Figure 28.5.
In the Adobe PDFMaker dialog box, shown in Figure 28.5, select the check boxes for the items you want to enable or disable. To edit the Adobe PDF Settings that are employed with Acrobat Distiller, click the Advanced Settings button. The same options you have available when adjusting the Distiller Adobe PDF Settings are available to you when you click on the Advanced Settings button. In most cases, you won't need to create custom PDF settings. Therefore, just select the conversion settings you want to use from choices in the Conversion Settings pull-down menu. By default, you should see Standard appear in the menu. Using the Standard settings generally does the job for creating slide presentations shown on-screen but not printed on commercial printing devices.
Note
Understanding the Adobe PDF Settings (called job options in earlier versions of Acrobat) is an elaborate and complicated process. For almost all the PDF creation you perform with the CS programs, you won't need to adjust conversion settings and won't find a need to create custom Adobe PDF Settings. If you do find that you need to understand more and want to create your own custom settings files, see the Adobe Acrobat 9 PDF Bible (published by Wiley).

Leave the default check boxes selected in the Adobe PDFMaker dialog box, and click OK to return to the PowerPoint application window. To create the PDF file, click the Create PDF tool in the Ribbon (refer to Figure 28.4). When you click this tool, the Save Adobe PDF File As dialog box opens, where you can click the Options button to open a different Adobe PDFMaker dialog box. Many of the adjustments you have in the dialog box shown in Figure 28.5 also are included in the dialog box that opens when you click the Options button. You can use this dialog box to double-check your settings when converting PowerPoint files to Adobe PDF documents.
Adobe Presenter is installed with Acrobat Professional Extended on Windows only. When it comes to presentations and showing slides from a computer monitor, Presenter is the tool that creates the most impressive-looking slides from Microsoft PowerPoint. You must have PowerPoint installed on Windows before you can use Adobe Presenter.
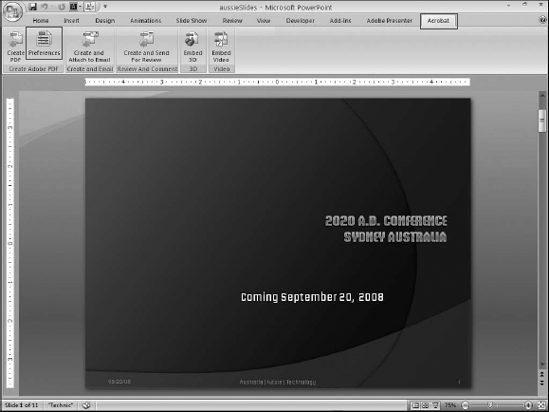
In the PowerPoint Ribbon, click the Adobe Presenter tab to view the options available with Presenter, and the Ribbon changes to the view shown in Figure 28.6.

Figure 28.6. Click the Adobe Presenter tab in the PowerPoint Ribbon to display the Adobe Presenter tools.
A number of options are available with Presenter to make your slide creations much easier. You can add video and sound, import webcam snapshots, insert Adobe Flash files, create quiz questions, set attributes for slide displays, and more.
Adobe Presenter also captures all the animation effects you add to a PowerPoint presentation. Keep in mind that you must add the animations—such as text flying in or out of a slide, fading text and objects, transitions, and so on—to slides using tools in PowerPoint. After the animations have been added to the slide presentation using PowerPoint tools and menu commands, you can export the presentation using Adobe Presenter, which retains the PowerPoint effects in the resultant PDF document.
To export a PowerPoint presentation using Adobe Presenter, click the Publish tool in the Adobe Presenter tab in PowerPoint. The Adobe Presenter – Publish Presentation window opens, as shown in Figure 28.7.

Figure 28.7. Click Publish in the Adobe Presenter tab in the PowerPoint Ribbon to open the Adobe Presenter – Publish Presentation window.
Your first choice is to determine which output purpose you want to use. If you click My Computer, you publish a presentation for Web viewing. If you choose Adobe Connect Pro, you publish the presentation for sharing the file on Acrobat.com. If you choose Adobe PDF, you create a PDF document locally on your computer.
Click Adobe PDF to produce a PDF document, and click the Choose button to target a location on your computer where you want to save the file. After you determine the target folder for the saved file, click the Publish button and the presentation is converted to PDF.
By default, your presentation opens in Acrobat. In Figure 28.8, you can see a presentation converted to PDF using Adobe Presenter. Notice that the total number of pages for the document is only one page. Our example presentation has eleven slides, but you see only one page in the PDF file because the presentation was converted to an Adobe Flash file. All the slides are there in a Flash interface. You have complete navigation control using Flash skins to play, pause, and jump around slides.

All the transition effects and animations you add in PowerPoint are captured and displayed the same in the Flash file as when viewing a slide show in Microsoft PowerPoint. The Adobe Flash interface also offers some other options, such as a speaker profile, a time code, and more controls for viewing the slides.
If your comfort zone is strictly limited to the CS applications, you may not want to learn either PowerPoint or Keynote. If so, then you can use some of the CS programs as presentation-authoring tools. All the CS programs except Adobe Acrobat can be used as the authoring tool, while Acrobat is used as the display tool for showing presentations. In practicality, using Adobe Dreamweaver is more cumbersome (unless, of course, the presentation format will be HTML), while the most likely candidate to help you create a presentation project is Adobe InDesign.
Creating slides in InDesign has its advantages and disadvantages. In terms of disadvantages, InDesign does not offer you dynamic outlining where you add text in an outline format that is automatically applied to individual slides. The actual creation of text on slides is much faster in a dedicated slide-creation tool. Additionally, you have no options for printing notes or handouts, adding animation to text and objects, editing charts and graphs, and a few other specific slide-creation features.
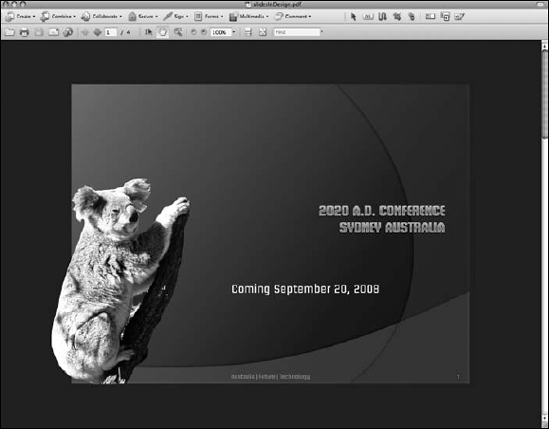
On the advantage side of using InDesign, you have much more design freedom than using dedicated slide-creation programs, including the ability to import native CS application documents; the ability to import files saved from a wider range of formats; better typographic control; more-sophisticated editing of graphic elements such as applying drop shadows, adding transparency, and feathering objects, creating layers, using style sheets and graphic styles, and all the options InDesign offers you for creating sophisticated layouts. As an example, in Figure 28.9, you can see a native Photoshop image in the lower-left corner of the slide breaking the page edge in the PDF document. This type of effect can be created only using Adobe InDesign.
As a final editing task, you may want to add bookmarks to your presentation. Bookmarks can help you easily return to areas of discussion when answering questions or adding information on topics as you make a presentation. You have a choice for adding bookmarks directly in InDesign and having those bookmarks exported in the PDF document or creating bookmarks in Acrobat. In some workflows, you may find a benefit in creating bookmarks in InDesign if a layout specialist is unfamiliar with Acrobat and doesn't have the full version installed on a computer.
To create bookmarks in InDesign, choose Window
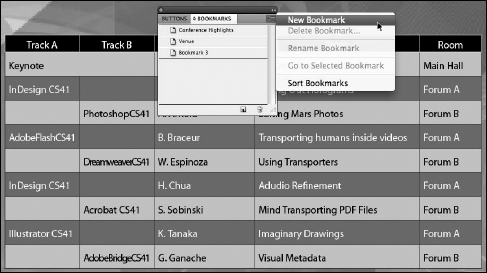
If you want to create a bookmark without capturing highlighted text as the bookmark name, don't select any text, but select New Bookmark from the flyout palette. InDesign automatically names the bookmark simply as Bookmark 1, Bookmark 2, Bookmark 3, etc. To edit the name, select Rename Bookmark in the palette menu. A dialog box opens where you edit the name.
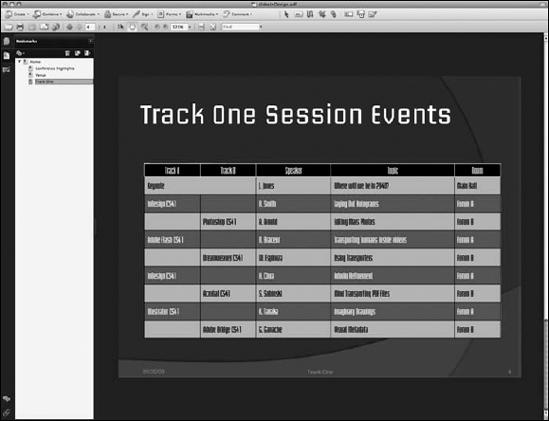
After creating bookmarks, scroll the Bookmark palette and review the bookmark names. To check the bookmark links, double-click on a name and InDesign opens the page associated with the bookmark. Note that InDesign requires you to double-click a bookmark name to view the destination, while Acrobat requires only a single mouse click.
Note
For more information about creating bookmarks and interactive links in InDesign, see Chapter 26.
After you've created your slides, added bookmarks, and reviewed the document, you need to export the file as a PDF for a more-suitable file format for viewing slides. Don't attempt to use InDesign as a slide viewer, especially when you need to exchange files with clients or across platforms. Obviously, one advantage to creating PDF documents is that any user can display the slide presentation with the free Adobe Reader software. If you distribute InDesign files, every user who wants to view the presentation needs a licensed copy of InDesign.
To export the file to PDF, choose File
The next dialog box that opens is the Export to Interactive PDF dialog box, shown in Figure 28.11. Here, you make choices for the PDF attributes. Choose from options for viewing the PDF, creating PDFs with Layers, adding tags to the PDF file, and changing views and transitions to your liking. Be certain to click Include All for Buttons and Media.

When you're finished with the attribute choices, click OK and the file is exported to PDF. If you selected View PDF after Exporting, the file opens in your default Acrobat viewer. In Figure 28.12, you can see a PDF exported from InDesign with bookmarks.
All the InDesign editing features you learned in Parts III, IV, and V are available to you when creating slide presentations just like other kinds of layouts. Using master pages, character and paragraph styles, tables, and so on is helpful in creating any kind of layout. Creating notes and handouts, however, is another matter. If you want to create note pages with slides on each page as you can with the slide-presentation programs, you need to export slide pages from InDesign and import them back into a template designed for creating note pages. Assuming you have a PDF document you want to use as a slide presentation, the following steps demonstrate how you can use InDesign to create note handouts.
STEPS: Creating Note Handouts in InDesign
Create a new document in Adobe InDesign. Launch Adobe InDesign, and chooseFile
Note
If you know ahead of time the number of slides in the presentation, enter the value in the Number of Pages field box. If you don't remember the exact number of pages in your PDF document, enter an approximate value and you can add or delete pages when working in the InDesign document.
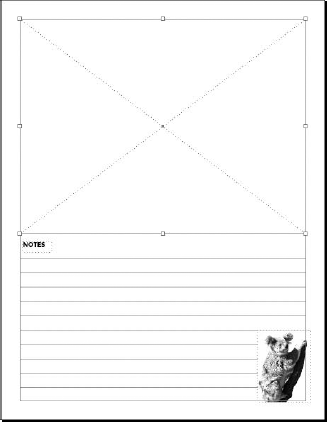
Create a master page. Open the Pages Panel and double-click the default A-Mastermaster page. On the master page, draw lines for note comments, and add any graphicobjects, an auto page number, a title, and other items you want to display on each notepage.
Note
For information on working with master pages and adding auto page numbers, see Chapter 22.
Add a graphic frame placeholder to the master page. Select the Rectangle Frame tool in the InDesign toolbox, and click the cursor anywhere on the document page. The Rectangle dialog box opens. Enter the width and height you used in your slide presentation, and click OK. Drag the frame rectangle so the top-left corner resets at the top and left guidelines. Press

Tip
You can use a note template for not only slides created in InDesign, but also slides you may have created in PowerPoint or Keynote. After they're exported to PDF, you have the same opportunities to design note handouts in InDesign. If you want more freedom for the way your handouts are designed, import them into an InDesign layout. If you use the standard 10×7½-inch slide format, enter those values in the Rectangle dialog box that opens when clicking on the Rectangle Frame tool.
Note
For more information on sizing frame rectangles, see Part III.
Select the PDF file to import. Navigate to the first page in your InDesign file, and select File
Select All pages. Click Open in the Place dialog box, and the Place PDF dialog box opens (Figure 28.14). Select All in the dialog box to place all pages.
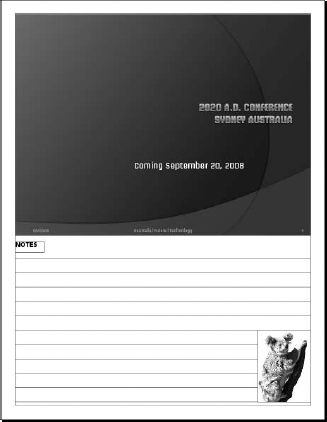
Place the first page in the rectangle frame. Click OK in the Place PDF dialog box, and the cursor loads the graphic. Be certain to move anywhere atop the rectangle frame location on page 1, and click the cursor. The first page in the PDF file is placed inside the rectangle frame, as shown in Figure 28.15.
Size the graphic to the frame size. Select the frame and press
Export to PDF. If you want to send your file off to a copy shop for printing or host the note handouts on a Web site for attendees to download, convert the file to PDF. The copy shop won't need links, fonts, or a copy of InDesign CS to print the file, and those downloading your file from a Web site can use the free Adobe Reader software to view the document.

You also have another alternative that works very well. When you create an InDesign file you can place the file in a Master Frame just like using PDF files. When InDesign files are placed, you have all the editing options available to you for changing text and objects.
If you want to make edits in your note handouts, you can easily return to the master page and edit any text or images, or modify the rectangle frame.
The last tool you should use to create a slide presentation among the CS programs is Illustrator. However, we know there are creative professionals who rely on Illustrator for everything from singlepage illustrations to multipage catalogs. We don't recommend it, but we do know some artists who feel so comfortable with Illustrator that they wouldn't take a second look at a layout program, no matter what it had to offer.
The good news is that Illustrator CS4 and CS5 support multipage documents. It took only 14 versions of Illustrator for Adobe to finally acquiesce to users' demands to include support for multipage documents that was introduced in Illustrator CS4. The time is now, and it's finally arrived.
If you're a die-hard Illustrator designer who wants to create some down-and-dirty slide presentations, try using the new multipage document options in Illustrator by following these steps.
STEPS: Using Illustrator as a Presentation Design Tool
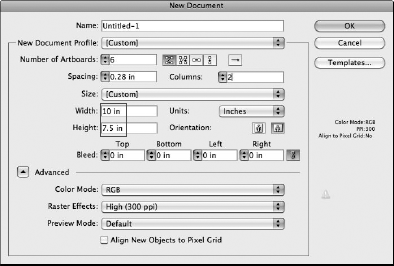
Determine the layout. Choose File
Create your layouts. Each artboard is a separate work area, but you can create artwork in each artboard using copy/paste commands, use the same color palette, and access all Illustrator tools, palettes, and menu commands. In Figure 28.17, we created a six-page layout for slides in Illustrator.
Create a PDF file. Choose File


When you want to collaborate or share presentations with other users, you may want to use an online presentation authoring tool. Adobe provides you with online presentation development, presentation collaboration, and comment and review services for presentations on Acrobat.com.
The presentation application on Acrobat.com is like an abbreviated version of Microsoft PowerPoint that is free to all users who sign into www.acrobat.com. The features available for creating presentations are quite similar to many features offered by Microsoft PowerPoint that enable you to develop a presentation, save the file, share with other users, and export to PDF for viewing.
Note
For more information on Acrobat.com, creating an Adobe ID, and using other Acrobat.com services, see part VIII.
When you log in to Acrobat.com with your Adobe ID and click the New Presentation button, you are taken to the Presentation workspace. Figure 28.19 shows a presentation in development.

To create a new slide, click the New Slide drop-down menu; you find options for creating slides based on several different master slides as shown in Figure 28.20. After creating a new slide from a master, you add text and objects similar to the way you create slides in PowerPoint.
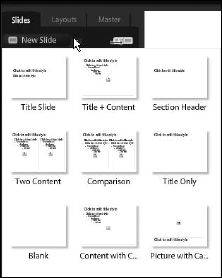
Figure 28.20. Click New Slide to open a menu where you find options for creating slides from an assortment of master slides.
At the top of the Presentation workspace, you find icons for these options:
Design: The default view shows the Design tools. Click the first icon in the row above the slide, and you can choose to change side themes, change slide color sets, create a custom color set, and choose from several options for adding slide transitions.
Slides: Click the second icon and you find a panel with different slide options for a layout such as a Title Slide, Title + Section Header, Blank slide, Picture and Content and an assortment of content layouts.
Text: Click the T icon in the tool row to access options for changing font attributes, adding styles to type, and setting paragraph attributes.
List: The List item offers you options for bulleted lists or numbered lists.
Shape: Regardless of the tool you select in the tools row, various shapes are displayed along the right side of the slides (refer to Figure 28.19). At the top of the list of shapes, you find the Text object shape. The second shape option is Image. To add images to your slides, click the Image tool among the shapes and a dialog box opens, enabling you to browse your computer, add a shape from Flickr, add a shape from a Google search, or add a shape from a Web site. The remaining shapes are an assortment of geometric objects you can add to a slide by clicking or click-dragging the shape to the slide in view. After you have a shape on a slide, several options appear in the tool row for changing shape object attributes.
At the top of the presentation workspace, you find menus with these menu commands:
The Presentation menu has commands similar to the File menu in other programs where you can Open, Close, Save, Export, Share, Publish, and check spelling for presentations.
The Edit menu offers the traditional Cut, Copy, Paste, Undo, and Redo commands, as well as commands for duplicating slides and replacing images.
The Arrange menu contains commands for moving objects front and back, aligning objects, and snapping objects to a grid.
The Help menu contains commands for getting support and logging into discussion forums and blogs related to working with presentations on
Acrobat.comand help information.
Tools and commands in the presentation workspace on Acrobat.com are straightforward and intuitive. In a short session, you can easily create a presentation that you can share with other users, solicit comments on your presentation from other users, or export the presentation to a PDF document. When you choose Presentation
Page transitions are available in both Edit mode and Full Screen mode in Acrobat. A page transition is an effect such as a fade-out and fade-in applied to pages as they're turned. You can set page transitions for all pages in a file or among selected pages in the Pages panel. You might add page transitions to PDF documents for trade-show displays where you want to show slides in self-running kiosks.
To set transitions on all pages in a document, or a specified range of pages while remaining in Edit mode (as opposed to Full Screen mode), click the Pages panel icon, and from either the Options menu in the Pages panel or a context menu, select Set Transitions. If you want to set transitions for pages in a noncontiguous order, open the Pages panel and
From the Transition pull-down menu, you select the transition you want to apply to the selected pages, either from pages you selected in the Pages panel or a range of pages you specify in the Pages Range field boxes. Acrobat offers you a total of 50 different choices for different effects. One choice is to set no transition, with the remaining 49 choices being different effects.
If you check the Auto Flip check box, pages scroll at an interval automatically according to the number of seconds you select from the pull-down menu below the Auto Flip check box. Choices for the interval range from 1 to 32,767 seconds. You can select fixed interval options or type a value within the acceptable range. If you want to manually scroll pages, leave the check box disabled.
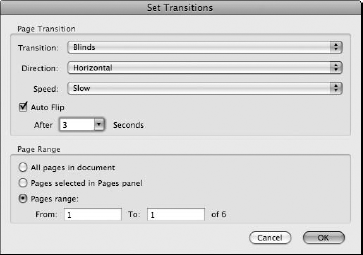
If you don't select pages in the Pages panel, you make choices for applying transitions to all pages or specify a page range in a contiguous order by clicking on the Pages range and typing in the page From and To field boxes. When you select pages in the Pages panel, the Pages Selected in the Pages panel check box becomes active by default and the transitions are applied to the selected pages.
After setting the effects and page range, click OK and transitions apply to the pages when you scroll pages in Edit mode.
Tip
During your design phase and before you convert files to PDF, you can preview a slide show in Adobe Bridge. To preview a collection of CS5 files, open a folder in the Bridge window containing your native documents. Choose View
Note
For more information on viewing documents in slide view in Adobe Bridge, see Chapter 6.
The Full Screen view shows PDF pages without the presence of the Acrobat tools, title bar, menu, or palettes. Not only do Full Screen views offer you a different appearance for displaying PDF pages, but the mode is also necessary if you want to view certain effects. PowerPoint presentations with animation, for example, can only display effects created in the original PowerPoint file while viewing a PDF in Full Screen mode.
Note
For more information on creating PDF documents from PowerPoint files, see the "Converting Presentation Documents to PDF" section, earlier in this chapter.
If you converted PowerPoint slides containing animation effects, such as motion objects and transitions, the animation is not viewable in Edit mode. You need to change the viewing mode to Full Screen mode. Press
If you prepare presentations for clients and want to make it easier for them to launch Full Screen mode, you can save the PDF file so the document always opens in Full Screen view. Choose File
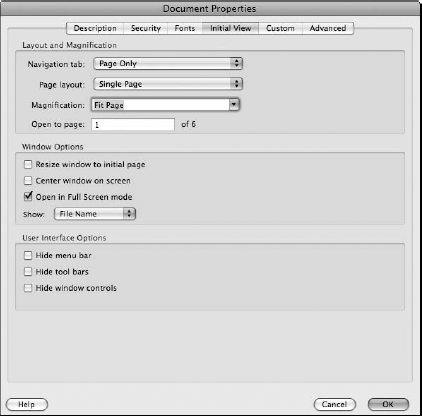
In the Document Properties dialog box, click on Initial View at the top of the pane and check the box for Open in Full Screen. Click OK, and save the file. The next time you open the PDF file either by double-clicking the document icon or by choosing File
Note
For security purposes, Acrobat prompts you to confirm viewing a document in Full Screen View. Click Yes in the warning dialog and the file opens in Full Screen View. If you want to continue to view the same file in Full Screen View, check the box where you see Remember my choice for this document in the warning dialog box. Subsequent viewing takes you to Full Screen View without a dialog box prompting you to confirm the view.
If you want to set up a kiosk or workstation for viewing documents in Full Screen mode, start by making some choices in the Full Screen preferences. In the preference settings, you can control some of the viewing options. Choose Edit
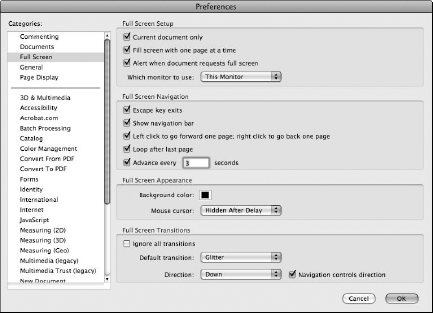
Figure 28.23. To open Full Screen preferences, press
The preference choices include the following:
Current document only: This option applies transitions to only the open document.
Fill screen with one page at a time: This option sets the page view to the maximum screen coverage by a single page.
Alert when document requests full screen: When enabled, a warning dialog box opens asking you to confirm opening in full screen mode.
Which monitor to use: From a drop-down menu you have options for several monitor views such as This Monitor (the current monitor viewing the documents), Best Colors, Widest, Tallest, Biggest, and Main.
Escape key exits: If you want to exit Full Screen view, you can strike the Esc key when you enable this check box. Be certain to leave the check box at the default switch. If you disable the check box, remember to use
Show navigation bar: This option enables the viewer to use buttons for advancing and retracing pages.
Left-click to go forward one page; right-click to go back one page: With this option, you can navigate pages with mouse clicks. For both Windows and Mac users who use a two-button mouse, clicking on the left or right button navigates pages in the respective direction.
Loop after last page: Using this option and the preceding setting for auto-advancing, you can set up a kiosk and have the slide presentation continue with auto repetition. After the last page, the presentation starts again.
Advance every: Enter a value in the text box to set the time interval for advancing to the next slide.
Background color: Click on the color swatch, and the preset color palette opens; here, you can make choices for the background color. The background color appears outside the slide pages on all pages that don't fit precisely within the monitor frame. If you want to use a custom color, click on Other Color at the bottom of the palette and select a custom color from your system palette.
Mouse cursor: You have three choices from the pull-down menu for the mouse-cursor display while viewing slides in Full Screen mode. You can choose from Always Visible, Always Hidden, or Hidden After Delay. The Hidden After Delay menu choice shows the cursor position when you scroll pages and then hides it after a short delay.
Ignore all transitions: If you set transitions while in Edit mode and want to eliminate the transition effects while in Full Screen view, enable this option.
Default transition: From the pull-down menu, you have choices for one of the same 49 different transition effects. If you apply a transition in the Full Screen preferences, then all pages use the same transition. Selecting Random from the menu choices offers you effects that change randomly as you move through slide pages. If you want to use specific transitions that change for selected pages, set the transitions from the Document
Direction: This option specifies the direction (Horizontal/Vertical or Up/Down, depending on the transition type).
To advance through slides when in Full Screen mode, you can use the preference setting and scroll pages with mouse clicks. If you disable the preference choice for left-click to go forward one page; right-click to go back one page, you scroll pages with keystrokes. Strike the Page Down or Page Up keys (or press the Spacebar or Enter/Return key) to move forward and press Shift+Enter/Return to move backward through slides. Additionally, you can use the up- or left-arrow keys to move backward and the down- or right-arrow keys to move forward. Use the Home key to move to the first page and the End key to move to the last page. If you want to move to a specific page without leaving Full Screen mode, press Shift+
You may have a slide presentation that doesn't require access to Acrobat menus and tools, but you want to show cross-document links. Perhaps you design a presentation about a company's financial status, economic growth, or projected growth, and your client wants to show a financial spreadsheet, another PDF document, or a scanned image of a memo or report. The slideshow created in PowerPoint with the motion objects and viewing in Full Screen mode is what you want, but you also want the flexibility for opening other files without leaving the Full Screen mode.
If you want to open a secondary document while in Full Screen mode, you can create links or form-field buttons to secondary files. When you click on the link, the link action is invoked. If opening a secondary file, the file link opens in Full Screen mode. After viewing the file, press
To set up a file link, create a link or form-field button and create a link to open a file. Acrobat offers you options for opening a linked document in the existing window or a new window. You can create the kind of file linking and views to make things easy on your clients, and they won't need to struggle finding files located on a hard drive or launching external applications. All the file linking and activation can be created with buttons in Acrobat.
Note
For information on creating interactive links and buttons, see Chapter 26.
You can also create URL links to display a Web site while in Full Screen mode by using the Open a Web Link action. Click on the link, and your Web browser opens at the specified URL. When you quit the Web browser, you're returned to the slide presentation in Full Screen mode. If you use PowerPoint effects, the effects aren't disturbed.
Note
To learn more about setting link actions to URLs, see Chapter 26.
Tip
In Acrobat 7 and above, you do not need to create links to URLs using links or buttons. If you design your documents with URLs in text using the full URL address such as http://www.company.com (or www.company.com) before PDF creation, Acrobat 7 and above recognize the text as a link to a URL. Position the cursor over the text in Acrobat, and click. Your default Web browser is launched and opens the URL Web page.
Another interactivity tool that you can use with Full Screen view is a remote-control device. For about $50 to $75, you can purchase a handheld remote control. The control comes in two parts. The control device has two buttons used for moving forward and backward in the slide presentation. The companion unit is plugged into a USB port on a laptop or desktop computer. You open the slide presentation in Full Screen view and click the left or right button to navigate slides while you walk across a stage. Some devices also have a button for cursor control. You can remotely move the cursor on a slide and click on a button that opens a secondary file, Web link, or other action associated with the button or link.
When using remote devices, be certain to set your Full Screen preferences to left-click to go forward one page; right-click to go back one page.
You convert PowerPoint slides to PDF with the PDFMaker macro.
To create note handouts from PowerPoint, use the Print dialog box and print the file to the Adobe PDF Printer after making the attribute choices in the Print dialog box for the type of handouts you want to create.
You can export Apple Keynote slides to PDF and PowerPoint formats. Keynote offers Macintosh users a robust slide-creation program with easy, intuitive palettes and tools.
You can use layout programs such as InDesign to create slide presentations. For creating handout notes, set up a master page with objects and elements to be added to each page. Import the PDF slide presentation and convert to PDF.
Adobe Illustrator can be used to create multipage PDF documents.
Layered PDFs add additional viewing options in slide presentations. To create layered PDFs, use programs, such as InDesign CS5 and Illustrator CS5, that support layers and that export to the PDF 1.5 format (Acrobat 6, 7, or 8 compatibility).
Page transitions are applied to pages individually using the Advances
When using Full Screen mode, open the Preferences dialog box and select Full Screen.
Full Screen views support file linking with link and button actions, Microsoft PowerPoint animation, and transitions applied to pages with either the Full Screen preferences or the Set Page Transitions command.