
IN THIS CHAPTER
Importing tables created in Microsoft Word and Excel
Creating and using InDesign tables
One common way to present data is in tabular format. Tables orient data into rows and columns. The intersection of each row and column is called a cell. Cells can hold text, images, or even another table. The format applied to a table is typically consistent across all the cells that make up the table.
Tables created in external applications such as Microsoft Word or Excel may be imported into CS applications such as InDesign, Illustrator, and Dreamweaver. The Clipboard is often used to move tables between applications.
In addition to importing tables, InDesign supports tables and table styles for easy creation and duplication of tables. InDesign includes table features for adding rows and columns, merging cells and creating a table from tab-delimited text. Individual cells are formatted in a number of ways, including alignment, cell strokes and fills, and evenly distributed cells. In addition, you can create dynamic links between Excel spreadsheets and InDesign tables so that changes in a spreadsheet are dynamically updated in InDesign files.
Dreamweaver also can create tables based on HTML. Although most of the table-formatting options in Dreamweaver are the same as the options for tables in InDesign, there are some differences between the two.
In this chapter, we talk about tables as they relate to Illustrator, Photoshop, and InDesign. For information related to Dreamweaver tables, see Chapter 24.
InDesign, Illustrator, and Dreamweaver can create tables natively in the authoring applications. You can import tables in these programs as well as Photoshop from Microsoft Word and Microsoft Excel files.
Note
For information related to tables in Dreamweaver, see Chapter 24.
Microsoft Word has a fairly robust table-creation feature allowing you to create tables by selecting the number of rows and columns, creating rows and columns, and converting text to a table. Tables created in Word are moved into the CS applications either by copying the table onto the Clipboard and pasting it into the target application or by using import commands such as File
Before a table is copied to the Clipboard, the cells that you want to move must be selected. Selecting table cells in Word is as easy as dragging over the cells with the mouse. All selected cells are highlighted, as shown in Figure 20.1.
Note
The entire table is selected by clicking on the Table Move icon located in the upper-left corner of the table in Print Layout viewing mode in Word 2007 for Windows. On the Mac, change your view to Page Layout mode. This selects the entire table and all its contents.

Figure 20.1. Table cells are highlighted when selected. Clicking the Table Move icon selects the entire table. Table Move icon
After the cells are selected, choose Edit
Importing Microsoft Word tables in Illustrator can be handled in three ways:
Open a Word file in Illustrator. Choose File


Figure 20.2. Choose File
Open, and open an MS Word file to see the Microsoft Word Options dialog box.You choose what elements to convert when opening the file by checking the boxes in the Microsoft Word Options dialog box. Be certain to leave the defaults as shown in Figure 20.2 if you want to retain paragraph/text formatting.
When you click OK in the Microsoft Word Options dialog box, the text appears in Illustrator with the formatting intact. However, any strokes and cell fills are lost when importing Word tables using this option, as shown in Figure 20.3.
Opening a Word file produces the same result as choosing File
Copy/Paste a Word table. Select a table in Microsoft Word and copy it, then open Illustrator. Choose Edit
Paste text into an Area Text Frame. When you choose Edit


Of the three options available when importing Word tables in Illustrator, using the Open or File
Although Illustrator thinks of tables as text surrounded by line objects, there is one feature in Illustrator that understands table data very well—the Graph Data window. Table data may be pasted directly into the Graph Data window, but to create a graph you need to use data that would logically form a graph. If you try to create a graph with text as shown in Figure 20.6, Illustrator cannot create the graph.

Suppose you want to create some large over-sized prints containing table data and Photoshop is your tool of choice. Generally for graphic design pieces, Photoshop is not the best application for large amounts of text. However, if you create some large posters for announcing conference sessions, events, or other similar types of designs, you might want to use Photoshop.
Creating tables in Photoshop is much more difficult than creating a table in another application and importing it into a Photoshop file. In Figure 20.7, you see a simple table added to a Photoshop file. The table data were first created in MS Word and then imported into the Photoshop design.

You have only one option to choose if you want to preserve formatting from a Word table when pasting into Photoshop. You must select the table in Word as described in "Using Word tables in Illustrator" and paste the table into Photoshop by choosing Edit

Figure 20.8. If you paste text in Photoshop with the Type tool active and an I-beam cursor visible, the text is pasted without formatting.
When you paste text into Photoshop, the text remains a vector object and can be scaled using the Transformation tools without loss of resolution.
Note
For more information on using the Transformation tools, see Chapter 11.
Table cells that are copied in Word and pasted into InDesign can be recognized in InDesign as tables and are edited using InDesign's table features. All table and character formatting in Word is also pasted into InDesign.
Another way to import Word files containing tables into InDesign is by choosing File
Tables imported in this manner from Word appear in InDesign as editable tables, but if you want to remove the table formatting, you can select the Remove Styles and Formatting from Text and Tables option in the Microsoft Word Import Options dialog box. This makes the Convert Tables To dropdown list active with options to convert as Unformatted Tables and Unformatted Tabbed Text.
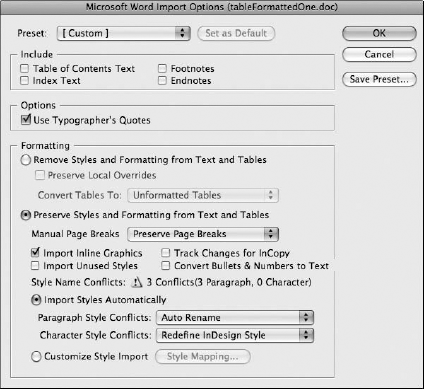
Figure 20.9. The Microsoft Word Import Options dialog box includes options for handling text formatting.
Tip
If you have any trouble with the imported tables, try to import the table as Unformatted Tabbed Text and use InDesign's Table
Although tables in Word are useful, the real king of tables among the Microsoft Office products is Excel. Excel tables include formulas that compute the value of a cell based on other cells. This is a powerful concept that saves countless hours of manual calculations. However, after an Excel table is imported into a CS application, all of its formulas and automatic calculations are lost.
You can copy Excel spreadsheets to the Clipboard and paste them into Photoshop, Illustrator, and InDesign by choosing Edit
Excel tables that are copied into InDesign are converted to InDesign tables, allowing them to be edited using the InDesign table features. Using InDesign, you can create dynamic links to Excel spreadsheets so that when a spreadsheet is updated in Excel, the updates are dynamically updated in the InDesign file.
The data found in Excel tables, like Word tables, also can be copied and pasted into the Graph Data window for graphing in Illustrator.
Tip
Remember that Excel tables, like Word tables, that are copied and pasted into Illustrator must first be ungrouped before the table text may be edited within Illustrator.
Excel tables by default do not include cell borders. To have borders appear when a table is copied and pasted into a CS application, you need to make the cell borders visible in Excel. This is done in Excel by opening the Format Cells dialog box (Format

The same conditions apply to Excel tables as you find with pasting tables from Word. If you copy cells in Excel and choose Edit

Figure 20.11. Pasted tables from Excel spreadsheets in a Photoshop layout retain the data formatting.
You'll find one distinction between pasted Word files and pasted Excel files in Photoshop. When you paste Word files, the data remain as vector objects and the text can be edited. When you paste Excel files in Photoshop, the data are rasterized and you lose all editing capabilities.
Tip
If you want Excel tables passed as vector objects in Photoshop, open the Excel file in Word, copy the table from Word, and then paste in Photoshop.
Pasted Excel files in Illustrator follow similar principles as when pasting Word files. If you paste an Excel table in Illustrator, you retain the table appearance, but you lose the editing capabilities. If you create an Area Text Frame and choose Edit
In addition to the Copy and Paste features, you also can place Excel documents within an InDesign document by choosing File
Excel documents are divided into sheets, which are selected using tabs at the bottom of the Excel window. Large sheets of data also can be made up of customized views. As you import data into InDesign, you can select which sheets and views to import. The Cell Range drop-down list displays the row and column numbers referenced in Excel; hidden cells also can be imported.
The formatting options include a formatted table, unformatted table, and unformatted tabbed text. Although the Formatted Table option works most of the time, if you encounter any trouble, choose to format the table as Unformatted Tabbed Text and let InDesign's Table
The Cell Alignment options include Left, Center, Right, and Current Spreadsheet alignment.

Figure 20.12. Pasted tables from Excel spreadsheets in Illustrator show the difference between pasting a table and pasting the data within an Area Text Frame.
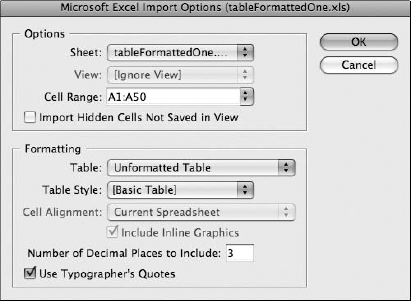
Figure 20.13. When you place a Microsoft Excel document within an InDesign document, this dialog box of options appears letting you select which sheet and view to open and letting you specify how to format the tables.
Note
After clicking OK to place an Excel spreadsheet, an Information dialog box appears if the Formatted Table option was selected. This dialog box instructs you that you can speed up the import process by choosing to import the table as an unformatted table.
Adobe InDesign is the only program discussed in this chapter that permits you to create a link from the application document to the original Excel spreadsheet. By default, linking to spreadsheets is disabled. You need to adjust some preferences settings in order to link to spreadsheet files in InDesign.
To create links to spreadsheet files, open the InDesign Preferences by pressing Ctrl/
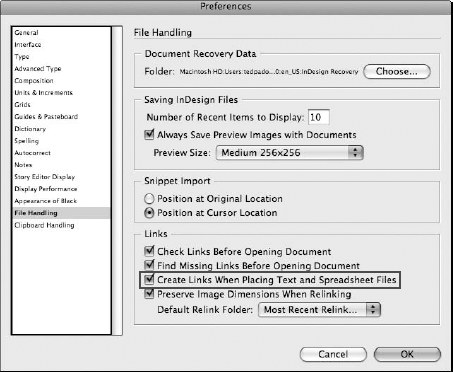
Figure 20.14. Open the File handling Preferences, and check Create Links When Placing Text and Spreadsheet Files.
When you edit a spreadsheet file and open InDesign, you are prompted to update file links. Click OK, and any edits made in the spreadsheet document are updated in InDesign. If you're not prompted to update links when you open an InDesign file, open the Links panel (Window
Although several applications can import and use tables imported from external files such as Microsoft Word and Microsoft Excel documents, only InDesign and Dreamweaver deal natively with tables. And of these two applications, Dreamweaver tables are hindered by the restrictions that HTML requires.
Note
For more information on Dreamweaver tables, see Chapter 24.
Tables in InDesign, however, are very robust and offer a host of formatting and editing options. Tables are part of a story and can flow through the threaded frames of a story in an InDesign document.
Tables in InDesign are a specialized form of text object. To create a table, you must first create a text object using the Type tool or position the cursor within an existing text object at the place where the new table is located.
Choose Table

Figure 20.15. When you create a new table, the Insert Table dialog box specifies the number of rows and columns to include in the table.
The new table fills the width of the text frame that contains it with the specified number of columns. The cell height is determined initially by the size of the text contained in the text object. After the table is created, the container text frame has no control over the table's height and width. You alter the cell size by dragging on the cell borders using the Type tool. The cursor changes to show the directions that the cell can move.
Warning
Be aware that tables can be set to a width that exceeds the width of the text frame. This can cause problems for your layout if you're not careful.
Note
Tables cannot be added to type positioned along a path.
After a table is created, you can populate it with data using the Type tool. Just click in a cell, and type the data. Add graphics to a cell by choosing File
Tables also can be populated by copying and pasting data from other tables created in InDesign or imported from Excel or Word into the new table. Be aware that if you copy and paste data into a single cell, then the entire copied selection of data is nested within the single table cell. If you select a two or more cells before pasting, then the copied data is pasted within the new table aligning the upper left copied cell data with the upper left selected cell.
You can copy and paste tab-delimited text or data from an Excel file into an InDesign table without nesting the content inside a cell.
Tab and Shift+Tab move the cursor between adjacent cells. Tab moves to the next cell, and Shift+Tab moves to the previous one. If the next cell already has some data, that data is selected. Pressing the Tab key when the cursor is positioned in the last cell adds a new row to the table.
The arrow keys also can be used to move between cells, but they move directly between rows and columns. For example, if you press the up arrow when the cursor is positioned in the top cell of a row, then the bottom cell of the same column is selected. The Escape key toggles the selection of the cell content on and off. You also can extend the selection between cells by holding down the Shift key while moving to a different cell.
If you're dealing with a particularly long table, choose Table
Tip
You can set individual tabs within single cells using the Tab Ruler. If you want to tab to a tab position within a cell, press Alt/Option+Tab. You remain within the active cell instead of tabbing to the next cell.

Normal text is converted into a table using common delimiters such as tabs, commas, and paragraph returns. Before converting text to a table, make sure that you separate the text for each cell with a common separator and that you separate the end of each row with a different separator. For example, separate each text cell using a comma and each row using a paragraph return.
Select the text that you want to convert into a table with the Type tool, and choose Table

Figure 20.17. The Convert Text to Table dialog box lets you select the separator to use to delineate rows and columns. The options include Tab, Comma, Paragraph, and Other.
InDesign also includes a command to do the opposite—convert tables into text. During this process, you select the separators that are placed in the text for separating rows and columns. The menu command (Table
Longer tables are formatted to run between several different text frames. If the size of the table exceeds the text frame, the frame's out port has a red plus sign in it, as shown in Figure 20.18. If you create a new text frame, you can click on the out port for the first frame and then on the in port (or just on the frame) for the second frame to connect (or thread) the two frames. This causes the table data not visible in the first frame to be displayed in the second frame; if new rows or columns are added to the first frame's table, the table data is pushed down to the second frame.
Note
Frame threading and in and out ports are covered in Chapter 16.

Tables that span several frames and/or pages benefit from using headers and footers. Headers and footers are specified when a table is created, but you can convert the topmost row (or a number of rows) to a header and the bottom-most row (or a number of rows) to a footer (or any header or footer to a body row) by choosing Table
Headers and Footers have an option to appear in every text Column, once per frame, or once per page. This makes tables that span multiple frames or pages easier to understand.
After an InDesign table is created, you have complete control over the size and number of cells. New rows and columns may be added or deleted and individual cells merged or split.
You can easily select table cells using the Type tool. A single click on an empty cell positions the cursor within the cell, and a double click on a populated cell selects text in a cell. Dragging a marquee over several cells selects multiple cells at once.
Tip
Double-clicking the contents of a table cell selects it contents, but if you press the Escape key, the selection toggles between the cell contents and the cell. If you watch the Control panel, you can see different settings selected.
Moving the cursor over the top or left edge causes the cursor to change to an arrow. If you click when this arrow cursor is visible, then the entire column or row is selected. If you position the cursor in the upper-left corner, it changes into a diagonally pointing arrow. Clicking selects the entire table.
You also select table elements—including Cell (
It is unnerving to find that you need a new row or column in the middle of a table that has already been formatted correctly. Luckily, InDesign offers an easy way to do this. Hold down the Option/ Alt key while dragging to resize a row or a column and a new row or column is created.
Note
To create a new row by dragging with the Option/Alt key held down, you must drag a distance at least equal to the height of the table's text.
You add multiple rows and/or columns to a table by choosing Table

Figure 20.19. The Insert Rows dialog box positions the new rows above or below the current selection.
The total number of rows and columns that make up a table are listed in the Table Options dialog box and in the Table palette. Entering a new value for either the Row or Table field adds or deletes rows or columns from the current table.
You can delete rows and columns by choosing Table
Note
When you select a single cell, a row, or a column, pressing the Delete key only clears the contents of the selected cells; it doesn't remove the cells.
Rows and columns also are deleted by dragging the bottom edge upward or the right edge leftward with the Option/Alt key held down.
Often, the first row or column of cells is used as a header to describe the data that follows. Because this single header applies to all cells, you can merge all the cells in the header to make a single cell that extends the entire width of the rows or columns. To merge several cells, just select them and choose Table

Text and images contained within a table are formatted just as normal using the Control palette, but tables and table cells have several unique formatting options. You can set these options in the Table Options dialog box, shown in Figure 20.21; choose Table

Figure 20.21. The Table Options dialog box is divided into several different panels for controlling the table settings, the row and column strokes, the background fills, and the headers and footers.
The Table Setup panel of the Table Options dialog box lists the total number of body rows, columns, header rows, and footer rows. Increasing or decreasing these values adds or deletes from the table. The Table Setup panel also includes controls for defining the table border and the spacing before and after the table. The Headers and Footers panel is used to specify the number of header and footer rows and where they're repeated for tables that span several frames or pages.
The strokes used to create the rows and column borders are changed using the Row and Column Strokes panels in the Table Options dialog box, shown in Figure 20.22. Access this panel by clicking on the Row Strokes tab (or Column Row tab) or by choosing Table
Using the First and Next fields, you can establish any type of pattern. The Weight, Type, Color, and Tint settings let you control the look of the row borders. The Preserve Local Formatting check box keeps any cell formatting applied to a single cell when enabled. Using the Preview option lets you make changes and view the results without closing the dialog box.
The Fills panel of the Table Options dialog box changes the background cell color for the specified alternating pattern. The options include Every Other Row/Column, Every Second Row/Column, Every Third Row/Column, and Custom Row/Column.

Table styles hold all the formatting properties for a table in a panel where they can be reapplied to other tables quickly and easily. All defined styles are listed in the Table Styles panel. New table styles are created by clicking the Create New Style button located at the bottom of the panel.
Double-clicking on a style opens the Table Style Options dialog box. When double-clicking a style, you can inadvertently apply a style; therefore, a better option is to open a context menu and choose Edit <style name>, and the Table Style Options dialog box opens as shown in Figure 20.23. Within this dialog box, you can rename the style and select one of the option panels listed to the left. The panels include General, Table Setup, Row Stroke, Column Stroke, and Fills. Each of these panels holds settings for defining how the table is constructed, how it looks, and all the properties that affect the entire table.
Styles are applied to new tables by selecting the table and choosing one of the styles from the Table Styles palette. If you want to change the table independent of the style without affecting the style, you can use the Break Link to Style palette menu command.
You control cell formatting in the Cell Options dialog box, shown in Figure 20.24. Open this dialog box for the current cell by choosing Table
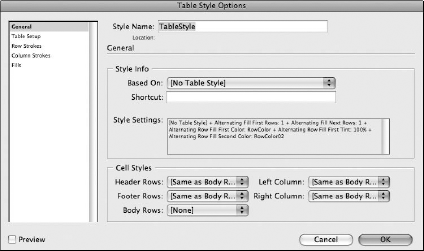
Figure 20.23. The Table Style Options dialog box includes settings for defining the look of the entire table.
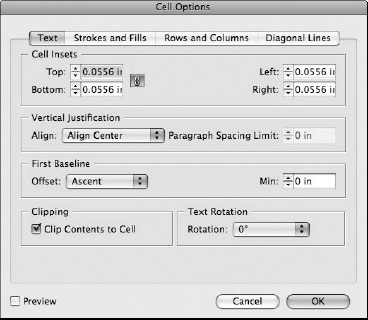
Figure 20.24. The Cell Options dialog box is divided into several different panels for controlling the cell's alignment, strokes and fills, and cell dimensions, as well as for adding diagonal lines.
You change row and column size by positioning the mouse cursor over a cell border and dragging to increase or decrease the row or column size. The mouse cursor changes to show the direction that the border can move, as shown in Figure 20.25. If the text entered into a cell exceeds the width of the column, the text is displayed as a red dot to indicate that the text exceeds the cell size.

Figure 20.25. The cursor changes to show the directions that the cursor can move to resize the selected row. Overset text is marked with a red dot, indicating that the text doesn't fit in the cell.
Holding down the Shift key while dragging an internal row or column border changes the adjacent row or column at the expense of the other. Dragging the bottom or rightmost border with the Shift key held down proportionally sizes all the rows or columns at once.
Initially, the row height is set based on the text size, and increasing the text size increases the row height. This is based on Row Height set to the At Least option. It also can be set to use the Exactly option, which makes the cell size consistent regardless of the text size. These controls are found in the Rows and Columns panel of the Cell Options dialog box.
To make several rows and columns have the same dimensions, select the rows or columns that you want to distribute and choose Table
The Cell Inset value is the amount of space between the cell text and the cell border. A Cell Inset value of 0.0 causes the text to print on top of the cell border. The Vertical Justification options include Top, Center, Bottom, and Justify; the First Baseline options include Ascent, Cap Height, Leading, x Height, and Fixed.
The Text Rotation values include 0, 90, 180, and 270 degrees. This allows the text to be rotated and displayed vertically. Figure 20.26 shows a sample table where the text for the months has been rotated 90 degrees.

InDesign CS permits you to edit tables in the Story Editor. To open a table in the Story Editor, select a table and choose Edit in Story Editor. The Story Editor displays the text for all cells in a table as shown in Figure 20.27.
While in the Story Editor you can add notes to the table cells. Open a context menu on a line of text and choose New Note. The cursor appears blinking within two yellow-orange icons appearing like an hourglass. Type text and you add the note text in the Story Editor as shown in Figure 20.28. When you return to the layout the notes are not visible in the table. You need to reopen the Story Editor to view the note comments.
Tables created in InDesign can be tagged and exported using the XML format. Keep in mind that the table as well as the individual cells all need to be tagged in order to be exported. To see the applied tags, choose View


Tables created in Microsoft Word may be imported into InDesign, Illustrator, and Photoshop using the Clipboard.
Tables copied from Word or Excel may be pasted into Illustrator's Graph Data window.
Tables created in Microsoft Word and Excel may be imported directly into InDesign.
InDesign can create, edit, and format tables.