Formatting type
Working with character style sheets
Working with paragraph style sheets
Combining styles to create nested style sheets
Using styles with tables
Working with graphic and object styles
Adding type to a page is one of the more common tasks performed by creative professionals. Long gone are the days when we ordered type from a professional typesetter. Today's graphic artists are both artists and typographers. Fortunately, the typographic tools in the CS applications make your job easier when setting type.
For anyone who has set type for manuals, books, and other long documents, style sheets should be familiar tools. It's hard to imagine working with large bodies of text without using style sheets. Without them, your labors would be tenfold. You would have to manually set the styles for each body of text throughout a document, and any style changes would require the same laborious process.
Illustrator supports character and paragraph styles that make layouts much more flexible. Photoshop supports text styles for applying effects to type. In InDesign, you'll find impressive style sheet capabilities such as nested styles and style sheets for tables. In Dreamweaver, you have abundant opportunities for adding styles to Web page designs.
Note
For information on working with styles in Dreamweaver, see Chapter 24. For more information on cell and table styles in InDesign, see Creating Cell and Table Styles later in this chapter.
This chapter takes you through setting type in CS applications and creating character, paragraph, and graphic styles and styles for formatting cells, tables, and objects in InDesign.
If you have type created in programs like Microsoft Word, you can import text into both Illustrator and InDesign, as described in Chapter 18. If you don't use a word-processing program to set type, you can add type in Illustrator, Photoshop, or InDesign with the Type tool. In Illustrator, setting type adds some flexibility when setting type on irregular shapes and paths. Each program has its own strength in regard to typesetting, and it's worth your time to look at both programs so you know which one is best for a particular job.
Illustrator has two kinds of type functions, both created with the Type tool. You create point type by clicking the cursor in the document window and type. The primary limitation of point type is that the type doesn't wrap or conform to a specific area. If you keep typing, the characters eventually go off the page, unless you add a carriage return at the end of each line.
The other kind of type in Illustrator is area type. Area type conforms to a specific boundary, and the type wraps to the outside boundary. The type boundary is created by clicking and dragging open a rectangle with the Type tool or by clicking the cursor on the edge of an object with the Type tool or Area Type tool. Doing so binds the type to the shape of the object. The object can be a simple geometric shape, a polygon, or an irregular shape.
You also have tools for creating vertical type. Click the Type tool, and keep the mouse button depressed to expand the toolbar. There are two vertical type tools—one for vertical type (used for both point and area type) and one specifically for area type. The results of creating type with the type tools are shown in Figure 15.1.
To create point type, simply click the Type tool in the Illustrator Toolbox and click the cursor at the location where you want to begin typing. A blinking cursor appears.
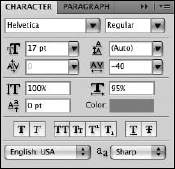
After typing a line of text, you can use the Character panel or keyboard shortcuts to change type appearances. Choose Window

Figure 15.1. Type, created in Illustrator can appear as (1) vertical point type, (2) point type, (3) area type, (4) type on a path or (5) vertical area type.

The type control available in the Character panel includes the following:
Type selection is made from the pull-down menu.
Type style is selected from options in the pull-down menu.
Type point size can be selected from fixed sixes in the pull-down menu or by typing values in the field box. The values range from 0.1 points to 1,296 points.
Kerning type is handled by selecting from fixed sizes or by typing values in the field box.
Horizontal scaling is defined from fixed values or by typing values in the field box.
Baseline shifts move the baseline of the type up when positive values are entered and down when negative values are entered.
Underline and strikethrough. Select type, and click either the underline option or the strikethrough option or both to apply the respective type effects.
Language selection is made from the pull-down menu. This item is important for hyphenation and spell checking. If None is selected, the spell checking is skipped. This is a selection you might make for ignoring spell checking items such as catalog part numbers.
Leading is controlled by selecting from fixed values or by typing values to 1/100th of a point.
Tracking amounts are specified in whole numbers ranging from −1,000 to 10,000 points.
Vertical scaling of type can be adjusted in increments ranging from 1 percent to 10,000 percent.
Characters can be rotated in increments up to 1/100 degree.
Choose None, Sharp, Crisp, or Strong for type appearances. You need to make a choice from the menu for the type appearance to change the default before adding type to the document.
In addition to using the Character panel, you can perform several adjustments using keyboard shortcuts. To modify the type, use the following key combinations:
Alt+right arrow (Option+right arrow on the Mac): Increases tracking. Select type characters for the characters of which you want to change tracking amounts.
Alt+left arrow (Option+left arrow on the Mac): Decreases tracking. Select type characters for the characters of which you want to change tracking amounts.
Alt+up arrow (Option+up arrow on the Mac): Decreases leading. Affects only selected characters.
Alt+down arrow (Option+down arrow on the Mac): Increases leading. Affects only selected characters.
Alt+ Shift+up arrow (Option+Shift+up arrow on the Mac): Increases baseline shift. Affects only selected characters.
Alt+Shift+down arrow (Option+Shift+down arrow on the Mac): Decreases baseline shift. Affects only selected characters.
Alt+Ctrl+left arrow (Option+

Alt+Ctrl+right arrow (Option+
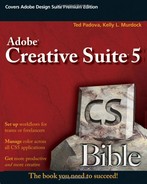
Other options available in the Character panel are selected from the panel menu. Click the right-pointing arrow in the upper-right corner of the panel, and the panel menu opens as shown in Figure 15.3. The menu options include the following:
Standard Vertical Roman Alignment: The direction of half-width characters such as Roman text or numbers changes in vertical alignment. When this option is checked, you can rotate selected individual characters within a block of text without affecting the rotation of the unselected characters.
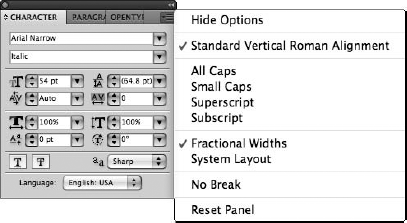
All Caps: Sets all selected characters to caps, as shown in Figure 15.4.
Small Caps: Sets all selected characters to small caps, as shown in Figure 15.4.
Superscript: Selected characters appear as superscript above the baseline, as shown in Figure 15.4.
Subscript: Selected characters are subscripted below the baseline, as shown in Figure 15.4.
Fractional Widths: As a default, leave this item checked because the type is displayed in the best appearance. The spacing between characters varies. If disabled, the characters are monospaced.
System Layout: Characters are previewed using the operating system's default text handling. This option is particularly helpful when designing user-interface designs where you might create dialog boxes, panels, and menus.
No Break: Should be applied manually to selected type that you don't want to break across lines. This is appropriate for technical names or other words that should not be split across lines.
Reset Palette: Restores the default character settings in the panel.
The Character panel by default is nested together with two other panels. The Paragraph panel is used for paragraph formatting, and it makes sense to describe the options when discussing area type. The OpenType panel offers options for a number of different settings you can make when using OpenType fonts.
Note
For more information on OpenType fonts, see Chapter 14.
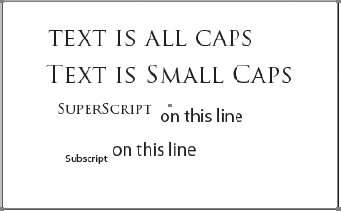
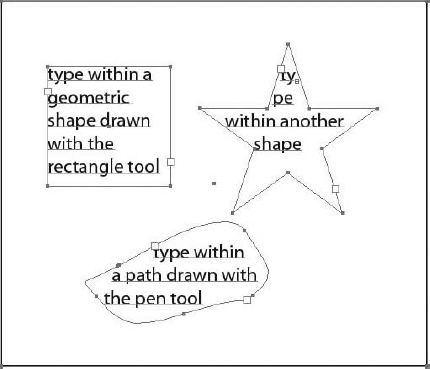
Area type is created using the Type tool. Instead of clicking the cursor where point type is created, click the cursor and drag open a rectangle. By default, when you release the mouse button, a blinking I-beam cursor appears in the top-left corner of the rectangle. Area type also can be created within closed paths. Any object you draw in Illustrator can define the boundaries for area type. When adding area type to a closed path, simply click the cursor on the edge of the object and the blinking I-beam informs you the object is ready to accept type. In Figure 15.5, you can see results of area type applied to different shapes.
In the Paragraph panel, you'll find options for paragraph formatting. Some of the options, such as paragraph alignment, also can apply to point type. However, indents and paragraph spacing, although available with point type, are more likely to be applied to area type.
When you create area type and want to change paragraph formatting, click the Paragraph tab to show the options. If the panel is not in view, choose Window

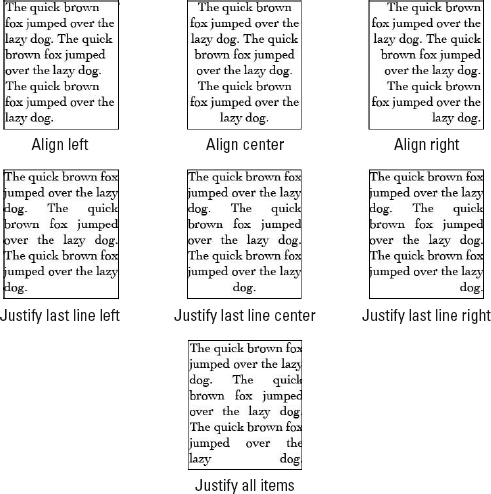
As shown in Figure 15.6, the panel contains many options. These include the following:
Align Left: Text alignment for the paragraph is aligned left.
Align Center: Paragraph text is aligned centered.
Align Right: Paragraph text is aligned right.
Justify with Last Line Aligned Left: The paragraph is fully justified with the last line aligned left.
Justify with Last Line Aligned Center: The paragraph is fully justified with the last line aligned center.
Justify with Last Line Aligned Right: The paragraph is fully justified with the last line aligned right.
Justify All Lines: All text is justified, even the last line. If you have only two words appearing in the last line of text, one word is aligned left and the other word is aligned right.
Left Indent: Text is indented from the left edge of the text block.
First Line Left Indent: The first line of text in the paragraph is indented left, and the other lines are aligned left without indentation.
Space Before Paragraph: This option adds space above the paragraph in amounts specified in the field box.
Hyphenation: When the check box is checked, hyphenation is applied to the paragraph.
Right Indent: Text is indented from the right edge of the text block.
Space After Paragraph: This option adds space after a paragraph in amounts specified in the field box. Use the space after and space before paragraphs instead of using carriage returns.
The seven views of type formatted using the different paragraph formats are shown in Figure 15.7. From the Paragraph panel fly out menu, the Adobe Every-line Composer was selected to compose the type in Figure 15.7.
As detailed in Chapter 14, OpenType fonts offer you many more glyphs than TrueType or PostScript fonts. With more glyphs available in an OpenType Pro font, you have alternate choices for the way you want to display characters. Because the number of characters can vary between OpenType fonts, be aware that all options are not available with every font. As you open the Character panel and view the tabs, the final tab is the OpenType tab. Click this tab, and the options appear, as shown in Figure 15.8.
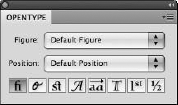
The panel displays two pull-down menus and a line of buttons. To have the menu commands and buttons active, you need to have an OpenType font selected. Not all options are available for all OpenType fonts. Depending on the number of characters and styles contained within an OpenType font, the options vary. From the Figure pull-down menu, the options include the following:
Note
If using Asian OpenType fonts (Chinese, Japanese, and Korean), you may have more options available in the OpenType panel.
Default Figure: Choose this option to use the default style for numbers appearing in the selected font.
Tabular Lining: Only when the OpenType characters are available, the full-height figures line up in a monospaced appearance and do not cross the baseline. You might use this option when setting type in tables and charts.
Proportional Lining: Proportional spacing is used with numbers for aligning the numerals to the baseline.
Proportional Oldstyle: When characters are available, use this option when you want a classic type appearance. It creates a more sophisticated look when using lowercase characters.
Tabular Oldstyle: Applies to varying height characters with fixed, equal widths. This option might be used when you want a classic appearance of old-style figures, but you want the characters to align in columns.
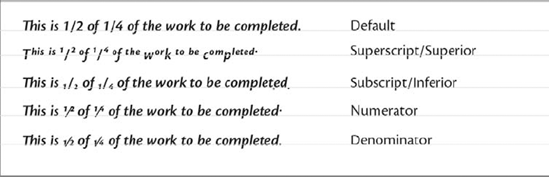
Another set of menu commands appears in the Position pull-down menu. The Position options offer choices for the placement of characters respective to the baseline. These options are particularly helpful when working with numbers and fractions. Again, these are available only if they are offered in the current OpenType font for a given selection of type. The menu choices include the following:
Default Position: Keeps the default position of characters for the selected font.
Superscript/Superior: Raises characters above the baseline.
Subscript/Inferior: Lowers characters below the baseline.
Numerator: Applies to numerals designed as fractions. The fractional characters only are raised to appear as numerators.
Denominator: Applies to numerals designed as fractions. The fractional characters only are lowered to appear as denominators.
Figure 15.9 displays the various options choices when using the Cronos Pro OpenType font and applying the different position options to alpha and numeric characters.
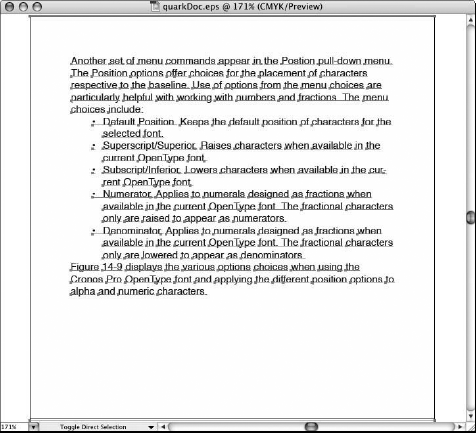
Many different types of documents can be opened and edited in Illustrator. Often, the objects appear to be translated without problems, but you may find that much of the original paragraph formatting is lost. Files you may want to convert to Illustrator documents—CAD drawings, page layouts from other programs, charts, graphs, and so on—typically open in Illustrator with broken type blocks. To convert the point type segmented throughout a document, look over the following steps to see how you can fix such problems.
STEPS: Converting Point Type to Area Type
Open an EPS file in Illustrator. For this example, we use a QuarkXPress document saved from XPress using the Save Page as EPS menu command. Notice that in Figure 15.10, when all the type is selected in Illustrator, you see point type on each line of text and broken along the lines of type. This copy would be difficult to edit in its present form.
Cut the text from the art board. Choose Edit

Paste the type. Select the Type tool, and drag open a rectangle to define the boundaries for the area type. Choose Edit
Format the type. Add carriage returns and tabs where needed to create the paragraph format you want to apply to the body of text. Use the Paragraph panel to set type formats such as space before and after, as well as any alignment considerations you need, as shown in Figure 15.12.


For more-precise placement and sizing of the text block, you can use guides and create text frames according to guide positions. If you have legacy Illustrator files that were designed with point type where it makes more sense to use area type and paragraph formatting, you can cut the point type and paste it back into a type frame.
The new additions to the type features in Illustrator required recoding the Illustrator type engine. The results of the update create some problems when opening legacy files in Illustrator CS2 and CS3. Any Illustrator document created from version 10 and prior uses a different type engine than Illustrator CS2 through CS5. In addition, new type enhancements introduced in Illustrator CS4 were significant and often trigger many warnings when opening legacy files. When you open a legacy file in Illustrator CS4 or CS5, you first see an alert dialog box, as shown in Figure 15.13.
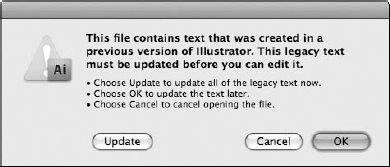
Figure 15.13. Opening legacy files in Illustrator CS4 or CS5 prompts you to preserve the type appearance in the document or update the text.
If you click Update, the text is updated to conform to the new type engine. The text is editable, but you may experience shifts in type appearance and position. If you click OK, the text is not updated, and the type appearance and position remain intact. The type is not editable, however. The type blocks appear within rectangular bounding boxes, as shown in Figure 15.14.
You can elect to update text on a block-by-block basis. If you click OK and don't update the type when opening a legacy file, you can individually update text blocks by clicking with the Type tool on a given body of text or by double-clicking the type with the Selection tool. Illustrator then prompts you in another alert dialog box, offering you a few choices. In Figure 15.15, you can see the choices appearing for Copy Text Object and Update.
When you select Copy Text Object, a duplicate of the text block is placed behind the converted text. After copying the text, the foreground text is selected when you click with the Type tool. The other option for Updating the text accomplishes the same result as when you first open a legacy document and click Update (refer to Figure 15.15).
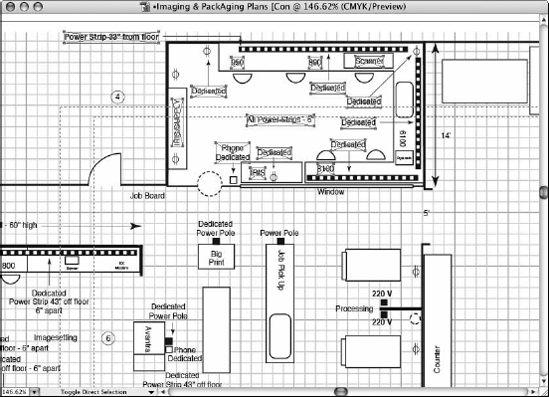
Figure 15.14. If you open legacy files without updating the text, text blocks appear within bounding boxes when the text is selected.
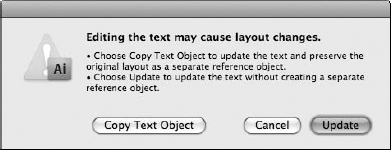
Figure 15.15. Clicking any legacy text block with the Type tool opens a dialog box where you can decide how the type is updated.
If you want to update multiple items, options are available in a menu command. Choose Type
In the Legacy submenu, the options include the following:
Update All Legacy Text: If you open a legacy file and choose to not update the text, you can later select this option to update all the text in the file. This gives the same result as if you had opened a legacy file and clicked Update.
Update Selected Legacy Text: You can select individual text blocks to update by using the Selection tool and pressing the Shift key as you continue clicking additional text blocks. With a group of objects selected, choose this menu item and the selected text is updated.
Show/Hide Copies: When clicking Copy Text Object (refer to Figure 15.15), copies of the original text are placed behind the updated text. If you click Hide Copies, the copied text is hidden. Conversely, when clicking Show Copies, all hidden text is shown. If you have a converted unedited text block in front of the original text, you won't see the copies hidden or shown. To see the original text, hide the foreground text by selecting it and choose Object
Delete Copies: Selecting this menu command deletes all copies.
Select Copies: This menu command selects all copies.
It's best to keep copies of your artwork until your text conversions are made successfully. When updating text, you may encounter problems such as the following:
Character position and attribute changes: Updating text may shift characters and change attributes such as leading, tracking, and kerning.
Word shifts: Words may shift to the next line. The text within a bounding box may scroll past the bottom of the text frame thereby hiding one or more lines of text. Hyphenation may be altered.
Word overflows: In linked text frames, words may overflow to the next thread.
As a matter of practice, you should carefully check the type conversions on legacy files. Before deleting copies, be certain that the text attributes and word flow follow your design intent.
Setting type in Photoshop is a task you optimally perform only on small bodies of text and when creating headlines and stylizing type. We say optimally because Photoshop is not as well suited for setting type as are Illustrator and InDesign. Therefore, we won't spend much time talking about typesetting in Photoshop.
You create type in Photoshop by clicking the Type tool in the Toolbox and then clicking the cursor in the document window. A blinking I-beam appears, and you are now ready to type. The default type tool is Horizontal Type. If you click and hold down the mouse button in the Toolbox, you also can choose the Vertical Type tool, the Horizontal Type Mask tool, or the Vertical Type Mask tool. The latter two are used to create type masks that essentially are selections that can be filled, painted, or used to capture underlying pixels.
Type in Photoshop changed from raster-based to vector-based back in version 6. When you set type in Photoshop, it appears on a separate layer and remains fully editable as long as the Photoshop image is not flattened or the layer is not rasterized. If you want to preserve the type on a layer and keep it editable, you need to save the file with layers intact. Saving as a PDF (with layers) preserves the type on the layers and keeps it in vector form.
Tip
If you prepare files for PDF viewing, leave the type on a layer and save as Photoshop PDF. When the PDF is opened in Acrobat, all the type is searchable with Acrobat Search.
For typesetting in Photoshop, you have attribute choices you can make in the Options bar as well as two panels where character and paragraph options choices are made.
When you click the Type tool in the Photoshop Toolbox, the Options bar displays options for setting type. As shown in Figure 15.16, the choices extend from character attributes to paragraph options. The individual settings include the following:

Change Text Orientation: Click the icon to change from horizontal to vertical and vice versa. If a block of text has been created on a layer, you can change type orientation by simply selecting the layer and applying the change.
Font Family: The pull-down menu lists all fonts available to your system. Photoshop reads installed fonts when you launch the program. Therefore, if you load a new font with a font-management tool, you need to quit Photoshop and relaunch it before the font is recognized in the menu.
Font Style: You have choices for font style from pull-down menu commands. Choose from options such as Regular, Bold, Italic, and Bold Italic when the styles are available for a given font.
Font Size: From the pull-down menu, you have choices for fixed point sizes, or you can enter a value in the field box. Sizes range from 0.01 to 1,296 points. Because the type is vector art, however, you can use the transformation tools to create any type size you want.
Note
For more information on transforming objects, see Chapter 11.
Anti-Aliasing Method: Anti-aliasing creates an illusion of smoothing objects. When you anti-alias objects, small partially transparent pixels are added to objects, giving the appearance of smoother edges. Photoshop offers you several choices for anti-aliasing, including the following:
None: Applies no anti-aliasing.
Sharp: Adds a slight amount of anti-aliasing, keeping the type sharp in contrast.
Crisp: Similar to Sharp but adds a little more anti-aliasing, making the appearance slightly less sharp.
Strong: Creates a slightly bold appearance to the type. If you anti-alias type and it appears to lose the normal type weight, add Strong to thicken the characters.
Smooth: Adds more anti-aliasing. A good choice for type that may appear with strong jagged edges.
Align Left: Aligns text left.
Align Center: Aligns text centered.
Align Right: Aligns text right.
Text Color: Click the color swatch, and the Photoshop Color Picker opens. You can make choices for the type color from the Color Picker, from the Color and Swatches panels, or from the Foreground Color tool in the Photoshop Toolbox.
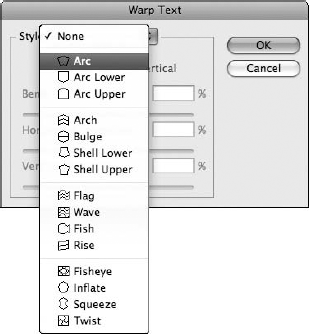
Create Warped Text: Photoshop offers you many options for applying effects to type from the Create Warped Text tool. Select the type you want to use to apply a new style, and the Warp Text dialog box opens as shown in Figure 15.17. When warping text, you can apply changes by either selecting the text with the Type tool or selecting the layer containing the text.
Toggle the Character and Paragraph Panels: This toggles the Character and Paragraph panels open and closed.
Some character attributes are the same in the Character panel as you find in the Options bar. Choices for font family, font style, and anti-aliasing methods are duplicated in the Character panel. The panel also contains other options. When you open it, you'll notice the panel appears similar to the Character panel found in Illustrator. To open the panel, choose Window
As you can see, the options are almost identical to those found in Illustrator. Notice that the horizontal and vertical scaling is flopped in the Photoshop Character panel, but the six attribute choices below the pull-down menus for font and style are identical to Illustrator.
Photoshop does offer additional choices that appear at the bottom of the panel. From the row of icons, reading left to right, you have the following choices:
Faux Bold: Enables you to bold a font that does not have a bold equivalent with the chosen typeface
Faux Italic: Enables you to italicize a font that does not have an italic equivalent
All Caps
Small Caps
Superscript
Subscript
Underline
Strikethrough
From the lower-left pull-down menu, you can choose from installed languages. The pull-down menu in the lower right is where anti-aliasing choices are made.
When creating type in Photoshop, you press the Num Pad Enter key to complete the typesetting and signal Photoshop that you've ended your type edits. If you press the Return/Enter key, Photoshop adds a carriage return to the body of type. The ability to add carriage returns means Photoshop supports paragraph type. The attributes you can assign to paragraphs are, in part, located in the Options bar, where you can choose from three justification methods. The remaining choices are located in the Paragraph panel. When the Character panel is open, click the Paragraph tab to open the panel shown in Figure 15.19.

As you can see in Figure 15.19, the Paragraph panel options in Photoshop are identical to those in Illustrator. As is the case with changing character attributes, you can select the text with the Type tool or simply click the layer in the Layers panel. Changes you make in the Paragraph panel are applied to the text regardless of which selection you make.
Line Illustrator and InDesign Photoshop are two composers that are selectable in the paragraph panel. Open the fly-away menu and choose one of the following:
Adobe Single-line Composer: The single-line composer offers a traditional approach to composing type one line at a time. This option is helpful when you want manual control over line breaks.
Adobe Every-line Composer: The Every-line composer considers a range of lines and applies line breaks to the range resulting in a more attractive type appearance.
As a matter of default, you might choose the Adobe Every-line Composer option when setting type in Illustrator, Photoshop, and InDesign. When you need manual control over line breaks and want to apply soft and hard breaks manually, choose the Adobe Single-line Composer option from the fly-away menu in the Paragraph panels in all these applications.
In many design workflows, you're likely to be handed copy that has been composed in a word processing program. If you work with copywriters or obtain copy from clients, the files are usually Microsoft Word documents. And unless the author used style sheets you can import, you'll need to reformat the text in InDesign.
Note
For more information on importing Microsoft Word documents, see Chapter 18.
For some creative professionals, using word-processing programs may not be as appealing as setting type in InDesign. Certainly, for single-page ads and smaller pieces, you may use InDesign for both creating copy and performing the layout tasks. Fortunately, InDesign does have some impressive tools if you decide to use the program for creating copy.
InDesign's Story Editor is like having your own word processor built into the program. In order to use the Story Editor, you need to have a text frame selected on a document page. If no text frame exists, the Story Editor is not accessible.
To open the Story Editor, select a text frame or several text frames and then choose Edit

The Story Editor opens and appears in front of the document window. The Story Editor is dynamic in many ways. As you type in the Story Editor, the text is updated on the corresponding text frame. As its own document window, the Story Editor does not prevent you from using other tools and menus in InDesign that are needed for setting type. Panels used for styles and text formatting are accessible to you while working in the Story Editor. In Figure 15.20, the Story Editor is open where text is added in the editor and displayed on the document page. The Paragraph Styles panel is used to select styles and apply them in the Story Editor.
In Figure 15.20, notice the appearance of the vertical ruler. InDesign offers you a vertical depth ruler to measure the depth of text. Another feature in InDesign is support for viewing overset text with markers. When you set type and your type frame is not large enough to display the type, the text is overset and hidden from view. You need to open the text frame to reveal the hidden text. In the Story Editor, the hidden text is marked with an Overset, as you see in Figure 15.21.

Figure 15.21. Overset text is marked with a line. The text falling below the line is hidden from view when you return to the Layout mode.
While working in the Story Editor, you can make choices from the Type menu and panels where type attributes are selected, or you can make similar choices from a context menu. To open a context menu in the Story Editor, press the Control key and click (Mac) or right-click (Windows) and the context menu shown in Figure 15.22 opens.
When you want to return to the InDesign document window, click the close box in the Story Editor window, select Edit in Layout from the context menu, or choose Edit
The Character panel in InDesign offers the same options as Illustrator, with the exception of the Skew option in place of the Rotate option. Below the Horizontal Scale setting, you see the Skew option (shown as a slanted T), as shown in Figure 15.23.
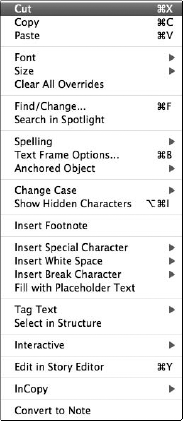
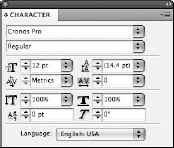
Figure 15.23. The InDesign Character panel offers almost identical options to those in the Illustrator Character panel.
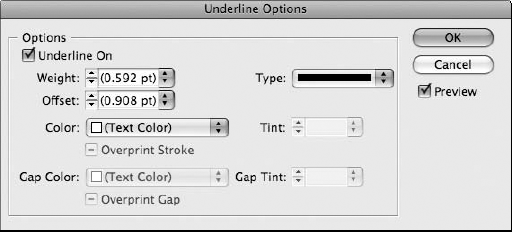
From the panel menu, you can see some other options choices available only in InDesign. The underline and strikethrough options are listed in the panel, but each contains a companion Options menu where you can change attributes for underlines and strikethroughs, such as line weight, spacing, color, gaps, and so on. Select Underline Options, and the dialog box opens, as shown in Figure 15.24. Most items in the dialog box should be self-explanatory. A little more confusing are the Offset options. Increasing the Offset pushes an underline down, while decreasing the Offset pushes the line up. This may be counterintuitive and not logical to you. Try to remember that increase in this instance is down, while decrease is up.
The options for strikethrough are similar to the options for underlining. Click the Strikethrough Options menu command, and a similar dialog box opens. Again, the options should be self-explanatory.
Another distinction you'll find between the Character panels in Illustrator and InDesign are the options selections for OpenType fonts. In Illustrator, buttons appear in the bottom of the OpenType panel, and in InDesign you can see the submenu items in Figure 15.25 offering the same options.
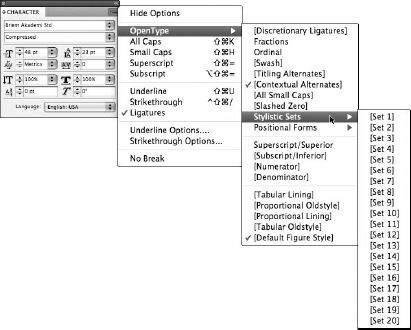
Another feature in InDesign is an option for selecting Stylistic Sets, as you see in Figure 15.25. OpenType fonts contain many alternate characters such as ligatures, fractions, swashes, ornaments, ordinals, titling, stylistic alternates, and so on. The OpenType panel lets you set up rules for using glyphs such as using ligatures, titling characters, and fractions for a given body of text. By using Stylistic Sets, you can apply alternates to a selected block of text without having to change each character individually.
Setting type in InDesign does not require you to access Character and Paragraph panels to change attributes. The Control panel that appears by default at the top of the screen when you launch InDesign is one of the most frequently used tools favored by design professionals. Depending on the tool you select in the InDesign Toolbox, the panel changes to reflect options choices for the selected tool. In Figure 15.26, formatting options are shown for characters (top), paragraphs (middle), and objects (bottom).

Figure 15.26. When the Type tool is selected, you can toggle between formatting options for characters (middle) and paragraphs. When other tools are selected, options for transforming objects are displayed (bottom).
Note
When using wide monitors looking at paragraph Controls InDesign CS3 and higher also shows some character controls at the same time.
With the Type tool selected, you can toggle between character and paragraph options in the Control panel. Simply click either the letter A or the paragraph symbol on the far left side of the panel. From there, you can make attribute choices by changing field box values and using pulldown menus. When using tools other than the Type tool, the panel displays options for applying attributes to objects, as shown in the last panel in Figure 15.26.
The Control panel is a handy place to select either character or paragraph styles. In addition, when selecting objects, you have options for showing graphic styles. From the flyout menu, all the style sheets contained in your document are listed. When you add a new style, it's added to the appropriate menu.
Note
For information on creating style sheets, see the sections "Creating Character Styles," "Creating Paragraph Styles," and "Creating Cell and Table Styles."
Another menu is found when you click the right-pointing arrow. Depending on the panel shown, you'll see different menu items with additional choices for setting type or for working with objects. Many of the options choices you see in pull-down menus are the same options found in the panels. You can choose among top-level menus, panels, or the Control panel to apply the same edits. Additionally you can use the panel menu on the Control panel to customize which information is displayed in this panel. InDesign offers you this flexibility so you can make choices quickly and easily.
One nice distinction between InDesign and the other CS applications is the ability to use dummy copy when preparing templates, creating styles, or creating comps for a new design project. Rather than search your hard drive for the Lorem Ipsum Greek text file you've probably used since the early days of PageMaker, you can now use InDesign's built-in support for filling text frames with placeholder text.
To use placeholder text, click in any text frame or any object where you want to convert the object to a text frame. When you see the I-beam cursor blink, choose Type

If you create comps and layouts where Greek type is used frequently, you may want to create a keyboard shortcut to access the menu command. Look over the steps that follow to see how you can assign a keyboard shortcut to access the Fill with Placeholder Text menu command.
STEPS: Using Placeholder Text
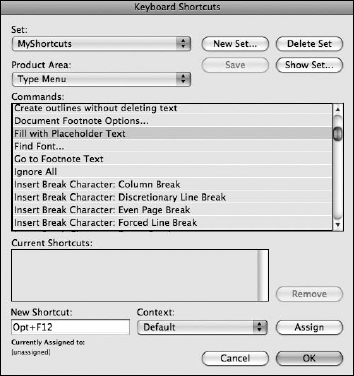
Assign a keyboard shortcut to the Fill with Placeholder Text menu command. Choose Edit
Click the Assign button, and InDesign informs you that you can't edit the default set. Click Yes in the dialog box to create a new set, and the New Set dialog box opens. Type a name for your personal custom set, and click OK. Click OK again to exit the Keyboard Shortcuts dialog box. The new shortcut is added to your new set. In Figure 15.28, we added the new keyboard shortcut to a set we named MyShortcuts.
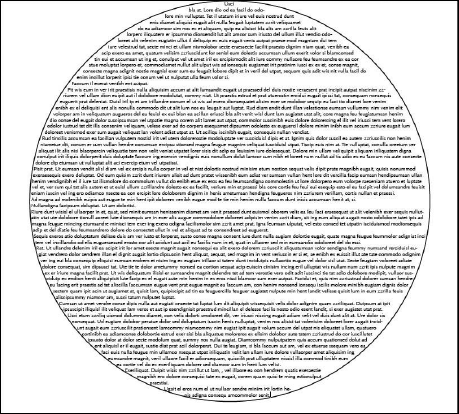
Create an object. From the InDesign Toolbox, click the Rectangle tool, the Ellipse tool, or the Polygon tool, and draw an object on the document page. For this example, we created an ellipse using the Ellipse tool.
Convert the object to a text frame. When you draw an object in InDesign, the object appears as an Unassigned object. You can convert the object to a text object or a graphic object via a menu command. For a quick and easy method, select the Type tool and position the cursor within the object. When the cursor shape changes to the Type tool, displayed with a marquee oval around the T character, click the mouse button. The I-beam cursor starts to blink, signifying that the object is ready to accept type.
Set the font attributes. From the Control panel, select a font, point size, and other attributes that you want displayed on the type. The type attributes you assign before filling the object with text are used when filling with placeholder text.
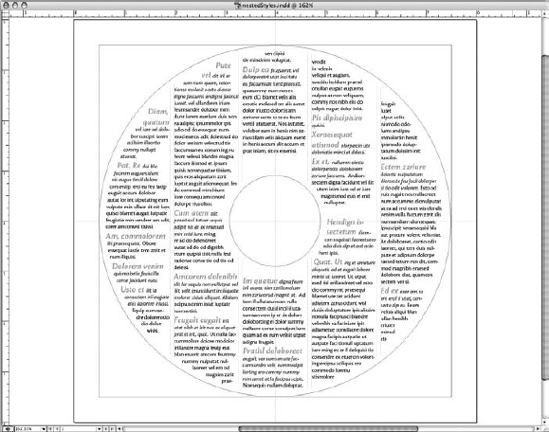
Use your keyboard shortcut to fill with placeholder text. Press the keyboard shortcut you assigned to the Fill with Placeholder Text command. The object is filled with text using the font attributes you selected in the Control panel. Figure 15.29 shows the results of filling an object with placeholder text.
The Paragraph panel in InDesign offers some of the same options as found in Illustrator, with the exception of two icons used for defining drop caps in paragraphs two alignment features, a last line indent and snap to baseline adjustments. The last two icons, shown in Figure 15.30 as A and B at the bottom of the panel, contain an option for defining the height of a drop cap (A). Setting the value to 2, for example, creates a drop cap whose height is equivalent to the first two lines of the paragraph. On the lower-right side of the panel, you can specify the number of sequential characters you want to appear as drop caps (B).
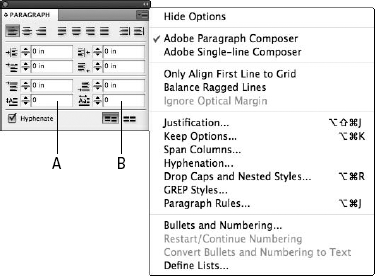
Figure 15.30. The last two field boxes offer options for choosing the number of lines a drop cap is applied to (A) and the number of characters to be used as drop caps (B).
You find more distinction between the Illustrator Paragraph panel and the InDesign Paragraph panel when opening the panel menus. InDesign offers some advanced formatting features not found in the other CS programs and some that are not found in any other layout and design program. When you open the panel menu, the options appear (refer to Figure 15.30). The menu commands include the following:
Adobe Paragraph Composer: (Known as the Adobe Every-line Composer in Illustrator and Photoshop). Break points are created to help prevent unattractive line breaks in paragraphs. Traditional methods for creating break points handled only one line at a time. The Adobe Paragraph Composer composes the breaks by taking into consideration all the lines in the paragraph. This results in a more attractive paragraph (available in InDesign, Illustrator, and Photoshop).
Adobe Single-Line Composer: This option uses the more traditional method of creating break points, taking into consideration only single lines of text (available in InDesign, Illustrator, and Photoshop).
Only Align First Line to Grid: When aligning text to a grid, only the first line of text is aligned to the grid.
Balance Ragged Lines: This option is helpful for headlines and pull quotes and when centering paragraphs. Multiple lines of type appear more balanced, as widow-type oversets at the end of the text block are eliminated. You must use Adobe Paragraph Composer and the paragraph composer to see any results with this menu command.
Ignore Optical Margin: This option overrides the Optical Margin option shown in Figures 15.32 and 15.33. In Figure 15.32 we set the optical margin in the Story Editor. In Figure 15.33 you see the text without the optical margin setting on the top and with the optical margin setting enabled on the bottom.
Justification: This option opens the Justification dialog box where paragraph justification options are set.
Keep Options: This option opens a dialog box where you can assign attributes to lines in paragraphs that you want to stay together when the paragraph flows to other frames and pages.
Span Columns: This option is new in InDesign CS5. This choice enables you to add text that spans the width of multiple columns—something like a heading or caption above a layout of two or more columns.
Hyphenation: This offers similar options for controlling hyphenation as you find in Illustrator with two more options added to InDesign for hyphenating across columns and hyphenating last words.
Drop Caps and Nested Styles: One of the truly amazing features available for typesetting is the ability to create nested styles. You have controls for drop cap positions relative to optical margins and collisions between descenders and lines beneath the drop cap and looping options for nested styles. When you are selecting the command, the Drop Caps and Nested Styles dialog box opens.
Note
For more information on nested styles, see the section "Creating Nested Styles."
GREP Styles: GREP styles allow a designer to automatically and dynamically apply character styles to the content of a paragraph using GREP patterns. We could automatically style something like a Social Security number that appears anywhere in a paragraph with this feature.
Paragraph Rules: The attributes for rules assigned to paragraphs are handled in the Paragraph Rules dialog box. Select this menu command to open the dialog box.
Bullets and Numbering: Bullets and Numbering opens the Bullets and Numbering dialog box shown in Figure 15.31. You have choices for selecting from preset characters to use as bullet markers (or number styles), or click Add to display any character set loaded in your active system fonts. Attribute choices enable you to choose font, point size, style, color, indentation, and tab positions.
Restart/Continue Numbering: Select Numbers from the List Type pull-down menu and you find options for restarting numbered lists. You might use this command when you have a second list following a first list where you want the numbers in the second list to begin at 1. You also can open the dialog box from a context menu when the cursor is placed in a paragraph containing bullets and/or numbered lists.

Convert Bullets and Numbering to Text: To convert bullets and numbering to text, select a block of bulleted or numbered text and select this menu command. This command converts InDesign's automated bullets and numbers into selectable and editable content. Once this conversion takes place the automatic qualities are removed. The bullets and numbers are not cleared; they become part of the text flow. If a paragraph style was used you'll see that manual overrides have been applied.
Paragraph formatting also can be applied in the Control panel and via menu commands. One particular option not found in either the Control or Paragraph panels is setting paragraphs for Optical Margin Alignment. When you choose Window

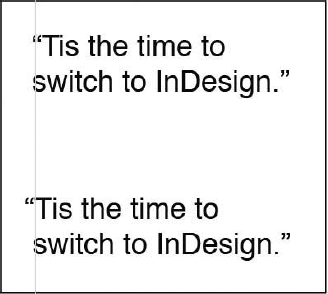
When you select the Optical Margin Alignment check box, paragraph alignment displays a different appearance. With traditional computer typesetting methods, paragraphs can appear misaligned, especially when punctuation marks and/or wide characters are used. In Figure 15.33, you can see where Optical Margin Alignment was applied to the bottom text block compared to the default margin alignment on the first text block. Because the punctuation hangs outside the text frame on the second block of text, the characters appear more aligned.
InDesign has so many different options for setting character and paragraph attributes that a complete coverage would take the space occupied by all the chapters in this book. We've highlighted some of the main features here and discussed the options found in the menus and panels. For a comprehensive view of setting type in InDesign, see the InDesign CS5 Bible by Galen Gruman (Wiley, 2010).
Once the job of Illustrator, applying type to paths also is available in Photoshop and InDesign. Applying type to paths opens up worlds of possibilities for each application. With the capability for adding type to paths in Photoshop, you can use familiar methods for stylizing type with shadows, embossing, filter effects, and so on, and you don't need to rely on rasterizing type in Photoshop that was originally created in Illustrator. In addition, in InDesign CS5 you can apply transparency effects to Photoshop .psd files imported in an InDesign layout.
Adding type to paths is a simple process in any of the CS programs where this feature is available. Basically, you create a path either with the Pen tool or use segments from paths created with other tools used for drawing objects. In Photoshop, select the Type tool, click a path, and begin typing. In Illustrator and InDesign, use the Type on a Path tool. Access the Type on a Path tool by pressing the mouse button down on the Type tool and selecting it from the pop-up menu.
To add type to freeform paths, click the mouse button on the path and begin typing. For closed paths in either Illustrator or InDesign, by default, the type is added to the outside edge of the path. The respective program knows the distinction between adding type to a path and creating type inside a closed path. This is determined with the proper selection of the Type tool. When the Type on a Path tool is selected, the type conforms only to the path and not to the inside of a closed path.
In Photoshop, the task is a little different. When you have a closed path, placing the cursor on the path and clicking the mouse button enables you to type on the path. If you move the cursor inside the path, the cursor shape changes to the oval marquee around the letter T, signifying that type is to be added inside the path. The shape of the cursor informs you where the type will be placed.
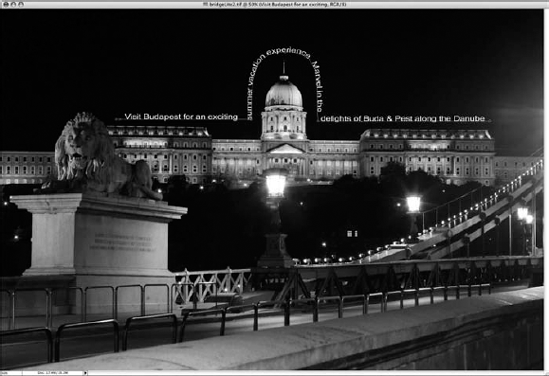
In Figure 15.34, you can see type added to a path in Photoshop. When adding type to a path, be certain to check the paragraph attributes for alignment. If your type doesn't show up on the path, you may need to adjust the alignment from center-aligned to left-aligned or reduce the type size. After adding the type, you can change the alignment and other text attributes.
Both Illustrator and InDesign permit adjustments to type on paths in the same manner. When you add type to an open path, the type is added in a straightforward fashion. However, if you start with a closed object and then delete one side, type may be added to the shape flopped or upside-down.
In each program, you can move type along a path or flop it by moving the centerline appearing within the type. In InDesign, the line is much less visible than in Illustrator, but it does exist. In Figures 15.35 and 15.36, you can see type added to a semicircle that began as an elliptical shape. The type is flopped. To move the type up where the type reads from left to right, drag the line at the center point upward.

Figure 15.35. To align type on a path in Illustrator, drag the centerline left/right or upward. Drag this line up/down or left/right to reposition type
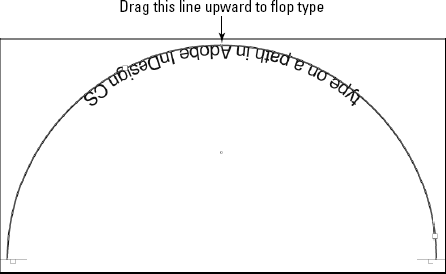
Figure 15.36. The same centerline appears in InDesign, but the line is less visible. Drag this line upward to flop type
Additional editing options are available in both Illustrator and InDesign in a separate dialog box specifically handling type on a path effects. Select type on a path in either program and select Type

In the Type on a Path Options dialog box, you can make various choices for type effects and baseline alignments.
In both InDesign and Illustrator, you have the ability to create style sheets at the character level. Using character styles allows you to specify formatting attributes for a selected range of text within your documents. For example, you may want to use different character formatting for Web-site URLs and e-mail addresses that appear in your copy. Instead of changing type in the Character panel, or using tedious find-and-replace commands to alter attributes of single characters or a string of words within a document, you can apply global changes to characters quickly and easily by changing formatting options in the Character Styles panel. All text to which you've applied the specific style is changed automatically. Using both character and paragraph styles saves time and ensures that your documents have a consistent look.
In Illustrator, you can set up character styles from scratch or by designating preformatted text as the basis of the new style. You also can copy an existing style and make formatting variations in order to create a new style.
To create a new character style, open the Character Styles panel by choosing Window

To create a new style from scratch, click the Create New Style button in the lower-right portion of the panel. A new style with a default name automatically appears in the panel. An alternative way to create a new style is to select New Character Style from the panel menu. At this point, you're prompted to give the style a custom name. Either way, when the new style name appears in the list, doubleclick it to edit its attributes with the Character Style Options box, shown in Figure 15.39.
Warning
Double-clicking a style in the Character Styles panel applies the style to any text you currently have selected in your document. If no text is selected, the style is applied to any new text you type. To keep either of these events from happening, press Shift+Ctrl (Shift+

When the Character Style Options dialog box opens, you see the name of the selected style at the top and five options to the left. The options include the following:
General: This is the pane displayed when you first open the Character Style Options dialog box. It's a summary of the remaining four settings, the style settings. You can view attributes of the separate style settings by toggling the gray arrows in the right side of the pane.
Basic Character Formats: In this menu, you can specify font family, font style, size, leading, kerning, tracking, case, position (superscript or subscript), and whether or not you want Standard Vertical Roman Alignment.
Advanced Character Formats: Here you can specify horizontal and vertical scale, baseline shift, character rotation, and desired language.
Character Color: Choose your desired fill, stroke, and overprint options here.
OpenType Features: This panel allows you to set OpenType options just like those found in the OpenType panel (see the section "Using OpenType").
After you've set up your attributes the way you want them, simply click OK.
You can easily create copies of existing character styles by either dragging the style onto the Create New Style button, or by choosing Duplicate Character Style from the Character Styles panel menu. To delete styles, simply drag the style name to the trash icon, or select the style and choose Delete Character Style from the panel menu. You also can import styles from other Illustrator documents by using the Load Styles command.
Tip
You can easily create a new style sheet based on the formatting of existing text. This is handy if you're experimenting with different design options because it eliminates the need to manually type all the formatting details in the Character Style Options menus ahead of time. Simply select the text whose attributes you want to use, and click the Create New Style button.
To apply character styles in Illustrator, first select the characters with the Type tool or a selection tool. If you're typing new characters, place the cursor where you want the style to begin. Then simply click the style name in the Character Styles panel. To designate a style to be used for any new type in the document, be sure to deselect all type objects first; then click the style name.
Photoshop doesn't have character or paragraph style panels. Logically, you wouldn't use Photoshop for setting large bodies of type. However, Photoshop is often used when stylizing type where you may apply various effects and filters. The edits you make to type in Photoshop can be captured as graphic styles. To see how graphic styles and tool presets are used with Photoshop, see the section "Working with graphic styles in Photoshop."
The process of setting up and using character styles in InDesign is very similar to Illustrator. InDesign does offer a few additional options for refining your typesetting capabilities, however.
Open the Character Styles panel by choosing Type
Creating a new style is the same procedure as in Illustrator: Click the Create New Style button in the lower-right portion of the panel, or open the panel flyout menu and select New Character Style. You can then specify attributes with the Character Style Options or New Character Style box. The options here are pretty much like Illustrator's, with a few minor differences. As shown in Figure 15.40, with InDesign you have the added ability to base styles on existing styles and create shortcuts. You also have advanced options for underlining, strikethroughs, and ligatures, as well as a no-break option and a skew option in place of Illustrator's rotation option. You also can apply a style to a selection using the Apply Style to Selection option in the New Character Style window. This option is handy when you create a new style and text is selected in the layout. You can apply the new style to the selected text without leaving the New Character Style dialog box.

Notice in Figure 15.38 the Character Styles panel also has a folder icon. Click this icon and a new styles group is created. You can nest styles in groups of folders in InDesign.
Duplicating, editing, and deleting Character Styles is the same as in Illustrator. InDesign can import character styles from other InDesign documents using the Load Character Styles command. A distinction between defining and applying styles between Illustrator and InDesign is InDesign's support for defining type attributes without adding a typeface to the style. For example, you can define a style for italicized text and apply the style to text having different faces with the result being just the italics applied to the type without changing typefaces.
Paragraph styles are especially helpful for managing large amounts of text in both InDesign and Illustrator. The one limitation you have with respect to both character and paragraph styles among the CS applications is that styles created in either Illustrator or InDesign cannot be imported across programs. You can import styles from application documents using the same application. For example, you can load character styles in Illustrator from another Illustrator document. However, you cannot load character styles in Illustrator from an InDesign document or vice versa. The same applies to paragraph styles. Furthermore, when you import Illustrator files containing style sheets in InDesign, or copy and paste text between programs, the style-sheet information is lost.
Just like with Character Styles, you can set up paragraph styles from scratch or by designating preformatted text as the basis of the new style. You also can copy an existing style and make formatting variations in order to create a new style.
Open the Paragraph Styles panel, shown in Figure 15.41, by choosing Window
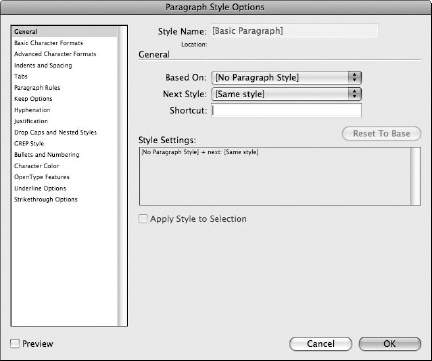
By default, every paragraph is assigned the Normal Paragraph Style if no paragraph style exists. Otherwise, the default is the default paragraph style in the document. To create a new paragraph style, click the Create New Style button in the lower-right portion of the panel. A new style with a default name automatically appears in the panel. Or create a new style by selecting New Paragraph Style from the panel menu. At this point, you'll be prompted to give the style a custom name. Either way, when the new style name appears in the list, double-click it to edit its attributes with the Paragraph Style Options box, shown in Figure 15.42.

When the Paragraph Style Options dialog box opens, you see the name of the selected style at the top and ten options to the left. These include the following:
General: This pane is displayed when you first open the Paragraph Style Options box. It's a summary of the remaining nine settings, the style settings. You can view attributes of the separate style settings by toggling the gray arrows in the right side of the pane.
Basic Character Formats: Specify font family, font style, size, leading, kerning, tracking, case, position (superscript or subscript), and whether or not you want Standard Vertical Roman Alignment.
Advanced Character Formats: Specify horizontal and vertical scale, baseline shift, character rotation, and desired language.
Indents and Spacing: Specify alignment, left indent, first-line indent, right indent, space before, and space after.
Tabs: Specify tab settings.
Composition: Specify the Adobe Composer and hanging punctuation.
Hyphenation: Specify hyphenation preferences.
Justification: Specify justification preferences.
Character Color: Choose desired color and stroke options.
OpenType Features: This panel allows you to set OpenType options just like those found in the OpenType panel (see the "Using OpenType" section, earlier in this chapter).
After you've set up your paragraph attributes the way you want them, click OK.
You can easily create copies of existing paragraph styles by either dragging the style onto the Create New Style button, or by choosing Duplicate Paragraph Style from the Paragraph Styles panel menu. To delete styles, simply drag the style name to the trash icon, or select Delete Paragraph Style from the panel menu. You also can import styles from other Illustrator documents by using the Load Paragraph Styles command in the panel menu.
To apply paragraph styles in Illustrator, insert the cursor in a single paragraph or select a range of paragraphs. Simply click the style name in the Paragraph Styles panel. To designate a style to be used for all new paragraphs in the document, be sure to deselect all type and objects first; then click the style name in the panel.
If you see a plus sign next to a paragraph style in the Paragraph Styles panel, it means the selected text has overrides. Overrides are formatting attributes that don't match the defined style. To clear overrides, simply reapply the same style or use the Clear Overrides command in the Character Styles panel menu. Illustrator preserves overrides when you apply a different style to text with overrides, and to clear them you need to Option/Alt-click the style name when you apply the style.
Just like with character styles, the process for setting up and using paragraph styles in InDesign is very similar to Illustrator. InDesign offers additional options here as well.
Open the Paragraph Styles panel by choosing Type
Creating a new style is the same procedure as in Illustrator: Click the Create New Style button in the lower-right corner of the panel, or select New Paragraph Style from the panel menu. Additionally you can create a style group by clicking the folder in the Paragraph Styles panel. Drag and drop new styles in the folder you add to the Paragraph Styles panel.
You specify attributes with the Paragraph Style Options or New Paragraph Style box. The options here are similar to Illustrator, but greatly expanded to include: the addition of keyboard shortcuts, basing styles on other styles, paragraph rules, keeping lines together, drop caps, nested styles, next style, Apply Style to Selection, ligature options, more OpenType options, skewing instead of character rotation, and underline and strikethrough options. As shown in Figure 15.43, the many options for paragraph-style formatting are selected in the left pane where individual options appear on the right side of the dialog box.
Duplicating, editing, and deleting Paragraph Styles in InDesign is the same as in Illustrator. You can import Paragraph Styles from other InDesign documents using the Load Paragraph Styles command. One additional feature you have with InDesign is synchronizing all style systems via a Book to make many documents have exactly the same styles. This feature is particularly helpful in workflow environments where you can create layout templates with paragraph and character styles, and workgroup members can work on different chapters/sections of a document that is eventually converted to a book. For working on independent documents you might use a template where all members of your workgroup can load styles from a master template and set type according to the styles defined for a particular project.
There are four ways to apply a paragraph style to selected text in InDesign. You can select the text and click the style name in the Paragraph Styles panel, choose the style name from the pull-down menu in the Control panel, use the Quick Apply method by selecting Edit
Note
When you apply a paragraph style to text, it doesn't automatically remove any existing character formatting in the paragraph. A plus sign (+) appears next to the paragraph style in the Paragraph Styles panel if there is any formatting applied that doesn't match the current style. Even if you click No Paragraph Style, the formatting remains intact. If you want to remove all formatting, including the existing character styles, you must press Alt or Option and then click No Paragraph Style in the panel or use the Clear Overrides buttons at the bottom edge of the styles panels.
Nested styles enable you to apply complex formatting to text using one or more character styles. You may decide, for example, that multiple paragraphs in your layout need to include a custom drop cap, a special style treatment for the first sentence, and a third style for the remainder of the body copy. In this instance, you would create two separate character styles, capture them as a nested style, and apply the nested style to other paragraphs in your composition. Each time the nested style is applied to a new paragraph, the drop cap, first sentence characters, and remaining body copy styles are applied automatically.
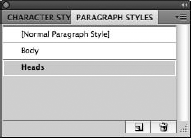
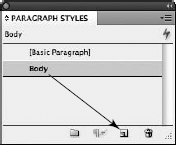
The easiest way to create a nested style is to first create the individual character styles required. These individual styles need to be listed in the Character Styles panel. For the body copy, create a paragraph style and add it to the Paragraph Styles panel. Drag the paragraph style name to the Create New Style icon to create a duplicate style. Notice in Figure 15.44 the style named Body is selected. Drag the style name to the Create New Style icon, as shown in the figure. The duplicated style appears in the panel with the word copy after the style name.
You can double-click the paragraph style copy to open the Paragraph Styles panel. However if text is selected, you'll first apply that style to a paragraph. A better option is to right click (Control + click on a Mac with a mouse with one button) to open a context menu and select Edit <style name>. In the Paragraph Style Options dialog box, scroll down the list and select Drop Caps and Nested Styles in the left pane, as shown in Figure 15.45. The options change to settings used for creating nested styles. To make this process a little more comprehensible, work through the following steps to see how a nested style is created and then applied to a body of text.

Figure 15.45. Select Drop Caps and Nested Styles on the left to access the attribute choices for creating nested styles.
What Happens When You Forget to Add a Character Style?
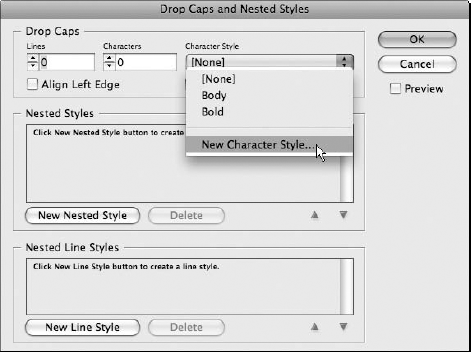
The steps used to create a nested style assume you had all the proper character styles defined. If you forgot to create a character style, you needed to bail out of the Drop Caps and Nested Styles dialog box, create the character style you need to add to the nested style, and reopen the Drop Caps and Nested Styles dialog box. All this you had to do prior to InDesign CS4. In the last two releases of InDesign, when you're in the Drop Caps and Nested Styles dialog box, you can add a new character style without leaving the dialog box. Just open the Character Style pull-down menu and choose New Character Style. The new style dynamically appears in the list of available styles in the Drop Caps and Nested Styles dialog box.
STEPS: Creating and Applying Nested Styles
Create a text passage in InDesign. Import text from a text file, or use placeholder text containing several paragraphs.
Set type attributes for the body copy. Select all the placed text, and choose a font style and point size that represents the main body copy you intend to use.
Define a new paragraph style. Click the cursor anywhere in the placed text after setting the font attributes, and select New Paragraph Style from the Paragraph Styles panel menu. Provide a name for the style. In our example, we use Body for the style name. After creating the style, select all the text by placing the cursor anywhere in the text body and press
Select the first two words in the first paragraph, and change the font attributes. Change the selected text point size to a larger point size than the body copy. Add points to the type in the Control panel, and change the font. Open the Color panel, and assign a new color to the character.
Create a character style for the first two words. Select the first two words you changed in Step 4, and select New Character Style from the Character Styles panel menu, shown in Figure 15.46. Name the style 1st two Words.
Create another style for the first sentence. Select the first character in the third word through the last character in the first sentence. Change type attributes to a different font style from the style used for the body copy. Open the Character Styles panel menu, and select New Character Style. Be certain the cursor appears within the sentence where you just changed the font attributes before opening the New Character Style dialog box. Provide a name for the style, such as 1st Sentence, and click OK.
Duplicate the Body text paragraph style. Select Body in the Paragraph Styles panel, and drag it to the Create New Paragraph Style icon. InDesign automatically names the new style Body copy.
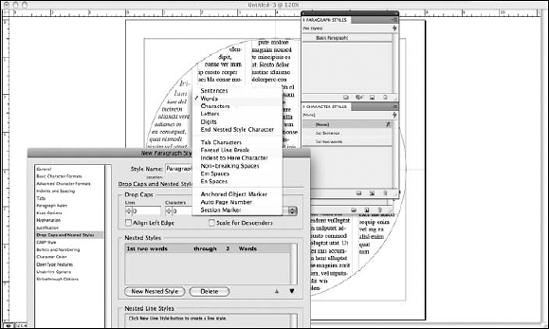
Create a nested style. Right-click (Control + click on the Mac) on the Body copy style you created in the Paragraph Styles panel and select Edit Body to open the Paragraph Style Options dialog box. Click Drop Caps and Nested Styles in the left pane. Click New Nested Style. In the Nested Styles window, the highlighted item appears as None. When you click the item, a pull-down menu shows all the character styles you created in the Character Styles panel. Select 1st Two Words from the menu items. Select Words on the right side of the new nested style entry in the Nested Styles window, as shown in Figure 15.47. Select the default number 1 and type 2 in the field box.
Add a second character style to the nested style. Click New Nested Style. From the Character Style pull-down menu on the left, select 1st Sentence (the second character style you created) as shown in Figure 15.48. Select Sentence in the last pull-down menu. Click OK when you're finished defining the style. Be certain to leave the value in the field box at the default 1 for one sentence.
Apply the nested style to the copy. Click the cursor in the text passage, and press
Deselect the text. Click the cursor anywhere on the page, and the text is deselected. The final styling appears as shown in Figure 15.49.


Tip
When working with selected text, press the Esc key to toggle out of the text mode and deselect all.
Making changes to type attributes where nested styles have been assigned is easy. As is the case with paragraph styles, the nested style is based on the various character styles. You can revisit the Character Styles panel and make changes to type attributes. The type changes are dynamically updated in the nested style, which directly changes the type where the nested style was applied.
One of the best features added to InDesign CS4 was the ability to use style sheets with tables. If you've spent hours formatting tables in InDesign and then had to repeat all the steps to produce an attractive table, you'll very much appreciate having cell and table styles to speed up your work.
Before you begin using the cell styles in InDesign, your best workflow is to first format a table and create a table style. You create tables in InDesign using Character and Paragraph Styles with the Character and Paragraph Styles panels. All the text formatting for type should have at least one occurrence of a paragraph style and that style should be applied to all type having identical appearances in your table. In addition, add a table header and or footer using menu commands in the Table menu.
When your first table is formatted as you like including fills, strokes, text formatting from Paragraph Styles, header row, and so forth, select the table and open the Table Styles panel. Click the Create new style icon in the panel or open the flyout menu and choose New Table Style. The New Table Style dialog box opens as shown in Figure 15.50.

Type a name for your new style in the Style Name text box. Along the left side of the dialog box, you see options for the Table Setup, Row Strokes, Column Strokes, and Fills. If you formatted your table using stokes and fills you needn't bother adjusting the settings in the different panes in the New Table Style dialog box. If you want to change the cell attributes when formatting new tables, you can make these adjustments in the various panels.
At the bottom of the New Table Styles dialog box shown in Figure 15.50, you find options for selecting cell styles. As yet, we haven't created any cell styles, so you should leave the settings at the default and click OK in the New Table Style dialog box.
At this point, you created a table style ready for use when adding a new table having similar attributes to your layout. The next step in the process is to create cell styles.
To repeat what we said at the beginning of this section on Creating a Table Style, you need to format text using styles from the Paragraph Styles panel. You first add the various character styles for formatting type and then create paragraph styles using the character styles. When all the text is properly formatted for cells using paragraph styles, select the type in a cell and open the Cell Styles panel. To create a new cell style, choose New Cell Style from the flyout menu. The Cell Style Options dialog box opens, as shown in Figure 15.51.

Name the style by typing a new name in the Style Name text box. At the bottom of the General pane shown in Figure 15.51, you see a drop-down menu where choices can be made from the paragraph styles you created in the Paragraph Styles panel. Be sure to select the proper style for the cell you are formatting.
As with the New Table Style dialog box, you have options for formatting Strokes and Fills by clicking the respective label in the left pane. Additionally, you have options for formatting text and diagonal lines. If your cell is properly formatted, simply click OK to create the new style. If you want to make changes for other new tables you add to your layout, use the various panes in the panel to make the desired changes.
In Figure 15.52 you see a table that has been formatted for a layout at the top of the figure. Below the formatted table is an unformatted table. The top table has been selected and a new table style created in the Table Styles palette.
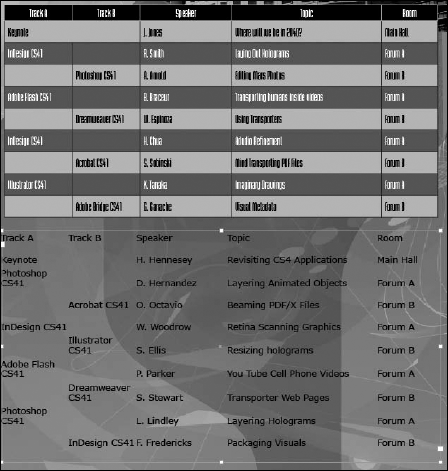
Figure 15.52. The top table is formatted for the layout and the bottom table is an unformatted table.
When you select the unformatted table and apply the table style, the table takes on some of the attributes of your formatted table such as row and column fills and strokes, as you can see in Figure 15.53. However, InDesign doesn't know what the type formatting should be for the cells in the table. This is where your cell styles help you finish the formatting.
To apply all the cell styles to your table for the text formatting, you use the Table Styles panel. Right-click (Control + click on the Mac) the table style name in the Table Styles panel or doubleclick the Table Style name you created for your table style, or open a context menu and select Edit <style name>. The Table Style Options dialog box opens. This dialog box is identical to the New Table Styles dialog box.
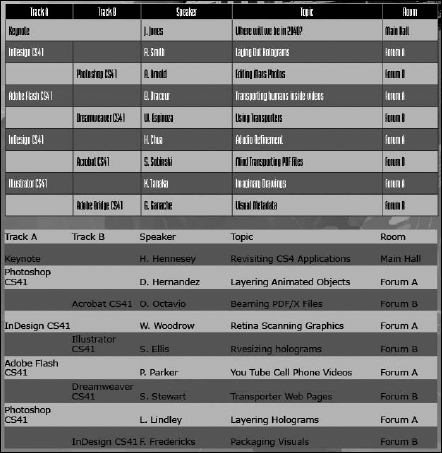
Figure 15.53. When a table style is applied to a new table, only partial table attributes are applied.
At the bottom of the Table Style Options dialog box you make selections for the cell styles you created in the Cell Styles panel. Notice in Figure 15.54 that we created cell styles for header rows and body rows. The pull-down menus reflect the cell style names used when we created the cell styles.
Click OK and your cell styles are applied to the cells in the table. If you need to convert the first row to a header, select the first row and choose Table
Assuming you followed the recommended procedure described here, an unformatted table should appear with the same formatting attributes as the table used to create the table style. In Figure 15.55 you can see the second table after we added the cell styles in the Table Style Options dialog box.


Graphic styles are used when you want to apply effects to type and objects. Instead of using the character and paragraph panels, Illustrator, Photoshop, and InDesign offer you a styles panel where effects applied to type can be captured as a style. When you add additional type to a document, you can click a graphic style in Photoshop and Illustrator or object style in InDesign and all the effects associated with that style are applied to the selected type.
Graphic styles are not restricted to text. You can use graphic styles with objects as well as with type. Just to stay consistent with the content in this chapter, we'll confine the discussion on graphic styles to applying them to type.
Illustrator provides you with a number of different graphic styles libraries you can load in the Graphic Styles panel. Choose Window

Figure 15.56. Choose Window
In addition to applying preset styles, you can create custom styles and add them to your Graphic Styles panel. Graphic styles are created much like character and paragraph styles. You first edit text or an object and then capture the edits as a new graphic style. To see how easily you can create graphic styles, follow the steps below.
STEPS: Creating Graphic Styles in Illustrator
Create text. Type a single character on a page. Use 72 points or more for the point size. You can create more than one text character; but if you decide to apply effects that take some time to render, everything will move faster when using a single character.
Fill and stroke the character. Use the Swatches or Color panel and the Stroke panel, and select colors to add for the fill and stroke. Set the stroke value between 3 to 5 points.
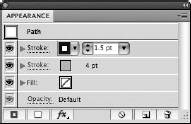
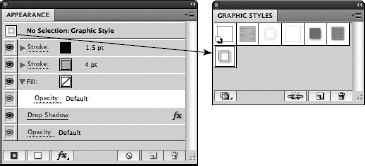
Apply a second stroke. Open the Appearance panel, and from the panel menu select Add New Stroke, or click the Add New Stroke tool at the bottom of the panel. While the new stroke is selected in the Appearance panel, you can change attributes for color and stroke value right in the Appearance pane as shown in Figure 15.57. In our example, we use a 4-point stroke for the first stroke and 1.5 for the second stroke. Click a contrasting color in the Swatches color panel to change the color of the stroke.
Tip
When you want to add multiple strokes to a path, always use the Appearance panel. You might want to illustrate a map with road paths where a white path appears above a larger black path to give the appearance of parallel lines. Rather than creating two strokes where the narrower white stroke appears above a larger black stoke, just use the appearance panel to add a second stroke. Your illustration will have fewer objects, and it is much easier to edit the stroke sizes and colors using the Appearance panel.
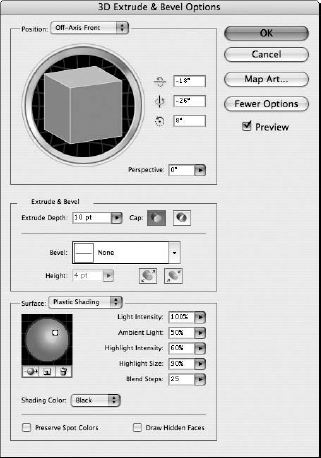
Apply an effect. Select Type or Character in the Appearance panel, and open the 3D Extrude & Bevel Options dialog box by choosing Effect
Apply a drop shadow. Drop shadows can be applied directly in the Appearance panel, as shown in Figure 15.59. Open the Effects pull-down menu and choose Stylize
Tip
When you want to make changes to effects such as Extrude and Bevel, open the Appearance panel and doubleclick 3D Extrude & Bevel. The 3D Extrude and Bevel Options dialog box opens where you can change the settings. If you attempt to use the 3D Extrude & Bevel menu command to edit a previous 3D effect, you'll be applying another extrusion to an object that already has one 3D effect applied to it.
Create a new graphic style. Place the Appearance panel adjacent to the Graphic Styles panel. Drag the item listed as Type: Graphic Style in the Appearance panel to the Graphic Styles panel as shown in Figure 15.60. The effects applied to the type are added as a new graphic style.
Name the style. Double-click the new style in the Graphic Styles panel. The Graphic Styles Options dialog box appears. Type a name for the style, and click OK.
Apply the style to new type. Type a text in the document window and select it. Click the new style you added to the Graphic Styles panel. All the attributes assigned to the style are applied to your new type as shown in Figure 15.61.


Photoshop doesn't support character and paragraph styles, but you do have many options for creating and applying graphic styles to objects in Photoshop.
To open the Styles panel, choose Window
In addition to the preset library styles, Photoshop offers you an option for creating your own custom style by selecting the New Style menu command. You can define style attributes for vector and raster artwork.
You apply styles from the library style options to selected layers or objects in Photoshop. Create any type characters in Photoshop, and click a style in the Styles panel. In addition, you can create type and vector objects in Illustrator, copy the artwork, and paste the artwork as a Smart Object in Photoshop.
When you choose Edit

Figure 15.62. The Styles panel offers options for selecting style libraries that you can load in the Styles panel.

Objects created as 3D renditions in Illustrator lose the 3D views when applying styles in Photoshop unless pasted as a Smart object. When a 3D object is not pasted as a smart object and you apply a style in Photoshop, the object appears as a 2D object. In Figure 15.64, a simple object was drawn in Illustrator, and the object was revolved in the 3D Revolve Options dialog box. When pasted in Photoshop where a style was applied to the object, the end result produced a 2D object, as you see on the right side of the figure.
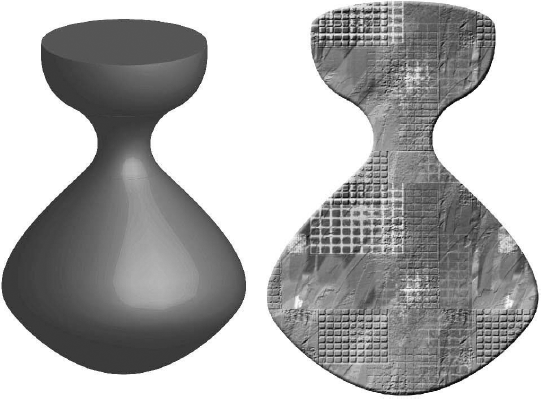
InDesign provides you with an Object Styles panel. Object styles offer the same kind of options in InDesign for stylizing type and objects as you have available in Illustrator and Photoshop. InDesign goes much farther with object styles than you have available with graphic styles in Illustrator and Photoshop as you can see by the options shown in Figure 15.66.
To open the Object Styles panel, choose Window
Object styles can be used with text frames and the object styles can apply paragraph styles to the contents of frames. You have options for separate stroke, fill, and text transparencies. If you want to apply type attributes such as font style, color, character and paragraph formatting, and so on, you need to create a paragraph style for those attributes. You can then add additional effects in the Object Styles panel.
To understand how object styles are used in InDesign, follow these steps.
STEPS: Creating Object Styles in InDesign
Add type to a document page. Type a word on a new blank document.
Set the type attributes. Select a font, and set the point size. Add color from the Swatches or Color panels. Use a gradient color if you like.
Create a paragraph style. Open the Paragraph Styles panel menu, and select New Paragraph Style. Type a name for the new style in the New Paragraph Styles dialog box.
Note
For information on creating paragraph styles in InDesign, see the section "Using paragraph styles in InDesign."
Apply effects to the text frame. You can add fill and stroke colors to the text frame; add corner effects to the frame corners; add transparency, drop shadows, and feather edges; set text wrap attributes and story options; and set anchored objects attributes.
Create a new Object Style. Choose Window
Note
The list of check boxes on the left side of the dialog box enables you to select the settings that you want to apply to the object style. You can remove check marks for those items that you want eliminated from your style. When using fills and strokes, you can click the Fill and Stroke tool in the dialog box to apply either when a Fill or Stroke is selected in the left pane. For example, you can add a stroke color when Fill is selected in the left pane by clicking the Stroke tool in the right pane and selecting a color from the scrollable color list.
Apply additional settings. Click each of the items in the left pane to open attribute choices in the right pane for each respective item. The most important item to select is Paragraph Styles. Be certain to select Paragraph Styles and select the style you added for your type effect.
Apply the Style. Click OK when you finish adding all the settings in the Object Styles Options dialog box. When you return to the document window, add a new line of type and click the text frame. Click the style name in the Object Styles panel to apply the style to the new text frame. In Figure 15.67, we added a drop shadow, added a stroke to the frame, and applied corner effects to the frame corners. The type is filled with a gradient defined in the Paragraph Style Options dialog box.
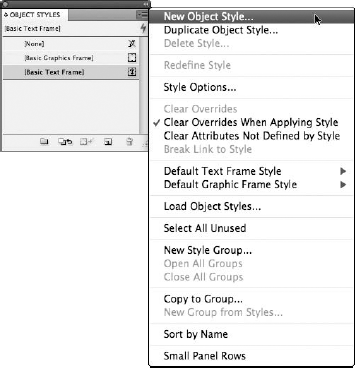
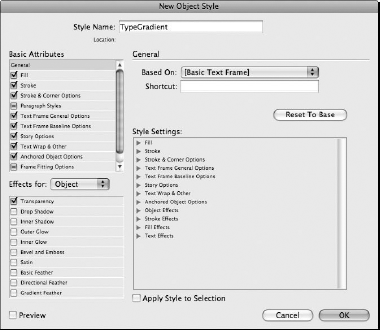

If you want to reuse styles, save your InDesign document. Open a new document, and select Load Object Styles from the Object Styles panel menu. The Open a File dialog box appears. Locate the file containing the style you want to load, and select it in the Open a File dialog box. Notice in Figure 15.68 that you can see a document thumbnail of a page containing the style. Click OK, and the Load Styles dialog box appears.
Note
Loading Object Styles also loads paragraph and character styles in the Paragraph and Character Styles panels.

The Load Styles dialog box offers you options for selecting which styles you want to load in your new document as shown in Figure 15.69. The first two styles are defaults. These styles are added to each new document you create in InDesign. Deselect the styles, and select the custom styles you want to load. Notice that the Load Styles dialog box offers you a description for a selected style in the dialog box and the style you are about to import. Click OK, and the style is added to the Object Styles panel in your new document.

Illustrator text is created as either point type or area type. When formatting paragraphs and working with larger bodies of text, click and drag the cursor to create area type.
Legacy Illustrator files need to be updated to edit type in Illustrator CS5. You can update type when opening a legacy file in Illustrator CS5 or at a later time after a document has been opened without updating the type.
OpenType fonts offer you many more sophisticated typesetting features as compared to PostScript and TrueType fonts.
Both Illustrator and InDesign offer options for creating character and paragraph style sheets. Style sheets are used to apply type formatting when repeating format designs throughout a layout.
InDesign provides an impressive typesetting feature in the form of nested style sheets. Nested styles are used when several different character styles are applied to a paragraph and you want to duplicate the paragraph formatting throughout a passage of text.
Illustrator, Photoshop, and InDesign have styles panels you can use to create styles when applying graphic effects to text and objects. The styles are not transportable among the programs, but you can import styles in new documents for styles created in the respective program.