
In Chapter 30, we introduced you to Acrobat.com As we mentioned, Acrobat.com is a service provided by Adobe Systems during the Acrobat 9.0 release and just prior to the introduction of the Creative Suite 3.3.
Using your Acrobat.com account, you can share files with clients and colleagues without having to worry about configuring your own local server for permissions access.
To share a single file with other users, you can easily use methods you're familiar with such as e-mailing a document. However, if you have several files and files of different types, you may want to create a PDF Portfolio in Acrobat 9 and share the portfolio with other users via Acrobat.com or via e-mail.
In this chapter, we talk about creating PDF Portfolios, sharing files via e-mail, and sharing files via Acrobat.com using some sharing methods you find in Acrobat 9.0.
In Acrobat 8, Adobe introduced a new method for assembling different files in what was called a PDF Package. PDF Packages were designed to support needs by designers and knowledge workers to collect a variety of file types and assemble them neatly in a single package that could be distributed to others via e-mail or Web hosting.
In Acrobat 9, you find all the features we had available with PDF Packages introduced in Acrobat 8 and additional features that have greatly improved the collection of various documents into a single file. For the creative people, the thing you'll like most about PDF portfolios is that the focus of the new feature is on design. Whereas PDF Packages limited your options for customizing the appearance of a package, PDF Portfolios offer you an almost limitless number of ways to enhance the visual appearance of your portfolio presentation.
You may have a number of clients who want to share files with you when you begin a design piece. Perhaps an Excel spreadsheet, some Word files, a PowerPoint presentation, and related documents might be sent to you in native formats for you to create a concept for a new design. You also might want to share files with your clients such as proofs for an advertising campaign that may include print material, Web hosted material, and perhaps a video file.
Both you and your client can assemble files in a PDF Portfolio, submit the portfolio to Acrobat. com, and enjoy an easy sharing experience. As a PDF author, you'll want to know a few things about assembling a PDF Portfolio.
To begin the process of creating a PDF portfolio, do the following:
STEPS: Adding files to a PDF Portfolio
Create a new PDF Portfolio. Several menu commands are available for creating PDF Portfolios. Choose File

Add files to the new portfolio. You have several choices for adding files to PDF Portfolios in the new PDF Portfolio interface shown in Figure 32.1. You can drag files from your desktop or a folder on your hard drive, click the Add button in the PDF Portfolio interface, or add a folder of files by clicking the Add Existing Folder button. If you click a button to add files/folders, the Add Files dialog box opens, as shown in Figure 32.2.
Select files to add to the portfolio. If you decide to use the Add Files button, choose the files you want to add by selecting them in the Add Files dialog box shown in Figure 32.2.
Click Open. Regardless of the method you use to add files to your new portfolio, the files appear with thumbnail previews as shown in Figure 32.3. In this figure, several different file types are added to a new PDF Portfolio.


If you follow steps as outlined in the section "Assembling a portfolio," you can save your portfolio and distribute it to recipients. However, you may want to add some design to the presentation of your portfolio for a more appealing view. PDF Portfolios offer you a variety of design controls to create the look that you want displayed to end users.
When files are added to a portfolio, the Edit PDF Portfolio panel on the right side of the portfolio interface opens. From the list of categories, click Choose a Layout. In the Choose a Layout panel, you have several options to decide what layout view you want to use to display your files.
You can edit a description for each file regardless of the layout view you decide to use. Below the file name, click the cursor and type a description to detail some information about the file. In Figure 32.4, we chose the Sliding Row layout and added a brief description for the files.

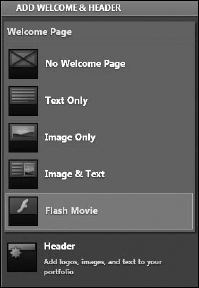
Click the Add Welcome & Header item in the Edit PDF Portfolio, as shown in Figure 32.5, and you can add a Welcome page. The Welcome page can be text only, image only, text on top of an image, or an Adobe Flash file. Select the item you want to use for a Welcome page, and the left pane changes where you can add text, an image, or both text and image, or you can drag and drop an Adobe Flash file to the pane.
Welcome pages are optional. If you have something like an animation of your company logo or summary of your company, you can add a Flash file to the Welcome page. Keep in mind that end users can dismiss the Welcome page and not show it again when reopening your portfolio. Therefore, be certain to add only nonessential information to a Welcome page that doesn't require a viewer to look over the page for any pertinent information.
More options are available for customizing the appearance by changing colors for text and cards. Click the Select a Color Scheme option, and you can choose from preset colors or add custom colors to change the appearance and make the color scheme consistent with your corporate colors.
In addition to customizing the colors you have a few other panels in the Edit PDF Portfolio panel. Use the Specify File Details panel to add and sort columns when viewing files in the Detail View and use the Publish panel to save a file, e-mail it, or upload the file to Acrobat.com.
From the Modify pull-down menu, choose Secure Portfolio. The Document Properties window opens with the Security tab selected, as shown in Figure 32.6. From the Security Method pulldown menu, choose a security method. You have the same security options that are available with PDF files.
When you secure a document and prevent editing, all files in the portfolio are secured as well as the layout and design of the portfolio itself.
Note
For more information on securing files, see Chapter 25.

No doubt you are familiar with e-mailing file attachments. In addition to adding a file attachment to a new e-mail message, you have some commands within Acrobat and within a PDF Portfolio to use for e-mailing documents. Depending on the option you choose, either your e-mail client application is used or Acrobat can serve as your e-mail client.
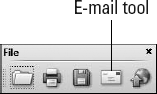
You have several choices for e-mailing files from within Acrobat. If you have a single PDF file, you can open the file and click the E-mail tool in the File toolbar shown in Figure 32.7. When you click the E-mail tool, your default e-mail client opens and the file shown in the Document pane is automatically added as a file attachment, as shown in Figure 32.8.
If you want to e-mail a PDF Portfolio, you can open the Share pull-down menu in the PDF Portfolio toolbar and choose Email, as shown in Figure 32.8. You also can choose File

Figure 32.8. In a PDF Portfolio, choose Email from the Share pull-down menu for an easy way of e-mailing your portfolio.
Any of the options you use to e-mail a PDF Portfolio opens a new message in your default e-mail client with the file added as an attachment. Simply add your recipient(s) and a subject line, and type a message, as shown in Figure 32.9. Click Send, and the file is e-mailed.

Figure 32.9. Choose an Email option, and the open portfolio (or file) is added to a new message window in your default e-mail client.
Note
Not all e-mail clients automatically open when you use an Email option in Acrobat. For some e-mail clients, you may need to open the program in order to see the new e-mail message.
Another option you have for e-mailing files is to use Acrobat.com and let Acrobat serve as your e-mail client. Rather than a file attachment added to an e-mail message, you use the Share Documents on Acrobat.com wizard and Acrobat sends an e-mail to your list of recipients. In the e-mail message is a file link where recipients can download the file. This option is particularly helpful when recipients have an e-mail server capped at a certain file size that may be much less than the size of a file you want to e-mail to your colleagues and clients.
To e-mail a file to recipients using Acrobat.com, follow these steps:
STEPS: Submitting Files via Acrobat.com
Open a PDF document or a PDF Portfolio. You use the same steps regardless of whether you choose to e-mail a file or a PDF Portfolio.
Choose File
Log onto
Acrobat.com. TheAcrobat.comlogin dialog box opens, as shown in Figure 32.10. Log on with your Adobe ID and password.Note
If you don't have an Adobe ID, see Chapter 30 for information about creating an Adobe ID and logging onto
Acrobat.com.Click OK in the
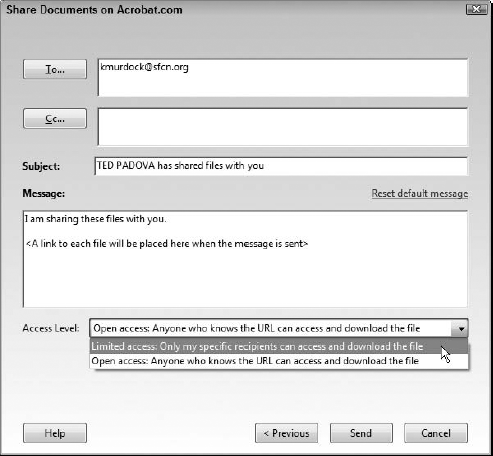
Acrobat.comlogin dialog box. When you click OK, the Share Documents onAcrobat.comwizard opens. The first pane in the wizard shows you the file you are about to upload toAcrobat.comYou can change the file or add additional files by clicking the Browse button. When you have the appropriately identified file listed, click Next and you arrive at the second pane in the wizard.Add recipient(s), and choose an access level. Type names of your recipients in the To text box, and open the Access Level pull-down menu, as shown in Figure 32.11. Choose either Limited access or Open access from the menu choices. Limited Access is used when you want only those you've invited to download your file. Open access permits anyone whom you've invited to visit your
Acrobat.comlibrary to download the file.Send the e-mail. Click Send, and Acrobat now becomes your e-mail client and performs several steps. Your file is uploaded to your
Acrobat.comlibrary, and e-mail messages are sent to your list of recipients. Within the e-mail message, Acrobat adds a URL link where the recipients can locate the file you're sharing with them from yourAcrobat.comlibrary.

You can control the sharing of files from within Acrobat or from within your Acrobat.com library. As a Creative Suite user, you have Adobe Acrobat as part of the suite applications and you can use all the menu commands within Acrobat to initiate file sharing. In Addition, Adobe Reader 9 and above users also can initiate file sharing from within Adobe Reader. But you may have clients who aren't using Adobe Reader 9 or don't even have Adobe Reader installed on their computer.
As an added benefit for sharing files, anyone can use the free Acrobat.com service provided by Adobe to share files. Therefore, when clients need to send you files, you can instruct them to easily upload files to Acrobat.com and send you a URL link for where you can download the files. In addition, you may have several files you want to share with recipients, and working in your Acrobat.com workspace may be easier than launching wizards in Acrobat.
To access Acrobat.com, use the File
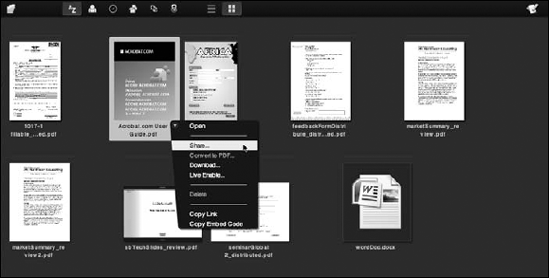
When a file has been uploaded to your Acrobat.com library, click the down arrow to open a pulldown menu and choose Share, as shown in Figure 32.12. This action opens the share options on Acrobat.com.
You can share files on Acrobat.com from either files you uploaded to your Acrobat.com workspace or through the File

STEPS: Choosing Options for File Sharing
Click the down arrow on a file name and click Share.
Note that the down arrow appears when the cursor is placed over a file name. When you click the Share menu command the Share dialog box opens as shown in Figure 32.14.
Add recipients.
The first field text box is where you type e-mail addresses. If you have shared files in previous sessions, click the down-pointing arrow to the right of the first text box and you find recipient addresses for other individuals with whom you've shared files.
Choose a Role for the Recipient(s).
You find an assorted number of different titles under the Role menu. Click the down-pointing arrow to open the menu and make choices accordingly.
Choose an access level.
Two check boxes appear below the list of recipients you add to the Share dialog box. The first check box enables everyone with access to the document to open and view it. Anyone you have not invited to view the document isn't able to open it. The second check box enables anyone who has access to your
Acrobat.comlibrary to view the document. In other words, individuals who have not been invited in the Share dialog can still view the document if they log on to yourAcrobat.comworkspace. Choose an option by clicking a check box.Share the file.
Click Next and an e-mail message opens
Type a message that will be received by recipients in an e-mail message.
Click the Share button, and a message is sent to your list of recipients. In the message box, a URL link is automatically added by
Acrobat.comfor the recipients to click. After a recipient clicks the link, the user's default Web browser opens and the file is downloaded fromAcrobat.com.

Acrobat.com serves as your e-mail client to send the e-mail messages.
PDF Portfolios are a new feature in Acrobat 9 that offer more custom design features than were available with PDF Packages in Acrobat 8.
Files of different types can be added to PDF Portfolios.
PDF files and Portfolios can be e-mailed via e-mail attachments by choosing options in Acrobat to e-mail files.
Files can be shared on
Acrobat.comwith open access and limited access.