Files created for print fall into two categories—designs for composite prints and designs for color separations or commercial printing. When you design documents for composite printing, your output device might be a laser printer, a desktop inkjet printer, a large-format inkjet printer, a color copier, a film recorder, or a high-end commercial color printer. Files designed for commercial printing are typically color-separated and printed to film, direct to plate, or direct to press.
This chapter is concerned with setting print attributes for composite color that may print to your office desktop printers as well as advanced settings for commercial devices designed for printing prepress.
The first step in printing files is to select the target printer and the print attributes associated with the printer, such as paper size, paper feed, paper tray, and so on. If you work as an independent designer in a small shop, you may have only one printer on your network. After you assign your printer as the default printing device, you don't need to worry about printer selection. However, if you work in production workflows in larger shops, you may have a variety of printers attached to your network. In these environments, it's essential you make the proper printer selection before sending off a job for print. Selecting printers varies between Mac OS and Windows.
One of the clear disadvantages of using the CS programs when you print a document is the inconsistency between what you see in an application document window versus what prints. The programs vary in what dialog boxes you access, whether you have access to a printing device PPD (PostScript Printer Description), how to set up custom pages, and what print attributes to use. To fully comprehend printer selection, we need to look at the CS programs individually.
In InDesign on Mac OS, you make printer selections in the Print dialog box. Notice that you don't have a command under the File menu for Page Setup. If you choose File
To make a printer choice, choose File

Notice that you have a choice for accessing the Page Setup dialog box in the Print dialog box. Click Page Setup, and a warning dialog box opens, as shown in Figure 35.2. The warning informs you that settings can be made in InDesign's Print dialog box without opening the Page Setup dialog box. Be certain to use the InDesign option rather than the Page Setup dialog box. Conflicts can persist if you make choices in the Page Setup dialog box.
Also in the Print dialog box is a Printer pull-down menu where you select your target printer in Illustrator. Like InDesign, Illustrator has a Document Setup dialog box where no print options are selected.
To select a target printer in Illustrator, choose File
Note
Adobe PDF is a printer option in all applications because it's installed with Adobe Acrobat. For device output, you typically should use the Adobe PDF printer.

Photoshop, Dreamweaver, and Acrobat all make use of a Page Setup dialog box. Rather than use the Print dialog box to access a printer, your first choice in these programs is the Page Setup dialog box, shown in Figure 35.4. From the Format For pull-down menu, select the printer you want to use.
Note
Dreamweaver doesn't have a Print command for use in printing a Web page preview. The Print Code command in Dreamweaver is used to print the HTML code of a Web page. If you want to print a Web page design, select Preview in Browser and choose the Web Browser from the submenu. Use your chosen browser to print the Web page.

If you need to define custom page sizes for your output, set up the custom page by selecting Custom Paper Size in the Settings pull-down menu. After you create a custom page size, return to the Page Setup dialog box and select the new page size before moving to the Print dialog box.
Note
For more information on creating custom page sizes, see Chapter 22.
Similar to printer selections on the Mac, Windows users access printers in the Page Setup or Print dialog boxes. Also like the Mac CS applications, some programs don't have a Page Setup dialog box, while others require you to first visit a Page Setup dialog box when selecting a printer and paper size.
When using InDesign and Illustrator on Windows, you make your printer selections in the Print dialog boxes. The Document Setup dialog boxes offer the same options as you find in the Mac counterparts. In InDesign, choose File

Likewise, in Illustrator choose File
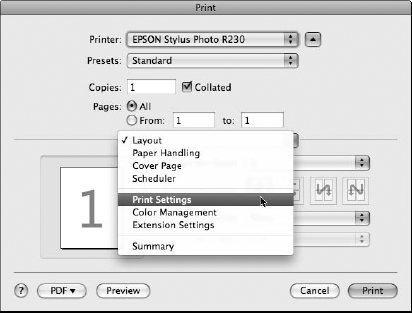
Photoshop, Dreamweaver, and Acrobat all use different dialog boxes for printer selection than the dialog box you use for printing. In Photoshop and Dreamweaver, you use the Page Setup dialog box; in Acrobat, you use the Print Setup dialog box. Most of the CS applications also let you choose a printer from the Print dialog box, as you can see in Figure 35.6. For adjusting settings for the print driver such as paper size, orientation, defining custom pages, and so on, you need to use the Page Setup dialog box and adjust the properties for the printer.

Acrobat handles printer selection in either the Print dialog box or by using the File
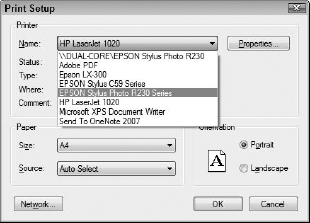
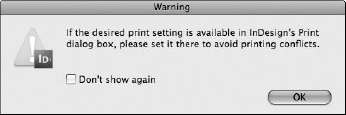
From the Name drop-down list, you make a choice for your target printer. After selecting the target printer, click the Properties button to open the printer properties for the selected printer. In Figure 35.8, you can see the Properties dialog box for an HP LaserJet 1020.
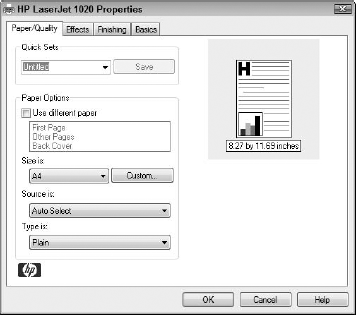
Figure 35.8. Click Properties in a Page Setup or Print Setup dialog box to open the printer driver properties.
After making a printer selection and adjusting properties, you then make choices for print attributes in the Print dialog boxes. If paper selection is handled in Page Setup or Print Setup dialog boxes, be certain to make the proper paper choice before opening the Print dialog box.
If your task is to print composite color to desktop or large-format commercial printers, you don't need to manage many of the print attributes in the print dialog boxes. Items such as emulsion, screening, separations, and so on are used for prepress and commercial printing. In some circumstances, you must use an option designed for commercial printing when printing composite color. For example, when printing on Mylar on your desktop color printer, you must print emulsion down so the image is reversed on the back of the substrate (printing material). Special conditions like this require you to know all the print features in the Print dialog boxes.
Although you may not use all the options available to you when printing CS application documents, an elaborate description is offered here for both composite and commercial printing. Use this information in conjunction with the material in Chapter 40 when printing to commercial printing devices. Because each program has some different attribute settings, look over the settings descriptions according to the program you use for final output.
In Illustrator, choose File
Tip
PPD files are text documents. If you need to install a PPD from a Mac to a Windows machine or vice versa, you can copy the file to either platform. As text-only documents, they're completely cross-platform compliant.
The default series of settings are the General print options shown in Figure 35.5. When you select General in the left pane, the options choices include the following:
Print Preset: At the bottom of the dialog box, notice the Save Preset button. You can change options in all the settings related to selections in the left pane and, as a last option setting, click Save Preset. Illustrator opens a dialog box where you supply a name for the preset, and the new preset appears in the Print Preset drop-down list. When you want to use the same print options, choose the preset name from the drop-down list, and all the settings associated with the preset are applied. The file prints according to the preset options.
Printer: As discussed in the previous "Printer selection on Windows" and "Printer selection on the Mac" sections, you select the target printer from the drop-down list. You also have a selection for Adobe PostScript File. Use this option if you want to create a PostScript file that ultimately downloads to a printing device. You might use a PostScript file if you have a printer driver and a PPD for a commercial printing device at your service center, but you don't have the printer online at your studio. You can create a PostScript file that your service center can download to its printer using all the attribute choices made from the PPD file.
PPD: You select PostScript Printer Description file from the PPD drop-down list shown in Figure 35.9. Desktop color printers do not use PPDs. Unless your printer is a PostScript printer, you won't have an option for PPD selection. If you're using a PostScript printer, choose the associated PPD for your printer.
Copies: If you're printing more than one copy, change the value in the field box to the desired number of copies. By default, 1 appears in the field box. Below Copies, you find options for printing All pages or a page range.
Reverse Order: These items work when you print Illustrator documents as tiled pages or print multiple artboards.
Ignore Artboards: If you have data on multiple artboards and check this box, the bounding box for the data is used as the defined print area.
Skip Blank Artboards: Any artboards containing no data are skipped to avoid printing blank pages.
Media: If you're using a PostScript printer, the PPD contains all the page sizes supported by the printer and generally supports a custom page size. If the PPD supports custom pages, select Custom from the Size drop-down list and enter values in the Width and Height field boxes. If you use a non-PostScript printer, the Printer driver contains the fixed page sizes and you lose options for creating custom pages.
Transverse: If a PPD supports transversing media, the check box is active. Transverse rotates pages 90 degrees and is typically used on roll-fed machines to conserve paper. For example, you can rotate a portrait letter page 11 inches high so the page height is 8.5 inches high. The print is still a portrait view, but the image is rotated 90 degrees so the roll of paper uses 8.5 inches instead of 11 inches.
Orientation: Click one of the four icons below the Transverse check box for Portrait, Landscape, Portrait Rotated, or Landscape Rotated.
Options: Placement, scaling, and tiling options are found in this section of the General print properties. Do Not Scale is the default and prints the document at 100 percent. Fit to Page reduces or enlarges the illustration to the page size you print. The Custom Scale option allows you to type scaling values in the Width and Height boxes. The chain link between Width and Height is activated by default, ensuring proportional scaling. If you click the chain link, you can distort the drawing by typing values independently for width and height, without regard to proportional sizing.
From the Print Layers drop-down list, Visible & Printable limits output to visible layers but not layers designated as non-printing. Visible Layers is all layers currently visible including layers set as non-printing. All Layers will output all layers regardless of their non-print status and visibility—this option prints everything.
The Tile options are helpful when you print composite color on small desktop devices where you design a piece for a large display print. If you need to proof the artwork on your printer before sending it off to an imaging center, use the Tiling options for Tile Full Pages or Tile Imageable Areas. The artwork prints on several pages in sections, which you can piece together to see the full print.
Printer's marks are essential when printing files to commercial equipment especially when printing color separations. Items such as color names, registration marks, and crop marks are needed when preparing printing plates and trimming paper. On composite color prints, you may print an image on a larger-size paper to accommodate a bleed and, therefore, need to add crop marks so you know where to trim the paper. Click Marks and Bleed, and the options for adding printer's marks appear in the Print dialog box, as shown in Figure 35.9.
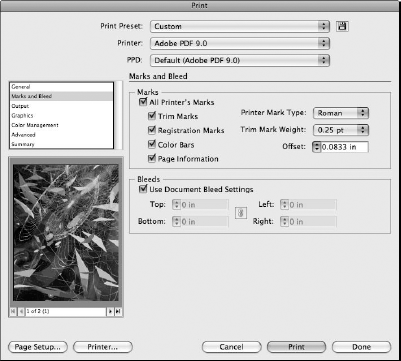
All Printer's Marks: When you check All Printer's Marks, the marks for Trim, Registration, Color Bars, and Page Information appear in the output and are visible in the thumbnail proof (refer to Figure 35.9). If you want some of the available printer's marks to print, individually check those items.
Printer Mark Type: The choices are Roman or Japanese. Select the type of mark from the drop-down list. To see the differences between the two marks, toggle the view by selecting from the two options in the drop-down list.
Trim Mark Weight: You have choices for the stroke weight of the trim marks at 0.125, 0.25, and 0.5 stroke weights. Select the desired weight from the drop-down list.
Offset: Specifying an offset amount offsets the bleed and trim marks from the artwork. (Available only for Roman printer marks.)
Bleeds: You can specify the bleed amount uniformly on all sides or in individual distances by typing values in the Bleeds field boxes. Click the chain-link icon to toggle between uniform distances and non-uniform distances.
Tip
The chain link icon you see in the Bleeds section in Figure 35.9 appears in many dialog boxes in the CS applications, particularly in Adobe InDesign. When the icon is highlighted, a value in any one of the four text boxes is linked to the remaining text boxes. Therefore, if you type 18 pt in one box, all other text boxes automatically add the same value. If you click the link icon to deselect it, values are uniquely added to each box individually.
Output settings offer options for printing composite or separations, controlling emulsion, and screening and setting halftone frequencies. For composite color, you probably won't need separations or screening. For some composite color printers, several options are grayed out, as shown in Figure 35.10.

Mode: Three choices appear for Composite, Separations (Host-Based), and In-RIP Separations. Host-based separations separate the file before it is delivered to the PostScript RIP (Raster Image Processor). In-RIP separations deliver the composite file to a PostScript 3 RIP, where the RIP separates the file.
Emulsion: The choices are for Up (Right Reading) or Down (Wrong Reading). Typically, composite prints are printed positive emulsion up, while film separations are printed negative emulsion down. On occasion, you may need to print emulsion down for such items as iron transfers, Mylar, LexJet, and so on.
Image. The choices are for Positive or Negative image. If printing a composite image, the menu item is grayed out and defaults to Positive.
Printer Resolution: For imagesetting and platesetting equipment at commercial print shops, you find resolution and halftone settings in the Printer Resolution drop-down list. These options are related to the PPD used for PostScript printers but are not accessible for non-PostScript printers such as desktop color printers. For printing composite color, you won't need to access any resolution/screening options.
Convert All Spot Colors to Process: If your file contains spot color and you need four-color process printing, click the check box for converting spot color to process color. Note that the option is used for spot color only and does not apply to RGB color. Also note that the conversion takes place at the printing device RIP and does not change the color in the file.
Overprint Black: For files where you have black type against color backgrounds, you may want to globally overprint the black.
Document Ink Options: A list of all used colors appears at the bottom of the Output settings. You can change Frequency, Angle, and/or Dot Shape by clicking in the respective column according to color and editing the value and you can click on the eye icon to turn off printing for colors you don't want to print. After clicking, a field box appears where you can type new values.
The Graphics settings offer some options that help improve the ability to print complex Illustrator files on PostScript printers. For composite color printing on non-PostScript printers, the options are grayed out. Click Graphics in the left pane, and the options shown in Figure 35.11 are available.
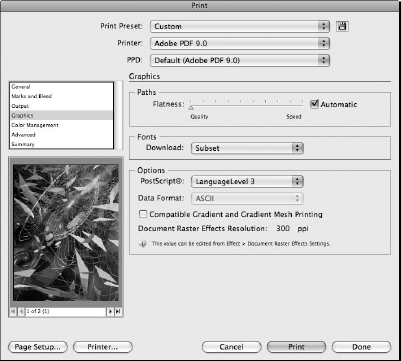
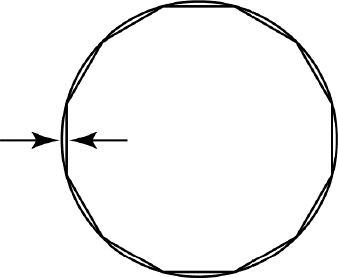
Paths: Move the slider to the right to increase the flatness. Flatness breaks up complex paths to more simplified paths that make the entire drawing easier to print. If you increase the amount of flatness to the maximum, you can run the risk of distorting shapes where circles appear as polygons. In Figure 35.12, you can see how the flatness amount is measured. The original circle with an exaggerated flatness setting appears as a polygon. The flatness amount is measured by the distance between the original circle and a midpoint on a chord created with the flatness adjustment.
Fonts: For PostScript printing, you can download fonts to the printer's RIP at the time a file is printed. Select None to download no fonts. Select Subset to download only font characters within font sets that are contained in the file. Select Complete to download the entire font character set.
PostScript: Select a Language level for the PostScript printer used. In some cases, the drop-down list is grayed out, and Illustrator makes an automatic selection between PostScript Level 2 and PostScript 3, depending on the printer used.
Data Format: When printing a PostScript file, you have choices for selecting Binary or ASCII encoding. For almost all purposes, use binary encoding and the file sizes become much smaller than selecting ASCII. For other printer selections, Illustrator makes the choice for you for ASCII or Binary and grays out the drop-down list preventing you from changing the option.
Compatible Gradient and Gradient Mesh Printing: Unless you experience problems printing gradients or gradient meshes on a PostScript RIP, don't select this check box. This option resolves problems when these gradients don't print.
Document Raster Effects Resolution: This item is informational in the Print dialog box. It reports the current setting for document raster effects resolution. If you print to imaging equipment capable of printing at high resolutions such as 1200, 2400, or 3600 dpi, and so on, you should change the value from the default to a higher resolution such as 300 ppi. To make the settings adjustments, you need to close the Print dialog box and choose Effect


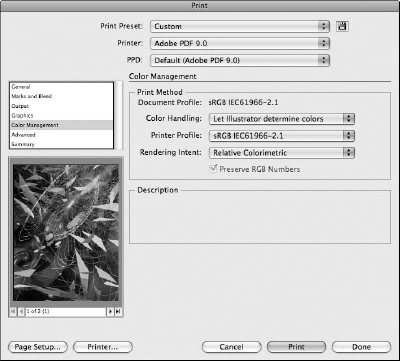
For color-managed workflows, you can use ICC profiles and select your profiles from the Printer Profile drop-down list, as shown in Figure 35.14. Select a Rendering Intent from the drop-down list options for Perceptual, Saturation, Relative Colorimetric, or Absolute Colorimetric. The choices you make in the Color Management settings should be consistent with the color-managed workflow in your environment.
Note
For more information on ICC profiles, managing color, and understanding the print space intent, see Chapter 5.
Advanced options include the following:
Print as Bitmap: For a quick proof print, you might use this option where all the vector art in your illustration is printed as a bitmapped image. Selecting this option prints the file as a rasterized bitmap but does not rasterize the file.
Overprints: Select from options for overprinting items identified in your drawing for overprints. The options are Simulate, Preserve, or Discard. If you want to simulate an overprint on text comps, select the Simulate option. If you want to preserve overprints you identified in Illustrator, select Preserve from the drop-down menu. If you want to discard all overprints, select Discard and all overprints you assigned in Illustrator are ignored.
Preset: Select Low, Medium, or High for resolution related to transparency flattening and bitmap conversion. If you click Custom, the Custom Transparency Flattener Options dialog box opens as shown in Figure 35.15. In this dialog box, select the amount of transparency flattening you want by moving the slider for the Raster/Vector Balance and adjust resolution for line art and text conversion to bitmaps as well as gradients and gradient meshes. If you want to convert text and/or strokes to outlines at the time of printing, select those options. Clip Complex Regions also simplifies printing; if you have difficulty printing a file, enable this check box.

Click Summary, and the summary options appear in the Print dialog box, as shown in Figure 35.16. The Options list displays a list of the settings you made from all the other categories. If your document contains items that won't print correctly or if you made options choices that prevent printing with optimum results, the Warnings box lists potential problems you may encounter. Read the warnings, and return to your document or to the other categories and make corrections as needed.

Depending on your printer and the complexity of your design, you may find rasterizing your Illustrator file in Adobe Photoshop to be the only way you can print the document. Some desktop printers do well with printing directly from Illustrator, while some printers may have some difficulties for properly printing a file. In addition, some older PostScript printers may likewise have problems printing your Illustrator artwork. If you experience such problems, open the Illustrator file in Photoshop. The Import PDF dialog box opens regardless of whether you saved the file as an AI file or a PDF file. You make choices for cropping, image resolution, color mode, and bit depth. Under most circumstances, you want to be certain to select the Anti-aliased check box. Click OK, and the file is rasterized and opens in Photoshop.
As a Photoshop file, you can print directly from Photoshop or save the file in a format that can be downloaded directly to printers supporting direct file downloads. For example, many large-format inkjet printers support downloading TIFF files. In such cases, you would save the file from Photoshop in TIFF format.
Color printers have unique attributes that you select from the device printer driver. On the Mac, when you choose File

Note
Device print settings are accessible from all the CS programs. When printing to devices where special paper handling is needed, as well as options for resolution output and color-mode selections, use the device print settings.
Click Continue to pass through the warning dialog box. Another Print dialog box opens offering a range of print options as well as specific settings for your color printer. From the drop-down list below the Presets drop-down list, select Print Settings. In this Print dialog box, you make choices for the media type, inks, and various settings for the print mode. In Figure 35.18, the options for a low-end Epson color printer are shown.

On Windows, you make the same kinds of choices from the Page Setup dialog box. Click Printer in the Page Setup dialog box to open the Print dialog box. Select your printer from the Name dropdown list, and click the Properties button. Advanced print settings are made in subsequent dialog boxes, and other options are similar to those found on the Mac.
Because the range of printers is so great, discussing all the options for all printers isn't possible. For specific information related to the options choices you need to make for media type, inks, color profiles, and mode settings, consult your printer's user manual.
Printing from Photoshop is usually performed when you print composite color. For prepress and color separations, Photoshop files most often find their way into Illustrator or InDesign documents. You can print to commercial equipment from Photoshop, but most imaging technicians generally import the Photoshop files into a layout program for printing.
If you're printing composite color, you first visit the Page Setup dialog box and set the page size for the output on your printer. When you create a custom page size in the Page Setup dialog box, be certain that you return to the Page Setup dialog box and select the new custom page.
Note
You can open the Page Setup dialog box from within the Print dialog box.
After selecting the Page Setup, choose File

In the Print dialog box that opens, the following options appear:
Match Print Colors (below the image preview): This option is used with Proof Setup to match colors when printing a hard proof. (Available when you let Photoshop manage the color.)
Gamut Warning: This option shows the range of colors that are outside the printable color region. (Available when you let Photoshop manage the color.)
Show Paper White: This option simulates the white point of the target media and device, it will show a duller set of colors and gray paper when proofing to a Japan Web paper simulation. (Available when you let Photoshop manage the color.)
Printer: From the drop-down menu, choose your printer.
Copies: In the text box, type the number of copies you want to print.
Print Settings: Click the Print Settings button to open the Page Setup dialog box.
Position: If you uncheck Center Image, you can move the artwork around the page where a dynamic preview displays in the thumbnail. You can type coordinate values in the field boxes or click and drag the image in the preview box.
Scaled Print Size: Use the field boxes to scale the image up or down. Be aware that, when scaling images up, you need to consider the relationship between scaling size and resolution. As a 150 ppi (pixels per inch) image is scaled up 200 percent (or twice the size) the resolution drops to 75 ppi (or one-half the resolution). You can scale by editing the Scale field box, by checking the box to scale the image to fit the media, by typing values for the height and width, or by dragging handles at one of the four corners of the bounding box.
Bounding Box: You may have white space at one or more sides of your image or around the entire image. When you check the box for Show Bounding Box, a rectangle is displayed at the image size including the white space.
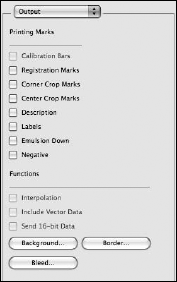
Output/Color Management: Open the pull-down menu where you see Color Management, and select Output for the output options. Check the boxes for the types of printer marks and emulsion control, as shown in Figure 35.20.
Functions: The Functions area of the Print dialog box includes the following options:
Interpolation: This option prints with interpolation to upsample/downsample images not meeting the resolution requirements of the output device.
Include Vector Data: This option prints placed vector objects, type, and vector data created in Photoshop as vector items without rasterizing them.
Send 16-bit Data: For 16-bit images, this option sends the 16-bit data.
Background: By default, the background or area outside the image area is white. You can change the color by clicking Background and selecting a new color in the Color Picker dialog box that opens after clicking the Background button.
Border: Border prints a border around the bounding box. You specify point size for the border in the Border dialog box that opens after clicking the Border button.
Bleed: If you want a bleed, click the Bleed button and a dialog box opens enabling you to specify the bleed amount.
The Color Handling pull-down menu in the Photoshop Print dialog box contains three options for managing color:
Printer Manages Color
Photoshop Manages Color
Separations
If you choose the first option and let your printer manage color, you need to be certain that color management is turned on in the Print driver. The dialog box that opens after you click Print in Photoshop is where you make selections for the print driver to manage color.
If you choose the second option and let Photoshop manage color, you need to address two more settings. The first is to select a Printer Profile from the drop-down menu for the paper and printer you use. After clicking Print, you need to turn color management off. Leaving color management on in the print driver "double profiles" your output, which will be much less than a true color representation of your image.
Choosing Separations is available only with CMYK image files. It is used for printing separate color and spot plates on a press.
Photoshop is the only program in the CS applications that provides you with these options and the ability to use developer-supplied printer profiles when using desktop inkjet printers. The other CS applications merely support choosing the application to manage color on PostScript-only printing devices.
When you choose to let your printer manage color, color profiling is handled automatically by the printer. This option works only in Photoshop. All other CS applications depend on using a PostScript printer only. Do not use this option in Illustrator, InDesign, or Acrobat unless your output device is a PostScript color printer.
To print a file from Photoshop (or any CS application) on a Macintosh while letting the printer determine the color, choose File
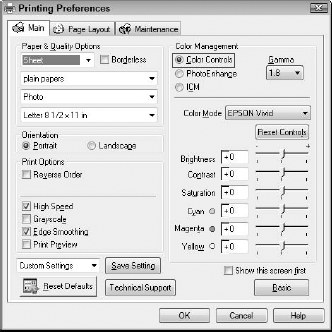
Make a choice for the paper from the Media Type pull-down menu, and choose Color Management from the pull-down menu above the Page Setup item, as shown in Figure 35.22.
When you open the Color Management panel, shown in Figure 35.23, in the Print dialog box, you need to be certain that Color Controls is selected. This choice is a default, but if you change it in a previous print session, be sure you make this choice. Essentially, we are telling the printer to manage the color. In order to do so, the Color Controls need to be enabled. Click Print, and your file is printed using the printer's built-in color profiling system.


In Windows, choose Printer Manages Color in the Photoshop Print dialog box and click Print. The next Print dialog box opens and lists your available printers. Choose your target printer, and click Preferences. Depending on the type of printer you use, you'll find options for color controls. The Epson R230 printer we use in this example has an Advanced button in the Printing Preferences dialog box. Click Advanced, and choose Color Controls in this dialog box, as shown in Figure 35.24.
Click OK in the Printing Preferences dialog box, and click Print to print your file using the printer to manage color.
You use Photoshop to manage color when you have color profiles installed on your computer. Some low-end color printers rely on canned profiles that are part of the printer driver, and you won't find the profiles individually installed on your computer. Move up to a little more expensive model of printer, and you often find separate individual profiles installed on your computer.
All other CS applications like Illustrator, InDesign, or Acrobat also provide the option of letting the application determine color. If you use low-end printing devices that do not install profiles, you must make a choice for the color profile in the application using a generic sRGB profile such as the choice made in Acrobat in Figure 35.25 when printing to a device that doesn't have a corresponding color profile available.
If you have a color profile installed with your printer installation and you're using Photoshop to print while making the choice to let Photoshop determine color, open the Printer Profile pulldown menu and choose the profile for the paper you're using, as shown in Figure 35.26.

Figure 35.25. In CS applications other than Photoshop, choose sRGB for the color profile when your printer doesn't install individual color profiles.

Figure 35.26. Choose Photoshop Manages Colors when you have printer profiles available, and choose the profile suited for your paper type from the Printer Profile pull-down menu.
The next step in your print process is critically important. Because you are letting Photoshop manage the color, you need to turn off color management used by your printer. When you open the Color Management (on a Macintosh) or Printing Preferences (in Windows), as shown in Figures 35.23 and 35.24 respectively, you need to turn off the color management.
Follow the steps described in "Using the printer to manage color" to get to the color controls. When you arrive at there, turn them off, as shown in Figure 35.27 for the Macintosh and Figure 35.28 for Windows.

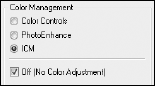
When you click the Print button, Photoshop uses your selected profile to manage the color.
When you print from InDesign, all the print controls are contained in the Print dialog box. Unlike Photoshop, the page setup and paper size selections are made in the same dialog box where you set all the other print attributes. Select File
Items such as printer selection, page range, and collating are the same in InDesign as you find in the other CS applications. As you look over the settings below, realize that the items noted here are those items not found in either the Illustrator or Photoshop Print dialog boxes:
Spreads: Printer spreads can be output from InDesign. The Spreads option prints two across the spine. InDesign can have up to ten pages in a spread. When you set up the page size for printing spreads, be certain to add the width dimension to accommodate all pages. Two letter portrait pages, for example, would be set up for 17 by 11 (2 times 8.5 inches by 11 inches high).
Print Master Pages: Check this box to print the master pages.
Print Layers. Choose from All Layers, Visible Layers, or Visible and Printable Layers.
Print Non-Printing Objects: You can identify some objects and layers for nonprinting. When this option is selected, all objects targeted for nonprinting are printed.
Print Blank Pages: Just as the name suggests, any blank pages contained in the file are printed.
Print Visible Guides and Baseline Grids: Something that can help you in the design of a piece is to print the pages with guides and baseline grids. You can see the guide and grid lines on the printed pages and carefully look them over for alignment and formatting.

Click Setup in the left pane to show options for selecting paper size, scaling, and tiling as shown in Figure 35.30:

Setup: The Setup options include choices for selecting paper sizes. In InDesign you have choices for choosing fixed paper sizes from the Paper Size pull-down menu or by adding a Custom paper size and typing values in the Width and Height field boxes. The fixed sizes are derived from the PPD selected in the PPD pull-down menu. Custom sizes can be added in InDesign without going to a Page Setup dialog box and defining a custom page size. As you tab out of the Width and Height fields, the thumbnail preview shows you how the page sizes appear on selected or custom page sizes.
The document setup should be the final trim size of the document, the media size (set in this dialog) controls how the document prints on the output device; scaling and position options also control how the document is output to the media.
Offset: For roll-fed imaging equipment, the offset value offsets the printed image from the paper edge.
Gap: Also on roll-fed machines, the gap is the distance between printed pages.
Orientation and Transverse: The same options are available in InDesign that you find in Illustrator.
Options: Options settings include scaling output, page position in one of four locations, printing thumbnail images of a layout, tiling large pages that can't fit on a single paper size, and setting the overlap gap for tiled pages.
Note that the thumbnail preview in the lower-left corner of the Print dialog box shows a proxy view of the page setup.
Marks and bleeds are similar to options you find in Illustrator and Photoshop. The items in the Marks area of the Marks and Bleed section of the Print dialog box shown in Figure 35.31 are self-descriptive. InDesign has an additional item not found in either Illustrator or Photoshop in the Bleed and Slug area of the dialog box. Check Include Slug Area to print any content you add in the slug area such as job numbers, dates, and other information you want included in a slug.

Output options include specific settings for printing composites or separations. Color control and ink management are included in the options shown in Figure 35.32:

Color: Choices are Composite Leave Unchanged, Composite Gray, Composite RGB, Composite CMYK, Separations, and In-RIP Separations. Choices made for the kind of composite print you want can affect the color, so be certain to choose the setting appropriate for your desired output. The Color choices defined include the following:
Composite Leave Unchanged: This option is intended for use where you print to color printers that are Pantone-certified and can simulate spot-color inks. Very few printers are capable of rendering accurate spot colors, so this option is one you won't use unless working with a printer that can accurately reproduce spot colors.
Composite Gray: When printing to grayscale printers, use this option. All colors are printed with varying levels of gray.
Composite RGB: Use this option when outputting for screen or when printing to inkjet color printers that prefer printing from RGB mode. Most inkjets typically use CMYK color inks, but large-format inkjets like the Colorspan DisplayMakers prefer printing RGB files.
Composite CMYK: For most composite color prints, you're likely to use this option. When your inkjet printer prefers printing CMYK color, select this option from the drop-down list.
Separations: Use separations when printing to RIPs using PostScript Level 2 and below or when printing to PostScript RIPs not supporting In-RIP separations. Also, if you aren't certain of the RIP PostScript level or whether In-RIP separations are supported and you're preparing PostScript files for your service center, use Separations.
In-RIP Separations: A composite image is sent to the printer's RIP where the RIP separates the file. Many PostScript 3 RIPs support In-RIP separations, but not all PostScript 3 RIPs. If preparing files for imaging centers, be certain to inquire about their capabilities for printing before sending PostScript files.
Text as Black: Check this box to print text as pure black color as opposed to printing a mix of RGB or CMYK color to produce black.
Trapping: The drop-down list commands are made available only when Separations or In-RIP Separations are selected. Options include one of three choices. You can turn trapping off, use InDesign built-in trapping, or use In-RIP trapping. InDesign has a sophisticated built-in trapping technology, and the Adobe In-RIP Trapping engine is even more powerful. If you don't have more-powerful dedicated trapping software, either option provides you with some impressive results. Note that In-RIP Trapping is available only on PostScript 3 RIPs that support In-RIP Trapping.
Flip: Flipping a page is available for separations as well as composite printing. If you print to Mylar, LexJet, and other substrates necessitating printing documents flipped, InDesign CS offers new options over previous versions of the program and can accommodate separation and composite printing when page flipping is needed. For printing to imagesetters and platesetters, reading and emulsion are typically handled at the writing engine or the RIP. Therefore, you most often print files emulsion up and without flipping a page.
Screening: Derived from the selected PPD, you make fixed halftone screen selections from the drop-down list. To add a custom frequency not available from the drop-down list, you can manually adjust the inks for frequency and angle below the Inks table.
Frequency: You can adjust the halftone frequency manually by selecting inks in the Inks table and typing values in the Frequency field box.
Angle: The default angles for process color includes Cyan at 15°, Magenta at 75°, Yellow at 0°, and Black at 45°. Spot colors all default to 45°—the same angle used for black. If you introduce spot colors, be certain that the color angles are set apart from the other color angles. For example, on a two-color job containing Black and a spot color, change the spot color to either the Cyan or Magenta angle of 15° or 75°. If you have process color and a spot color, set the spot color angle 22° apart from the other process colors—something like 22° or 37°.
The Graphics pane includes options for how image files are printed, font handling, and PostScript level. These options are generally used for proofing when printing for high-end prepress and commercial printing. The options shown in Figure 35.33 include the following:

Figure 35.33. The Graphics pane has options for image and font handling as well as PostScript level.
Images: From the drop-down list, you have choices for what data is sent to your printer:
All: Sends all the image data to the printer and is the choice you want to use for composite color printing.
Optimized Subsampling: Sends enough data to the printer for an optimized print but downsamples images if the resolution is more than needed to output a satisfactory print.
Proxy: Sends a 72-ppi image to the printer, resulting in a faster print for proofing purposes.
None: Sends no image data for a quick print where you can examine type and layout without printing the images.
Fonts: From the drop-down list, you have three choices:
None: Downloads no fonts. Use this option only when you know that all the fonts in your document reside in your printer's memory or on a hard drive attached to your printer.
Complete: Downloads all fonts to your printer's memory.
Subset: Sends only the characters in a font to your printer's memory.
Download PPD Fonts: Fonts listed in your printer's PPD are downloaded to your printer's memory. The PPD fonts are generally the fonts contained in your printer's memory. Most laser printers have the fonts Courier, Helvetica, Times, and Symbol burned into the ROM chips in the printer. The PPD for the printers lists these fonts where the printer retrieves them when files containing the fonts are printed.
PostScript: Choices are PostScript Level 2 or PostScript 3. Choose the PostScript level according to your printer if printing to a PostScript printer. If printing composite color to non-PostScript printers, don't worry about changing the default. PostScript-level choices won't have an effect on printing to non-PostScript devices.
Data Format: Generally, the choice is made for you. By default, Binary is selected and you'll see ASCII grayed out.
Click the Color Management item in the left pane, and the Color Management options open, as shown in Figure 35.34.

Print: Choose either Document, which uses the document's color space, or Proof, which uses the color space provided by the printer.
Options: From the Color handling drop-down menu, either choose your PostScript printer or let InDesign determine the color handling. If using a color profile calibrated for your printer, choose Let InDesign Determine Colors. From the Printer Profile drop-down list, select a color space that InDesign uses to map the color from the document's color space to the printer's color space. If you select PostScript Color Management, you use a profile based on the CRD (color rendering dictionary) available for PostScript 3 devices that have built-in color management. Choosing the option for InDesign to handle color lets you select a profile you calibrated for your printer.
Output Color: Check Preserve RGB Numbers to preserve the color profile in the file. If the box remains unchecked, the printer's color profile is used.
Simulate Paper Color: This option is available if you print a Proof. Select the check box, and the colors appear as when printed on specific papers, such as printing to newsprint or uncoated stock.
Click Advanced in the left pane to open options for the Advanced settings, as shown in Figure 35.35. Options such as OPI (Open Prepress Interface) management and transparency flattening are contained in this pane. You have these options:

Print as Bitmap: Check this box, and select a resolution to print a raster image. This setting is something you might use if you're having a problem printing fonts and vector art on a desktop printer. The option is not used when printing on commercial printing devices.
OPI Image Replacement: This option and the check boxes for EPS, PDF, and bitmap images relate to replacing FPO (for-position-only) low-resolution images with high-resolution images during layout. When computers were less powerful and had less memory, OPI was used when service centers archived high-resolution images and designers used low-resolution images to create layouts. Today, with powerful computers that have plentiful RAM and hard-drive space, most people use high-resolution images for layout. For composite color printing, you're likely to never use the OPI settings.
Transparency Flattener: On most PostScript RIPs, you need to flatten transparency to successfully print your document. Any use of the Transparency palette, applying drop shadows to objects in InDesign, applying a feather, using blending modes, or using transparency in imported images requires you to flatten the transparency. From the presets, use these settings in these situations:
Low Resolution for quick proof prints on desktop printers
Medium Resolution for desktop proofs on desktop color printers and copy machines, on-demand printers, and so on
High Resolution for all files printed as separations and on high-end commercial PostScript devices
Ignore Spread Overrides: You can flatten transparency on spreads by viewing a spread in the Document window and choosing Spread Flattening on the Pages menu. You can override spread-specific flattener settings by selecting this check box at the time of printing or export.
As in other CS applications, a Summary dialog box lists all the settings made through the panes in the Print dialog box. If you want to save the summary to a text file that you can send to a service center, or that you can retain for future use, click Save Summary in the Summary pane to save a file defining all the print attributes select for a given print job.
Acrobat contains all the print controls needed for high-end prepress as well as all the settings you need for printing composite color. Additionally, you can use Acrobat to print files originating in the other CS applications after converting documents to PDF. Using Acrobat as your printing tool simplifies the printing process because you need to learn only those print options from a single set of dialog boxes.
Note
For a description of all the print tools in Acrobat 8, see Chapter 40.
The first place to start when printing files from Acrobat is to visit the Page Setup dialog box. After selecting the proper page size and orientation or defining a custom page size, choose File
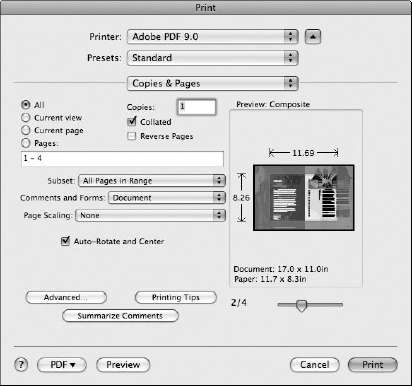
There are two sets of Print dialog boxes in Acrobat. The default opening view is the Print dialog box. The second Print dialog box is the Advanced Print Setup dialog box that opens after you click the Advanced button; this is the place where options typically used for commercial printing are found. The Print dialog box includes the following options:
Copies/Collated: Use the field box to enter the number of copies you want to print. The Collated check box collates pages when printing multiple copies.
All: This option prints all pages in the document.
Current View: This option enables you to print a portion of a page. Zoom in to the document page and select Current View to print the page as you see it displayed on your monitor.
Current Page: Navigate to the page you want to print, and select Current Page. The result is a print of the page currently viewed in the Document pane.
Reverse Pages: Click this radio button to print from back to front.
Pages: Click Pages, and select the range of pages you want to print.
Subset: Subset contains several options in the drop-down list. Choose to print all pages in a range, odd pages only, or even pages only.
Document and markups: From the drop-down list, you have choices for printing the document as you might print any file. Acrobat offers additional options not available in other CS applications, such as comment notes, stamps, and form fields. The Document and Comments option prints the document and the contents of the comment notes. When you select the item, the comments on the first page, if they exist, display in the Preview area. The Form Fields Only option prints only the form fields from an Acrobat form.
Page Scaling: Page Scaling offers options for None, Fit to Printable Area, Shrink to Printable Area, Tile Large Pages, Tile All Pages, Multiple Pages per Sheet, and Booklet Printing. Select the option you want from the drop-down list choices.
In Acrobat 9, you'll find some new additions to this menu. Choose Tile Large Pages or Tile All Pages, and you can tile large prints that you create for oversized inkjet printers. Choose the Multiple pages per sheet option, and you can define the number of pages you want to print on a single sheet of paper.
Auto-Rotate and Center: When enabled, pages are auto-rotated and centered.
Summarize Comments: Prints a comment summary for PDFs containing Comments & Markups.
Preview: A document preview shows the current page as a thumbnail in the preview box. By default, the opening page previews. If you navigate to another page, the respective page displays in the preview box. Because Acrobat accommodates pages of different sizes in the same document, you can easily check a page to see if it prints properly on the current page setup. If you select the Reverse Pages check box, the Preview shows the pages in reverse order.
For composite color printing where you don't need bleeds and printer's marks, the options in the Print dialog box are all you need to send your PDF documents to your printer. When high-end commercial prepress and printing are needed, the Advanced Print Setup dialog box is where you need to make options choices. Click the Advanced button in the Print dialog box, and the Advanced Print Setup dialog box opens, shown in Figure 35.37.
On the left side of the Advanced Print Setup dialog box, you make choices for options associated with output, marks and bleeds, PostScript options and color management. The first item available for selection is Print As Image. For composite color printing when you have difficulty printing a document to your desktop printer, use this option as a last resort. When you check the box, all vector objects and type convert to bitmaps. The results are often less than optimal but can mean the difference between printing the page or not. If you experience PostScript errors when printing a file, check the Print as Image check box.
The drop-down menu adjacent to the Print As Image check box provides a list of preset values for output resolution. If you want to supply a custom resolution, type a value in the text box. You can greatly improve the appearance of files printed with the Print As Image option by raising the resolution to 300 dpi or more.
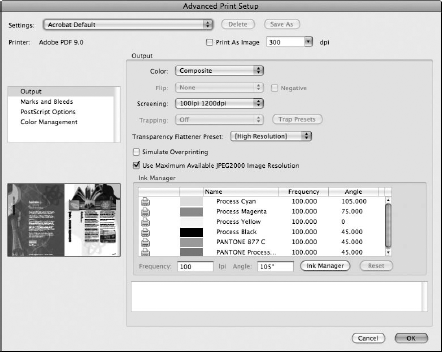
Output options offer choices for handling color and screening. In the Output pane, you find settings for the following:
Color: The same options for composite and separations are available in Acrobat as you find in InDesign and Illustrator. See "Setting print options in Illustrator" and "Setting print options in InDesign" earlier in this chapter.
Flip/Negative: Flip is available only when printing color separations. If you need Emulsion down on a Composite print, you need to import the PDF in InDesign and flip the page. Check the box for Negative if you want to print the file as a negative.
Screening: Fixed values are derived from the PPD for PostScript printers. You select custom frequencies and screen angles in the Ink Manager at the bottom of the Output pane.
Trapping Off: Turns off trapping.
Trap Presets: Opens the trap presets dialog box where you can define traps.
Transparency Flattener Preset: Choose from High, Medium, and Low Resolution options for flattening transparency. Any custom flattener presets created in Acrobat are also available here.
Note
For more on flattening transparency, see Chapter 38.
Simulate Overprinting: This option, also available for composite, prints a proof showing the effects of overprints assigned in the document. This feature emulates the overprinting previews of high-end color proofers that display overprints in composite proofs.
Use Maximum Available JPEG2000 Image Resolution: When enabled, the maximum usable resolution contained in JPEG2000 images is used.
Ink Manager: If your file contains spot colors or RGB colors, you can convert spot or RGB to CMYK color by clicking the Ink Manager button to open the Ink Manager dialog box. To edit the frequency and angle for each plate, click a color and the Edit Frequency and Angle. Supply the desired frequency and angle for each color by successively opening the dialog box for each color.
Click the Marks and Bleeds option in the left pane, and the marks and bleeds options appear, shown in Figure 35.38. Acrobat behaves a little differently from the other CS applications because you don't have a document setup to define page size as in the other applications. You need to be certain that the Page Setup page size is large enough to accommodate printer's marks. However, you need to define the bleeds in the document you convert to PDF. If bleeds were not included (say, from an InDesign file), the PDF won't set a bleed outside the printer's marks. Be certain you include bleed amounts in your Illustrator and InDesign files before exporting to PDF.
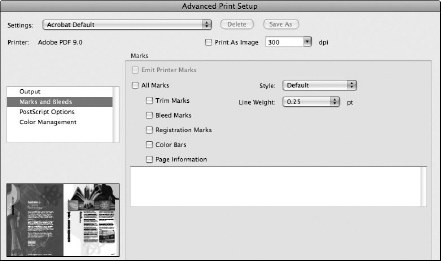
Check All Marks, or individually click the check boxes below the Marks Style drop-down list. From the drop-down list options, you can choose a number of different styles that support U.S.A. and Eastern marks and bleed styles.
The PostScript Options section includes a variety of settings used for preserving embedded halftone frequencies, transfer functions, handling color, and some other miscellaneous settings. Click PostScript Options to open the options choices for the PostScript settings, as shown in Figure 35.39. You have these options:

Font and Resource Policy: Three options are available from the drop-down list:
Send at Start: Sends all fonts to the printer as the print job starts.
Send by Range: Sends fonts encountered on the pages while new pages print and where the fonts stay in memory until the job finishes printing.
Send for Each Page: Conserves memory where the fonts are flushed after each page prints. This option takes more time to print but can overcome problems when you experience difficulty in printing a job.
Print Method: Choose from PostScript Level 2 or PostScript 3 depending on the level of PostScript used by the RIP.
Download Asian Fonts: Check the box if Asian characters are in the document and not available at the RIP.
Convert TrueType to Type 1: This option converts TrueType fonts to Type 1 fonts.
Emit CIDFontType2 as CIDFontType2 (PS version 2015 and greater): This option sends older CID Type 2 fonts as a newer PostScript version.
Emit Undercolor Removal/Black Generation: GCR/UCR removal is necessary only if the original file contains embedded settings. Deselect the box to remove any embedded settings that you might have inadvertently added and saved in Photoshop. If you want to apply any embedded settings, checking the box to emit the settings applies them as they were embedded in the authoring program.
Emit Halftones: If the PostScript file contained embedded halftones, you can preserve them here, and the frequency assigned in the Output options is used to print the file. Check the box to apply the frequency embedded in a file. You preserve halftones when you want an embedded halftone frequency in an image to print at a different frequency than the rest of the job.
Emit Transfer Functions: Deselect the box to eliminate any transfer functions that might have been embedded in Photoshop images. If you know you want images to print with embedded transfer functions that you may have applied according to instructions provided from a publication house, check the box to preserve the transfer functions.
Emit Flatness: This option applies flatness settings for vector data saved with EPS files.
Emit PS Form Objects: PostScript XObjects store common information in a document— things like backgrounds, headers, and footers. When PostScript XObjects are used, the printing is faster, but it requires more memory. To speed up the printing, check the box to emit PostScript XObjects.
Discolored Background Correction: Enable this option only when printing composite proofs where backgrounds print darker or with a discolored appearance like a yellow tint.
Always use host collation: If you select this option, you need to select Collated in the Print dialog box. Check this box if the target printing device supports a collated option, and override the Collated function in the Print dialog box if it fails to collate on a given printer.
Click Color Management in the left pane, and the Color Management options open, as shown in Figure 35.40.
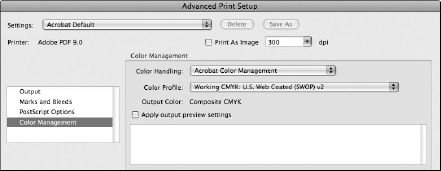
For color handling, choose Acrobat Color Management. Your choices for profile support for nonPostscript printers are limited to a sRGB or a CMYK profile. If you use a PostScript device, you can choose to let the printer determine color and choose a profile suited for your paper.
The Apply output preview settings are available for composite printing only. If you want to apply settings made in the Proof Setup for a simulated print, enable the check box.
For composite printing to desktop PostScript devices, you can successfully print using the Print and Advanced Print Setup dialog boxes. However, for commercial printing to imagesetters, plate-setters, and direct-to-press equipment, printing direct from Acrobat can produce some unexpected results. A better option is to generate a PostScript file and download the PostScript file to your printer. When printing directly to high-end devices, you can experience problems with color handling, black type printing with tints, and PostScript errors that prevent the job from being printed.
For commercial output, choose File
Note
For more information on saving files as PostScript for printing purposes, see Chapter 40.
Some CS applications require you to use the Page Setup dialog box before opening the Print dialog box.
Print options for screening, color handling, separations, printer's marks, and so on are found in advanced print options dialog boxes generally available through the Print dialog box.
Desktop color printers often have special print options where choices for paper types and color handling are accessed via the printer's print driver.
InDesign and Acrobat are the most commonly used applications for commercial printing to imagesetters, platesetters, and on-demand devices. Photoshop is the most common application used when printing to large format inkjet printers.