
Understanding the Bridge environment
Managing application documents
Using metadata
Using the Bridge search engine
Using application services
Editing camera raw images
Managing color in Adobe Bridge
Running slide shows in Bridge
Using Mini Bridge
Adobe Bridge is the central hub for all CS5 apps. With Adobe Bridge, you can organize and categorize all CS5 documents and complete several simple editing tasks such as rotating multiple images and converting multiple camera raw images with different settings for saving and editing in Adobe Photoshop. You also can synchronize color management settings across the print oriented applications. Bridge also includes a robust search engine to help you find specific pieces of content. In short, Adobe Bridge is the center of the CS5 universe from where you control, manage, and maintain all your applications documents as well as enjoy some nifty features.
Adobe Bridge comes with both the Standard and Premium editions of the Creative Suite as well as with an individual copy of Photoshop CS5, Illustrator CS5, InDesign CS5, Flash CS5, or Dreamweaver CS5. Adobe Bridge is not included when you purchase a single copy of Acrobat Professional.
Note
Adobe Acrobat 9 Pro also includes the Organizer tool that works in some ways similar to the Bridge. Acrobat's Organizer is built into the program and used exclusively for managing PDF documents in Acrobat. For more information on Acrobat's Organizer, see Chapter 7.
To open the Bridge, follow these steps:
STEPS: Launch the Bridge
Double-click the program icon. Locate the Adobe Bridge program icon or the program alias, and double-click to launch the Bridge. Note that this method of launch is necessary when you work in Acrobat Professional or when you work without any other CS5 application open.
Use a menu command in a CS5 program. If you have Photoshop, Illustrator, InDesign, Acrobat, or Flash open, select File

Within the Advanced panel in the Preferences dialog box, you can enable the Start Bridge at Login option to cause Bridge to open automatically when the computer starts.
Tip
You also can launch Adobe Bridge by clicking the Bridge icon located at the left end of the Options bar in Photoshop, Illustrator, and InDesign. In Flash, Dreamweaver, and Fireworks, you can access Bridge from the File
Note
For information on editing metadata, see the section "Working with Metadata."
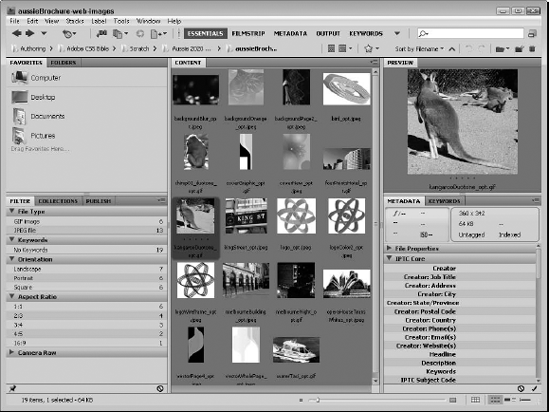
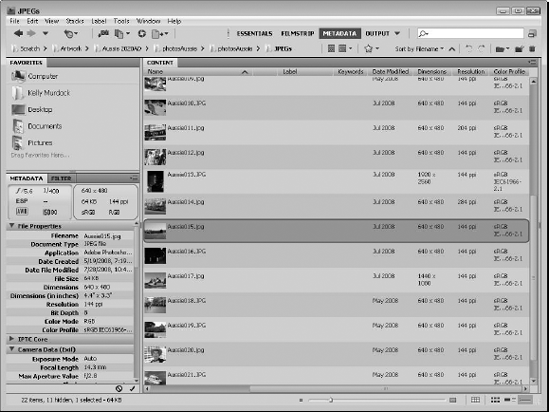
The Bridge has a standard interface similar to the other CS5 apps including several palettes and panels that are easy to move about the window. In the center of the Bridge interface is a large window that displays thumbnails for the current folder, as shown in Figure 6.2. This large window is also a panel that can be moved to any of the available columns.
The Content panel displays thumbnail images for all Adobe CS application documents. A description for each file is reported below the thumbnail image for filename (depending on the options that are enabled and the size of the thumbnails). The description information can include the creation date and time, image resolution, and dpi (dots per inch). The filenames are editable in the content area. Click a filename, and wait a moment for the I-beam cursor to appear.
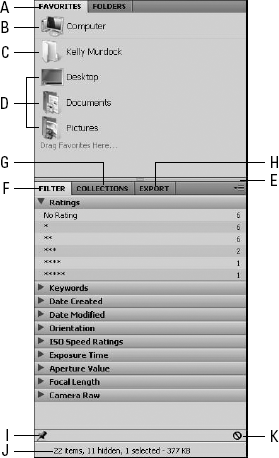
To the left of the main thumbnail display panel are the Favorites, Folders, Filter, and Collections panels, as shown in Figure 6.3.
The Bridge components contained in the left panel include the following:
Favorites/Folders: Two tabs appear at the top of the left pane. The Favorites items include the items detailed below. When you click the Folders tab, you can navigate your hard drive and any connected and networked devices including external drives and memory sticks, by opening folders viewed in a hierarchy containing root and nested folders.
Note
The Bridge General Preferences determine what appears in the Favorites tab. Press

Computer (My Computer): Click the icon, and you navigate to the root location where your boot drive, external drives, CD drives, and network places are accessed.
Default User Folder: Below the Computer icon is an icon for the default user who is currently logged in.
Desktop/Documents/Pictures: These links (on the Macintosh) are designed to point to the standard file folders that hold documents and images. For Windows, you can customize similar folders in the Desktop, Documents, or Pictures folders.
Separator bar: You can drag the separator bars to resize the panes.
Filter: From the Filter panel, you have options to focus the files viewed in the Content area using several different criteria including Filename, Document Type, Date Created, File Size, Resolution, Dimensions, and so on.
Collections/Export: Collections are designed to contain sets of files that match a defined set of search parameters. There is also a Smart Collections feature that holds a dynamic search that constantly collects files that match the criteria of the smart collection.
Export: The Export tab includes preset icons for batch moving, publishing, and processing content files. To queue a content item, simply drag it to the appropriate export icon. When you initiate the export, you can select the destination folder or online site. You also can select to rename, resize, change the quality setting, or change the metadata for the content to be exported.
Keep Filter when Browsing: This option maintains the desired filter while browsing to another filter when enabled.
Status bar: The text at the bottom of the panel displays details about the selected thumbnails.
Clear Filter: This option removes the current filter setting and shows all files in the current folder.
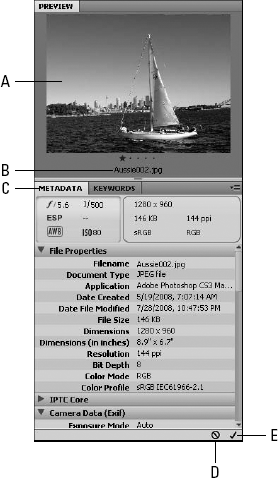
The right side of the Bridge window, shown in Figure 6.4, includes a Preview panel for the current selection. You use it to view thumbnail images of all CS5 application documents and PDF files. The Preview panel can also be used to view several other media file types including .mov and .avi files. Non-Adobe documents that aren't recognized are shown in the window, but previews are not shown. The tools in these panels include:
Preview: Click an image in the Content panel, and the selected document appears in the Preview pane. Note that previews for documents are provided for all CS application documents and for many different types of non-Adobe files including sound and multimedia files. The Preview pane can hold multiple selections allowing you to compare images side by side.
Document Title: The filename is reported for the current selected file. You cannot edit the filename in the Preview pane.
Metadata: Metadata is information that an authoring application automatically supplies. This information includes the creation and modification date as well as the custom data you can add to the file, such as copyright information or author name. The metadata are displayed for the current selected file in the content area.
Cancel: Click Cancel if you edit metadata in a document and want to cancel all changes you made in the Metadata pane.
Apply: Click the Apply check mark to apply an edit made in the Bridge to a file's metadata.
In the upper-left corner of the Bridge interface are several menu buttons, as shown in Figure 6.5. These buttons include the following:

Navigation arrows: As you view different folders, you can click the left arrow to view the previously viewed folder or the right arrow to trace your steps forward. Note that the right arrow becomes active only when you have first visited a previous folder by clicking the left arrow.
Go to Parent or Favorites: This button presents a drop-down list of all the parent folders for the current item. It also includes options for accessing the Favorites, Bridge Home, Desktop, Pictures, and Documents folders.
Reveal Recent Files: This button opens a folder of recently accessed folders. It also includes an option to Clear all Recent Files and Folders.
Get Photos from Camera: This button lets you access the Photo Downloader utility for obtaining digital photos from a docked camera.
Refine: The Refine button includes options for opening Review Mode, doing a Batch Rename, and viewing the File Info for the selected file.
Open in Camera Raw: This button opens the selected image in the Camera Raw processing dialog box.
Output: The Output button includes options for outputting the selected file to PDF or to the Web.
The upper-right corner of the Bridge interface contains several more menu buttons, as shown in Figure 6.6. These buttons include the following:
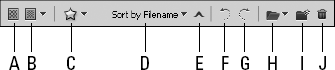
Prefer Embedded Images: This button speeds the browsing of images by using any embedded previews instead of having to load and display the images.
Thumbnail Quality Settings: This button includes options for the preview quality versus speed. Options include Prefer Embedded, High Quality on Demand, and Always High Quality. Another option lets you Generate 100% Previews.
Filter by Rating: This button filters the thumbnails by the ratings applied to the various files. Other options let you show only rejected items, only unrated items, only labeled items, or only unlabeled items.
Sort Options: This button offers a list of sorting options including by Filename, Type, Date Created, Date Modified, Size, Dimensions, Resolution, Color Profile, Label, and Rating. You also have a Manually option.
Ascending/Descending: This button lets you toggle between ascending and descending order.
Rotate Left: Select a thumbnail in the content area, and click the Rotate Left tool. The image is rotated left.
Rotate Right: This button rotates the selected thumbnail right.
Open Recent Files: Clicking this presents a list of recently opened files for the various CS5 applications. You also have a Clear Menu option.
Create New Folder: As the icon implies, clicking it creates a new folder. If you have a folder open, the new folder is created within the current active folder.
Delete: The familiar trash icon denotes deleting a file when you click it. First select an image in the content area, a range of images, or a folder, and then click the trash icon.
Finally, in the lower-right corner of the interface are several buttons and a slider for setting the view options and thumbnail sizes, as shown in Figure 6.7. These buttons include the following:

Smaller Thumbnail Size: This button zooms to the smallest thumbnail size.
Zoom Slider: Move the slider to the left to zoom out of the thumbnail view and to the right to zoom in. Click the opposing icons to view the smallest and largest (M) sizes respectively.
Larger Thumbnail Size: This button zooms to the largest thumbnail size.
Lock Thumbnail Grid: This button creates a grid where each thumbnail has the same size. It also sizes the thumbnails within the Content panel to fit within the given space so you can page through thumbnails without seeing only part of a thumbnail.
View as Thumbnails: This button makes all files visible as thumbnails.
View Contents as Details: This button makes all files visible along with their details.
View Contents as List: This button displays all files as a list similar to what you'd see in a Finder or Explorer view where all the file details are displayed within columns. You can sort the files by clicking on the column head.
When you practice a little using the Bridge to view files and mark documents with stars, you can easily understand simple methods for sorting and organizing all the content you use for a given project. When you create certain views such as navigating to a folder and sorting documents by stars and/or labels, you may want to return to the last view obtained in the Bridge. Fortunately, Adobe anticipated such needs and offers you a method of saving workspaces much like you save workspaces in other CS applications.
Workspaces are custom defined views that keep track of the position and placement of the various panels along with the different display options. Within the Window
Essentials: Displays all images using the standard default thumbnails and columns of panels to the left and right.
Filmstrip: Displays all thumbnails along the bottom of the Content panel and the selected thumbnail in a large Preview panel above the horizontal thumbnails with the default panels to the left, as shown in Figure 6.8.
Metadata: Displays a list of files with small thumbnails and file details sorted in columns, as shown in Figure 6.9.
Output: Displays a large preview of the selected thumbnail along with a horizontal strip of thumbnails. The Output panel is displayed to the right.
Keywords: Displays a list of larger thumbnails with all its file details to the right using the View Contents as Details option.
Preview: Displays a vertical column of thumbnails next to a large Preview panel on the right.
Light Table: Fills the entire window with the Content panel showing thumbnails.
Folders: Displays all thumbnails along with the Folders panel to the left.

Any custom defined workspaces are displayed in the Options bar at the top of the interface for quick selection. You can reorder these links by dragging them to the left or right.
You can manage tabs in the Bridge much like you can with other CS applications to customize the workspace. In the Bridge, the tabs are always docked in the Bridge window, but you can move and mix them in the left or right panels. If you want to add more room for displaying thumbnails, drag all the tabs in the right column and drop them in the panes on the left. You can then toggle views among the Metadata, Keywords, and Preview tabs as shown in Figure 6.10.
Note
For information on adding and editing metadata, see the section "Working with Metadata," later in this chapter.
If you move your tabs around and you want to change the arrangement back to the original look, choose Window
You can open multiple windows in the Bridge and work back and forth between windows much like when you work with multiple file folders on your desktop. To open another window, choose File
If you use the Window
Tip
If you have a two-monitor configuration, then you can use a set of synchronized windows to show an expanded Preview pane on one monitor and the Content pane on the other monitor.

Figure 6.10. To provide more viewing room for thumbnails, drag the Preview, Metadata, and Keywords tabs to the left column of panes.
To close a window, click the close box in the upper-right corner or press
Just as you have many options for file organization on your computer desktop, the Bridge offers you many of the same options and more. When you work with the Creative Suite, you don't have to leave the Bridge to organize or edit any documents, and you can move and arrange files and folders all within the Bridge window.
New folders are created in the Bridge window. At the top of the Bridge window, click the New Folder icon, and a new untitled folder is added to the folder in view. The text is highlighted when a new folder is added. Just type a name for your folder, and press the Return/Enter or Num Pad Enter key to register the name.
You can locate new folders by dragging them around the content area. The content area behaves similarly to a slide sorter where you can organize documents and folders according to personal preferences. Click and drag a folder or document around the content pane. When a vertical blue separator bar appears, Bridge informs you that when you release the mouse button, the folder (or document) will be dropped to the right of the separator bar.
To create subfolders within folders and place files within folders, first add a new folder as described in the preceding section, "Creating new folders." Name your new folder. Select a group of files by Shift-clicking or
You also can add files and folders to folders by dragging and dropping them from the desktop to the Bridge window. The Bridge is smart; when you drag a file from within an open folder in desktop view to the Bridge window and release the mouse button, Adobe Bridge drops the file in the respective folder. The Bridge view subsequently changes to the folder where the file is placed. In other words, your desktop view is completely mirrored in the Bridge window, and file locations are preserved when you drag them to and from the Bridge window.
You can easily drag and drop files between folders in the Bridge window to relocate them. The relocation of files in the Bridge window is mirrored on your desktop. If you drag a file from the Bridge window to your desktop or another folder, you likewise relocate the file on your desktop and the action is mirrored in the Bridge window.
If you have two hard drives or an external media device attached to your computer and you drag a file from the Bridge window to a secondary drive, the file is copied to the target drive. To move a file from a folder and ultimately from the Bridge window, press the
To copy a file from one folder to another folder on the same drive, press Option/Alt and drag and drop a file.
When browsing your hard drive to find files, you'll want to view the Folders tab in the Bridge window. The Folders tab displays your computer hard drive and all drives attached and networked to your computer. Click a drive or folder to access files contained therein, or click the arrows adjacent to drives and folders to display nested folders.
You can easily return to last viewed folders by clicking on the Path Bar, as shown in Figure 6.11. Clicking the folder icon adjacent to the current folder moves you up one level, while clicking the left and right arrows helps navigate to previous and next views.
You also can sort using one of five different ratings (identified as stars) that you can individually assign to files. Additionally, you can sort files by labels that also are individually user defined. When a document thumbnail is selected in the content area, five tiny stars appear below the thumbnail. Click a tiny star, and the icon becomes larger, as shown in Figure 6.12. In the figure, you can see several documents tagged with different stars and one image with the default rating.
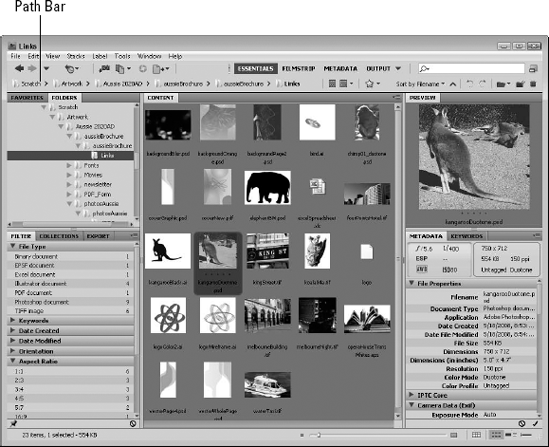
Figure 6.11. The Folders tab displays folders contained in the root drive and all attached media devices. Path Bar
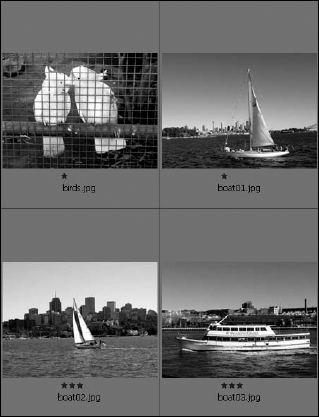
Figure 6.12. Four files are rated. At the top left and right are one star, and at the bottom left and right are three stars.
In addition to rating files with stars, you also can label files with color codes. Labeling files with colors is an easy way to mark a number of files imported from digital cameras, CDs, external media cartridges, or other sources used to copy files to your hard drive. As files are reviewed, you can mark them with one of five different colors. You can customize color names in the Preferences dialog box. Although you cannot change the colors, you can identify a color with a specific name. For example, you can use labels to identify files according to status in a workflow.
To change the color names, open the Preferences dialog box. On the Macintosh, choose Bridge
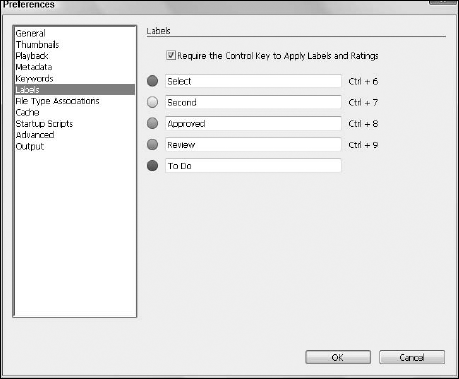
As shown in Figure 6.13, you can change the label name to a custom name by typing in the text box adjacent to any color. Changing labels should be something you do for your own personal file organization. If you change label names and share files with other users in your workgroup, the other users won't see the same label names.
Note
XMP (eXtensible Metadata Platform) is an Adobe-specific set of data that provides information about a file and its use by Adobe applications. In order to store XMP data, a file must be XMP write capable. File types such as BMP (bitmap format), DCS (desktop color separation format), PICT (Macintosh Picture format), and Photoshop 6 PDF (Portable Document Format) are not XMP write capable.
After you label files, you can then sort and/or view them according to label, like sorting and viewing files according to stars. When you rate a file with a star rating and identify a document with a label, you can sort and/or view nested labels. For example, you can rate images with one, two, three, or four stars and label the same documents with different colors. You can then choose to display only red files with three or more stars, hence narrowing the number of displayed documents to those you specifically identify with a given identity.
You can view metadata you add in the Bridge when you work with the CS5 applications. If you label a Photoshop document in the Bridge with a label name, the name is visible when you open the file in Photoshop and select File
Likewise, you can view metadata when you import photos in Adobe InDesign. In InDesign, don't use the File menu command. Rather, open the Info palette (Window
Note
The File
Be aware that assigning a label color in the Bridge is just a means of visually identifying documents in the Bridge window. What's important is the label name. The name is written to the XMP data and thereby is visible to the other CS applications. When using labels in the Bridge, be certain to not use the color names if you want label names to be written to the XMP data. Descriptive names are more meaningful in your workgroup than color names.
You cannot write XMP data to certain file types mentioned earlier in the section on "Labeling files." Additionally, you cannot write XMP data to files that are locked, such as files you open from CD-ROMs. You may find that the label names for all these files are retained in the Bridge window, but don't be fooled. The labels are stored in the Bridge cache (a memory location on your hard drive). When the cache is cleared or the CD-ROM is viewed on a different machine, the label names for these files are not retained. The only label names retained are within the metadata for those file types supporting XMP write that aren't on a read-only storage device.
You can remove files and folders from your hard drive directly from within the Bridge window. To delete a file or folder, select the item(s) to delete and press the Delete/Backspace key or Del key. When you select one of these delete commands, a dialog box appears asking whether you'd like to Reject or Delete the file. Rejected files are given a sub-zero star rating and can be hidden using the View
Likewise, you can select files/folders to delete and click the trash icon in the Bridge window. When you delete files using the Bridge, the files are moved to the trash can on your desktop. If you change your mind and want to retain files, move them out of the trash can in desktop view to the desired folder.
Like all the CS applications, the Bridge supports the use of context menus. Depending on the file type, menu options change. If you select any file type including non-Adobe application documents, and open a context menu on a file in the content area, the menu choices are as shown in Figure 6.14. You open context menus by right-clicking the mouse. On Macintosh with a one-button mouse, press the Ctrl key and click to open a context menu.

Menu options for all files are slightly different depending on the type of file that is selected, but some of the common commands include the following:
Open: Select a file, and choose open results in the same operation as double-clicking a file in the content or Preview pane. The default editing application opens the file.
Open With: From the submenu, you have a list of programs from which to choose. You might have a PDF file that by default opens in Adobe Acrobat. If you want to open the file in Adobe Reader, use Open With and choose Adobe Reader from the menu options.
Test in Device Central: This menu choice opens the file in a window that can emulate the display of the file on one of several different multimedia-enabled phones and PDAs.
Open in Camera Raw: This menu choice opens the file into a Camera Raw window where you can alter the Camera Raw settings. This choice appears only when right clicking on a bitmap image.
Cut, Copy, and Paste: These commands let you cut, copy, and paste files between different folders.
Duplicate: This command creates a copy of the selected item or items with a single command.
Delete/Move to Trash: This choice removes a file from a folder and deposits it in the trash can on the desktop. Choosing this menu command performs the same operation as selecting a file and clicking the trash icon in the Bridge window or pressing the Delete/ Backspace or Del keys.
Move to, Copy to, Export to: These menu items let you move, copy, or export the selected file to a selected folder or online service from a menu.
Reveal in Explorer/Reveal in Finder: This menu choice also is available under the File menu. If you want to find a file in a desktop view, select this menu command.
Add to Favorites: You can add a file to your Favorite list. For more information about using Favorites, see the section "Adding Favorites," later in this chapter.
Rename/Batch Rename: You can rename a single folder or file or a folder of files in a batch sequence. For more information on creating batch sequences, see the section "Batch processing with actions" later in this chapter.
Develop Settings: This menu provides access to the Camera Raw settings for the selected file. You also have options for copying and pasting settings between files.
Lock Item: This locks the current file or folder so it cannot be moved or renamed. Locked items have a simple icon displayed in the upper-right corner.
File Info: Select File Info, and the same dialog box you open in the CS programs opens in the Bridge. You can add metadata in the File Info dialog box.
Label: From the submenu, you have choices the same as when using the label section in the Label menu. You cannot choose ratings from this submenu, but you can assign labels to selected documents.
New Folder: This menu option creates a new folder in the current folder.
Sort: This menu sorts the current contents passed on the selected sort option.
If you have a group of images that are similar or that you want to group together, you can organize them by grouping them together into a stack. A stack is a group of images that are collected together to help make the folder structure simpler. Creating a stack of images doesn't delete or remove any individual items.
To create an image stack, just select several items and choose the Stacks
When a stack is closed, only the thumbnail for the item on top of the stack is displayed. If you click this thumbnail then only the single item is selected, and if you change the metadata you are only changing it for this one item. If you click the outline of the stack, then all the items in the stack are selected, and if you change the metadata for this selection, then it is changed for all the items in the stack.
Tip
You can quickly tell if one item or all items in the stack are selected by looking at the Preview pane. If the stack is selected, then multiple items are shown in the Preview pane.
Note
Stacks can be labeled and rated just like individual files, but only the rating of the top file in the stack is displayed.
You can dissolve a stack using the Stacks
New items can be added to an existing stack by dragging and dropping a file onto an existing stack. You also have options in the Stacks menu to Expand and Collapse all stacks.

When a stack includes ten or more images, you can cycle through the images using a Play button that appears when you move the mouse over the top of the stack. This displays each image in succession. Next to the Play button is a slider that you can drag to scrub through the images. The Stacks
Warning
If the Play button and slider don't appear when you move the mouse over the stack, then increase the size of the stack. The Play button and slider won't appear when the stack size is too small.
For the animated preview, you can set the Frame Rate at which the images are played back using the Stacks
Tip
Stacks are very handy for previewing animation sequences that consist of multiple successive images.
Collections in Bridge provide a way to keep a group of content together regardless of its location. Collections are accessed and saved in the Collections panel. To create a new collection, simply click the New Collection button at the bottom of the panel. After a new collection is created, you can drag items from the Content panel and drop them into the collection icon. You can then recall the items contained within the collection by clicking the collection's icon in the Collections panel.
Note
Collections are found in Bridge and also in Acrobat; they both work similarly. Collections in Acrobat provide a way to have a single selectable item in the Organizer point to files in different locations.
Note
For information on using Acrobat's Organizer, see Chapter 7.
The Collections panel also supports Smart Collections. Smart Collections let you save your search criteria so you don't need to reenter them anew every time. You can save a search as a Smart Collection and easily retrieve files having met a given set of search criteria. This feature saves you lots of time when returning to search results.
To create a Smart Collections, click the New Smart Collection button located at the bottom of the Collections panel. This opens the Smart Collection dialog box, shown in Figure 6.16, where you can define the custom search. A defined Smart Collection continues to add files that meet the defined criteria to its set every time the Smart Collection is accessed. The bottom of the Collections panel also includes an Edit Smart Collection button that lets you change the search criteria.
You can add files and folders to the Favorites pane. Open a folder in the Bridge, and select a file or folder. From a context menu, select Add to Favorites. Likewise, you can select a file or folder and choose File
When you add files and folders to the Favorites pane, you are not copying files or moving them from one location to another. The Favorites are like document aliases or shortcuts and require very little storage space. When you delete a Favorite—either by selecting it and clicking the trash icon, using a key on your keyboard, or using a context menu— the Favorite is removed from the list, but your files remain in their original location.
Warning
Adding many files to the Favorites defeats part of the purpose for the Bridge—which is essentially to help you organize and manage your program documents. If you have a long list of Favorites and need to scroll the pane to find files, your organization becomes messy and unorganized. Be selective when you add files, and try to use folders where files for a current project are stored. Be certain to perform cleanup and remove files and folders routinely from the Favorites list after you complete projects or no longer use the files.
If you use a digital camera, you may want to take the cryptic names the camera uses to save your files and change them to more descriptive filenames. Bridge lets you add names and extensions to files in a snap. You can add names that give a better clue for what the contents of images are rather than names like P1010273 or CRW_6062.
To rename files using a batch command, follow these steps.
Open a folder of files in the Bridge that you want to rename. If you have digital camera files, use them for the following steps. If not, use any folder of photos. The original files won't be disturbed if you follow these steps.
Select the files you want to rename. Typically, you will rename an entire folder of files. When renaming all files in a folder, press
Tip
If you have files in different folders and you want to rename files from the different folders, first perform a search. You need some form of metadata common to all the files. Your search results are reported in a new Bridge window, even though the files are stored in different folders. Select all the files you want to rename, and save the results to either the source folder or a new folder. For more information on searching metadata, see the section "Searching in the Bridge," later in this chapter.
Create a folder for the destination files. You can choose to rewrite the existing filenames or write copies of the files to a different folder. The new folder will contain the renamed files. For these steps, use a second folder where the files are to be copied. You can create a new folder in the Bridge window where you view the files to rename.
Select the Batch Rename command. Open the Tools menu and select the command, or open a context menu on one of the selected images and choose Batch Rename. The Batch Rename dialog box opens, as shown in Figure 6.17.
Choose a destination folder. Select the radio button for Copy to other folder. This option copies the files to another folder while leaving the original images unedited. To specify the target folder for the copied images, click Browse. The Browse for Folder dialog box opens, and you can navigate to your hard drive and identify the target folder. Select the folder you want to use, and click Choose.
Add a root name. The default New Filename is the root name. The pull-down menu defaults to Text, and the name you want to use is typed in the text box on the right. If you stop here and process the batch, your filenames will appear as photo (1), photo (2), photo (3), where photo is used as the root name. Add a name to the text box, but don't click Rename yet.
Add a Sequence Number. Rather than have your filenames appear as name+(1), and so on, you can add a sequence number so the name appears as photo001, photo002, photo003, and so on. To do so, you need to add another option in the New Filenames section of the Batch Process dialog box. Click the plus (+) symbol to the right of the text box, and the dialog box expands to reveal more options you can use for filenames. Open the second pull-down menu, and select Sequence Number from the menu commands. In the text box to the right of the menu choice, add "001" as shown in Figure 6.14. Note the example of the filename shown at the bottom of the dialog box under the New filename label.
Tip
Depending on where you view files, such as desktop views, dialog boxes, applications windows, and so on, filenames do not always appear in dictionary order. A file labeled as image9 may appear after image89 in some windows or dialog boxes. To ensure proper reading order in all windows and dialog boxes, be certain to add leading zeros sufficient enough to accommodate the number of files you want to rename. For example, you can use a single leading zero and two digits for files numbered up to 99, two leading zeros and three digits to accommodate files numbered up to 999, and so on.
Process the batch. Select the check box to preserve the current filename in the XMPMetadata, and click Rename in the top-right corner. After the Bridge processes the files, open the target folder and view the results. In Figure 6.18, the files were changed to aroot name of "Aussie"—where the files were shot—and a sequence number beginningwith 001.

In the left column of panels, next to the Collections panel, is an Export panel. Contained within this panel are export presets for saving files to your hard drive and for publishing files on Photoshop.com. You also can add new presets to the panel using the Add Preset button located at the bottom of the panel.
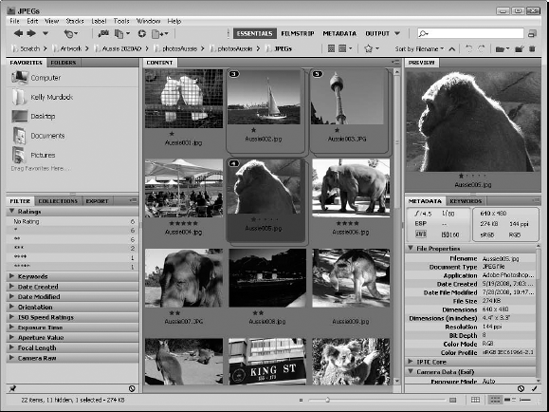
Figure 6.18. After running the Batch Rename command, the files are renamed and saved to the target folder.
Beneath each preset icon in the Export panel, you can queue up files to export by dragging their thumbnails from the Content panel and dropping them on the export preset icons in the Export panel. When one or more files are queued, icon buttons appear to the right of the preset icon for clearing the queue and for beginning the export process.
If you click the Publish button to begin the export process, the Export dialog box appears. Using the Destination tab in this dialog box, you can select to save the exported files to the original file location, to a specific browsed folder, or into a subfolder. You also have options to create a unique filename, overwrite the existing filename, or skip the file.
The Export dialog box also includes a panel labeled Image Options, shown in Figure 6.19, that includes options for batch renaming files, resizing and resampling images, and setting the image quality. You also can add metadata and keywords to the exported content.

Keywords and Metadata are data that can be used to describe your file. The information can be sorted, viewed in other applications, searched, and used to describe copyright information, identify files, and archive documents. With regards to user-supplied information, if you had to manually enter rows of field data in each and every file, metadata would be a useless tool. However, Adobe makes it much easier for you by providing a means for creating a template and using that template to apply common metadata to gigabytes of documents.
Keywords are defined and stored in the Keywords panel and can be organized into categories called sub-keywords. To create a new keyword for the selected image, click the New Keyword button at the bottom of the Keywords palette. This adds a text field where you can type the new keyword. The new keyword is automatically added to the top of the current keyword set. You can also create new keyword sets using the New Keyword Set button at the bottom of the palette.
Keywords can be added to a new keyword set by dragging and dropping them into the new set. Dragging a keyword or a keyword set into the trash icon deletes it. Once a keyword is added to a file, you need to enable the check box to the left of the keyword to associate the keyword with the file. Once enabled, you can search for images by keyword.
At the bottom of the Keywords panel is a search bar where you can enter a specific term to search for. The icon lets you choose to search for keywords that contain, are equal to, or start with an entered value.
The Bridge lets you see document metadata at a glance in the Metadata panel. The Bridge Metadata Preferences determine which fields are displayed in the panel. You caught a glimpse of the Metadata Preferences in the section "Labeling files," earlier in the chapter. Label data is metadata, but the edits you made for label names occur in a separate preference pane than the Metadata pane. You cannot add metadata in the preferences; the Metadata Preferences are used to display and hide the categories shown in the Metadata panel in the Bridge window. Therefore, your first task is to open the Preferences and select which fields you want to view and ultimately edit when you work in the Metadata panel.
Open the Preferences dialog box, and click Metadata in the left pane. Metadata are divided into several categories in the Bridge. Some of these categories are single items, and others contain a nested group of fields expandable when you click the right-pointing arrow to expand (and collapse) the category. The categories include the following:
File Properties: This describes file attributes, and most often the data are imposed automatically when you create files. Items like file size, creation date, modification date, resolution, bit depth, dimensions, and so on are all part of the File Properties, and you cannot edit these items. Non-editable items do not provide field boxes for text entries in the Metadata pane in the Bridge.
IPTC (IIM, legacy): These data are editable in the Metadata pane. You can add information here for things like copyright information, captions, document title, author, keywords, and location. By default, however, this set of data is hidden from view. You also can add the same information to the IPTC Core. IPTC Core is a newer specification, and you should use it for all the data you add to current documents. The IPTC (IIK legacy) data appears from legacy files created before October 2004.
IPTC Core: Like IPTC (IIM, legacy), all the data here are editable. As a new specification developed by the International Press Telecommunications Council (IPTC) in October 2004, you should use it with all your current documents. The same field data are available in the IPTC Core fields where you find identifying information as described above with IPTC (IIM legacy).
IPTC Extension: This includes additional values as defined by the International Press Telecommunications Council (IPTC) such as the copyright owner, image creator, licensor, property release status, and so on.
Fonts: Fonts are applicable only to Adobe InDesign and Illustrator files. All the fonts used in an InDesign document or in an Illustrator document are displayed below the font heading when you select a file. When any other file type is selected, the Fonts category disappears.
Linked Files: This includes a list of the files linked to the current file, which is common for InDesign documents.
Plates: Plates are applicable only to Adobe Illustrator files. The plates indicate any spot color plates that are specified for the file, such as CMYK.
Document Swatches: Like Fonts, Swatches are visible only with Adobe InDesign and Illustrator files and likewise disappear when you select file types, other than InDesign or Illustrator documents. In Figure 6.20 you can see the metadata information for fonts and swatches when you select an InDesign file. Note that the remaining categories are collapsed in the Metadata pane.
Camera Data (Exif): This information is not editable. The data are derived from digital cameras and provide information related to the settings applied when the photograph was taken. Figure 6.21 shows all the information displayed with a photo taken from a digital camera. Exchangeable image file (Exif) data are written when files are saved from digital cameras in RAW, DNG, and JPEG formats and also can be embedded in TIFF-formatted files.


GPS: Global Positioning System (GPS) data is useful for files containing a GPS system on the digital camera. If your camera does not have a GPS, then the data fields are left blank.
Camera Raw: Camera Raw information describes the settings that Photoshop uses when you open a file and certain information about your camera and the settings used to shoot a photo.
Audio: Any audio file data included in the file are described in these fields, including the Bit Rate, Channels, and Duration. You also can specify the Artist, Album, and Genre.
Video: Any video segments included in the file are described here, including the Date Shot, Scene, Compressor used, and so on.
Edit History: Edit History is like a log file that can keep track of editing history made in Adobe Photoshop.
Version Cue: Version Cue information and comments are listed for Version Cue documents.
DICOM: This data applies only to Photoshop CS3 Extended files and higher. It includes information for images saved using the Digital Imaging and Communications in Medicine (DICOM) format. This information can include the Patient's Name, ID, Date of Birth, Physician, and so on.
Mobile SWF: This data holds information that enables images to be viewed on mobile devices and the options for displaying such images.
The many data fields available for metadata inclusion result in a long list. There are many different fields and categories you are likely not to use in any given editing session. Explore all the preference choices you have in the Metadata Preferences, and uncheck those items you never use or won't use for a collection of files. After disabling items you won't use, be certain to check the box for Hide Empty Fields. When you return to the Metadata pane in the Bridge window, only the fields that are checked are visible. This makes scrolling the list much easier, and you'll have an easier time when you need to add data to any given editable field. There is also an option to Show Metadata Placard that you can disable to hide the placard displayed at the top of the Metadata panel if you want more room to see the metadata.
If you want to edit a field, select a file and open the Metadata pane in the Bridge window and view the fields in the categories you have visible. On the right side of the pane, you can see a pencil icon for all the fields that are editable. If the icon is not present, you can't add data to the field. Click in a field, and the text box becomes active for any field marked with a pencil icon. In Figure 6.22, note the Creator: Email(s) field is edited and the field boxes are outlined among the IPTC Core fields.

Figure 6.22. Look for fields containing a pencil icon, and click the field to make the text box active. Type the data you want to add to the document metadata.
Obviously, if you have hundreds of files and many fields to edit, the process of manually typing data in fields is laborious, and you're not likely to add data to every image you take with a digital camera or use in a layout. Fortunately, you can supply common information to document metadata using templates.
You may be a photographer who shoots wedding, commercial, product, or other types of photography. If you perform a photo shoot and take the equivalent of several rolls or hundreds of digital photos, you are likely to use some common information in the metadata for your images on a given assignment. Typically you'll use your personal identifying information as well as information unique to the assignment such as location, client, project, and so on. All this information is common among the files and does not require you to add unique data for each file.
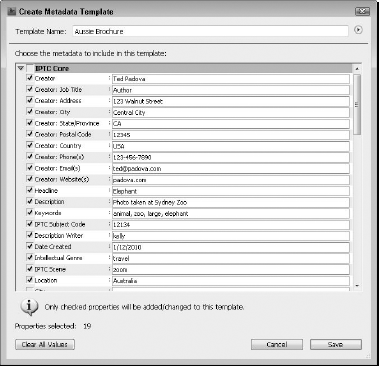
When you want to add common data to a group of images, you can easily create a metadata template and import the metadata into hundreds of photos with one click of the mouse. To see how a template is created, follow the steps detailed below.
STEPS: Creating a Metadata Template
Select a Photoshop image in the Bridge. You can use another CS application document, but for many artists the more common files you are likely to use more often arePhotoshop documents. Select the Tools
Note
You don't need to start with an image selected. With no file selected, you get a blank slate to work with. If the image already has some metadata defined, then you can use it as a template.
Add data to the field boxes. Several categories are listed in the Create Metadata Template dialog box, shown in Figure 6.23. Be certain to supply information that is common among all files. For example, for a given image, Author might be you or a professional photographer, and thus you would add the same common data to a large collection of files. Additionally you might have some descriptive information and keywords common among a group of files. However, the Document Title is typically a field that is unique among a group of images.
Add IPTC information. The fields where you find the most editable text boxes are contained in the IPTC section. Select IPTC Core, and add your personal contact information or the information of the photographer used for the photo shoot. Continue adding information relevant to your job in the IPTC Core category, and then move on to the other categories as appropriate.
Name the template and save a Metadata Template. Enter a name for the template in the top field and click the Save button. Note that you don't have an option to choose a destination folder. Metadata templates are automatically saved in a specific folder that the Bridge handles for you. The template is saved to the proper location and ready for use and can be selected from the Tools menu.
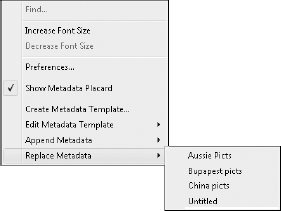
After you create a Metadata template, it's time to add the template data to files. You have two choices. You can choose to replace data or append data. When you choose Replace Metadata, the existing properties are replaced with the template data. When you choose Append Metadata, the data from the template are added to fields only when non-existing data match the same fields. As a matter of rule, if you want the data to be identical in your files and the template data are current and correct, use the Replace Metadata command. To see how replacing (or appending) metadata is handled, follow these steps.
STEPS: Use a Metadata Template to Replace Data
Select Files in the Bridge window. You identify files to replace (or append) the template data by selecting them in the Bridge window. If you have a folder where you want all the files to be replaced with the template data, press
Tip
To select most files in a folder with several files unselected, select the fewer files first. Open the Edit menu, and select Invert Selection or press
Open the Metadata palette menu. Click the tiny right-pointing arrow in the top-right corner of the Metadata tab to open the flyout menu.
Select the template to use to replace the data. Select Replace Metadata from the menu options in the flyout menu, and select the template name you want to use in the submenu, as shown in Figure 6.24, or you can choose the Tools
Pause to let the Bridge import the metadata. In the lower-left corner of the Bridge window, you can see the status of the file updates. Be certain to wait until the Bridge completes its work. When finished, you can view the metadata on the selected files as shown in the example in Figure 6.25. If you divided a photo shoot into several folders, open each folder, select files, and use the Replace Metadata and your template to repeat updating the files.
Templates are stored as XMP files on your hard drive. The Tools menu doesn't have a command for you to delete a template after you create one, but you can find these files in the XMP/Metadata Templates folder. You also can access these templates by opening the Create Metadata Templates dialog box using the menu found in the Tools menu. All available template files are displayed when you select the Show Templates Folder menu from the pop-up menu in the Create Metadata Template dialog box. The template files are viewed inside the folder. Select any template you want to delete, and move it to the trash.

The Bridge provides you a powerful search engine where you can quickly search your hard drive, network server, and external media for files based on a large range of criteria. The exercises you performed earlier in this chapter for assigning labels to files (see the section "Labeling files") and adding metadata (see the section "Working with Metadata") become more meaningful when you use the labels and metadata information to search for documents. Not only the metadata such as filename, creation date, file size, and so on is searchable. You can search on all metadata you add to your documents.
You can narrow searches by adding multiple criteria and conditions as well as search on Boolean expressions. After you create a search in the Bridge, you can save your search results as a new Collection. Collections are saved in the Collections panel.
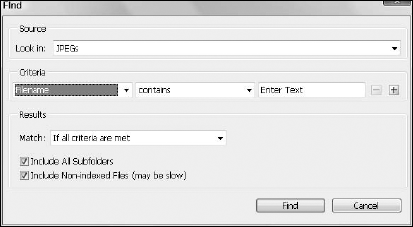
To search for files in the Bridge, you use the Find command. Open the Edit menu and select Find, and the Find dialog box opens, as shown in Figure 6.26. At first glance, the dialog box appears limited in providing you with many search options. Don't be fooled. You can dynamically expand the dialog box to provide you with an elaborate set of criteria and conditions.

Before you perform a search, take a moment to look over all the options you have in the Find dialog box:
Look in: The pull-down menu contains several categories, shown in Figure 6.27, from which you can select a location where you want to search for documents. The categories include:
Current Folder: The current content area displays documents found in the current folder. You can change the current folder by clicking Browse to the right of the Look in pull-down menu. The Browse for Folder dialog box opens, and you can navigate to your hard drive and select a folder. Searching the current folder reports results found only in this folder.
Recently Opened Folders: The last several recently accessed folders are also listed below the current folder.
Favorites: Favorites are grayed out unless you have identified documents or folders and added them to your Favorites. If you have several folders added to your Favorites, the search reports results from all folders that meet the search criteria. If you have, for example, five folders added to your Favorites and one file in each of the five different folders meet your search criteria, the five files display in a single Bridge window.
Hard Drive Roots: The hard drive root along with any connected devices and networked drives may also be selected.
Browse: The last option lets you browse for a specific folder.
Criteria: The criteria section of the Find dialog box is where you determine precisely what you want to search for. Several items are available to help narrow your search:
Filename: Filename is the default. Click Filename, and you find a list of metadata items to search as shown in Figure 6.28. All these items are self-explanatory. To use All Metadata at the bottom of the list, see the section "Searching metadata."
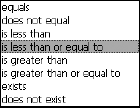
Conditions: The menu shown in Figure 6.29 shows the different conditions that need to be met to return results. Among the available options are: contains reports any text you type to the right of the Conditions menu. does not contain reports all data not containing the text you search. is means that the searched data must equal what you search for. starts with requires that you can type a character, several characters, a word, or several words, and the results are reported for data starting with what you add to the text box. ends with is the same as starts with, but results are reported for text matching the end of a data string. This item is frequently used for file extensions such as .jpg, .indd, .ai, and so on.
Note
The available conditions change depending on the criteria that you're searching for. For example, if you search for a specific rating, then the conditions are different, including 'greater than or equal to'.
Text box: You type the items you want to search in this box. Text is typed for all items except Rating. When you select Rating, the text box changes to a pull-down menu where you can choose between one and five stars or No Rating. Some items require adhering to special formats. File size requires you to type numeric values to express the number of kilobytes, and dates require using date formats.
Minus (−) and Plus (+): Click the plus (+) symbol to add a new line of criteria. To see how additional criteria helps your search, see the section "Searching metadata." Click the minus (-) symbol to eliminate a row of criteria.
Match: You have two options in the Match pull-down menu. Choosing if any criteria are met reports results for any text in a string matching the metadata or any text from two criteria. This option is similar to using Boolean OR. Choosing if all criteria are met requires all text in a string or all text in all criteria to match the metadata. This option is similar to using Boolean AND. For an example in using the Match items, see the section "Searching metadata."
Include All Subfolders: When you search a folder from any of the Look in areas, you can search the root folder or the root folder and all subfolders. Select the check box when you want to search all the subfolders.
Include Non-indexed Files: This item causes all files to be searched and not just those files that have been indexed. As it warns, this can take a while if enabled.


One special item to note when you use the Find dialog box is that any criteria you type in the text box is not case sensitive. Additionally, there is no switch to enable case sensitivity.
After familiarizing yourself with the search options available to you in the Bridge, the best way to get up to speed is to start searching for files. A little practice here goes a long way in helping you master some of the power the Bridge provides you when searching for documents. To acquaint yourself with the search options, try to work through the following steps.
STEPS: Searching Metadata in Adobe Bridge
Open a folder in the Bridge window. When you perform a search using the Find command, you must have a Bridge window open. If no window is open, the Find command is grayed out.
Chose Edit
Target a location to search. Open the Look in pull-down menu to locate a recent folder. If the folder you want to search does not appear in the menu, click Browse and navigate your hard drive to locate a target folder to search. Note that you can choose a root folder with many subfolders and search all nested folders.
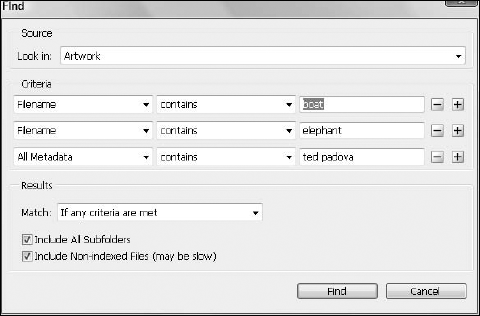
Add the first line of criteria. You can choose any one of the items in the first pull-down menu where you see the default name Filename. If you know that a filename contains a text string, use Filename. The second pull-down menu is a condition. If you know that a word or some characters are contained in a filename, use Contains, or select another option that more closely meets your requirements. Type the text string to search in the text box. From the Match pull-down menu, select if any criteria are met.
Add a second line of criteria. Click the plus (+) symbol to the right of the first row of criteria. A second row appears offering you the same options. In this line, select Filename again in the first pull-down menu. Select Contains, and type another text string in the text box. Make sure the same Match option is selected here as in Step 4. When you choose the same item to search and choose if any criteria are met from the Match pull-down menu, you are using Boolean OR to report your search results. In other words, you're asking Bridge to report the first text string OR the second text string to be contained in your search results. If you choose if all criteria are met, you are using Boolean AND where the results are reported only when the first text string AND the second text string are contained in the search results.
Add a third line of criteria. From the first pull-down menu, select All Metadata and likewise select contains in the second pull-down menu. In the text box, type one of the metadata items you added in a template when you performed steps earlier in this chapter in the section "Appending and replacing metadata." In this example, I'll use data supplied for author name. In the Match pull-down menu, change the option to the if all criteria are met option. The Find dialog box at this point should look like Figure 6.30.
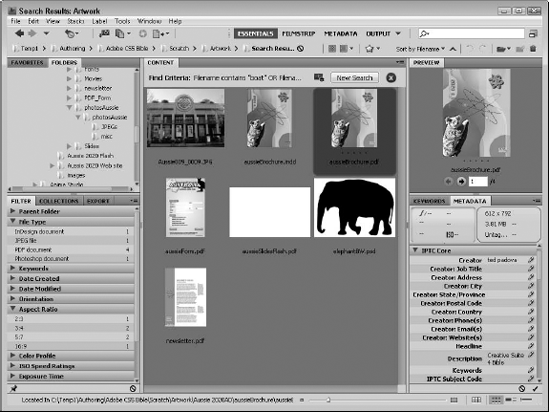
Click Find in the lower-right corner of the Find dialog box. The results are reported in the existing Bridge window as shown in Figure 6.31.
Tip
The criteria of your search are easily examined in the Bridge window after clicking Find. Look at the top of the Bridge window, and the criteria are reported in a line of text.
Take a moment to review what occurred in this example. If you duplicated the steps, here you are asking the Bridge to report results when a filename contains one text string AND a second text string AND the metadata contains a third text string. All conditions must be true for any results to be reported in a new Bridge window.
Tip
If you have files scattered around your hard drive and not nested in a single folder, you can search an entire drive. The first step is to be certain you add some common identification to all files within a given work project. You can use a file-naming convention where all files in a given project have some common text in the filename, or add one item in the metadata common to all files related to a given project—something like text added to a Description field. When you click Browse, select the drive where your files are contained. Additionally, set the criteria to search a string on a filename or All Metadata, and use the common identifier in the text box. When you click Find, all files from different folders are reported in a Bridge window. If you want to narrow the search to common file types, use another criteria item and search using a file extension.
Camera raw is a format supported by many higher-end amateur and professional digital cameras. The camera raw file contains unprocessed data from the digital camera's image sensor. As such, you are working with a maximum amount of data, and you're not relying on the camera to process any image information. When you open a camera raw image, you have control over how you want the image interpreted, and thus you can make adjustments for lighting, brightness, sharpness, temperature, exposure, saturation, and more. Think of the camera raw format like a film negative, while JPEG and TIFF images are like photo prints. You can make prints from a negative and control exposure times for the prints, dodge, burn, and so on. If you make a print from a print, you're not working with all the data you had when the negative was made and therefore have much less control over lighting, exposure, contrast, and so on.
When you shoot several images containing similar content, lighting conditions, brightness values, and so on, you can make adjustments on one image for the proper processing and then use the Bridge to apply the same settings to similar images. The Bridge offers you several controls for making the camera raw processing more automated that can significantly speed up the process of opening the files.
Camera raw has its own set of preferences apart from the Bridge preference settings. On the Macintosh, choose Bridge
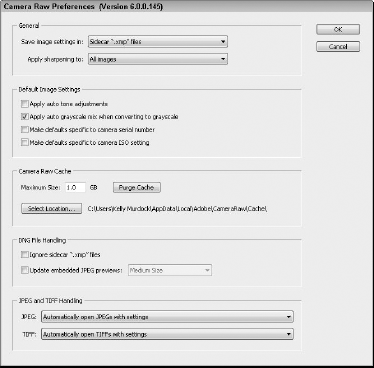
Figure 6.32. The Camera Raw Preferences are contained in an individual dialog box apart from the other Bridge Preferences.
The Camera Raw Preferences offer a few options for working specifically with these file types, including these:
Save image settings in: A pull-down menu offers two options for where Camera Raw settings are saved. This is an important adjustment when working with Camera Raw images, and you'll want to visit the preference options regularly to be certain you know where the settings are saved. The choices include:
Sidecar XMP files: This option is the best for collaborative workflow environments and for archiving images. The settings you apply to an image are saved in an XMP file in the same folder where the image resides. The filename uses the same base name as your image file with an .xmp extension. The XMP files can store IPTC metadata and other metadata associated with the file (see "Working with Metadata" earlier in this chapter). In Bridge, XMP sidecar files are hidden by default, but they are visible in the Macintosh Finder or Windows Explorer. When you copy, move, and delete camera raw images in the Bridge, the XMP sidecar files are moved along with their corresponding images. You can make the XMP sidecar files visible by choosing View
Camera Raw Database: If you choose this option from the pull-down menu, the settings are stored in a Camera Raw database file on your local hard drive. The files are stored in the user's Preferences folder located at
Users/user name/Library/ Preferences(Macintosh) or the user's Application Data folder located atDocuments and Settings/user name/Application Data/Adobe/CameraRaw(Windows). The filename where the preferences are stored is Adobe Camera Raw Database. The database file is indexed by file content. Therefore, if you move or rename camera raw files, the settings in the Camera Raw database stay connected with the images. It should be obvious that this method for saving settings is less desirable for collaborative workflow environments as the settings are not available to other users when retrieving files from offline media storage.
Apply sharpening to: The Camera Raw plug-in can apply sharpening to camera raw images. If you want to use the plug-in to apply sharpening to the actual images, select All Images from the pull-down menu. If you select the Preview Images Only option from the pull-down menu, sharpening is applied only to the preview image leaving the camera raw file intact.
Apply auto tone adjustments: This option causes all camera raw processed images to be adjusted automatically in tone using a default auto tone procedure.
Apply auto grayscale mix when converting to grayscale: This option automatically does an auto grayscale mix anytime a camera raw file is converted to grayscale.
Make defaults specific to camera serial number: When enabled, this option sets the defaults based on the camera's serial number. This keeps all settings consistent for any images downloaded from a specific camera.
Make defaults specific to camera ISO setting: This option maintains the settings for all camera raw images that have a specific ISO setting. With this option, all camera raw images taken with the same ISO setting are consistent.
Camera Raw Cache: When working with camera raw files, you have two cache files to deal with. The Bridge has its own cache where the processing of image thumbnails, previews, and metadata are stored. When files are saved to the cache, your computer speed increases so you can view items more quickly. The camera raw cache increases the speed of loading the Camera Raw dialog box and recalculating camera raw image previews after you make settings changes. This section of the Camera Raw Preferences dialog box handles the related camera raw cache:
Maximum Size: The default is 1GB. You can increase the cache size by editing the value in the text box. You can process about 200 images per gigabyte. If you are working on significantly more images, open the preferences and increase the cache size.
Purge Cache: The cache occupies storage space on your hard drive. If you want to free up some room on your hard drive, click Purge Cache. Be aware that when you return to the Camera Raw dialog box, the time to view previews and settings takes longer as a new cache file is built.
Select Location: The default location where the cache file is saved appears in the dialog box. This location is your boot drive. If you want to change the cache location, click Change Location and navigate to the folder where you want the cache saved. If you use secondary hard drives for scratch data, you can change the cache location to your data drive.
DNG File Handling: These two options apply to DNG files. The first option causes the XMP file to be ignored. This is extra data that isn't needed in some cases. You also can define the size of the embedded JPEG preview thumbnails.
JPEG and TIFF Handling: These options let you select to define how JPEG and TIFF images are opened. The options include Disable, Automatically Open with Settings, or Automatically Open All.
The Camera Raw dialog box appears in Bridge, Acrobat, and Photoshop because of a plug-in. Camera raw features are not hard coded in either program. Adobe created a plug-in to work with camera raw images because the plug-in requires some frequent updating. Camera manufacturers who support writing to the camera raw format all use a different flavor of camera raw. It's like Beta, VHS, and Super VHS, or cassette and 8-track. It's all tape, but the formats are different. As new cameras are made, newer camera raw formats are created. In order to regularly upgrade the camera raw features in Bridge and Photoshop, Adobe offers plug-in upgrades routinely so you can download and install them easily to keep your programs updated.
Adobe has been trying to get camera manufacturers to support the Adobe-developed format DNG (Digital Negative) so we can all experience consistency when saving and opening files from our digital cameras. Unfortunately, the battle does not look promising. After all, we're dealing with the hardheaded companies that battled over beta versus VHS and 8-track versus cassette. Granted, the battles of beta versus VHS were eventually won, but there were only two major players in those battles. With camera raw, the number of players is significantly greater, and the likelihood that every manufacturer will support DNG is unlikely. We wish Adobe luck in their efforts, but don't hold your breath.
When you open a camera raw image, it opens in the Camera Raw dialog box. You have two choices for where the Camera Raw dialog box appears. If you select an image and choose File
You process the image regardless of where the Camera Raw dialog box appears, and when you finish making adjustments, you click Done or Open (Image). When you click Done, your settings are changed from the original default to adjustments made in the Camera Raw dialog box. You are returned to the Bridge window or to Photoshop, but the file does not open. If you click Open in the Camera Raw dialog box (or Open Image when multiple files are opened in the dialog box), the file opens in Photoshop regardless of which plug-in you use. Your original camera raw image remains unaffected when you open a file in Photoshop, and you can return to it to apply different settings to open again in Photoshop. If you apply settings without opening a file, you can return to defaults and the original image data are again available for making new settings adjustments.
Note
Adobe Bridge includes a preference setting in the General panel that controls whether a double-click opens the Camera Raw Settings.
The Camera Raw dialog box can open and work with RAW, DNG, TIFF, and JPEG files. All adjustments made in the Camera Raw dialog box are non-destructive.
You also can process multiple images. In the Bridge, Shift-click to make a contiguous selection, or
When you open a camera raw photo in either Bridge or Photoshop, the Camera Raw plug-in opens the Camera Raw dialog box, shown in Figure 6.33. The Camera Raw dialog box has lots of options, so be certain to look over the descriptions of the following settings:
Separator bar: Drag the separator bar to size the Filmstrip and Preview. As the Filmstrip is sized up, the Preview is sized down and vice versa. Double-click the separator bar, and the Filmstrip hides from view offering more area to preview the image.
Tools: Several tools appear at the top of the window:
Zoom tool (Z): Click in the preview to zoom in. Press the Option/Alt key and click the Zoom tool to zoom out. Click and drag open a marquee to zoom into a defined area.
Hand tool (H): Click and drag to move the document around the Preview area when zoomed in.
White Balance tool (I): Click the White Balance tool in the image area to sample an area and set the white balance. If you click in an area that's too bright, a dialog box informs you that you cannot remap the white point to the sampled area.
Color Sampler tool (S): Move the tool around the image area, and the RGB color values are reported in the RGB values (H). Click to plot a sampler point. Click again, and another point is sampled. You can plot as many as nine different color samples. Each sample's RGB values are reported below the tools area in the dialog box. When you click with the Color Sampler, a button appears. Click Clear Samples to delete all the sampled points.
Target Adjustment tool (T): Tonal and color adjustments are made using the various sliders located to the right of the Camera Raw dialog box, but an easier way to make adjustments is with the Target Adjustment tool. If you click and hold down this tool in the Toolbar at the top of the dialog box, you can choose to adjust the Parametric Curve, Hue, Saturation, Luminance, or Grayscale Mix. Then click the image at the specific targeted color or tone that you want to adjust, and drag the tool to the right to increase or to the left to decrease the adjustment value. The adjustment sliders move as you drag.
Crop tool (C): You can use the Crop tool to target an area you want to isolate to apply exposure controls. If you find the crop area to snap to proportions and you want to crop an image disproportionately, open a context menu (or the pull-down menu in the Crop tool icon) and select Normal from the menu commands. If you want fixed ratios, return to the context menu and select a fixed size that matches your needs. If you crop an area in the image preview and click done, you haven't changed the original raw image. Open the image again in the Camera Raw dialog box, and open a context menu using the Crop tool. Select Clear Crop from the menu commands.
Straighten tool (A): This tool is used for straightening crooked images. For example, if a series of shots is taken on a tripod that's slightly crooked, you can fix all the images with a single swipe of the Straighten tool. It gives the user the same results as straightening in Photoshop, except the Straighten tool has these benefits: It doesn't require a two-step measurement and a rotation process as in Photoshop, it's a live adjustment that can be changed on the fly, it's stored in metadata and can be reverted or changed at any time without calculations, it combines rotation and cropping into one step, and it's much easier to apply to multiple images.
Spot Removal tool (B): This tool lets you click and drag to locate and size an area to be retouched. Then a second equal-sized area can be moved about the image to define the sampled area used to retouch the first area. In the Options bar, you can set the size of the area and whether the type is Clone or Heal. The Heal option is feathered around the edges.
Red Eye Removal tool (E): This tool lets you drag over an eye pupil to remove the redness without destroying the details of the area. In the Options bar, you can set the Pupil Size and how dark the area becomes.
Adjustment Brush tool (K): This tool lets you drag over an area and apply one of many image adjustments as a brush. You can control the size, feather, flow, and density of the brush. Suppose you want to alter the brightness and saturation of a specific area of the image. This tool lets you easily control this by painting with the specific brightness and saturation settings. The adjustments that you have control over include Exposure, Brightness, Contrast, Saturation, Clarity, Sharpness, and Color.
Graduated Filter tool (G): This tool lets you apply the same adjustment values available in the Adjustment Brush tool, except that you apply the adjustments as a gradient. By clicking this tool, you specify the initial gradient location and drag to set the end of the gradient. This is a great tool for adjusting horizons to create the perfect sunset.
Open Preference dialog (Ctrl+K): This automatically opens the Camera Raw Preferences dialog box shown earlier.
Rotate image 90° counterclockwise (L): This rotates the image left in a counterclockwise direction.
Rotate image 90° clockwise (R): This rotates the image right in a clockwise direction.
Toggle mark for delete tool: Select an image in the filmstrip, and click the trash icon. The file is marked for deletion. Files are not trashed in the Camera Raw dialog box until you first mark them and then click Done. Files are moved to the trash on your desktop. If you want to move them out of the trash and back to a folder, be certain to bring back both the CRW file and XMP file if saving your settings in sidecar files. This only works if more than one file is open.
Preview: The Preview dynamically updates as you change settings. If you zoom in and out of the preview image and want to return to a fit page view, press
Toggle Full Screen Mode: Click this button to make the Camera Raw window fill the current screen resolution. Click a second time to return it to its previous size.
Shadows toggle: When checked, the image shows clipped shadows as a colored highlights in red, green, blue or a combination of these colors, depending on the colors being clipped. Clipping indicates all areas where some color remapping will occur.
Highlights toggle: Clipped highlights are shown in red, green, or blue.
Histogram: The histogram displays the total range of the image data. As you make settings adjustments in the Camera Raw dialog box, the histogram dynamically updates to display a graph showing the data changes.
RGB values and Camera Metadata: The values reported here are derived from the position of the current tool. As you move the tool around the Preview area, the color values change to report the values of the pixels beneath the tool. When you click in the Preview with the Color Sampler, the values for the plotted area are reported in the RGB values and duplicated below the tools. To the right of the RGB values are the Camera Metadata values.
Tabs: The individual tabs change the default Basic pane to provide you with more editing options, including these:
Basic: Basic is the default tab and the view you see in Figure 6.32. Use the sliders to adjust the image for proper white balance, temperature, and exposure settings. Additional controls adjust the clarity and vibrancy.
Tone Curve: The curve settings in the Parametric panel offer settings for adjusting the highlights, lights, darks, and shadows. The Point panel controls are similar to those you find in Photoshop's Curves dialog box.
Detail: Use this tab to adjust sharpening and noise reduction adjustments. If you hold down the Alt (Option) key while dragging these values, you see the isolated sharpening changes.
HSL/Grayscale: Use this tab to control the Hue, Saturation, and Luminance values for the image and also to convert the image to grayscale.
Split Toning: This tab includes sliders for the hue and saturation of the highlights and shadows. It also has a Balance control.
Lens Correction: Lens corrections are made for Chromatic Aberration and Vignetting that you might find apparent in digital camera images. There is also a Post Crop Vignetting setting.
Note
For more control over correcting aberrations created from digital cameras, use the Lens Correction filter in Photoshop CS5, which is covered in Chapter 10.
Effects: The Effects tab includes options for adding a grain effect to the current image. You can set the Amount, Size, and Roughness. The Effects panel also includes settings for automatically doing a Post Crop Vignette. You have options for switching between black and white borders, a Roundness setting for creating circular or rectangular with rounded corners, and Feather setting.
Camera Calibration: You may experience colorcasts and tint differences in shadows and non-neutral colors between the color profile used for your camera and the Camera Raw built-in profile. Use this tab to compensate for the differences.
Presets: The Presets tab holds any defined groups of settings. At the bottom of this pane is a New Preset button that opens the dialog box, shown in Figure 6.34, where you can select the settings to include in the preset.
Snapshots: The Snapshots tab opens a panel where you can save and quickly compare several different image states. To create a snapshot, simply click the New Snapshot button at the bottom of the panel and then name the snapshot. All the settings applied to a snapshot can be recalled by selecting a snapshot from the Snapshots panel. Snapshots are saved with the image file when exiting the Camera Raw dialog box.
Flyout menu: Click the right-pointing arrow to open the menu. Menu commands are available for saving and loading settings, exporting settings, deleting settings, setting new defaults, and opening the Camera Raw Preferences dialog box.
White Balance: White balance sets the color balance of an image to reflect the lighting conditions under which the photo was taken. Here you'll find compensation for such items as sunlight, shade, flash, fluorescent, and tungsten lighting. You also have a Custom choice where the pull-down menu reflects custom if you change either the temperature or the tint.
Adjustment sliders: The adjustment sliders affect the image brightness values. When one of the sliders is moved, the Preview image dynamically changes to reflect the new setting. You see a preview of each setting made with the adjustment sliders and can choose settings that best produce the image detail and color balance.
Done: When you click Done, the settings you made apply to the image. The Camera Raw dialog box closes, but the file does not open in Photoshop.
Cancel: Click Cancel to dismiss the dialog box without applying any settings. You also can press Esc to cancel out of the dialog box. Press Option/Alt, and the Cancel button changes to a Reset button. Click Reset, and all the settings made in your editing session are dismissed and return to the same appearance as when you opened the file(s) in the Camera Raw dialog box.
Open image: Click Open Image to open the Preview image in Photoshop with the applied settings.
Image selection: Use the left and right arrows to scroll images in the filmstrip up or down respectively. The readout to the right of the arrows displays the current image in the Preview window and the total number of images opened in the Camera Raw dialog box.
Color Space/Bit Depth/Size /Resolution: At the bottom of the preview pane is a link that lists the specified Color Space, the image's Bit Depth, its current Size, and Resolution. Clicking this link opens the Workflow Options dialog box, shown in Figure 6.35, where you can change any of these values. Select from four options for your color working space. The default is Adobe RGB (1998). If you are processing files for Web hosting, you may want to change the color space to sRGB IEC61966-1. Choose from 8-bit or 16-bit for a color depth value. If you have a camera that supports 16-bit images, leave them at 16-bit. High-bit images can be edited in Photoshop, and this format is preferred when adjusting Sharpening, Levels, Curves, or any other color or brightness controls. The current image resolution is reported in the text box. You can change image resolution by adding a new value in the text box. You can choose to view either pixels/inch or pixels/ cm from the pull-down menu to the right of the Resolution text box. Use this option to change resolution when you have a number of files you want to process to the same resolution and size. From the pull-down menu, you can select different physical sizes for your image. Resizing the image by selecting a menu item does not affect image sampling.
Note
The Open in Photoshop as Smart Objects option in the Workflow Options dialog box gives you the flexibility to come back to Bridge and change the RAW processing setting for any placed images.
Image Preview: This displays the current image selected in the filmstrip. If only one image is open, the image appears in the Preview area. The preview image is targeted for the adjustments you make for all the other settings in the dialog box.
Zoom settings: In addition to using the Zoom tool, you can click the minus (-) symbol to zoom out or the plus (+) symbol to zoom in. From the pull-down menu, you can select fixed zoom sizes. Note that the text appearing between the symbols and the arrows used to open the pull-down menu is not an editable item. The readout is used for information only to show the zoom level in relation to actual size.
Save image: Click Save Image to save the settings applied to the image(s). If you want to return to defaults, open the image and select Camera Raw Defaults from the Settings (K) pull-down menu. The Save Options dialog box lets you save the image to the same location or to a different location. You also can rename the images by adding numerical suffixes.
Filmstrip: The filmstrip shows a thumbnail preview for all files opened in the Camera Raw dialog box. You can click a thumbnail, and the image appears in the Preview area as well as the filmstrip. The file in the Preview area is the one targeted for editing. Note that if you open only one Camera Raw image at a time, the filmstrip becomes unavailable in the Camera Raw dialog box.
Synchronize: When you open multiple files in the Camera Raw dialog box, you can apply settings to one image, then use Select All or individually select multiple images and synchronize the settings. When you select Synchronize, the Synchronize dialog box opens. You can use this dialog box to choose which settings to apply to the selected image. This dialog box offers the same options as the Paste Camera Raw Settings dialog box. See the section "Applying settings in Bridge" later in this chapter for more information.
Select All: This selects all the images in the filmstrip. You can select all images and globally apply the same settings to the selected images. You also can Shift-click or
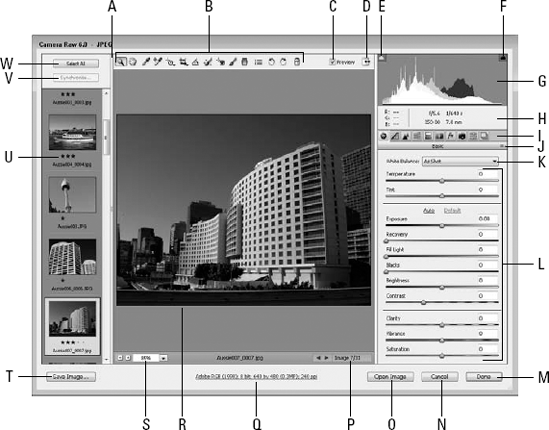
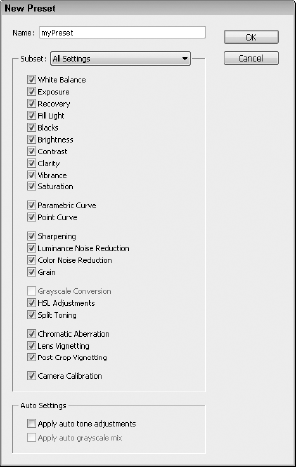

You can save any adjustments you make as settings or use them as new defaults. From the flyout menu adjacent to the Settings pull-down menu, you have a number of choices, as shown in Figure 6.36.

The default setting is Image Settings. You can change the settings by saving and loading settings, apply settings that you make as a new default, or you can select a defined preset. When you want to return to the image as it was taken, select Reset Camera Raw Defaults.
In addition to options available in the flyout menu in the Camera Raw dialog box, you have similar menu commands when you choose Edit
Camera Raw Defaults: This option is the same as selecting Reset Camera Raw Defaults in the flyout menu.
Previous Conversion: If you convert an image and want to apply the same conversion setting, select an image or multiple images in the Bridge and choose Edit
Copy camera Raw Settings: Assume that you made some conversion settings changes on an image and clicked Done in the Camera Raw dialog box. The settings are applied to your image. You can select the image, and choose Edit
Paste Camera Raw Settings: After copying settings, choose Edit
Clear Camera Raw Settings: This command clears the settings that you applied to a camera raw file. Select a file in the Bridge, and choose Edit
Saved Presets: Any saved presets are listed by name after the Clear command.
If you make settings changes and click Open in the Camera Raw Settings dialog box, the file opens in Photoshop. From Photoshop, you can save files in a variety of formats. But Photoshop won't let you save back to camera raw. Photoshop does support a Photoshop Raw format, but it's not the same as camera raw. Camera raw saves uncompressed bits from a camera's CCD or CMOS. Photoshop Raw is a flexible file format designed for transferring images between applications and computer platforms.
If you want to adjust settings and save the adjusted images as a new file while preserving your settings and the camera raw format, click Save in the Camera Raw dialog box. When you click Save in the dialog box, the Save Options dialog box appears, as shown in Figure 6.37.
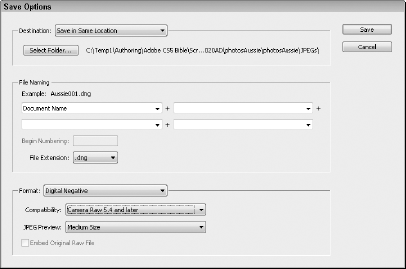
Attribute choices for your saved image from the Camera Raw Save Options include the following:
Destination: Click Select Folder to navigate your hard drive and find a new location to save your file.
File Naming: Supply a name for your file in the text box on the left and an extension on the right. If you have multiple files open in the Camera Raw dialog box, you can add additional names by clicking the plus (+) symbol to add more field boxes. You do not need to add or change extensions because the dialog box automatically supplies an extension in the File Extension pull-down menu when you change the format in the Format pull-down menu.
Format: If you want to save back to raw format, you can choose the Adobe Digital Negative (DNG) format. The file is saved as a camera raw file. When you open the file, it opens in the Camera Raw dialog box. However, the file you save as DNG does not retain all the original raw information obtained from the file you first opened in the Camera Raw dialog box. The new settings prevail, and you can't return to original defaults. If you want to retain all data as the image was first taken with your camera, check the box at the bottom of the dialog box for Embed Original Raw File.
The remaining options in the Save Options dialog box for DNG files offer you choices for image compression, JPEG previews (only when DNG format is chosen), and Convert to Linear Image (stores the data in an interpolated format). Other formats for JPEG, TIFF, and Photoshop all have different attribute choices for their respective formats. These attribute choices are the same as you are familiar with when saving files from Photoshop.
In Bridge, you can synchronize color across the CS5 applications that work with color policies including Photoshop, Illustrator, InDesign, and Acrobat. Bridge does not provide you options for creating color profiles or embedding profiles in application documents. Rather, you use Bridge to ensure that when you work with a given color space in Photoshop, you work with the same color space in InDesign and all other CS5 programs. Synchronizing color in Bridge ensures that a given monitor or printing profile in Photoshop or Illustrator is maintained when you import the images in InDesign. If you have one color setting in one program and a different color setting in another program, the Color Settings dialog box alerts you that your color settings are not synchronized.
Note
For information related to creating color profiles and working in color-managed workflows, see Chapter 5. This section presumes you have created a color profile, as detailed in Chapter 5.
To synchronize color across the CS5 applications in Bridge, follow these steps.
STEPS: Synchronizing Color in Adobe Bridge
Launch Bridge. Note that you do not need a Bridge window open in order to synchronize color.
Open the Suite Color Settings. Choose Edit
Expand the list of color management settings. By default, Bridge displays a short list of color management settings. Select the Show Expanded List of Color Settings Files check box, as shown in Figure 6.38.
Select a color setting. Color settings are created in other programs such as Adobe Photoshop or made available to you from service providers or other users in your workflow. If you have color settings installed properly on your computer, they are visible in the Suite Color Settings dialog box. Scroll the list of settings, and select the setting used in your workflow.
Apply a color setting to synchronize color. Click Apply after selecting the setting of your choice. Your color settings are now synchronized across the CS5 applications. If you open Photoshop, Illustrator, or InDesign, and choose Edit

Synchronizing color settings is of particular benefit for creative professionals who work on design projects for both print and Web. When you begin a new project, be certain to visit the Bridge Suite Color Settings dialog box and synchronize your color. As you switch between print and Web designs, change your color settings accordingly. Bridge makes it easy for you to be certain you work in the same color space in each CS5 application.
Note
For information on using color settings for print and Web, see Chapter 5.
You also can use Bridge to create a grid of thumbnails for printing or for a Web gallery using the Output panel. The easiest way to access the Output panel is to select the Output workspace from the Window
At the top of the Output panel are options for creating a PDF file or a Web Gallery. For the PDF option, you can select one of several templates including 2×2 Cells, 4×5 Contact Sheets, and more. You also can specify overlay and watermarks.
The Web Gallery option includes templates along with fields where you can add textual information about the gallery images. Additional options upload the gallery directly to a server.
Both options include buttons for previewing the resulting pages.

Some of the automated features in several CS applications have been added as menu commands in the Bridge. You can execute actions and commands in the Bridge without leaving the window or opening any one of the other CS programs. Actually, the Bridge opens the applications for you when actions and internal program features are used. Photoshop, Illustrator, InDesign, and Fireworks are all supported with one or more features you are likely to use frequently.
Among the automated features and commands integrated between the Bridge and the CS5 programs, Photoshop supports the most options. These options are located in the Tools
The Photoshop Batch command is supported from within Bridge. When you choose Tools
Note
Before you run a Batch sequence in Photoshop, you should visit the Actions palette and load actions you use in your workflow. Photoshop CS5 defaults to a new set of actions that are used to change workspace appearances. Many of the familiar actions found in earlier versions of Photoshop are left out of the Default Actions set. If you need one of the actions formerly included in the default set, you need to load a saved actions file. See the section "Loading actions" nearby for more information.
After you explore some of the actions sets loaded by default, you may find these new default actions somewhat useless in your design work. The familiar actions you have used in earlier versions of Photoshop are installed with Photoshop CS5; you just need to load them to make them available in the Actions palette.
STEEPS: Loading actions
In the Actions palette, you can load action files, save action files, and replace action files. Loading actions appends a new action set to the palette. Replacing an action set removes the former actions and adds the new action set you load. If you haven't worked with loading actions in earlier versions of Photoshop, look over the following steps to see how action sets are loaded.
STEPS: Loading Actions
Open the Actions palette. By default, the Actions palette is visible when you launch Photoshop CS5. If the palette is not visible, choose Window
Open the Load dialog box. Click the palette menu icon of the Actions palette to open a palette menu. Scroll down the menu options, and select Load Actions and navigate to the appropriate folder. The Load dialog box opens as shown in Figure 6.40.
Load an action set. When you select Load Actions in the Actions palette menu, Photoshop opens the Photoshop Actions folder where all action sets are saved. Select one of the sets, and click Load. If you want to load actions that match the default actions in Photoshop CS1, select Sample Actions.atn and click Load. You can click to select a set and shift or

Running actions from the Bridge
If all you can do in the Bridge were run an action on a folder of files, there would be no benefit to running the action from Bridge or from Photoshop. However, the Bridge offers you one option that Photoshop doesn't. In Photoshop, you run actions on open files or on a folder of files. Photoshop does not offer you a discretionary selection of images you want to affect with an action. Bridge, on the other hand, lets you individually select files in the content area and apply actions to a selected group. If you use Bridge search and find files from different folders meeting your search criteria, the files are loaded in a new Bridge window. Subsequently, you can run an action on files from different folders—something you can't do in Photoshop's Batch dialog box.
When you have the files in view in a Bridge window, choose Tools
Note that when you load action sets or create custom actions, all the actions are available in the Batch dialog box and can be run from Bridge or from within Photoshop.
Another cool feature in Photoshop CS5 is the Image Processor. You can select images in the Bridge and choose Tools

Using the Image Processor is like running several actions at once. Options include:
Select Files: You can select files from the Bridge or from within Photoshop. When you select Bridge files, the number of files to process is reported in the Image Processor dialog box.
Select location to save processed images: Essentially, you have the same option here as you do with actions. You can overwrite the processed images or save the processed files as copies to another folder.
File Type: You can choose to save files as JPEG, Photoshop (PSD), or TIFF images. If you save files as JPEG, you have additional options for adjusting file compression (Quality text box), resizing images, and converting color profiles to sRGB. You might have used TIFF images in a layout that you want to print. You can repurpose the files for Web hosting when you use the JPEG option. You can size PSD files to fit, and you can flatten the images by checking Maximize Compatibility. Saving as TIFF also offers resizing, and you can use LZW compression.
Run Action: You can add an action to the processing attributes. As one example, you might convert images to another format, resize them, and then add an action to convert images to grayscale.
Copyright Info: You can add metadata for copyright information.
Include ICC Profile: You can use the current color settings in Photoshop and embed an ICC profile.
When you finish setting attributes, click Run and the files are processed.
Note
If all you want to do with the Image Processor is to add copyright metadata, don't use the Image Processor. The Image Processor opens each file in Photoshop, processes the image, and saves the results. Using a metadata template and adding copyright information in the Bridge works much faster because individual files are not opened and saved from Photoshop. For information on creating metadata templates, see the section "Creating a Template" earlier in this chapter.
The Live Trace feature is supported in Bridge. You can select a Photoshop image in the Bridge and choose Tools
Note
For information on using Live Trace, see Chapter 8.
A nice feature of the Bridge is viewing slide shows directly in Bridge. The slide show feature is not like creating a permanent slide show that you can when exporting to a PDF Presentation from Bridge or Photoshop. The slide show feature in Bridge is a temporary viewing option. You might have a collection of images you want to use in a design campaign and quickly preview the images you're contemplating using in your artwork. The slide show feature in Bridge displays all Photoshop, Illustrator, InDesign, Acrobat PDFs, and camera raw images. Dreamweaver pages are not supported with previews.
To view a slide show in Bridge, open a folder containing the images you want to preview. Choose View
You can access a quick help menu when viewing the slide show. Press H, and the help screen shown in Figure 6.42 appears. The help screen appears on top of the current slide in view.
You can use various keyboard shortcuts to control slide show viewing. You can even make some edits to the files as you view them in Slide Show. Note that you can change labels and ratings while in Adobe Bridge Slide Show. Most of the keyboard shortcuts are self-explanatory when it comes to changing slides, opening a previous or next document, rotating images, pausing and playing, and so on.
When you click a slideshow image, the display mode changes. You can zoom in on the area where you click and clicking again zooms out. You can access the Slideshow Options by pressing the L key.
When you view images in Adobe Bridge Slide Show, just remember to use the H key and call upon help while viewing a show. If you want to compare documents, you can open multiple slide shows. Use the Bridge to open a folder, and press

The View menu includes a Review Mode feature. This mode places the current folder of images in a loop that you can quickly cycle through using the arrow keys, as shown in Figure 6.43. If you click on an image, you can zoom in on the image and examine it with the Loupe tool. If you drag the image downward, the image is dropped from the current set, letting you limit the current collection.
If you right-click the image, you can rate, label, or apply specific commands to the image. After you exit Review Mode, all the remaining images are saved as a collection.
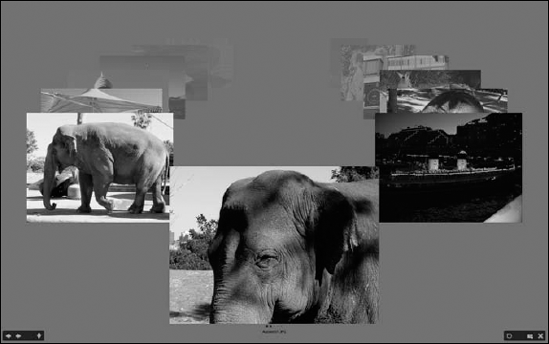
Adobe Bridge is a small application when compared to a full-featured program like Photoshop, but it is a separate application and sometimes you want to browse through saved files without having to load up Bridge. For these cases, Adobe has created a palette that has the core features of Bridge that exists within the parent application. This palette is called Mini Bridge, and it is found in Photoshop, InDesign, and Illustrator. For Photoshop and Illustrator, you can open the Mini Bridge palette from the Window
When the Mini Bridge palette is first opened, it displays options to Browse Files or access Settings, Flickr, or Photoshop.com. If you choose the Browse Files option, a compact version of Adobe Bridge opens within the palette, offering the options to browse through file thumbnails. You can return to the opening options at any time by clicking the Home button at the top of the palette.
The Mini Bridge palette, shown in Figure 6.44, includes many of the same navigation and folder management tools available in Bridge, such as the Previous and Next buttons, the Path Bar, and panels for Favorites, Recent Files and Folders, and Collections. It also includes the Content panel with controls at the top of the panel to select, filter, and sort thumbnails. The controls at the bottom of the Content panel let you dynamically resize the thumbnails and change the thumbnail layout. The layout options include Thumbnails, Filmstrip, Details, and List.
At the top of the Mini Bridge palette are icons for navigating between previous views, opening or hiding unused panels, and accessing the Search dialog box. Using the right-click menu, you also can access the Slideshow and Review modes, export selected images, and open items in the Camera Raw dialog box.
From the Mini Bridge home view, you can access several settings. These settings also can be accessed using the palette menu. The main Bridge application needs to be running before you can use the Mini Bridge palette, and the first setting lets you set whether Bridge is opened when Mini Bridge is first accessed or when you begin browsing files.
Other settings control the palette appearance, including the interface brightness and the image backdrop. The final setting lets you select which applications to enable within Mini Bridge. Changing any of the enabled applications requires a restart of the parent application.
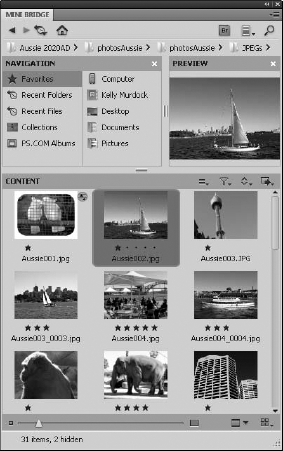
The Bridge is a standalone executable application similar to the File Browser found in earlier versions of Photoshop. The Bridge is the center of the CS5 applications from which all document launching and organization can be accomplished.
The Bridge supports saving workspaces. You can open multiple windows and work between Bridge windows for file management and organization.
You can manage, resize, and group tabs in Bridge.
You can mark files with ratings and labels and sort documents according to ratings and label identify.
You can batch rename files and queue files for export in Bridge.
You can edit document metadata in Bridge.
Bridge supports the creation of XMP metadata templates. You can apply metadata from a template to folders of files.
You can search files on metadata in folders, nested folders, and different folder locations.
You can save searches as collections, and you can retrieve the results easily from the collections.
You can open camera raw images using the Bridge camera raw plug-in. You can copy settings and paste settings into additional camera raw images in the Bridge window. You can return camera raw images to defaults in the Bridge window.
You can synchronize color settings in the Bridge for the print-based CS applications.
You can execute application automation commands in the Bridge for Photoshop and Illustrator.
You can execute Photoshop's Batch commands from the Bridge.
Images are viewed in a slide show format using the Slide Show feature.
The Mini Bridge palette, found in Photoshop, Illustrator, and InDesign, offers most of the Bridge features within the parent application.