Setting up a site design
Creating Web pages in Dreamweaver
Working with Cascading Style Sheets
Prototyping Web pages in Fireworks
Exporting to XHTML
Preparing to publish a Web site
Publishing a Web site using Dreamweaver
Exporting a Web site
Linking PDF documents
Understanding Digital Rights Management and document Web hosting
Document repurposing deals with reusing designs for different media. In today's business climate, designs created for print are frequently reused to produce Web sites, CD-ROMs, PDF files, and video products. Repurposing designs can save lots of time and presents a consistent look across several products.
This chapter presents one repurposing example among many. Documents created for print in InDesign may be exported for use in Dreamweaver to create Web sites. You also can use Device Central to test how various pages look in different mobile devices.
After you've completed the design for your Web site, the final step in the repurposing workflow is uploading Web content to an online server. But you must first obtain some server space from a hosting company and enter the server information within Dreamweaver. You can then upload, download, or synchronize with the server. In addition, you can use Dreamweaver to export the site to a local Web folder that an external FTP client can use to upload the files.
PDF files offer another common way to present designs on the Web. PDF files may include links to other Web resources and, if hosted using Adobe's Policy Server, can be made secure.
One common design-repurposing path is to move layouts created in InDesign to the Web. To facilitate this process, InDesign includes an export feature that enables you to quickly move a print design to Dreamweaver and the Web. Choose File
The exporting process converts all the InDesign text content into a single XHTML page. The formatting for this text is converted to a Cascading Style Sheet (CSS). All other images and objects are converted to either the JPEG or GIF formats or packaged in their native format for more controlled optimization later in Dreamweaver.
Note
If any linked image files are missing from the InDesign document, a warning dialog box appears, informing you that if you continue, the missing images are packaged with low-resolution versions of themselves.
To export an InDesign document for use in Dreamweaver, open the document in InDesign and choose File

Figure 24.1. The XHTML Export Options dialog box lets you specify how documents get moved to Dreamweaver.
The General panel of the XHTML Export Options dialog box includes a setting for exporting just the selection or the entire Document. You also can choose the page ordering to be based on the page layout or on the defined XML structure. It also includes options for handling bulleted and numbered lists. Because both of these are different in InDesign from how they are treated in HTML, you have options to use Unordered Lists, standard text, or Ordered Lists.
Warning
When exporting an InDesign document to HTML, be aware that manual formatting like bold and italic is not preserved, but paragraph and character styling are preserved.
The Images panel of the XHTML Export Options dialog box, shown in Figure 24.2, lets you specify to copy images to the exported folder as Optimized images, as Originals, or as Links to the Server Path. All images contained within the InDesign document are copied to a separate Images folder located within the export folder. Selecting the Original option moves a copy of the original images to the Images folder. Formatted images are images that have been cropped or scaled within InDesign. These images have _fmt added to their filenames, and optimized images have .opt added to their filenames.
If you choose the Links to the Server Path, then only the text that defines the links to the location of the images on the server is exported. This keeps all the images from having to be exported, but it requires that the images be manually placed on the server.

Figure 24.2. The Images panel of the XHTML Export Options dialog box lets you specify how images get converted.
The Advanced panel of the XHTML Export Options dialog box, shown in Figure 24.3, lets you add links to an external CSS or JavaScript files.

Web pages conform to the Hypertext Markup Language (HTML), which has its own methods for displaying and formatting content. Although HTML can be used to create some interesting layouts, its feature set is fairly simplistic when compared to InDesign, and several specific InDesign elements aren't exported. The following is a short list of InDesign elements that are not exported as they are in InDesign:
Note
If you need to preserve the layout and all the content of an InDesign document, try exporting it and using it on the Web as a PDF document.
Drawn objects and shapes created with the Rectangle, Polygon, Pen, and Pencil tools are not exported.
Video files are not exported with the exception of Flash (SWF) files.
Hyperlinks and bookmarks are not exported, but hyperlinks within the text are recreated as anchor links in HTML.
Outlined text isn't exported.
Master page objects such as page numbers aren't exported.
If you use grouping within an InDesign document, you can control how the content is exported to an XHTML file. Groups in InDesign are exported as DIV tag objects, which keeps the objects together as part of a Dreamweaver page. If you want a section of text and its associated graphics to stay together on the Web page, use groups in InDesign to accomplish this.
Defined paragraph and character styles are also exported as DIV and SPANS objects in Dreamweaver. These HTML types are fairly basic, but they can represent text styles like bold and italics and text weight and size.
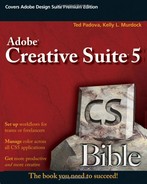
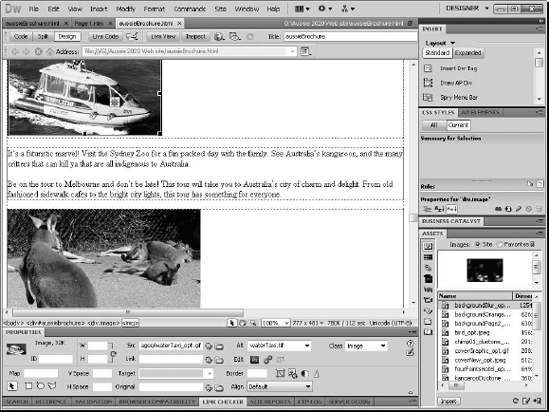
To view an exported InDesign document in Dreamweaver, simply open the HTML file; and all the image links are loaded automatically. Figure 24.4 shows an exported InDesign layout page opened in Dreamweaver. Once loaded, you can manipulate the content as desired.

Another way to move content between InDesign and Dreamweaver is to select and copy the various content objects to the Clipboard and paste them into Dreamweaver. Copying and pasting works well for text selected with the Text tool in InDesign, but images cannot be copied and pasted between the two, because InDesign deals with image links. However, embedded images can be copied and pasted. The same behavior works for images and text that is dragged and dropped between the two packages.
Although linked images cannot be copied and pasted between InDesign and Dreamweaver, images in Photoshop can be copied and pasted (or dragged and dropped) into Dreamweaver. When a Photoshop image is pasted into Dreamweaver, the Image Preview dialog box, shown in Figure 24.5, automatically opens. Using this dialog box, you can quickly specify the conversion options for the image. If you have a specific file size that you want to convert the image to, click the Optimize to Size Wizard button and the optimization settings are changed so the targeted file size is matched.

When a graphic is pasted into Dreamweaver, you also can double-click the graphic to load the image in Photoshop for more editing.
Moving assets from InDesign to Dreamweaver can save lots of steps, but the limitations of the Web can often make a well-designed layout look terrible online. If you find that the InDesign layout isn't going to work for you, you can use Fireworks to quickly lay out a Web site. When you prototype a site in Fireworks, the layout moves without problems to Dreamweaver, where you can add the final details and publish the site.
The key to prototyping in Fireworks is that you already have all the assets you used for the InDesign layout. You simply need to reuse all these assets in a new layout that works on the Web.
Fireworks uses the PNG image format as its default project file, so the first step is to create a new PNG file with the same dimensions as your desired Web page. The New Document dialog box in Fireworks lets you specify the dimensions and resolution of the new project. You also can specify a canvas color to be used for the background.
When a new file is created, it is added to the Pages palette as Page 1. Using this palette, you can add more pages to the project. The Pages palette also allows you to quickly move between the different pages in the project. Using the Pages palette menu, you also can specify a master page, which works just like a master page in InDesign.
After new pages are established, you can use the various design tools in the Toolbox to create both bitmap and vector images to the pages. The Type tool allows adding and editing of text and headings.
The Bitmap tools include many tools also found in Photoshop, including the Marquee, Lasso, and Magic Wand selection tools, the Brush, Pencil, Eraser, Rubber Stamp, Replace Color, and Red Eye Removal tools, and several editing tools including the Blur, Sharpen, Dodge, Burn, and Smudge tools.
The Vector tools include several that are similar to those in Illustrator, including Line, Pen, Rectangle, and Freeform transform tools. Several Web-specific tools for defining image map areas and slicing images are available as well.
By combining these tools together into a single package, Fireworks has all the tools to quickly throw together a Web site mock-up. After text and images are added to the project, such as those in Figure 24.6, you can quickly drag and reposition objects and text. Each selected item has a panel of properties that you can use to modify the selection.

When you've completed the layout in Fireworks, you can use the File
Exporting the layout as HTML and images allows the file to be opened directly in Dreamweaver, maintaining the position of all its images and elements, as shown in Figure 24.7.
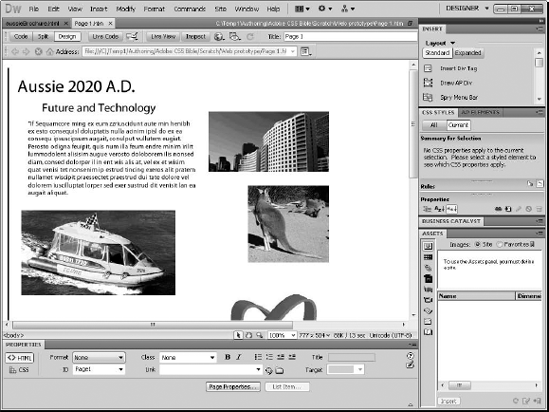
Figure 24.7. All positional information is maintained when a Fireworks layout is opened in Dreamweaver.
Another option for exporting a Fireworks layout is to use the File
The final step of the Export Wizard, shown in Figure 24.8, shows a comparison of the images using different formats. Using this dialog box, you can quickly tune the exported images to a desired size or quality. The Image Preview also shows the Web-safe colors that are included in the layout.
Often, starting from a blank Web page to create a Web site is easier than some other creation methods. Exporting an existing layout has some benefit, but you also can create Web pages by reusing the existing content and laying out the pages using blank pages.
Each of the applications included in the Creative Suite has its own purpose, and the purpose of Dreamweaver is to create Web pages and manage Web sites. Web pages are much different from the layout designs found in any of the other CS5 applications, because they're constrained to conform to Hypertext Markup Language (HTML).
HTML is the language that Web browsers read that defines the placement of text and images on a Web page. HTML is very linear in its layout approach, with objects positioned on top of one another from the upper-left corner of the page to the bottom of the page following the left edge of the page.
Web sites are a collection of Web pages that you publish to the Web. The typical workflow for Web sites is to design the site first and then to flesh out the individual Web pages.
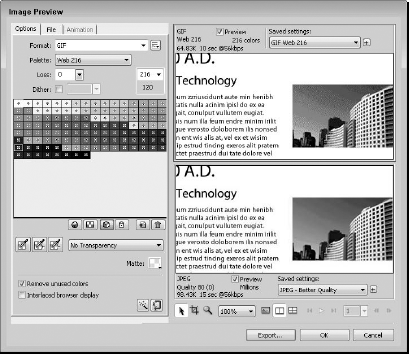
When Dreamweaver launches, a Welcome dialog box appears, as shown in Figure 24.9. This dialog box provides quick links to the new features of Dreamweaver CS5, tutorials, and resources. It also includes icons for creating a New Document, opening an existing one, or creating one from a sample. You can deselect the Don't Show Again option to make this dialog box go away.
Clicking the New Document icon in the Welcome dialog box or choosing File

The New Document dialog box opened with the File
To create a new Web site, select the Site
You can add Web pages that you created before creating the site using several different methods. With the Files palette open, as shown in Figure 24.12, select File

When you add pages to a site, Dreamweaver includes a command to automatically check the new page links to see if they are correct using the File
Among the most common errors are links that point to pages that don't exist. To fix bad links, locate the link on the page and change its link. To update the site file view after the incorrect links have been fixed, simply choose View

Text on a single Web page isn't placed within a text frame like InDesign; it pushes surrounding objects to fit all the text in the designated size. Images, likewise, aren't cropped or sized; they appear at their actual resolution where they rest between sections and paragraphs of text on the page.
These rules are understood by Dreamweaver, but be aware that if objects don't seem to stay where you put them, HTML and the Web browser, not Dreamweaver, are to blame.
The first place to start building Web pages is with the files you exported from InDesign, or you can drag and drop content directly on a blank Web page.
Each Web page displays in its own window, as shown in Figure 24.14. Dreamweaver lets you have multiple files open at the same time, and each file's name is listed along the top edge of the window. You have several ways to view each page using the tabs at the top of the window:
Code: This window displays the HTML code that generates the Web page.
Split: This window divides the Web page into two panels—one displaying Code view and the other displaying Design view, as shown in Figure 24.15.
Design: The default view, which displays laid-out Web-page objects, allows you to easily select and reposition objects.
The Insert palette, shown in Figure 24.16, includes several different tools that you can add to a Web page. Using these several tools, you can add and define the various Web page objects. The Insert palette is divided into several different groups:

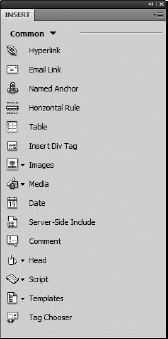
Common: This panel includes the most commonly used Web page elements, such as Hyperlinks, Tables, Images, and Media.
Layout: This panel includes objects designed to help lay out the Web page, such as Frames, DIV tags, and table definitions.
Forms: This panel includes objects found on form pages, such as buttons, labels, pop-ups, and text fields.
Data: This panel includes objects and features for working with data, such as importing data, creating and managing records, and defining dynamic data.
Spry: This panel includes a set of pre-built JavaScript templates for doing data validation, menu bars, and tabbed panels.
Incontext Editing: This panel includes options for creating repeating and editable regions and for managing CSS classes.
Text: This panel includes icons for formatting a text selection, including bold, italics, size, headings, ordered lists, and unordered lists.
Favorites: This panel can be customized to hold any of your favorite tool icons.
After you locate the correct object in the Insert palette, you can add it to a Web page window by dragging it from the Toolbox and dropping it on the Web page or by double-clicking an object to add it at the cursor's location.
You select objects on a Web page in the Layout Editor by clicking them with the Selection tool. A border around the object appears, and the properties for the selected object appear in the Properties palette. Figure 24.17 shows the Properties palette when an image is selected in the Web page. The exact properties displayed in the Properties palette depend on the object selected.

Text can be easily added to a Web page by simply typing on the page. The text is added at the position of the cursor. Dreamweaver also includes basic formatting options on the Insert Toolbox under the Text tab at the top of the interface and in the Text menu. Formatting options include text alignment, font size, text style (strong, emphasis, and teletype), and text color. You also have options to create numbered and unnumbered lists. These text-formatting options are implemented in HTML and create markup tags for the text.
When text is added to a Web page, it flows around the other objects on the page, including headings and images depending on the settings for the objects. You can overlay text on top of other items using layers. Text also can be imported from other applications such as Microsoft Word using the Clipboard.
You can add links, which open another Web page within a browser, to text or images within a Web page. To create a link, select the text you want for a link and click the Hyperlink icon in the Insert palette. The Hyperlink dialog box, shown in Figure 24.18, appears. In the Hyperlink dialog box, you can click the Browse button and select the Web page or image to which you want to link. The Web page name appears in the Link field. You also can specify the following: a Target that defines whether the link is opened in a new window, a Title that appears when the mouse cursor moves over the link, and an Access Key and Tab Index.

Figure 24.18. At the top of the Inspector palette, you specify the Web page or object to which you want to link.
Graphics also can act as hyperlinks using the Link property. Two helpful icons lie to the right of the Link property. The Point to File icon lets you click and drag to the file name that you want to link to. Whichever file in the Files palette that you drop the mouse on is added to the Link value. The next icon is the Browse File icon, which lets you locate the linked file from a file dialog box.
Note
The Point to File icons are available for other properties, including the image SRC and Low SRC values.
After you create links between Web pages, the File
The Common category of the Toolbox includes many of the core objects that you can use to create Web pages, including images, tables, multimedia objects, and so on.
To load an image onto a Web page, simply locate the cursor where you want the image located and click the Image icon in the Insert palette. The Image icon includes several options including Image, Image Placeholder, Rollover Image, Fireworks HTML, Navigation Bar, and several hotspot shapes. If the Image option is selected, the Select Image Source dialog box, shown in Figure 24.19, opens. Use the Browse button found in the Properties palette. Other Properties palette properties include the image's size, alignment, and Alt Text, which is the text that appears when the cursor is placed over the image. Images also can be links to other Web pages.

STEPS: Building a Web page
Open an existing site, and add a Web page to the site. Choose the Site

Note
On a Mac, the New File command is accessed using the panel menu.
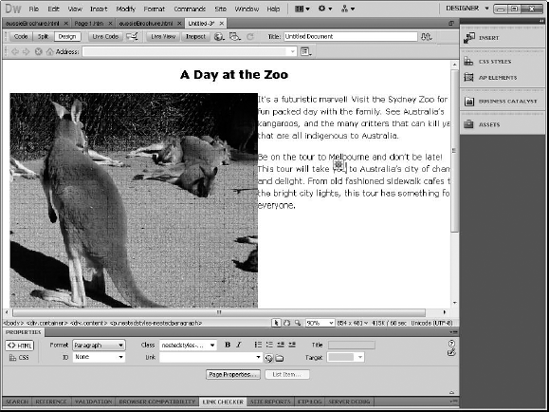
Add and format a heading. At the top of the new blank Web page, type a heading forthe Web page. Then select the Text tab in the Insert Toolbox. Select Format
Add some more text. At the end of the heading text, press Enter to move the cursor to the next line. Then type the main text of the Web page, as shown in Figure 24.21. Typing text here is similar to using a word processor.
Add an image icon to the Web page. From the Insert panel, select the Common category and locate the Image object. Then click the image icon to open the Select Image Source dialog box. Locate an image to load, and click OK. The resulting Web page is shown in Figure 24.22.
Correct the image alignment. To make the text wrap around the new image, select the image object and change the Alignment value to Left in the Properties palette. This allows the text to wrap around the image.
Add some white space to the image. To set the image off from the text, with the image selected and change the HSpace and VSpace values to 10 in the Properties palette. This adds 10-pixel-wide margins around the image, as shown in Figure 24.23.


All text within a Web page can have formatting applied to it using standard HTML tags such as <B> for bold text or <H1> for a heading level 1. These standard formatting options don't deal with CSS and are saved as part of the HTML code. But another method for formatting text is available using Cascading Style Sheets.
CSS allows formatting styles to be defined, named, and saved. These formatting styles are saved in a style sheet and may be applied to several sections of text within the Web page by referencing the defined name. If you need to change the style of text in the Web page, you can make the change to the style sheet and all text sections using that style are automatically updated.
A single Web page may have several style sheets applied to it. For example, a single Web page may have an internal style sheet defined within its header that affects only the text within that Web page, but Web pages also may reference an external style sheet that governs the text styles for all the Web pages within a site. When this happens, the style that you apply to a specific text section is cascaded down according to a defined precedence.
To understand the style precedence, you need to realize that the closer the style definition is to the content, the more likely it will be applied. For example, an external style is more remote than an internal style, so the internal style takes precedence and is applied.
Tip
An external style sheet makes the text styles for a whole Web site consistent, controlled, and easy to update.
You create Cascading Style Sheets (CSS) within Dreamweaver using the CSS Styles palette. You can open this editor by choosing the Window
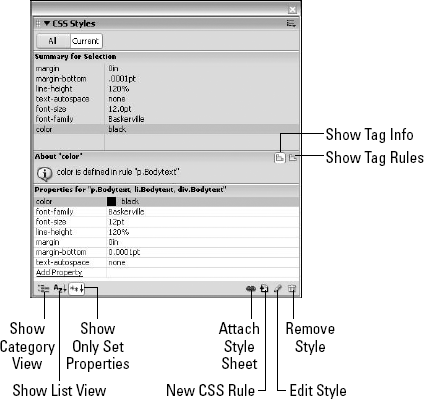
Double-clicking a named style sheet tag in the CSS Styles palette opens it so you can see the individual styles that make up the current style sheet for editing, as shown in Figure 24.25. The Rule Definition dialog box shows all the properties for the selected tag.

You may define styles for standard HTML elements, such as h1, h2, body, p, and so on. You also can define styles using a .class definition and styles that are applied to all objects that have specific IDs. Using these tabbed panels, you may set many different properties, including Font, Text, Block, Margin, and so on.
Element styles (h1, p, a, and so on) are applied automatically whenever you use the HTML element. To apply class styles, you can select the text and select the type of style to use the CSS Styles palette menu, or select the style from the Properties panel, or use the Text
You apply ID styles by adding ID="id_name" to the HTML tag for the text item to which you want to apply the style. This is done in Code view.
When you define and apply styles to text, they're automatically added to the Web page. An external style sheet is saved as a separate file. The benefit of an external style sheet is that all your defined styles for an entire Web site with multiple pages can be derived from a single source, and global style changes to the entire site can be made easily in a single location.
To create an external style sheet, you first need to create a reference to the external style sheet by clicking the Attach Style Sheet menu command from the palette menu. This opens a panel where you can click the Create button to locate an existing style sheet, or browse to one using the Browse button.
If the defined styles in a Web page are ones you want to use across your site, you can use the Move CSS Rules palette menu command to save the style definitions to an external file.
Web browsers on personal computers have made great strides in becoming standardized, but many mobile devices including cell phones, PDAs, and even portable game devices can connect to the Internet and view Web pages. Such devices struggle with the following limitations that make displaying Web pages on these devices difficult:
They have small, limited viewing displays, which make Web pages designed for standard Web browsers incompatible.
The bandwidth for many mobile devices is much lower than their computer counterparts, resulting in much slower connection speeds.
No standard language definition exists for viewing or for displaying content on mobile Web devices.
The available language definitions for mobile devices include the following:
XHTML Basic/XHTML Mobile: Defined and endorsed by the governing W3C organization, the XHTML Basic language definition is the standard for many mobile devices.
i-mode HTML: This language definition is the standard for Japanese and European mobile device markets.
WML: Wireless Markup Language is the standard used on WAP-enabled mobile phones and is endorsed by the OMA organization.
MMS: Multimedia Messaging Service defines a mobile messaging standard, but it also can handle multimedia objects such as audio and images.
Despite all these problems, the good news is that Dreamweaver supports all these various language definitions and can be used to create Web pages that users can view on a majority of mobile devices.
Templates for each of these mobile device standards can be selected from the New dialog box by choosing File
When you select any of the mobile templates from the New dialog box, Design view is automatically set to Mobile view. You can manually set this view by choosing View
After you create or design a Web page for a mobile device, you'll want to view it using that device. This may present some difficulty because you probably don't own one of every type of mobile device. The solution to this problem is emulation. Mobile device manufacturers have created simple XML-based definitions that emulate the actual device using a computer program. After a Web page is designed for a mobile device, you can use Device Central to see how it actually looks when viewed on a range of devices. Device Central, shown in Figure 24.26, is accessed using File
Note
Device Central is accessible from the other CS5 apps, including Adobe Bridge.

Device Central includes a fairly diverse set of currently available devices, but new devices are being added to the list all the time. Using the Devices
Note
Most emulators use the arrow keys to navigate the Web page simulating the device's buttons.
In addition to changing the view mode, Dreamweaver automatically disables the features that aren't available with the selected mobile language definition. For example, if the XHTML Basic mobile template is selected, the Type Size options are disabled.
Tip
Although the tools and objects in the Toolbox aren't disabled when a new mobile template is opened, you can customize the Toolbox to match the selected mobile template by clicking the Palette Options button at the bottom of the Toolbox, selecting the Customize pop-up menu option, and choosing the mobile template definition that matches the current Web page.
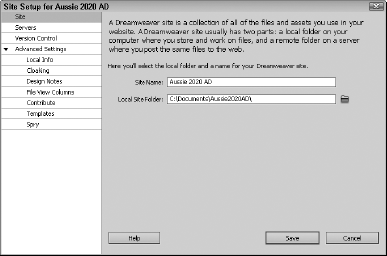
One of the key advantages of Dreamweaver is that it's a complete Web-authoring and Webpublishing solution: It's used to design and create Web sites and also to publish those sites to a Web server. The first step in publishing Web sites is to configure Dreamweaver so that it can access the Internet and locate the Web servers. Dreamweaver provides a wizard to help define the site. This wizard walks you through locating a working copy of the site on your local hard drive and configuring a shared copy of these files on the Web server.
The steps to defining a site in Dreamweaver so that it can publish to a Web site are simple, but much of the information required to configure the system comes from the Internet Service Provider (ISP) that you're using to host your site. Each ISP has different required settings, but you must follow some general guidelines.
Before you can upload any files to a Web server, you need to get your computer connected to the Internet. This requires that you have the TCP/IP protocol on your system.
Note
Internet connections use the TCP/IP network protocols. Before you can connect to the Internet, you need to set up this networking protocol for your system.
If you're having trouble with any of the information required to connect to your Web server such as the Web address, contact your ISP. Your ISP can provide you with this information.
Note
If you're having trouble connecting to a server, the server may be offline.
After you connect to the Internet, you can browse Web pages and get e-mail using your system. You also can repurpose your designs and publish them to a Web server using Dreamweaver. The first step in this process is to tell Dreamweaver where your files are saved locally and where the Web server is located on the Internet.
You can open the Site Definition dialog box by clicking the Create New Dreamweaver Site link on the Welcome Screen dialog box or by using the Site
During the site definition process, the wizard asks several questions. One of the first questions is whether you want to work with server technology such as ColdFusion, ASP.NET, ASP, JSP, or PHP. These technologies require additional installations in order to be used on the site. If you plan on using any of these, be sure to inform the wizard that you want to work with these technologies.
The wizard also gives you the option to edit local files and then upload them to the server or to edit the files directly on the server. Enabling the option to edit files directly on the server allows pages in the site to be broken as they are being editing and removes the safeguards of testing the Web pages before they are published. However, it is convenient for making quick changes. It really depends on the type of workflow you want to establish.

The Site Definition wizard offers several connection options to the remote Web server including FTP, Local/Network, WebDAV, RDS, and Visual SourceSafe. Again, the method you choose depends on your workflow and on which connection method your ISP supports.
Finally, the wizard lets you decide whether to enable a check-in/check-out process. This process sets up a system called version control that locks any file that is checked out so other workers cannot make changes to it at the same time that someone else is working on the file. It also requires files to be checked back in when the changes are saved. This can be a lifesaver if you have many people working on the site at a single time. Dreamweaver includes support for Subversion, a popular version control system.
The Advanced panel of the Site Definition dialog box includes many additional configuration settings.
After a site is created, it is found in the Files palette along with all the files that are part of the site, as shown in Figure 24.28. Open this palette by choosing Window
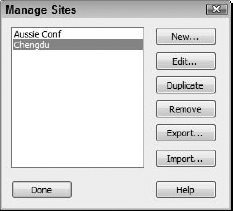
As multiple sites are added to your system, the Manage Sites dialog box, shown in Figure 24.29, becomes helpful. Using this dialog box, you can add new sites, edit existing sites, duplicate and remove sites, and export and import sites.
If you select to edit an existing site, the Site Definition dialog box opens again where you can use the Advanced panel to change any of the site configuration settings.
Prior to pushing your changes to a live server, you should always check your site for problems. Dreamweaver includes several helpful utilities that make it possible to check all your links automatically.
Another good habit is to use Dreamweaver's Clean Up HTML/XHTML utility before publishing any Web page changes. This utility is found in the Commands
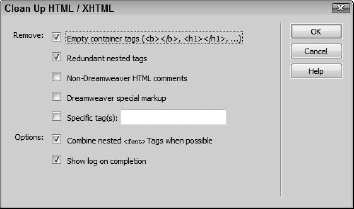
When some Web pages are imported or generated by an external program such as Microsoft Word, the resulting HTML code often has lots of extra characters that are proprietary to the application that generated the HTML. This extra code can cause problems for some Web browsers, but more than likely, they'll just add extra size that is unnecessary to the site files. By removing this unnecessary information, the files are smaller and quicker to download. Also, problems are less likely to occur when you remove the extra code.
Markup and scripting code is very picky about requiring correct syntax to be used. If you enter code directly in Code View, then typos can cause trouble that may be tough to figure out. To handle and eliminate these problems, you can use Dreamweaver's Validator to validate the code syntax.
To validate the code for the current page, select the File
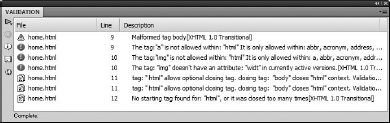
The Validator panel in the Preferences dialog box includes multiple different markup specifications that you can have Validator check the code against. This list includes HTML, XHTML, Internet Explorer and Netscape extensions, ColdFusion, wireless markup language, and JavaScript.
After you configure your system to connect to a Web server, the steps involved in publishing a site are rather simple. Dreamweaver provides two methods for actually uploading the Web site files to the Web server. One method connects directly to the server using the Files palette, and the other uses the FTP Browser.
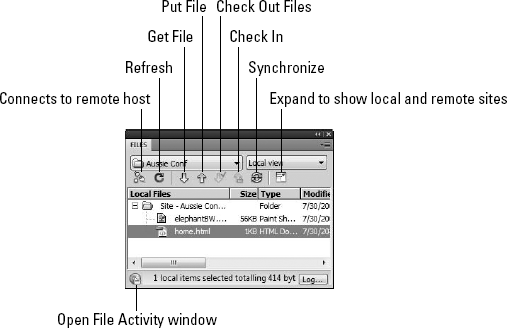
Before you can view a Web site on the Internet, you must transfer all the files that make up the site to the Web server. The Web server then presents the files to the user's browser upon request. You accomplish the process of moving these files using the Files panel. Start by clicking the Connect to Remote Host button to establish a connection between your local root files and the Web server. Then select the files to push to the Web server, and click the Put Files button. This copies the selected file to the Web server.
The dialog box also contains a button to Get Files, which copies the selected content off the Web server and places a copy in the local root folder.
The Synchronize button causes all files that don't have the same date and time stamp to be copied to the Web server, or vice versa. This provides an easy way to quickly update the site. Clicking the Expand to Show Remote and Local Sites button opens two side-by-side panes, as shown in Figure 24.32. This view is convenient and even lets you drag the files back and forth between the two panes.

If Dreamweaver has any trouble connecting to the server, a warning dialog box appears with information on the problems that were encountered.
After connecting, you can upload, download, or synchronize files, depending on your situation. You upload and download files using the Get File and Put File buttons. You synchronize files using the Synchronize button. These commands also are available in the Site menu. When you click the Synchronize button, Dreamweaver compares the time and date stamp for the local file with the one on the server. If a newer file exists on either side, then the file is downloaded or uploaded to synchronize the date and time stamps between the two files. Files that have the same date and time stamp can be ignored because they are already synchronized. With both boxes, if you select a file in the Site column, information about the file is displayed. Icons to the right of the site filenames indicate whether a file is to be skipped, uploaded, downloaded, or deleted.
Note
When you upload files to the Web server using the Files palette, Dreamweaver copies to the server the last modification date and time for each file, not the date and time when the files were uploaded. Because of this, the local files may be synchronized with the files on the Web server.
From the Manage Sites dialog box, you have an option to Import a Web site. Dreamweaver looks for files that have the .ste extension. The .ste file is an XML file that carries all the site definition data such as the site settings and a list of the all the files that make up the site and where they are located. Using this file, Dreamweaver can upload the site files to a local server or migrate the site from an older version of Dreamweaver.
If you have difficulty connecting or uploading files to a Web server using Dreamweaver, you can always export the files to a local directory and then upload the directory using an external file-transfer program.
To export a site, open the Manage Sites dialog box and click the Export button. This command opens a file dialog box where you can give the site definition data a filename and a location for exporting. The site definition file is exported using the Site Definition File format, .ste and all the site files are copied to the designated folder.
You can repurpose documents created in InDesign for use on the Web by exporting for Dreamweaver. This process bundles all the necessary files into a folder that Dreamweaver can use.
Another approach is to prototype the site in Fireworks and export the mock-up to Dreamweaver.
A site project includes many Web pages. You can create site projects using Dreamweaver's Site Wizard.
Dreamweaver is a robust editor for creating and designing Web pages. These Web pages can include a myriad of objects. You edit object properties using the Properties palette.
Cascading Style Sheets are an efficient way to apply text styles to a section of text within a Web page and to multiple pages throughout the site.
Dreamweaver includes templates for creating Web pages for mobile devices and features for editing and viewing mobile Web pages using Device Central.
To upload a Web site, you must configure Dreamweaver by entering the server information in the Site Definition wizard, which includes settings for uploading, exporting, and cleaning up files.
After you configure and connect to the Web server, you can see the files on the Web server in the site window.
Check your site links and clean up the HTML code before publishing.
You can use the Files panel to upload, download, or synchronize files between the local file system and the Web server.
Using the site map view, you can see all the files that make up the site and their relationships.