3. Customizing the Way You Work
What You’ll Do
Change Sync Settings Preferences
Control Transparency & Gamut Preferences
Change Units & Rulers Preferences
Change Guides, Grid & Slices Preferences
Manage Libraries with the Preset Manager
Create a Customized User Interface
Introduction
No description of Adobe Photoshop would be complete without that well-known, but little utilized area called Preferences. Photoshop preferences serve several purposes. They help customize the program to your particular designing style, and they help you utilize available computer resources to increase the overall performance of the program.
By modifying File Handling preferences, such as appending a file extension on the file, or being asked when saving a layered TIFF file, you can streamline the file saving process. In addition, you can change the way your cursors look. For example, do you want your paintbrush to look like a paintbrush when you paint, do you prefer a precision crosshair or the actual brush size shape, or the shape with a crosshair?
As you use Photoshop, you’ll come to realize the importance of working with units and rulers. Precision is the name of the game when you are working with images. What about the color of your guides, grids, and slices? No big deal, you say. Well, if you’ve ever tried viewing a blue guide against a blue-sky image, you know exactly why guide color is important. By working through preferences such as Image Cache, Scratch Disks, and RAM (Random Access Memory), speed increases of up to 20% can be achieved.
In addition, customizing the program helps make you more comfortable, and studies show that the more comfortable you are as a designer, the better your designs. Plus, being comfortable allows you to work faster, and that means you’ll accomplish more in the same amount of time. What does setting up preferences do for you? They make Photoshop run faster (up to 20%), you work more efficiently, and your designs are better. That’s a pretty good combination. Photoshop doesn’t give you Preferences to confuse you, but to give you choices, and those choices give you control.
Optimizing Photoshop
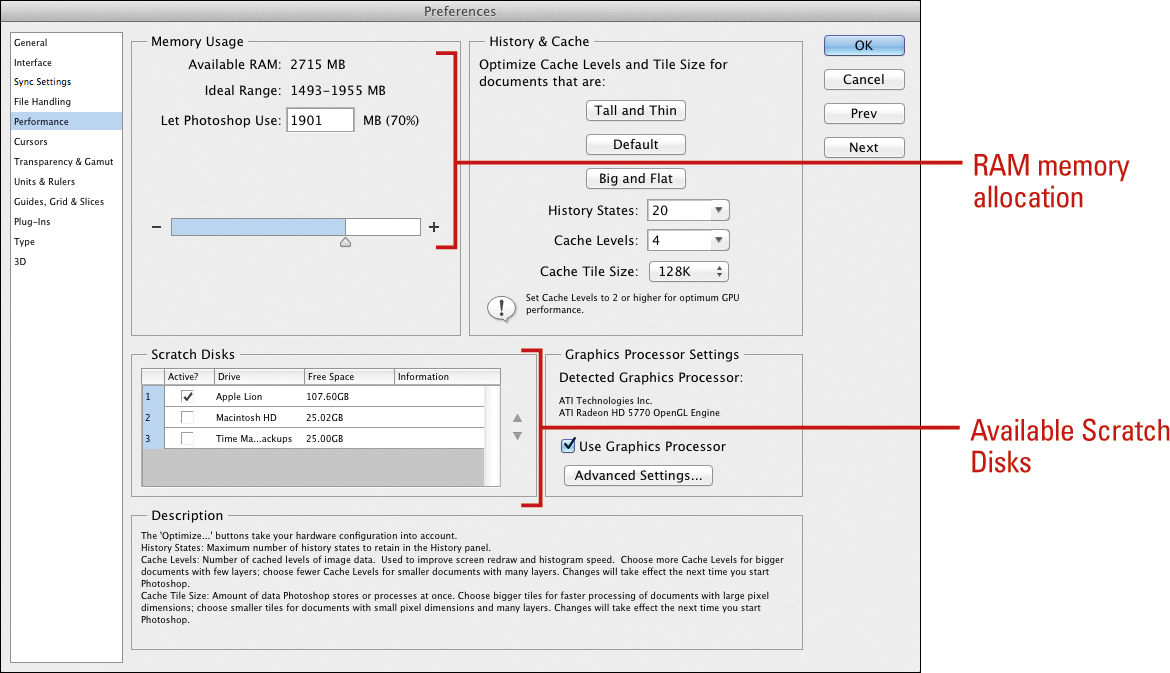
Photoshop is a powerful program, and as such, requires a tremendous amount of computing power. When working on large documents, a poorly optimized Photoshop program will mean longer processing times for your files. That’s the bad news if you have a deadline to meet. The good news is that Photoshop can be configured to run more efficiently. To optimize Photoshop, click the Edit (Win) or Photoshop (Mac) menu, point to Preferences, and then click Performance. The Performance preferences dialog box contains options that will help maximize the performance of Photoshop.
History States
History States control the number of undos available. In fact, you can have up to 1,000 undos (ever wonder who would make so many mistakes that they would need 1,000 undos?). Unfortunately, increasing the number of History States will ultimately increase the amount of RAM Photoshop uses to manage the History panel. Assigning more RAM to manage History means less memory for Photoshop to perform other operations, and will reduce the performance of the program. If you are experiencing problems with slow performance, lowering the number of History States frees up more RAM, and permits Photoshop to operate more efficiently.
Scratch Disk
When your computer doesn’t have enough RAM to perform an operation, Photoshop uses free space on any available drive, known as a Scratch Disk. Photoshop requires 5 times the working size of the file in contiguous hard drive space. For example, if the working size of your file is 100 MB, you will need 500 MB of contiguous hard drive space, or you will receive an error message: Out of Scratch Disk Space (I hate it when that happens). Using additional hard drives gives Photoshop the ability to divide the processing load and increase performance. Photoshop detects and displays all available internal disks in the Preferences dialog box. Scratch disks must be physically attached to your computer (avoid networks and removable media, such as USB drives, or rewritable CDs or DVDs). For maximum speed, avoid USB, and use 4- or 6-pin FireWire drives. Benchmark tests show FireWire drives provide up to a 20% speed improvement when used as Scratch Disks. Think of saving one hour out of every five, or one full day out of every five. That’s not too bad. For best results, select a scratch disk on a different drive than the one used for virtual memory or any large files you’re editing.

Memory & Image Cache
Photoshop functions in RAM (actually all applications work within RAM). To run efficiently, Photoshop requires 5 times the working size of the open document in available memory (some tests indicate 6 to 8 times). Strictly speaking, the more RAM you can assign to Photoshop, the more efficiently the program operates, especially when opening large documents. RAM usage is determined by the working size of the document, not its open size. As you add elements to a document, the working size of the file increases.
Cache Levels are screen redraws, or how many versions of the current active document Photoshop saves. When you’re working on large documents, more Cache Levels help speed up the redraw function, and make image manipulation proceed faster. However, they are held primarily in RAM, so the more Cache Levels you choose, the less RAM is available for other Photoshop functions. Cache Tiles are the amount of data Photoshop stores or processes at once; use a larger tile size for larger documents to speed up processing. If you’re not sure what to set, use one of the preset buttons.
Setting General Preferences
Photoshop’s General preferences help you configure some of the more common features of the program. Color picker, image interpolation, and image Smart Object settings, as well as the History log, are set up in General preferences. Other options, such as beeping when an operation is finished, auto-updating open documents, and using the Shift key for tool switching, can all be turned on or off in the Options area. The Color Picker options allow you to select a color picker, either Adobe or the OS, and a HUD color picker (in 8-bit and 16-bit documents). The History Log lets you save all the History States performed on a particular document. For example, when you open an image, all the adjustments and actions performed are saved in a text file. This gives you access to valuable information, and lets you reproduce the steps performed on one image to correct another.
Work with General Options
![]() Click the Edit (Win) or Photoshop (Mac) menu, point to Preferences, and then click General.
Click the Edit (Win) or Photoshop (Mac) menu, point to Preferences, and then click General.
![]() Click the Color Picker list arrow, and then select Adobe or another. operating system (Windows or Macintosh).
Click the Color Picker list arrow, and then select Adobe or another. operating system (Windows or Macintosh).
![]() Click the HUD Color Picker list arrow, and then select a color picker style, such as Hue Strip or Hue Wheel.
Click the HUD Color Picker list arrow, and then select a color picker style, such as Hue Strip or Hue Wheel.
![]() Click the Image Interpolation list arrow, and then select Nearest Neighbor, Bilinear, Bicubic, Bicubic Smoother, Bicubic Sharper, and Bicubic Automatic.
Click the Image Interpolation list arrow, and then select Nearest Neighbor, Bilinear, Bicubic, Bicubic Smoother, Bicubic Sharper, and Bicubic Automatic.
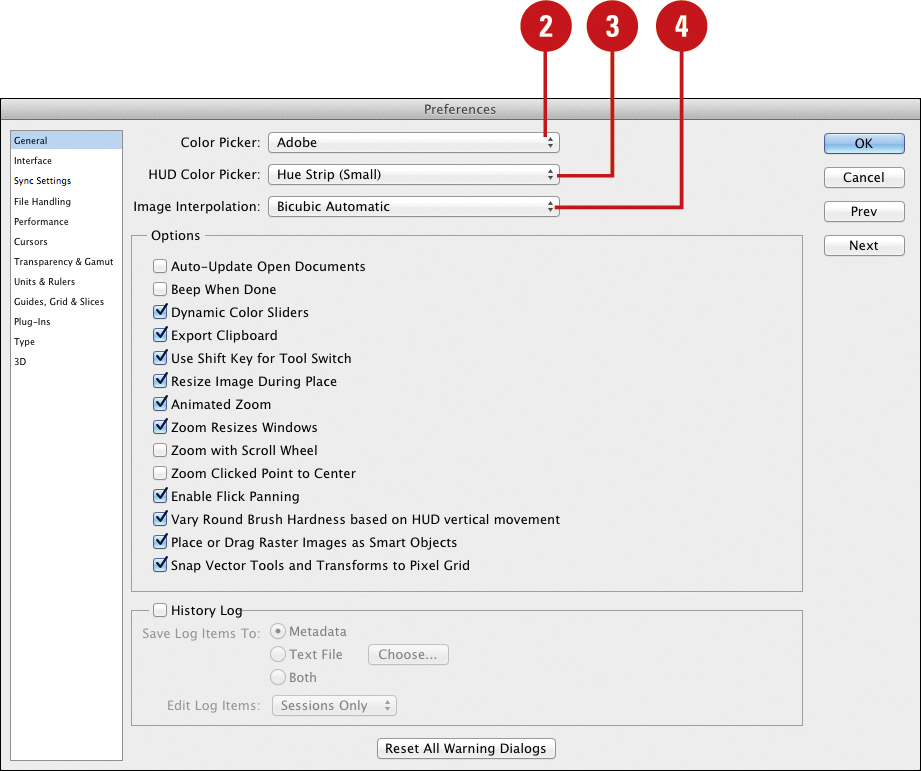
![]() Select the various options you want to use:
Select the various options you want to use:
♦ Auto-Update Open Documents. Creates a link between the open image and the image file on disk.
♦ Beep When Done. Makes a sound when an operation is complete.
♦ Dynamic Color Sliders. Previews color effects within the slider bars.
♦ Export Clipboard. Transfers a copied image to the operating systems clipboard.
♦ Use Shift Key For Tool Switch. Allows you to use the keyboard shortcut when two tools share the same slot in the toolbox.
♦ Resize Image During Place. Allows you to resize an image during a Place.
♦ Animated Zoom. Enables continuous-motion, smooth zooming in and out of your document, and Scrubby Zoom.
♦ Zoom Resizes Windows. Forces the image window to resize when zoom is selected.
♦ Zoom With Scroll Wheel. Determines whether zooming or scrolling is the default operation of the scroll wheel.
♦ Zoom Clicked Point to Center. Centers the zoom view on the clicked location.
♦ Enable Flick Panning. Enables quick mouse movement over the image instead of holding down the mouse.
♦ Vary Round Brush Hardness based on HUD Vertical Movement. Enables brush variations (hardness and opacity) when vertically moving brush HUD.
♦ Place or Drag Raster Images as Smart Objects. Converts raster images to Smart Objects when you place or drag them.
♦ Snap Vector Tools and Transforms to Pixel Grid. Enables the snapping of vector tools and transformations to the pixel grid.
Trouble?
Some options require the Use Graphics Processor option enabled in Performance Preferences to work; see details on page 75.
![]() Select the History Log check box and then set the log options you want to use.
Select the History Log check box and then set the log options you want to use.
![]() Click OK.
Click OK.

Setting File Handling Preferences
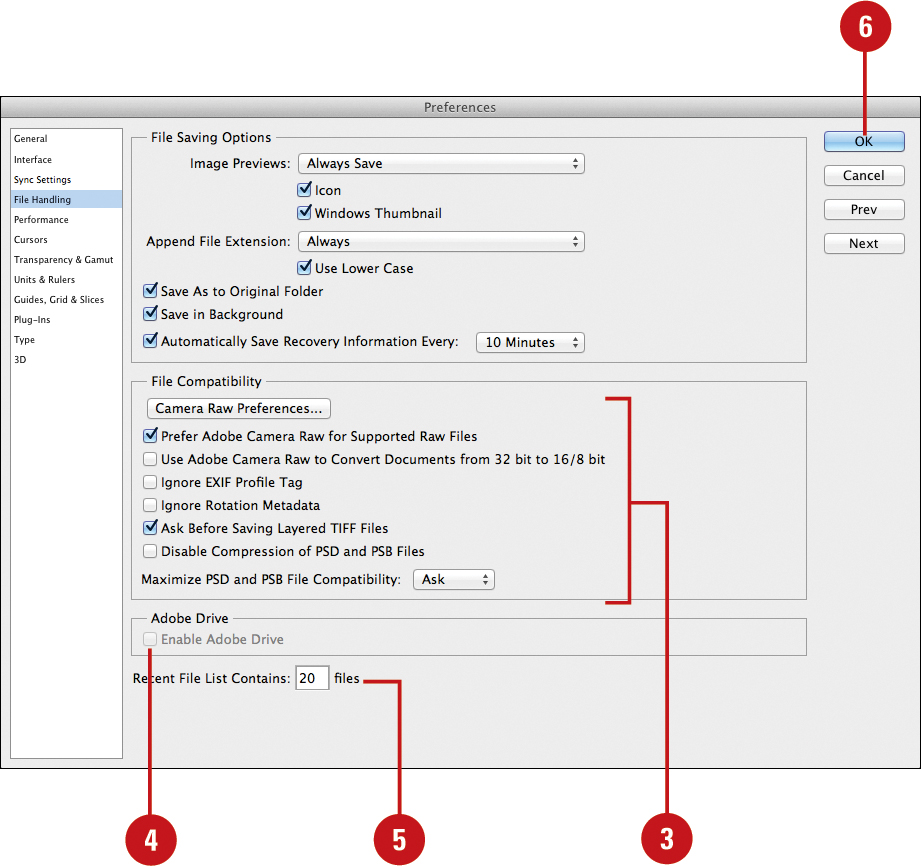
Sooner or later, you’ll have to save the file (document) you’ve created in Photoshop. Photoshop lets you save files using different formats, including TIFF, EPS, JPEG, or BMP. The File Handling preferences provide several options that modify what information is saved with a file. You can also set options to automatically save the file based on a time interval or save the file in the background, which allows you to keep working while Photoshop saves behind the scenes; a progress information appears in the Document tab and Status bar. If Photoshop crashes unexpectedly, the program automatically tries to recover and open your file. Image previews are typically very small, adding very little to the file size of the saved document. Once saved you may want to open, print, and possibly even modify the document using other image-editing applications. The File compatibility options help you use or save a file, including Camera Raw (New!), that will be transformed in Photoshop or transportable to other applications.
Work with File Handling Options
![]() Click the Edit (Win) or Photoshop (Mac) menu, point to Preferences, and then click File Handling.
Click the Edit (Win) or Photoshop (Mac) menu, point to Preferences, and then click File Handling.
![]() Select the File Saving Options you want to use:
Select the File Saving Options you want to use:
♦ Image Previews. Select from: Always Save, Never Save, or Ask When Saving.
♦ Icon. Saves previews of the images (Mac).
♦ Windows Thumbnail. Saves previews viewable when using the Win File Open command (Mac).
♦ Append File Extension. Choose whether or not to append the file extension (Mac).
♦ Use Lower Case (Mac) or File Extension (Win). Choose to have upper or lower case extensions.
♦ Save As To Original Folder. Saves the file to original folder as the default.
♦ Save in Background. Photoshop automatically saves in the background while you work.
♦ Automatically Save Recovery Information Every. Saves document information for recovery based on an interval.

![]() Select the File Compatibility options you want to use:
Select the File Compatibility options you want to use:
♦ Camera Raw Preferences Click to choose from options such as default image settings, cache size, DNG file handling, and whether or not to open JPEG and TIFF files with Camera Raw.
♦ Prefer Adobe Camera Raw for Supported Raw Files. Open supported raw files in Camera Raw.
♦ Use Adobe Camera Raw to Convert Documents from 32 bit to 16/8 bit. Converts 32-bit raw documents to 16/8-bit (New!).
♦ Ignore EXIF Profile Tag. Ignores color space metadata attached to digital camera images.
♦ Ignore Rotation Metadata. Ignore metadata attached to digital camera images.
♦ Ask Before Saving Layered TIFF Files. Lets you create multi-layered documents, and then save them using the TIFF format.
This is a distinct advantage when you need to use multi-layered files and you don’t want to save them using Photoshop’s proprietary format (PSD).
♦ Disable Compression of PSD and PSB Files. Disables compression of files.
♦ Maximize PSD and PSB File Compatibility. Lets you save PSD files that can be opened in earlier versions of the program and PSB (Large Document Format) files.
![]() Select the Enable Adobe Drive check box to enable Adobe Drive in your work process.
Select the Enable Adobe Drive check box to enable Adobe Drive in your work process.
![]() Enter the number of files (up to 30) to keep in the Recent File List box.
Enter the number of files (up to 30) to keep in the Recent File List box.
![]() Click OK.
Click OK.

Setting Interface Preferences
Working with Interface preferences gives you control over whether Photoshop displays or hides user interface features. You can change the user interface display by color theme or some elements by a selected color and border. For example, you can show the program window in four color themes in shades of gray or the Application icon in color or grayscale, show channels in color, or show selected menu items in user-defined colors. Interface preferences also allow you to use gestures with a tablet and pen, show descriptive labels when your cursor is placed over an option, automatically collapse icon panels when you click away, remember panel locations for the next use, and enable text drop shadows. You can also change the size of the text font on the Options bar, panels, and tool tips, restore all panels back to their default workspaces, as well as choose where to show transformation values.
Work with Interface Options
![]() Click the Edit (Win) or Photoshop (Mac) menu, point to Preferences, and then click Interface.
Click the Edit (Win) or Photoshop (Mac) menu, point to Preferences, and then click Interface.
![]() Select the Interface options:
Select the Interface options:
♦ Color Theme. Choose from four shades of gray. (Dark is default).
♦ Screen Modes. Choose background and border colors for the three screen modes.
♦ Auto-Collapse Iconic Panels. Automatically collapses icon panels when you click away.
♦ Auto-Show Hidden Panels. Hidden panels will temporarily appear when you point to the edge of the application window.
♦ Open Documents as Tabs. Opens documents in one window with tabs.
♦ Enable Floating Document Window Docking. Allows floating document windows to dock when you move them.
♦ Show Channels In Color. Allows you to view channels in the Channels panel in color.
♦ Show Menu Colors. Displays menu items in user-defined colors.
♦ Show Tool Tips. Shows labels when your cursor is placed over an option.
♦ Enable Gestures. Allows the use of gestures with a tablet and pen.
♦ Enable Text Drop Shadows. Select to have text drop shadows on panel labels.
♦ Show Transformation Values. Select where to show transformation values near the cursor: Never, Top Left, Top Right, Bottom Left, or Bottom Right.
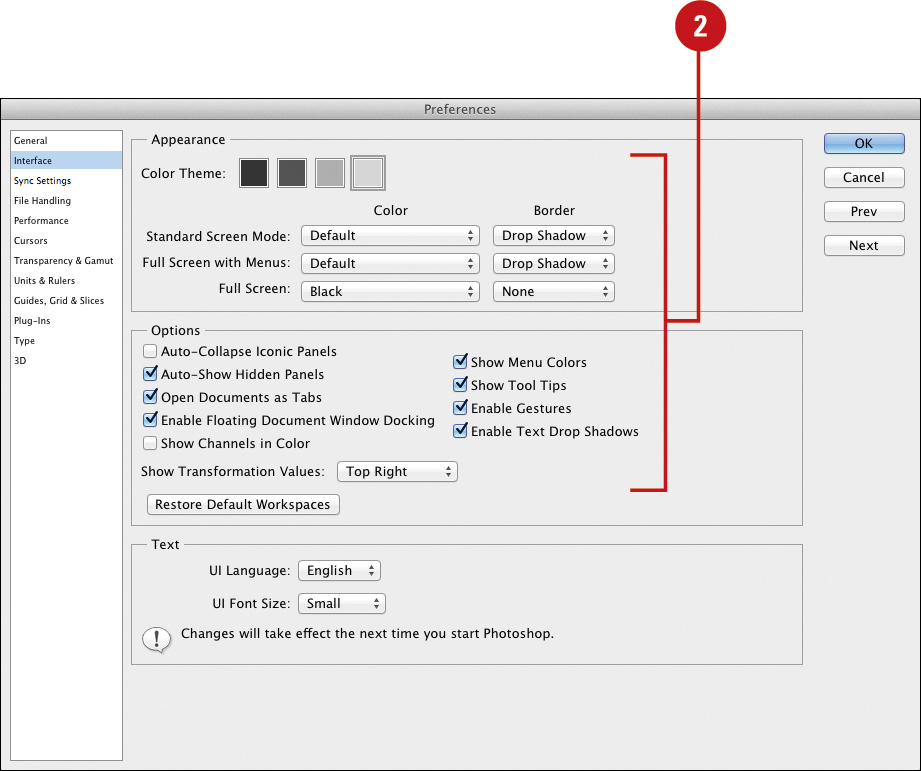
![]() To restore all Photoshop panels back to their default workspaces, click Restore Default Workspaces.
To restore all Photoshop panels back to their default workspaces, click Restore Default Workspaces.
![]() Select the UI Text settings you want to use:
Select the UI Text settings you want to use:
♦ UI Language. Choose a default language.
♦ UI Font Size. Choose a size for interface fonts.
![]() Click OK.
Click OK.

Did You Know?
You can turn a text box into a slider. You can use any text box which displays a numerical value, such as font size, like a slider. Point to the name of the box (which changes the cursor to a hand with arrows), and then move the mouse left to decrease or right to increase the displayed number.
Changing Sync Settings Preferences
Photoshop’s Sync Settings preferences (New!) allows you to specify the settings you want to synchronize to an Adobe Creative Cloud account, which you can use on other computers with Photoshop. Creative Cloud is a membership-based cloud solution that allows you to access Adobe software, tools, services, personal files, tutorial videos, and sync program settings online from any computer or device. In order to sync program settings (New!) and access online content on Creative Cloud and Adobe.com, you’ll need to sign in to the service with your Adobe ID. If you’re not signed in when you start Photoshop, you’ll be asked to do so. When you’ve synced settings (New!) on Creative Cloud from another computer and there is a conflict, you’ll be asked if you want to sync settings (keep local or remote) to this computer.
Change Sync Settings Preferences
![]() Click the Edit (Win) or Photoshop (Mac) menu, point to Preferences, and then click Sync Settings.
Click the Edit (Win) or Photoshop (Mac) menu, point to Preferences, and then click Sync Settings.
♦ You can also click the Edit (Win) or Photoshop (Mac), point to account address, and then click Manage Sync Settings.
![]() Select the Sync Settings check box to sync the settings you want or deselect to not sync any settings at all.
Select the Sync Settings check box to sync the settings you want or deselect to not sync any settings at all.
![]() Select or deselect the Photoshop settings you do or don’t want to sync to the Creative Cloud.
Select or deselect the Photoshop settings you do or don’t want to sync to the Creative Cloud.
![]() Click the When Conflict Occurs list arrow, and then select an option to specify how you want to deal with sync conflicts.
Click the When Conflict Occurs list arrow, and then select an option to specify how you want to deal with sync conflicts.
♦ Ask My Preference.
♦ Sync Local Settings.
♦ Sync Cloud Settings.
♦ Keep Latest File.
![]() Click OK.
Click OK.

Work with Sync Settings
![]() When you start Photoshop and settings are synced with Creative Cloud from another computer, click Keep Local or Keep Remote to set sync settings (New!).
When you start Photoshop and settings are synced with Creative Cloud from another computer, click Keep Local or Keep Remote to set sync settings (New!).

![]() To sign in to your Creative Cloud account, click the Help menu, click Sign In, click Sign In Now, create an account or enter your
To sign in to your Creative Cloud account, click the Help menu, click Sign In, click Sign In Now, create an account or enter your
♦ To sign out, click the Help menu, click Sign Out (account address), and then click Sign out.

![]() Click the Edit (Win) or Photoshop (Mac) menu, and then point to account address.
Click the Edit (Win) or Photoshop (Mac) menu, and then point to account address.
![]() Use any of the following:
Use any of the following:
♦ Sync Settings Now. Syncs the settings to your Creative Cloud account based on your Sync Settings preferences.
Timesaver
Click the Sync Settings button on the Status bar, and then click Sync Settings Now.
♦ Manage Sync Settings. Opens Sync Settings preferences.
♦ Manage Creative Cloud Account. Opens your default web browser, displaying your Creative Cloud account, where you can make changes.


![]() If a conflict occurs, click the Sync Settings button, and then click Keep Local or Keep Remote. If you want to remember it, select the Remember my choice check box.
If a conflict occurs, click the Sync Settings button, and then click Keep Local or Keep Remote. If you want to remember it, select the Remember my choice check box.

See Also
See “Using the Status Bar” on page 30 for information on Sync Setting button on the Status bar.
Setting Cursors Preferences
We communicate with Photoshop using various devices, such as a drawing tablet, mouse, touch screen, track pad, or keyboard. Photoshop communicates with us using visual cues, the most prominent one being the shape of the cursor. For example, when a cursor looks like an I-beam, this typically means it’s time to enter text, or when the cursor looks like a magnifying glass, clicking on the image expands the view size. When you paint, you can specify how Photoshop displays the brush tip. Working with the Cursors preferences gives you control over how Photoshop communicates with you.
Work with Cursors Options
![]() Click the Edit (Win) or Photoshop (Mac) menu, point to Preferences, and then click Cursors.
Click the Edit (Win) or Photoshop (Mac) menu, point to Preferences, and then click Cursors.
![]() Select the Painting Cursors options you want to use:
Select the Painting Cursors options you want to use:
♦ Standard. Painting cursors look like their toolbox icons.
♦ Precise. Painting cursors appear as crosshairs.
♦ Normal Brush Tip. Painting cursors appear with the shape of the active brush tip.
♦ Full Size Brush Tip. Shows the full size of the brush tip, including feathered edges.
♦ Show Crosshair In Brush Tip. Displays a crosshair in the center of the brush tip.
♦ Show Only Crosshair While Painting. Displays a crosshair while using a paint brush.
![]() Select the Other Cursors options you want to use:
Select the Other Cursors options you want to use:
♦ Standard. Painting cursors look like their toolbox icons.
♦ Precise. Painting cursors appear as crosshairs.
♦ Brush Preview. Choose a color for brush editing preview.
![]() Click OK.
Click OK.

Controlling Transparency & Gamut Preferences
Transparency & Gamut preferences control how Photoshop displays transparent areas of a document (commonly called the checkerboard), as well as the color and opacity of areas of an image that fall outside of the CMYK (Cyan, Magenta, Yellow, and Black) color mode. It’s important to understand that transparency in Photoshop does not always translate into transparency after you save the file. For example, the JPEG format does not support transparency. When you save the file, Photoshop will fill the transparent areas of the image with a matte color (the default is white). In addition, the Gamut Warning may be activated because a monitor displays color information using RGB, and has more available saturation values than a CMYK document. Using a different ink or spot colors can sometimes fix an out-of-gamut color. For transparency it’s important to remember that unless you’re printing the document directly in Photoshop, it’s the format you choose that determines if the transparent areas will be saved, and the Gamut Warning is there to warn you of any areas that may not print the way you expect. To activate the gamut warning option, open a document, click the View menu, and then click Gamut Warning. Out-of-Gamut areas of the image will display with the color and opacity chosen in preferences.
Control Transparency & Gamut Options
![]() Click the Edit (Win) or Photoshop (Mac) menu, point to Preferences, and then click Transparency & Gamut.
Click the Edit (Win) or Photoshop (Mac) menu, point to Preferences, and then click Transparency & Gamut.
![]() Select the Transparency Settings options you want to use:
Select the Transparency Settings options you want to use:
♦ Grid Size. Allows you to select a transparency grid size.
♦ Grid Colors. Allows you to choose the color scheme for the transparency grid.
![]() Select the Gamut Warning options you want to use:
Select the Gamut Warning options you want to use:
♦ Color. Choose a color to mask areas of an image that move out of the CMYK color space.
♦ Opacity. Enter a value from 0% to 100%. Opacity determines how much of the Color Overlay masks the original image pixels.
![]() Click OK.
Click OK.

Working with Units & Rulers
While changing the measurable units and rulers do not affect output quality, they do help to measure information in a document consistent with the specific output device. Ruler Units give you precise information on the width and height of the active document. The Column Size measurements provide information that Photoshop needs to create documents with columns, such as newspapers, magazines, brochures, etc. The New Document Preset Resolutions area lets you select specific resolution values when creating new documents. Insert the values you’ll use most often in the creation of a new Photoshop document.
Work with Units & Rulers Options
![]() Click the Edit (Win) or Photoshop (Mac) menu, point to Preferences, and then click Units & Rulers.
Click the Edit (Win) or Photoshop (Mac) menu, point to Preferences, and then click Units & Rulers.
![]() Select the Units options you want to use:
Select the Units options you want to use:
♦ Rulers. Sets a default measuring system for the Ruler bar.
For example, pixels would be most common for images displayed on a monitor, and picas or inches most common for output to press or printer.
♦ Type. Use to measure type with pixels, points, or millimeters.

Did You Know?
You can switch between ruler measurements without going to Preferences. To change the default measurement system of the Ruler bar, simply move into the Ruler bar, and then right-click your mouse. A list of available measurement options will be instantly available.
![]() Select the Column Size settings you want to use:
Select the Column Size settings you want to use:
♦ Width. Choose a measurement system and numerical value for column width.
♦ Gutter. Choose a measurement system and numerical value for gutter (the space between the columns).
When you choose a measurement system (points, inches, or centimeters), Photoshop changes the value to correspond to the type of measurement system.
![]() Select the New Document Preset Resolutions settings you want to use:
Select the New Document Preset Resolutions settings you want to use:
♦ Print Resolution. Select a print resolution and measurement value for default printing.
♦ Screen Resolution. Select a print resolution and measurement value for default screen display.
![]() Click the PostScript or Traditional option measuring systems for Photoshop’s type tool (PostScript is the most widely used).
Click the PostScript or Traditional option measuring systems for Photoshop’s type tool (PostScript is the most widely used).
![]() Click OK.
Click OK.

Did You Know?
You can choose what type of Point/Pica size to use. Click PostScript (72 points/inch) or click Traditional (72.27 points/inch). PostScript is more widely used, and Photoshop defaults to this option.
Working with Guides, Grid & Slices
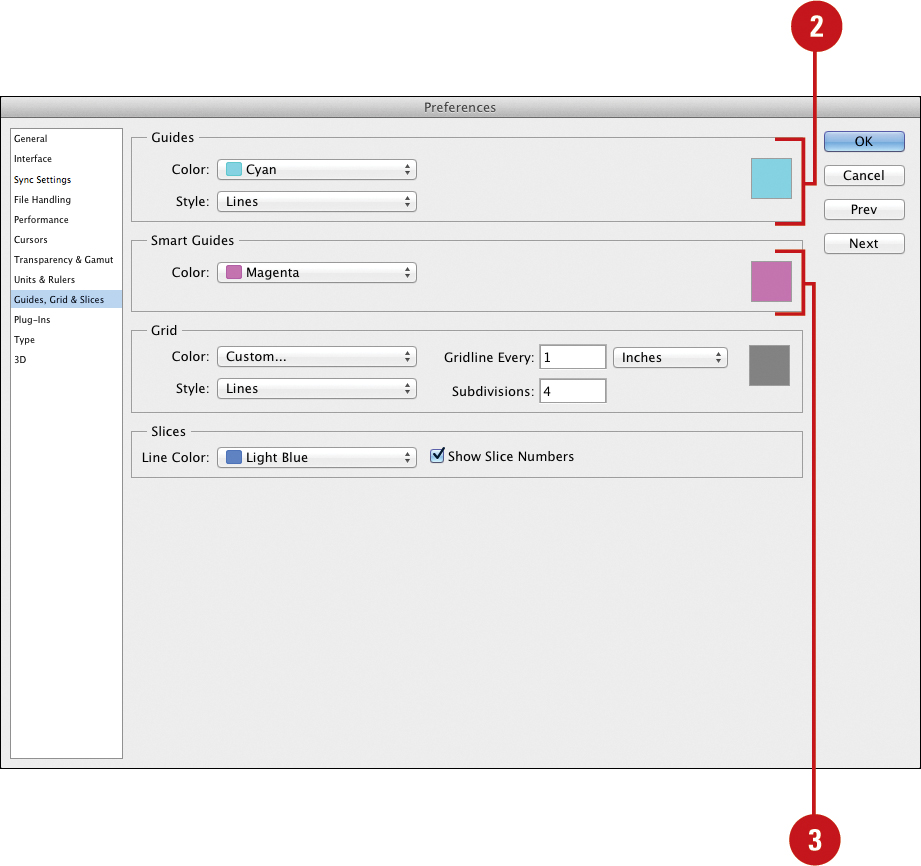
Guides, Grid & Slices preferences help keep a multi-layered document in proper order. For example, using Guides can help you line up buttons on a web interface, or make sure specific design elements are precisely placed within the document window. The Guides option lets you select the color and style of the guides placed within a Photoshop document. Guides are placed within the image by dragging them from the horizontal or vertical Ruler bars in the active document. The Grid options let you decide on a color, style, and layout for Photoshop’s grid system. The Slices option defines the visible color of a slice, and whether Photoshop displays a number value for each slice.
Work with Guides, Grid & Slices Options
![]() Click the Edit (Win) or Photoshop (Mac) menu, point to Preferences, and then click Guides, Grid & Slices.
Click the Edit (Win) or Photoshop (Mac) menu, point to Preferences, and then click Guides, Grid & Slices.
![]() Select the Guides options you want to use:
Select the Guides options you want to use:
♦ Color. Select a default color for displaying guides.
♦ Style. Select a default (Lines or Dashed Lines) for displaying guidelines.
![]() Select the Smart Guides options you want to use:
Select the Smart Guides options you want to use:
♦ Color. Select a color for use with Smart Guides.
Did You Know?
You can change a horizontal guide into a vertical guide, and vice versa. Move into the Ruler bar and drag a guide into the document window. Before releasing the mouse, hold down the Alt (Win) or Option (Mac) key. The guide automatically switches directions.
![]() Select the Grid options you want to use:
Select the Grid options you want to use:
♦ Color. Select a default color for displaying grids.
♦ Style. Select a default style (Lines, Dashed Lines, or Dots) for displaying the grid.
♦ Gridline Every. Enter a value for how often the grid lines appear within the active document.
♦ Subdivisions. Enter a value for how many subdivisions (lines) appear between each main gridline.
![]() Select the Slices options you want to use:
Select the Slices options you want to use:
♦ Line Color. Select a default line color for displaying document slices.
♦ Show Slice Numbers. Select the check box to display a number for each slice in the upper left corner of the slice.
Important
When you select a line color, choose a color that is different than the grid and guide line colors. That way you can easily identify grids and guides for user-created lines.
![]() Click OK.
Click OK.

Did You Know?
You can change color choices for Guides, Grid & Slices. Not satisfied with the color choices offered by the color and style menus? Click on the Color boxes located on the right side of the Preferences dialog box, and select any color from the Color Picker.
Setting Plug-Ins Preferences
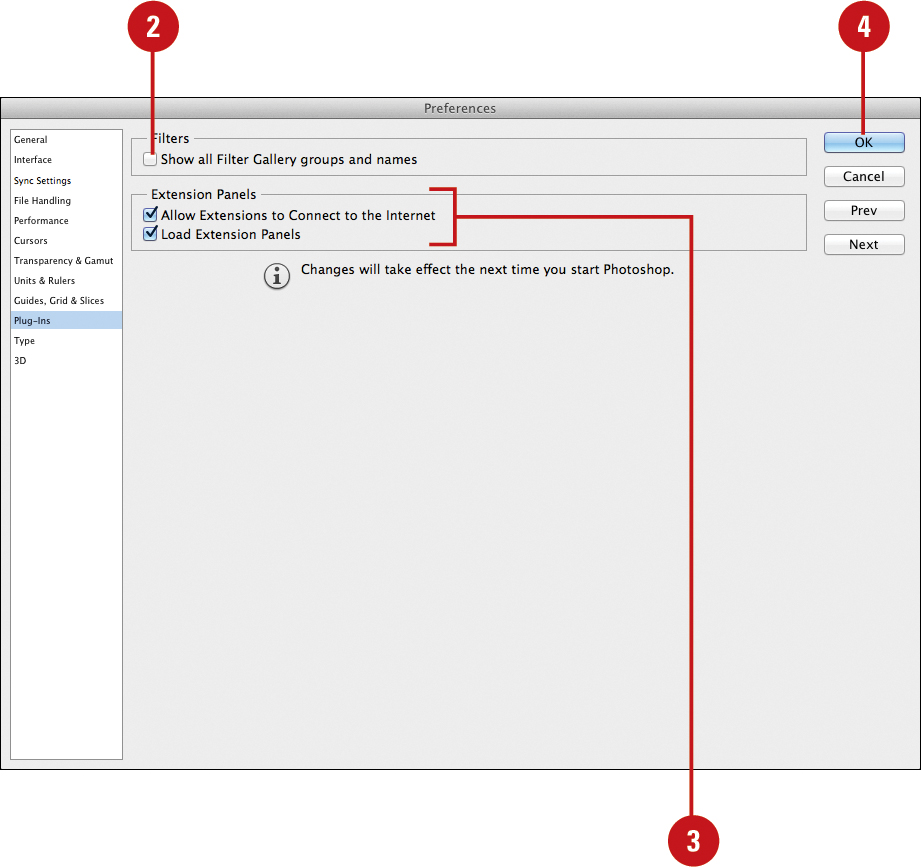
A plug-in is an external code modal that extends the functionality of a program. Photoshop comes with several installed plug-ins, such as Camera Raw and Filter Gallery; however, you can install other third-party ones too. If you want to use third-party plug-ins, you’ll need to place or install them (unless specified by the developer) in the default Photoshop Plug-ins folder—located in the main Adobe Photoshop folder—in order to make them available in Photoshop; the Additional Plug-ins Folder is no longer available. Plug-ins preferences allows you to specify options relating to plug-ins, filters, or extension panels. For filters, you can specify whether you want to show all Filter Gallery groups and names on the Filter menu. For extension panels, you can specify whether to allow extensions to connect to the Internet and load extension panels for use on the Extensions submenu on the Window menu.
Work with Plug-Ins Options
![]() Click the Edit (Win) or Photoshop (Mac) menu, point to Preferences, and then click Plug-Ins.
Click the Edit (Win) or Photoshop (Mac) menu, point to Preferences, and then click Plug-Ins.
![]() Select the Show all Filter Gallery groups and names check box to display all Filter Gallery groups and names on the Filter menu.
Select the Show all Filter Gallery groups and names check box to display all Filter Gallery groups and names on the Filter menu.
![]() Select the Extension Panels options you want to us:
Select the Extension Panels options you want to us:
♦ Allow Extensions to Connect to the Internet. Select to all extensions to connect to sites on the Internet.
♦ Load Extension Panels. Select to load extension panels, such as Kuler and Adobe Exchange, which become available on the Extensions submenu on the Window menu.
![]() Click OK.
Click OK.
Did You Know?
You can find out about installed plug-ins. Click the Help (Win) or Photoshop (Mac) menu, point to About Plug-ins, and then select a plug-in to find out about it.
Selecting Scratch Disks
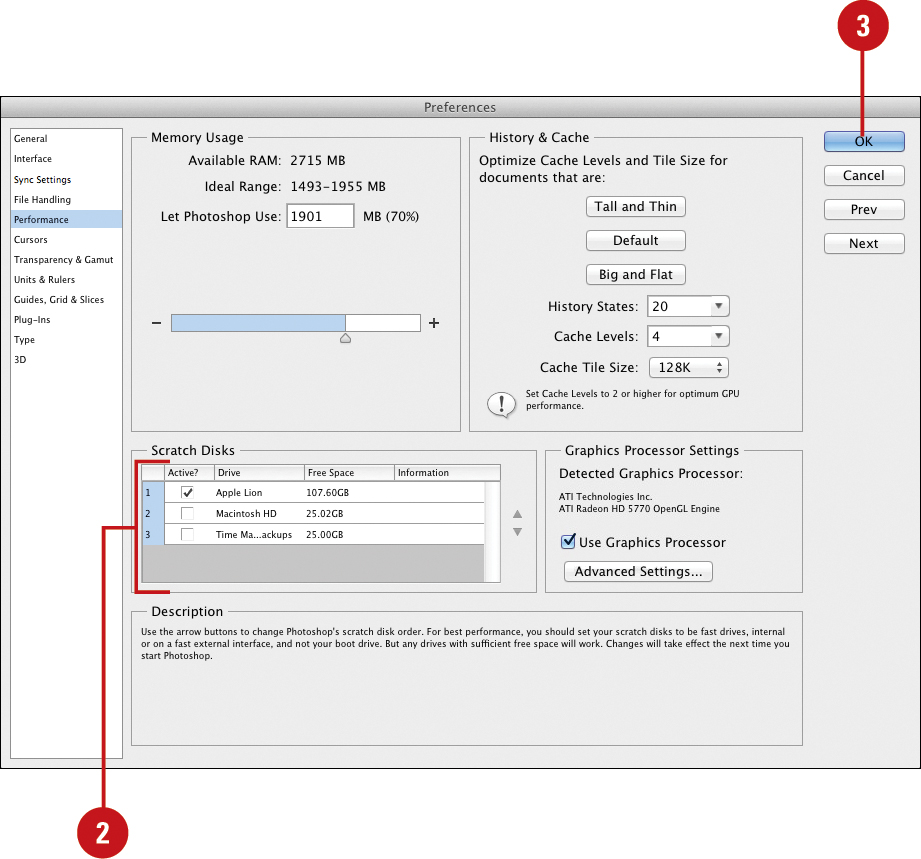
Performance preferences are available to help you get the best performance out of your computer by letting you choose one or more hard drives for scratch operations. When your computer doesn’t have enough RAM to perform an operation, Photoshop uses free space on any available drive, known as a Scratch Disk. Photoshop runs faster when you divide the Scratch Disk workload. Scratch operations are performed on your hard drive and take place when Photoshop is using one of its many filters and adjustments. Photoshop detects and displays all available disks in the Performance preferences dialog box, where you can select the disks you want to use. By assigning additional hard drives to the task, you speed up Photoshop’s overall performance. Scratch Disk changes take effect the next time you start Photoshop.
Work with Scratch Disks Options
![]() Click the Edit (Win) or Photoshop (Mac) menu, point to Preferences, and then click Performance.
Click the Edit (Win) or Photoshop (Mac) menu, point to Preferences, and then click Performance.
![]() Select the check box next to the scratch disk you want to use or clear the check box to remove it.
Select the check box next to the scratch disk you want to use or clear the check box to remove it.
Important
Photoshop holds scratch disk space as long as the application is open. To delete scratch disk space you must close Photoshop.
![]() Click OK.
Click OK.
Allocating Memory & Image Cache
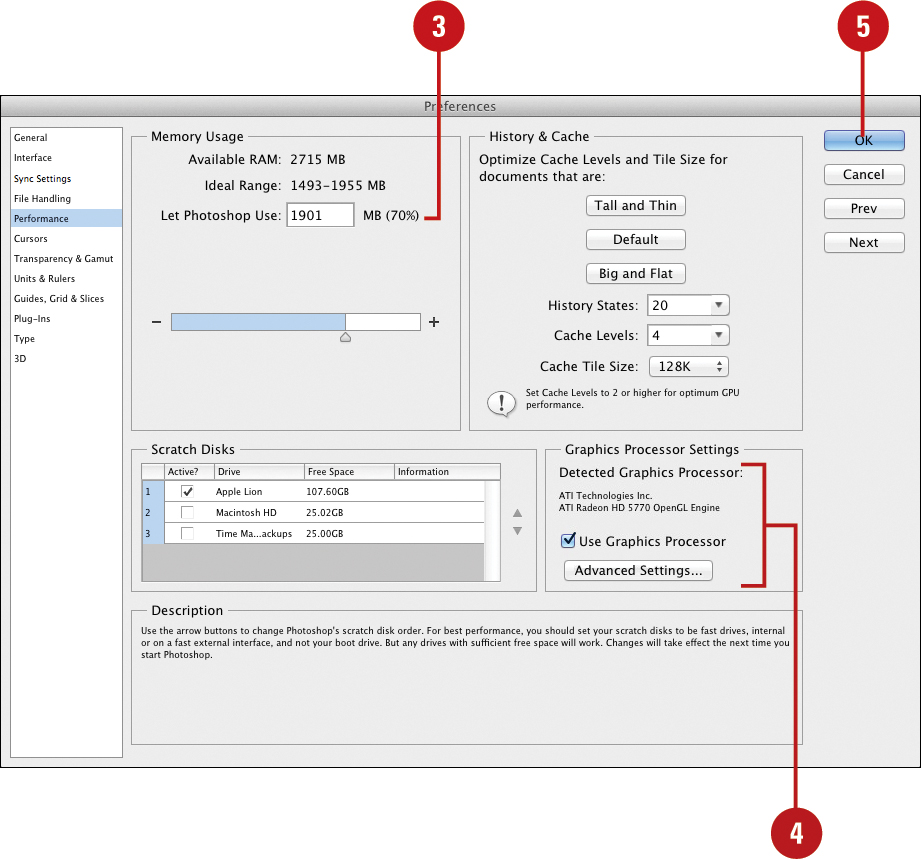
Memory Usage and History & Cache preferences give you control over how much RAM is assigned to Photoshop, and how much memory is allocated to screen redraws (Image Cache). Photoshop, being a high-performance application, requires a fairly large amount of RAM. Photoshop uses many operations that affect RAM: History States, Undo, Clipboard, and Cache. Cache Levels are screen redraws, or how many versions of the current active document Photoshop saves. When you’re working on large documents, more Cache Levels help speed up the redraw function, and make image manipulation proceed faster. However, they are held primarily in RAM, so the more Cache Levels you choose, the less RAM is available for other Photoshop functions. Cache Tiles are the amount of data Photoshop stores or processes at once; use a larger tile size for larger documents to speed up processing. If you’re not sure what to set, use one of the preset buttons. By fine-tuning Photoshop’s engine, you increase its overall speed, and you’ll get more design miles to the gallon.
Allocate Memory & Image Cache Options
![]() Click the Edit (Win) or Photoshop (Mac) menu, point to Preferences, and then click Performance.
Click the Edit (Win) or Photoshop (Mac) menu, point to Preferences, and then click Performance.
![]() Select the History & Cache options you want to use:
Select the History & Cache options you want to use:
♦ Optimize. Click a button to use a preset cache level.
♦ Tall and Thin. Use for small documents and many layers (dozens to hundreds).
♦ Default. Use for general use.
♦ Big and Flat. Use for large documents (hundreds of megapixels) with few layers.
♦ History States. Enter the amount of History States steps you want to keep as undos; you can enter up to 1,000. The more History States used, the more RAM is required, which impacts performance.
♦ Cache Levels. Select a number from 1 to 8. Set to 2 or more for optimum GPU performance.
♦ Cache Title Size. Specify a size for the amount of data Photoshop stores or processes at once. Use a large amount for large documents to maintain a good processing speed.

![]() Enter the percentage of RAM used in the Let Photoshop Use box.
Enter the percentage of RAM used in the Let Photoshop Use box.
Photoshop needs about 5 times the size of the open document of unused RAM to operate efficiently.
Important
Never select upwards of 100% Memory Usage for Photoshop, leaving little for the operating system or any other open programs. Any changes made for allocating memory and image caching will take place the next time you start Photoshop.
![]() If you have a video card installed, the video card name appears. Select the Use Graphics Processor check box (which uses OpenGL) to use the enhanced speed and smoothness of graphic/3D rendering and navigation. Click Advanced Settings to select additional options:
If you have a video card installed, the video card name appears. Select the Use Graphics Processor check box (which uses OpenGL) to use the enhanced speed and smoothness of graphic/3D rendering and navigation. Click Advanced Settings to select additional options:
♦ Drawing Mode. Select a mode (Basic, Normal, or Advanced) to use different amounts of memory processing.
♦ Use Graphics Processor to Accelerate Computation. Select to access available GPU power to speed up computation.
♦ Use OpenCL. Select to access available parallel processing power; uses the GPU to accelerate filter performance.
♦ Anti-alias Guides and Paths. Select to enable anti-alias smoothing for better display with GPU hardware.
![]() Click OK.
Click OK.
Setting Type Preferences
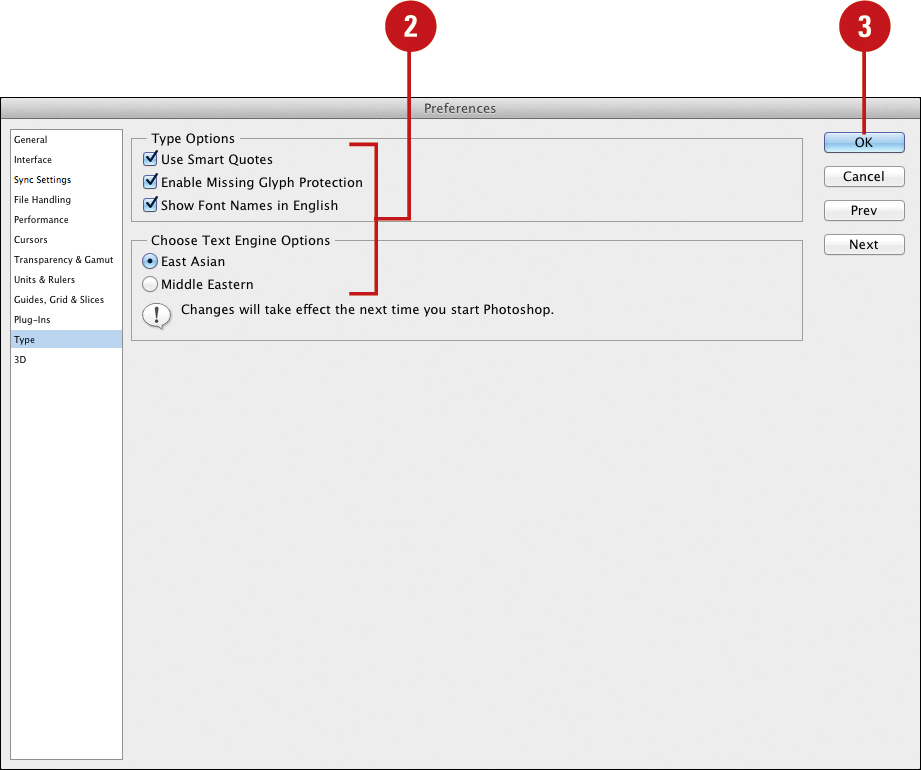
Although Photoshop is not by definition a typesetting application, such as Adobe InDesign, it does have some very powerful type features. For example, Adobe Photoshop allows you to output PostScript text to a printer with a PostScript option. This way you will not need to place Photoshop images into type-intensive applications, such as InDesign or Illustrator, just to create a few lines of text. In addition, Photoshop’s type menu lets you see fonts exactly as they will print or display. For designers who use a lot of fonts, this WYSIWYG (What You See Is What You Get) font menu is a timesaver. You can use Type preferences to help you select the type and font options you want to use.
Work with Type Options
![]() Click the Edit (Win) or Photoshop (Mac) menu, point to Preferences, and then click Type.
Click the Edit (Win) or Photoshop (Mac) menu, point to Preferences, and then click Type.
![]() Select the Type options you want to use:
Select the Type options you want to use:
♦ Use Smart Quotes. Select to use left and right quotation marks.
♦ Enable Missing Glyph Protection. Select to automatically select incorrect, unreadable characters between roman and non-roman (Japanese or Cyrillic) fonts.
♦ Show Font Names In English. Select to display non-roman fonts using their roman names.
♦ Choose Text Engine Options. Select to display East Asian or Middle Eastern.
![]() Click OK.
Click OK.
Important
Photoshop uses PostScript measuring systems to size fonts. Therefore a 72-point font will print 1 inch tall. This lets you know how big the fonts will appear when output to print.
Managing Libraries with the Preset Manager
The Preset Manager gives you one place to manage brushes, swatches, gradients, styles, patterns, contours, custom shapes, and preset tools. The Preset Manager can be used to change the current set of preset items and create new libraries of customized sets. Once a library is loaded in the Preset Manager, you can access the library’s items in all locations where the preset is available. Changes made in the Preset Manager are global and are applied every time you open Photoshop. When you save a new preset, the name appears in the dialog box for the specific option you selected. You can also migrate presets from earlier versions as well as import/export presets.
Create a New Preset
![]() Click the Edit menu, point to Presets, and then click Preset Manager.
Click the Edit menu, point to Presets, and then click Preset Manager.
♦ To migrate presets from earlier Photoshop CS versions, click the Edit menu, point to Presets, and then click Migrate Presets.
![]() Click the Preset Type list arrow, and then select the options.
Click the Preset Type list arrow, and then select the options.
![]() Click the Options list arrow, and then select from the available presets to add them to the current item list.
Click the Options list arrow, and then select from the available presets to add them to the current item list.
![]() To remove any items in a new preset, click a thumbnail, and then click Delete.
To remove any items in a new preset, click a thumbnail, and then click Delete.
![]() To reorganize their order, click and drag the thumbnails to new positions within the view window.
To reorganize their order, click and drag the thumbnails to new positions within the view window.
![]() To change a preset name, click a thumbnail, click Rename, change the name, and then click OK.
To change a preset name, click a thumbnail, click Rename, change the name, and then click OK.
![]() Click one or more thumbnails (Ctrl+click (Win) or
Click one or more thumbnails (Ctrl+click (Win) or ![]() +click (Mac), and then click Save Set.
+click (Mac), and then click Save Set.

![]() Enter a new set name, and then select a location to store the set.
Enter a new set name, and then select a location to store the set.
The set is saved with the ABR extension.
![]() Click Save, and then click Done.
Click Save, and then click Done.
Using and Customizing Workspaces
The Photoshop workspace consists of a document surrounded by an Application frame (Mac only), Options bar, toolbox, and over 20 floating panels. Depending on how you work, your workspace may reflect any combination of the above. For example, when you work with text, you would need the Character and Paragraph panels, but you might not need the Styles or Histogram panel. Rather than making you redesign your workspace every time you begin a new project, Photoshop gives you ways to use predefined workspaces or create your own customized workspaces. Photoshop includes predefined workspaces including Essentials (Default), What’s New, 3D, Motion, Painting, Photography, and Typography. If you’re curious about all the new features in Photoshop CC, you can choose a drop-down menu system with all the new features highlighted. You can access workspaces by using the Workspaces menu on the right side of the Options bar or the Workspace submenu on the Window menu. When you create or change a workspace, Photoshop auto-saves any changes (even if you exit Photoshop) until you reset it.
Display a Workspace
![]() Click the Workspaces menu on the Options bar, or click the Window menu, and then point to Workspace.
Click the Workspaces menu on the Options bar, or click the Window menu, and then point to Workspace.
![]() Select a panel option:
Select a panel option:
♦ Custom panel name. Displays a custom panel layout that you created.
♦ Essentials (Default), What’s New, 3D, Motion, Painting, Photography, or Typography. Displays panel layouts created by Adobe for specific purposes in Photoshop.


Did You Know?
You can reset a workspace. You can reset a workspace to its original configurations. Select the workspace, click the Workspace menu or click the Window menu, point to Workspace, and then click Reset workspace name.
![]() Click the Workspaces menu on the Options bar, or click the Window menu, and then point to Workspace.
Click the Workspaces menu on the Options bar, or click the Window menu, and then point to Workspace.
![]() Type a name for the workspace.
Type a name for the workspace.
![]() Select check boxes to save Keyboard Shortcuts or Menus.
Select check boxes to save Keyboard Shortcuts or Menus.
![]() Click Save.
Click Save.

Delete a Customized Workspace
![]() Click the Workspaces menu on the Options bar, or click the Window menu, and then point to Workspace.
Click the Workspaces menu on the Options bar, or click the Window menu, and then point to Workspace.
![]() Click the Workspace list arrow, and then click the workspace you want to delete, or click All Custom Workspaces.
Click the Workspace list arrow, and then click the workspace you want to delete, or click All Custom Workspaces.
♦ You cannot delete the current workspace. You must switch to another workspace first.
![]() Click Delete, and then click Yes to confirm the deletion.
Click Delete, and then click Yes to confirm the deletion.

See Also
See “Setting Interface Preferences” on page 62 for more information on resetting all Photoshop panels back to their original settings.
Building Specialized Workspaces
If you want to build a specialized workspace with custom panels in Photoshop, you can use the Adobe Configurator panel utility. The external program is available as a separate download from Adobe at www.labs.adobe.com. With Configurator, you can drag and drop tools, menu items, scripts, actions, and other objects into a panel to build a specialized workspace design. In addition, you can access anything on the web, such as blogs, videos, or e-mail, with these specialized designs that leverage built-in Flash support. When you’re done creating a design, you can export it for use in Photoshop or InDesign.
Build a Specialized Workspace with Configurator
![]() Start Adobe Configurator 3.0 or later from the Start menu or screen (Win) or the Applications folder (Mac).
Start Adobe Configurator 3.0 or later from the Start menu or screen (Win) or the Applications folder (Mac).
![]() Click the File menu, and then click New Panel.
Click the File menu, and then click New Panel.
![]() Click the Select Product list arrow, and then click Photoshop CC or InDesign CC.
Click the Select Product list arrow, and then click Photoshop CC or InDesign CC.
![]() Click OK.
Click OK.

![]() Use the controls on the right to enter a panel name, and customize the layout and functionality.
Use the controls on the right to enter a panel name, and customize the layout and functionality.
![]() Drag the items you want to add to your panel from the left pane to the new panel.
Drag the items you want to add to your panel from the left pane to the new panel.
![]() To save the panel file (GPC), click the File menu, and then click Save Panel As. Enter a name, specify a location, and then click Save.
To save the panel file (GPC), click the File menu, and then click Save Panel As. Enter a name, specify a location, and then click Save.

![]() Click the File menu, and then click Export. Specify the location of the Plug-In Panels folder (the default), click Select, and then click OK.
Click the File menu, and then click Export. Specify the location of the Plug-In Panels folder (the default), click Select, and then click OK.
![]() Click the File menu, and then click Exit.
Click the File menu, and then click Exit.
![]() In Photoshop or InDesign, click the Window menu, point to Extensions, and then select your new panel. Restart Photoshop or InDesign after exporting your panel for the first time.
In Photoshop or InDesign, click the Window menu, point to Extensions, and then select your new panel. Restart Photoshop or InDesign after exporting your panel for the first time.
Creating a Customized User Interface
Photoshop’s pull-down menus actually contain hundreds of options (yes, I did say hundreds). If you find navigating through menus a hassle, then Adobe has the answer to your problem with a customizable user interface. In Photoshop, you have the ability to choose what menu items appear on the pull-down menus and you can even colorize certain menu items for easier visibility. If you no longer want to use a customized set, you can delete it and restore Photoshop back to the default.
Create and Work with a Customized User Interface
![]() Click the Window menu, point to Workspace, and then click Keyboard Shortcuts & Menus.
Click the Window menu, point to Workspace, and then click Keyboard Shortcuts & Menus.
![]() Click the Menus tab.
Click the Menus tab.
![]() To create a new set based on the current active set, click the Create a New Set button, enter a name, and then click Save.
To create a new set based on the current active set, click the Create a New Set button, enter a name, and then click Save.
![]() Click the Set list arrow, and then select a listing of modified User Interfaces.
Click the Set list arrow, and then select a listing of modified User Interfaces.
♦ Delete Set. Select the set, and then click the Delete button.
♦ Restore Original Set. Select the Photoshop Default set.
![]() Click the Menu For list arrow, and then click Application Menus or Panel Menus with the items you want to modify.
Click the Menu For list arrow, and then click Application Menus or Panel Menus with the items you want to modify.
![]() Click an arrow (left column) to expand the menu that contains the command you want to modify.
Click an arrow (left column) to expand the menu that contains the command you want to modify.
![]() Click the Visibility icon associated with a command to show or hide the command.
Click the Visibility icon associated with a command to show or hide the command.
![]() Click the Color list arrow, and select a color for the selected command.
Click the Color list arrow, and select a color for the selected command.
![]() Click the Save All Changes button to save the new customized User Interface.
Click the Save All Changes button to save the new customized User Interface.
![]() Click OK.
Click OK.

Defining Shortcut Keys
A wise man once wrote “time is money,” and Photoshop is a program that can consume a lot of time. That’s why the Photoshop application uses keyboard shortcuts. Keyboard Shortcuts, as their name implies, let you perform tasks in a shorter period of time. For example, if you want to open a new document in Photoshop, you can click the File menu, and then click New, or you can abandon the mouse and press Ctrl+N (Win) or ![]() +N (Mac) to use shortcut keys. Using shortcut keys reduces the use of the mouse and speeds up operations. In fact, a recent study in the American Medical Journal suggested that the use of shortcut keys significantly cuts down on repetitive stress, and reduces instances of carpal tunnel syndrome. Photoshop raises the bar by not only giving you hundreds of possible shortcut keys, but also actually allowing you to define your own shortcuts.
+N (Mac) to use shortcut keys. Using shortcut keys reduces the use of the mouse and speeds up operations. In fact, a recent study in the American Medical Journal suggested that the use of shortcut keys significantly cuts down on repetitive stress, and reduces instances of carpal tunnel syndrome. Photoshop raises the bar by not only giving you hundreds of possible shortcut keys, but also actually allowing you to define your own shortcuts.
Create a Keyboard Shortcut
![]() Click the Edit menu, and then click Keyboard Shortcuts.
Click the Edit menu, and then click Keyboard Shortcuts.
![]() Click an arrow (left column) to expand the menu that contains the command for which you want to create a shortcut.
Click an arrow (left column) to expand the menu that contains the command for which you want to create a shortcut.
![]() Select an item from the Commands list.
Select an item from the Commands list.
![]() Use the keyboard to create the new shortcut. For example, press Ctrl+N (Win) or
Use the keyboard to create the new shortcut. For example, press Ctrl+N (Win) or ![]() +N (Mac).
+N (Mac).
![]() Click Accept.
Click Accept.
![]() Click OK.
Click OK.

Did You Know?
You can save time using shortcut keys. According to several time and motion studies, using shortcut keys can actually save a computer user 1 hour out of every 8 in a work day.
