
17. Working with Automate Commands
What You’ll Do
Work with Batch File Processing
Work with Conditional Mode Change
Convert a Multi-Page PDF to PSD
Introduction
It’s great when you hear about new tips and tricks that will save time. But it’s never a good policy to shave time if it means sacrificing quality. Adobe Photoshop has come to the rescue with some great time-savers that will help you. The Automate commands give you the ability to streamline your workflow, and make short work of repetitive tasks.
Think of an automation as a batch of actions all rolled up into one powerful command. In the busy world of graphic design, with all the image processing you need to do on a daily basis, Photoshop’s Automate commands give you the ability to deliver consistent results, over and over again, with the click of a button.
The Automate commands let you process—through batch file processing—hundreds of image files with the click of a button. In addition, you can use commands to crop and straighten photos, resize photos, and merge photos together to create a panoramic or HDR (High Dynamic Range) Pro image. Photoshop also gives you the ability to convert a multi-page PDF file into a Photoshop document.
In addition to using the automation commands in Photoshop, you can also use them in Adobe Bridge. The Tools menu in Bridge contains commands available with different Adobe Creative Suite programs, such as Photoshop or Illustrator. The Photoshop automation commands appear under the Photoshop submenu in Bridge’s Tools menu.
Working with Batch File Processing
There is nothing more exciting than working on a new creative project, and watching your designs come to life. Conversely, there is nothing more tiresome than having to apply a new creative concept or correction individually to 50 separate images. For example, you just spent three hours coming up with a procedure to color-correct an heirloom photograph, and the process took two filters and three adjustments. The photo looks great; however, you now have 50 other images with the exact problem. You could create an action, but you would still have to open each image and apply the action 50 times. The solution is to batch process the images after you have created the action. Batch file processing lets you apply an action to an entire folder of images, and all you have to do is click a button. Now, what could be simpler than that?
Work with Batch File Processing
![]() Create a new folder, and then move all the images into the folder.
Create a new folder, and then move all the images into the folder.
Important
These files must be image files. There should not be any other files, such as text files, inside this folder.
![]() Create a second folder to hold the modified images (optional).
Create a second folder to hold the modified images (optional).
![]() Open Photoshop (you do not need to open a document).
Open Photoshop (you do not need to open a document).
![]() Click the File menu, point to Automate, and then click Batch.
Click the File menu, point to Automate, and then click Batch.
![]() Select from the following Play options:
Select from the following Play options:
♦ Click the Set list arrow, and then select the Set containing the Action you want to apply to the images.
♦ Click the Action list arrow, and then select the correct Action.
![]() Click the Source list arrow, and then select an image source from the following: Folder, Import, Opened Files, or Bridge.
Click the Source list arrow, and then select an image source from the following: Folder, Import, Opened Files, or Bridge.

![]() Click Choose (available if Folder is selected as the source), and then select the location of the image folder.
Click Choose (available if Folder is selected as the source), and then select the location of the image folder.
![]() Select the check boxes for any options you want:
Select the check boxes for any options you want:
♦ Override Action “Open” Commands. Select to use an open command embedded into the Action.
♦ Include All Subfolders. Select to batch process any images located in folders embedded in the main image folder.
♦ Suppress File Open Options Dialogs. Select to disable the File Open dialog box.
♦ Suppress Color Profile Warnings. Select to disable the Color Profile Mismatch dialog box.
![]() Click the Destination list arrow, and then click None, Save and Close, or Folder.
Click the Destination list arrow, and then click None, Save and Close, or Folder.
![]() Click Choose (available if Folder is selected as the source), and then select the destination of the modified images.
Click Choose (available if Folder is selected as the source), and then select the destination of the modified images.
![]() Select the Override Action “Save As” Commands check box to use a save command embedded into the Action.
Select the Override Action “Save As” Commands check box to use a save command embedded into the Action.
![]() If Folder is selected as destination, the File Naming options allow you to rename the modified files, and then select the Compatibility options you want: Windows, Mac OS or Unix, or any combination of the three.
If Folder is selected as destination, the File Naming options allow you to rename the modified files, and then select the Compatibility options you want: Windows, Mac OS or Unix, or any combination of the three.
![]() Click the Errors list arrow, select an errors option, and then click Save As to save your error information, if necessary.
Click the Errors list arrow, select an errors option, and then click Save As to save your error information, if necessary.
![]() Click OK.
Click OK.

Working with Conditional Mode Change
The Conditional Mode Change command lets you specify the conditions for changing the mode of an image in an action. When you create an action that changes modes, it can cause a problem when you run the action. For example, you create an action and one of the commands is to convert the image from RGB to Grayscale. Running the action on a file that is not RGB will cause an error. But, what if you want to use the same action to convert a CMYK image to Grayscale? You can if you make the mode change within the action using Conditional Mode Change. Using this option guarantees that you will never have a problem using an action to change the mode of an image.
Work with Conditional Mode Change
![]() Open a document.
Open a document.
![]() Start recording an Action.
Start recording an Action.
Important
To make a conditional mode change, you must have a document open and an available Action to change.
![]() Click the File menu, point to Automate, and then click Conditional Mode Change.
Click the File menu, point to Automate, and then click Conditional Mode Change.
![]() Select the check boxes with the possible modes for the source image; you can click All.
Select the check boxes with the possible modes for the source image; you can click All.
![]() Click the Mode list arrow, and then select the target mode to which you want the image converted.
Click the Mode list arrow, and then select the target mode to which you want the image converted.
![]() Click OK.
Click OK.

![]() Add any additional commands to the action.
Add any additional commands to the action.
![]() Click the Stop Recording button, and then save the action.
Click the Stop Recording button, and then save the action.
See Also
See “Building a New Action” and “Recording an Action” on page 396 for information on action recording.
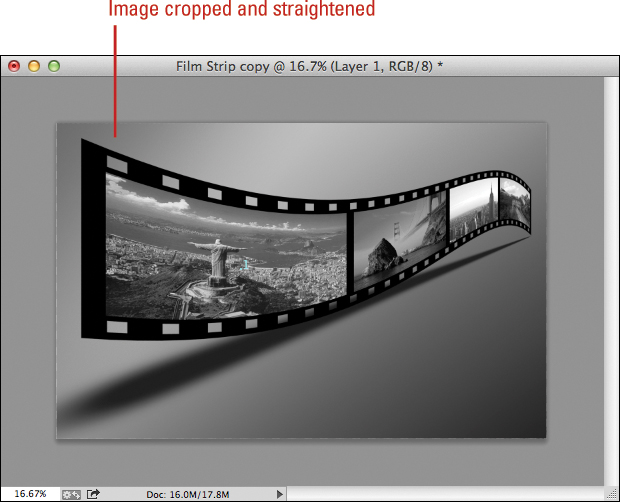
Cropping and Straightening Photos
The Crop and Straighten Photos command is a nifty way to quickly straighten multiple scanned images or make separate image files out of one image. For example, you have a photograph of two people standing side-by-side, and you want a separate image of each person. Or you have several scanned images that weren’t quite straight on the platen. The Crop and Straighten Photos command works best when the images in the document are separated by some white space. When you apply the command to an image, it looks for areas to divide based on shifts in color; no selection is required.
Crop and Straighten Photos
![]() Open a document.
Open a document.

![]() Click the File menu, point to Automate, and then click Crop and Straighten Photos.
Click the File menu, point to Automate, and then click Crop and Straighten Photos.
Photoshop automatically creates separate images from the available image information in the active document, and then places the images into individual files.
Did You Know?
You can control the Crop and Straighten Photos command through selection. Use the Rectangular Marquee tool to select a portion of the image before using the Crop and Straighten Photos command, and then Photoshop will work only within the selection.
See Also
See “Using the Crop Tool” on page 104 and see “Using the Perspective Crop Tool” on page 106 for more information on cropping images.
Converting a Multi-Page PDF to PSD
Photoshop’s list of automation features is impressive, and it gets longer and better with each new version of the program. One of the features that will come in handy is the ability to convert a multi-page PDF directly into multiple Photoshop image files. For example, you have this great Adobe PDF document that contains images you want to use in a Photoshop design. The PDF format is a versatile file format that can contain both vector and bitmap data, as well as electronic document search and navigation features. Some PDF files contain a single image, while other PDF files contain multiple pages and images. When you open a PDF file, you can choose which pages to open, as well as specify a specific rasterization process (how to convert the image from vector to raster). Although Adobe moved this process from the Automation panel to the Open dialog box, it still rates a spot in automation.
Convert a Multi-Page PDF to PSD
![]() Open Photoshop (it is not necessary to open a document).
Open Photoshop (it is not necessary to open a document).
![]() Click the File menu, and then click Open.
Click the File menu, and then click Open.
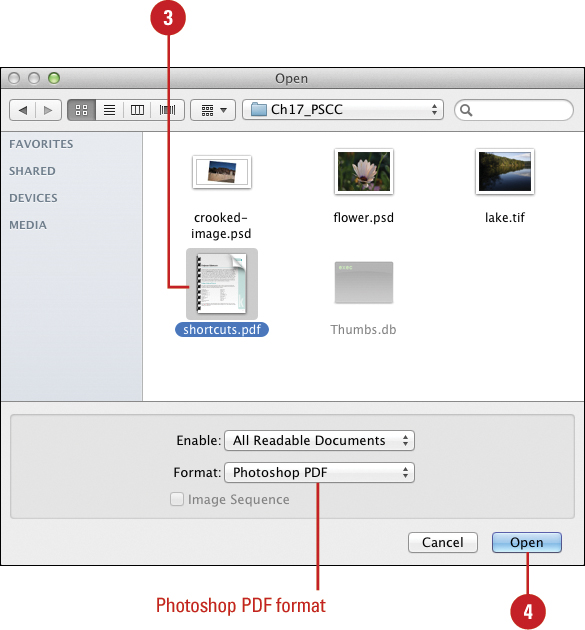
![]() Select a document in the Photoshop PDF format.
Select a document in the Photoshop PDF format.
![]() Click Open.
Click Open.
![]() Click the Pages or Images option to display PDF pages or images extracted from the PDF pages.
Click the Pages or Images option to display PDF pages or images extracted from the PDF pages.
![]() Select from the following Page Options:
Select from the following Page Options:
♦ Name. Enter a name for the new document.
♦ Crop To. Click the list arrow, and then select from the various cropping options.
♦ Anti-aliased. Select the check box to use anti-aliasing smoothing techniques during the conversion.
♦ Width and Height. Specify the width and height for the image size in the measurement system you want. Select the Constrain Proportions check box to maintain proportions.
♦ Resolution. Choose a resolution for Photoshop to use when it rasterizes the PDF document.
♦ Mode. Click the list arrow, and then select a color mode for the output document.
♦ Bit Depth. Click the list arrow, and then select 8- or 16-bit color depth.
![]() Select the Suppress Warnings check box to prevent the operation from stopping on alert dialog boxes.
Select the Suppress Warnings check box to prevent the operation from stopping on alert dialog boxes.
![]() Shift+click to select contiguous pages, or Ctrl+click (Win) or
Shift+click to select contiguous pages, or Ctrl+click (Win) or ![]() +click (Mac) to select separate pages.
+click (Mac) to select separate pages.
![]() Click OK.
Click OK.
Photoshop creates separate PSD files from each specified page within the PDF document, and places the text and/or images on a transparent layer.

Did You Know?
You can convert Photoshop images into PDF documents. Photoshop gives you the option to save the document in the Photoshop PDF file format. Photoshop documents saved as PDF files preserve shape information as vector data, and you have the option of preserving type layers.
Creating a PDF Document
The PDF (Portable Document Format) format from Adobe lets you create individual documents that can be opened by literally any computer or operating system using Adobe Acrobat Reader (free at www.adobe.com). Photoshop recognizes two types of PDF files: Generic PDF (multiple pages and images) and Photoshop PDF (single image only). If you need to create specialized PDFs, you can create your own PDF presets to make the job easier. Adobe provides standard presets to make PDF creation quick and easy, and you can even create your own customized presets.
Create a PDF Document
![]() Click the File menu, and then click Save As.
Click the File menu, and then click Save As.
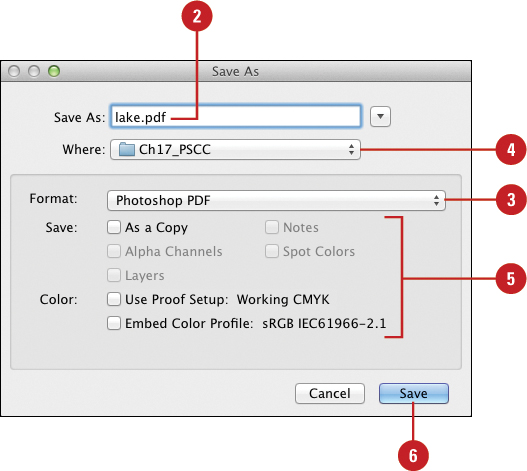
![]() Enter a name for the file in the File Name (Win) or Save As (Mac) box.
Enter a name for the file in the File Name (Win) or Save As (Mac) box.
![]() Click the Format list arrow, and then click Photoshop PDF.
Click the Format list arrow, and then click Photoshop PDF.
![]() Click the Save In (Win) or Where (Mac) list arrow, and then choose where to store the image.
Click the Save In (Win) or Where (Mac) list arrow, and then choose where to store the image.
![]() Select the save and color options that you want.
Select the save and color options that you want.
![]() Click Save.
Click Save.
![]() Select from the general options:
Select from the general options:
♦ Adobe PDF Preset. Select from predefined compression options (Smallest File Size, recommended).
♦ Standard. Select from various PDF standards with which the file should be compliant (None, recommended).
See Also
See “Saving a Document” on page 28 for information on the save options in the Save As dialog box.
♦ Compatibility. Select a version of the PDF reader application with which the file should to be compatible (5.0, recommended).
♦ Description. Enter a new description, if desired.
![]() Select from the other PDF options:
Select from the other PDF options:
♦ Preserve Photoshop Editing Capabilities. Disabled for PDF presentations.
♦ Embed Page Thumbnails. Check to add thumbnails to the presentation (optional; creates larger files).
♦ Optimize For Fast Web Preview. Check to optimize for viewing on the Web (recommended).
♦ View PDF After Saving. Check to view the presentation after it’s created.
![]() Click Compression to modify compression values (typically not required), Output to set color management and PDF/X (for prepress) options, Security to set passwords and print options, and Summary to review your settings.
Click Compression to modify compression values (typically not required), Output to set color management and PDF/X (for prepress) options, Security to set passwords and print options, and Summary to review your settings.
![]() To create your own presets, click Save Preset, enter a name, and then click Save.
To create your own presets, click Save Preset, enter a name, and then click Save.
♦ You can access the Adobe PDF Presets dialog box from the Edit menu. Click the Edit menu, and then click Adobe PDF Presets.
![]() Click Save PDF to save your PDF document.
Click Save PDF to save your PDF document.

Creating a Contact Sheet
Part of any photographer’s bag of tools is the ability to look at thumbnails from a particular shoot to quickly assess the contents. Due to popular demand, Contact Sheet II is back in Photoshop and it’s time for a refresher course! Photoshop’s Contact Sheet II provides you with a way to view multiple images in a contact sheet format. Traditional photographers used to create contact sheets in the darkroom by placing a group of negatives on a piece of light-sensitive photographic paper, laying a piece of glass over the top, and exposing the glass and negative paper sandwich to light. After processing, you had a contact sheet with thumbnails of your images. Now with Photoshop, you can create your contact sheet without the darkroom requirements.
Create a Contact Sheet
![]() Create a folder, and then move in the images you want to create a contact sheet for into the folder.
Create a folder, and then move in the images you want to create a contact sheet for into the folder.
![]() Open Photoshop (it is not necessary to open a document).
Open Photoshop (it is not necessary to open a document).
♦ Mini Bridge. You can also use the Mini Bridge to open the files you want to use beforehand.
![]() Click the File menu, point to Automate, and then click Contact Sheet II.
Click the File menu, point to Automate, and then click Contact Sheet II.
![]() Click the Use list arrow, and then select a source option: Files, Folder, or Open Documents.
Click the Use list arrow, and then select a source option: Files, Folder, or Open Documents.
![]() Click Choose, select the folder containing the images (available only if Folder is selected) for your source images, and then click Open.
Click Choose, select the folder containing the images (available only if Folder is selected) for your source images, and then click Open.
![]() Select the Include Subfolders check box to add images from folders embedded into the original source folder.
Select the Include Subfolders check box to add images from folders embedded into the original source folder.
![]() To group images, select the Group Images by Folder check box.
To group images, select the Group Images by Folder check box.

![]() Select from the Document options:
Select from the Document options:
♦ Units. Click the list arrow, and then select a measurement system for the output paper document.
♦ Width/Height. Enter a width and height for the contact sheet.
♦ Resolution. Enter a resolution for the output document.
♦ Mode. Click the list arrow, and then select a color mode for the output document.
♦ Bit Depth. Click the list arrow, and then select a color bit depth for the images, either 8-bit or 16-bit.
♦ Color Profile. Click the list arrow, and then select a color profile for the images.
♦ Flatten All Layers. Select to create a contact sheet as a composite (flattened) image. Leave unchecked to place the images in a separate layer.
![]() Select from the Thumbnail options:
Select from the Thumbnail options:
♦ Place. Click the list arrow, and then select an option to determine whether the contact images run top-to-bottom or left-to-right.
♦ Use Auto-Spacing. Check to let Photoshop control the placing of the images on the page.
♦ Columns/Rows. Enter a value for rows and columns.
♦ Rotate For Best Fit. Check to let Photoshop rotate images for best placement on the page.
![]() Select the Use Filename As Caption check box to use as the caption for the thumbnail, and then set the font type and size for the caption (recommended).
Select the Use Filename As Caption check box to use as the caption for the thumbnail, and then set the font type and size for the caption (recommended).
![]() Click OK.
Click OK.
♦ To cancel the image processing, press ESC.


Creating Panoramic Images
Ever wanted to create a panoramic photograph? Panoramas are those great-looking images that incorporate a wide view into one photograph. For example, you want to create a single photograph of a big lake, but the lens on your camera doesn’t go that wide. So you start at the left of the lake, and take a photo. Then you move slightly to the right and take another photo, and another, until you have reached the far right side of the lake. So, now you have four or five separate images of a lake, and you want to stitch them together into a single panoramic view. If you have Photoshop, you have what you need to make it happen.
Create Panoramic Images Using Photomerge
![]() Click the File menu, point to Automate, and then click Photomerge.
Click the File menu, point to Automate, and then click Photomerge.
![]() Click the Use list arrow, and then select from the following options:
Click the Use list arrow, and then select from the following options:
♦ Files. Click the Browse button, and then select the images.
♦ Folder. Click the Browse button, and then select the folder containing all the images.
![]() To quickly add currently opened files to the list, click Add Open Files.
To quickly add currently opened files to the list, click Add Open Files.
![]() To remove any images from the list, click the file name, and then click Remove.
To remove any images from the list, click the file name, and then click Remove.
![]() Click one of the layout options:
Click one of the layout options:
♦ Auto. Analyzes the images and uses the Perspective, Spherical, or Cylindrical layout.
♦ Perspective. Creates a stretched or skewed effect on the side images.
♦ Cylindrical. Creates a bow-tie effect like an unfolded cylinder.
♦ Spherical. Aligns the layers as if mapped inside a sphere. Great for images that cover 360 degrees.
♦ Collage. Matches overlapping content and transforms source.
♦ Reposition. Aligns the layers and matches overlapping content without transforming source.
![]() Select the Blend Images Together check box to create seams between the image borders and match the image color. Clear the checked box to apply a simple rectangular blend to the images.
Select the Blend Images Together check box to create seams between the image borders and match the image color. Clear the checked box to apply a simple rectangular blend to the images.
♦ Vignette Removal. To compensate for darkened corners, usually when using wide-angle lenses.
♦ Geometric Distortion Correction. Allows Photoshop to fix problems caused by wide-angle and fisheye lenses.
![]() Click OK.
Click OK.
Photoshop merges the images into a single, panoramic document file.


Did You Know?
You can use the following hints for the best results with Photomerge. For the best results, use the following rules of thumb when you take pictures. Overlap images by approximately 25% to 40%, don’t change the zoom distance, keep the camera level, stay in the same position, maintain the same exposure, and avoid using distortion lenses.
You can start the Photomerge command from Bridge. In Adobe Bridge, select the images you want, click the Tools menu, point to Photoshop, and then click Photomerge.
See Also
See “Using the Adaptive Wide Angle Filter” on page 372 for information on correcting bending in panoramas.
Processing Lens Corrections
If you take a lot of photographs with the same camera and need to correct the same problem, you can use Photoshop’s automated lens correction process to fix them all at once. You can correct flaws that occur during the shooting of images, such as geometric distortion, vignetting, and chromatic aberration. You can select options to have Photoshop select the best correction profile or select one on your own. You can search online or use Adobe Lens Profile Creator (available at www.labs.adobe.com) to create one. If you know how you want to fix a problem, you can also manually select adjust options to correct it.
Process Lens Corrections
![]() Click the File menu, point to Automate, and then click Lens Correction.
Click the File menu, point to Automate, and then click Lens Correction.
![]() Click the Use list arrow, and then select from the following options:
Click the Use list arrow, and then select from the following options:
♦ Files. Click the Browse button, and then select the images.
♦ Folder. Click the Browse button, and then select the folder containing all the images.
![]() To quickly add currently opened files to the list, click Add Open Files.
To quickly add currently opened files to the list, click Add Open Files.
![]() To remove any images from the list, click the file name, and then click Remove.
To remove any images from the list, click the file name, and then click Remove.
![]() Click the File Type list arrow, and then select a file type to save the corrected file: JPG, PNG, PSD, or TIFF.
Click the File Type list arrow, and then select a file type to save the corrected file: JPG, PNG, PSD, or TIFF.
![]() If you want to specify a destination folder, click Choose, select the folder for your destination images, and then click Open.
If you want to specify a destination folder, click Choose, select the folder for your destination images, and then click Open.
♦ If you don’t select a destination folder, the images are saved in the source folder.
![]() Select the Match Best Profile check box to have Photoshop use the best camera/lens profile for the correction.
Select the Match Best Profile check box to have Photoshop use the best camera/lens profile for the correction.
♦ If you deselect the check box, click Choose to select the profile you want to use.

![]() Select from the following Correction options:
Select from the following Correction options:
♦ Geometric Distortion. Select to correct compensation for barrel, pincushion, or fisheye distortion.
♦ Barrel. Straight lines that bow out towards the edges of the image.
♦ Pincushion. Straight lines that bow inward to the edges of the image.
♦ Fisheye. A wide angle lens that covers an angle of about 180 degrees, producing a circular image with outside distortion.
♦ Auto Scale Image. Select to automatically scale the image to remove blank areas of the image cased by corrections.
♦ Chromatic Aberration. Select to correct color fringe along the edges of objects, caused by the lens focusing on different colors of light in different planes.
♦ Edge. Specify how you want to color color fringe along the edges, either Edge Extension, Transparency, Black Color, or White Color.
♦ Vignette. Select to correct any defects that darken the corners of an image due to light fallout around the perimeter of the lens.
![]() Click OK.
Click OK.

Merging Images to HDR Pro
The Merge to HDR Pro command allows you to combine multiple images or different exposures of the same image or scene (i.e., a bracketed exposure). This command takes the best elements of each photograph and combines them to create a single HDR (High Dynamic Range) image with more dynamic range than is possible with a single image, creating 32-bit high-quality digital images. Since several photos will be combined to create a single image, it’s important to place the camera on a tripod (so the camera won’t move between shots), and then take enough photographs (a minimum of 3) at different exposures to capture all the dynamic range of the scene. You can have Photoshop automatically align the merging images and remove any ghosting due to people moving or misalignment during consecutive shots, or you can do it manually. HDR Pro comes with custom presets—such as Flat, Monochromatic, Photorealistic, Saturated, or Surrealistic—to make it easier to set options. HDR Pro includes faster, smoother exposure adjustments. You can even use HDR Pro along with Photomerge—an image stitching feature—for high-quality panoramic images.
Use Merge To HDR Pro
![]() Click the File menu, point to Automate, and then click Merge To HDR Pro.
Click the File menu, point to Automate, and then click Merge To HDR Pro.
![]() Click the Use list arrow, and then select from the following options:
Click the Use list arrow, and then select from the following options:
♦ Files. Click the Browse button, and then select the images.
♦ Folder. Click the Browse button, and then select the folder containing all the images.
![]() To quickly add currently opened files to the list, click Add Open Files.
To quickly add currently opened files to the list, click Add Open Files.
![]() To remove any images from the list, click the file name, and then click Remove.
To remove any images from the list, click the file name, and then click Remove.

Did You Know?
You can start the Merge To HDR command from Bridge. Select the images you want, click the Tools menu, point to Photoshop, and then click Merge To HDR Pro.
![]() Select the Attempt To Automatically Align Source Images check box to let Photoshop try to align the images together.
Select the Attempt To Automatically Align Source Images check box to let Photoshop try to align the images together.
![]() Click OK.
Click OK.

![]() If you did not check the option in step 5, specify any of the following options, and then click OK.
If you did not check the option in step 5, specify any of the following options, and then click OK.
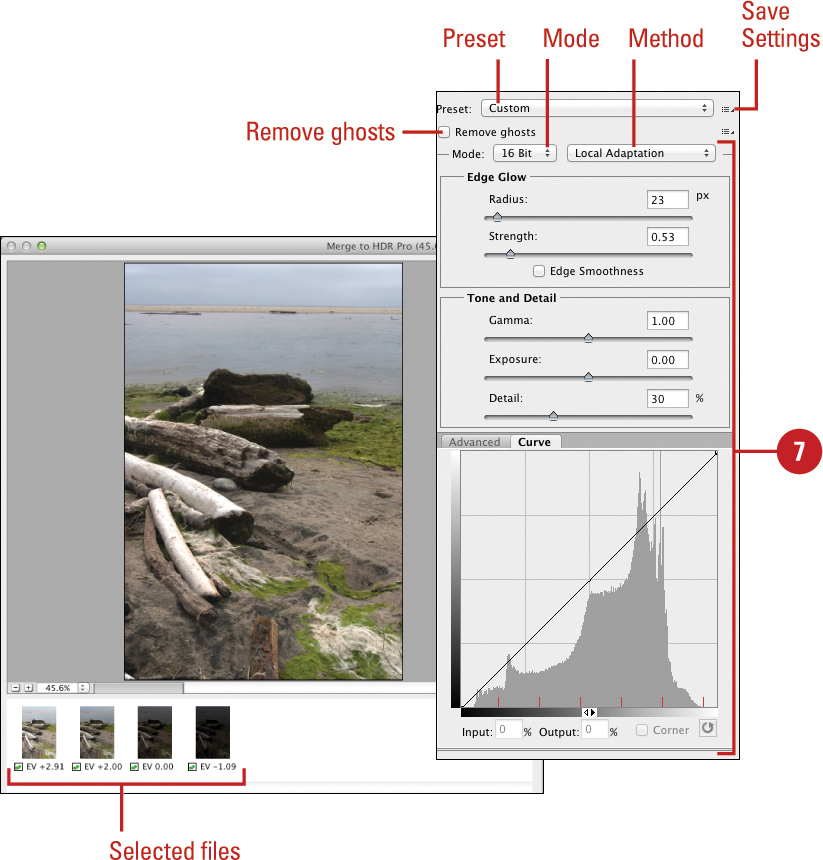
♦ Select Files. Select or clear the check box under each thumbnail to specify which images to use.
♦ Preset. Select a preset, such as Flat, Photorealistic high or low contrast, Monochromatic artistic, and Surrealistic.
♦ Remove Ghosts. Select to remove image ghosts. Ghosts are slight shifts in elements when you take consecutive photos.
♦ Mode. Click the Mode list arrow, and then select a bit depth for the merged image.
♦ Method. Click the Method list arrow, and then select from the available options (vary based on the method):
♦ Exposure. Adjusts the highlight end of the image’s tonal scale.
♦ Gamma. Adjusts the image gamma, using a simple power function. Similar to adjusting the midpoints in an image’s brightness.
♦ Save Settings. Click the Preset Options button, click Save Preset, type a name, and then click Save.
Photoshop attempts to combine the elements of all the images.
Processing Multiple Image Files
The Image Processor command in Photoshop allows you to convert and process multiple files without first creating an action, which is something you need to do with the Batch command. The Image Processor options make it easy to convert a set of files to either JPEG, PSD, or TIFF, or all three formats at the same time. When you take a lot of digital pictures, you can process the raw files all at once using the same options. If you are working on a collage with specific size and color requirements, you can use Image Processor to resize images to specific dimensions and embed a color profile or change the color mode to sRGB (the default working space for most Adobe color settings and the one recommended for web and digital camera images). In addition, you can include copyright metadata into any of the converted images.
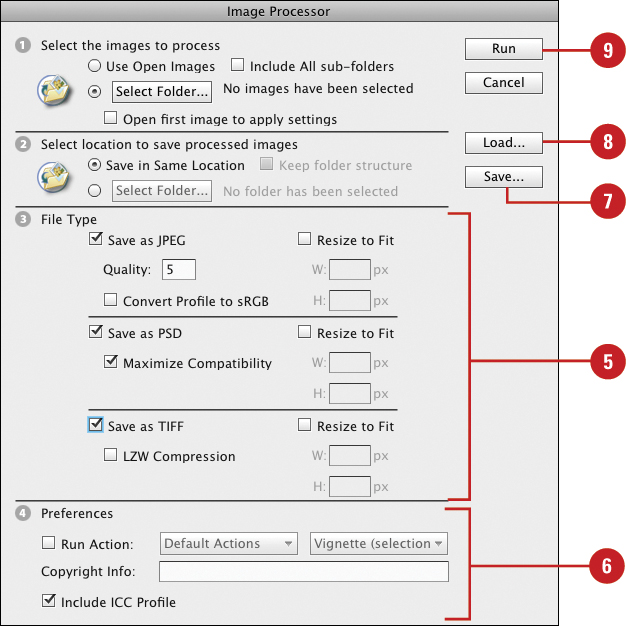
Use the Image Processor Command
![]() Click the File menu, point to Scripts, and then click Image Processor.
Click the File menu, point to Scripts, and then click Image Processor.
![]() Click the Use Open Images option or click Select Folder to select the images or folder to process. You now also have the option to choose to include sub-folders.
Click the Use Open Images option or click Select Folder to select the images or folder to process. You now also have the option to choose to include sub-folders.
![]() Select the Open First Image To Apply Settings check box to apply the same settings to all the images.
Select the Open First Image To Apply Settings check box to apply the same settings to all the images.
This allows you to adjust the settings in the first image, and then apply the same settings to the rest of the images.
![]() Click the Save in Same Location option or click Select Folder to select the location in which to save processed images. You also now have the option to keep the original folder structure when saving.
Click the Save in Same Location option or click Select Folder to select the location in which to save processed images. You also now have the option to keep the original folder structure when saving.
If you process the same file multiple times and save it to the same location, each file is saved with a unique file name so it’s not overwritten.

![]() Select from the following options:
Select from the following options:
♦ Save As JPEG. Saves image in JPEG format.
♦ Quality. Enter a quality value between 0 and 12 (3 or 4 recommended for web graphics).
♦ Resize To Fit. Resizes the images to fit the width and height in pixels.
♦ Convert Profile To sRGB. Converts the color profile to sRGB; select the Include ICC Profile check box to save it.
♦ Save As PSD. Saves images in the PSD Photoshop format.
♦ Maximize Compatibility. Saves a composite of a layer image for programs that can’t read layered images.
♦ Save As TIFF. Saves images in the TIFF format.
♦ LZW Compression. Saves TIFF files using the LZW compression scheme.
![]() Select from the following Preferences options:
Select from the following Preferences options:
♦ Run Action. Runs a selected Photoshop action.
♦ Copyright Info. Includes file information entered in the IPTC copyright metadata, or you can add your own.
♦ Include ICC Profile. Embeds the color profile with the saved image files.
![]() To save your settings, click Save, enter a name, and then click Save.
To save your settings, click Save, enter a name, and then click Save.
![]() To load saved settings, click Load, select the settings file, and then click Open.
To load saved settings, click Load, select the settings file, and then click Open.
![]() Click Run.
Click Run.
Adjusting an Image Fit Size
The Fit Image command is a quick way to adjust an image to a specific width and height without changing its current aspect ratio. While the same process can be accomplished using Photoshop’s Image Size dialog box, this way is quicker and works more reliably when used to change the size of an image within an action. Like another one of the Automate commands called Conditional Mode Change, the Fit Image command is designed to work best when incorporated into an action. When the action is executed, the Fit Image command will adjust the image size without opening any dialog boxes or requiring you to answer any formatting questions.
Use the Fit Image Command
![]() Open a document.
Open a document.
![]() Click the File menu, point to Automate, and then click Fit Image.
Click the File menu, point to Automate, and then click Fit Image.
![]() Enter a Width and Height for the transformation.
Enter a Width and Height for the transformation.
Photoshop maintains the image’s aspect ratio.
![]() Click OK.
Click OK.
