14. Manipulating Images with Filters
What You’ll Do
Create and Work with Smart Filters
Apply Multiple Filters to an Image
Create and Apply a Liquify Mesh
Use the Spot Healing Filter
Use the Adaptive Wide Angle Filter
Use the Lighting Effects Filter
Blend Modes and Filter Effects
Control Filters Using Selections
Use a Channel Mask to Control Filter Effects
Protect Images with Watermarks
Introduction
Adobe Photoshop filters are a designer’s dream come true. With filters you can turn a photograph into an oil painting or a watercolor; you can even change night into day. Photoshop’s Filter menu includes more than a hundred highly creative filters, which can be applied once, reapplied, or combined with other filters to create any effect your imagination can dream up.
The potential combination of filters and images literally runs into the millions. This means that Photoshop filters are truly an undiscovered territory. As a matter of fact, the Filter Gallery lets you view the effects of one or more filters on the active document. This level of power gives you unbelievable creative control over your images.
Other commands, such as the Fade command, let you reduce the effect of the applied filter. You can even apply a blending mode to the final image. In addition, you can utilize a channel mask to control how the filter is applied to the image. You could also use a black to white gradient channel mask to slowly fade the effects of the filter from left to right.
Photoshop even lets you protect your intellectual property by embedding a customizable watermark into the image that is almost invisible to see, and virtually impossible to remove. In fact, you can print an image that contains a watermark, run it off on a copy machine and rescan it, and the watermark is still there. Now that’s protection.
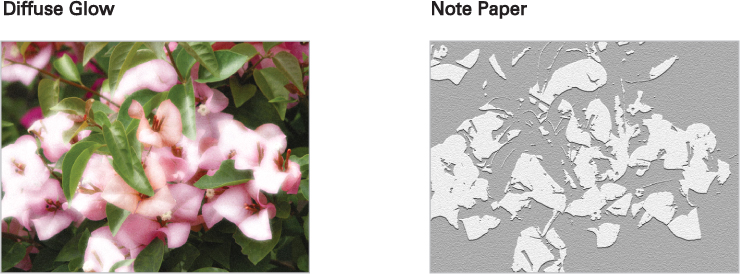
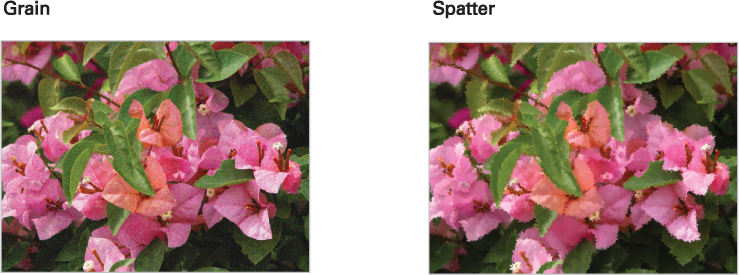
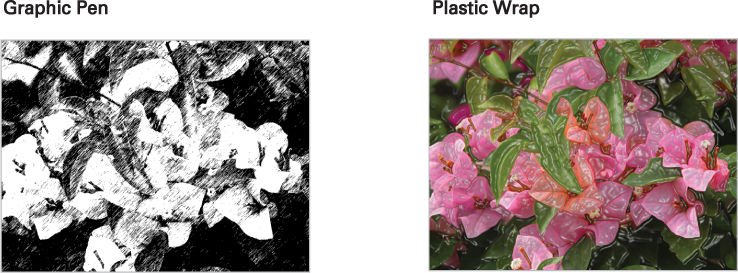
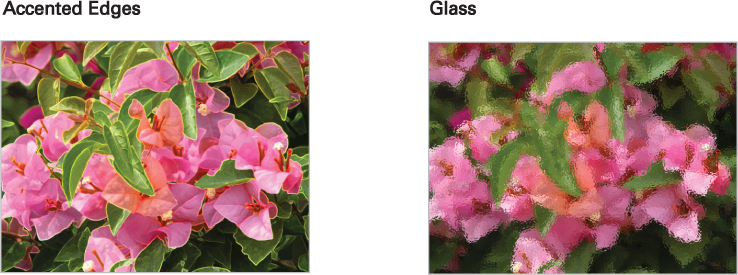
Take a moment to view some of the various filter effects that Photoshop offers. Because there are so many filters available, we can’t show you all of them, but we think you’ll enjoy viewing the selection at the end of the chapter.
Working with the Filter Gallery
The Filter Gallery enables you to maintain complete and total control over Photoshop’s filters. In essence, the Filter Gallery gives you access to all of Photoshop’s filters and lets you apply the filters to any raster image, while viewing a large preview of the results. The Filter Gallery dialog box is composed of three sections—Image Preview, Filter Selection, and Filter Controls. When you use the Filter Gallery to modify the image, you see exactly how the image will look; there is no guesswork involved. When you apply a filter to an image, you are physically remapping the pixel information within the image. Photoshop contains over a hundred filters and the combinations of those filters are astronomical. If you are a math wizard, you know there are over 100 million combinations available, and that means no one has yet discovered all the ways you can manipulate an image in Photoshop...have fun trying.
Work with the Filter Gallery
![]() Open a document.
Open a document.
![]() Select the Layers panel, and then select the layer you want to modify with a filter effect.
Select the Layers panel, and then select the layer you want to modify with a filter effect.
![]() Click the Filter menu, and then click Filter Gallery.
Click the Filter menu, and then click Filter Gallery.
![]() Change the image preview by clicking the plus or minus zoom buttons, or by clicking the black triangle and selecting from the preset zoom sizes.
Change the image preview by clicking the plus or minus zoom buttons, or by clicking the black triangle and selecting from the preset zoom sizes.
![]() If necessary, drag the lower right corner in or out to resize the Filter Gallery dialog box.
If necessary, drag the lower right corner in or out to resize the Filter Gallery dialog box.
![]() Click the expand triangle, located to the left of the individual categories, to expand a filter category. Filter categories include:
Click the expand triangle, located to the left of the individual categories, to expand a filter category. Filter categories include:
♦ Artistic
♦ Brush Strokes
♦ Distort
♦ Sketch
♦ Stylize
♦ Texture

![]() Click a filter from the expanded list to view its default effects on the image.
Click a filter from the expanded list to view its default effects on the image.
![]() Modify the effects of the filter using the filter controls.
Modify the effects of the filter using the filter controls.
![]() To temporarily hide the Filter Selections, click the Show/Hide Filter Thumbnails button, located to the left of the OK button.
To temporarily hide the Filter Selections, click the Show/Hide Filter Thumbnails button, located to the left of the OK button.
![]() Click OK.
Click OK.

Did You Know?
You can reapply a specific filter effect using a shortcut. Press Ctrl+F (Win) or ![]() +F (Mac) to reapply the last filter to the image.
+F (Mac) to reapply the last filter to the image.
You can find filters in the Filter Gallery. Filters located both on the Filter menu, and in the Filter Gallery are located only in the Filter Gallery, reducing visual clutter. So, if you can’t find a filter on the Filter menu, check the Filter Gallery. If you like using the Filter menu, read the following item below.
You can display all filters and groups on the Filters menu. Click the Edit (Win) or Photoshop (Mac), point to Preferences, and then click Plug-Ins. Select the Show All Filter Gallery Groups And Names check box, and then click OK.
Creating and Working with Smart Filters
When you apply a filter to a Smart Object, the filter becomes a nondestructive Smart Filter. If you don’t have a Smart Object, you can convert a normal layer to one with Smart Filters. Smart Filters appear in the Layers panel below the Smart Object layer, where you can show or hide them independently. You can apply any filter, including Blur Gallery (New!) and Liquify (New!), to a Smart Object—including Smart Object video layers (New!)—except Vanishing Point. You can also apply the Shadows/Highlights and HDR Toning adjustments as Smart Filters. After you apply a Smart Filter, you can adjust, reorder, or delete it.
Create and Work with Smart Filters
![]() Open a document.
Open a document.
![]() Use one of the following to create a Smart Filter:
Use one of the following to create a Smart Filter:
♦ Smart Object layer. Select a Smart Object layer, click the Filter menu, select a filter, then specify the options you want.
♦ Normal layer. Select the layer, click the Filter menu, click Convert for Smart Filters, and then click OK.
![]() Select the layer with the Smart Filters in the Layers panel.
Select the layer with the Smart Filters in the Layers panel.
![]() Click the arrow to the right of the layer to display the filter effects.
Click the arrow to the right of the layer to display the filter effects.

![]() Use any of the following to work with the smart layers:
Use any of the following to work with the smart layers:
♦ Show or Hide. Click the eye icon.
♦ Move. Drag the effect up or down the list.


♦ Delete. Drag the effect to the Delete icon at the bottom of the Layers panel.
♦ Duplicate. Hold down Alt (Win) or Option (Mac), and then drag the Smart Filter from one Smart Object to another, or to a new location in the Smart Filters list.
♦ Edit Options. Double-click the icon to edit blending filter options.
Applying Multiple Filters to an Image
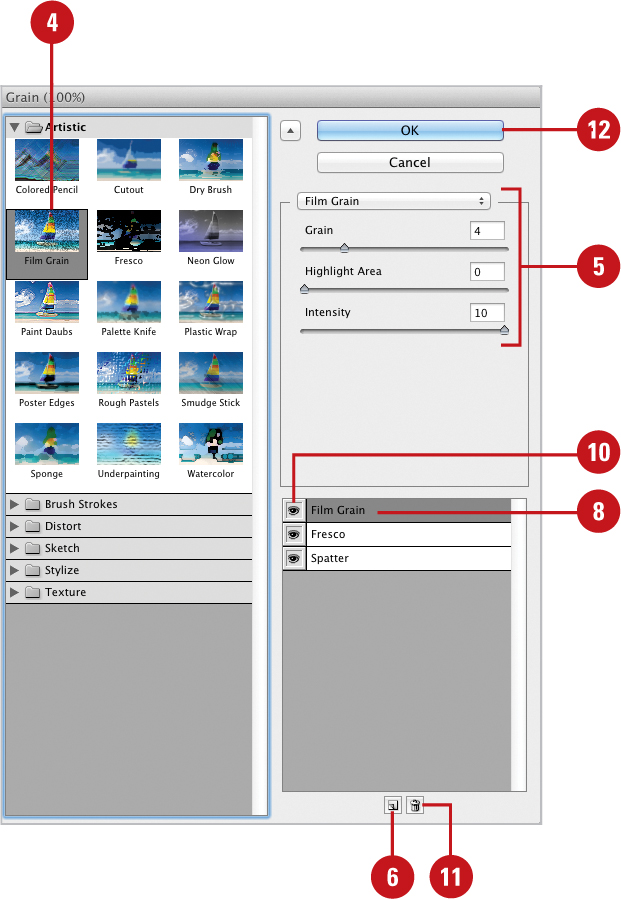
Not only does Photoshop’s Filter Gallery let you apply and view a filter effect, it lets you view the multiple effects of two or more filters. The Filter Gallery has its own Layers panel, and you can have multiple filter layers. The order of the filters influences their impact on the image, so when you use more than one filter, try dragging the filter layer up or down in the stack to see the different possibilities. Experiment with different stacking orders to create unique, eye-popping special effects.
Apply Multiple Filters to an Image
![]() Open a document.
Open a document.
![]() Select the Layers panel, and then select the layer or Smart Object to which you want to apply a filter.
Select the Layers panel, and then select the layer or Smart Object to which you want to apply a filter.
![]() Click the Filter menu, and then click Filter Gallery.
Click the Filter menu, and then click Filter Gallery.
![]() Select the filter you want.
Select the filter you want.
![]() Adjust the filter as necessary.
Adjust the filter as necessary.
![]() Click the New Effect Layer button, located at the bottom of the Filter Adjustments section. You can add as many effects layers as needed.
Click the New Effect Layer button, located at the bottom of the Filter Adjustments section. You can add as many effects layers as needed.
![]() Select and adjust a second filter (repeat steps 4 and 5).
Select and adjust a second filter (repeat steps 4 and 5).
![]() Adjust each individual effect by clicking on the effect layer you want to change.
Adjust each individual effect by clicking on the effect layer you want to change.
![]() To change the filter’s influence on the image, drag an effect layer to another position in the stack.
To change the filter’s influence on the image, drag an effect layer to another position in the stack.
![]() To temporarily show or hide the effect on the image, click the Show/Hide button.
To temporarily show or hide the effect on the image, click the Show/Hide button.
![]() To delete a selected effect layer, click the Delete button.
To delete a selected effect layer, click the Delete button.
![]() Click OK.
Click OK.
Important
Once you click the OK button, the effects are permanently applied to the active image, unless it’s a Smart Object.
Applying the Liquify Filter
The Liquify filter gives you amazing control over an image. For example, you can distort the image pixels almost as if the image were an oil painting that had yet to dry. In addition, you can magnify specific areas of an image or reduce them in size. The Liquify filter lets you warp (push), pull, twirl (rotate), pucker, and bloat any area of an image. The distortions you create can be subtle or drastic, which makes the Liquify filter a powerful tool for retouching images or for creating artistic effects. If a distortion is more drastic than you want, you can smooth (New!) it out. The user interface has been simplified to display the options most people use. If you want more control, you can use advanced mode. Lag times for image changes have been greatly reduced for even better efficiency.
Modify Images with the Liquify Filter
![]() Open a document.
Open a document.
![]() Select the Layers panel, and then select the layer or Smart Object on which you want to use the liquify tool.
Select the Layers panel, and then select the layer or Smart Object on which you want to use the liquify tool.
♦ If you convert the layer to a Smart Object (New!), it keeps the original layer intact.
![]() Click the Filter menu, and then click Liquify.
Click the Filter menu, and then click Liquify.
![]() Select the Advanced Mode check box, and then select from the following Liquify tools:
Select the Advanced Mode check box, and then select from the following Liquify tools:
♦ Forward Warp. Pushes pixels in front of the brush as you drag.
♦ Reconstruct. Drag inside the image, using a specific brush size to restore previously modified areas of the image.


Hold down Alt (Win) or Option (Mac), and drag across a warp with the Reconstruct tool (New!) to smooth a warp rather than scaling back or removing it.
♦ Smooth (Advanced). Drag inside the image to smooth out areas of the image (New!).
♦ Twirl Clockwise (Advanced). Click in an area to twirl the pixels (contained inside the brush tip) clockwise. To twirl counter clockwise, hold down the Alt (Win) or Option (Mac) key.

♦ Pucker. Click and hold to move pixels towards the center of the brush tip.

♦ Bloat. Click and hold to move pixels away from the center of the brush tip.

♦ Push Left. Drag to push pixels to the left of the brush tip. For example, dragging straight up pushes pixels to the left, and dragging to the right pushes pixels up.
♦ Freeze Mask (Advanced). Paints a mask over an area of the image, and then protects that area from change.
♦ Thaw Mask (Advanced). Erases the protective mask created with the Freeze tool.
♦ Hand. Drag to move the visible image. Useful if the image is larger than the physical document window.
♦ Zoom. Click to zoom in on a specific area of the image. Click and drag to define an area to zoom in on. Hold down the Alt (Win) or Option (Mac) key and click to zoom out.
![]() Click OK.
Click OK.

Working with Liquify Options
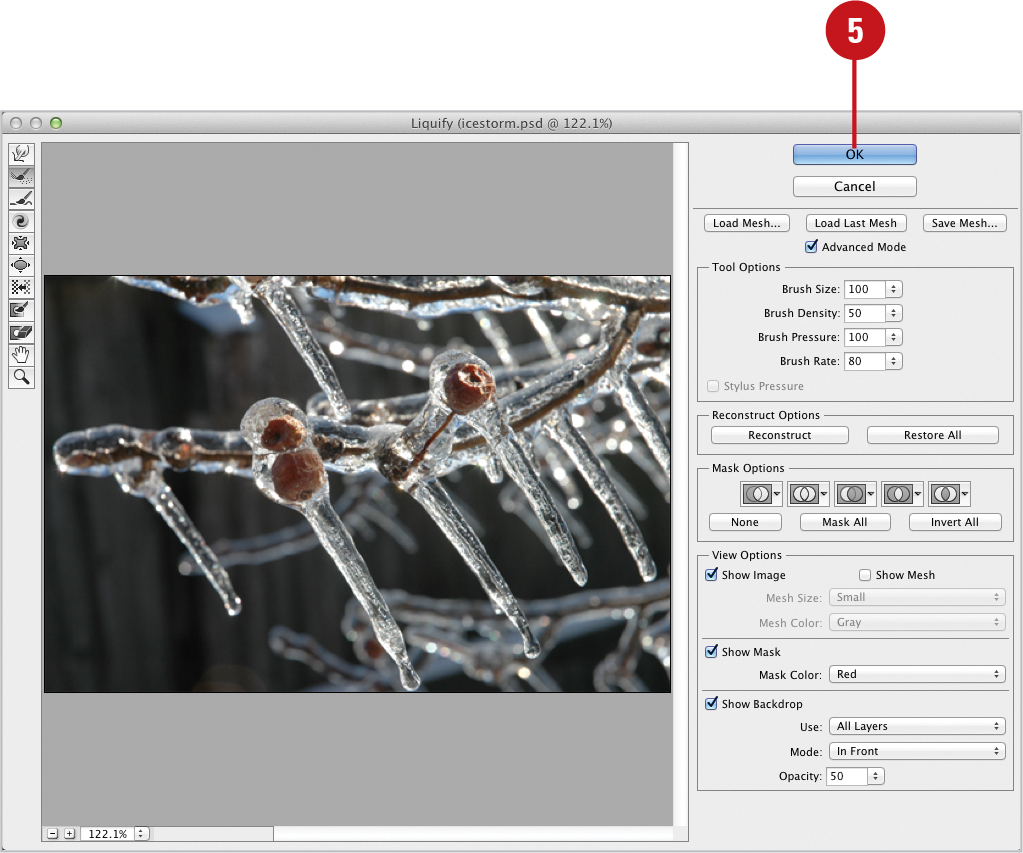
The Liquify Tool options control the brush tip. Since all the Liquify commands are executed with a brush, it’s important to understand how you control the brush tip. When you apply the brush stroke, the faster you drag the mouse, the less effect is applied to the image; if you drag slowly, you gain more control and the effect is more intense. The maximum brush size is no longer 1,500 pixels; it’s now 15,000. Practice dragging the cursor over the image to produce different effects, and if you make a mistake, don’t forget the undo key—Ctrl+Z (Win), ![]() +Z (Mac). The user interface has been simplified to display the options most people use. If you want more control, you can use advanced mode.
+Z (Mac). The user interface has been simplified to display the options most people use. If you want more control, you can use advanced mode.
Work with Liquify Options
![]() Open a document.
Open a document.
![]() Select the Layers panel, and then select the layer or Smart Object on which you want to use the liquify tool.
Select the Layers panel, and then select the layer or Smart Object on which you want to use the liquify tool.

♦ If you convert the layer to a Smart Object (New!), it keeps the original layer intact.
![]() Click the Filter menu, and then click Liquify.
Click the Filter menu, and then click Liquify.
![]() Select the Advanced Mode check box, and then select from the following Liquify tools:
Select the Advanced Mode check box, and then select from the following Liquify tools:
♦ Brush Size. Select a value (1 to 15,000).
♦ Brush Density (Advanced). Select a value (0 to 100). Brush Density controls how much the brush feathers at the ends. Lower values equal increased feathering.
♦ Brush Pressure. Select a value (1 to 100). Determines how quickly a liquify effect is applied to the image when the brush is moving. The lower the value, the slower the effect.
♦ Brush Rate (Advanced). Select a value (0 to 100). Determines how quickly a liquify effect is applied to the image when the brush is stationary. The lower the value, the slower the effect.
♦ Stylus Pressure. Select the check box if you’re using a drawing tablet. The pressure you apply to the drawing tablet will now control the pressure applied with the Liquify brush.
♦ Reconstruct (Advanced). Click the button to reconstruct the image stage by stage.
♦ Restore All. Click the button to restore the image to its original state.

![]() Click OK.
Click OK.
Did You Know?
You can change the size of the cursor in Liquify. Press the [ or ] (bracket) keys. The increments have been adjusted. You can also press the Alt+right drag (Win) or Ctrl+Option+ right drag (Mac).
Working with Liquify Mask Options
When you work with an image that contains a selection or mask, you can use that information to control how the Liquify command adjusts the image. Think of the mask as a visual representation of the work areas of the image. Creating a mask gives you precise control over what portions of the image are modified.
Work with Liquify Mask Options
![]() Open a document.
Open a document.

![]() Select the Layers panel, and then select the layer or Smart Object containing a selection or mask.
Select the Layers panel, and then select the layer or Smart Object containing a selection or mask.
![]() Click the Filter menu, and then click Liquify.
Click the Filter menu, and then click Liquify.
![]() Select the Advanced Mode check box, and then select from the following Liquify Mask options:
Select the Advanced Mode check box, and then select from the following Liquify Mask options:
♦ Replace Selection. Shows the selection, transparency or layer mask in the original image.
♦ Add To Selection. Shows the mask in the original image, so you can then add to the selection using the Freeze tool.
♦ Subtract From Selection. Subtracts pixels in selection from current protection created with the Freeze tool.
♦ Intersect With Selection. Uses only pixels that are selected and currently frozen.
♦ Invert Selection. Uses your selection to invert the currently frozen area.
![]() Click OK.
Click OK.

Working with Liquify View Options
The Liquify View Options control what you see in the preview window. For example, you can choose to view or hide a mask, or even change its color. If the image you’re working on is in a transparent layer you can even choose to view the image with or without the other image layers. How you view the image is up to you; however, having choices gives you greater control over the final results.
Work with Liquify View Options
![]() Open a document.
Open a document.
![]() Select the Layers panel, and then select the layer or Smart Object containing a selection or mask.
Select the Layers panel, and then select the layer or Smart Object containing a selection or mask.
![]() Click the Filter menu, and then click Liquify.
Click the Filter menu, and then click Liquify.
![]() Select the Advanced Mode check box, and then select from the following Liquify View options:
Select the Advanced Mode check box, and then select from the following Liquify View options:
♦ Show Image. Shows/hides the active image preview.
♦ Show Mesh. Displays a mesh (grid) over the image preview.
♦ Mesh Size. Select between a Small, Medium, or Large mesh.
♦ Mesh Color. Select a color for the mesh.
♦ Show Mask. Shows/hides the mask.
♦ Mask Color. Select a color for the mask.
♦ Show Backdrop. Shows/hides the backdrop.
♦ Use. Select what layers are displayed in the image preview.
♦ Mode. Displays the active layer either In Front, Behind, or Blended with the other layers.
♦ Opacity. Determines the blending opacity between the individual layers.
![]() Click OK.
Click OK.

Creating a Liquify Mesh
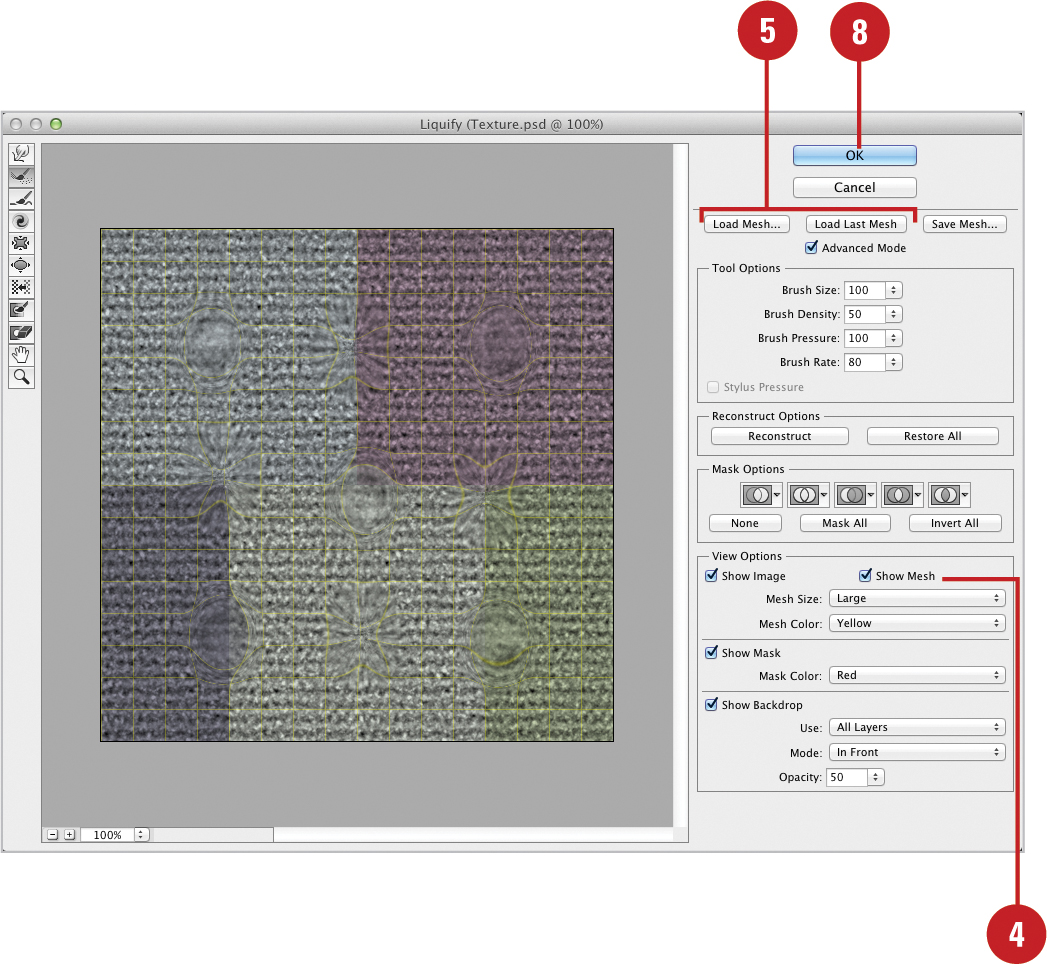
You may have noticed the Load Mesh and Save Mesh buttons, located at the top of the Liquify dialog box. A mesh is a predefined Liquify operation. When you activate the mesh option, a mesh or grid is placed over the image, and then as you use the Liquify tools, the mesh distorts and bends. After applying a lot of work to a particular image, it’s quite possible you might want to use that exact mesh on another image. That’s where the Load Mesh and Save Mesh options come into play. With the click of a button you can create a mesh and use it over and over again with the Load Last Mesh and Load Mesh buttons.
Create a Liquify Mesh
![]() Open a document.
Open a document.
![]() Select the Layers panel, and then select the layer or Smart Object on which you want to use the Liquify tool.
Select the Layers panel, and then select the layer or Smart Object on which you want to use the Liquify tool.
![]() Click the Filter menu, and then click Liquify.
Click the Filter menu, and then click Liquify.
![]() Select the Advanced Mode check box, and then select the Show Mesh check box.
Select the Advanced Mode check box, and then select the Show Mesh check box.
![]() Use the Liquify tools to adjust the image.
Use the Liquify tools to adjust the image.
![]() Click Save Mesh.
Click Save Mesh.
![]() Enter a descriptive name for the mesh.
Enter a descriptive name for the mesh.
![]() Click Save.
Click Save.
![]() Click OK.
Click OK.


Did You Know?
You can display the distortion created by the Liquify tools. Check this option to display a mesh (grid) over the image preview. When you select the Show Mesh check box, a mesh is applied to an image, which distorts as you apply the Liquify tools. When you clear the Show Image check box (dimming the image), you get a visual grid that represents the distortion values applied to the image.
Applying a Liquify Mesh
Applying a mesh to an image is a lot easier than redoing a particular Liquify operation and to be honest, it would be virtually impossible to reproduce a Liquify adjustment from scratch. That’s why Adobe gives you the option of creating, saving, and loading your very own personalized meshes. You can use the Load Last Mesh button to quickly load the last mesh or use the Load Mesh button to select the one you want. Load Last Mesh allows you to quickly continue working where you left off instead without having a save a mesh beforehand, which most people don’t always remember to do.
Apply a Liquify Mesh
![]() Open a document.
Open a document.
![]() Select the Layers panel, and then select the layer or Smart Object on which you want to use the Liquify tool.
Select the Layers panel, and then select the layer or Smart Object on which you want to use the Liquify tool.
![]() Click the Filter menu, and then click Liquify.
Click the Filter menu, and then click Liquify.
![]() Select the Advanced Mode check box, and then select the Show Mesh check box.
Select the Advanced Mode check box, and then select the Show Mesh check box.
![]() To load the last used mesh, click Last Load Mesh.
To load the last used mesh, click Last Load Mesh.
If this is not the mesh you want, you can continue and select the one you want to use.
![]() Click Load Mesh.
Click Load Mesh.
![]() Select a mesh file.
Select a mesh file.
![]() Click Open.
Click Open.
The distortions generated by the mesh are applied to the image.
![]() Click OK.
Click OK.

Did You Know?
You can modify a loaded mesh. Open a mesh, and then use the Liquify options to further distort the mesh pattern. That way you can create a generic mesh pattern and modify the pattern to fit any design need.
Using the Camera Raw Filter
In addition to opening files in Camera Raw from the Open dialog box, you can also apply Camera Raw as a Smart Filter to a layer (New!) from an opened image with file formats other than raw formats (New!), which are created from digital cameras. You can also convert to a Smart Object to nondestructively modify it. Photoshop uses Camera Raw version 8 (New!), allowing you to correct, adjust, and enhance image details. If you’re not sure what to do, you can click Auto on the Basic tab to have Camera Raw do it or drag sliders to adjust options manually.
Use the Camera Raw Filter
![]() Open a document.
Open a document.
![]() Select the Layers panel, and then select layer or Smart Object to which you want to apply the filter.
Select the Layers panel, and then select layer or Smart Object to which you want to apply the filter.
♦ If you convert the layer to a Smart Object, it keeps the original layer intact.
![]() Click the Filter menu, and then click Camera Raw.
Click the Filter menu, and then click Camera Raw.
![]() Click a tab: Basic, Tone Curve, Detail (Sharpen & Noise Reduction), HSL / Grayscale, Split Toning, Lens Corrections (New!), Effects, Camera Calibration, Presets, or Snapshots.
Click a tab: Basic, Tone Curve, Detail (Sharpen & Noise Reduction), HSL / Grayscale, Split Toning, Lens Corrections (New!), Effects, Camera Calibration, Presets, or Snapshots.
![]() Use tools to modify the image:
Use tools to modify the image:
♦ Use the Zoom, Hand, Rotate, Crop, and Straighten tools to change the size, orientation, and position of the image.
♦ Use the White Balance tool to adjust color cast or the Color Sampler tool to sample a color from the image.
♦ Use the Spot Removal (New!) (Heal or Clone) or Red Eye Removal tool to fix the image.
♦ Use the Adjustment Brush, Graduated Filter, Radial Filter (New!), or Targeted Adjustment tool to make adjustments to exposure, brightness, contrast, saturation, clarity, sharpness, and color.
![]() Click OK or Cancel to accept or reject changes.
Click OK or Cancel to accept or reject changes.

Using the Upright Filter
In Camera Raw, you can use the Upright filter (New!) under the Lens Correction tab to correct a tilted horizon or unbalanced perspective in an image. With the Upright filter, you can level an image with horizontal and/or vertical perspective, or let the tool automatically correct everything for you. With the Show Grid option, you can display a grid to see how the alignment appears. You can also drag sliders to manually adjust Distortion, Vertical, Horizontal, Rotate, Scale, and Aspect ratio (New!).
Use the Upright Filter in Camera Raw
![]() Open a document.
Open a document.
![]() Select the Layers panel, and then select the layer or Smart Object to which you want to apply the filter.
Select the Layers panel, and then select the layer or Smart Object to which you want to apply the filter.
♦ If you convert the layer to a Smart Object, it keeps the original layer intact.
![]() Click the Filter menu, and then click Camera Raw.
Click the Filter menu, and then click Camera Raw.
![]() Select the Preview check box to view the results.
Select the Preview check box to view the results.
![]() Click the Lens Correction tab.
Click the Lens Correction tab.
![]() Click the Manual tab.
Click the Manual tab.
![]() Click any of the following Upright (New!) options:
Click any of the following Upright (New!) options:
♦ None. Removes all changes.
♦ Automatic. Let’s Photoshop level and balance the image.
♦ Level. Levels the horizontal of the image.
♦ Vertical. Levels the vertical of the image.
♦ Full. Levels the horizontal and vertical of the image.
![]() Drag sliders to manually adjust Distortion, Vertical, Horizontal, Rotate, Scale, and Aspect (New!).
Drag sliders to manually adjust Distortion, Vertical, Horizontal, Rotate, Scale, and Aspect (New!).
![]() To show a grid to preview the alignment, select the Show Grid check box.
To show a grid to preview the alignment, select the Show Grid check box.
![]() Click OK.
Click OK.

Using the Radial Filter
In Camera Raw, you can use the Radial filter (New!) to apply image correction and enhancement adjustments outside or inside an oval radial filter region. You can create multiple filter regions in the same image, giving you the ability to target the areas you want to change. It’s like a vignette—a fall-off in brightness at the edges—in the Lens Correction filter, however, you can do more with it in the Radial filter, such as create multiple regions, move them around, and apply image adjustments.
Use the Radial Filter in Camera Raw
![]() Open a document.
Open a document.
![]() Select the Layers panel, and then select the layer or Smart Object to which you want to apply the filter.
Select the Layers panel, and then select the layer or Smart Object to which you want to apply the filter.
♦ If you convert the layer to a Smart Object, it keeps the original layer intact.
![]() Click the Filter menu, and then click Camera Raw.
Click the Filter menu, and then click Camera Raw.
![]() Select the Preview check box to view the results.
Select the Preview check box to view the results.
![]() Select the Radial Filter tool on the toolbox.
Select the Radial Filter tool on the toolbox.
![]() Drag from the center to create a radial filter region. You can drag a resize handle to adjust the region.
Drag from the center to create a radial filter region. You can drag a resize handle to adjust the region.
![]() To show or hide the radial filter regions, select or clear the Show Overlay check box.
To show or hide the radial filter regions, select or clear the Show Overlay check box.
![]() To move the radial filter region, click the circle in the middle to select it, and then drag it.
To move the radial filter region, click the circle in the middle to select it, and then drag it.
![]() Click the Inside or Outside option to specify where to apply the adjustments.
Click the Inside or Outside option to specify where to apply the adjustments.
![]() Drag sliders to manually adjust settings, such as Exposure, Sharpness, Contrast, and Feather.
Drag sliders to manually adjust settings, such as Exposure, Sharpness, Contrast, and Feather.
![]() To add another radial section region, click the New option, and then repeat Steps 5 thru 8.
To add another radial section region, click the New option, and then repeat Steps 5 thru 8.
![]() Click OK.
Click OK.

Using the Spot Removal Filter
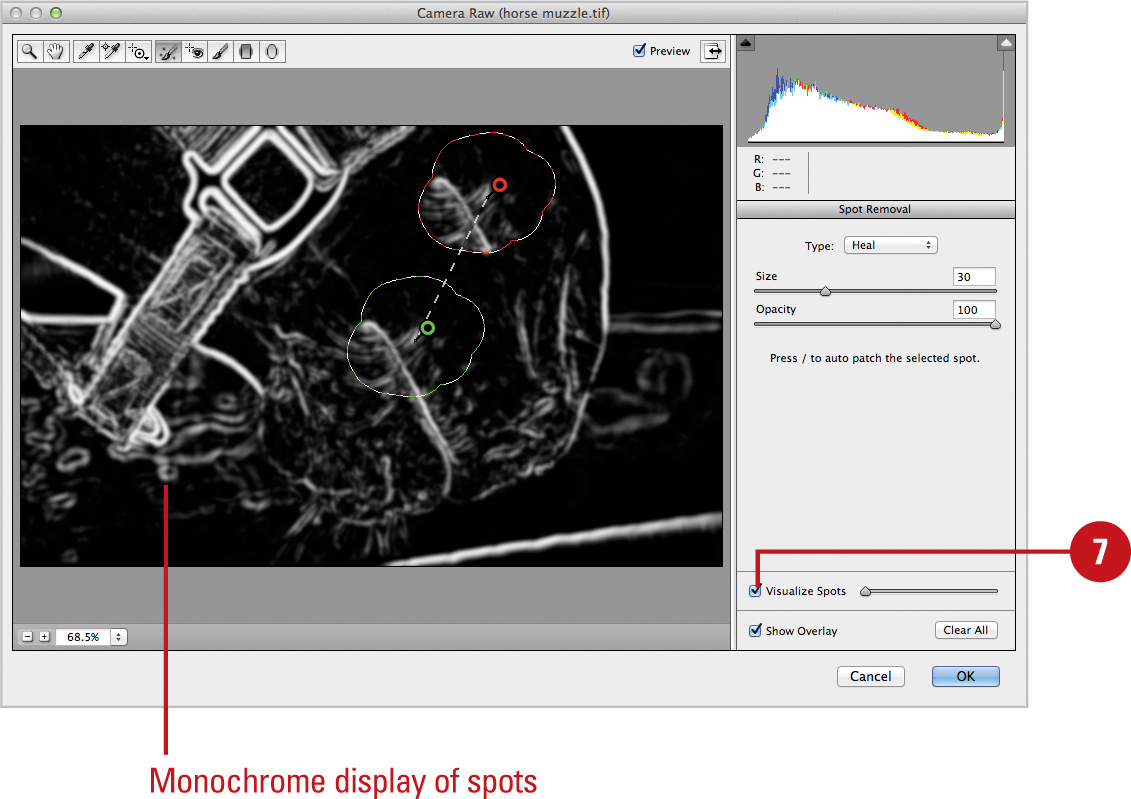
In Camera Raw, you can use the Spot Removal filter (New!) to heal or clone spots in an image. Instead of using a circle to define an area, you can drag any shape to heal or clone spots in an image. If you’re not sure what areas to fix (sometimes it can be very hard to see), you can use the Visualize Spots option to help you see them. With the Show Overlay option, you can see the fixed areas and selection source points, which you can drag to move them.
Use the Spot Removal Filter in Camera Raw
![]() Open a document.
Open a document.
![]() Select the Layers panel, and then select the layer or Smart Object to which you want to apply the filter.
Select the Layers panel, and then select the layer or Smart Object to which you want to apply the filter.
♦ If you convert the layer to a Smart Object, it keeps the original layer intact.
![]() Click the Filter menu, and then click Camera Raw.
Click the Filter menu, and then click Camera Raw.
![]() Select the Preview check box to view the results.
Select the Preview check box to view the results.
![]() Select the Spot Removal tool on the toolbox.
Select the Spot Removal tool on the toolbox.
![]() Click the Type list arrow, and then click Heal or Clone.
Click the Type list arrow, and then click Heal or Clone.
![]() To display spots in the image to make them easier to fix, select the Visualize Spots check box (New!), and then drag the slider to display spots in white.
To display spots in the image to make them easier to fix, select the Visualize Spots check box (New!), and then drag the slider to display spots in white.
![]() Drag the image to fix spots with any shape you want (New!).
Drag the image to fix spots with any shape you want (New!).
![]() To display the spot fix selections and selection source points in the image, select the Show Overlay check box.
To display the spot fix selections and selection source points in the image, select the Show Overlay check box.
![]() To move the selection source point, drag a pin (New!).
To move the selection source point, drag a pin (New!).
![]() Click OK.
Click OK.

Using the Adaptive Wide Angle Filter
The Adaptive Wide Angle filter aims at reducing areas of distortion, such as a bend, created by using wide-angle lenses with large fields-of-view, such as a fisheye lens, rendering the distorted areas closer to human visual perception. This filter is useful for correcting panoramas that can have bending issues. Using the Constraint tools, you provide the filter with information about what images lines should be straight and the filter works on retaining the areas you’ve identified, while eliminating localized areas of distortion. If you want to reuse constraint designs, you can choose the Load Constraints or Save Constraints on the Options menu.
Use the Adaptive Wide Angle Filter
![]() Open a document.
Open a document.
![]() Select the Layers panel, and then select the layer or Smart Object to which you want to apply the filter.
Select the Layers panel, and then select the layer or Smart Object to which you want to apply the filter.
♦ If you convert the layer to a Smart Object, it keeps the original layer intact.
![]() Click the Filter menu, and then click Adaptive Wide Angle Filter.
Click the Filter menu, and then click Adaptive Wide Angle Filter.
If the program recognizes lens data, it automatically provides a suitable profile and selects Auto under Correction.
![]() Click the Correction list arrow, and then select a correction method: Fisheye, Perspective, Auto, or Full Spherical.
Click the Correction list arrow, and then select a correction method: Fisheye, Perspective, Auto, or Full Spherical.
♦ If you select Fisheye or Perspective, the filter tries to read image metadata and automatically set Focal Length and Crop Factor as well as select the As Shot check box.
![]() Select the Constraint or the Polygon Constraint tool on the toolbox.
Select the Constraint or the Polygon Constraint tool on the toolbox.

![]() Click and drag or click, move and click to create a constraint line or polygon. If you want a straight line, press Shift as you draw.
Click and drag or click, move and click to create a constraint line or polygon. If you want a straight line, press Shift as you draw.
If the constraint line curves, the filter is using lens data.
![]() If you want to straighten a drawn constraint line, right-click the line, and then click Horizontal, Vertical, or Arbitrary.
If you want to straighten a drawn constraint line, right-click the line, and then click Horizontal, Vertical, or Arbitrary.
![]() To adjust the constraint line, use any of the following:
To adjust the constraint line, use any of the following:
♦ Length. Drag a white square handle at either end.
♦ Angle. Drag a white circle handle (which are connected by a bigger circle).
♦ Focal Length. If a white square handle appears in the middle, drag it.
![]() Use the following tools to move the image or change the view:
Use the following tools to move the image or change the view:
♦ Move. Drag the image to move it around in the canvas.
♦ Hand. Drag to move the visible image.
♦ Zoom. Click to zoom in on a specific area of the image. Click and drag to define an area to zoom in on. Hold down the Alt (Win) or Option (Mac) key and click to zoom out.
![]() Use the following options:
Use the following options:
♦ Preview. Select to display the image with changes.
♦ Show Constraints. Select to show the constraint lines.
♦ Show Mesh. Select to show a grid mesh.
![]() To delete a constraint, click the line to select it, and then Delete.
To delete a constraint, click the line to select it, and then Delete.
Timesaver
Press Alt (Win) or Option (Mac), and then click the constraint line to delete it.
![]() Click OK.
Click OK.

♦ Reset. When you hold Alt (Win) or Option (Mac), the Cancel button changes to Reset.
Using the Oil Paint Filter
The Oil Paint filter is a painting filter that changes the pixels to make your image look as if it were created with oil paints. This filter had previously been available to Photoshop users, but only through downloading an optional plug-in called Pixel Bender. The filter is available on the Filter menu. You can apply this filter directly to a Background. If the image has multiple layers, you can choose one and apply the filter to only that layer. Or, you can group one or more layers together and apply the filter to all of them at once. If you choose to group layers, you will be asked to convert the layers for Smart Filters before you can use the Oil Paint filter. You can also use the Oil Paint Filter on text layers, although the text must be rasterized first.
Use the Oil Paint Filter
![]() Open a document.
Open a document.
![]() Select the Layers panel, and then select the layer or Smart Object to which you want to apply the filter.
Select the Layers panel, and then select the layer or Smart Object to which you want to apply the filter.
♦ If you convert the layer to a Smart Object, it keeps the original layer intact.
![]() Click the Filter menu, and then click Oil Paint Filter.
Click the Filter menu, and then click Oil Paint Filter.
![]() Drag any of the following sliders to adjust Brush and Lighting options:
Drag any of the following sliders to adjust Brush and Lighting options:
♦ Stylization. Specifies the style of brush stroke (.1 to 10). Provides a stucco to long brush stroke effect.
♦ Cleanliness. Provides a grainy to smooth effect.
♦ Scale. Specifies the scale of the brush stroke (.1 to 10). Scales the brush stroke from the upper left part of the image.
♦ Bristle Detail. Specifies the depth of the brush strokes (.1 to 10).
♦ Angular Direction. Specifies the angle of the brush stroke and the angle of the light to the brush stroke (0 to 360 degrees).
♦ Shine. Specifies a reflection of light on the image (0 to 10).
![]() Click OK.
Click OK.

Using the Lighting Effects Filter
While the Lighting Effects filter has been around in Photoshop for a long time, now it’s been redesigned. When you use Lighting Effects, an interface workspace appears with a large preview of your image, an onscreen adjustment capability, and an Options bar that gives you easy access for adding lights, using presets, resetting current light, and a choice to preview before and after versions.
Use the Lighting Effects Filter
![]() Open a document.
Open a document.
![]() Select the Layers panel, and then select the layer or Smart Object to which you want to apply the filter.
Select the Layers panel, and then select the layer or Smart Object to which you want to apply the filter.
♦ If you convert the layer to a Smart Object, it keeps the original layer intact.
![]() Click the Filter menu, point to Render, and then click Lighting Effects.
Click the Filter menu, point to Render, and then click Lighting Effects.
Two elliptical selections appear around a pin. The inner ellipse is the light hotspot, while the outer one is the overall light.
![]() To use a preset, click the Presets list arrow on the Options bar, and then select a preset.
To use a preset, click the Presets list arrow on the Options bar, and then select a preset.
![]() Drag a white circle handle to adjust the scale (width or length) or rotation of the light. To move the light, point inside the light or to the pin, and drag it.
Drag a white circle handle to adjust the scale (width or length) or rotation of the light. To move the light, point inside the light or to the pin, and drag it.
![]() Drag any of the following sliders to adjust the lighting effects:
Drag any of the following sliders to adjust the lighting effects:
♦ Color, Intensity, and Hotspot. These affect the active light. You can also drag the outer pin circle to adjust intensity.
♦ Colorize, Exposure, Gloss, Metallic, Ambience, and Texture. These affect the image.
![]() To add a light source, click the Spot Light, Point Light, or Infinite Light button on the Options bar.
To add a light source, click the Spot Light, Point Light, or Infinite Light button on the Options bar.
![]() Click OK or Cancel on the Options bar to accept or reject changes.
Click OK or Cancel on the Options bar to accept or reject changes.


Using the Blur Filter Gallery
The Blur Gallery workspace includes three filter tools: Field Blur, Iris Blur, and Tilt-Shift. The Field Blur tool applies a blur to a specified point. The Iris Blur tool applies a blur to create an elliptical region of focus. The Tilt-Shift tool applies a blur and distortion to a linear region. Instead of spending a whole month’s salary on a specialized lens, just open your image in Photoshop and apply some of these blur filters to get the look you want. Use these filters to generate shallow depth of field and tilt-shift effects. There is also an on-image, interactive model that is GPU accelerated. Your image is front and center and the preview is much bigger than that of other blur filters. You can change the blur’s shape, size, and amount by changing points and pins directly on the image.
Use the Field, Iris, or Tilt-Shift Blur Filter
![]() Open a document.
Open a document.
![]() Select the Layers panel, and then select the layer or Smart Object on which you want to use the filter.
Select the Layers panel, and then select the layer or Smart Object on which you want to use the filter.
♦ If you convert the layer to a Smart Object (New!), it keeps the original layer intact.
![]() Click the Filter menu, point to Blur, and then click Field Blur, Iris Blur, or Tilt-Shift.
Click the Filter menu, point to Blur, and then click Field Blur, Iris Blur, or Tilt-Shift.
The Blur Tools and Blur Effects panels appear as well as a pin point within the image.
![]() To adjust the blur, click to place a pin (the blur point), and then drag a blur slider (sharper focus to the left or more blurry to the right) or enter a specific value in the Blur Tools panel. You can click to set multiple blur points.
To adjust the blur, click to place a pin (the blur point), and then drag a blur slider (sharper focus to the left or more blurry to the right) or enter a specific value in the Blur Tools panel. You can click to set multiple blur points.

♦ Field Blur. A pin appears in the image with a bull’s eye, indicating it’s selected.
♦ Iris Blur. An elliptical selection appears around a pin with four circle handles inside. Drag the white diamond handle to adjust the region corners or the gray circle handles to adjust the region shape. Drag the white circle handles to adjust the focus of the region.
♦ Tilt-Shift. Straight lines appear above and below a pin. The non-dotted lines represent the top and bottom of the blur, while the top and bottom dotted lines represent the background and foreground distortion. Select the Symmetric Distortion check box to apply the foreground setting to the background.
![]() Use the following to work with pins:
Use the following to work with pins:
♦ Add. Click in the image.
♦ Select. Click the pin (appears as a bull’s eye).
♦ Hide/Show. Press Ctrl (Win) or ![]() (Mac)+H. Also hides/shows any selections.
(Mac)+H. Also hides/shows any selections.
♦ Remove. Click the Remove All Pins button on the Options bar.
![]() To add blur effects, use any of the following in the Blur Effects panel:
To add blur effects, use any of the following in the Blur Effects panel:
♦ Light Bokeh. Drag slider or enter value to control the amount of highlights in the blur.
♦ Bokeh Color. Drag slider or enter value to control the colorfulness of the bokeh.
♦ Light Range. Drag slider to control the luminous level for the bokeh color.
![]() To switch between blur tools, click the Expand/Collapse arrow in the Blur Tools panel.
To switch between blur tools, click the Expand/Collapse arrow in the Blur Tools panel.
![]() To enable or disable individual blur tools or effects, select or deselect the check box to the right of the item in the panel.
To enable or disable individual blur tools or effects, select or deselect the check box to the right of the item in the panel.
![]() Click OK or Cancel on the Options bar to accept or reject changes.
Click OK or Cancel on the Options bar to accept or reject changes.

Using the Lens Blur Filter
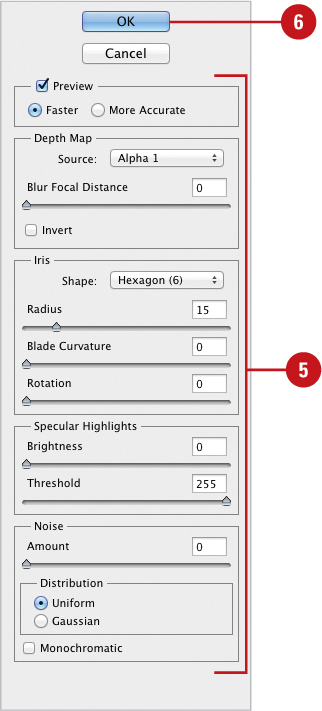
The Lens Blur filter creates a varying depth of field so that certain objects stay in focus and other areas become blurred. What stays in focus and what is blurred is determined by a user-defined selection or alpha channel. When the filter is activated, a depth map is created to determine the three-dimensional position of the pixels in an image. If you use an alpha channel, the black areas in the alpha channel are at the front of the photo, and the white areas are in the distance. Experiment with selections and alpha channel masks to see how precisely you can control the visual effect of blurring in an image.
Use the Lens Blur Filter
![]() Open a document.
Open a document.

![]() Select the Layers panel, and then select the layer or Smart Object to which you want to apply the Lens Blur.
Select the Layers panel, and then select the layer or Smart Object to which you want to apply the Lens Blur.
♦ If you convert the layer to a Smart Object, it keeps the original layer intact.
![]() Create a selection or alpha mask to control the blur.
Create a selection or alpha mask to control the blur.

![]() Click the Filter menu, point to Blur, and then click Lens Blur.
Click the Filter menu, point to Blur, and then click Lens Blur.
The Lens Blur dialog box opens.
See Also
See “Using the Gaussian Blur and Despeckle Filters” on page 174 for information on using filters.
![]() Select from the following options:
Select from the following options:
♦ Preview. Select Faster to generate quicker preview, or More Accurate to view the image with the filter applied.
♦ Depth Map. Select a source from the Source list arrow.
♦ Blur Focal Distance. Drag the slider to set the depth at which pixels are in focus. The higher the value, the greater the effect.
♦ Invert. Inverts the selection or alpha channel.
♦ Shape. Select an iris option from the Shape list arrow.
♦ Radius. Drag the slider to add more blur.
♦ Blade Curvature. Drag the slider to smooth out the edges of the iris.
♦ Rotation. Drag the slider to rotate the iris.
♦ Brightness. Drag the slider to increase the brightness of the highlights.
♦ Threshold. Drag the slider to select a brightness cutoff so that all the pixels that are brighter than that value are treated as highlights.
♦ Amount. Drag the slider to add or remove noise.
♦ Uniform or Gaussian. Select one method to add noise to an image.
♦ Monochromatic. Adds noise without affecting the color in your image.
![]() Click OK.
Click OK.

Working with Photo Filters
The Photo Filter command reproduces the same effect of placing a colored filter in front of the camera lens when you take a picture. Photographers place colored filters in front of a camera lens to adjust the color balance of the image and control the color temperature of the light transmitted through the lens. In addition to simulating a color filter, the Photo Filter command also lets you select a color preset and apply a specific hue adjustment to an image. If you want to apply a custom color adjustment, the Photo Filter command lets you specify a user-defined color using the Adobe Color Picker.
Work with Photo Filters
![]() Open a document.
Open a document.

![]() Select the Layers panel, and then select the layer or Smart Object to which you want to apply the filter.
Select the Layers panel, and then select the layer or Smart Object to which you want to apply the filter.
♦ If you convert the layer to a Smart Object, it keeps the original layer intact.
![]() Click the Image menu, point to Adjustments, and then click Photo Filter.
Click the Image menu, point to Adjustments, and then click Photo Filter.
![]() Select the Preview check box to view the results in the active document window.
Select the Preview check box to view the results in the active document window.
![]() Select from the following options:
Select from the following options:
♦ Filter. Click the list arrow, and then select from the available filter presets.
♦ Color. Click the color box, and then select a color using the Color Picker dialog box.
♦ Density. Drag the slider to increase or decrease the impact the color has on the image.
♦ Preserve Luminosity. Select the check box to prevent the image’s lightness values from being changed as a result of adding a color filter (recommended).
![]() Click OK.
Click OK.

Blending Modes and Filter Effects
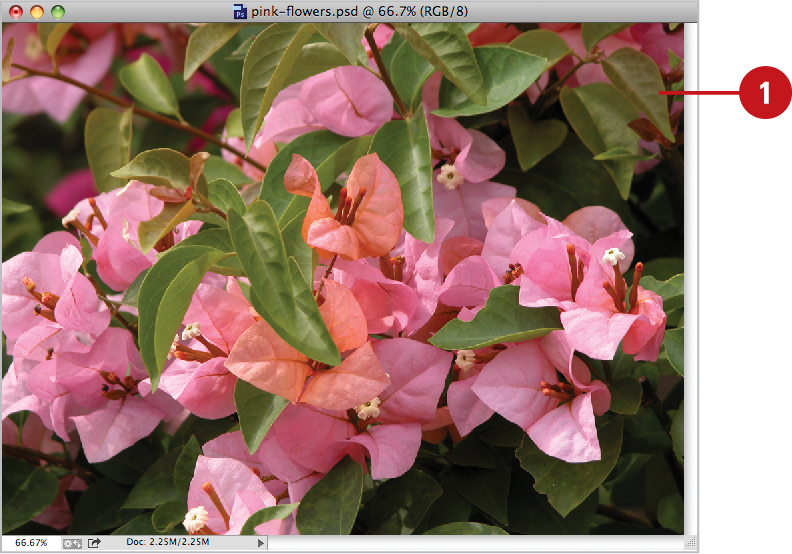
When Adobe introduced the Filter Gallery in Photoshop, it finally gave designers the ability to view the effects of multiple filters applied to a single image. While this changed forever how we apply filters to an image, there is one more creative way to work—Blending Modes. For example, you can make a copy of an image, apply a separate filter effect to each layer, and then use the Blending Modes option to create a totally different image. While this is not a new technique, the results of combining two or more layers together, each with a different filter effect, can produce quite stunning results.
Work with Blending Modes and Filter Effects
![]() Open an image.
Open an image.
![]() Select the layer or Smart Object to which you want to apply a blending mode and filter.
Select the layer or Smart Object to which you want to apply a blending mode and filter.
![]() Press Ctrl+J (Win) or
Press Ctrl+J (Win) or ![]() +J (Mac) to create a copy of the selected layer.
+J (Mac) to create a copy of the selected layer.
![]() Select the layers one at a time and apply a different filter to each layer.
Select the layers one at a time and apply a different filter to each layer.
![]() Select the top layer.
Select the top layer.
![]() Click the Blending Modes list arrow and experiment with the various blending options.
Click the Blending Modes list arrow and experiment with the various blending options.

In this example, the Cutout and Find Edges filters were used on the separate layers, and then combined with the Linear Light Blending Mode.
Did You Know?
You can use the Opacity option to further control the final image. If the blending effect appears a bit too intense, simply lower the opacity of the top or bottom layer to change the intensity of the filter effects.
Building Custom Patterns
The Pattern Maker filter (optional plug-in, available for download at www.adobe.com) lets you create your own distinctive patterns, based on image information in the active document, or clipboard memory. Since the pattern is based on sample data, it shares the visual characteristics of the sample. For example, if you sample an image of a cloudy sky, the Pattern Maker generates a tile-like pattern that is different from the sample but still retains the elements of a cloudy sky. You can even generate multiple patterns from the same sample.
Build Custom Patterns
![]() Open a document.
Open a document.
![]() Select the Layers panel, and then select the layer or Smart Object you want to use to create a pattern.
Select the Layers panel, and then select the layer or Smart Object you want to use to create a pattern.
![]() Click the Filter menu, and then click Pattern Maker.
Click the Filter menu, and then click Pattern Maker.
The optional filter is available at www.adobe.com. Search for the filter, and then download it.
![]() Select the Rectangular Marquee tool on the toolbox, and then select a portion of the image.
Select the Rectangular Marquee tool on the toolbox, and then select a portion of the image.
![]() Select the portion of the image you want to use to generate an image.
Select the portion of the image you want to use to generate an image.
![]() Click Generate to create a random pattern based on the selected sample.
Click Generate to create a random pattern based on the selected sample.

![]() Click Generate Again to generate another random pattern.
Click Generate Again to generate another random pattern.

Important
All the patterns are stored in the Tile History box, located on the bottom right of the Pattern Maker dialog box.
![]() Select from the available Tile Generation options:
Select from the available Tile Generation options:
♦ Use Clipboard As Sample. Uses the pixel information contained in the Clipboard as the tile-generating pattern.
♦ Use Image Size. Creates a tile pattern the size of the original image.
♦ Width. Enter a value (1 to 800), or click the black triangle and drag the slider left or right to define a width.
♦ Height. Enter a value (1 to 800), or click the black triangle and drag the slider left or right to define a height.
♦ Offset. Click the list arrow, and then click None, Horizontal, or Vertical.
♦ Amount. Enter a percentage value (1% to 100%), or click the black triangle and drag the slider left or right.
♦ Smoothness. Click the list arrow, and then select a value of 1, 2, or 3.
♦ Sample Detail. Enter a value from 3 to 21, or click the black triangle and drag the slider left or right.
♦ Show. Click the list arrow, and then select between the generated sample and the original image.
♦ Tile Boundaries. Select the check box to view the tile edges in the preview window. Click on the color box, and then select an alternate color.
![]() Scroll through your tile patterns using the left/right arrow keys underneath the Tile History preview. Stop when you see the pattern you want.
Scroll through your tile patterns using the left/right arrow keys underneath the Tile History preview. Stop when you see the pattern you want.
![]() Click OK.
Click OK.

Important
When you click OK, the Pattern Maker filter overwrites the original image, so it’s a good idea to make a copy of the image in a separate layer before using the Pattern Maker filter.
Applying a Fade Effect
Photoshop’s Fade command is a one-shot chance to change your mind. For example, you’ve just applied the Find Edges filter to an image. You like the look but the effect is too dramatic. What you really want to do is tone down the effect. Unfortunately, filter effects don’t fade like a gradient; they are simply applied, all or nothing, to the image. You could create a copy of the original layer, apply the effect to the copy, and then use Layer transparency and blending mode options to merge the effect with the image, but there’s an easier way. Just use the Fade command.
Apply a Fade Effect
![]() Open a document.
Open a document.

![]() Select the Layers panel, and then select the layer or Smart Object to which you want to apply a filter.
Select the Layers panel, and then select the layer or Smart Object to which you want to apply a filter.
![]() Click the Filter menu, and then click Filter Gallery.
Click the Filter menu, and then click Filter Gallery.
![]() Apply any of Photoshop’s filters to the active image.
Apply any of Photoshop’s filters to the active image.
![]() Click OK.
Click OK.
![]() Click the Edit menu, and then click Fade. The Fade command includes the name of the applied filter.
Click the Edit menu, and then click Fade. The Fade command includes the name of the applied filter.
Important
The Fade command must be executed before performing any other command. Once you execute another command, the ability to modify the last filter is lost.
![]() Change the Opacity and Mode settings until you see the effect you’re after.
Change the Opacity and Mode settings until you see the effect you’re after.
![]() Click OK.
Click OK.


Did You Know?
You can use the Fade command with almost any filter or drawing tool. Every time you draw, use a command, or use a filter, the Fade command gives you a one-shot chance to fade and blend.
Controlling Filters Using Selections
When you apply a filter to an image, Photoshop applies the filter equally to the entire image. Unfortunately, that might not be what you had in mind. For example, you might want to apply the Gaussian Blur filter to a portion of the image. In that case, Photoshop’s selection tools come to the rescue. The primary purpose of making a selection is to define a work area, and when you select an area before applying a filter, the only area impacted by the filter will be the selected area.
Control Filters Using Selections
![]() Open a document.
Open a document.

![]() Select the Layers panel, and then select the layer or Smart Object to which you want to apply a filter.
Select the Layers panel, and then select the layer or Smart Object to which you want to apply a filter.
![]() Click one of the selection tools on the toolbox, and then create a selection in the document window.
Click one of the selection tools on the toolbox, and then create a selection in the document window.
![]() Click the Filter menu, and then click Filter Gallery.
Click the Filter menu, and then click Filter Gallery.
![]() Select any of Photoshop’s filters.
Select any of Photoshop’s filters.
![]() Adjust the filter options until you see the effect you want.
Adjust the filter options until you see the effect you want.
![]() Click OK.
Click OK.

The filter is only applied to the selected areas of the image.
See Also
See Chapter 4, “Mastering the Art of Selection,” on page 83 for more information on creating selections.
Using a Channel Mask to Control Filter Effects
Photoshop’s filters can be applied to any raster image. In addition, filters can be controlled with the use of selections. You can use any of Photoshop’s selection tools to define a working area. However, simple selections are limited in what they can do. Although the edge of selections can be modified by feathering, the inside area of the selection is completely selected. What if you want to apply a filter in a completely different way? For example, what if you want to apply a filter that is stronger on the right side of the image, and slowly tapers off from left to right? In that case a simple selection won’t help, but a Channel mask will do exactly what you need.
Use a Channel Mask to Control Filter Effects
![]() Open a document.
Open a document.
![]() Click the Channels panel, and then click the Add New Channel button.
Click the Channels panel, and then click the Add New Channel button.
![]() Select the Gradient tool on the toolbox, click a linear gradient, select the default foreground and background colors of black and white, and then drag right to left across the new channel mask.
Select the Gradient tool on the toolbox, click a linear gradient, select the default foreground and background colors of black and white, and then drag right to left across the new channel mask.
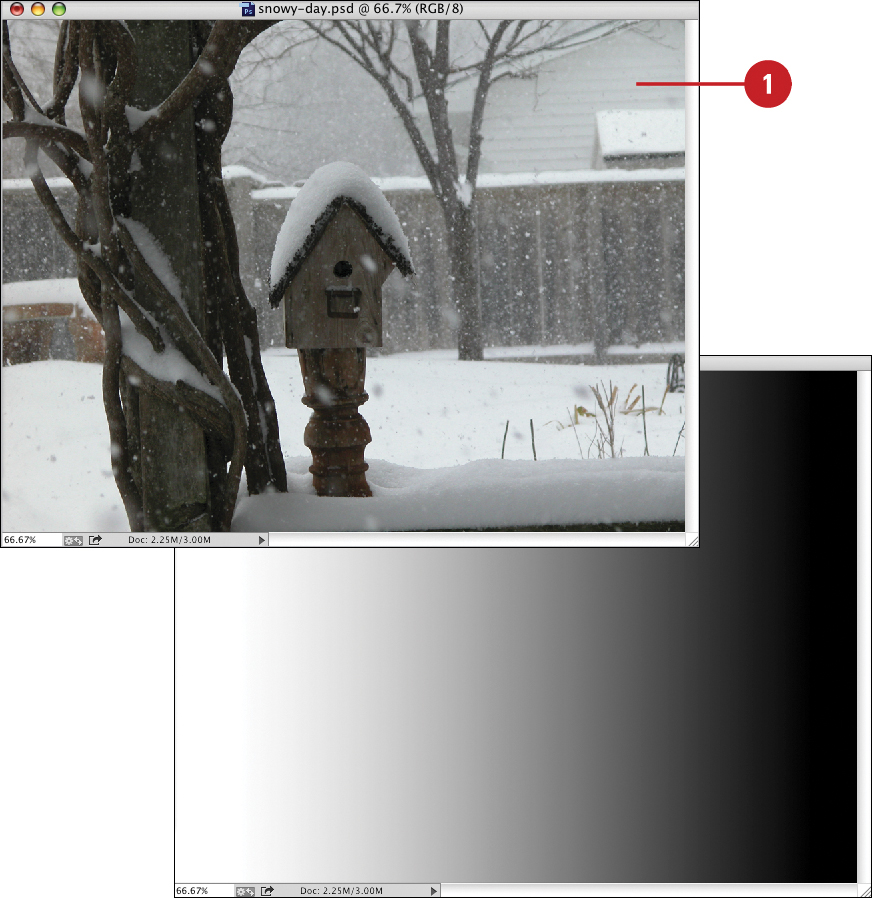
Photoshop creates a horizontal, black to white channel mask.
![]() Select the Layers panel, and then select the layer containing the image you want to modify.
Select the Layers panel, and then select the layer containing the image you want to modify.

![]() Click the Select menu, and then click Load Selection.
Click the Select menu, and then click Load Selection.
![]() Click the Channel list arrow, select the new channel, and leave the other options at their default values.
Click the Channel list arrow, select the new channel, and leave the other options at their default values.
![]() Click OK.
Click OK.

![]() Click the Filter menu, and then click Filter Gallery.
Click the Filter menu, and then click Filter Gallery.
![]() Click any of the available filters, and then adjust the options until you are satisfied with the result.
Click any of the available filters, and then adjust the options until you are satisfied with the result.
![]() Click OK.
Click OK.
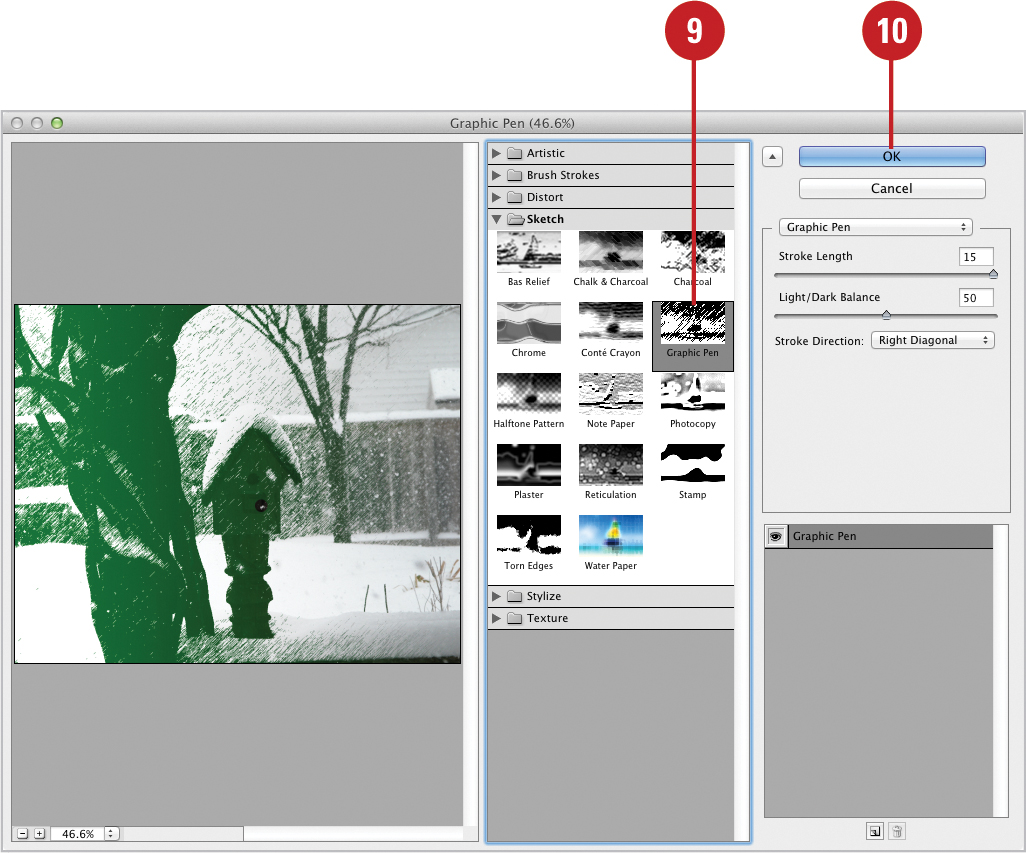
The gradient mask (black to white) creates a ramped percentage selection. The white area of the mask is fully selected and the black area is fully masked. As the mask moves to black, the image becomes less and less selected. When the filter is applied, it loses strength from left to right (matching the shades of gray in the mask).
Protecting Images with Watermarks
Digital watermarks are designed to protect your intellectual property. When you embed a digital watermark, it actually inserts the watermark information as visible noise into the image. This means that someone can copy your image, scan it, and the watermark is still part of the image. To embed a digital watermark, you must register and pay a service fee with Digimarc Corporation, which maintains a database of artists, designers, and photographers along with their contact information. You can then embed the Digimarc ID in your images, along with information such as the copyright year or a restricted-use identifier.
Protect Images with Watermarks
![]() Open the image you want to watermark.
Open the image you want to watermark.

Important
The Embed Watermark filter won’t work on an image that has been previously watermarked.
![]() If you’re working with a layered image, you should flatten the image before watermarking it; otherwise, the watermark will affect the active layer only.
If you’re working with a layered image, you should flatten the image before watermarking it; otherwise, the watermark will affect the active layer only.
![]() Click the Filter menu, point to Digimarc, and then click Embed Watermark.
Click the Filter menu, point to Digimarc, and then click Embed Watermark.
♦ If prompted, click OK to the warning alert.
![]() If you’re using the watermark for the first time, click Personalize. Get a Digimarc ID by clicking Info to launch your web browser and visit the Digimarc web site at www.digimarc.com.
If you’re using the watermark for the first time, click Personalize. Get a Digimarc ID by clicking Info to launch your web browser and visit the Digimarc web site at www.digimarc.com.
Enter a Digimarc ID and any other necessary information, and then click OK.
The Personalize button becomes a Change button, allowing you to enter a new Digimarc ID.
![]() Click the Image Information list arrow, select an option, and then enter a copyright year, Transaction ID, or Image ID for the image.
Click the Image Information list arrow, select an option, and then enter a copyright year, Transaction ID, or Image ID for the image.
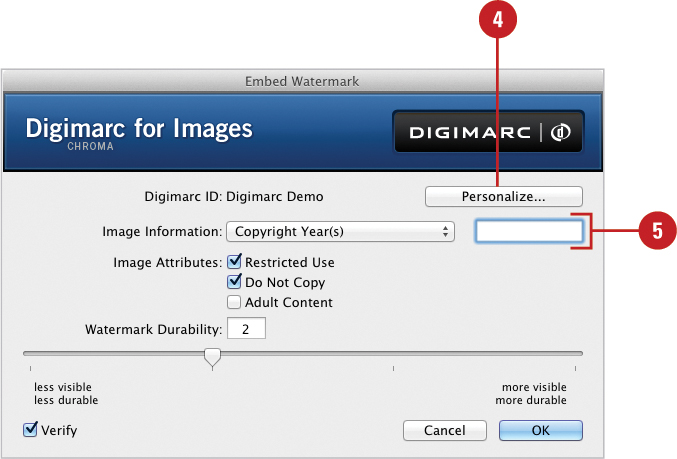
![]() Select any of the following Image Attributes check boxes:
Select any of the following Image Attributes check boxes:
♦ Restricted Use. Select the check box to limit the use of the image.
♦ Do Not Copy. Select the check box to specify that the image should not be copied.
♦ Adult Content. Select the check box to label the image contents as suitable for adults only.
![]() Choose a level of durability (visibility) for the watermark.
Choose a level of durability (visibility) for the watermark.
![]() Drag the slider, or enter a value (1 to 4). The higher the number, the more aggressive the watermark.
Drag the slider, or enter a value (1 to 4). The higher the number, the more aggressive the watermark.
![]() To automatically assess the watermark’s viability after it’s embedded, select the Verify check box.
To automatically assess the watermark’s viability after it’s embedded, select the Verify check box.
![]() Click OK.
Click OK.

Did You Know?
There is a difference between copyrights and trademarks. Be wary of logos, symbols, devices, brand names, company names, and anything which are or should be marked trademark, service mark or registered trademark in an image. These are protected as long as they are in use by the owner.
Viewing Various Filter Effects
Photoshop provides a bountiful selection of filters, over one hundred. Take a moment to view some of the various filter effects that Photoshop offers. The original image is shown to the right, and we’ve displayed some common filters on the following pages. A good thing to think about when using filters is your original image. Look at the background colors, and see if they will look good with some of the filters. The best thing to do is open an image that has a lot of varied details, and then apply some filters to see what looks good to you.

Various Filter Effects


