
20. Working with Video
Introduction
Photoshop allows you to work with video as well as create a timeline-based animation. If you want to add video to a document, you can create a new video layer. You can create a video layer from a file, or create a blank one and add a video file to it later. When you insert a video, it’s linked to the Photoshop document, and the file needs to stay in the same location, otherwise you’ll be asked to find it when you reopen the document. Photoshop opens a variety of video files and image sequences. When you open a video file or add a video to a layer, it creates a video group to help you with organization. The video appears in the Timeline and Layers panels.
After you insert a video layer, you can modify it using the Timeline panel in Video Timeline view. You can change the start and stop points, trim frames, add a transition fade, or add animation using keyframes. The power of Photoshop comes to the fore front when you work with video because you can add text and other effects, such as adjustment layers, to video just like you would with an still image.
After you finish creating your video document in Photoshop, you can export it as a video (using Adobe Media Encoder) or an image sequence. The video formats include: DPX, H.264, or QuickTime. If you need a still image for a video to create a poster, you can rasterize the video layer with the image you want.
Opening Video Files and Image Sequences
In Photoshop, you can open video files and image sequences using the Open command from the File menu using the Video files of type (common formats listed in the table below) or the Image Sequence check box. Video layers can contain files with the following color modes and bits per channel (bpc):
♦ Grayscale. 8, 16, or 32 bpc
♦ RGB. 8, 16, or 32 bpc
♦ CMYK. 8 or 16 bpc
♦ Lab. 8 or 16 bpc
Video and Image Sequence Formats

Creating a Video Layer
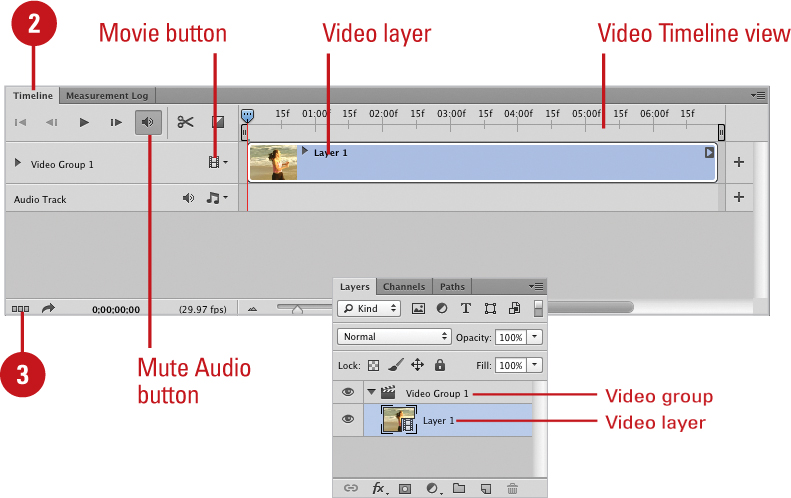
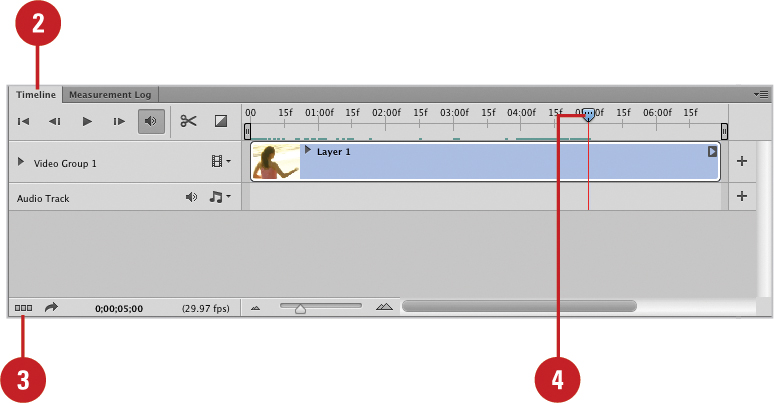
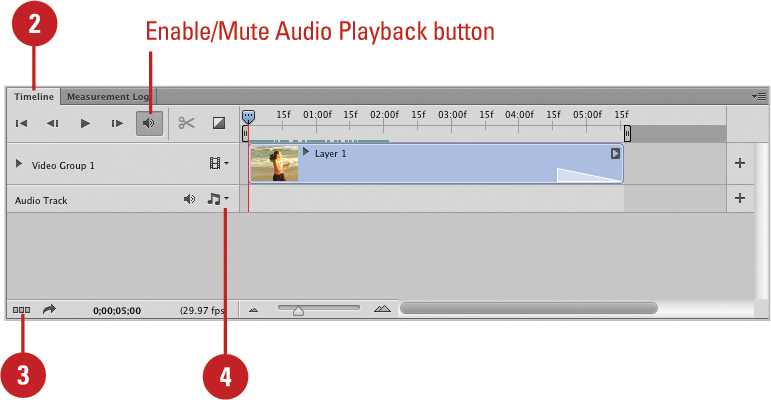
If you want to add video to a document, you can create a new video layer in Photoshop. You can create a video layer from a file, or create a blank one and add a video file to it later. If you want to open a video later, you can use the Open command from the File menu. When you insert a video, it’s linked to the Photoshop document, and the file needs to stay in the same location, otherwise you’ll be asked to find it when you reopen the document. Photoshop opens a variety of video files and image sequences. The video appears in the Layers and Timeline panels. When you open a video file or add a video to a layer, it creates a video group. You can even play the video with sound by either clicking Alt (Win) or Option (Mac) when you hit the Play button, or toggle the Mute Audio button in the Video Timeline view.
Create a Video Layer
![]() Open a document.
Open a document.
![]() Select the Timeline panel.
Select the Timeline panel.
♦ Click the Window menu, and then click Timeline.
![]() To switch to Video Timeline view, click the Convert to Video Timeline button.
To switch to Video Timeline view, click the Convert to Video Timeline button.
![]() Use any of the following:
Use any of the following:
♦ Open File. Click the File menu, click Open, select a video or image sequence, and then click Open.
This creates a video group.
♦ New Layer From File. Click the Layer menu, point to Video Layers, click New Video Layer from File, select a video or image sequence, and then click Open.
♦ New Blank Video Layer. Click the Layer menu, point to Video Layers, and then click New Blank Video Layer.
♦ Add Video to Layer. Click the Movie button for the layer in the Timeline panel, click Add Media, select a video or image sequence, and then click Open.
This creates a video group.

Modifying a Video Layer
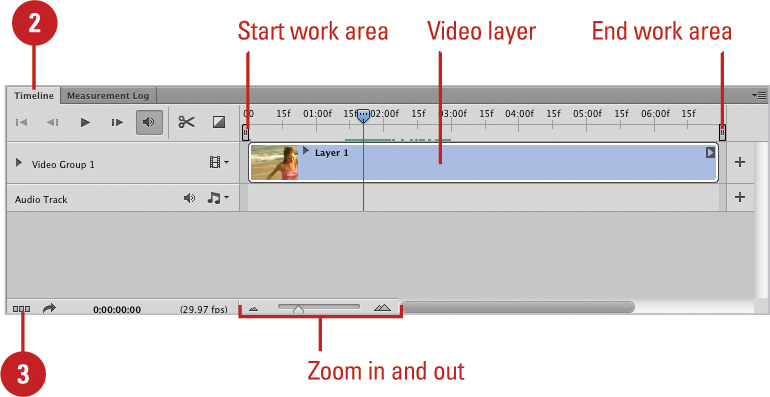
After you insert a video layer, you can modify it in Photoshop using the Timeline panel in Video Timeline view. You can zoom in and out to display the Timeline the way you want, and then drag the playhead, also known as the current-time indicator, to the time or frame number in the video where you want to start your modifications. You can change the start and stop points (also known as In and Out points), trim frames, add a fade-in or fade-out, or add animation using keyframes. A keyframe defines the location of a property change to the video layer. When you set at least two keyframes that change properties, such as position, opacity, or style, you create animation.
Modify a Video Layer Duration
![]() Open a document with a video.
Open a document with a video.
![]() Select the Timeline panel.
Select the Timeline panel.
♦ Click the Window menu, and then click Timeline.
![]() To switch to Video Timeline view, click the Convert to Video Timeline button.
To switch to Video Timeline view, click the Convert to Video Timeline button.
![]() Use any of the following methods to change the video duration:
Use any of the following methods to change the video duration:
♦ Start and End Work Area. Point to the ends of the work area bar, and then drag to change the position. Click the Timeline Options button, point to Work Area, and then select an option to lift (delete) or extract (crop) the work area.
♦ In and Out Points. Point to the start or end of the clip (cursor changes to a double-arrow), and then drag to change the duration.
♦ Move Position. Point to within the clip, and then drag it.
![]() To delete a clip, do any of the following:
To delete a clip, do any of the following:
♦ Timeline Panel. Select the clip, and then press Delete or Backspace.
♦ Layer Panel. Drag video or group layer to Delete icon.

![]() Select the Timeline panel.
Select the Timeline panel.
♦ Click the Window menu, and then click Timeline.
![]() To switch to Video Timeline view, click the Convert to Video Timeline button.
To switch to Video Timeline view, click the Convert to Video Timeline button.
![]() Click the down arrow for a video layer to display layer properties.
Click the down arrow for a video layer to display layer properties.
![]() Click the Time-Vary Stopwatch icon to enable shape animation for the layer property.
Click the Time-Vary Stopwatch icon to enable shape animation for the layer property.
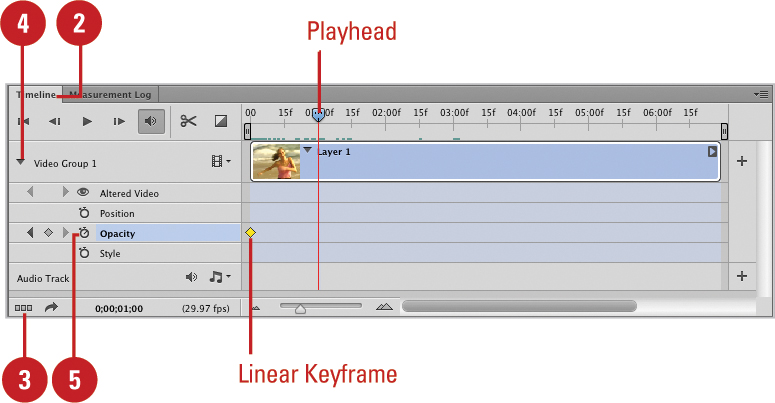
![]() Position the playhead where you want to set a keyframe, and then make the property changes you want, such as Opacity, in the Layers panel.
Position the playhead where you want to set a keyframe, and then make the property changes you want, such as Opacity, in the Layers panel.

![]() Use any of the following methods to change the keyframe:
Use any of the following methods to change the keyframe:
♦ Select. Click the keyframe icon.
♦ Move. Drag to change the position.
♦ Delete. Right-click the keyframe icon, and then click Delete Keyframes.
♦ Method. The diamond keyframe icon animates the property change evenly over time (known as a Linear Keyframe). If you want an instant property change, you can change the interpolation method to a Hold Keyframe, which appears as a square keyframe icon. Right-click a keyframe icon, and then click Hold Interpolation or Linear Interpolation.
Creating a Video Group
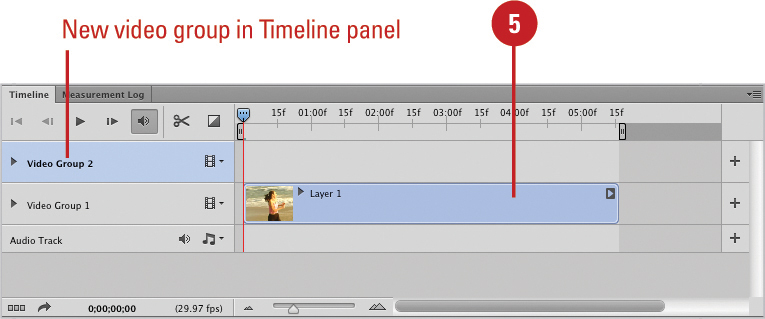
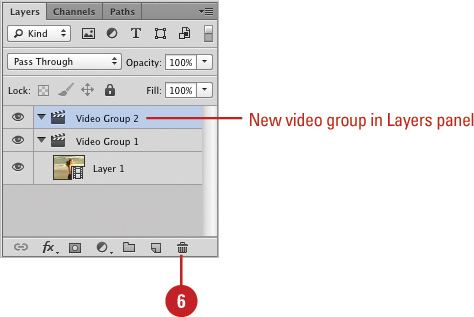
As you add video and audio clip as well as other Photoshop elements to your projects, the Video Timeline view can become cluttered and hard to work with. To help alleviate the clutter and create some organization, you can create video groups. Even though it’s called a video group, you can put any type of Photoshop layer into the group. The group appears in the Video Timeline view in the Timeline panel and in the Layers panel. You can click the Expand/Collapse arrow to show or hide the elements in the group in the Layers panel. The stacking position in the Layers panel determines the stacking order in the Timeline panel. You can rearrange the order in the Layers panel.
Create a Video Group
![]() Open a document with a video layer.
Open a document with a video layer.
![]() Select the Timeline panel.
Select the Timeline panel.
♦ Click the Window menu, and then click Timeline.
![]() To switch to Video Timeline view, click the Convert to Video Timeline button.
To switch to Video Timeline view, click the Convert to Video Timeline button.
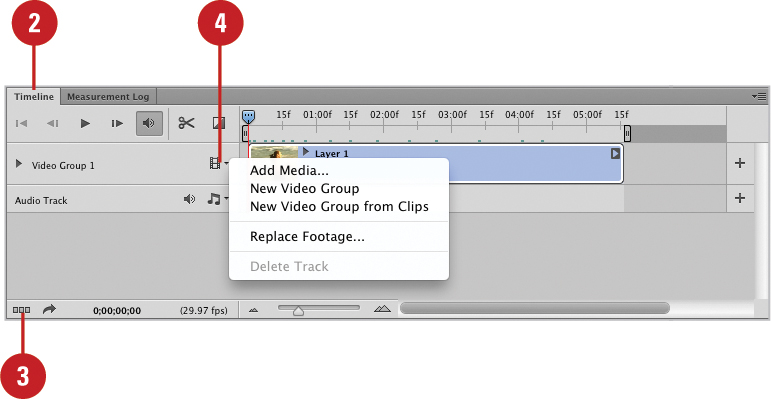
![]() To create a video group, do any of the following:
To create a video group, do any of the following:
♦ New Video Group. Click the Movie button, and then click New Video Group.
♦ New Video Group from Clips. Select one or more clips, click the Movie button, and then click New Video Group from Clips.
♦ New Video Group by Combining Clips. Select one or more clips onto another clip.
![]() To change elements in a video group, drag the element into the group. You can drag elements in the Timeline or Layers panel.
To change elements in a video group, drag the element into the group. You can drag elements in the Timeline or Layers panel.
![]() To delete a group, drag the video group to the Delete button in the Layers panel. in a video group.
To delete a group, drag the video group to the Delete button in the Layers panel. in a video group.
Adding Text to a Video Layer
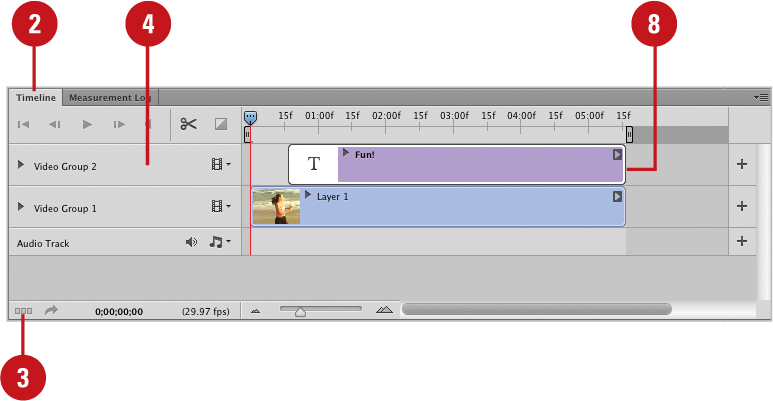
The power of Photoshop comes to the fore front when you work with video because you can add text and other elements to video just like you would with a still image. For text, you can use a type tool and other formatting options to create the look you want and then adjust the position and duration in the Timeline panel. You can also add adjustments layers and other Photoshop effects. Before you add effects, you can create a Smart Object with video layers just like other layers, so you can keep the original video in tact. It’s an opportunity to have fun with videos in Photoshop and allow your creativity to soar.
Add Text to a Video Layer
![]() Open a document with a video layer.
Open a document with a video layer.
![]() Select the Timeline panel.
Select the Timeline panel.
♦ Click the Window menu, and then click Timeline.
![]() To switch to Video Timeline view, click the Convert to Video Timeline button.
To switch to Video Timeline view, click the Convert to Video Timeline button.
![]() Select the video group that you want to add a text layer.
Select the video group that you want to add a text layer.
![]() Select a type tool on the toolbox.
Select a type tool on the toolbox.
![]() Click or drag a type box on the video, and then enter the text you want to add.
Click or drag a type box on the video, and then enter the text you want to add.
A text layer is added to the selected video group.
![]() Use formatting options on the Options bar, menus, and panels to create the type you want.
Use formatting options on the Options bar, menus, and panels to create the type you want.

![]() You can drag start or end point of the text clip to adjust the duration or drag the clip to reposition it.
You can drag start or end point of the text clip to adjust the duration or drag the clip to reposition it.
Did You Know?
You can change the stacking order in the Timeline panel. Drag the video group or layer to another stacking position in the Layers panel.
Splitting a Video Layer
In addition to modifying a video layer, you can split it into two new video layers at the specific point you want in Photoshop. You can zoom in and out to display the Timeline the way you want, and then drag the playhead to the time or frame number in the video where you want to split it. The video layer is duplicated and appears next to the original in the Video Timeline view. The original layer contains the video from the start to the current time or frame, and the duplicate layer contains the video from current time or frame to the end.
Split a Video Layer
![]() Open a document with a video layer.
Open a document with a video layer.
![]() Select the Timeline panel.
Select the Timeline panel.
♦ Click the Window menu, and then click Timeline.
![]() To switch to Video Timeline view, click the Convert to Video Timeline button.
To switch to Video Timeline view, click the Convert to Video Timeline button.
![]() Drag the playhead to the time or frame number where you want to split the video layer.
Drag the playhead to the time or frame number where you want to split the video layer.
![]() Click the Split at Playhead button on the Timeline panel.
Click the Split at Playhead button on the Timeline panel.

♦ You can also click the Timeline Options button, and then click Split at Playhead.

Did You Know?
You can preview video or timeline animation. You can preview a video or animation in the document window. Drag the playback head to the point where you want to play the video or animation. Click the Play button at the bottom of the Timeline panel. You can also press the Spacebar to play or stop the playback. Photoshop caches it to memory for faster playback.
Cloning Video Layer Content
If you have video or animation frames that you want to retouch or duplicate, you can use the Clone Stamp and Healing Brush tool in Photoshop. The Clone Stamp tool allows you to sample content from one area of a frame (known as the source) and paint it over another area of the same or a different frame (known as the target). The Healing Brush tool allows you to blend the sampled content from the source with the target to fix a problem. You can use the Clone Source panel to set several samples from one part of a video frame and clone or blend them in another video frame.
Clone Parts of a Video Layer
![]() Open a document with a video layer, and then select it in the Layers panel.
Open a document with a video layer, and then select it in the Layers panel.
![]() Select the Timeline panel.
Select the Timeline panel.
♦ Click the Window menu, and then click Timeline.
![]() To switch to Video Timeline view, click the Convert to Video Timeline button.
To switch to Video Timeline view, click the Convert to Video Timeline button.
![]() Drag the playhead to the time or frame number that is the source of the sample you want.
Drag the playhead to the time or frame number that is the source of the sample you want.

![]() Select the Clone Stamp tool on the toolbox.
Select the Clone Stamp tool on the toolbox.
![]() To set a sample point, Alt (Win) or Option (Mac), and click where you want the sample.
To set a sample point, Alt (Win) or Option (Mac), and click where you want the sample.
![]() To set another sample point, select a Clone Stamp button on the Clone Source panel, adjust the playhead, and then repeat Step 6.
To set another sample point, select a Clone Stamp button on the Clone Source panel, adjust the playhead, and then repeat Step 6.

![]() Select the target video layer and move the playhead to the frame you want to paint.
Select the target video layer and move the playhead to the frame you want to paint.
![]() If you set multiple samples, click the source in the Clone Source panel.
If you set multiple samples, click the source in the Clone Source panel.
Timesaver
Use Shift+Alt (Win) or Shift+Option (Mac) to show the clone overlay temporarily.
![]() Drag the area you want to paint.
Drag the area you want to paint.
Adding a Transition to a Video Layer
Instead of having a video abruptly start, you can add a transition fade effect to the start or end of a video. If you have text or other elements within the video, you can also add transitions to the item. You can add a transition by using the Transition button in the Video Timeline view in the Timeline panel. You can set the duration of the transition to create the effect you want to achieve. If you decided you don’t want a transition, you can quickly delete it without effecting the video. Or, you can change a transition to different one.
Add a Transition to a Video Layer
![]() Open a document with a video layer.
Open a document with a video layer.
![]() Select the Timeline panel.
Select the Timeline panel.
♦ Click the Window menu, and then click Timeline.
![]() To switch to Video Timeline view, click the Convert to Video Timeline button.
To switch to Video Timeline view, click the Convert to Video Timeline button.
![]() Click the Transition button in the Timeline panel.
Click the Transition button in the Timeline panel.
![]() Specify the duration you want for the transition.
Specify the duration you want for the transition.
![]() Drag a transition to the beginning or end of the video you want.
Drag a transition to the beginning or end of the video you want.

![]() To edit or delete a transition, right-click on the transition in the video, and then do any of the following:
To edit or delete a transition, right-click on the transition in the video, and then do any of the following:
♦ Transition Type. Click the Type list arrow, and then select a transition type.
♦ Transition Duration. Click the Duration list arrow, and then specify a duration.
♦ Delete Transition. Click the Delete button.

Adding Audio to a Video Layer
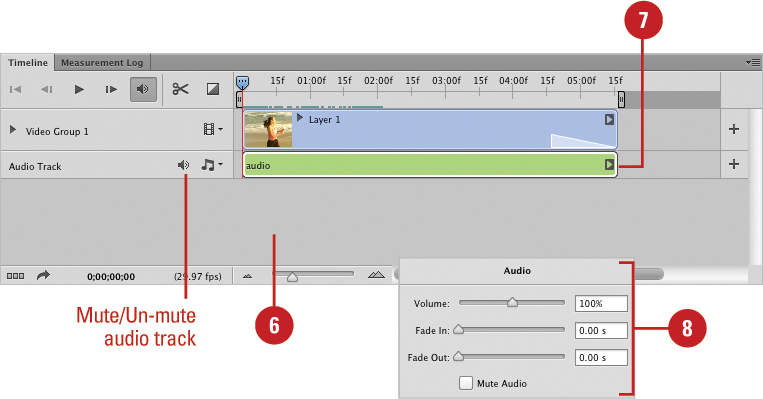
In addition to video clips, you can also add audio to the Timeline panel. You can also add a transition fade to audio; however the process is a little different. You right-click the audio track in the Video Timeline view in the Timeline panel, and then adjust the Fade In or Fade Out settings on the pop-up. You can also adjust the volume for the audio track. You can use the Music button on the Audio track to perform sound-related commands, such as Add Audio, Duplicate Audio Clip, Delete Audio Clip, Replace Audio Clip, New Audio Track, and Delete Track.
Add Audio to a Video Layer
![]() Open a document with a video layer.
Open a document with a video layer.
![]() Select the Timeline panel.
Select the Timeline panel.
♦ Click the Window menu, and then click Timeline.
![]() To switch to Video Timeline view, click the Convert to Video Timeline button.
To switch to Video Timeline view, click the Convert to Video Timeline button.
![]() Click the Music button for the Audio Track in the Timeline panel, and then click Add Audio.
Click the Music button for the Audio Track in the Timeline panel, and then click Add Audio.
♦ Delete. Click Delete Audio Clip or Delete Track on pop-up.
![]() Select the audio file, and then click Open.
Select the audio file, and then click Open.
![]() Deselect all layers in the Layers panel.
Deselect all layers in the Layers panel.
![]() To modify audio position or duration, do any of the following:
To modify audio position or duration, do any of the following:
♦ Move Position. Point to within the clip, and then drag it.
♦ Duration. Point to the start or end of the clip (cursor changes to a double-arrow), and then drag to change the duration.
![]() To adjust the volume or a transition fade, right-click the audio track, and then do the following:
To adjust the volume or a transition fade, right-click the audio track, and then do the following:
♦ Volume. Drag the slider or enter a percentage.
♦ Fade In or Fade Out. Drag the slider or enter a time in seconds.
Creating an Animation
An animation is a sequence of images, or frames, that vary slightly to create the illusion of movement over time. One of the most Internet-compatible animation formats is the animated GIF. The original designation, GIF89a, gives you an idea of how long this format has been around. The GIF file format (Graphics Interchange Format) is used primarily for clip art, text, and line art, or for images that contain areas of solid color. You can use a sequence of individual image layers to create animation frames in Frame view in the Timeline panel, which you can save as an animated GIF. Once the image is created, you can open and use it in any application that supports the GIF file format.
Create an Animated GIF from Scratch
![]() Open Photoshop.
Open Photoshop.
![]() Click the File menu, and then click New.
Click the File menu, and then click New.
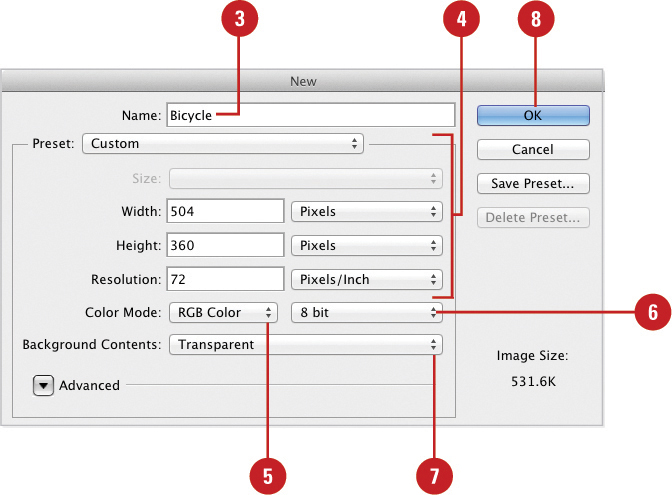
![]() Enter a name in the Name box.
Enter a name in the Name box.
![]() Click the Preset list arrow, and then select from the available presets, or enter in a customized Width, Height, and Resolution.
Click the Preset list arrow, and then select from the available presets, or enter in a customized Width, Height, and Resolution.
![]() Click the Color Mode list arrow, and then select a color mode for the image.
Click the Color Mode list arrow, and then select a color mode for the image.
![]() Click the Bit Size list arrow, and then choose a bit depth for the image (8 bit recommended).
Click the Bit Size list arrow, and then choose a bit depth for the image (8 bit recommended).
![]() Click the Background Contents list arrow, and then click White, Background Color, or Transparent (animated GIF files look best using transparency).
Click the Background Contents list arrow, and then click White, Background Color, or Transparent (animated GIF files look best using transparency).
![]() Click OK.
Click OK.
![]() Create the first image for the animated GIF.
Create the first image for the animated GIF.

![]() Press Ctrl+J (Win) or
Press Ctrl+J (Win) or ![]() +J (Mac) to create a copy of your first animation in a separate layer.
+J (Mac) to create a copy of your first animation in a separate layer.
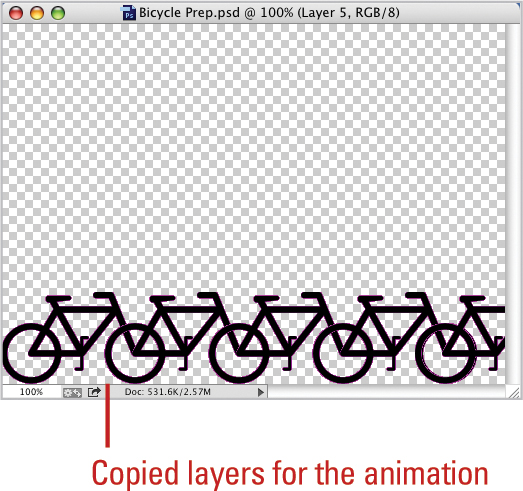
![]() Modify the second image (animations are essentially the same image, modified slightly between each animation frame or, in this case each layer).
Modify the second image (animations are essentially the same image, modified slightly between each animation frame or, in this case each layer).
![]() Repeat steps 10 and 11 until you have enough layers for the animation.
Repeat steps 10 and 11 until you have enough layers for the animation.

![]() Click the Window menu, and then click Timeline.
Click the Window menu, and then click Timeline.
![]() To switch to Frame view, click the Convert to Frame Animation button.
To switch to Frame view, click the Convert to Frame Animation button.
![]() Click the Timeline Options button on the Timeline panel, and then click Make Frames From Layers.
Click the Timeline Options button on the Timeline panel, and then click Make Frames From Layers.

![]() Click the Play button to view your animation in the document window.
Click the Play button to view your animation in the document window.
![]() Click the File button, and then click Save for Web.
Click the File button, and then click Save for Web.
![]() Fine-tune the image using the available options.
Fine-tune the image using the available options.
![]() Click Save to save the current image using the Save Optimized As dialog box.
Click Save to save the current image using the Save Optimized As dialog box.

See Also
See Chapter 9, “Using the Paint, Shape Drawing, and Eraser Tools,” on page 231 for more information on using the various drawing tools.
Working with Animation
After you create an animation using the Timeline panel, you can use controls at the bottom of the panel to work with the animation. You can use controls to select frames, play back the animation, and specify how many times you want to play it back. If you need to quickly copy or remove frames, you can use the Duplicates Selected Frames or Deletes Selected Frames buttons. Animation is all about creating motion, which can be time intensive to do on a frame-by-frame basis. In Photoshop, it’s not necessary to create every frame. You can use the Tweens Animation Frames button to help you create frames between one frame and another. Tweening allows you to quickly animate objects. The animation appears in the Timeline panel by default in the Frame view; however, you can also display it in Video Timeline view. In Video Timeline view, you can see how each layer within the animation plays. In this view, you can also use Onion Skin mode, which allows you to view multiple frames simultaneously.
Work with an Animation
![]() Open a document with an animation.
Open a document with an animation.
![]() Click the Window menu, and then click Timeline.
Click the Window menu, and then click Timeline.
![]() To switch to Frame view, click the Convert to Frame Animation button.
To switch to Frame view, click the Convert to Frame Animation button.
♦ This is a toggle button that switches back and forth between Frame and Video Timeline view.
![]() Select any of the following options to play and select frames in the animation:
Select any of the following options to play and select frames in the animation:
♦ First Frame. Selects the first frame.
♦ Previous Frame. Selects the previous frame.
♦ Play. Plays the animation.
♦ Next Frame. Selects the next frame.
![]() Click the Loop Count list arrow, and then select the option you want.
Click the Loop Count list arrow, and then select the option you want.
♦ Once/3 Times. Plays the animation one time or three times.
♦ Forever. Plays the animation over and over again in a continuous loop.
♦ Other. Opens the Loop Count dialog box where you can select a specific number of times to loop the animation.
![]() Select any of the following options to work with frames:
Select any of the following options to work with frames:
♦ Tweens Animation Frames. Creates motion tween between frames.
♦ Duplicates Selected Frames. Duplicates the selected frames.
♦ Deletes Selected Frames. Deletes the selected frames.
![]() To switch to Video Timeline view, click the Convert to Video Timeline button.
To switch to Video Timeline view, click the Convert to Video Timeline button.

![]() To change the Video Timeline view to see more or less of the animation window, click the Zoom In or Zoom Out button or drag the slider.
To change the Video Timeline view to see more or less of the animation window, click the Zoom In or Zoom Out button or drag the slider.

![]() To display other commands and options, click the Timeline Options button.
To display other commands and options, click the Timeline Options button.
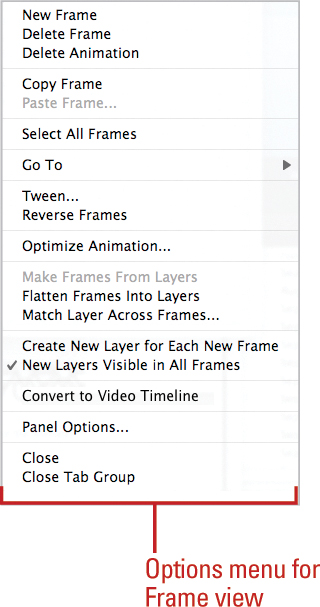

♦ Onion Skinning. Displays multiple frames simultaneously. Click Enable Onion Skins on the menu to enable it. To disable it, click the command again. To set options, click Onion Skin Settings on the menu.
![]() To switch back to Frame view, click the Convert to Frame Animation button.
To switch back to Frame view, click the Convert to Frame Animation button.

Exporting Directly to Video
Photoshop lets you export a document as a video (using Adobe Media Encoder) or an image sequence. The video formats include: DPX, H.264, or QuickTime. DPX is a bitmap format used to store a single frame of a video. H.264 is an advanced high quality video format with low bit rates that allows you to create videos for Android Phones & Tablets, Apple devices (TV, iPad, iPhone, and iPod), YouTube, Vimeo, and HD (High Definition) devices. QuickTime is an Apple video format. You can also export an animation to separate image files. The file formats include: BMP, Cineon, Dicom, JPEG, JPEG 2000, OpenEXR, Photoshop, PNG, SCI RGB, Targa, and TIFF.
Export Directly to Video
![]() Open a document.
Open a document.
If the document is an animation, the frames will be visible in the Timeline panel.
![]() Click the File menu, point to Export, and then click Render Video.
Click the File menu, point to Export, and then click Render Video.
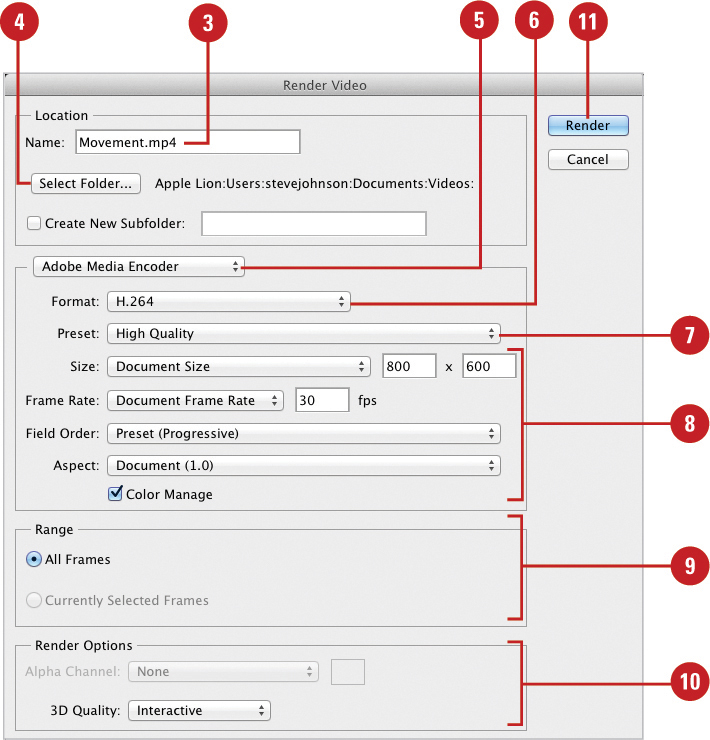
![]() Type a name for the video or use the one provided.
Type a name for the video or use the one provided.
![]() Click Select Folder, select the folder where you want to store the file, and then click OK (Win) or Choose (Mac).
Click Select Folder, select the folder where you want to store the file, and then click OK (Win) or Choose (Mac).
![]() Click the Options list arrow, and then click Adobe Media Encoder.
Click the Options list arrow, and then click Adobe Media Encoder.
![]() Click the Format list arrow, and then click the video format you want: DPX, H.264, or QuickTime.
Click the Format list arrow, and then click the video format you want: DPX, H.264, or QuickTime.
![]() Click the Preset list arrow, and then select the video preset for the device you want.
Click the Preset list arrow, and then select the video preset for the device you want.
![]() Adjust options related to the selected format; options vary depending on the format.
Adjust options related to the selected format; options vary depending on the format.
![]() Select the option with the range of frames you want to include.
Select the option with the range of frames you want to include.
![]() If available, select the alpha channel option and specify the 3D Quality you want.
If available, select the alpha channel option and specify the 3D Quality you want.
![]() Click Render.
Click Render.
If the document is an animation, the frames will be visible in the Timeline panel.
![]() Click the File menu, point to Export, and then click Render Video.
Click the File menu, point to Export, and then click Render Video.
♦ You can also click the Render Video button in the Video Timeline view in the Timeline panel.
![]() Type a name for the video or use the one provided.
Type a name for the video or use the one provided.
![]() Click Select Folder, select the folder where you want to store the file, and then click OK (Win) or Choose (Mac).
Click Select Folder, select the folder where you want to store the file, and then click OK (Win) or Choose (Mac).
![]() Click the Options list arrow, and then click Photoshop Image Sequence.
Click the Options list arrow, and then click Photoshop Image Sequence.
![]() Click the Format list arrow, and then click the image format you want.
Click the Format list arrow, and then click the image format you want.
![]() Specify the start number and number of digits you want in the file name, and then select the size and frame rate (fps) you want.
Specify the start number and number of digits you want in the file name, and then select the size and frame rate (fps) you want.
![]() To select options related to the format you selected, click Settings, make your selections, and then click OK; options vary depending on the format.
To select options related to the format you selected, click Settings, make your selections, and then click OK; options vary depending on the format.
![]() Select the option with the range of frames you want to include.
Select the option with the range of frames you want to include.
![]() If available, select the alpha channel option and specify the 3D Quality you want.
If available, select the alpha channel option and specify the 3D Quality you want.
![]() Click Render.
Click Render.


Creating an Image from a Video
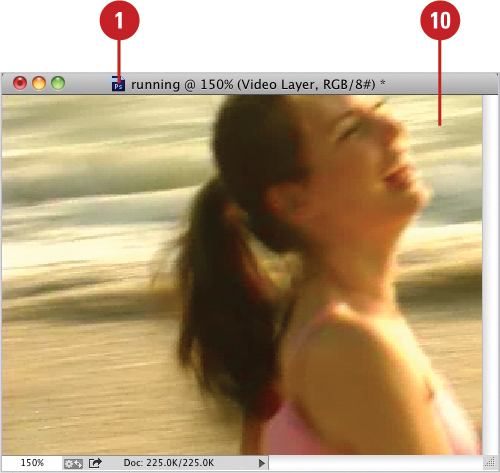
You can create a still frame from a video layer, which is useful as a poster image for a video. If you want a still image from a video, you can rasterize the video layer, creating a flattened composite of the current frame. All other parts of the video are removed. Rasterizing takes a video image and turns it into a bitmap, or a matrix of pixels. After you rasterize the video into an image, you can modify the image just like any other one in Photoshop.
Create an Image from a Video
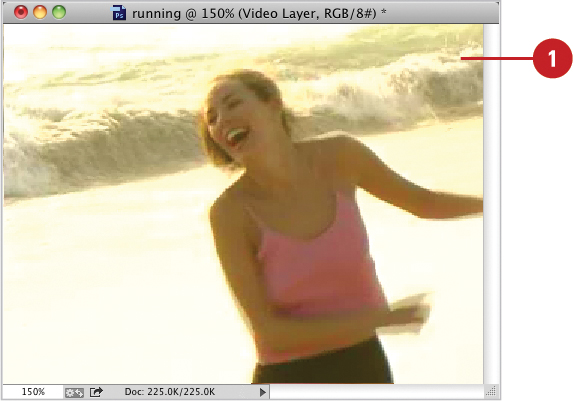
![]() Open a document with a video.
Open a document with a video.
![]() Click the Window menu, and then click Timeline.
Click the Window menu, and then click Timeline.
![]() To switch to Video Timeline view, click the Convert to Video Timeline button.
To switch to Video Timeline view, click the Convert to Video Timeline button.
![]() Drag the playhead to the position where you want to create a still image.
Drag the playhead to the position where you want to create a still image.

![]() Click the Layer menu, point to Rasterize, and then click Video.
Click the Layer menu, point to Rasterize, and then click Video.
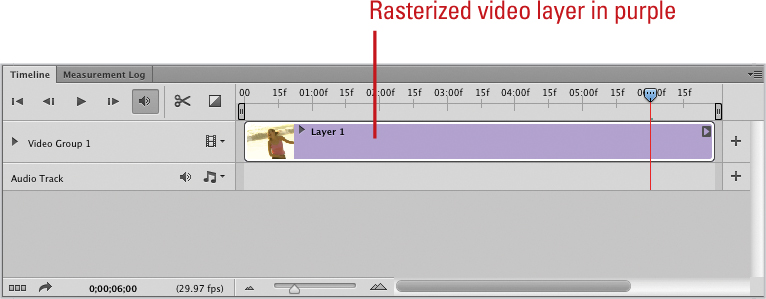
♦ You can also click the Layer menu, point to Video Layers, and then click Rasterize.
The video screen is changed into a rasterized image, which appears in purple. A normal video layer appears in blue.