
22. Working Together with Adobe Programs
What You’ll Do
Get Photos from a Digital Camera
Work with Raw Images from a Digital Camera
Work with Images Using Adobe Bridge
Set Preferences in Adobe Bridge
Automate Tasks in Adobe Bridge
Script with Adobe ExtendScript Toolkit
Work with Adobe Extension Manager
Introduction
Adobe Creative Cloud (CC) provides access to an integrated collection of professional programs—including Illustrator, InDesign, Photoshop, and Dreamweaver to name a few—that work together to help you create designs in print, on the web, or on mobile devices. Adobe CC programs are designed to work together so you can focus on what you need to do, rather than on how to do it. In fact, the Adobe CC programs share tools and features for common tasks so you can work uninterrupted and move seamlessly from one program to another. With your Adobe CC program, you can sign in to Creative Cloud and Adobe.com with your Adobe ID to access online cloud services. Creative Cloud is a membership-based cloud solution that allows you to access and download Adobe software, tools, services, personal files, tutorial videos, and sync Adobe CC program settings online from any computer or device. You can go to www.creativecloud.com or www.adobe.com for more details.
Along with the professional programs, Creative Cloud also includes additional Adobe services and tools (available for download)—such as Bridge, Camera Raw plug-in, Media Encoder, Extension Manager, and ExtendScript Toolkit—to help you perform specific jobs, such as locating, downloading, and modifying images for projects, managing files and program plug-ins and extensions, testing files for different mobile devices, and creating scripts.
For example, Adobe Bridge is a program that lets you view, open, modify, and manage images located on your computer from any Adobe CC program. Bridge allows you to search, sort, filter, manage, and process image files one at a time or in batches. You can also import files from your digital camera and view file information and metadata.
Exploring Adobe Programs
Adobe Creative Cloud
Adobe Creative Cloud is a membership-based cloud solution that allows you to access and download Adobe software, tools, services, personal files, tutorial videos, and sync program settings online from any computer or device. Creative Cloud includes an integrated collection of professional programs that work together to help you create designs in print, on the web, or on mobile devices. The Adobe programs for print design include InDesign and Acrobat Pro; for graphic design the programs include Photoshop, Illustrator, and Fireworks; for video and sound design the programs include Premiere Pro, After Effects, Encore, and Soundbooth; and for web design the programs include Flash Professional, Dreamweaver, Edge Animate, and Fireworks.
Working with Adobe Tools
With an Adobe program, you can also use additional Adobe tools—including Bridge, Camera Raw plug-in, Media Encoder, Extension Manager, and ExtendScript Toolkit—to help you perform related tasks, such as managing files and extensions and automating tasks with scripts.
Adobe Bridge
Adobe Bridge is a file management/batching program that manages and processes images while you work. To use Bridge, click Browse in Bridge on the File menu or the Go to Bridge button on the Applications bar within an Adobe program or from the Start menu or screen (Win) or the App folder (Mac).
Camera Raw Plug-In
The Camera Raw plug-in—available in Adobe Bridge, Adobe Photoshop, and other Adobe programs—allows you to open and process with fine control RAW image formats (not processed, also known as digital negatives) produced by digital cameras. Raw image formats are intended to capture as closely as possible the characteristics of the picture. DNG (Digital NeGative) is a raw format developed by Adobe.
Adobe Media Encoder
Adobe Media Encoder allows you to encode and compress video and audio files and convert them to distribution formats: F4V, FLV, H.264, and MP3. You can select a format and preset for systems—such as high-definition (HD), desktops, and the web (Flash, Vimeo, and YouTube)—and devices—such as Apple TV, iPad, iPhone, and Android. The presets include: size, bitrate (data rate), and frames per second (fps) rate.
Adobe Extension Manager
Adobe Extension Manager allows you to install and delete added program functionality, known as extensions, to many Adobe programs. You can use the Extension Manager to access the Adobe Exchange site (which is also available within an Adobe CC program using the Adobe Exchange panel (New!)), where you can locate, research, and download many different types of extensions, plug-ins, and other resources for use in Adobe programs.
Adobe ExtendScript Toolkit
Adobe ExtendScript Toolkit allows you to create, edit, and debug an extended version of JavaScript, called ExtendScript, to be used for scripting Adobe programs. If you perform the same set of tasks on a regular basis, you can use scripting as a powerful tool to make a lengthy set of tasks simple.

Getting Started with Adobe Bridge
Adobe Bridge CC is a stand-alone program—available for download from Creative Cloud—that lets you view, open, and manage images located on your computer from any Adobe CC program. Adobe Bridge is literally the glue that binds Adobe CC programs and shared tools into one cohesive unit. The Bridge program provides a set of panels that make it easy to find, view, and manage the files on your computer or network. As you work with Bridge, you’ll open, close, and move (dock and undock) the panels to meet your individual needs. After you customize the workspace, you can save the location of the panels as a custom workspace, which you can display using the Workspace command on the Window menu. Bridge also provides some predefined workspaces.
Get Started with Adobe Bridge
![]() Start your Adobe CC program, click the File menu, and then click Browse in Bridge.
Start your Adobe CC program, click the File menu, and then click Browse in Bridge.

♦ If prompted, install/update from Adobe Application Manager.
♦ You can also click the Go to Bridge button on the Application bar (if available). Ctrl (Win) or ![]() (Mac)+ click for a maximized view, Alt (Win) or Option (Mac)+click to open a new Bridge window, or Shift+click to open Mini Bridge.
(Mac)+ click for a maximized view, Alt (Win) or Option (Mac)+click to open a new Bridge window, or Shift+click to open Mini Bridge.
♦ You can also start Bridge from the Start menu/screen (Win) or the Applications folder (Mac).
![]() To open and close a panel, click the Window menu, and then click the panel name you want.
To open and close a panel, click the Window menu, and then click the panel name you want.
![]() To move a panel, drag the panel tab you want to another location in the Bridge window.
To move a panel, drag the panel tab you want to another location in the Bridge window.
![]() To save a workspace, click the Window menu, point to Workspace, click New Workspace, type a name, and then click OK.
To save a workspace, click the Window menu, point to Workspace, click New Workspace, type a name, and then click OK.
![]() To display a workspace, click the Window menu, point to Workspace, and then click the workspace you want.
To display a workspace, click the Window menu, point to Workspace, and then click the workspace you want.
![]() When you’re done, click the Close button in the Bridge window.
When you’re done, click the Close button in the Bridge window.

Getting Photos from a Digital Camera
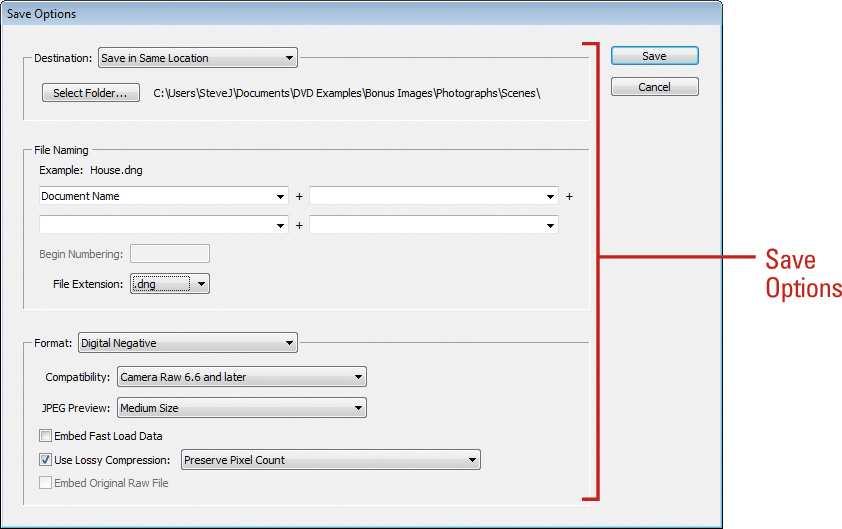
If you have raw or other images from your digital camera, you can use the Get Photos from Camera command in Adobe Bridge to retrieve and copy them to your computer. This allows you to specify where you want to store the files, rename them if you want, preserve metadata, or convert them to the DNG format. When you convert raw files to the DNG format, you specify preview size, compression, and whether to preserve the raw image data or embed the original raw file.
Import Raw and Other Files from a Camera
![]() In Adobe Bridge, click the File menu, and then click Get Photos from Camera or click the camera icon on the Application bar.
In Adobe Bridge, click the File menu, and then click Get Photos from Camera or click the camera icon on the Application bar.
![]() Click the Get Photos From list arrow, and then select the source camera or memory card.
Click the Get Photos From list arrow, and then select the source camera or memory card.
![]() Click the Browse button to select a folder location, and then create a new subfolder to store the images (optional).
Click the Browse button to select a folder location, and then create a new subfolder to store the images (optional).
![]() To rename the files, select a method, and then enter file name text.
To rename the files, select a method, and then enter file name text.
![]() Select the options you want:
Select the options you want:
♦ Preserve Current Filename in XMP. Select to save the current filename as image metadata.
♦ Open Adobe Bridge. Select to open and display the files in Adobe Bridge.
♦ Convert To DNG. Select to convert Camera Raw files to DNG. Click Settings to set DNG conversion options.
♦ Delete Original Files. Select to delete original files from camera or memory card.
♦ Save Copies To. Select to save copies to another folder for backup.
![]() To apply metadata to the files, click Advanced Dialog.
To apply metadata to the files, click Advanced Dialog.
![]() Click Get Photos.
Click Get Photos.

Working with Raw Images from a Digital Camera
Raw image file formats are created by most mid- to high-end digital cameras and contain information about how the image was taken. The raw format turns off all camera adjustments, and simply saves the image information. Using the raw format is as close to using traditional film as a digital camera can get. Raw images are larger; however, the increase in file size gives you more information that can be used by Camera Raw to adjust the image. Camera Raw version 8 (New!) is installed along with an Adobe CC program, such as Bridge and Photoshop, as a plug-in. It supports more than 400 cameras. Before you get started with Camera Raw, you can set preferences to apply default image options and specify how you want to open and work with work with DNG (Digital Negative), JPEG, and TIFF images. After you make Camera Raw adjustments, you can save the settings as a preset so you can use them later.
Set Camera Raw Preferences
![]() In Adobe Bridge, click the Edit (Win) or Adobe Bridge (Mac) menu, and then click Camera Raw Preferences.
In Adobe Bridge, click the Edit (Win) or Adobe Bridge (Mac) menu, and then click Camera Raw Preferences.
♦ In the Camera Raw dialog box, you can also click the Open Preferences Dialog button on the toolbar to access camera raw preferences.
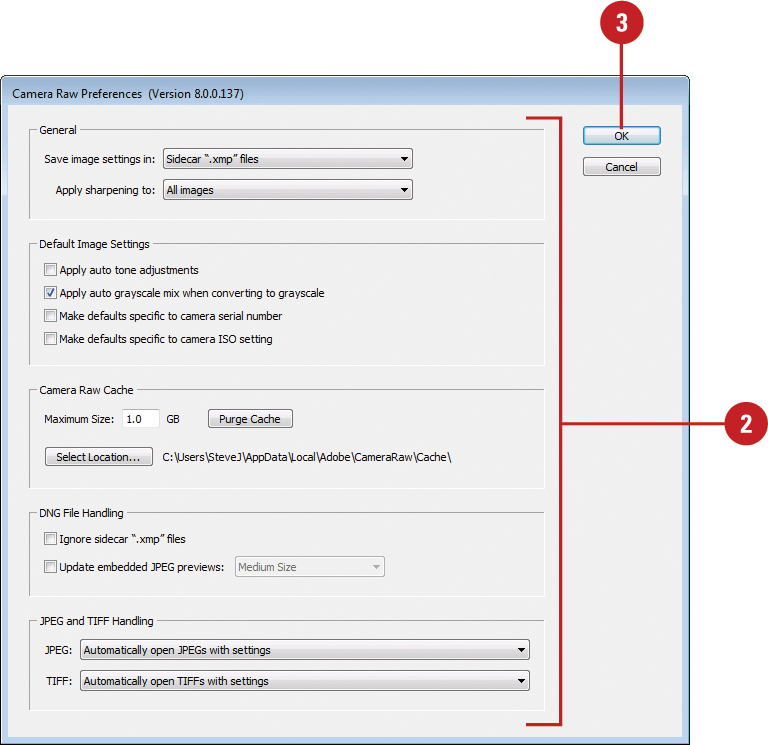
![]() Select the preferences you want:
Select the preferences you want:
♦ General. Specify where Camera Raw file settings are stored. Use Sidecar XMP files to store settings separately, or Camera Raw Database to store settings in a searchable database.
♦ Default Image Settings. Select options to automatically apply settings or set defaults.
♦ Camera Raw Cache. Set a cache size to shorten loading time for thumbnails and previews.
♦ DNG File Handling. Select options to ignore XMP files or update embedded content.
♦ JPEG and TIFF Handling. Automatically open JPEGs and/or TIFFs in Camera Raw.
![]() Click OK.
Click OK.
Work with Images in Camera Raw
![]() In Adobe Bridge, select the images (camera raw, TIFF or JPEG), right-click the selection, and then click Open in Camera Raw.
In Adobe Bridge, select the images (camera raw, TIFF or JPEG), right-click the selection, and then click Open in Camera Raw.
♦ In Photoshop, you can use the Open dialog box to open a file in Camera Raw.
The Camera Raw dialog box opens.
![]() Click any of the tools to modify or enhance the image, and select the Preview check box to see all changes that have been made.
Click any of the tools to modify or enhance the image, and select the Preview check box to see all changes that have been made.
![]() Click any of the tabs to modify or enhance the image.
Click any of the tabs to modify or enhance the image.
The Basics tab is easier to use with all sliders having a starting point in the middle.
![]() Click the Camera Raw Menu button to Load, Save, or Apply a specific set of Raw settings.
Click the Camera Raw Menu button to Load, Save, or Apply a specific set of Raw settings.
♦ You can use the Presets tab to apply, create, or delete presets.
![]() Click Save Image(s) to specify a folder destination, file name, and format for the processed images.
Click Save Image(s) to specify a folder destination, file name, and format for the processed images.
![]() When you’re done, click Done to process the file, but not open it, or click Open Image(s) to process and open it in Photoshop. Hold Alt (Win) or Option (Mac) to use Open Copy or Reset.
When you’re done, click Done to process the file, but not open it, or click Open Image(s) to process and open it in Photoshop. Hold Alt (Win) or Option (Mac) to use Open Copy or Reset.

Modifying Images in Camera Raw
From Adobe Bridge or Photoshop, you can use Camera Raw version 8 (New!) to open raw files (extensions vary with digital cameras), JPEG, and TIFF files to make image touch-ups and enhancements. If you’re not sure what to do, you can click Auto to have Camera Raw do it or drag sliders to adjust options manually. You can set white balance with presets (New!) (remove color casts), color temperature (warm or cool light source), image exposure, contrast, highlights, shadows, clarity, and vibrance (color vividness). In addition, you can adjust color tones (Hue, Saturation, and Luminance or grayscale), reduce luminance and color noise, add grain, add sharpening, correct for lens defects (including the Upright tool (New!) to straighten horizons and apply perspective corrections), add post-crop vignetting and effects, apply graduated (exposure) or radial (New!) (inside/outside circular area) filters and retouch images with the Spot Removal—Heal (New!) and Clone—and Red Eye tools. In addition, raw images can be converted into 16-bit mode, which provides control over adjustments such as tonal and color correction. Once processed, raw images can be saved in the DNG (Digital Negative), TIFF, PSD, or JPEG formats. All changes made to raw images are non-destructive, meaning only the metadata is changed to make different versions, leaving the original data unchanged.
Modify Images in Camera Raw
![]() In Adobe Bridge, select the images, right-click the selection, and then click Open in Camera Raw.
In Adobe Bridge, select the images, right-click the selection, and then click Open in Camera Raw.
♦ In Photoshop, you can use the Open dialog box to open a file in Camera Raw.
The Camera Raw dialog box opens.
![]() Click a tab: Basic, Tone Curve, Detail (Sharpen & Noise Reduction), HSL / Grayscale, Split Toning, Lens Corrections (New!), Effects, Camera Calibration, Presets, or Snapshots.
Click a tab: Basic, Tone Curve, Detail (Sharpen & Noise Reduction), HSL / Grayscale, Split Toning, Lens Corrections (New!), Effects, Camera Calibration, Presets, or Snapshots.
![]() To automatically make tonal adjustments, click Auto on the Basic tab.
To automatically make tonal adjustments, click Auto on the Basic tab.
![]() Use sliders or enter values to make any other manual adjustments.
Use sliders or enter values to make any other manual adjustments.

♦ Basic. Select a White Balance preset (New!); use sliders for Temperature, Tint, Exposure, Contrast, Highlights, Shadows, Whites, Blacks, Clarity, Vibrance, and Saturation.
![]() Use tools to modify the image:
Use tools to modify the image:
♦ Use the Zoom, Hand, Rotate, Crop, and Straighten tools to change the size, orientation, and position of the image.
♦ Use the White Balance tool to adjust color cast or the Color Sampler tool to sample a color from the image.
♦ Use the Spot Removal (New!) (Heal or Clone) or Red Eye Removal tool to fix the image.
♦ Use the Adjustment Brush, Graduated Filter, Radial Filter (New!), or Targeted Adjustment tool to make adjustments to exposure, brightness, contrast, saturation, clarity, sharpness, and color.
![]() Use options to view the image:
Use options to view the image:
♦ Preview. Select to display the image with all changes that have been made.
♦ Zoom Level. Changes to the level of image magnification can be made here.
![]() Click the file name to change the (color) Space, (bit) Depth, Size, and Resolution of the image.
Click the file name to change the (color) Space, (bit) Depth, Size, and Resolution of the image.
![]() Click Save Image(s) to specify a folder destination, file name, and format for the processed images.
Click Save Image(s) to specify a folder destination, file name, and format for the processed images.
![]() Select the images you want to synchronize (apply settings) in the Filmstrip (if desired, click Select All), and then click Synchronize.
Select the images you want to synchronize (apply settings) in the Filmstrip (if desired, click Select All), and then click Synchronize.
![]() When you’re done, click Done to process the file, but not open it, or click Open Image(s) to process and open it in Photoshop. Hold Alt (Win) or Option (Mac) to use Open Copy or Reset.
When you’re done, click Done to process the file, but not open it, or click Open Image(s) to process and open it in Photoshop. Hold Alt (Win) or Option (Mac) to use Open Copy or Reset.

Working with Images Using Adobe Bridge
With Adobe Bridge, you can drag assets into your layouts as needed, preview them, and add metadata to them. Bridge allows you to search, sort, filter, manage, and process image files one at a time or in batches. You can also use Bridge to create new folders; rename, move, delete and group files (known as stacking); edit metadata; rotate images; and run batch commands. You can also view information about files and data imported from your digital camera.
Work with Images Using Bridge
![]() Start your Adobe CC program, click the File menu, and then click Browse in Bridge, or click the Launch Bridge button (if available).
Start your Adobe CC program, click the File menu, and then click Browse in Bridge, or click the Launch Bridge button (if available).
![]() Click the Folder path, and then select a folder.
Click the Folder path, and then select a folder.
![]() Click the Folders tab and choose a folder from the scrolling list.
Click the Folders tab and choose a folder from the scrolling list.
![]() Click the Favorites tab to choose from a listing of user-defined items, such as Pictures.
Click the Favorites tab to choose from a listing of user-defined items, such as Pictures.
![]() Click an image within the preview window to select it.
Click an image within the preview window to select it.
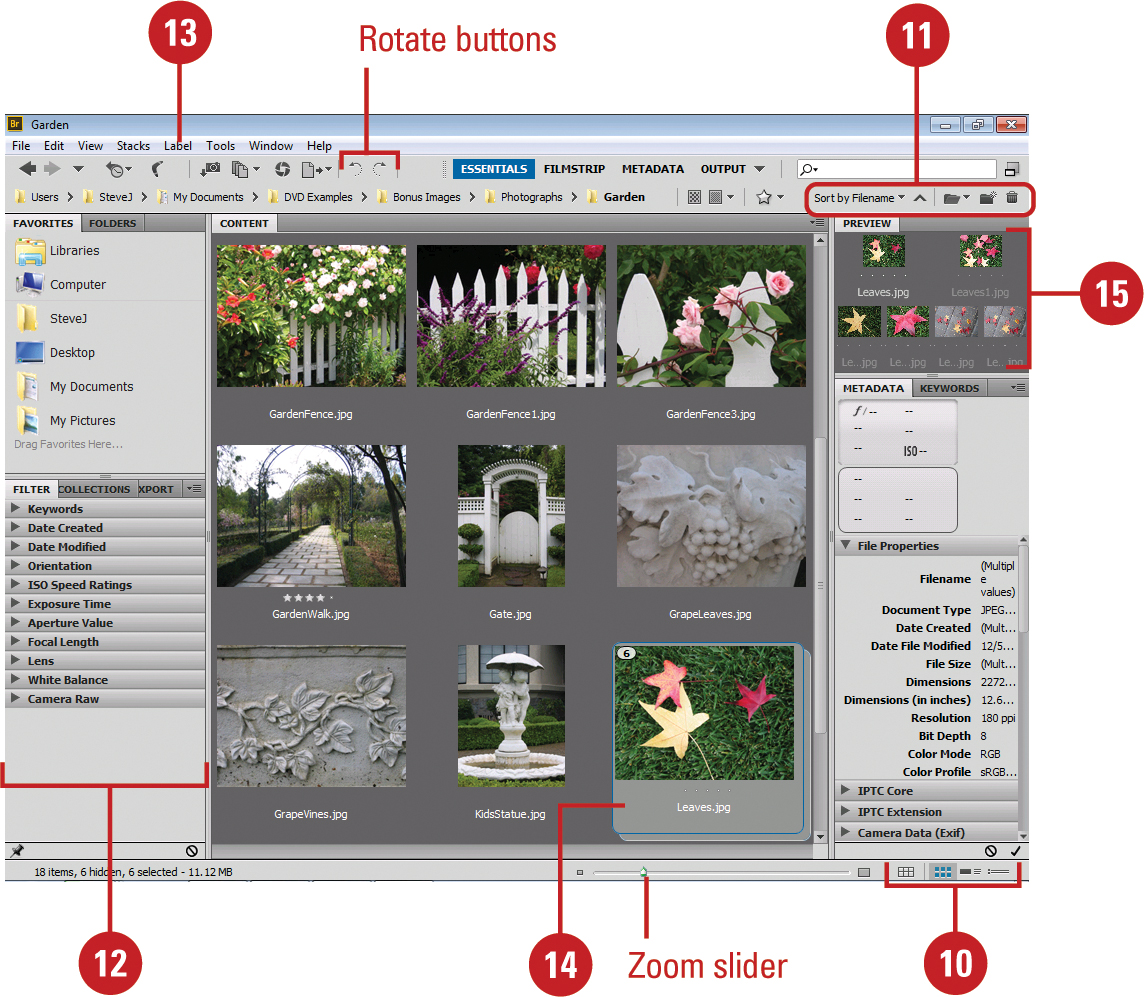
![]() Click the Metadata tab to view image information, including date and time the image was shot, and aperture, shutter speed, and f-stop.
Click the Metadata tab to view image information, including date and time the image was shot, and aperture, shutter speed, and f-stop.
![]() Click the IPTC Core or IPTC Extension arrow to add user-defined metadata, such as creator and copyright information, or captions.
Click the IPTC Core or IPTC Extension arrow to add user-defined metadata, such as creator and copyright information, or captions.
![]() Click the Preview tab to view a larger thumbnail of the selected image. Multiple images appear when you select them.
Click the Preview tab to view a larger thumbnail of the selected image. Multiple images appear when you select them.
♦ Click the image in the Preview tab to display a Loupe tool for zooming. Drag magnified box to change positions. Click it to deactivate the tool.
![]() Drag the Zoom slider to increase or decrease the thumbnail views.
Drag the Zoom slider to increase or decrease the thumbnail views.

![]() Click the preview buttons to select a different view of the workspace you have chosen. If you want to view your images in filmstrip or metadata focus mode, choose that workspace from the Window menu.
Click the preview buttons to select a different view of the workspace you have chosen. If you want to view your images in filmstrip or metadata focus mode, choose that workspace from the Window menu.
♦ View Content as Thumbnails. Default view. Displays the images as thumbnails with the file name underneath.
♦ View Content as Details. Displays a thumbnail of each image with selected details about the image such as date created, document type, resolution.
♦ View Content as List. Displays a small thumbnail of each image with metadata information details, such as date created and file size.
![]() Use the file management buttons to sort, open or delete images, or create a new folder.
Use the file management buttons to sort, open or delete images, or create a new folder.
![]() To narrow down the list of images using a filter, click the criteria you want to use in the Filter panel.
To narrow down the list of images using a filter, click the criteria you want to use in the Filter panel.
![]() To add a label or rating to images, select the ones you want, click the Label menu, and then select the label or rating you want.
To add a label or rating to images, select the ones you want, click the Label menu, and then select the label or rating you want.
![]() To group related images as a stacked group, select the images, click the Stacks menu, and then click Group as Stack.
To group related images as a stacked group, select the images, click the Stacks menu, and then click Group as Stack.
♦ Use the Stacks menu to ungroup, open, expand, or collapse stacks.
![]() Double-click on a thumbnail to open it in the default program, or drag the thumbnail from Bridge into an open Adobe application.
Double-click on a thumbnail to open it in the default program, or drag the thumbnail from Bridge into an open Adobe application.
Setting Preferences in Adobe Bridge
Adobe Bridge allows you to set preferences to customize the way you work. The Preferences dialog box is organized into categories—including General, Thumbnails, Playback, Metadata, Keywords, Labels, File Type Associations, Cache, Startup Scripts, Advanced, and Output. You can set specific options within these categories to suit your particular needs. For example, you can choose to display more metadata information with thumbnails, such as dimensions, size, keywords, color mode, label, etc. In addition, you can change the user interface with a color theme, brightness, backdrop, and accent color.
Set Bridge Preferences
![]() In Adobe Bridge, click the Edit (Win) or Bridge (Mac) menu, and then click Preferences.
In Adobe Bridge, click the Edit (Win) or Bridge (Mac) menu, and then click Preferences.
![]() Click the General category.
Click the General category.
![]() Select the appearance, behavior, and Favorite Items you want.
Select the appearance, behavior, and Favorite Items you want.
♦ Appearance. Select options for color theme, user interface brightness, image backdrop, and accent color.
♦ Favorite Items. Select the items you want to access and use.
![]() Click the Thumbnails category.
Click the Thumbnails category.
![]() Specify the performance and details options you want:
Specify the performance and details options you want:
♦ Performance and File Handling. Choose the maximum size of file to be processed (default: 1000 MB).
♦ Details. Select the metadata details you want to show with the thumbnail.

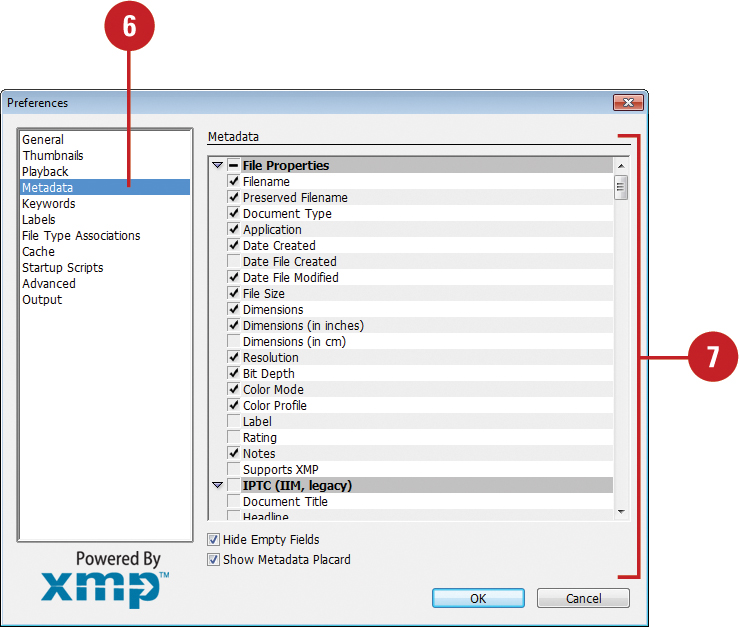
![]() Click the Metadata category.
Click the Metadata category.
![]() Select the check boxes with the metadata you want and clear the ones you don’t want.
Select the check boxes with the metadata you want and clear the ones you don’t want.
![]() Click the Labels category.
Click the Labels category.
![]() Enter names for labels you want to be associated with a specific color.
Enter names for labels you want to be associated with a specific color.
![]() Click the File Type Associations category.
Click the File Type Associations category.
The left column displays the file type and the right column displays the current program that will open the file by default.
![]() To change the default program, click the list arrow next to the file type, and then select a program or choose Browse to locate another application you would like to use.
To change the default program, click the list arrow next to the file type, and then select a program or choose Browse to locate another application you would like to use.

![]() Click the Cache category.
Click the Cache category.
![]() Choose where to store the cache, choose a cache size, and optimize or purge the cache from here.
Choose where to store the cache, choose a cache size, and optimize or purge the cache from here.
![]() Click the Startup Scripts category.
Click the Startup Scripts category.
![]() Select the check boxes with the programs you want to enable and clear the ones you want to disable.
Select the check boxes with the programs you want to enable and clear the ones you want to disable.
![]() Click the Advanced category, and specify whether to use software rendering and monitor-size previews, and then choose the language and keyboard options you want. You can also choose to have Bridge start automatically at login.
Click the Advanced category, and specify whether to use software rendering and monitor-size previews, and then choose the language and keyboard options you want. You can also choose to have Bridge start automatically at login.
![]() Click OK.
Click OK.

Applying Image Adjustments
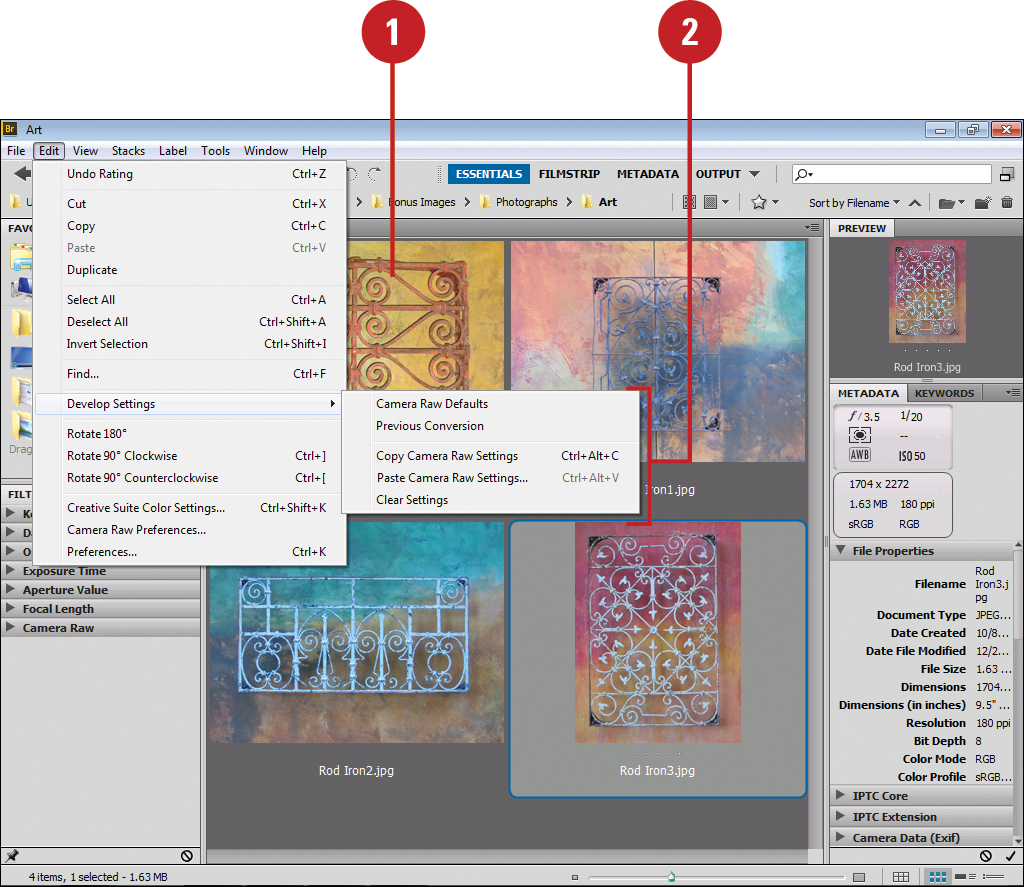
Adobe Bridge makes it easy to make adjustments to one image in Camera Raw and then apply those adjustments to other images directly from Bridge without going back into Camera Raw. For instance, you may be correcting the white balance for an image and have many other images that were shot at the same time, under the same lighting conditions. You can use the initial settings to correct the rest of your images right from Bridge. You can also make a preset from your favorite adjustments, which will then be available as a develop setting within Bridge.
Modify Images in Adobe Bridge
![]() In Adobe Bridge, display and select the images that you want to adjust.
In Adobe Bridge, display and select the images that you want to adjust.
![]() Use any of the following methods to modify an image:
Use any of the following methods to modify an image:
♦ Apply a Preset Adjustment. Click the Edit menu, point to Develop Settings, and then select a preset adjustment.
♦ Copy and Paste Settings. Click the Edit menu, point to Develop Settings, and then click Copy Settings. Select the image(s) to which you want to apply the settings. Click the Edit menu, point to Develop Settings, and then click Paste Settings. Select the options to apply, and then click OK.
♦ Apply the Most Recent Adjustment. Click the Edit menu, point to Develop Settings, and then click Previous Conversion.

Did You Know?
You can use Photoshop automation commands in Adobe Bridge. You can use the Batch or Image Processor commands on the Tools menu under Photoshop in Bridge to automate the processing of your camera’s raw files.
Automating Tasks in Adobe Bridge
The Tools menu provides commands you can use to automate tasks in Bridge. For example, you can automate the process of renaming a group of files using the Batch Rename command. If you use Photoshop, or InDesign, you can use commands on submenus to run automated tasks, such as processing raw images with Photoshop, or you can create a contact sheet of images in InDesign. You can also use the Tools menu to start other Adobe programs as well as create and edit Metadata templates, which you can use to append or replace metadata in InDesign or other XMP-enabled programs.
Rename Files Automatically in Adobe Bridge
![]() In Adobe Bridge, select the files or folders you want to use.
In Adobe Bridge, select the files or folders you want to use.
![]() Click the Tools menu, and then click Batch Rename.
Click the Tools menu, and then click Batch Rename.
![]() Select the Destination Folder option you want: Rename in same folder, Move to other folder, or Copy to other folder, and then click Browse to specify a new folder location.
Select the Destination Folder option you want: Rename in same folder, Move to other folder, or Copy to other folder, and then click Browse to specify a new folder location.
![]() Click the Element drop-down, and then select options to specify how you want to name the files:
Click the Element drop-down, and then select options to specify how you want to name the files:
♦ Text, New Extension, Current Filename, Preserved Filename, Sequence Number, Sequence Letter, Date/Time, Metadata, or Folder Name.
![]() Enter the text you want to use in conjunction with the Element selection to name the files.
Enter the text you want to use in conjunction with the Element selection to name the files.
![]() Select the Preserve Current File Name In XMP Metadata check box to retain the original filename in the metadata.
Select the Preserve Current File Name In XMP Metadata check box to retain the original filename in the metadata.
![]() Select the check boxes for the operating systems with which you want the renamed files to be compatible.
Select the check boxes for the operating systems with which you want the renamed files to be compatible.
![]() Click Rename.
Click Rename.

Using Mini Bridge
Adobe Mini Bridge is a condensed version of Adobe Bridge available in a panel within an Adobe CC program (Photoshop, InDesign, and InCopy). Mini Bridge—available when Adobe Bridge is installed—allows you to directly access graphics within a CC program, where you can drag and drop them in a document. Within Mini Bridge, you can navigate to different locations on your computer, search, sort, filter, and preview content as well as access Adobe Bridge. In Photoshop, the Mini Bridge panel appears in film strip mode, like in Lightroom.
Use Mini Bridge
![]() Start your Adobe CC program, and then start Mini Bridge:
Start your Adobe CC program, and then start Mini Bridge:

♦ Photoshop. Click the File menu, and then click Browse in Mini Bridge or click the Window menu, point to Extensions, and then click Mini Bridge.
♦ InDesign/InCopy. Shift+click the Go to Bridge button on the Application bar.
If prompted, click Launch Bridge.
Mini Bridge opens in the panel.
![]() Use the Path or Path button and the Navigation pod to locate the graphics you want to view.
Use the Path or Path button and the Navigation pod to locate the graphics you want to view.
![]() Use the buttons (View, Sort, and Filter) on the Tool bar to show, select, sort, and filter files.
Use the buttons (View, Sort, and Filter) on the Tool bar to show, select, sort, and filter files.
![]() To preview files, click the View button, and then click an option:
To preview files, click the View button, and then click an option:
♦ Slideshow. Displays a slide show of the viewed files.
♦ Review Mode. Displays a full screen preview of the viewed files.
♦ Full Screen Preview. Displays a full screen preview. You can also press the Spacebar.

Scripting with Adobe ExtendScript Toolkit
Adobe ExtendScript Toolkit is a program—available for download from Creative Cloud—you can use to create and test scripts to control and automate features in many Adobe programs. If you perform the same set of tasks on a regular basis, you can use scripting as a powerful tool to make a lengthy set of tasks simple. A script is a series of statements in a language—an extended version of JavaScript, called ExtendScript—that tells a program what to do. For example, you can write a script to open an image in Photoshop, make some enhancements, and then insert the image into an InDesign document. If you’re new to scripting, take a look at the Adobe Intro To Scripting document, which you can open from the Help menu. You can also use the Scripts panel to access favorite and sample scripts by target program. You can open the script, modify it, save it, and run it within the target program. Another option is the search the web for Extend-Script sample scripts. ExtendScript programs and scripts end with the extension JSX. A normal JavaScript file ends with the extension JS.
Use ExtendScript Toolkit to Work with Scripts
![]() Start Adobe ExtendScript Toolkit from the Start menu or screen (Win) or the Applications folder (Mac).
Start Adobe ExtendScript Toolkit from the Start menu or screen (Win) or the Applications folder (Mac).
![]() To use a built-in script, select the Scripts panel, select a target program, and then navigate to a script, and then double-click it to open it.
To use a built-in script, select the Scripts panel, select a target program, and then navigate to a script, and then double-click it to open it.
![]() To start a new script, click the File menu, and then click New JavaScript.
To start a new script, click the File menu, and then click New JavaScript.
![]() Enter or edit the script in the Document window.
Enter or edit the script in the Document window.
![]() To start, stop, pause, or step through the script, click the buttons on the Document window toolbar.
To start, stop, pause, or step through the script, click the buttons on the Document window toolbar.
♦ You can also use commands on the Debug menu.
![]() Click the File menu, and then click Save. If a new script, enter a name, specify a location, and then click Save.
Click the File menu, and then click Save. If a new script, enter a name, specify a location, and then click Save.
![]() When you’re done, click the Close button to exit the program.
When you’re done, click the Close button to exit the program.

Working with Adobe Media Encoder
Adobe Media Encoder is a program—available for download from Creative Cloud—you can use to encode and compress video and audio files and convert them to a variety of distribution formats: F4V, FLV, H.264, and MP3. With the Preset Browser, you can select a format and preset for systems—such as high-definition (HD), desktops and the web (Flash, Vimeo, and YouTube)—and devices—such as Apple TV, iPad, iPhone, and Android. The presets include: size, bitrate (data rate), and frames per second (fps) rate. When you export a movie for playback on a specific type of device at a certain bandwidth, you select an encoder (codec). Each encoder has a corresponding decoder that decompresses and interprets the data for playback. You can batch process multiple media files to expedite the workflow process. For example, you can add, reorder, and change the encoding settings of files in the batch processing queue while Media Encoder encodes other files. You can also use the Watch folder to help you automate the process. It’s a folder you add to the Watch folder list that automatically encodes any files in it.
Convert Media Files Using Presets
![]() Start Adobe Media Encoder from the Start menu or screen (Win) or the Applications folder (Mac).
Start Adobe Media Encoder from the Start menu or screen (Win) or the Applications folder (Mac).
![]() Click the Add Source button (+), select the media files you want to convert, and then click Open.
Click the Add Source button (+), select the media files you want to convert, and then click Open.
![]() Select each media file, click the Format list arrow, and then select a conversion file format. Click the Preset list arrow, and then select a predefined setting.
Select each media file, click the Format list arrow, and then select a conversion file format. Click the Preset list arrow, and then select a predefined setting.
![]() To use the Preset Browser, select the media file, select a preset, and then click Apply Preset.
To use the Preset Browser, select the media file, select a preset, and then click Apply Preset.
This adds a copy of the selected file with the preset applied.
♦ Presets. Use toolbar buttons to create, delete, group, view settings, import, and export presets.
![]() Click the Start Queue button.
Click the Start Queue button.
The media files are converted to the new media format and placed in the same folder as the original.
![]() When you’re done, click the Close button to exit the program.
When you’re done, click the Close button to exit the program.

Convert Media Files Using Custom Settings
![]() Start Adobe Media Encoder from the Start menu or screen (Win) or the Applications folder (Mac).
Start Adobe Media Encoder from the Start menu or screen (Win) or the Applications folder (Mac).
![]() Click the Add Source button (+), select the media files you want to convert, and then click Open.
Click the Add Source button (+), select the media files you want to convert, and then click Open.
Timesaver
You can drag one or more files from the desktop or file window directly into the queue.
![]() To create a duplicate copy of a media file to set different settings, select the media file, and then click the Duplicate button.
To create a duplicate copy of a media file to set different settings, select the media file, and then click the Duplicate button.
![]() To apply custom export settings, select the media file, click the Edit menu, click Export Settings, specify the settings you want, and then click OK.
To apply custom export settings, select the media file, click the Edit menu, click Export Settings, specify the settings you want, and then click OK.
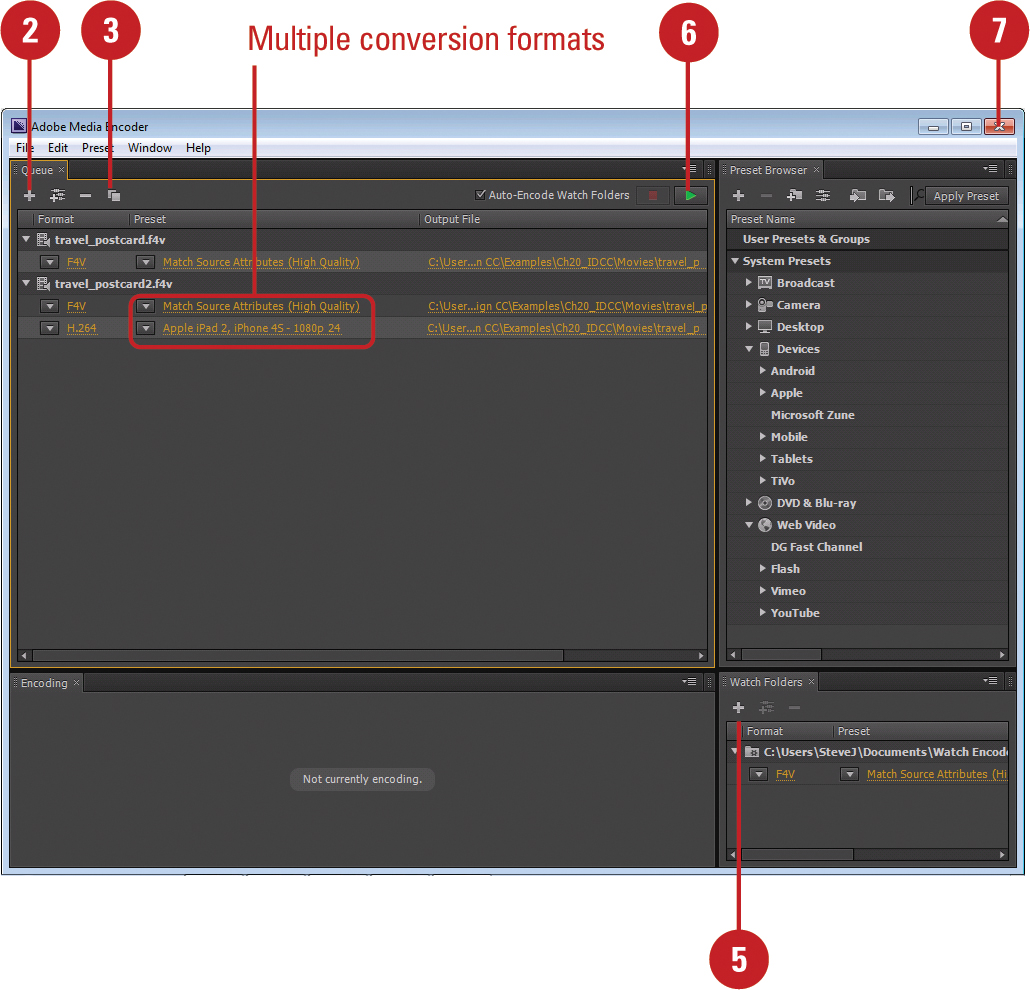

![]() To use a watch folder, click the Add Folder button (+), select the folder you want to use, and then click OK.
To use a watch folder, click the Add Folder button (+), select the folder you want to use, and then click OK.
♦ Select each folder, click the Format list arrow, and then select a conversion file format. Click the Preset list arrow, and then select a predefined setting.
Timesaver
You can drag one or more folders from the desktop or file window directly into the queue.
![]() Click the Start Queue button.
Click the Start Queue button.
The media files are converted to the new media format and placed in the same folder as the original.
![]() When you’re done, click the Close button to exit the program.
When you’re done, click the Close button to exit the program.
Working with Adobe Extension Manager
Adobe Extension Manager CC is a program—available for download from Creative Cloud—you can use to install and delete added program functionality, known as extensions, to many Adobe programs. The Extension Manager is available from the Help menu in Dreamweaver, Flash, InDesign, or Fireworks. You can use the Extension Manager or the Adobe Exchange panel (New!)—available on the Extensions submenu on the Window menu—to access the Adobe Exchange site, where you can locate, research, and download many different types of extensions with the ZXP or MXP (for compatibility) file format. ZXP is an Adobe Zip Format Extension Package file. Some are free and some are not. After you download an extension, you can use Extension Manager to install it for all users or only the current user. In Extension Manager, you can search and filter, enable, disable, and remove extensions.
Install and Use an Extension
![]() Start Adobe Extension Manager from the Start menu or screen (Win) or the Applications folder (Mac).
Start Adobe Extension Manager from the Start menu or screen (Win) or the Applications folder (Mac).
Timesaver
In Flash, InDesign, Dreamweaver, or Fireworks, click the Help menu, and then click Manage Extensions.
![]() To locate an extension, click Exchange to access the Exchange web site, download an extension, and then save it.
To locate an extension, click Exchange to access the Exchange web site, download an extension, and then save it.
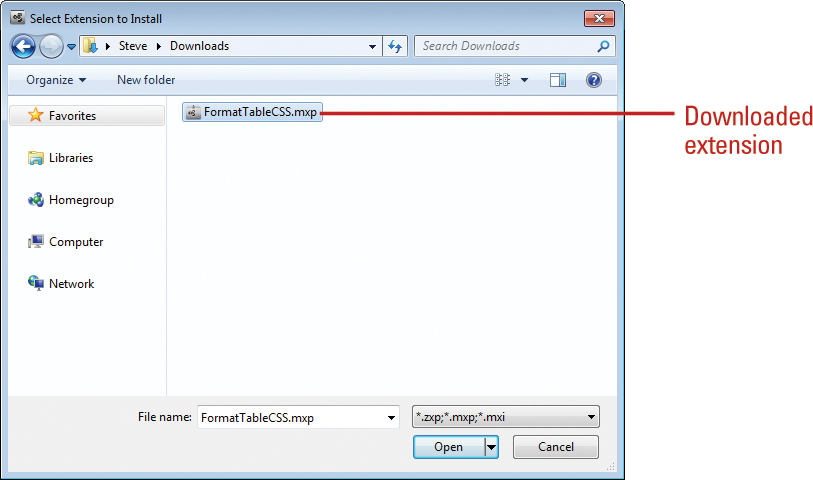
![]() To install an extension, click Install, locate and select the extension (.zxp or .mxp), and then click Open.
To install an extension, click Install, locate and select the extension (.zxp or .mxp), and then click Open.
![]() Perform any of the following:
Perform any of the following:
♦ Search. Select a filter from the down arrow, and then enter search name.
♦ Sort. Click a column heading.
♦ Enable or Disable. Select or deselect the Enabled check box.
♦ Remove. Select the extension, and then click Remove.
![]() When you’re done, click the Close button.
When you’re done, click the Close button.

Using the Adobe Exchange Panel
Adobe Exchange is a web site to get resources for Adobe programs. You can find brushes and textures to use in your documents and plug-ins and extensions to add functionality to your Adobe program. You can access the Adobe Exchange directly from Adobe CC programs with the Adobe Exchange panel (New!). With the Adobe Exchange panel, you can find, purchase (if needed), download, and install resources, extensions, and plug-ins for Adobe programs. In order to use Adobe Exchange, you’ll need your Adobe ID to access, store, and manage your resources online in My Stuff. From the Options menu in the Adobe Exchange panel, you can also install or launch Adobe Extension Manager CC (New!) to work with extensions for all Adobe programs.
Add Resources with the Adobe Exchange Panel
![]() In your Adobe CC program, select the Adobe Exchange panel.
In your Adobe CC program, select the Adobe Exchange panel.
♦ Click the Window menu, point to Extensions, and then click Adobe Exchange (New!).
![]() To display the home screen with features and new resources, click the Home button.
To display the home screen with features and new resources, click the Home button.
![]() To search for a resource, click in the Search box, enter a keyword, and then press Enter (Win) or Return (Mac).
To search for a resource, click in the Search box, enter a keyword, and then press Enter (Win) or Return (Mac).
![]() Click any of the following tabs on the panel:
Click any of the following tabs on the panel:
♦ All. Displays all resources.
♦ Paid. Display resources that cost a price.
♦ Free. Display resources that are free.
♦ My Stuff. Display all resources you downloaded.

![]() To download and install a resource (add to My Stuff), click the item, click the tabs, click the Free or Price button, and then follow the on-screen instructions
To download and install a resource (add to My Stuff), click the item, click the tabs, click the Free or Price button, and then follow the on-screen instructions
![]() To use Adobe Extension Manager, click the Options button, and then click Launch Extension Manager or Install Extension Manager.
To use Adobe Extension Manager, click the Options button, and then click Launch Extension Manager or Install Extension Manager.

Accessing Adobe Creative Cloud
Creative Cloud is a membership-based cloud solution that allows you to access and download Adobe software, tools, services, tutorial videos, personal files, and sync Adobe CC program settings online from any computer or device. For more details about the membership levels and services, go to www.creativecloud.com in your browser. In order to sync program settings (New!) and access or download online content on Creative Cloud and Adobe.com, you’ll need to sign in to the service with your Adobe ID, which you can do within an Adobe CC program. If you’re not signed in when you start an Adobe CC program, you’ll be asked to do so. If you synced program settings (New!) on Creative Cloud from another computer, you’ll be asked if you want to sync settings to this computer on start up (New!).
Access Adobe Creative Cloud
![]() Start your Adobe CC program.
Start your Adobe CC program.
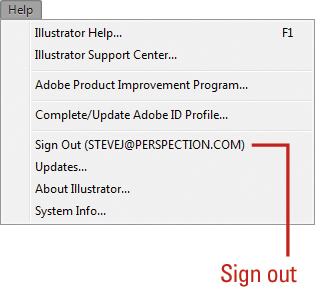
![]() To sign in to your Creative Cloud account, click the Help menu, click Sign In, click Sign In Now, create an account or enter your
To sign in to your Creative Cloud account, click the Help menu, click Sign In, click Sign In Now, create an account or enter your

♦ To sign out, click the Help menu, click Sign Out (account address), and then click Sign out.
![]() Click the Edit (Win) or Adobe program name (Mac) menu, point to account address, and then click Manage Creative Cloud Account.
Click the Edit (Win) or Adobe program name (Mac) menu, point to account address, and then click Manage Creative Cloud Account.
Your default web browser opens, displaying your Creative Cloud account.
![]() Click the Files, Apps or Upgrade to access content and options.
Click the Files, Apps or Upgrade to access content and options.
![]() Use the page options to work with files, view videos, and access Apps and services.
Use the page options to work with files, view videos, and access Apps and services.
![]() When you’re done, click the Close button to exit your web browser.
When you’re done, click the Close button to exit your web browser.

See Also
See “Changing Sync Setting Preferences” on page 64 for information on syncing settings for Creative Cloud.