
Chapter One: Creating a Web Site in Dreamweaver CS5
The topics in this book are not sequential—you can dive in wherever you need to, work backward, or jump around. But if you’re approaching the whole process of creating a Web site with Adobe Creative Suite 5, it makes sense to start with Dreamweaver. Dreamweaver functions as the coordinating center for Web sites. A good grasp of Dreamweaver is helpful to seeing the big picture of how other elements of your site fit together.
When you create a Web site with Adobe CS5, Dreamweaver plays the role of the orchestra conductor. Dreamweaver organizes and presents photos prepared in Adobe Photoshop CS5...artwork from Adobe Illustrator CS5...animation from Flash Professional CS5...interactive elements from Flash Catalyst CS5...video compressed for the Web using Adobe Media Encoder CS5...and more.
We’ll explore all these tools in this book—in enough depth for you to create a professional-quality, inviting, cutting-edge Web site. But we’ll start with Dreamweaver. The core of a Dreamweaver Web site is what Dreamweaver defines as a site. Web site is a generic term for—well, a Web site, but in Dreamweaver, the term has a specific meaning: a set of files grouped together in a folder that is controlled exclusively by Dreamweaver.
Define a Web site before you create Web pages or add content elements (like images or media). When you do that, Dreamweaver connects your Web pages to each other with links. It ensures images and media are properly embedded in pages. When you move or rename a Web page (or any file in your site), Dreamweaver updates any links that are affected by that change. And your Dreamweaver Web site can manage (usually one, but sometimes more) style sheet files that control the formatting of multiple pages across a site.
Defining a Dreamweaver Web site is also necessary when you get ready to transfer your site content from your local computer to a remote server, where others can access your content.
This chapter starts by walking you through the process of defining both a local (on your own computer) and a remote (on a server) Web site. The bulk of the chapter walks you through the basic process of creating Web-page content. The next chapter in this book will explore the process of laying out and formatting that content.
#1 Defining a Local Web Site
Dreamweaver CS5 has simplified the process of creating a Dreamweaver site. Previous versions of Dreamweaver tried to compel you to define a remote site (on a Web server) at the same time you created a local site (on your own computer). But the reality is that many people create a local site before they are sure where their remote site will be hosted, and so this simplified site definition process is welcome.
The essence of preparing to create a Dreamweaver site is to choose a folder on your computer that will store all the elements of the site. If you have a bunch of content already that you want to include in your site, a good way to start is by copying that content from the Web, from your flash drives, and from your hard drive, all into one folder on your computer.
Follow these steps to define a local site in Dreamweaver:
- Collect your entire site content in a single folder. You can create subfolders (subdirectories) for images, media, Web pages, and so on. But all these folders must be within the folder that will serve as your local site folder.
- Launch Dreamweaver CS5. From the Document window menu, choose Site > New Site. The Site Definition dialog opens.
- With Site selected in the category list on the left side of the dialog, enter a name for your site. This is just a name for your own reference; it can contain spaces, upper- and lowercase characters, special symbols, or anything else that helps you remember what site you are working on.
- Click the Browse for Folder icon to the right of the Local Site Folder field (Figure 1), and browse to and select the folder into which you copied content that will be used in your Web site (in step 1).
Figure 1. Defining a local site.

- Expand the Advanced Settings options in the categories list and select the Local Info tab. If you want Dreamweaver to automatically save images to one folder on your local storage system (usually a hard drive), you can navigate to a folder using the folder icon next to the “Default images folder” field. This is not a particularly essential option, and it can get in your way if you want to manually control where your files are stored.
- Choose the “Links relative to Document” option. This is the most efficient and reliable way to generate and update links between files and to define links for embedded images.
- Select the Enable cache check box. This activates the Assets panel that displays all site content. You may or may not use the Assets panel to track your content, but with this check box selected, you have that option.
- With your local site defined, click Save. Dreamweaver will now organize your files into a Dreamweaver site.
#2 Connecting to a Remote Site
Most developers create and test their Web pages first on their own computer, and then upload that content to a remote server once it has been tested, proofread, vetted and approved, and deemed ready to share. This is a different process, for example, than working with a blog site, where content is composed and submitted directly to a server. The two-stage development process in Dreamweaver allows you to thoroughly test your site before going live.
You don’t need a remote site until you are ready to go live. And feel free to skip this topic for now if you are only working on a local site. But when you are ready to upload your site, you will need to purchase a Web-hosting server. Web-site hosting costs as little as $5/month, sometimes for unlimited server space (file size) and bandwidth (amount of content flowing to and from your site). Shop around—if you do not have a remote site, there are many vendors ready to sell you one.
To define a remote site, follow these steps:
- Choose Site > Manage Sites to open the Manage Sites dialog.
- Click on your site (if more than one are listed), and click the Edit button. The Site Setup dialog for your site opens.
- Select Servers from the categories on the left side of the dialog. Click the Add New Server “+” button in the lower-left corner of the server list area. The Site Setup dialog appears.
- In the Basic tab of the Servers category dialog, choose FTP from the Connect Using drop-down menu. This is how almost all remote sites connect with your computer to transfer files (FTP stands for File Transfer Protocol). If your hosting company gave you other instructions (like logging in as SFTP, Secure FTP), follow those directions.
- On the Basic tab of the Site Setup dialog, enter a name for your server. This can be anything that helps you remember the server if you are using a lot of different servers (which is unlikely, meaning you can pretty much type any old thing in this field).
- In the FTP host field, enter the FTP location provided by your Web-host provider.
- In the Username field, enter the login or username provided by your Web-host provider.
- In the Password field, enter the password provided by your Web-host provider.
- In the Root Directory field, enter a root directory only if your Web-hosting service supplied you with one and indicated it was required.
- In the Web URL field, enter the URL for your Web site. This is different than the FTP address used to transfer files with Dreamweaver. Instead, here you enter the (Web-site address) for your new Web site, typically starting with http://.
- Expand the More Options section of the dialog. If your Web-host provider allows you to connect using passive FTP, select the “Use passive FTP” check box. You can try connecting to your site without this check box selected, and then try enabling passive FTP if your connection fails.
- If you are working behind a firewall, your system administrator might need to configure the Proxy Host settings in the Site Definition dialog. However, normally Dreamweaver adopts the same firewall settings you use with other programs to connect to the Internet, so custom settings are not necessary.
- Select the FTP Performance Optimization check box to speed up file transfers.
- After you define the remote connection, click the Test button. If your connection works, the confirmation dialog appears (Figure 2a).
Figure 2a. Testing a server connection.

Additional server parameters are defined on the Advanced tab of the Site Setup dialog. Let’s briefly survey them:
- Select the Advanced tab to view new settings.
- Keep the Maintain Synchronization Information check box selected; this enables powerful tools for synchronizing your local and remote sites.
- Leave other options unchecked. The Automatically Upload Files to Server on Save bypasses the normal two-step process of testing your site locally before uploading it to the world. The checkout options are for complex sites with teams of designers. The Testing Server is for live data sites where you are creating connections to server-side scripts that enable live data from databases.
- After you define Advanced settings for your remote server, click Save (Figure 2b).
Figure 2b. Advanced server connection settings.

You have now defined both your local and remote sites, and Dreamweaver can manage synchronizing the two.
#3 Managing Sites in the Files Panel
With a site open, you connect to your remote server by clicking the “Connects to remote host” icon in the Files panel (in either Expanded or Collapsed view). Once you connect to a remote server, you can see either local or remote server content using the View pop-up menu in the Files panel. To see the content of both the local and remote sites at the same time, click the “Expand to show local and remote sites” icon in the Files panel toolbar. In Expanded mode, click the Site Files icon in the Files panel toolbar (Figure 3a).
Figure 3a. Expanding the Files panel.

To upload an entire site from your local folder to the remote server, follow these steps:
- Click the root folder of your local site in the Files panel—either in Expanded or Collapsed view.
- With the root folder selected, click the Put File(s) icon in the Files panel toolbar (Figure 3b).
Figure 3b. Uploading an entire Web site.

- Dreamweaver will prompt you to confirm the action by clicking OK, and then it will upload your entire Web site. The Background File Activity dialog will track the progress of uploading your site.
Once you have uploaded your site, you won’t want to waste time re-uploading the entire site each time you change a file. Instead, you can upload selected files. Shift-click or Ctrl-click/Command-click to select files in the Files panel, and choose Put to upload the selected files.
You can also upload open pages directly from the Document window. Do this by clicking the File Management tool in the Document toolbar and choosing Put (Figure 3c).
Figure 3c. Uploading an open Web page.

You can synchronize either files you have selected (by Shift-clicking) in the Files window or your entire site. And you can synchronize your site either by updating the server with newer files from the currently open local site, or vice versa (moving newer files from the server to your local computer).
To synchronize your local and remote sites, follow these steps:
- From the main Dreamweaver menu, choose Site > Synchronize Sitewide. The Synchronize Files dialog appears.
- From the Synchronize pop-up menu in the Synchronize Files dialog, choose either selected files or the whole site.
- In the Direction pop-up menu, choose from the options—“get from server,” “put to server,” or both—that allow you to transfer files from local site to server, server to local site, or both ways, replacing older files with more recent ones.
- In the Synchronize Files dialog, click the Preview button. Dreamweaver connects to your remote site and creates a list of files that meet your criteria (“new at the remote site,” “newer at the local site,” or both). The list is displayed in a dialog (again) called Synchronize. Click OK, and Dreamweaver will update all files according to the criteria you defined.
A couple other icons to note in the Files panel: The Connect icon connects the Files window to your remote site. The Refresh icon refreshes local and remote site views.
When it’s time for housekeeping and moving files from one folder to another, you can also rely on the Dreamweaver Files panel. You can display the Files panel by choosing Window > Files or by pressing Shift+Command+F (Mac) or the F8 function key (Windows) to toggle between displaying and hiding the Files panel.
The Files panel menu has options for typical file management actions, like creating new files or folders, renaming files, copying or pasting files, deleting files, and so on.
The basic rule for working with files is this: Never change filenames or move files between folders using your operating system’s file management tools. Instead, always rely on Dreamweaver’s Files panel to manage filenames and to move files between folders.
The Site folder looks and works like the Finder (for Mac) and Windows Explorer (for Windows) utilities. It allows you to drag files between folders, copy and paste files, rename files, and delete files, just as you would do in Finder or Explorer.
When you define your local Web site in Dreamweaver, you define a local site folder. Dreamweaver knows that this folder is where all your site files should be kept. If you open a file from another folder or copy or move a file from another folder, Dreamweaver will prompt you to save a copy of that file in your Web folder. For example, if you embed an image in a Web page, Dreamweaver will prompt you to save that image to your site root or image folder when you place it on the page.
#4 Creating and Saving Web Pages
When you choose File > New, the New Document dialog opens. Throughout this book you will explore some of the most useful categories of new documents, but the first and main type of new document you’ll create in the New Document dialog is a basic page. The basic and main type of Web page you’ll create is an HTML page (Figure 4a).
Figure 4a. New Document dialog with a new HTML Web page selected.

Clicking the Create button in the New Document dialog generates a new page and opens that page in the Document window. The Document window is where you design Web pages. In the Document window, you can open many pages at a time and edit them. You use the Document window to create or paste text, embed images, define links, place and sometimes create page elements like style sheets (that control the look of a page), input forms, embed animation, and create interactive objects (that react to actions by a visitor).
You work in the Document window when you open an existing Web page or when you create a new one. Use the File menu to open an existing Web page (File > Open or File > Open Recent to access a list of recently opened pages) or to create a new Web page (File > New).
The right side of the status bar (at the bottom of the Document window) has some handy tools that aid in design techniques. The Select and Hand tools provide two ways to navigate around your document.
The Select tool is the default mode; it allows you to click on objects or click and drag to select text. The Hand tool works like similar tools in Adobe Photoshop or Illustrator, allowing you to grab a section of the page and drag it in or out of view.
• The Zoom tool is used to draw a marquee and enlarge a section of a page.
• To exit either the Zoom or Hand tool mode and return to the default cursor, click the Select tool.
• The Set Magnification drop-down menu is another way to define magnification.
• The Window size display indicates the size of your Design window, normally in pixels.
• The File Size/Download Time display estimates download time for the page parameters (Figure 4b).
Figure 4b. Status bar tools.

After you create a new page, you need to save it with a filename, and you need to assign a page title to that page. Every Web page needs a filename and a title. The filename is mainly an internal element. It is used to locate the file in a Web site and to link the file to other files. As such, filenames don’t have to be very creative, but they should avoid special characters like commas, ampersands (&), percent signs (%), spaces, and so on. You’ll be safe if you stick to lowercase alphanumeric characters, plus the helpful dash (-) and underscore (_) characters.
There is a special requirement for filenames assigned to a site home page. A site home page is the page that opens when visitors enter your URL in the address bar of their browser. This URL does not specify a file but only a server location. Once the server location is open in a browser, browsers detect the home page by looking for a file named index.htm or index.html. Never create files named both index.htm and index.html; this will confuse your server, the browsers, and you. Instead, choose one or the other, and create a file called index.html (or index.htm). This will be your home page.
Page titles are different from page filenames. Titles have nothing to do with how files are saved, linked to, or managed at a server. Therefore, they can contain any characters, including special characters like commas and other punctuation marks. As noted, every page has a page title, but unless you assign a page title, the default “Untitled Page” page title appears in browser title bars.
You can enter (or change) page title information in the Title field in the Document toolbar. If the Document toolbar is not visible in the Document window, choose View > Toolbars > Document (Figure 4c).
Figure 4c. Entering a page title.
![]()
#5 Working with Text and Defining Links
There are two basic options for bringing text to a Web page:
• Copying relatively unformatted text into Dreamweaver and formatting it in Dreamweaver
• Using export tools in your word processor and import tools in Dreamweaver to translate the markup language from PostScript to HTML
If you copy and paste text from your word processor into Dreamweaver, you can still use the formatting tools provided by Dreamweaver. These tools are designed to apply formatting that can be interpreted well and consistently by browsers. The downside of this method is that you need to reapply formatting in Dreamweaver.
On the other hand, saving your word processing file as an HTML file (some word processors have a Save As Web Page option) allows you to bring as much formatting as possible with the text as you move it into Dreamweaver. The downside of this method is that the formatting generated by your word processor is unlikely to hold up as consistently in browsers as text formatted in Dreamweaver.
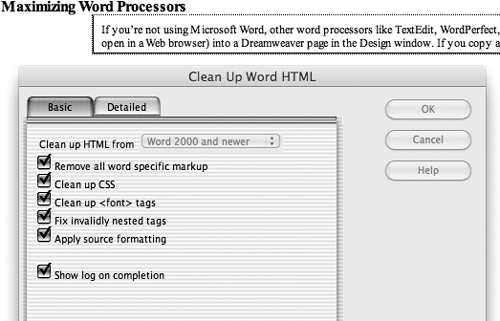
If you save a Word file as an HTML page or if you import a Word file into a Dreamweaver Web page, you can clean up the HTML that results by choosing Commands > Clean Up Word HTML. From the Clean Up HTML pop-up menu, choose a version of Word. Then accept the default check-box settings. Doing this will strip from the generated HTML any coding that would confuse browsers (Figure 5a).
Figure 5a. Cleaning up imported HTML code.
Links are one of the most basic and dynamic elements of a Web page. In fact, hypertext, the H in HTML, refers to text that could have link properties (at least at the time the name was coined). Links can be associated with text or images.
The easiest way to define links is to use the Properties inspector (choose Window > Properties if the inspector is not displaying). To define an absolute link, start by selecting the text you want to link from. In the Properties inspector, click the HTML button if that is not selected (deselect the CSS button). With the text selected, you can type an absolute link in the Link box in the Properties inspector (Figure 5b).
Figure 5b. Entering an absolute-link target for selected text.

To define a relative link, with the link text selected, click the blue Browse for File icon next to the Link box in the Properties inspector. The Select File dialog opens. Navigate to the linked file, and click Choose to generate a link to that file. The relative link appears in the Link box in the Properties inspector (Figure 5c).
Figure 5c. Defining a relative link.

The other attribute that is important to define for a link is the Target window. By default, links open in the same browser window as the linking page, causing the linking page to disappear. Visitors can click the Back button on their browser to return to the original, linking page.
If you want a page to open in a new browser window, go to the Properties inspector and choose the _blank attribute in the Target popup menu (Figure 5d).
Figure 5d. Defining the _blank link target that will open the link in a new browser window.

#6 Embedding and Editing Images
You embed photos or other images in Web pages with Dreamweaver. But try to avoid using Dreamweaver as your image-editing tool. Dreamweaver CS5 does come with a few, very minimalist and rather primitive image-editing tools. But programs (Adobe Photoshop and Photoshop Elements among the most prominent) allow you to export image files to JPEG, GIF, or PNG format, and resize and reformat images to look better and download faster on the Web.
That said, there are two basic approaches to embedding images in Dreamweaver:
• Prepare the image in Photoshop (or another image editor), sizing it, choosing a Web-friendly format, and adjusting color and quality for the Web.
• Copy and paste the image into Dreamweaver, and use Dreamweaver’s limited but functional tools to apply appropriate Web image settings.
Let’s walk through both of these options, starting with an image that has been saved to a JPEG, GIF, or PNG (pronounced “ping”) format. The image should be in your Dreamweaver Site folder (refer to #1, “Defining a Local Web Site”). To embed an image that has already been saved and resized, follow these steps:
- With your cursor at the insertion point for the photo (this should generally be at the beginning of a paragraph if there is text on the page), choose Insert > Image. In the Select Image Source dialog (Figure 6a), navigate to the image that you saved to your Site folder (a quick shortcut is to click the Site Root button in the dialog to jump to your Dreamweaver Site folder).
Figure 6a. Select Image Source dialog.

- Select the image you wish to insert and click Choose.
- With default settings for accessibility (these can be edited in the Preferences dialog—choose Edit > Preferences in Windows or Dreamweaver > Preferences on a Mac), you will be prompted to enter Image Tag Accessibility Attributes. Entering a brief description of the image in the Alternate Text box provides alternate content for visitors to your site who cannot see, or who have images disabled in their browsing environment. If long descriptions of images are appropriate, they can be saved as separate Web pages, and linked to in the Long Description box in the dialog (Figure 6b).
Figure 6b. Defining alternate text for an image.

- When you click OK in the Image Tag Accessibility Attributes dialog, the image appears on the page.
Even though you prepared this image in a program like Photoshop, you may want to edit the appearance in Dreamweaver, including by aligning the image to flow text around it. I’ll show you how to do that shortly, but first, let’s examine the other main scenario for bringing illustrations into Dreamweaver:
To copy and paste an image into Dreamweaver, follow these steps.
- Copy the image into your operating system clipboard. To copy an image from the Web, select the image in a Web browser and choose Copy Image from the Control-click (Mac) or right-click (Windows) context menu. Or, in other programs, choose Edit > Copy.
- Click in Dreamweaver at the point where you want to insert the image, and choose Edit > Paste. Depending on the source of the image and the image file type, Dreamweaver will immediately prompt you with either the Image Description (Alt Text) dialog or the Image Preview window.
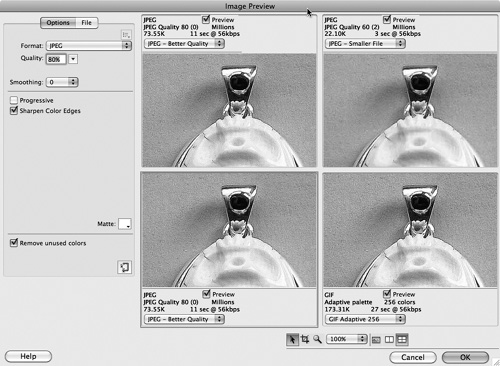
- If the Image Preview window opens, use the Format drop-down menu to choose a format (usually JPEG works best for photos). Use the Quality slider to define image quality (better color accuracy). Better image quality means a larger image, which will take longer to download. Select the Progressive check box for JPEGs, or the Interlacing check box for PNG and GIF format so that the image will “fade in” while it downloads, as opposed to appearing as line-by-line pixels starting at the top of the image.
- You can experiment with other image settings, like format, quality, and the sharpen Color Edges check box by choosing the 2-up or 4-up displays (the last two options in the row of tools at the bottom of the Image Preview dialog). Choose a panel and apply settings. Note the quality of the image, and the file size and download time (Figure 6c).
Figure 6c. Comparing different file formats and settings for an image for the Web in Dreamweaver’s Image Preview window.
- When you have defined settings, be sure you have the correct version of your image selected in the 2-up or 4-up display, and click OK.
The Save Web Image dialog appears. Click the Site Root button to jump to your Dreamweaver Site folder, and enter a filename in the Save As box. Then click Save.
- Enter a brief description of the image in the Image Description (Alt Text) box for visitors to your site who cannot see, or who have images disabled in their browsing environment. Click OK to place the image.
Once you’ve embedded an image in a Web page, you can use image-editing and alignment tools in the Properties inspector to control how the image appears on the page. With the image selected, you can do the following:
• Add spacing around the image by entering values (in pixels) in the V (vertical) Space or H (horizontal) Space boxes.
• Align an image (flow text to the right or left) by choosing right or left in the Align drop-down menu (Figure 6d).
Figure 6d. A right-aligned image with 2 pixels of vertical spacing and 5 pixels of horizontal spacing.

• Resize an image by selecting it, and clicking and dragging on a handle. Normally, you’ll want to Shift+click on the lower-right resizing handle to maintain the height-to-width ratio of the original image (so you don’t distort it). After you resize an image, you can click the Resample button in the Properties inspector to reduce the file size for a resized image.
• Use the Crop, Contrast, and Sharpen tools in the Dreamweaver Properties inspector to do very basic photo editing. When you select the Crop tool, with an image selected, movable crop marks appear. Click the Crop tool again to crop the image. The Brightness and Contrast button opens a small dialog with interactive Brightness and Contrast sliders (use the Preview check box to see the effect of your changes on the image). The Sharpen tool opens a one-slider dialog that allows you to apply a Sharpen effect and preview it (Figure 6e).
Figure 6e. Resizing an image and identifying image-editing tools.

#7 Inspecting Code
The Dreamweaver CS5 window has three views: Code, Design, and Split. Code view displays only code and is used by designers who want to bypass Dreamweaver’s ability to generate code. Design view hides most code, providing a graphical design interface. Split view displays code on the left (normally) of the Document window and a graphical design environment on the right (Figure 7a).
Figure 7a. Viewing a page in Split view.

To toggle between views, choose one of the three view buttons on the left side of the Document toolbar (if that toolbar is not visible, choose View > Toolbars > Document).
You can create complex, appealing, and high-end Web sites using Dreamweaver, and the rest of the CS5 Web suite, without resorting to any kind of coding. That said, you can also easily access coding in Dreamweaver, and you can use Dreamweaver CS5’s handy new Inspect button to easily associate code with elements in the Design window.
When you click the Inspect button, Dreamweaver prompts you to click a Switch Now link just under the toolbar. Doing so switches your display to Split view if it is set to Design or Code view, and automatically enables Live View and Live Code, which converts your Design window into something like a browser window (see #8, “Previewing in Live View and Browsers” for more on Live View). If you click the Switch Now link, you also display the CSS Styles panel, a powerful panel for controlling Web and page layout and format, and one you’ll begin to explore in Chapters 2 and 3 of this book. For now, the CSS Styles panel is not essential, but Split view and Live View are, because the point of the Inspect button is to help you examine elements of your page in a browser-like environment, and link them to associated code.
With Inspect mode on, select any element of your page. The code associated with that element is highlighted in the Code side of Split view. Use this feature either to learn coding, or to identify code and edit it directly in Split or Code view (Figure 7b).
Figure 7b. Inspecting code for an image.

The Live Code button in the Document toolbar must be deselected in order to edit code. With Code view in one window and Live view in another, you can edit code. You can then click the Refresh Design View icon in the Document toolbar to see your edited code reflected in Live view, where you can test it in a browser.
#8 Previewing in Live View and Browsers
Dreamweaver CS5 provides at least four ways to test your Web page in a viewing environment. The most substantial of these is new to CS5: Adobe BrowserLab. You can also preview pages in a browser installed on your own computer (BrowserLab gives you access to all major browsers, whether or not they are installed on your computer). You can also preview pages in Live view. Finally, you can see how your page will look on a mobile device in Device Central.
The first time you use BrowserLab, you’ll be prompted to sign up with Adobe to use it. As of this writing, BrowserLab is free, and we hope it will stay that way. After you sign up for BrowserLab, choose File > Preview in Browser > Adobe BrowserLab, or open the BrowserLab panel (Windows > Extensions > Adobe BrowserLab). In BrowserLab, you can choose 1-up (one browser view at a time) or 2-up, which is convenient for comparing your page in two different browsers. Use the drop-down menu to preview your page in any browser (Figure 8a).
Figure 8a. Previewing a Web page in two different browsers at the same time at Adobe BrowserLab.

Dreamweaver CS5’s Live view allows you to test pages in Design view. For example, in Live view links work like links—you can click them and follow them. With Live view turned off, when you click on a text link you can’t follow the link (unless you Control-click (Mac) or right-click (Windows) and select Follow Link from the context menu), but you can edit the link text.
If you don’t have access to BrowserLab, you can preview pages in browsers installed on your own computer by choosing File > Preview in Browser and then selecting one of your installed browsers.
Live view is not as accurate as previewing in an actual browser, but it does give you a basic sense of how your page will look. To switch to Live view, click the Live View button in the Document toolbar (or choose View > Live View). In Live view, you can test links, enter data into forms, and generally interact with your Web page just as you would in a browser (Figure 8b).
Figure 8b. Toggling from Design view to Live view.

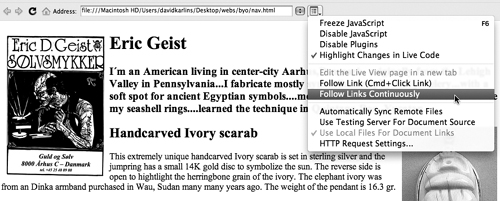
Additional controls over Live View display are available in the Browser Navigation toolbar (View > Toolbars > Browser Navigation). Options from the Live View Options drop-down menu in the Browser Navigation toolbar (Figure 8c) include defining whether links should function as links, along with rather complex options for controlling how JavaScript runs in Live view (for more on JavaScript in Dreamweaver, see Chapter 5, “Adding Effects and Interactivity with Spry and JavaScript”).
Figure 8c. Live View options.
To preview your page in a mobile device, choose File > Preview in Browser > Device Central. You can preview your page in one of the versions of Flash for mobile devices (like Flash Player 10.1). Or you can click the Home icon in the Device Central Device Library and choose any of dozens of mobile devices to test your page (Figure 8d).
Figure 8d. Previewing a Web page on a mobile device in Device Central.
