7. Using Text
This lesson will take approximately two and a half hours to complete. If needed, remove the previous lesson folder from your hard drive and copy the Lesson07 folder onto it.
![]()
Words are integral to any Flash site. Learn how to use the new Text Layout Format to create titles, sophisticated layouts, and dynamic text content that can change to suit different situations.
Getting Started
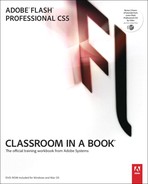
To begin, view the finished project to see the different kinds of text elements that you’ll create in this lesson.
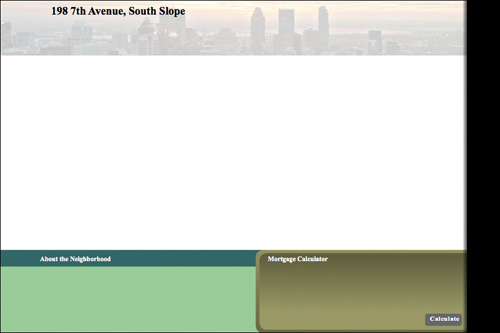
1 Double-click the 07End.swf file in the Lesson07/07End folder to play the animation.
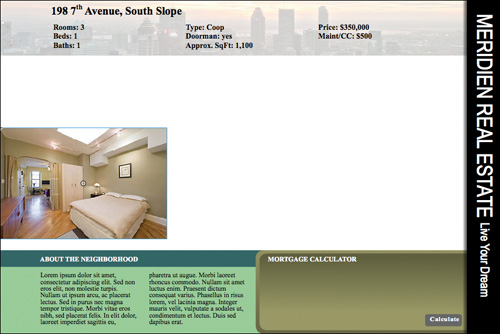
The finished project is an interactive realtor site for the fictional city of Meridien, whose restaurant guide you completed in the previous lesson. Viewers can read about the featured property and its neighborhood or figure out how much they can afford to pay every month using the mortgage calculator at the bottom right. Enter a new rate, a new value for the percent down, and click the Calculate button to display the estimated monthly payment.
2 Close the 07End.swf file.
3 Double-click the 07Start.fla file in the Lesson07/07Start folder to open the initial project file in Flash.

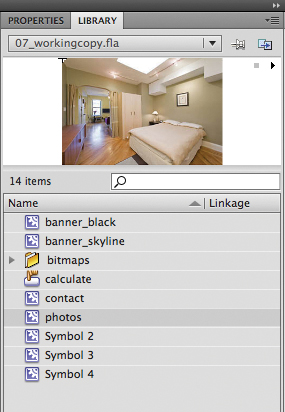
The Stage already includes some simple design elements to divide the space, with several assets already created and stored in the Library panel.
4 Choose File > Save As. Name the file 07_workingcopy.fla and save it in the 07Start folder. Saving a working copy ensures that the original start file will be available if you want to start over.
Understanding TLF Text
Flash Professional CS5 introduces a way of working with text that is different and much more powerful from previous versions. Flash uses a feature called Text Layout Format (TLF). When you choose the Text tool (![]() ) in the Tools panel to add text to the Stage, you must choose either TLF Text or Classic Text.
) in the Tools panel to add text to the Stage, you must choose either TLF Text or Classic Text.
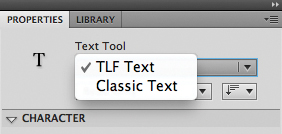
Choose TLF Text when you want to use more sophisticated controls for text formatting such as multiple columns or wrap-around text. You’ll learn many of the features unique to TLF Text in this lesson. Choose Classic Text when you don’t need that degree of layout control or if you need to target an older version of the Flash Player.
TLF Text depends on a specific external ActionScript library to function properly. When you test a movie or publish a movie that contains TLF Text, an additional Text Layout SWZ file (![]() ) is created next to your SWF file. The SWZ file is the external ActionScript library that supports TLF Text.
) is created next to your SWF file. The SWZ file is the external ActionScript library that supports TLF Text.
When a SWF file that contains TLF Text is playing from the Web, the SWF looks for the library in a couple of different locations. The SWF looks for the library on the local computer it is playing on, where the library is usually cached from normal Internet usage. The SWF also looks on Adobe.com for the library file, and if that fails, looks in the same directory as the SWF.
You should always keep the SWZ file with your SWF file so the TLF Text features work properly when you test your movies locally. You should also have the SWZ file accompany your SWF file when you upload it to your Web server, just to be safe.
Merging the TLF Text library
If you don’t want to maintain the separate SWZ file, you can merge the required ActionScript library with your SWF file. However, doing so adds significantly to the size of your published SWF file and is not recommended.
1 Choose File > Publish Settings. Click the Flash tab and choose Settings for ActionScript 3.0. You can also click the Edit button next to ActionScript settings in the Properties inspector.
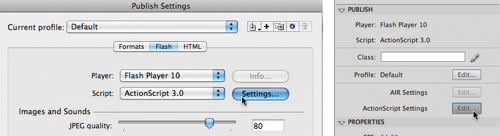
The Advanced ActionScript 3.0 Settings dialog box opens.
2 Click on the Library path tab.
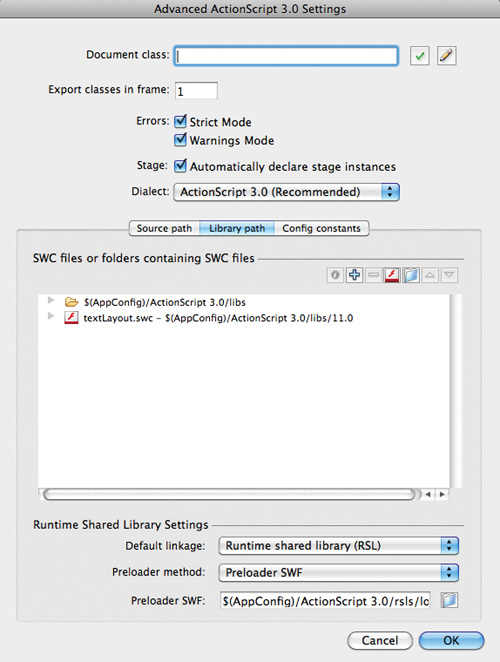
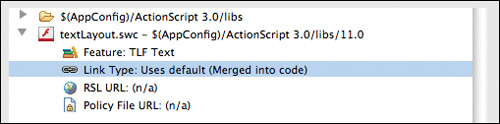
3 Click the arrow next to the textLayout.swc listing in the display window.
The arrow points downward, expanding the information about the TLF Text feature. Note that the Link Type shows that the file uses a runtime shared library, and the URL for the library is on Adobe.com.

4 In the Runtime Shared Library Settings section, choose Merged into code for the Default linkage.
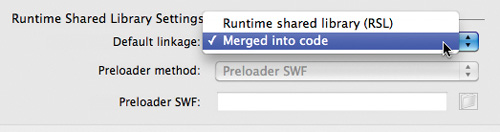
The Link Type changes to Merged into code.
The current Flash file will merge the TLF Text ActionScript library into the published SWF if you click OK to accept these settings. For the project in this lesson, do not merge the code. Click Cancel to leave the default setting, Link Type as a Runtime Shared Library.
Adding Simple Text
You’ll start by adding simple, single lines of text for display. Add text to the Stage with the Text tool in the Tools panel. When you add text, whether TLF Text or Classic Text, the text remains fully editable. So at any point after you create your text, you can return to it and change it or any of its properties, such as its color, font, size, or alignment.
Note
You can break apart text (Modify > Break Apart) to convert each letter into separate drawing objects whose stroke and fill you can modify. However, once broken apart, your text will no longer be editable.
As with other Flash elements, it’s best to separate text on its own layer to keep your layers organized. Having text on its own layer also makes it easy to select, move, or edit your text without disturbing the items in the layers below or above it.
Adding the titles
You’ll add titles to various sections of the realtor site and learn about the different formatting and style options.
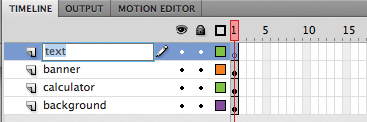
1 Select the banner layer and click the New Layer button. Rename it text.
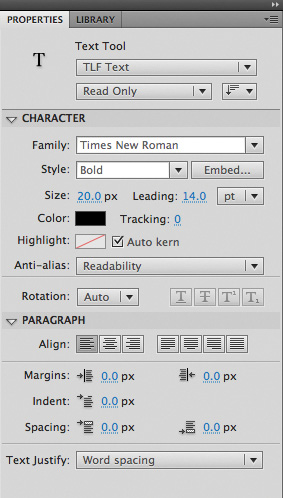
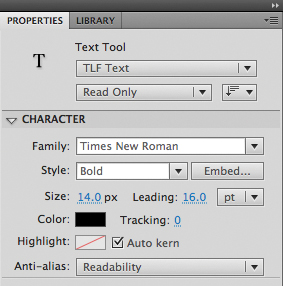
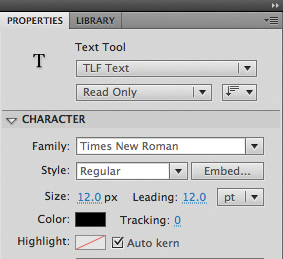
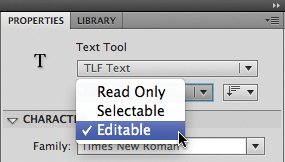
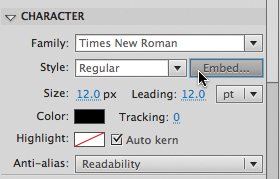
3 In the Properties inspector, select TLF Text and Read Only. In the Character section, choose Times New Roman for Family, Bold for Style, 20.0 for Size, 14.0 for Leading, and black for Color.
You may choose a similar font if Times New Roman is unavailable on your computer. For TLF Text, you have the option of choosing Read Only, Selectable, or Editable.
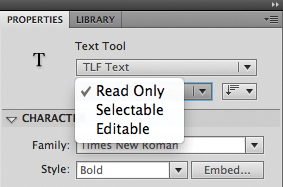
• Read Only displays text that can’t be selected or edited by the end user.
• Selectable displays text that the user can select to copy.
• Editable displays text that the user can select and edit. Use the Editable option for text input fields, such as login and passwords. You’ll use the Editable option later in this lesson to create the Mortgage Calculator.
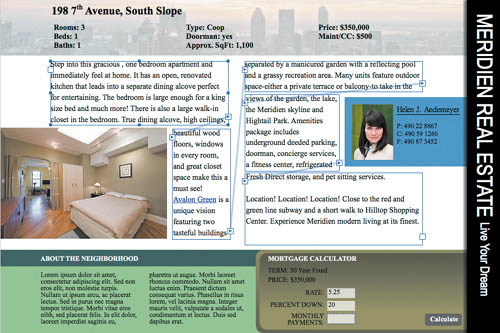
4 Click the top-left corner of the Stage where you want to begin adding text. Begin entering the address of the featured property, 198 7th Avenue, South Slope. Exit the Text tool by choosing the Selection tool.

5 In the Properties inspector, position the text at X=90 and Y=10.
Note
The registration of text is at the top-left corner of the text box.
6 Choose the Text tool again.
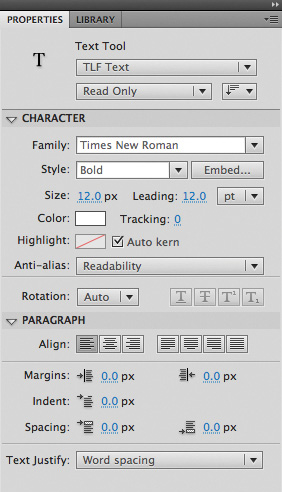
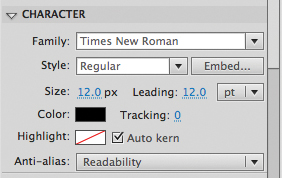
7 In the Properties inspector, select TLF Text and Read Only. In the Character section, choose Times New Roman for Family, Bold for Style, 12.0 for Size, 12.0 for Leading, and white for Color.
8 Click on the dark green banner to place the beginning of your next piece of text and enter the section title About the Neighborhood.

Note
You can also click and drag with the Text tool to define a text box at a set width and height. You can always change the dimensions of the text box to accommodate your text.
9 Create a third piece of text at the top of the dark brown area with the section title Mortgage Calculator.

10 Position the About the Neighborhood title at X=70 and Y=460. Position the Mortgage Calculator title at X=480 and Y=460.
Creating vertical text
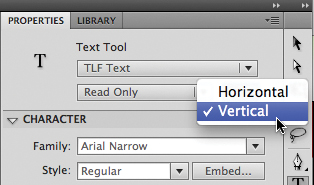
Although vertical text is not common, it can be useful for unusual displays. For many Asian languages, vertical text is essential to display them correctly. In this lesson, you’ll use a vertical orientation for the overall banner title.
1 Select the Text tool.
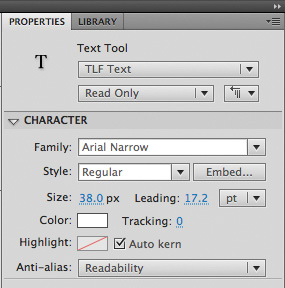
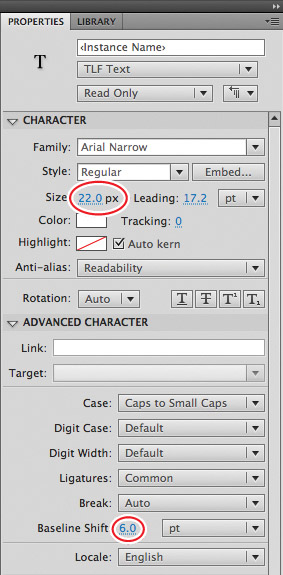
2 In the Properties inspector, select TLF Text and Read Only. In the Character section, choose Arial Narrow for Family, Regular for Style, 38.0 for Size, and white for Color.
3 From the orientation pull-down menu, choose Vertical.
Note
In the Character section of the Properties inspector, you can choose 270° to change the orientation of the individual characters as well as the lines of text.
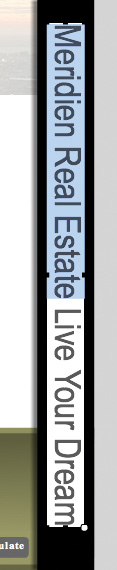
4 Click on the black vertical banner to place the beginning of your text and enter the banner title Meridien Real Estate Live Your Dream.

Modifying characters
Use the Character and Advanced Character options in the Properties inspector to modify the way your text appears. You’ve already used different colors, font families, font sizes, and orientations. Now you’ll explore some less obvious options.
1 Double-click the top address and select the “th” characters.

2 In the Character section of the Properties inspector, select the Superscript option.

The “th” becomes smaller and is raised from the baseline as a superscript.

3 Exit the Text tool by selecting the Selection tool, and click an empty part of the Stage to deselect the text.
4 Hold down the Shift key and select the bottom two text titles, About the Neighborhood and Mortgage Calculator.

5 In the Advanced Character section of the Properties inspector, choose Upper Case from the Case menu.
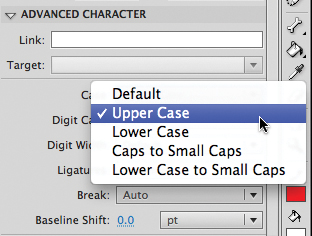
The characters in the two selected bottom titles change to all uppercase.

6 Double-click the vertical banner text and select the words Meridien Real Estate.
7 In the Advanced Character section of the Properties inspector, choose Upper Case from the Case menu.
The selected words in the banner title change to all uppercase.

8 Select the last three words of the banner title, Live Your Dream.
9 In the Properties inspector, change the font size to 22 and Baseline shift to 6.0.
The selected words in the banner title become smaller and are shifted upward from their baseline. The variations in size and baseline shift in the banner title create a more pleasing design.

Adding Multiple Columns
Now you’ll add the text description of the property and some details about the neighborhood. The text will appear in different columns. For the property details, you’ll add a three-column text description, and for the neighborhood, you’ll add a two-column text description.
1 Select the Text tool.
2 In the Properties inspector, select TLF Text and Read Only. In the Character section, choose Times New Roman for Family, Bold for Style, 14.0 for Size, 16.0 for Leading, and black for Color. Make sure you switch back to horizontal text.
3 Click on the top horizontal banner below the address and drag out a long text box to define the width and height of the text.

4 In the Container and Flow section of the Properties inspector, enter 3 for the Columns option.
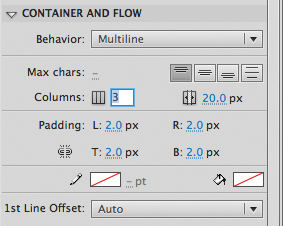
Your selected text box becomes enabled to display three columns.
5 Enter text in the text box that provides details of this hypothetical property, such as the number of rooms, number of beds, and so on. Press Return or Enter after each line. You can copy the information from the text file 07SampleRealEstateText1.txt in the 07Start folder.

The text is displayed in three columns. As text in the first column reaches the bottom of the text box, the next line appears at the top of the next column.
6 Exit the Text tool by choosing the Selection tool, and click an empty part of the Stage to deselect the text.
7 Select the Text tool again. Now you’ll create the text for the About the Neighborhood section.
8 In the Properties inspector, select TLF Text and Read Only. In the Character section, choose Times New Roman for Family, Regular for Style, 12.0 for Size, 12.0 for Leading, and black for Color.
9 Click on the bottom green bar below the About the Neighborhood title and drag out a text box so that it takes up most of the light green space.

10 In the Container and Flow section of the Properties inspector, enter 2 for the Columns option.
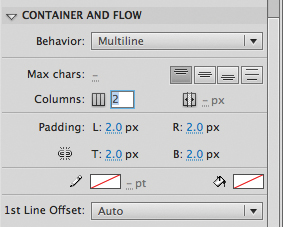
Your selected text box becomes enabled to display two columns.
11 Open the text file 07SampleRealEstateText1.txt in the 07Start folder if it’s not already open. Copy the Latin placeholder text in the About the Neighborhood section and paste it into the two-column text box.
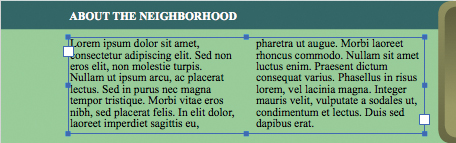
The text is displayed in two columns. As text in the first column reaches the bottom of the text box, the next line appears at the top of the next column.
Note
In the Container and Flow section of the Properties inspector, you can also modify the gutter, the space between columns, and the padding between the text and the boundaries of the text box to help you get the exact text layout you desire.
Modifying the text box
If your text doesn’t entirely fit in its text box, Flash displays a red cross at the bottom-right corner. The red cross means there is overflow text that is not visible.
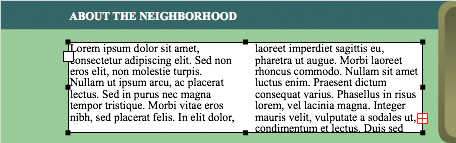
To see more of the text, you can enlarge the text box.
1 Select the Text tool or the Selection tool.
2 Move your mouse cursor over one of the solid blue squares surrounding the text box.
Your mouse cursor changes to a double-headed arrow, indicating the direction in which you can modify the size of the text box.
3 Click and drag to make the text box wider or taller to fit the text.

The text box gets resized, and the text reflows to accommodate the new dimensions.
Note
You can also resize a text box by entering new Width and Height values in the Properties inspector. However, do not resize a text box with the Transform panel or the Free Transform tool. Doing so will squash or stretch the contents of the text box and distort the text.
Wrapping Text
Long passages of text are visually boring. Instead, if you can wrap text around photographs or graphic elements, you create more visual interest and a more pleasing design. Take a look at any magazine in print or online, and you’ll see how text flows around photos to help integrate the elements on the page.
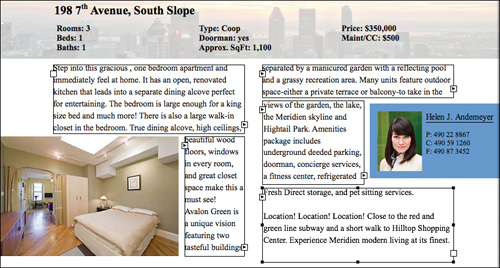
In this section, you’ll add some graphic elements to the realtor site—an animated slide show and a photo of the real estate agent—and create text that wraps around them both. You create wrapping text by linking separate text boxes. Text will flow from one text box to another as if in a single container.
Note
Linked text boxes are also referred to as “threaded text containers.”
Adding the graphics
The animated slide show and the graphic of the real estate agent have already been created and are in the Library panel for you to use.
1 Insert a new layer and rename it images. Drag the images layer under the banner layer.
2 In the Library panel, select the photos movie clip symbol.
3 Drag the photos movie clip symbol from the Library panel to the Stage. Position the movie clip instance at X=0 and Y=230.
The movie clip contains motion tweens of several photographs fading in and out. A movie clip’s animation is independent of the main Timeline and plays only when you test the movie (Control > Test Movie > in Flash Professional).
4 In the Library panel, drag the contact movie clip symbol from the Library panel to the Stage. Position the contact movie clip instance at X=620 and Y=175.
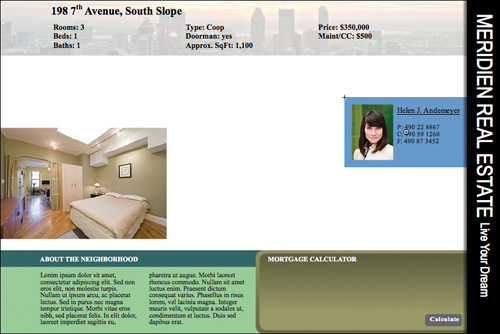
The movie clip of the real estate agent and her contact information is a simple static graphic.
Linking the text boxes
Now you’ll arrange several linked text boxes around the graphic elements.
1 Select the Text tool.
2 In the Properties inspector, select TLF Text and Read Only. In the Character section, choose Times New Roman for Family, Regular for Style, 14.0 for Size, 20.0 for Leading, and black for Color.
3 Click and drag out the first text box that takes up the space above the photo of the bedroom and whose right edge extends to about the middle of the Stage. Don’t worry about being too precise because you can always adjust the size and location of your text box.

Your first text box is created.
4 Click on the empty box on the lower-right corner of your text box.
Your cursor changes to an icon of the corner of a text box (![]() ).
).
5 Click and drag out your second text box just to the right of the photos movie clip instance.
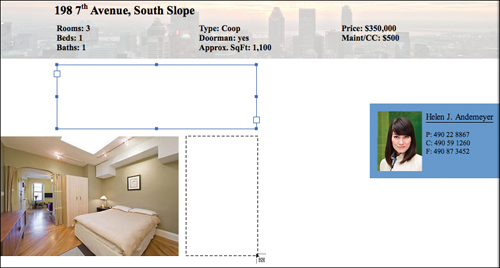
When you release your mouse cursor, your second text box becomes linked to the first text box. Blue lines that connect the first to the second represent the linkage.

Note
If you simply click on the Stage to define your next linked text box, Flash creates a text box that is identical in size to the previous text box.
6 Click on the empty box on the lower-right corner of your second text box; then click and drag out your third text box above the real estate agent contact information.
7 Continue creating linked text boxes until you have five boxes that flow around the photo and real estate agent.
Adding content to the linked text boxes
Next, add text to your linked text boxes. Begin with the first text box, and as text reaches the limit of one box, it will automatically flow into the next.
1 Open the file 07SampleRealEstateText1.txt from the 07Start folder if it’s not already open.
2 Copy the description of the property.
3 Double-click the first text box on the Stage and paste the text.
Click on the Stage outside the text boxes to deselect them and view how your text appears as it wraps around the graphics. Adjust the size or location to finesse the way your text flows from one box to the next.

Note
Treat the linked text boxes as if they were a single container. As you add, delete, and edit text, the contents reflow to fit. You can select all (Edit > Select All), and the contents of all the linked text boxes will be selected.
Deleting and inserting text boxes
If you need to edit the way the text flows, you can always delete linked text boxes or add new ones, and the linkages between the existing ones will be maintained.
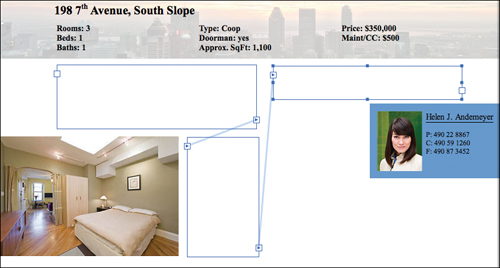
1 With the Selection tool, select the second linked text box.
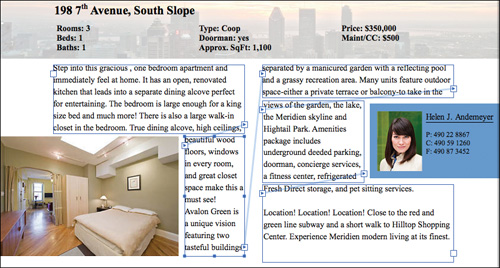
2 Press the Delete key on the keyboard.
The second linked text box is deleted from the Stage, but the remaining text boxes maintain their linkages. The first text box is now linked to the third at the top of the second column. Notice that the last text box shows the red cross at its bottom-right corner, indicating overflow text that cannot be displayed.

3 Click on the box containing the small arrowhead on the lower-right corner of the first text box.
4 Click and drag out the text box to reestablish the one you just deleted.
A new text box is inserted between the existing linked text boxes, and the text reflows to fill the new container.

Breaking and relinking text boxes
You can also break the links between text boxes and create new linkages.
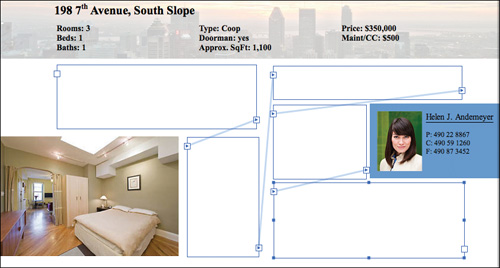
1 Click on the box containing the small arrowhead on the lower-right corner of the first text box (![]() ).
).
2 Move your mouse cursor over the second text box.
Your cursor changes to a broken link icon (![]() ), indicating that you can break the link to the text box that is currently below your cursor.
), indicating that you can break the link to the text box that is currently below your cursor.
3 Click on the second text box.
The link from the first text box to the second text box is broken. Your text now can’t flow out of the first text box.

4 Let’s reestablish the link. Click on the red box on the lower-right corner of the first text box and move your cursor over the second text box.
Your cursor changes to a linked icon (![]() ), indicating that you can establish a link to the text box that is currently below your cursor.
), indicating that you can establish a link to the text box that is currently below your cursor.
5 Click on the second text box.

The first text box is again linked to the second text box. Your text now flows throughout the five text boxes.

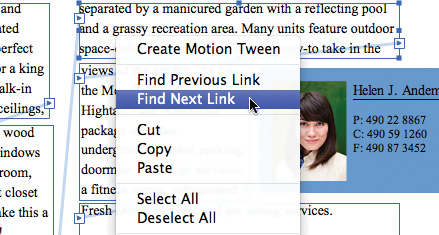
Finding the Next or Previous Link
Sometimes, if you have multiple linked text boxes, it may be confusing to see the linkages or difficult to select the boxes in succession. You can right-click/Ctrl-click over any text box and, if it is linked, you can choose Find Previous Link or Find Next Link. The previous or next linked text box will become selected.
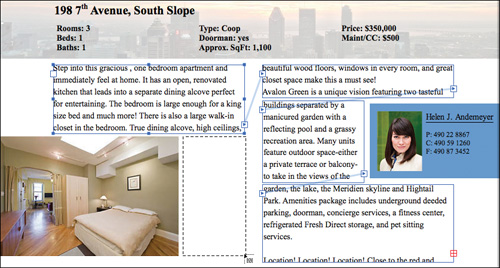
Hyperlinking Text
The description of the property on the realtor site contains references to several landmarks and destinations of interest in Meridien City. You’ll add a hyperlink to one of those text references so your users can click it and be directed to a Web site with additional information. Hyperlinks are easy to add to text and don’t require any HTML or ActionScript coding.
Adding a hyperlink
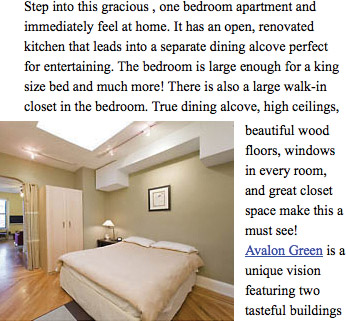
1 Double-click the second linked text box on the Stage and select the words Avalon Green.

Note
A _self Target loads the URL in the same browser window, taking over your Flash movie. A _top and _parent Target refers to the arrangement of a frameset, and loads the URL in a particular frame relative to the current frame.
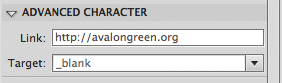
2 In the Advanced Character section of the Properties inspector, enter http://www.avalongreen.org for the Link and choose _blank in the Target pull-down menu.
The selected words in your text box become underlined, indicating that it is hyperlinked.

The Web address is a fictional one. Be sure to include the protocol http:// before any URL to choose a site on the Web. The Target field determines where the Web site loads. A _blank Target means that the Web site loads in a blank browser window.
3 Select the words Avalon Green, and in the Character section of the Properties inspector, change the color from black to blue.
The selected words become blue and remain underlined, which is the standard visual cue for a hyperlinked item in a browser. However, you are free to display your hyperlink in any fashion, just as long as your user can recognize it as a clickable item.
4 Choose Control > Test Movie > in Flash Professional. Click the hyperlink.
A browser opens and attempts to load the fictional Web site at www.avalongreen.org.
Creating User-input Text
Next, you’ll create the Mortgage Calculator, which accepts input from the user through the keyboard and displays estimated monthly payments based on those inputs. You create user-input text with Editable TLF Text. User-input text can be used to create sophisticated customized interactions that gather information from the viewer and tailor the Flash movie based on that information. Examples include applications requiring a login and password, surveys and forms, or quizzes.
Adding the static text elements
Start by creating all the text that doesn’t change or can’t be edited—the static elements of the mortgage calculator.
1 Select the Text tool.
2 In the Properties inspector, select TLF Text and Read Only. In the Character section, choose Times New Roman for Family, Regular for Style, 12.0 for Size, 12.0 for Leading, and black for Color.
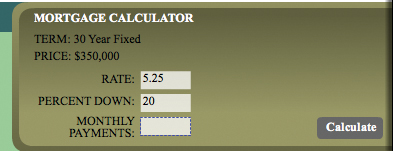
3 Click in the dark brown area under the Mortgage Calculator text and insert five separate lines of text for TERM: 30 Year Fixed, PRICE: $350,000, RATE, PERCENT DOWN, and MONTHLY PAYMENTS.

Adding the display fields
For Rate and Percent Down, you’ll add Editable text boxes so your user can enter their own numbers and customize the mortgage calculations to evaluate their buying decision.
1 Select the Text tool.
2 In the Properties inspector, select TLF Text and Editable. Keep the other font information the same as the previous text you created.
3 Click and drag out a small text box next to Rate.
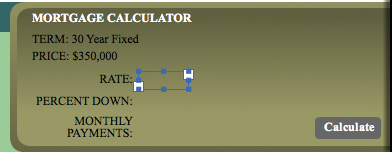
4 In the Container and Flow section of the Properties inspector, choose a white color and 75% Alpha value for the Fill.
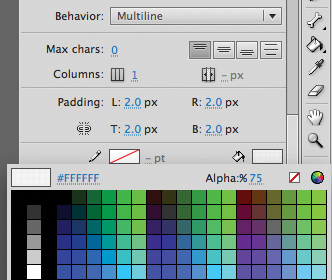
The Editable text box next to Rate displays a semitransparent white background. You can also add a stroke to the text box to give it more definition if you desire.
5 Create a second Editable text box next to Percent Down with the same semitransparent white background.

6 Create a third text box next to Monthly Payments with the same semitransparent white background, but make this text box Read Only.

The text box next to Monthly Payments is Read Only because it will display a number calculated based on the user-inputted Rate and Percent Down. The user does not need to edit the information in that box.
7 In the Editable text box next to Rate, enter 5.25. In the Editable text box next to Percent Down, enter 20.
Entering initial text in Editable text boxes often guides users in knowing what kind of text is expected.
Embedding fonts
For any text that may be edited during runtime, you should embed the fonts. Since the user can enter any kind of text in Editable text boxes, you need to include those characters in the final SWF to ensure that text appears as you expect it, with the same font that you’ve chosen in the Properties inspector.
1 Select the first Editable text box next to Rate.
Device Fonts
Use device fonts as an alternative to embedding fonts. Device fonts are three generic options grouped at the top of the Character Family pull-down menu. You can also choose the Use device fonts option from the Anti-alias pull-down menu.
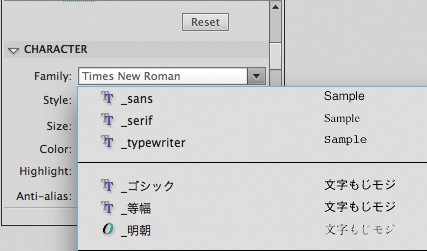
The three device fonts are _sans, _serif, and _typewriter. These options find and use the fonts on a user’s computer that most closely resemble the specified device font. When you use device fonts, you don’t have to worry about embedding fonts, and you can be assured that your viewer sees text that is similar to the text that you see in the authoring environment.
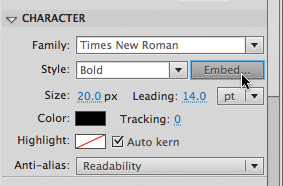
2 In the Character section of the Properties inspector, click the Embed button. You can also choose Text > Font Embedding.
The Font Embedding dialog box appears. The font that is used in the selected text box appears on the left.
3 In the Character ranges section, select Numerals.
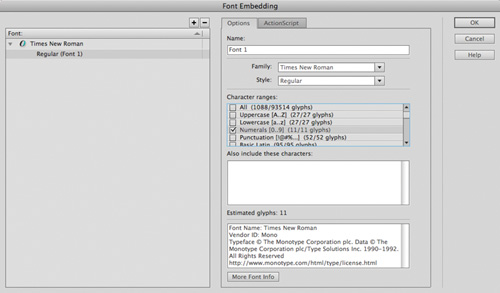
All the number characters of the current font, Times New Roman Regular, will be included in the published SWF. Click OK.
Note
Embedding fonts dramatically increases the size of your final SWF, so exercise caution when doing so, and limit the number of fonts and characters when possible.
Naming the text boxes
For Flash to control what text to display in a text box or to know what has been entered in an Editable text box, the text box must be given an instance name in the Properties inspector. Just as you named button instances in Lesson 6, naming text boxes on the Stage allows ActionScript to reference them. The same naming rules apply for text boxes as they do for buttons.
1 Select the first Editable text box next to Rate.
2 In the Properties inspector, enter rate_txt for the instance name.
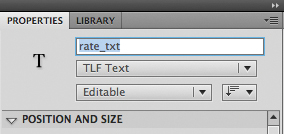
The suffix _txt is the convention for text boxes.
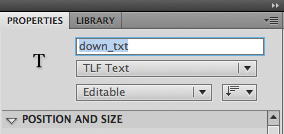
3 Select the next Editable text box next to Percent Down.
4 In the Properties inspector, enter down_txt for the instance name.
5 Select the Read Only text box next to Monthly Payments.
6 In the Properties inspector, enter monthly_txt for the instance name.

Changing the contents of text boxes
The contents of a text box are represented by its text property. You can dynamically change a text box’s contents by assigning new text to the text property. In this section, you’ll add ActionScript that reads the text entered in the Editable text boxes next to Rate and Percent Down, perform some mathematical calculations, and then display new text in the Read Only text box next to Monthly Payments.
1 Select the Calculate button on the Stage, and in the Properties inspector, enter calculate_btn for the instance name.
2 Insert a new layer and rename it actionscript.
3 Select the first keyframe of the actionscript layer and open the Actions panel.
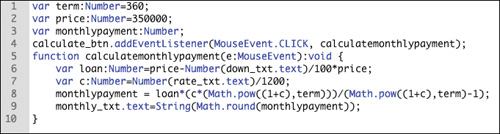
4 You must first create a few variables to hold numerical information. The variables will help you make the mortgage calculations. Variables are created, or “declared,” using the var keyword. Enter the code as follows:
![]()

5 Create an event listener and function for the Calculate button. You should be familiar with event listeners from Lesson 6, but if not, you should review the concepts in that lesson before moving on. The event listener and function should appear as follows:

6 Enter code within the function to make the mortgage calculations and display the results. The completed code for the event listener and function should be as follows:

Don’t get too discouraged looking at the code! Take your time to copy it exactly, or you can copy and paste it from the 07End.fla file in the 07End folder.
It may look complicated, but there are only two important concepts to identify. First, the contents of text boxes are referenced by the text property. So down_txt.text refers to the contents in the text box named down_txt, and rate_txt.text refers to the contents in the text box named rate_txt.
Second, text boxes contain text, or String data. To make numeric calculations, you must first convert the text to a number using Number(). To convert a number back to text, use String().
The rest of the surrounding code is algebraic manipulation according to a straight-forward mortgage payment formula.
Testing the calculator
Now test your movie to see how Flash controls the contents of the named text boxes.
1 Choose Control > Test Movie > in Flash Professional.
2 In the preview movie that appears, enter new values in the text boxes next to Rate and Percent Down, and then click the Calculate button.
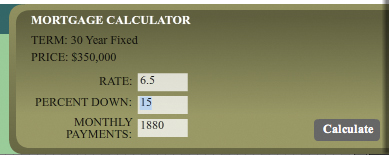
Flash reads the values in the text boxes next to Rate and Percent Down, calculates a monthly payment, and displays new text in the text box next to Monthly Payments. Try different values to see how much you can afford!
Loading External Text
So far, you’ve created an attractive layout with interactive tools for this property listing for the realtor. However, the realtor has many more listings, and it would be convenient to use the same format to display the information without re-creating a new layout for each property. You can load new text from an external file and display it in an existing text box, replacing its contents. To display additional listings, simply maintain additional text files and load them to be displayed as needed. This is an example of dynamic content—content that changes at runtime (in the SWF file) rather than being fixed during authortime (in the FLA file).
In this section, you’ll load new content from external text files to replace the property address, information, and description.
Naming the text boxes
To change the contents of the text boxes, you first need to give them instance names so they can be referenced in ActionScript. You’ll provide instance names for the address, information, and description of the property listing.
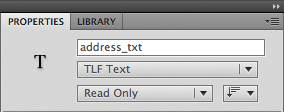
1 Select the text box at the top of the Stage that contains the address of the property listing.

2 In the Properties inspector, enter address_txt for the instance name.
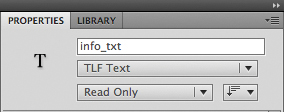
3 Select the text box below the address that contains the details of the property listing.

4 In the Properties inspector, enter info_txt for the instance name.
5 Select the first linked text box of the description of the property.

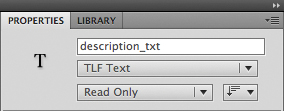
6 In the Properties inspector, enter description_txt for the instance name.
Embedding the fonts
When text changes at runtime, you need to embed all the characters of the font that the text would potentially use to make sure that the text displays properly.
1 Select the first linked text box named address_txt.
2 In the Character section of the Properties inspector, click the Embed button.
The Font Embedding dialog box appears. You can also choose Text > Font Embedding to display the dialog box.
3 The font used in the selected text box appears on the left side of the dialog box (Times New Roman Bold). In the Character ranges section, select Uppercase, Lowercase, Numerals, and Punctuation. Click OK.
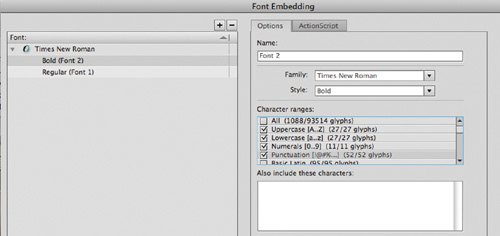
The character ranges that you’ve selected will be embedded in the final SWF file. Any of the characters in those ranges will display properly in your final Flash movie.
4 Select the first linked text box named description_txt.
5 In the Character section of the Properties inspector, click the Embed button.
The Font Embedding dialog box appears. The Numerals for Character range should already be selected since you embedded those characters for the Mortgage Calculator.
6 In the Character ranges section, select Uppercase, Lowercase, and Punctuation in addition to Numerals. Click OK.

The character ranges that you’ve selected will be embedded in the final SWF file. Any of the characters in those ranges will display properly in your final Flash movie.
Loading and displaying external text
Information for a second property listing is saved in three additional text files in the 07Start folder. You’ll add ActionScript to your movie that loads information from those text files.
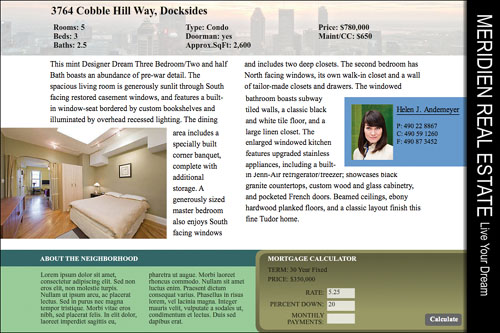
1 Open the file in the 07Start folder called 07SampleRealEstate2-address.txt.
The file contains information about the address of another property listing.

Note
Make sure you save external text content as a text-only file in an application such as SimpleText (Mac) or Notepad (Windows). Do not use Microsoft Word, because Word adds unnecessary additional information to the file that interferes with its proper loading. If you use Word, always choose Save As Text Only.
2 Choose Window > Code Snippets.
The Code Snippets panel appears.
3 Expand the Load and Unload folder and double-click the Load External Text option.
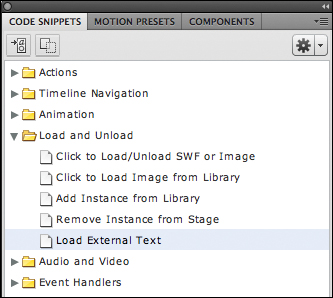
A new layer named Actions is automatically inserted in the Timeline, and the Actions panel opens to display the inserted code snippet. You’ll have to customize some of the code for it to work for this particular project.
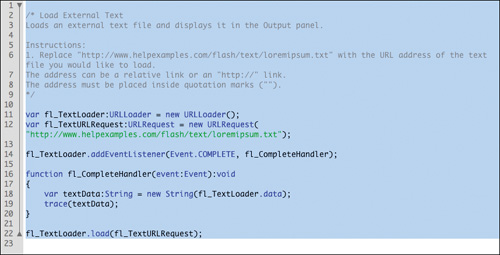
4 Replace the URL in line 12 of the code snippet with the filename of the property address, 07SampleRealEstate2-address.txt. Make sure you keep the double quotation marks surrounding the filename.
![]()
The code loads the file 07SampleRealEstate2-address.txt.
5 Replace the trace command in line 19 of the code snippet with the following code that assigns the new text to the text box named address_txt:
address_txt.text = textData;

The contents of the text file, 07SampleRealEstate2-address.txt, will be displayed in the text box named address_txt.
6 In the Code Snippets panel, double-click the Load External Text option again.
7 A second code snippet appears in the Actions panel that loads a second text file.
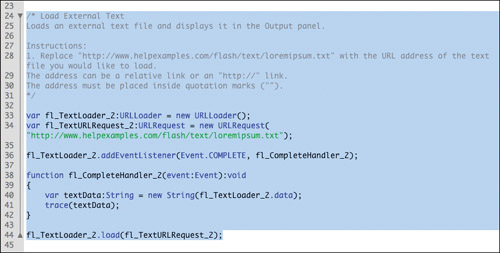
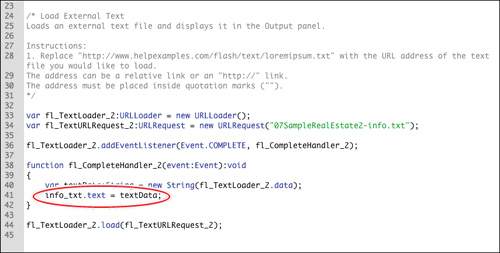
8 Replace the URL in line 34 with the filename of the property details, 07SampleRealEstate2-info.txt, and replace the trace command in line 41 with the following code that assigns the new text to the text box named info_txt:
info_txt.text = textData;
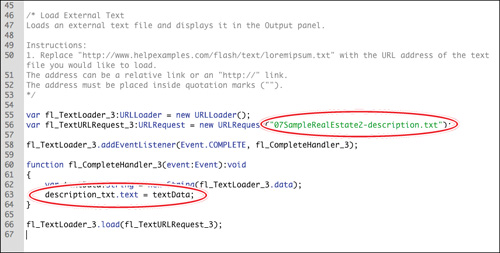
9 In the Code Snippets panel, double-click the Load External Text option a third time and make the code replacements to load 07SampleRealEstate2-description.txt and display the text in description_txt.
The three large blocks of code snippets appear in the Actions panel one after the other.
10 Choose Control > Test Movie > in Flash Professional.

Flash loads the three external text files and displays the contents of the text files in the targeted text boxes. The listing now displays details for a property on Cobble Hill Way instead of 7th Avenue.
The photos and Mortgage Calculator still refer to the previous listing, so the update to the new property is unfinished. However, you can still see in this incomplete example how flexible it is to develop a framework that loads external text content and displays it in text boxes on the Stage. Many professional Flash projects rely on dynamic content fed from external assets such as text files.
Review Questions
1 What is the extra SWZ file that is required for TLF Text?
2 What is the difference between Read Only, Selectable, and Editable TLF Text?
3 When do you need to embed fonts, and how do you do it?
4 How do you make text wrap around objects in a layout?
5 How do you change or read the contents of a text box?
Review Answers
1 The SWZ file is an external ActionScript library that contains information that supports TLF Text. If your Flash movie contains TLF Text, it needs the SWZ file to function properly. Flash automatically generates the additional file, which should always accompany your SWF file.
2 Read Only text is for display purposes and doesn’t allow the user to select or edit the text. Selectable text allows the user to select and copy text. Editable text allows the user to select, copy, delete, and edit the text. The contents of all three kinds of text can be changed dynamically with ActionScript.
3 Fonts should be embedded for any text that may be edited or changed at runtime, which means any Editable text box or any text box whose contents dynamically changes, except for text that uses device fonts. Choose Text > Font Embedding or click the Embed button in the Properties inspector to display the Font Embedding dialog box. In the Font Embedding dialog box, you can choose which font, style, and range of characters to embed in your Flash movie.
4 You can wrap text around objects such as photos or graphic elements in a layout by creating a series of linked text boxes, sometimes called threaded text containers. The links establish how overflow text from one text box flows into the next text box. Create the first text box, and then click on the small white box in its lower-right corner. After the mouse cursor changes to a text box icon, click and drag to add the next linked text box.
5 A text box’s contents are determined by its text property, which accepts String values. To change or access the contents of a text box, you must first give the text box an instance name in the Properties inspector. Then, in ActionScript, you can reference the contents of the text box with its instance name, followed by a dot, followed by the keyword text.