
8. Working with Sound and Video
This lesson will take approximately three hours to complete. If needed, remove the previous lesson folder from your hard drive and copy the Lesson08 folder onto it.
![]()
Sound and video add new dimensions to your projects. Import sound files and edit them directly in Flash, and use Adobe Media Encoder to compress and convert video files to use in Flash.
Getting Started
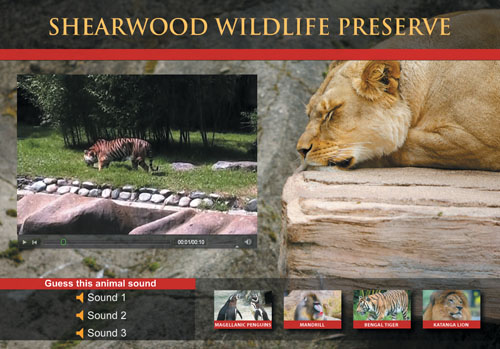
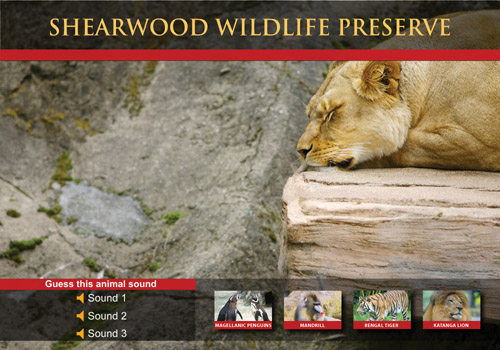
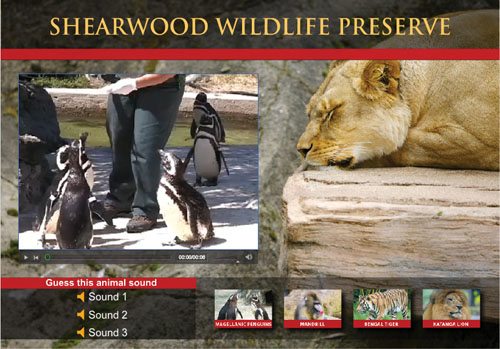
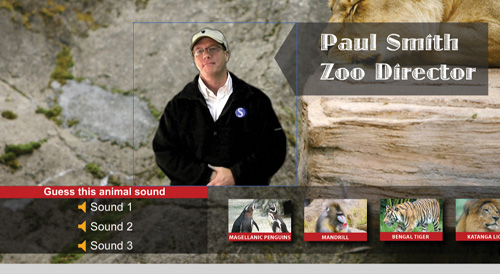
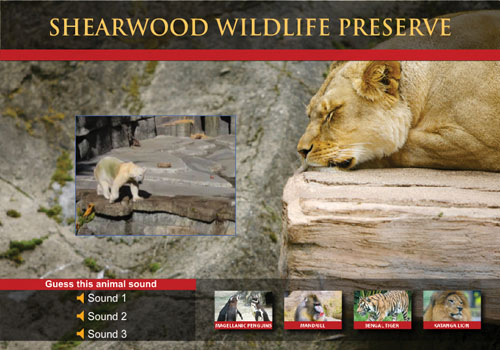
Start the lesson by viewing the finished animated zoo kiosk. You’ll create the kiosk by adding sound and video files to a project in Flash.
1 Double-click the 08End.swf file in the Lesson08/08End folder to play the animation.

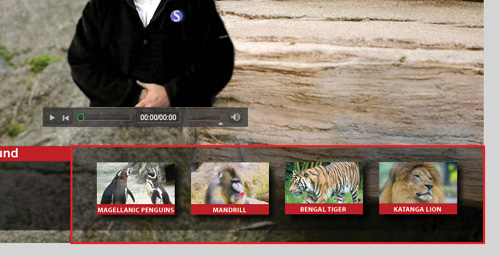
View the movie of the polar bear with a short soundtrack of an African beat. A zoo director introduces himself, and as he speaks, Flash elements appear that are synchronized with his talk.
2 Click a sound button to hear an animal sound.
3 Click a thumbnail button to view a short movie about the animal. Use the interface controls below the movie to pause, continue, or lower the volume.
In this lesson, you’ll import audio files and put them on the Timeline to provide the short audio flourish. You’ll also learn how to embed sounds in each button. You’ll use Adobe Media Encoder CS5 to compress and convert the video files to the appropriate format for Flash. You’ll learn how to work with transparent backgrounds in video to create the silhouetted zoo director video. You’ll also add cue points in the video of the zoo director to trigger other Flash animated elements.
1 Double-click the 08Start.fla file in the Lesson08/08Start folder to open the initial project file in Flash.
2 Choose File > Save As. Name the file 08_workingcopy.fla, and save it in the 08Start folder. Saving a working copy ensures that the original start file will be available if you want to start over.
Understanding the Project File
The initial setup of the project has been completed except for the audio and video portions and some of the ActionScript code. The Stage is 1000 × 700 pixels. A row of buttons of colorful animals is on the bottom row, another set of buttons on the left, a title at the top, and a background image of a resting lion.
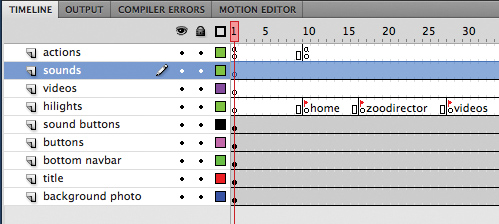
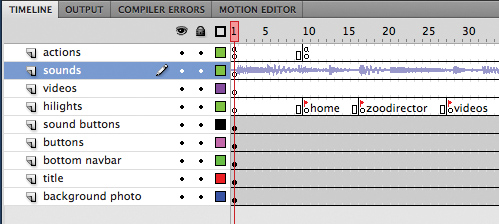
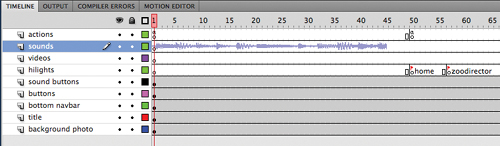
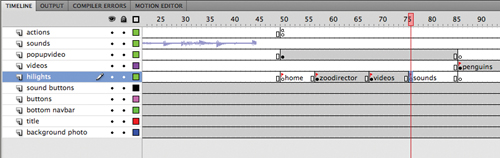
The Timeline contains several layers that separate the different content.
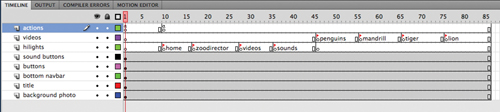
The bottom three layers, called background photo, title, and bottom navbar, contain design elements, text, and images. The next two layers above, called buttons and sound buttons, contain instances of button symbols. The videos layer and the hilights layer contain several labeled keyframes, and the actions layer contains ActionScript that provides the event handlers for the bottom row of buttons.
If you’ve completed Lesson 6, you should be familiar with the structure of this Timeline. The individual buttons on the bottom row are coded so that when the user clicks a button, the playhead moves to a corresponding labeled keyframe in the videos layer. You’ll be inserting content into each of those keyframes. But first you’ll learn to work with sound.
Using Sounds
You can import several types of sound files into Flash. Flash supports MP3, WAV, and AIFF files, which are three common sound formats. When you import sound files into Flash, they are stored in your Library panel. You can then drag the sound files from the Library panel onto the Stage at different points along the Timeline to synchronize those sounds to whatever may be happening on the Stage.
Importing sound files
You’ll import several sound files to the Library panel, which you’ll use throughout this lesson.
1 Choose File > Import > Import To Library.
2 Select the Monkey.wav file in the Lesson08/08Start/Sounds folder, and click Open.
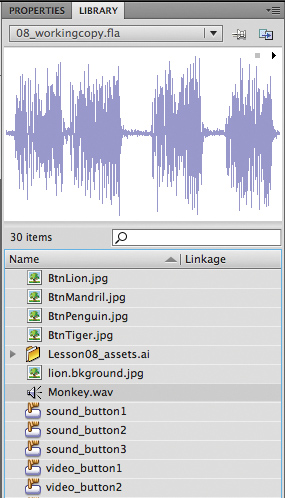
The Monkey.wav file appears in your Library panel. The sound file is indicated by a unique icon, and the preview window shows a waveform—a series of peaks and valleys that represent the sound.
3 Click the Play button on the far upper-right corner of the Library preview window.
The sound plays.
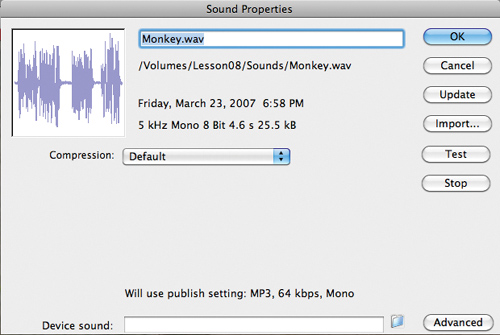
4 Double-click the sound icon in front of your Monkey.wav file.
The Sound Properties dialog box appears, providing information on your sound file, including its original location, size, and other technical properties.
5 Choose File > Import > Import To Library and select the other sound files to import into your Flash project. Import Elephant.wav, Lion.wav, Africanbeat.mp3, and Afrolatinbeat.mp3.
Note
Hold down the Shift key to select multiple sound files to import them all at once.
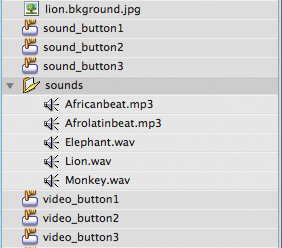
Your Library panel should contain all the sound files.
6 Create a folder in your Library panel and place all the sound files in it to organize your Library panel. Name the folder sounds.
Placing sounds on the Timeline
You can place a sound at any point along the Timeline, and Flash will play that sound when the playhead reaches the keyframe. You’ll place a sound on the very first keyframe to play as the movie starts to provide a pleasant audio introduction and set the mood.
1 Select the videos layer on the Timeline.
Where to Find Sound Clips
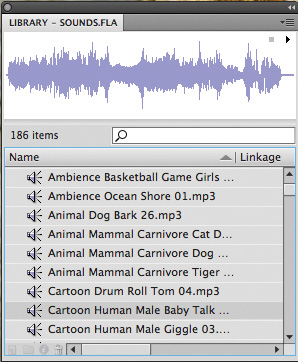
If you’re looking for interesting sounds to use in your Flash movie, you can use the free sound files available from Adobe. Flash CS5 Professional comes preloaded with dozens of useful sounds that you can access by choosing Window > Common Libraries > Sounds. An external library (a library that is not connected to the current project) appears.
Simply drag one of the sound files from the external library onto your Stage. The sound will appear in your own Library panel.
2 Insert a new layer and rename it sounds.
3 Select the first keyframe of the sounds layer.
4 Drag the Afrolatinbeat.mp3 file from the sounds folder in your Library panel onto the Stage.
The waveform of your sound appears on the Timeline.
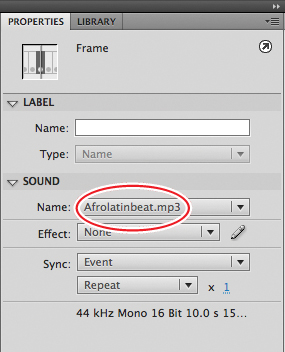
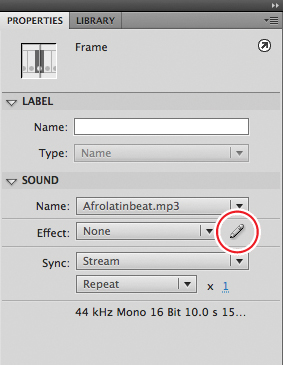
5 Select the first keyframe of the sounds layer.
In the Properties inspector, note that your sound file is now listed on the pull-down menu under the Sound section.
6 Select Stream for the Sync option.
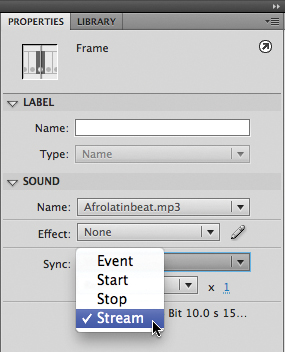
The Sync options determine how the sound plays on the Timeline. Use Stream sync for long passages of music or narration when you want to time the sound with the Timeline.
7 Move the playhead back and forth on the Timeline.
The sound plays as you scrub the Timeline.
8 Choose Control > Test Movie > in Flash Professional.
The sound plays only for a short while before getting cut off. Because the sound is set to Stream, it only plays when the playhead moves along the Timeline, and if there are sufficient frames to play. There is a stop action at frame 10 that stops the playhead, and hence, stops the sound.
Adding frames to the Timeline
The next step is to extend the Timeline so that the entire sound (or at least the portions that you desire) plays before the stop action halts the playhead.
1 Click on the Stage to deselect the Timeline, and then place the playhead between frames 1 and 9 by clicking on the top frame numbers.
2 Choose Insert > Timeline > Frame, or press F5, to insert frames in all the layers between frames 1 and 9.
3 Insert enough frames so that there are about 50 frames to play the sound before the stop action in the second keyframe of the actions layer.

4 Choose Control > Test Movie > in Flash Professional.
The sound lasts longer because it has more frames to play before the playhead stops.
Clipping the end of a sound
The sound clip you imported is a bit longer than you need. You’ll shorten the sound file by using the Edit Envelope dialog box. Then you’ll apply a fade so the sound gradually decreases as it ends.
1 Select the first keyframe of the sounds layer.
2 In the Properties inspector, click the Pencil button.
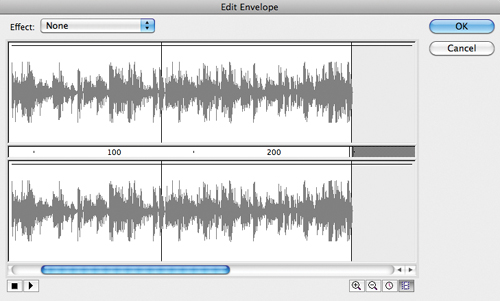
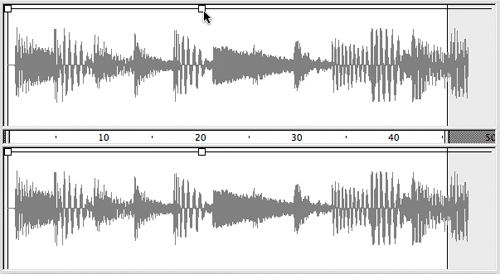
The Edit Envelope dialog box appears, showing you the sound’s waveform. The top and the bottom waveform are the left and right channels of the sound (stereo). A timeline is between the waveforms, a pull-down menu of preset effects at the left corner, and view options at the bottom.
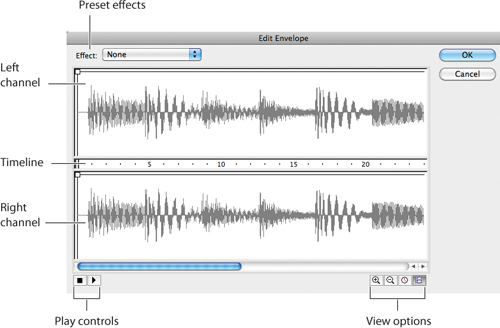
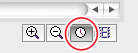
3 In the Edit Envelope dialog box, click the Seconds icon.
The timeline changes units to show seconds instead of frames. Click the Frames icon to switch back. You can switch back and forth, depending on how you want to view your sound.
4 Click the Zoom Out icon until you can see the entire waveform.
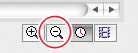
The waveform appears to end at around 240 frames, or about 10 seconds.
5 Drag the right end of the time slider inward to about frame 45.
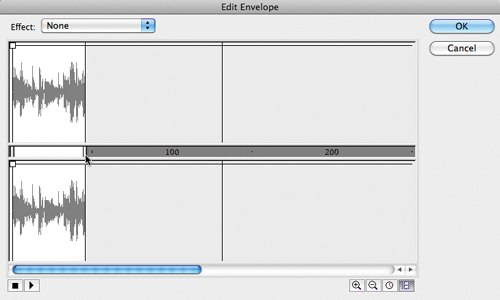
The sound shortens by being clipped from the end. The sound now only plays for about 45 frames.
6 Click OK to accept the changes you’ve made.
The waveform on the main Timeline indicates the shortened sound.
Changing the volume of a sound
The sound will be more elegant if it slowly fades out instead of being abruptly cut off. You can change the volume levels through time in the Edit Envelope dialog box. Use it to fade in, fade out, or modulate the volume of the left and right channels separately.
1 Select the first keyframe of the sounds layer.
2 In the Properties inspector, click the Pencil button.
The Edit Envelope dialog box appears.
3 Select the Frames viewing option, and zoom in on the waveform to see its end near frame 45.
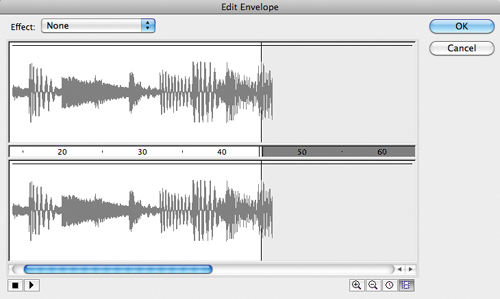
4 Click on the top horizontal line of the top waveform above frame 20.
A box appears on the line, indicating a keyframe for the sound volume.
5 Click on the top horizontal line of the upper waveform above frame 45 and drag it down to the bottom of the window.
The downward diagonal line indicates the drop in volume from 100% to 0%.
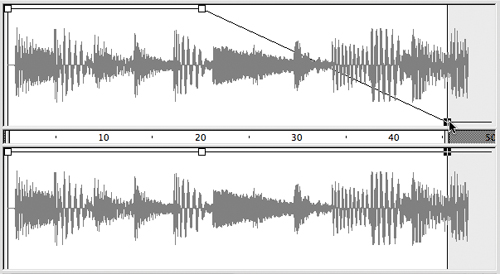
6 Click on the corresponding keyframe on the lower waveform and drag it down to the bottom of the window.

The volume levels for both the left and right channels slowly decrease starting at frame 20. By frame 45, the volume level is at 0%.
Note
You can choose and apply some of the preset effects from the pull-down menu in the Edit Envelope dialog box. Common effects like a fade-in or a fade-out are provided for your convenience.
7 Test the effects of your sound edits by clicking the Play button on the lower-left side of the dialog box. Click OK to accept the changes.
Deleting or changing the sound file
If you don’t want the sound on your Timeline, or you want to change to a different sound, you can make those changes in the Properties inspector.
1 Select the first keyframe of the sounds layer.
2 In the Properties inspector, select None in the Name pull-down menu.
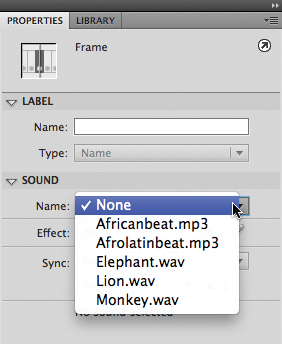
The sound is removed from the Timeline.
3 Now let’s add a different sound. Select Africanbeat.mp3 for Name.

The Africanbeat.mp3 sound is added to the Timeline. The settings in the Edit Envelope dialog box that clip the sound and fade it out remain in effect.
Setting the quality of the sounds
You can control how much or how little your sounds are compressed in the final SWF file. With less compression, your sounds will be better quality. However, your final SWF size will be much larger. With more compression, you’ll have poor quality sounds but a smaller file size. You must determine the balance of quality and file size based on the minimum acceptable level of quality. Set the sound quality and compression in the Publish Settings options.
1 Choose File > Publish Settings.
The Publish Settings dialog box appears.
2 Click the Flash tab and click the Set button for the Audio Stream options.
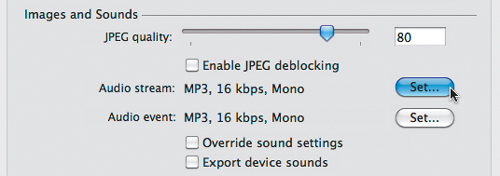
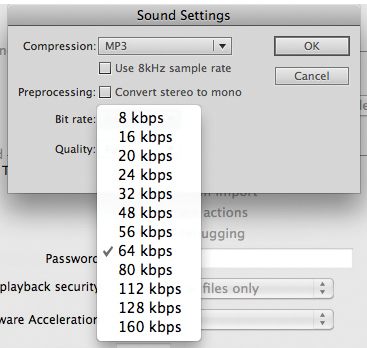
The Sound Settings dialog box appears.
3 Change the Bit rate to 64 kbps and deselect the option to Convert stereo to mono. Click OK to accept the settings.
4 Click the Set button for the Audio Event options.
The Sound Settings dialog box appears.
5 Change the Bit rate to 64 kbps and deselect the option to Convert stereo to mono. Click OK to accept the settings.
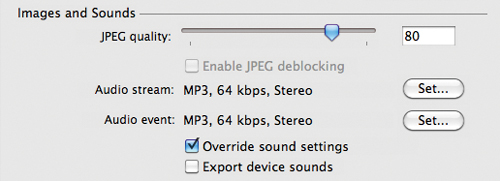
Now both the Audio Stream and Audio Event settings should be at 64 kbps with stereo sounds preserved.
The Africanbeat.mp3 file in particular relies on stereo effects, so keeping both the left and right channels is important.
The Bit rate is measured in kilobits per second, and it determines the quality of the sound in your final, exported Flash movie. The higher the bit rate the better the quality. However, the higher the bit rate the larger your file becomes. For this lesson, change the bit rate to 64 kbps.
6 Select Override sound settings, and click OK to save the settings.
The sound settings in the Publish Settings will determine how all your sounds are exported.
7 Choose Control > Test Movie > in Flash Professional.
The stereo effect of the sound is preserved, and the quality is determined by your settings in the Publish Settings dialog box.
Adding sounds to buttons
In the kiosk, the buttons appear in a column on the left. You’ll add sounds to the buttons so that they play whenever the user clicks them.
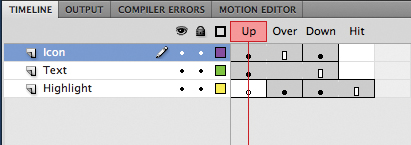
1 In the Library panel, double-click the icon of the button symbol called sound_button1.
You enter symbol-editing mode for that button symbol.
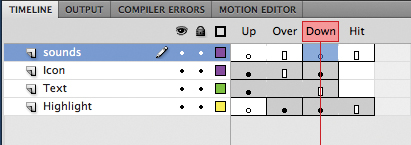
2 The three layers in the button symbol help organize the content for the Up, Over, Down, and Hit states.
3 Insert a new layer and rename it sounds.
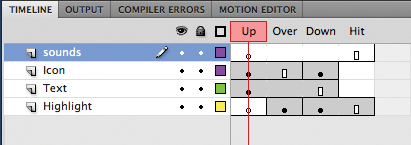
4 Select the Down frame in your sounds layer and insert a keyframe.
A new keyframe appears in the Down state of your button.
5 Drag the Monkey.wav file from the sounds folder in your Library panel to the Stage.
A waveform for the Monkey.wav file appears in the Down keyframe of the sounds layer.
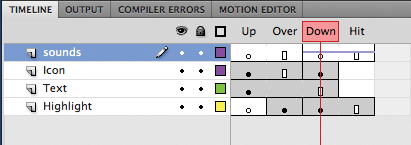
6 Select the Down keyframe in the sounds layer.
7 In the Properties inspector, choose Start for the Sync option.
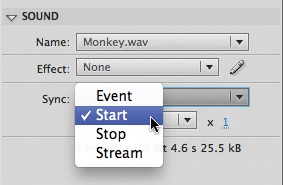
A Start sync option triggers the sound whenever the playhead enters that particular keyframe.
8 Choose Control > Test Movie > in Flash Professional. Test the first button to hear the monkey, and then close the preview window.
9 Edit the sound_button2 and the sound_button3 to add the Lion.wav and the Elephant.wav sounds to their Down states.
Note
You can also add sound to the Over state of a button symbol, and the sound will play whenever the mouse cursor hovers over the button.
Understanding Flash Video
Flash is the most common method of delivering video over the Web. More Internet users can view video with Flash than with any other technology including QuickTime, Windows Media Player, or RealPlayer. News sites such as the New York Times and content-sharing sites such as YouTube all rely on Flash to present video.
Adding video to Flash is easy, whether you want to present straight video alone, or whether you want to incorporate it with other animated elements. There are two options to display video in Flash. The first option is to keep the video separate from your Flash file and use a playback component from Flash to play the video. The second option is to embed the video in your Flash file.
Both methods require that the video be formatted correctly first. The appropriate video format for Flash is Flash Video, which uses the extension .flv or the extension .f4v. F4V is the latest Flash Video format that supports the H.264 standard, a state-of-the-art video codec that delivers high quality with remarkably efficient compression. A codec (compression-decompression) is a method computers use to compress a video file to save space, and then decompress it to play it back. FLV is the standard format for previous versions of Flash and uses the older codecs Sorenson Spark or On2VP6.
Note
Flash can actually play back any video encoded in H.264, so your video file doesn’t have to have the .f4v extension. For example, a video with a .mov extension encoded by QuickTime Pro with H.264 is compatible with Flash.
Using Adobe Media Encoder
You can convert your video files to the proper FLV or F4V format using Adobe Media Encoder CS5, a stand-alone application that comes with Flash Professional CS5. Adobe Media Encoder can convert single files or multiple files (known as batch processing) to make your workflow easier.
Adding a video file to Adobe Media Encoder
The first step to convert your video file to a compatible Flash format is to add the video to Adobe Media Encoder for encoding.
1 Launch Adobe Media Encoder CS5, which comes installed with Adobe Flash Professional CS5.
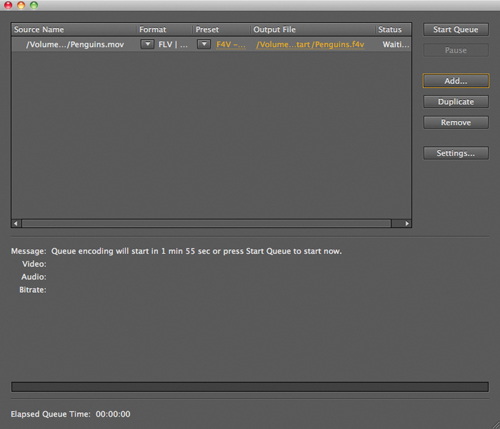
The opening screen displays a window that lists any current video files that have been added for processing. The window should be empty.
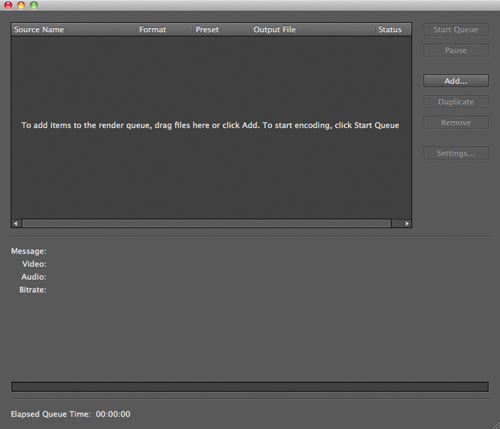
2 Choose File > Add or click the Add button on the right.
A dialog box opens for you to select a video file.
Note
You can also drag the file directly to the queue from your desktop.
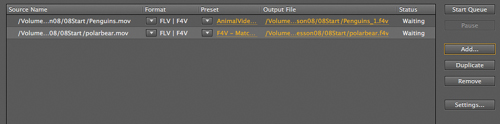
3 Navigate to the Lesson08/08Start folder, select the Penguins.mov file, and click Open.
The Penguins.mov file is added to the display list and is ready for conversion to an FLV or F4V format. Adobe Media Encoder will automatically begin the encoding process if you don’t do anything for two minutes.
4 Select Adobe Media Encoder CS5 > Preferences.
The Preferences dialog box appears. The first tab on the left, labeled General, will be selected.
5 Deselect the option, Start queue automatically when idle for 2.0 Minutes. Click OK.
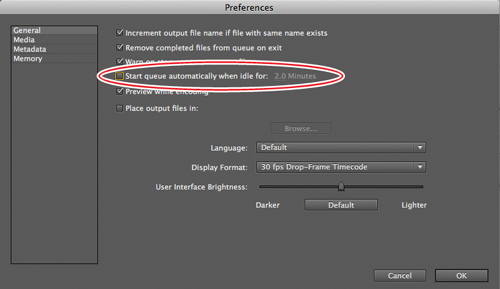
The encoder will not start automatically so you can move through this lesson at your own pace.
Converting video files to Flash Video
1 In the options under Format, select the FLV/F4V option.

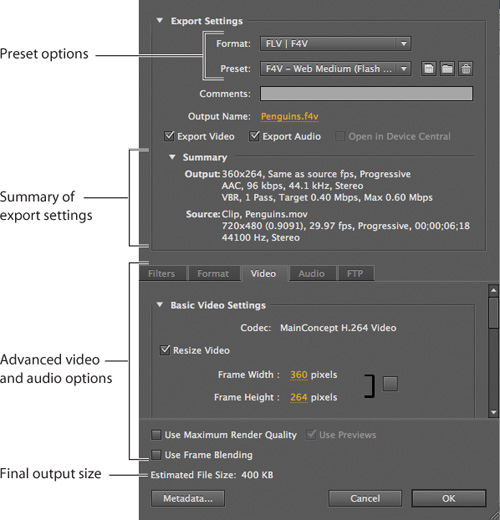
2 Under the Preset options, choose F4V-Web Medium.
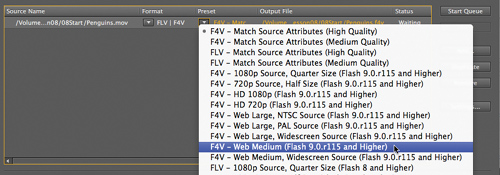
You can choose one of many standard preset options from the menu. The options determine the format (either the newer F4V or the older FLV) and the dimensions of the video. The Web Medium option converts your original video to 360 pixels wide by 264 pixels high, which is an average size to display video in a Web browser. In parentheses, Flash indicates the minimum Flash Player version required to play the selected video format.
3 Click on the Output File.
The Save As dialog box appears. You can choose to save the converted file in a different location on your computer and choose a different filename. Your original video will not be deleted or altered in any way.
4 Click Start Queue.
Note
If you have multiple video files to encode to F4V or FLV format, you can do so all at once and easily with Adobe Media Encoder in a process known as batch processing. Each file can even have its own settings. Click the Add button to add videos to the display list. Choose a different format for each file, if desired. Click Start Queue to begin the batch processing.
Flash begins the encoding process. Flash displays the settings for the encoded video and shows the progress and a preview of the video.
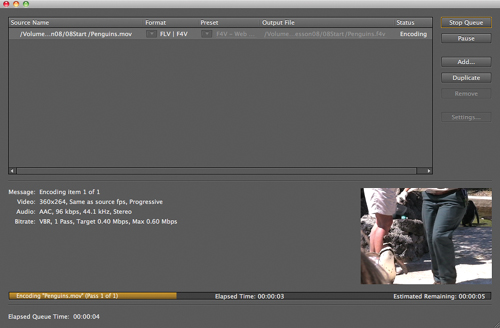
When the encoding process finishes, a green check in the display list indicates that the file has been converted successfully. You now have the file, Penguins.f4v in your Lesson08/08Start folder, along with the original Penguins.mov file.
![]()
Note
You can change the status of individual files in the queue by selecting the file in the display list and choosing Edit > Reset Status or Edit > Skip Selection. Reset Status removes the green check from a completed file so it can be encoded again, whereas Skip Selection makes Flash skip that particular file in the batch processing.
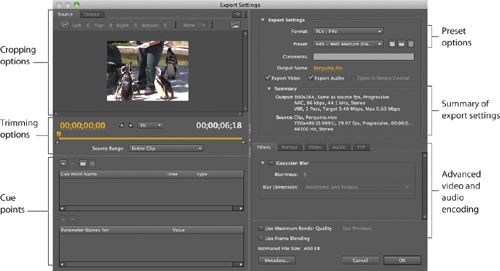
Understanding Encoding Options
You can customize many settings when converting your original video to the Flash Video format. You can crop and resize your video to specific dimensions, just convert a snippet of the video, adjust the type of compression and the compression levels, and even apply filters to the video. To display the encoding options, choose Edit > Reset Status to reset the Penguins.mov file, and then click the Preset selection in the display list or choose Edit > Export Settings. The Export Settings dialog box appears.
Cropping your video
If you only want to show a portion of your video, you can crop it. If you haven’t done so already, choose Edit > Reset Status to reset the Penguins.mov file, and then choose Edit > Export Settings so you can experiment with the cropping settings.
1 Click the Crop button at the upper-left corner of the Export Settings dialog box.
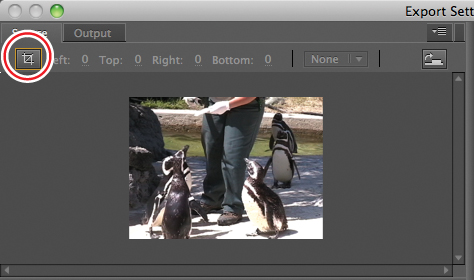
The cropping box appears over the video preview window.
2 Drag the sides inward to crop from the top, bottom, left, or right.
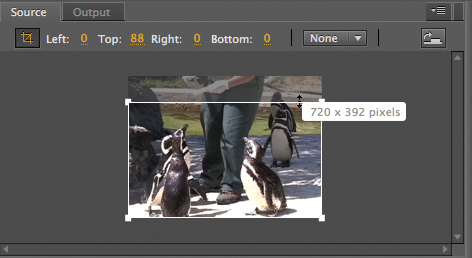
The grayed-out portions outside the box will be discarded. Flash displays the new dimensions next to your cursor. You can also use the Left, Top, Right, and Bottom settings above the preview window to enter exact pixel values.
3 If you want to keep the crop in a standard proportion, click the Crop Proportions menu and choose a desired ratio.
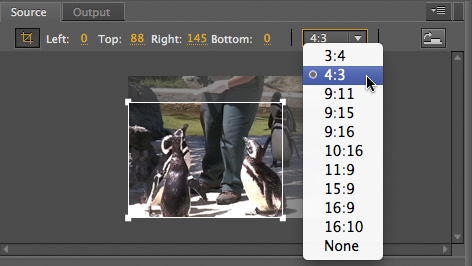
The cropping box will be constrained to the selected proportions.
4 To see the effects of the crop, click the Output tab or the Switch to Output button in the upper-right corner of the preview window.
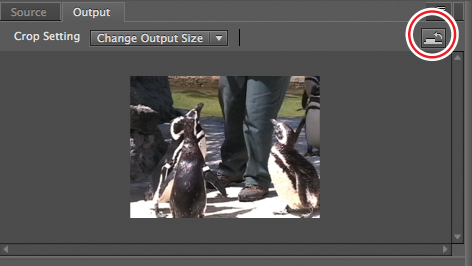
The preview window shows how your final video will appear.
5 The Crop Setting pull-down menu contains options to set how the crop will appear in the final output file:
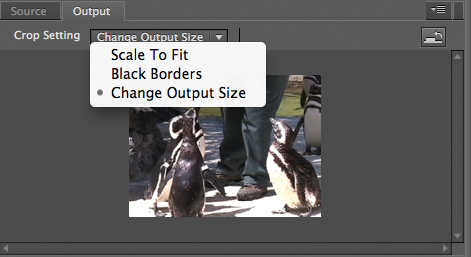
• Scale To Fit adjusts the dimensions of the crop and adds black borders to fit the output file.
• Black Borders adds black bands at either the top (letterbox) or at the sides (pillarbox) to fit the crop in the dimensions of the output file.
• Change Output Size changes the dimensions of the output file to match the crop dimensions.
The Scale To Fit and Black Borders options allow you to resize the output file in the Video tab on the right side of the Export Settings dialog box.
6 Exit the cropping mode without making the crop by clicking the Crop button again under the Source tab to deselect it. You will not need to crop the Penguins.mov video for this lesson.
Cue Points
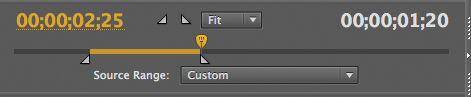
At the bottom left of the Export Settings dialog box is an area where you can set cue points for your video.
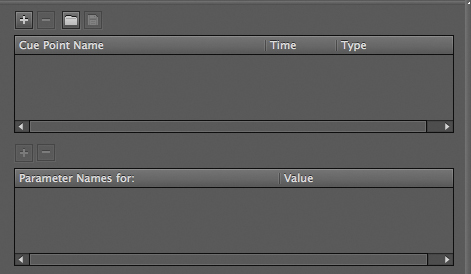
Cue points are special markers at various points along the video. With ActionScript, you can program Flash to recognize when those cue points are encountered, or you can navigate to specific cue points. Cue points can transform an ordinary, linear video into a true interactive, immersive video experience. Later in this lesson, you’ll add cue points to your video within Flash Professional CS5 when your video is directly on the Stage.
Adjusting video length
Your video may have unwanted segments at the beginning or the end. You can shave off footage from either end to adjust the overall length of your video.
1 Click and drag the playhead (top yellow marker) to scrub through your video to preview the footage. Place the playhead at the desired beginning point of your video.
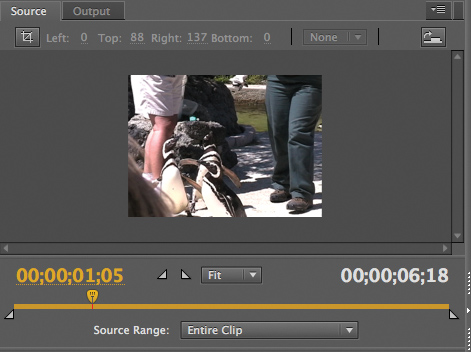
Time markers indicate the number of seconds that have elapsed.
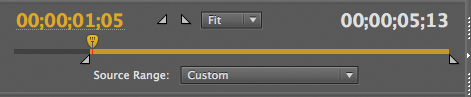
2 Click the Set In Point icon.
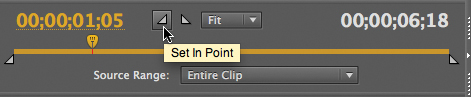
The In point moves to the current position of the playhead.
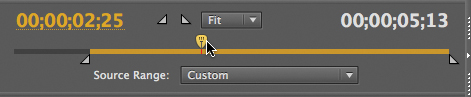
3 Drag the playhead to the desired ending point of your video.
4 Click the Set Out Point icon.
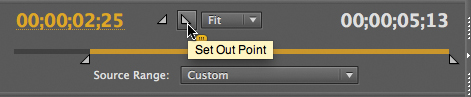
The Out point moves to the current position of the playhead.
5 You can also simply drag the In and Out point markers to bracket the desired video segment.
The highlighted portion of your video between the In and Out point markers will be the only segment of your original video that will be encoded.
Note
You can use the left or the right arrow keys on your keyboard to move back or ahead frame by frame for finer control.
6 Drag the In and Out points back to their original positions, or choose Entire Clip from the Source Range pull-down menu, because you do not need to adjust the video length for this lesson.
Setting advanced video and audio options
The right side of the Export Settings dialog box contains information about the original video and summarizes the export settings.
You can choose one of the preset options from the top Preset menu. At the bottom, you can navigate to advanced video and audio encoding options using the tabs. At the very bottom, Flash displays the estimated final output size.
You will export the Penguins.mov file again but at a larger size.
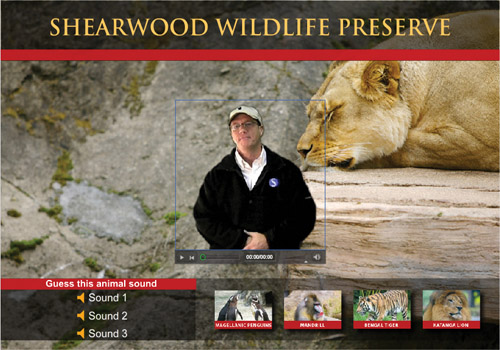
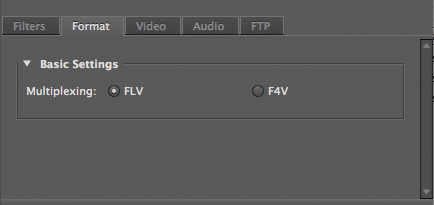
1 Make sure the Export Video and Export Audio boxes are selected.
![]()
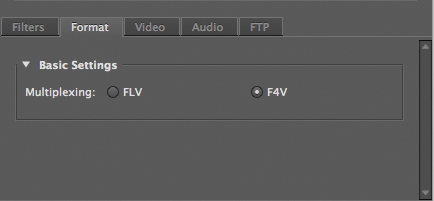
2 Click the Format tab and choose F4V.
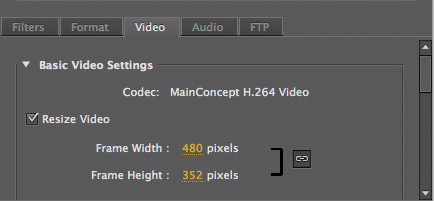
3 Click the Video tab.
4 Select Resize Video and click the Constrain option (the blank grey box). Enter 480 for the Width and click outside the field to accept the change.
The Height automatically changes to keep the proportions of the video.
5 Click OK.
Flash closes the Export Settings dialog box and saves your advanced video and audio settings.
6 Click Start Queue to begin the encoding process with your custom resize settings.
Flash creates another F4V file of Penguins.mov. Delete the first one you created and rename the second one Penguins.f4v.
Saving advanced video and audio options
If you want to process many videos similarly, it makes sense to save your advanced video and audio options. You can do that in Adobe Media Encoder. Once saved, you can easily apply your settings to other videos in the queue.
1 Choose Edit > Reset Status to reset the status of your penguin video in the queue, then choose Edit > Export Settings.
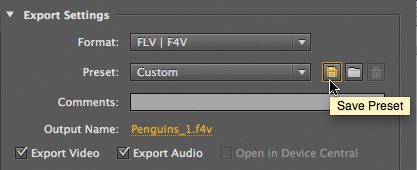
2 In the Export Settings dialog box, click the Save Preset button.
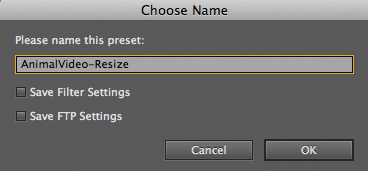
3 In the dialog box that opens, provide a descriptive name for the video and audio options. Click OK.
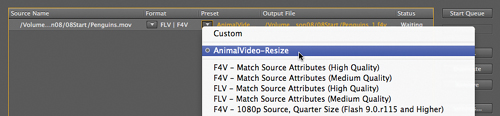
4 Return to the queue of videos. You can apply your custom settings to additional videos by simply choosing the preset from the Preset pull-down menu.
Playback of External Video
Now that you have successfully converted your video to the correct Flash-compatible format, you can use it in your Flash zoo kiosk project. You will have Flash play each of the animal videos at the different labeled keyframes on the Timeline.
You will keep your videos external to the Flash project. By keeping videos external, your Flash project remains small, the videos can be edited separately, and the videos can maintain different frame rates from your Flash project.
1 Open your 08_workingcopy.fla project in Flash Professional CS5.
2 Select the keyframe labeled penguins in the videos layer.

3 Choose File > Import > Import Video.
The Import Video wizard appears. The Import Video wizard guides you step by step through the process of adding video to Flash.

4 In the Import Video wizard, select On Your Computer and click Browse.
5 In the dialog box, select Penguins.f4v from the Lesson08/08Start folder and click Open.
The path to the video file appears.
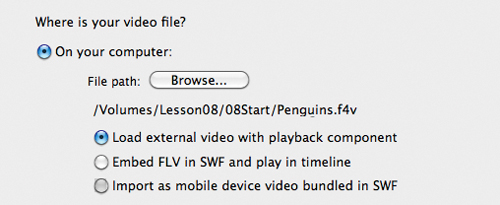
6 Select the Load external video with playback component option. Click Next or Continue.
Note
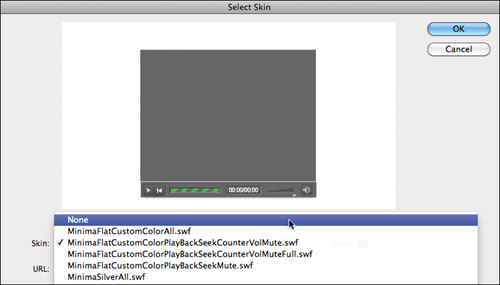
The skin is a small SWF file that determines the functionality and appearance of the video’s controls. You can use one of the skins provided with Flash, or you can choose None from the top of the menu.
7 In the next screen of the Import Video wizard, you select the skin, or the interface controls for the video. From the Skin menu, select the third option from the top, MinimaFlatCustomColorPlayBackSeekCounterVolMute.swf.
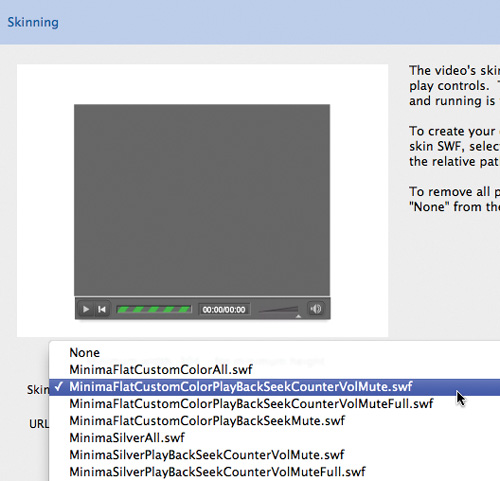
The skins fall in three broad categories. The skins that begin with “Minima” are the latest designs available in Flash Professional CS5 and include options with a numeric counter. The skins that begin with “SkinUnder” are controls that appear below the video. The skins that begin with “SkinOver” are controls that overlap the bottom edge of the video. A preview of the skin and its controls appear in the preview window.
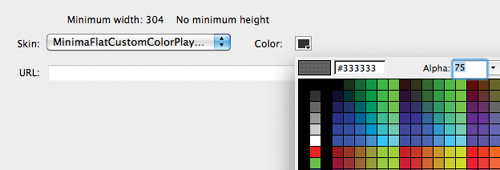
8 Select color #333333 with a 75% Alpha. Click Next or Continue.
9 On the next screen of the Import Video wizard, review the information for the video file, and then click Finish to place the video.
10 Your video with the selected skin appears on the Stage. Place the video on the left side of the Stage.
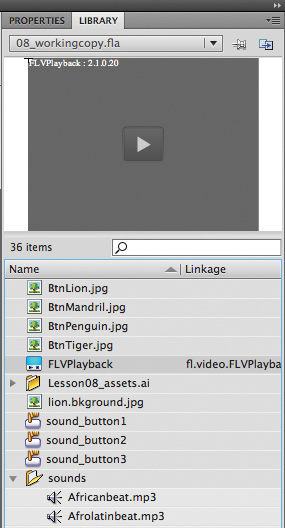
An FLVPlayback component also appears in your Library panel. The component is a special widget that is used on the Stage to play your external video.
Note
When a video on the Stage is selected, you can press the spacebar to begin or pause playback.
11 Click the play button on the skin of your video to preview the video.
The video plays on your Stage. Use the controls to play, stop, scrub, and change the volume of the movie. The ability to preview an external video on the Stage is a new feature in Flash Professional CS5.
Note
If you don’t have a skin on your video, you can still control playback of the video on the Stage by right-clicking/Ctrl-clicking on the video and choosing Play, Pause, or Rewind.
12 Choose Control > Test Movie > in Flash Professional. After the musical introduction, click the Magellanic Penguins button.
The video plays the external penguin video with the skin you chose in the Import Video wizard. Close the preview window.
13 The other animal videos have already been encoded (in FLV format) and provided in the 08Start folder. Import the Mandrill.flv, Tiger.flv, and Lion.flv videos in each of their corresponding keyframes. Choose the same skin as the Penguin.f4v video.
Note
The FLV or F4V files, the 08_workingcopy.swf file, and the skin file are all required for your zoo kiosk project to work. The skin file is published in the same folder as your FLA file.
Controlling the video playback
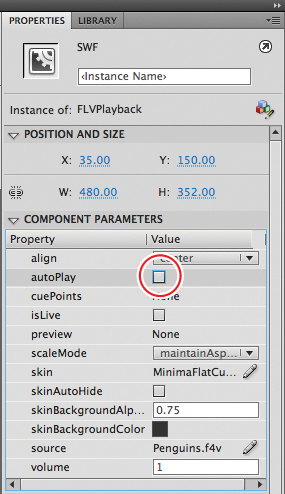
The FLVPlayback component lets you control which video plays, whether the video plays automatically, and other aspects of playback. The options for playback can be accessed in the Properties inspector. Individual properties are listed in the left column, and their corresponding values are listed in the right column. Select one of the videos on the Stage, and then choose among the following options:
• To change the autoPlay option, deselect the check box. When the check box is selected, the video plays automatically. When the check box is deselected, the video is paused on the first frame.
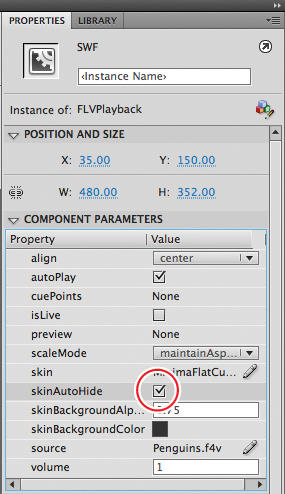
• To hide the controller and only display it when users roll their mouse cursor over the video, select the check box for the skinAutoHide option.
• To choose a new controller (the skin), click the name of your skin file and select a new skin in the dialog box that appears.
• To change the transparency of the skin, enter a decimal value from 0 (totally transparent) to 1 (totally opaque) for the skinBackgroundAlpha.
• To change the color of the skin, click on the color chip and choose a new color for the skinBackgroundColor.
• To change the video file or the location of the video file that Flash looks for to play, click the source option.
In the Content Path dialog box that appears, enter a new filename or click the Folder icon to choose a new file to play. The path is relative to the location of your Flash file.
Working with Video and Transparency
For the various animal videos, you want to show the entire frame with the animals in the foreground and the lush environment in the background. But sometimes you want to use a video file that doesn’t include a background. For this project, the zoo director was filmed in front of a green screen, which was removed using Adobe After Effects. When you use the video in Flash, the zoo director appears to be in front of the Flash background. A similar effect is used for news weatherpersons, where the background of the video is totally transparent and can show weather graphics behind the person.
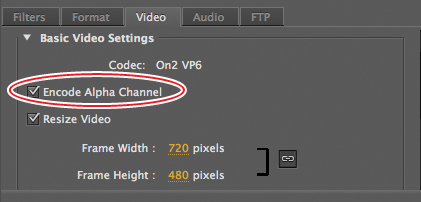
Transparencies in video (called alpha channels) are supported only in the FLV format using the On2VP6 codec. When encoding a video with an alpha channel from Adobe Media Encoder, be sure to choose Edit > Export Settings, click the Video tab, and then select the Encode Alpha Channel option.
You’ll import the video file, which is already in FLV format, into Flash for display with the playback component.
Importing the video clip
Now you’ll use the Import Video wizard to import the Popup.flv file, which has already been encoded with an alpha channel.
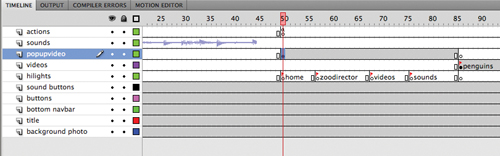
1 Insert a new layer called popupvideo.
2 Insert a keyframe at frame 50 and insert another keyframe at frame 86.

You’ll place the video of the zoo director at the end of the musical introduction at the same time the stop action appears (frame 50). The keyframe at frame 86 ensures that the video of the zoo director disappears from the Stage when the animal videos appear.
3 Select the keyframe at frame 50.
4 Choose File > Import > Import Video.
5 In the Import Video wizard, select On Your Computer and click Browse. Select the Popup.flv file in the Lesson08/08Start folder and click Open.
6 Select Load external video with playback component. Click Next or Continue.
7 Select the same skin that you’ve been using from the Skin menu and click Next or Continue.
8 Click Finish to place the video.
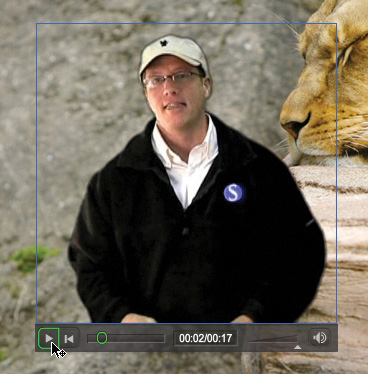
The video of the zoo director with a transparent background appears on the Stage.
9 Preview the video on the Stage by clicking the play button on the skin.
10 Choose Control > Test Movie > in Flash Professional.
After the musical introduction, the zoo director appears. If you click on one of the animal video buttons, the popup video is removed from the Timeline.
Note
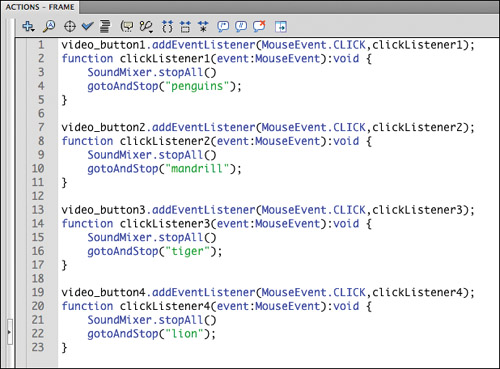
If you don’t stop one video before navigating to another keyframe containing a second video, the audio can overlap. To prevent overlapping sounds, use the command SoundMixer.stopAll() to stop all sounds before starting a new video. The ActionScript in the first keyframe of the actions layer in your 08_workingcopy.fla file contains the correct code to stop all sounds before navigating to a new animal video.
Using a Green Screen
Professionals often film people in front of solid green or blue backgrounds so they can easily remove, or key, the background in a video editing application such as Adobe After Effects. Then the person is merged with a different background. The image of the zoo director was filmed in front of a green screen, which was removed in After Effects. Follow these steps to use a green screen:
1 Shoot footage in front of a green screen:
• Use a green background that is flat, smooth, and free of shadows so the color is as pure as possible.
• Minimize the light that reflects off the green screen onto the subject.
• Keep movement to a minimum for Flash Video; use a tripod if possible.

2 Remove the background in After Effects or other video editing application:
• In After Effects, import the file as footage, create a new composition, and drag it onto the Composition Timeline.
• Create a garbage mask to roughly outline the shape and remove most of the background. But be sure the subject never moves outside the mask!
• Use the Color Range keying effect to delete the rest of the background. You may need to do some fine-tuning with the Matte Choker and Spill Suppressor effects. A spill suppressor removes the light that splashes onto the edges of the subject.

3 Export the file to FLV format:
Export the video file to Flash Video (FLV) format directly from the video editing application. Be sure to select Encode Alpha Channel. The alpha channel is the selection around the subject. Encoding the alpha channel ensures that the video exports without a background.

Using Cue Points
Cue points are special markers that you place in your video that Flash can detect with ActionScript. There are two ways to use cue points. Cue points can trigger an ActionScript command, letting you synchronize the video with other Flash elements. Or, you can jump to particular cue points in the video with ActionScript. Both types of cue points add more functionality to video.
In this section, you’ll add cue points to the zoo director video so relevant information can be displayed on the Stage as he speaks. New to Flash Professional CS5 is the ability to add cue points directly to video on the Stage.
Note
Recall that you can add cue points to video with Adobe Media Encoder. You can also add cue points to video with ActionScript in the Actions panel, which is not discussed in this book.
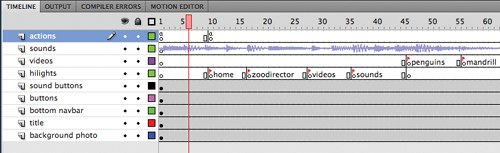
Inserting cue points
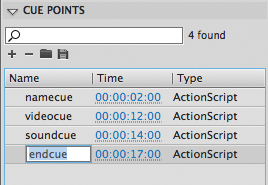
There are four points in the zoo director video at which you’ll want to synchronize the display of additional information. First, when he introduces himself, you’ll show his name. Second, when he instructs the audience to click on a video, you’ll highlight the videos. Third, when he refers to the sounds, you’ll highlight the sounds. Fourth, you’ll add a cue point to mark the end of the video.
1 Select frame 50 (the first keyframe in which the zoo director video appears) of the popupvideo layer.
2 Select the video of the zoo director on the Stage.
3 Click the play button on the skin and pause the video when the zoo director says, “...my name is Paul Smith.”
Note
If the FLVPlayback component on the Stage doesn’t show a preview of the video, right-click/Ctrl-click on the video and make sure that the Preview option is selected.
The numeric counter that displays the elapsed time should read about two seconds.
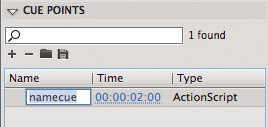
4 In the Properties inspector, click the Plus button in the Cue Points section to add a cue point at the two-second mark.
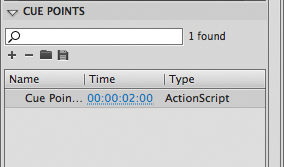
A cue point appears in the Cue Points section of the Properties inspector.
5 Click the name of the cue point in the Properties inspector and rename it namecue.
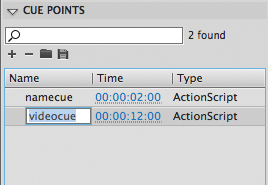
6 Continue playing the video and pause it when the zoo director says, “...so click on a video.”
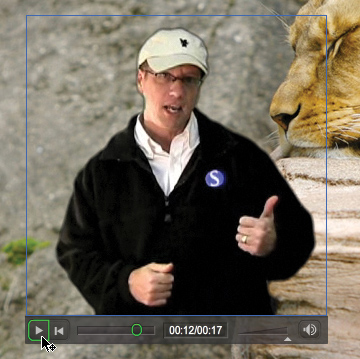
The numeric counter that displays the elapsed time should read about 12 seconds.
7 In the Properties inspector, click the Plus button in the Cue Points section to add a cue point at the 12-second mark, and rename the cue point videocue.
Note
If you need to adjust the time of any of the cue points, you can click and drag over the time or click to enter a time with millisecond precision.
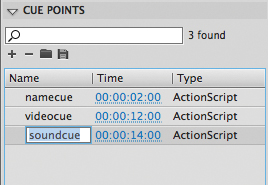
8 Continue playing the video and pause it when the zoo director says, “... click on a sound.”
9 In the Properties inspector, add a third cue point and rename it soundcue. The third cue point should be at the 14-second mark.
Note
In the Properties inspector, double-click any cue point in the Type column and your video on the Stage will immediately jump to that particular cue point.
10 Continue playing the video until it reaches the end. In the Properties inspector, add a fourth cue point and rename it endcue.
Note
To delete a cue point, select it in the Properties inspector and click the Minus sign.
Detecting and responding to cue points
Now you’ll add the ActionScript to detect the cue points and respond to them. The Code Snippets panel can help do much of the ActionScript coding.
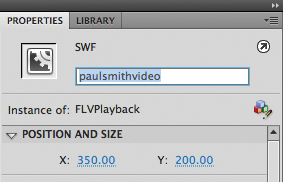
1 Move the playhead to frame 50 and select the video of the zoo director on the Stage. In the Properties inspector, enter paulsmithvideo as the instance name.
2 Open the Code Snippets panel (Window > Code Snippets).
3 Expand the Audio and Video folder in the Code Snippets panel and double-click the On Cue Point Event option.
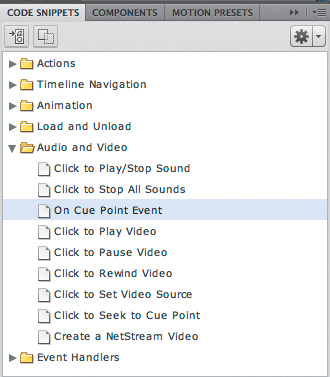
The Actions panel automatically opens and adds the necessary code to detect cue points on your selected video. The stop() command that you see on line 1 was already present in the Flash file.
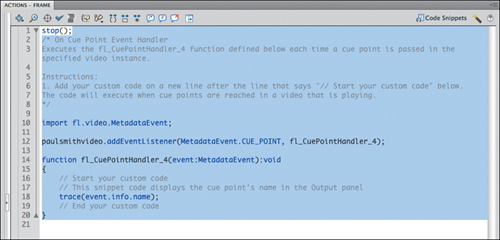
4 Now you must add conditional statements to check which of the cue points has been encountered and respond appropriately. Replace lines 16–19 with the following code:
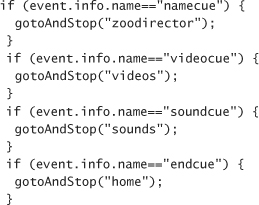
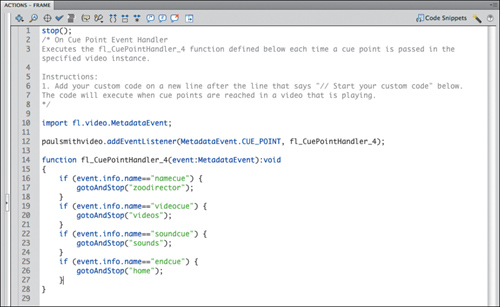
The final code checks the name of each cue point as it’s detected, and if there is a match, the playhead goes to a specific named keyframe on the Timeline.
Adding the synchronized Flash elements
The Timeline already contains several named keyframes. In these keyframes, you’ll place additional Flash elements that appear as the cue points in the video are detected.
1 Select the keyframe named zoodirector in the hilights layer.

2 Drag the symbol called zoo director name from the Library panel to the Stage and place it close to the video.
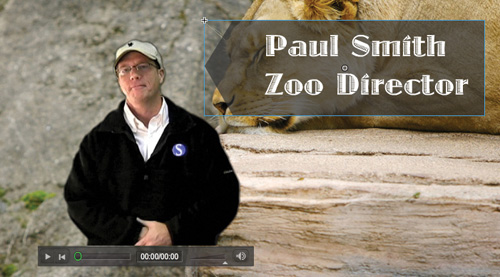
The graphic of the name appears when the playhead moves to the zoodirector keyframe.
3 Select the keyframe named videos in the hilights layer.
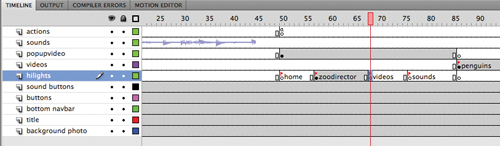
4 Select the Rectangle tool with a red 3.0 stroke and no fill. Draw a rectangle around the video buttons to highlight them.
The rectangular red outline appears when the playhead moves to the videos keyframe.
5 Select the keyframe named sounds in the hilights layer.
6 Draw another rectangle with the same stroke and fill settings around the sound buttons to highlight them.
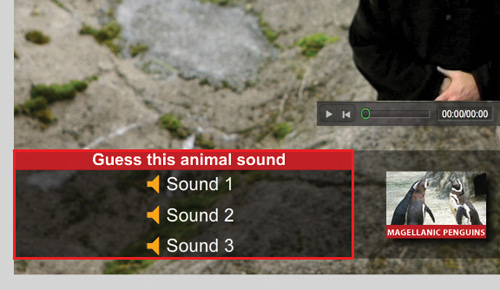
The rectangular red outline appears when the playhead moves to the sounds keyframe.
7 Choose Control > Test Movie > in Flash Professional.
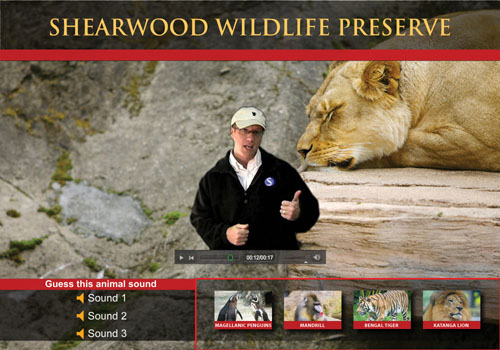
As the zoo director speaks, various Flash graphic elements pop up in synchrony.
Finishing touches
At the end of the zoo director’s introduction, he disappears, but the FLVPlayback component skin remains. You’ll remove the skin and position the video to be better integrated with the background.
1 Select the zoo director video in the popupvideo layer.
2 In the Component Parameters section of the Properties inspector, click the Pencil button next to the skin property.

3 In the dialog box that appears, choose None from the Skin pull-down menu. Click OK.
The zoo director video no longer has a skin.
4 With the Selection tool, move the video so that its bottom edge aligns with the top edge of the navigation bar. You’ll also want to move the zoo director name that appears in the zoodirector keyframe of the hilights layer so it remains close to the video.
Without the skin, the illusion of the virtual zoo director greeting us is more convincing.
Embedding Flash Video
In the previous section, you added cue points to synchronize external video with Flash elements on the Stage. Another way to integrate video with Flash elements is to use embedded video. Embedded video requires the FLV format and is best only for very short clips. The FLV file is saved in the Library panel of your Flash file, where you can place it on the Timeline. The video plays as long as there are sufficient frames on your Timeline.
Embedding video in Flash is supported by Flash Player versions 6 and later. Keep in mind the following limitations of embedded video: Flash cannot maintain audio synchronization in embedded video that runs over 120 seconds. The maximum length of embedded movies is 16,000 frames. Another drawback of embedding your video is the increase in the size of your Flash project, which makes testing the movie (Control > Test Movie > in Flash Professional) a longer process and the authoring sessions more tedious.
Because the embedded FLV plays within your Flash project, it is critically important that your FLV have the same frame rate as your Flash file. If not, your embedded video will not play at its intended speed. To make sure your FLV has the same frame rate as your FLA, be sure to set the correct frame rate in the Video tab of Adobe Media Encoder.
Encoding the FLV for embedding
You’ll embed a short video of a polar bear in the beginning of your zoo kiosk project.
1 Open Adobe Media Encoder.
2 Click the Add button and choose the polarbear.mov file in the Lesson08/08Start folder.
The polarbear.mov file is added to the queue.
3 Click Preset or choose Edit > Export Settings to open the Edit Export options. Click the Format tab and select FLV.
4 Click the Video tab and set the Frame Rate to 24. Make sure that the Resize Video check box is deselected.

The Flash file 08_workingcopy.fla is set at 24 frames per second, so you want your FLV to also be at 24 frames per second.
5 Deselect Export Audio at the top of the dialog box. Click OK.

6 Click Start Queue to encode your video.
The polarbear.flv file is created.
Embedding an FLV on the Timeline
Now that you have an FLV, you can import it into Flash and embed it on the Timeline.
1 Open the file 08_workingcopy.fla.
2 Select the first frame of the popupvideo layer.
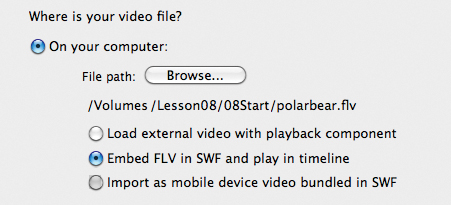
3 Choose File > Import > Import Video. In the Import Video wizard, select On Your Computer and click Browse. Select the polarbear.flv file in the Lesson08/08Start folder and click Open.
4 In the Import Video wizard, select Embed FLV in SWF and play in timeline. Click Next or Continue.
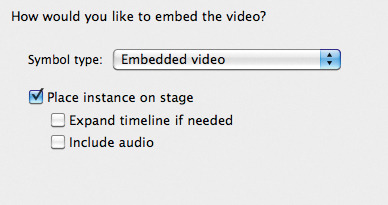
5 Deselect Expand timeline if needed and deselect Include audio. Click Next or Continue.
6 Click Finish to import the video.
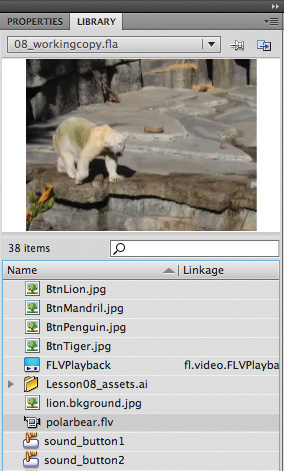
The video of the polar bear appears on the Stage. Use the Selection tool to move it to the left side of the Stage.
Note
You will not be able to hear audio in the authoring environment for embedded videos containing sound. To hear the audio, you must choose Control > Test Movie > in Flash Professional.
The FLV also appears in your Library panel.
7 Choose Control > Test Movie > in Flash Professional to see the embedded video file play from frame 1 to frame 49.
Using embedded video
It’s useful to think of embedded video as a multiframe symbol, very much like a symbol with a nested animation. You can convert an embedded video to a movie clip symbol, and then motion tween it to create interesting effects.
Next, you’ll apply a motion tween to the embedded video so it fades out just before the zoo director pops up and speaks.
1 Select the embedded video of the polar bear on the Stage, right-click/Ctrl-click it, and select Create Motion Tween.
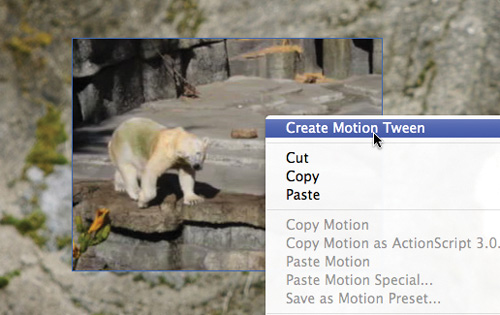
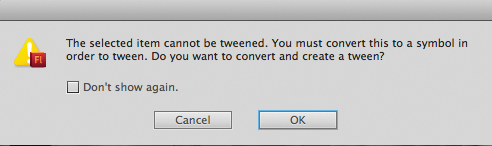
2 Flash asks to convert the embedded video to a symbol so it can apply a motion tween. Click OK.
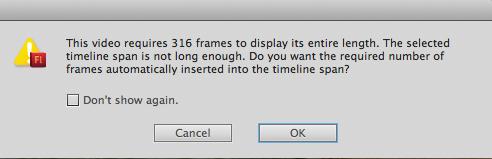
3 Flash asks to add enough frames inside the movie clip symbol so that the entire video can play. Click OK.
A motion tween is created on the layer.
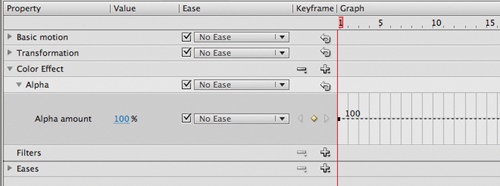
4 Select the motion tween and click the Motion Editor tab.
5 Collapse all the property categories. Click the Plus button next to Color Effect and choose Alpha.
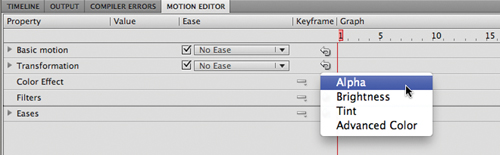
The Alpha property is added to the motion tween.
6 Select frame 1, and set the Alpha amount to 100%.
7 Select frame 30, right-click/Ctrl-click, and choose Add Keyframe.
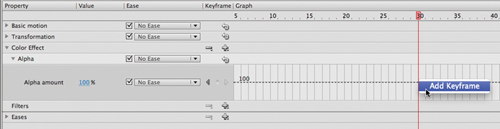
An Alpha keyframe appears at frame 30.
8 Select frame 49, right-click/Ctrl-click, and choose Add Keyframe.
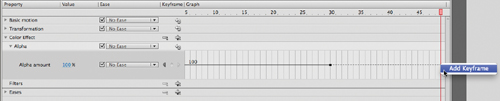
An Alpha keyframe appears at frame 49.
9 Select the last keyframe at frame 49 and drag it down to 0%.
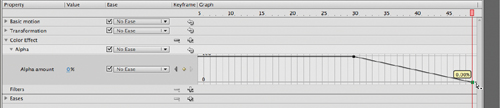
The Alpha is set to 0% at the last keyframe so the embedded video fades out from frame 30 to frame 49.
10 Choose Control > Test Movie > in Flash Professional to see the embedded video play and fade out.
Review Questions
1 How can you edit the length of a sound clip?
2 What is a skin for a video?
3 What are cue points and how are they used?
4 What are the limitations for embedded video clips?
Review Answers
1 To edit the length of a sound clip, select the keyframe that contains it and click the Pencil button in the Properties inspector. Then move the time slider in the Edit Envelope dialog box to clip the sound from the front or from the end.
2 The skin is the combination of functionality and appearance of video controls, such as Play, Fast Forward, and Pause buttons. You can choose from a wide array of combinations with the buttons in different positions, and you can customize the skin with a different color or level of transparency. If you don’t want viewers to be able to control the video, apply None from the Skin menu.
3 Cue points are special markers that you can add to an external video with Adobe Media Encoder or in the Cue Points section of the Properties inspector. You can create event listeners in ActionScript that detect when a cue point is encountered and respond accordingly, for example, by displaying graphics that are synchronized with the video.
4 When you embed a video clip, it becomes part of the Flash document and is included in the Timeline. Because embedded video clips significantly increase the size of the document and produce audio synchronization issues, it’s best to embed video only if it is very brief and contains no audio track.