
1. Getting Acquainted
This lesson will take less than an hour to complete. Copy the Lesson01 folder from the Adobe Flash Professional CS5 Classroom in a Book CD onto your hard drive if it’s not already there.
![]()
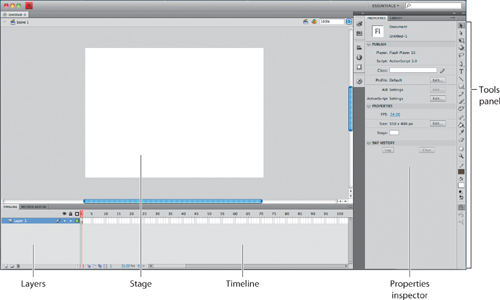
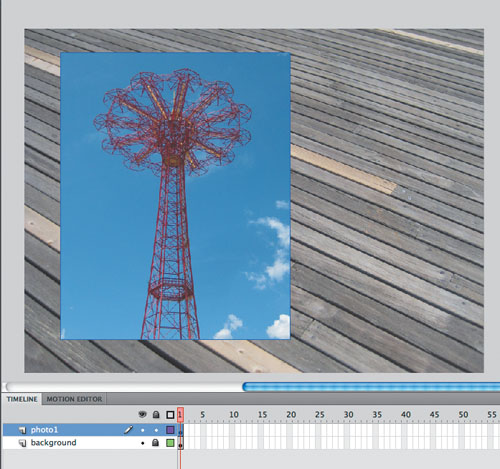
In Flash, the Stage is where the action takes place, the Timeline organizes frames and layers, and other panels let you edit and control your creation.
Starting Flash and Opening a File
The first time you start Flash you’ll see a Welcome screen with links to standard file templates, tutorials, and other resources. In this lesson, you’ll create a simple animation to showcase a few vacation snapshots. You’ll add the photos and a title, and in the process you’ll learn about positioning elements on the Stage and placing them along the Timeline.
1 Start Adobe Flash Professional. In Windows, choose Start > Programs > Adobe Flash Professional CS5. In Mac OS, click Adobe Flash Professional CS5 in the Applications folder or the Dock.
Note
You can also start Flash by double-clicking a Flash (*.fla) file, such as the 01End.fla file that is provided to show you the completed project.
2 Choose File > Open. In the Open dialog box, select the 01End.swf file in the Lesson01/01End folder and click Open to preview the final project.
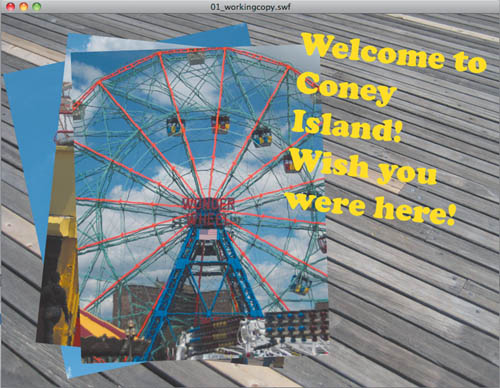
An animation plays. During the animation, several overlapping photos appear one by one, ending with a title.

3 Close the preview window.
4 Choose File > New. In the New Document dialog box, choose ActionScript 3.0. Click OK.
ActionScript 3.0 is the latest version of Flash’s scripting language, which you use to add interactivity. ActionScript 3.0 requires your browser to have Flash Player 9 or later. In this lesson, you will not be working with ActionScript, but you still must choose with which version your file is compatible.
5 Choose File > Save. Name the file 01_workingcopy.fla, and from the Format pull-down menu choose Flash CS5 document (*.fla). Save it in the 01Start folder. Saving your file right away is a good working habit and ensures your work won’t be lost if the application or your computer crashes. You should always save your Flash file with the extension .fla to identify it as the Flash source file.
Getting to Know the Workspace
The Adobe Flash Professional work area includes the command menus at the top of the screen and a variety of tools and panels for editing and adding elements to your movie. You can create all the objects for your animation in Flash, or you can import elements you’ve created in Adobe Illustrator, Adobe Photoshop, Adobe After Effects, and other compatible applications.
By default, Flash displays the menu bar, Timeline, Stage, Tools panel, Properties inspector, and a few other panels. As you work in Flash, you can open, close, dock, undock, and move panels around the screen to fit your work style or your screen resolution.
Choosing a new workspace
Flash also provides a few preset panel arrangements that may better suit the needs of particular users. The various workspace arrangements are listed in a pull-down menu at the top right of the Flash workspace or in the top menu under Window > Workspace.
1 Click the Essentials button at the top right of the Flash workspace and choose a new workspace.
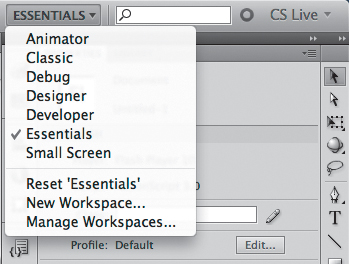
The various panels are rearranged and resized according to their importance to the particular user. For example, the Animator and Designer workspaces put the Timeline at the top for easy and frequent access.
2 If you’ve moved some of the panels around and want to return to one of the prearranged workspaces, choose Window > Workspace > Reset and the name of the preset workspace.
3 To return to the default workspace, choose Window > Workspace > Essentials. In this Classroom in a Book, we’ll be using the Essentials workspace.
Saving your workspace
If you find an arrangement of panels comfortable for your style of work, you can save the custom workspace to return to it at a later date.
1 Click the Workspace button at the top-right corner of the Flash workspace and choose New Workspace.
The New Workspace dialog box appears.
2 Enter a name for your new workspace. Click OK.
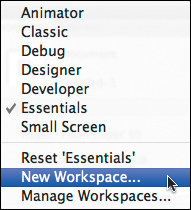

The current arrangement of panels is saved. Your workspace is added to the options in the Workspace pull-down menu, which you can access at any time.
About the Stage
The big white rectangle in the middle of your screen is called the Stage. As with a theater stage, the Stage in Flash is the area that viewers see when a movie is playing. It contains the text, images, and video that appear on the screen. Move elements on and off the Stage to move them in and out of view. You can use the rulers (View > Rulers) or grids (View > Grid > Show Grid) to help you position items on the Stage. Additionally, you can use the Align panel and other tools you’ll learn about in the lessons in this book.
By default, you’ll see the gray area off the Stage where you can place elements that won’t be visible to your audience. The gray area is called the Pasteboard. To just see the Stage, choose View > Pasteboard to deselect the option. For now, leave the option selected.
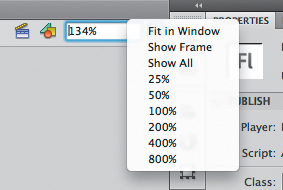
To scale the Stage so that it fits completely in the application window, choose View > Magnification > Fit in Window. You can also choose different magnification view options from the pop-up menu just above the Stage.
Changing the Stage properties
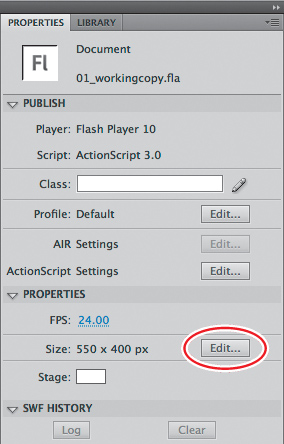
You’ll first want to set the color and the dimensions of the Stage. These options are available in the Properties inspector, which is the vertical panel just to the right of the Stage.
1 At the bottom of the Properties inspector, note that the dimensions of the current Stage are set at 550 × 400 pixels. Click the Edit button.
The Document Settings dialog box appears.
2 In the Width and Height boxes, enter new pixel dimensions. Enter 800 for the Width and 600 for the Height.
3 Click the Background color button and choose a new color for the Stage. Choose dark gray (#333333).
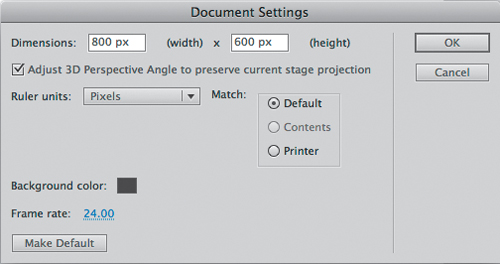
4 Click OK. Your Stage is now a different dimension and color. You can also change the Stage color by clicking the Stage button directly in the Properties inspector. You can change the Stage properties at any time.
Working with the Library Panel
The Library panel is accessible from a tab just to the right of the Properties inspector. The Library panel is where you store and organize symbols created in Flash, as well as imported files, including bitmaps, graphics, sound files, and video clips. Symbols are often-used graphics used for animation and for interactivity.
Note
You’ll learn much more about symbols in Lesson 3.
About the Library panel
The Library panel lets you organize library items in folders, see how often an item is used in a document, and sort items by type. When you import items into Flash, you can import them directly onto the Stage or into the library. However, any item you import onto the Stage is also added to the library, as are any symbols you create. You can then easily access the items to add them to the Stage again, edit them, or see their properties.
To display the Library panel, choose Window > Library, or press Ctrl+L (Windows) or Command+L (Mac).
Importing an item to the Library panel
Often, you’ll be creating graphics directly with Flash’s drawing tools and saving them as symbols, which are stored in the library. Other times you’ll be importing media such as JPEG images or MP3 sound files, which are also stored in the library. In this lesson, you’ll import several JPEG images into the library to be used in the animation.
1 Choose File > Import > Import to Library. In the Open dialog box, select the background.jpg file in the Lesson01/01Start folder, and click Open.
2 Flash imports the selected JPEG image and places it in the Library panel.
3 Continue importing photo1.jpg, photo2.jpg, and photo3.jpg from the 01Start folder. Don’t import the last image, photo4.jpg. You’ll use that image later in this lesson.
You can also hold down the Shift key to select multiple files and import all of them at once.
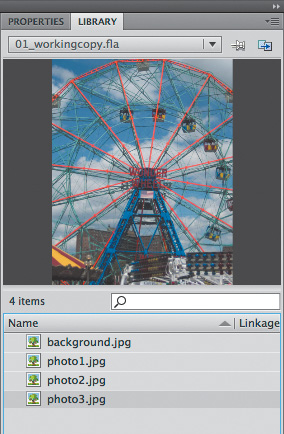
4 The Library panel displays all the imported JPEG images with their filenames and a thumbnail preview. These images are now available to be used in your Flash document.
Adding an item from the Library panel to the Stage
To use an imported image, simply drag it from the Library panel onto the Stage.
1 Choose Window > Library to open the Library panel if it isn’t already open.
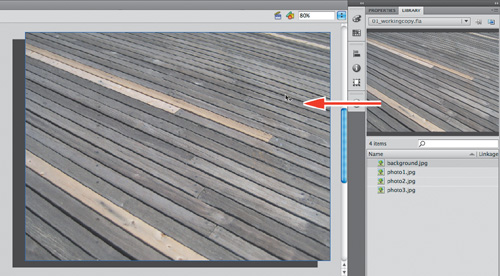
2 Select the background.jpg item in the Library panel.
3 Drag the background.jpg item onto the Stage and place it approximately in the center of the Stage.
Understanding the Timeline
The Timeline is located below the Stage. Like films, Flash documents measure time in frames. As the movie plays, the playhead, shown as a red vertical line, advances through the frames in the Timeline. You can change the content on the Stage for different frames. To display a frame’s content on the Stage, move the playhead to that frame in the Timeline.
At the bottom of the Timeline, Flash indicates the selected frame number, the current frame rate (how many frames play per second), and the time that has elapsed so far in the movie.
The Timeline also contains layers, which help you organize the artwork in your document. Think of layers as multiple film strips stacked on top of each other. Each layer contains a different image that appears on the Stage, and you can draw and edit objects on one layer without affecting objects on another layer. The layers are stacked in the order in which they overlap each other, so that objects on the bottom layer in the Timeline are on the bottom of the stack on the Stage. You can hide, show, lock, or unlock layers. Each layer’s frames are unique, but you can drag them to a new location on the same layer or copy or move them to another layer.
Renaming a layer
It’s a good idea to separate your content on different layers and name each layer to indicate its contents so that you can easily find the layer you need later.
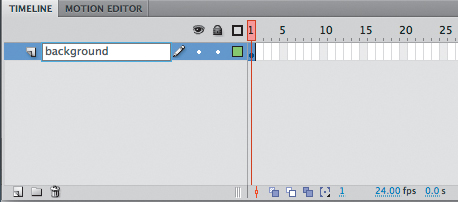
1 Select the existing layer in the Timeline.
2 Double-click the name of the layer to rename it and type background.
3 Click outside the name box to apply the new name.
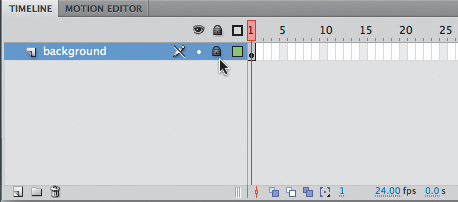
4 Click the dot below the lock icon to lock the layer. Locking a layer prevents you from accidentally making changes to it.
Adding a layer
A new Flash document contains only one layer, but you can add as many layers as you need. Objects in the top layers will overlap objects in the bottom layers.
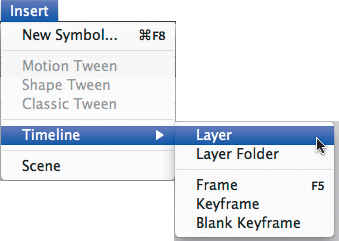
1 Select the background layer in the Timeline.
2 Choose Insert > Timeline > Layer. You can also click the New Layer button below the Timeline. A new layer appears above the background layer.
3 Double-click the new layer to rename it and type photo1. Click outside the name box to apply the new name.
Your Timeline now has two layers. The background layer contains the background photo, and the newly created photo1 layer above it is empty.
4 Select the top layer called photo1.
5 Choose Window > Library to open the Library panel if it isn’t already open.
6 Drag the library item called photo1.jpg from the library on to the Stage.
The photo1 JPEG appears on the Stage and overlaps the background JPEG.
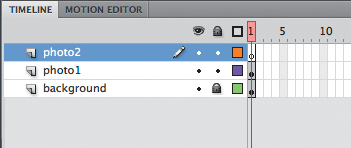
7 Choose Insert > Timeline > Layer or click the New Layer button (![]() ) below the Timeline to add a third layer.
) below the Timeline to add a third layer.
8 Rename the third layer photo2.
Working with Layers
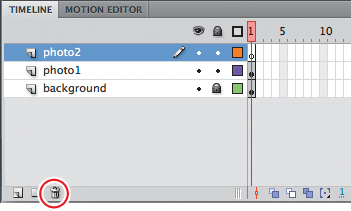
If you don’t want a layer, you can easily delete it by selecting it and then clicking the Delete button below the Timeline.
If you want to rearrange your layers, simply click and drag any layer to move it to a new position in the layer stack.
Inserting frames
So far, you have a background photo and another overlapping photo on the Stage, but your entire animation exists for only a single frame. To create more time on the Timeline, you must add additional frames.
1 Select frame 48 in the background layer.
2 Choose Insert > Timeline > Frame (F5). You can also right-click (Windows) or Ctrl-click (Mac) and choose Insert Frame from the context menu that pops up.
Flash adds frames in the background layer up to the selected point, frame 48.
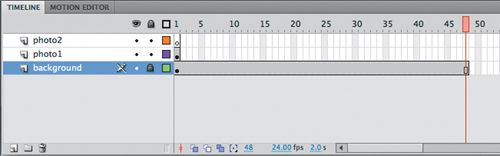
3 Select frame 48 in the photo1 layer.
4 Choose Insert > Timeline > Frame (F5). You can also right-click/Ctrl-click and choose Insert Frame from the context menu.
Flash adds frames in the photo1 layer up to the selected point, frame 48.
5 Select frame 48 in the photo2 layer and insert frames on this layer.
You now have three layers, all with 48 frames on the Timeline. Since the frame rate of your Flash document is 24 frames per second, your current animation lasts two seconds.
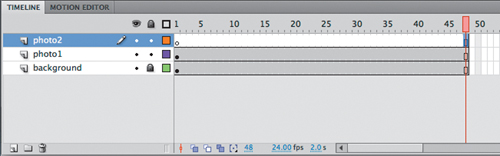
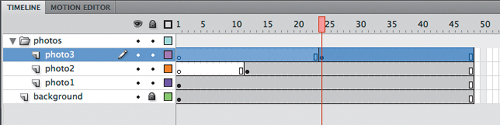
Creating a keyframe
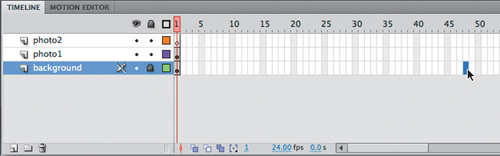
A keyframe indicates a change in content on the Stage. Keyframes are indicated on the Timeline as a circle. An empty circle means there is nothing in that particular layer at that particular time. A filled-in black circle means there is something in that particular layer at that particular time. The background layer, for example, contains a filled keyframe (black circle) in the first frame. The photo1 layer also contains a filled keyframe in its first frame. Both layers contain photos. The photo2 layer, however, contains an empty keyframe in the first frame, indicating that it is currently empty.
You’ll insert a keyframe in the photo2 layer at the point in time when you want the next photo to appear.
1 Select frame 24 on the photo2 layer. As you select a frame, Flash displays the frame number beneath the Timeline.
2 Choose Insert > Timeline > Keyframe (F6).
A new keyframe, indicated by an empty circle, appears in the photo2 layer in frame 24.
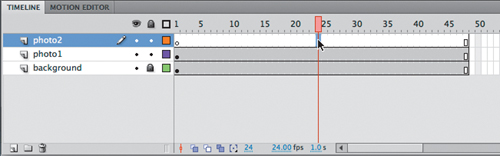
3 Select the new keyframe at frame 24 in the photo2 layer.
4 Drag the photo2.jpg item from your library onto the Stage.
The empty circle at frame 24 becomes filled, indicating there is now a change in the photo2 layer. At frame 24, your photo appears on the Stage. You can click and drag the red playhead from the top of the Timeline to “scrub,” or show what’s happening on the Stage at any point along the Timeline. You’ll see that the background photo and photo1 remain on the Stage throughout the Timeline but photo2 appears only at frame 24.
Understanding frames and keyframes is essential for mastering Flash. Be sure you understand how the photo2 layer contains 48 frames with 2 keyframes—an empty keyframe at frame 1 and a filled keyframe at frame 24.
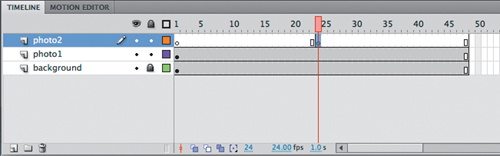
Moving a keyframe
If you want your photo2.jpg to appear later or earlier, you need to move the keyframe in which it appears later or earlier along the Timeline. You can easily move any keyframe along the Timeline by simply selecting it and then dragging it to a new position.
1 Select the keyframe in frame 24 on the photo2 layer.
2 Move your mouse cursor slightly, and you’ll see a box icon appear near your cursor indicating that you can reposition the keyframe.
3 Click and drag the keyframe to frame 12 in the photo2 layer.

The photo2.jpg now appears on the Stage much earlier in the animation.

Organizing Layers in a Timeline
At this point, your working Flash file has only three layers: a background layer, a photo1 layer, and a photo2 layer. You’ll be adding additional layers for this project, and like most other projects, you’ll end up having to manage multiple layers. Layer folders help you group related layers to keep your Timeline organized and manageable, just like you make folders for related documents on your desktop. Although it may take some time to create the folders, you’ll save time later because you’ll know exactly where to look for a specific layer.
Creating layer folders
For this project, you’ll continue to add layers for additional photos, and you’ll place those layers in a layer folder.
1 Select the photo2 layer and click the New Layer button (![]() ).
).
2 Name the layer photo3.
3 Insert a keyframe at frame 24.
4 Drag the photo3.jpg from the library onto the Stage.
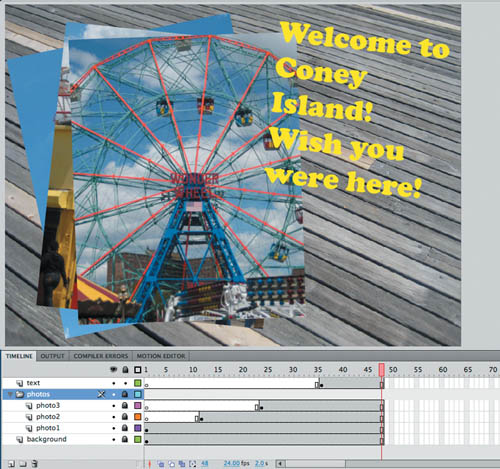
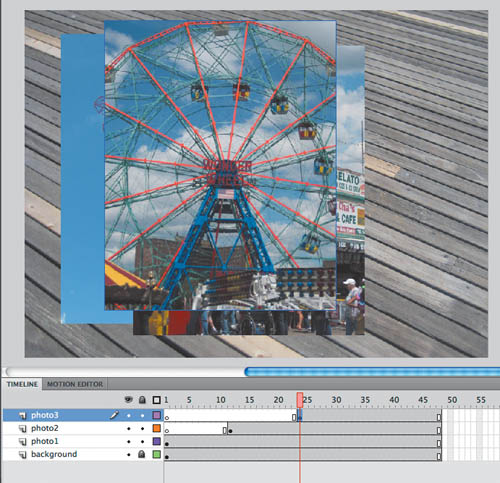
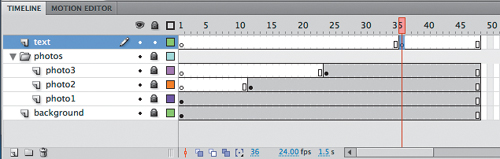
You now have four layers. The top three contain photos of scenes from Coney Island that appear at different keyframes.
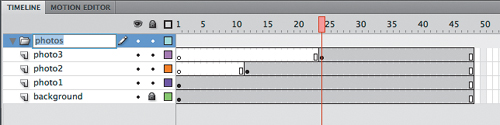
5 Select the photo3 layer and click the New Folder icon (![]() ).
).
A new layer folder appears above the photo3 layer.
6 Name the folder photos.
Adding layers to layer folders
Now you’ll add the photo layers to the photo folder. As you arrange layers, remember that Flash displays the layers in the order in which they appear in the Timeline, with the top layer at the front and the bottom layer at the back.
1 Drag the photo1 layer into the photo folder.
Notice how the bold line indicates the destination of your layer. When a layer is placed inside a folder, the layer name is indented.
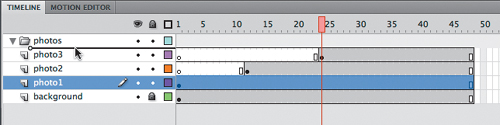
2 Drag the photo2 layer into the photo folder.
3 Drag the photo3 layer into the photo folder.
All three photo layers should be in the photo folder.
You can collapse the folder by clicking the arrow. Expand the folder by clicking the arrow again. Be aware that if you delete a layer folder, you delete all the layers inside that folder as well.
Changing the appearance of the Timeline
You can adjust the Timeline’s appearance to accommodate your workflow. When you want to see more layers, select Short from the Frame View pop-up menu in the upper-right corner of the Timeline. The Short option decreases the height of frame cell rows. The Preview and Preview in Context options display thumbnail versions of the contents of your keyframes in the Timeline.
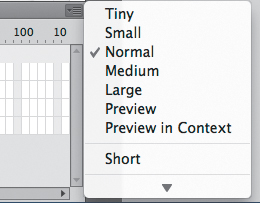
You can also change the width of the frame cells by selecting Tiny, Small, Normal, Medium, or Large.
Using the Properties Inspector
The Properties inspector gives you quick access to the attributes you’re most likely to need. What appears in the Properties inspector depends on what you’ve selected. For example, if nothing is selected, the Properties inspector includes options for the general Flash document including changing the Stage color or dimensions; if an object on the Stage is selected, the Properties inspector shows its x and y coordinates and its width and height, among other information. You’ll use the Properties inspector to move your photos on the Stage.
Positioning an object on the Stage
You’ll begin by moving the photos with the Properties inspector. You’ll also use the Transform panel to rotate the photos.
1 At frame 1 of the Timeline, select the photo1.jpg that you dragged onto the Stage in the photo1 layer. A blue outline indicates that the object is selected.
2 In the Properties inspector, type 50 for the X value and 50 for the Y value. Press Enter/Return to apply the values. You can also click and drag your mouse cursor over the X and Y values to change their positions. The photo moves to the left side of the Stage.
Note
If the Properties inspector is not open, choose Window > Properties, or press Ctrl/Command+F3.
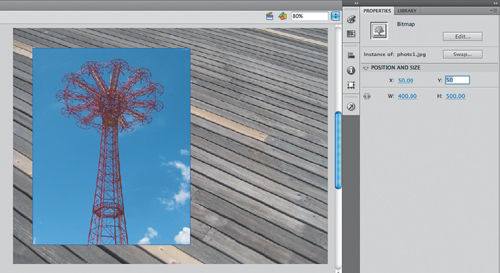
The X and Y values are measured on the Stage from the top-left corner. X begins at 0 and increases to the right, and Y begins at 0 and increases downward. The registration point for imported photos is at the top-left corner.
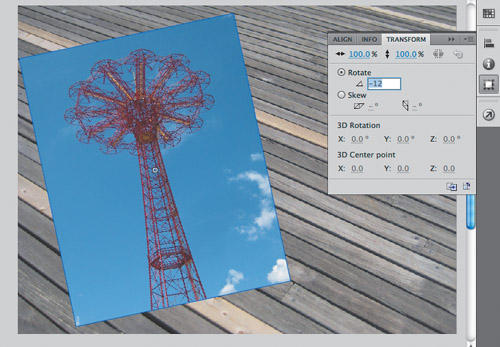
3 Choose Window > Transform to open the Transform panel.
4 In the Transform panel, select Rotate, and type -12 in the Rotate box, or click and drag over the value to change the rotation. Press Enter/Return to apply the value.
The selected photo on the Stage rotates 12 degrees counterclockwise.
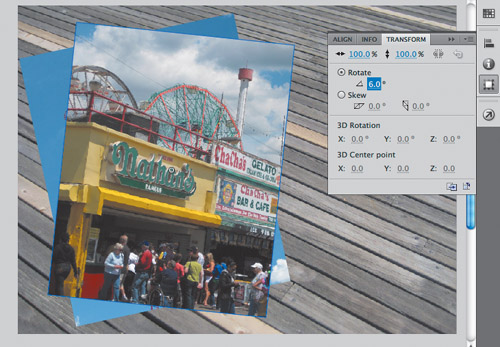
5 Select frame 12 of the photo2 layer. Now click on the photo2.jpg on the Stage.
6 Use the Properties inspector and Transform panel to position and rotate the second photo in an interesting way. Use X=80, Y=50, and a Rotate of 6 to give it some contrast with the first photo.
Working with Panels
Just about everything you do in Flash involves a panel. In this lesson, you use the Library panel, Tools panel, Properties inspector, Transform panel, History panel, and the Timeline. In later lessons, you’ll use the Actions panel, the Color panel, the Motion panel, and other panels that let you control various aspects of your project. Because panels are such an integral part of the Flash workspace, it pays to know how to manage them.
To open any panel in Flash, choose its name from the Window menu. In a few cases, you may need to choose the panel from a submenu, such as Window > Other Panels > History.
By default, the Properties inspector, Library panel, and Tools panel appear together at the right of the screen; the Timeline and Motion Editor are at the bottom; and the Stage is on the top. However, you can move a panel to any position that is convenient for you.
• To undock a panel from the right side of the screen, drag it by its tab to a new location.
• To dock a panel, drag it by its tab into the dock at a new position on the screen. You can drag it to the top, bottom, or in between other panels. A blue highlight indicates where you can dock a panel.
• To group a panel with another, drag its tab onto the other panel’s tab.
• To move a panel group, drag the group by its dark gray top bar.
You also have the option of displaying most of the panels as icons to save space but still maintain quick access. Click the upper-right arrows to collapse the panels to icons. Click the arrows again to expand the panels.
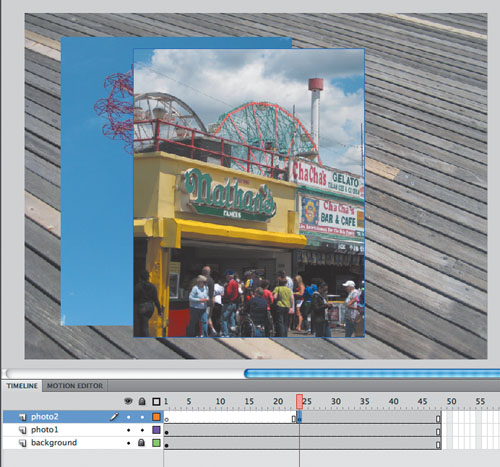
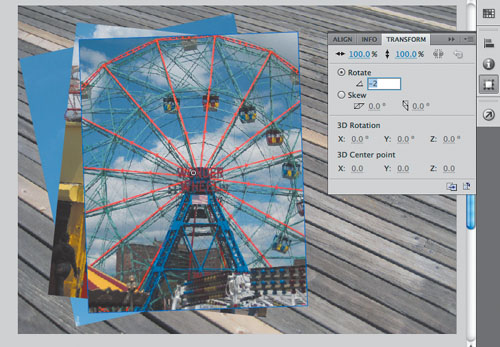
7 Select frame 24 in the photo3 layer. Now click on the photo3.jpg on the Stage.
8 Use the Properties inspector and Transform panel to position and rotate the third photo in an interesting way. Use X=120, Y=55, and a Rotate of −2 to give it some contrast with the other photos.
Note
When images are scaled or rotated in Flash, they may appear jagged. You can smooth them out by double-clicking the bitmap icon in the Library panel. In the Bitmap Properties dialog box that appears, select the Allow Smoothing option.
Using the Tools Panel
The Tools panel—the long, narrow panel on the far right side of the work area—contains selection tools, drawing and type tools, painting and editing tools, navigation tools, and tool options. You’ll use the Tools panels frequently to switch from the Selection tool to the Text tool to a drawing tool. When you select a tool, check the options area at the bottom of the panel for more options and other settings appropriate for your task.
![]()
Selecting and using a tool
When you select a tool, the options available at the bottom of the Tools panel and the Properties inspector change. For example, when you select the Rectangle tool, the Object Drawing mode and Snap To Objects options appear. When you select the Zoom tool, the Enlarge and Reduce options appear.
The Tools panel contains too many tools to display all at once. Some tools are arranged in groups in the Tools panel; only the tool you last selected from a group is displayed. A small triangle in the lower-right corner of the tool’s button indicates there are other tools in the group. Click and hold the icon for the visible tool to see the other tools available, and then select one from the pop-up menu.
You’ll use the Text tool to add a title to your animation.
1 Select the top layer in the Timeline, and then click the New Layer button.
2 Name the new layer text.
3 Lock the other layers below it so you don’t accidentally move anything into them.
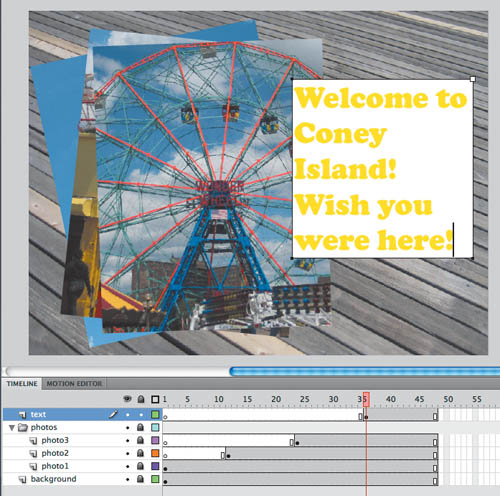
4 In the Timeline, move the playhead to frame 36 and select frame 36 in the text layer.
5 Choose Insert > Timeline > Keyframe (F6) to insert a new keyframe at frame 36 in the text layer.
You will create text to appear at frame 36 in this layer.
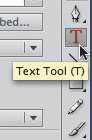
6 In the Tools panel, select the Text tool, which is indicated by the large capital letter T.
7 In the Properties inspector, choose Classic Text from the pull-down menu. Choose Static Text from the pull-down menu that appears below.
Classic Text is a mode for adding simple text that doesn’t require sophisticated options such as multiple columns or wrapping around other objects. Static Text is the option for any text that is used for display purposes. Dynamic and Input Text are special text options for more interactive purposes and can be controlled with ActionScript. You’ll learn about more advanced text options in Lesson 7.
8 Select a font and size in the Properties inspector. Your computer may not have the same fonts as those shown in this lesson, but choose one that is close in appearance.
9 Click the colored square in the Properties inspector to choose a text color. You can click on the color wheel at the upper right to access the Adobe Color Picker, or you can change the Alpha percentage at the upper right, which determines the level of transparency.
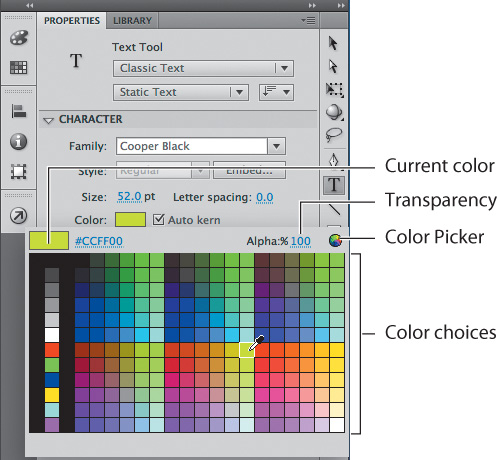
10 Make sure the empty keyframe in frame 36 of the title layer is selected, and then click on the Stage where you want to begin adding text. You can either click once and begin typing, or you can click and drag to define the width of your text field.
11 Type in a title that describes the photos that are being displayed on the Stage.
Tools Panel Overview
The Tools panel contains selection tools, drawing and painting tools, and navigation tools. The options area in the Tools panel lets you modify the selected tool. The expanded menu on the right shows the hidden tools. The black squares on the expanded menu to the right indicate the default tool that appears on the Tool panel. The single capital letters in parentheses indicate the keyboard shortcuts to select those tools. Notice how the tools are grouped together by similar function.
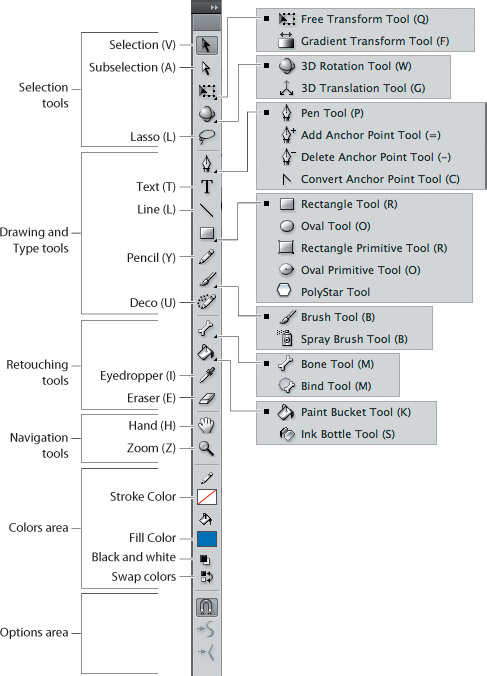
12 Exit the Text tool by selecting the Selection tool (![]() ).
).
13 Use the Properties inspector or the Transform panel to reposition or rotate your text on the Stage, if desired. Or, choose the Selection tool and simply drag your text to a new position on the Stage. The X and Y values in the Properties inspector update as you drag the text around the Stage.

14 Your animation for this lesson is finished! Compare your file with the final file, 01End.fla.
Undoing Steps in Flash
In a perfect world, everything would go according to plan. But sometimes you need to move back a step or two and start over. You can undo steps in Flash using the Undo command or the History panel.
To undo a single step in Flash, choose Edit > Undo or press Ctrl/Command+Z. To redo a step you’ve undone, choose Edit > Redo.
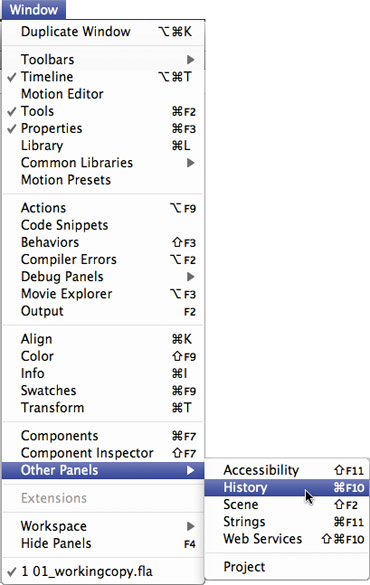
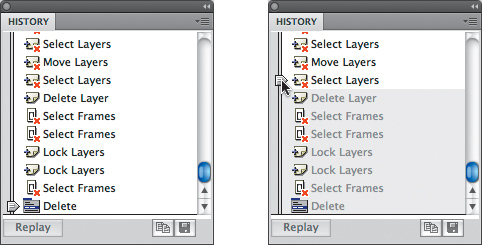
To undo multiple steps in Flash, it’s easiest to use the History panel, which displays a list of all the last 100 steps you’ve performed. Closing a document clears its history. To access the History panel, choose Window > Other Panels > History.
For example, if you aren’t satisfied with the newly added text, you can undo your work and return your Flash document to a previous state.
1 Choose Edit > Undo to undo the last action you made. You can choose the Undo command multiple times to move backward as many steps as are listed in the History panel. You can change the maximum number of Undo commands by selecting Flash > Preferences.
2 Choose Window > Other Panels > History to open the History panel.
3 Drag the History panel slider up to the step just before your mistake. Steps below that point are dimmed in the History panel and are removed from the project. To add a step back, move the slider back down.
Note
If you remove steps in the History panel and then perform additional steps, the removed steps will no longer be available.
Previewing Your Movie
As you work on a project, it’s a good idea to preview it frequently to ensure that you’re achieving the desired effect. To quickly see how an animation or movie will appear to a viewer, choose Control > Test Movie > in Flash Professional. You can also press Ctrl+Enter or Command+Return to preview your movie.
1 Choose Control > Test Movie > in Flash Professional.
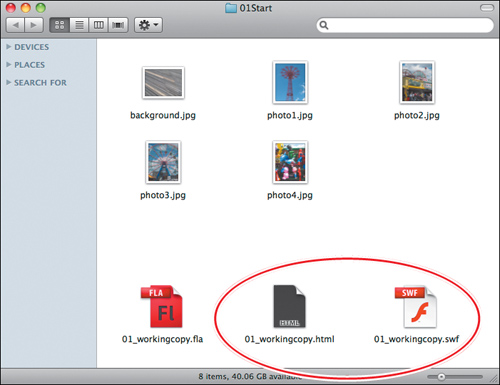
Flash creates a SWF file in the same location as your FLA file and opens and plays the file in a separate window. A SWF file is the compressed, published file that you would upload to the Web.
Flash automatically loops your movie in this preview mode. If you don’t want the movie to loop, choose Control > Loop to deselect the option.
2 Close the preview window.
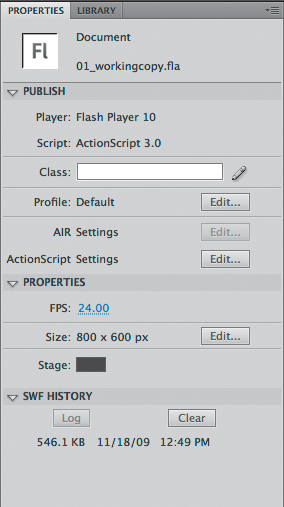
3 Click on the Stage with the Selection tool. Note at the bottom of the Properties inspector that the SWF History displays and keeps a log of the file size, date, and time of the most recent SWF file published. This will help you keep track of your work progress and revisions.
Publishing Your Movie
Note
You’ll learn more about publishing options in Lesson 10.
When you’re ready to share your movie with others, publish it from Flash. For most projects, Flash will create an HTML file and a SWF file. The SWF file is your final Flash movie, and the HTML file tells your Web browser how to display the SWF file. You’ll need to upload both files to the same folder on your Web server. Always test your movie after uploading it to be certain that it’s working properly.
1 Choose File > Publish Settings.
2 Click the Formats tab.
3 Select Flash (.swf) and HTML (.html).
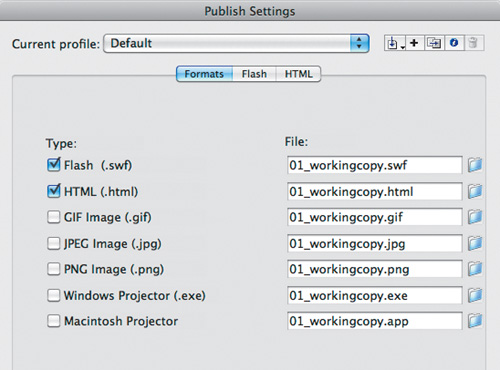
4 Click the HTML tab.
5 Deselect the Loop option.
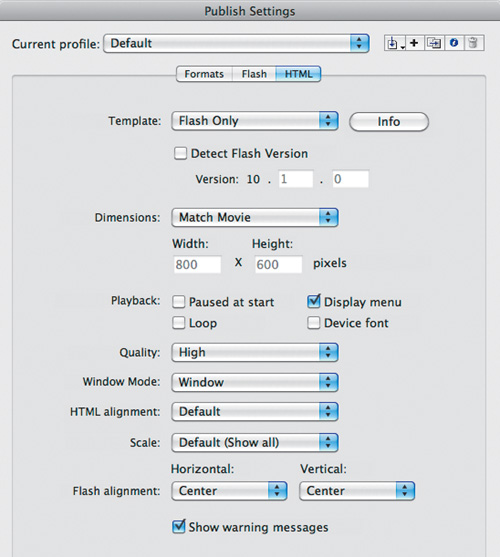
6 Click Publish at the bottom of the Publish Settings dialog box.
7 Click OK to close the dialog box.
8 Navigate to the Lesson01/01Start folder to see the files Flash created.
Saving Your Movie
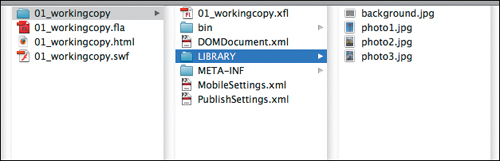
You’ve already saved your Flash movie as an FLA file, but another option is to save your movie in an uncompressed format known as an XFL format. The XFL format is actually a folder of files rather than a single document. The XFL file format exposes the contents of your Flash movie so that other developers or animators can easily edit your file or manage its assets without having to open the movie in the Flash application. For example, all the imported photos in your Library panel appear in a Library folder within the XFL format. You can edit the library photos or swap them with new photos. Flash will make the substitutions in the movie automatically.
1 Choose File > Save As.
2 Name the file 01_workingcopy.xfl and choose Flash CS5 Uncompressed Document (*.xfl). Click Save.
Flash creates a folder named 01_workingcopy, which contains all the information about your Flash movie.

3 Close the Flash document by choosing File > Close.
Modifying an XFL document
In this step, you’ll modify the Library folder of the XFL document to make changes to your Flash movie.
1 Open the LIBRARY folder inside the 01_workingcopy folder.
The folder contains all the photos you imported into your Flash movie.
2 Select the photo3.jpg file and delete it.
3 Drag the photo4.jpg file from the 01Start folder and move it to the LIBRARY folder inside the 01_workingcopy folder. Rename photo4.jpg as photo3.jpg.
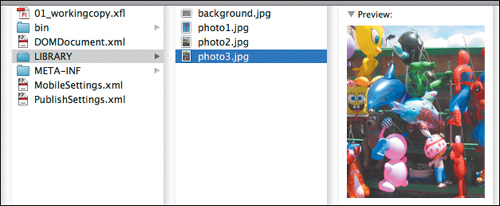
Swapping out photo3.jpg with a new image in the LIBRARY folder automatically makes the change in the Flash movie.
4 To open an XFL document, double-click the .xfl file.
The last image in keyframe 24 of your Timeline has been swapped with the photo4.jpg image with which you made the substitution.

Finding Resources for Using Flash
For complete and up-to-date information about using Flash panels, tools, and other application features, visit the Adobe Web site. Choose Help > Flash Help.
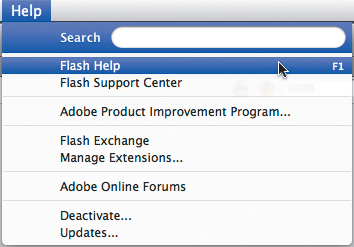
You’ll be connected to the Adobe Community Help Web site where you can search Flash Help and support documents, as well as other Web sites relevant to Flash users. You can narrow your search results to view only Adobe help and support documents as well.
Note
If Flash detects that you are not connected to the Internet when you start the application, choosing Help > Flash Help opens the Help HTML pages installed with Flash. For more up-to-date information, view the Help files online or download the current PDF for reference.
If you plan to work in Flash when you’re not connected to the Internet, download the most current PDF version of Flash Help from www.adobe.com/support/documentation.
For additional resources, such as tips and techniques and the latest product information, check out the Adobe Community Help page at community.adobe.com/help/main.
Checking for Updates
Adobe periodically provides updates to software. You can easily obtain these updates through Adobe Application Manager, as long as you have an active Internet connection.
1 In Flash, choose Help > Updates. The Adobe Application Manager automatically checks for updates available for your Adobe software.
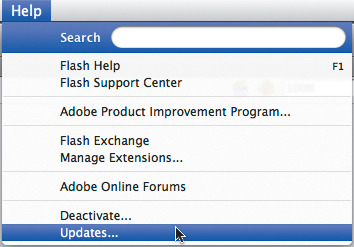
2 In the Adobe Application Manager dialog box, select the updates you want to install, and then click Download And Install Updates to install them.
Note
To set your preferences for future updates, choose Help > Updates, and then click Preferences in the Adobe Application Manager. Select how often you want Adobe Application Manager to check for updates, for which applications, and whether to download them automatically. Click OK to accept the new settings.
Review Questions
1 What is the Stage?
2 What’s the difference between a frame and a keyframe?
3 What’s a hidden tool, and how can you access it?
4 Name two methods to undo steps in Flash and describe them.
5 How can you find answers to questions you have about Flash?
Review Answers
1 The Stage is the area viewers see when a movie is playing in Flash Player or a Web browser. It contains the text, images, and video that appear on the screen. Objects that you store on the Pasteboard outside of the Stage do not appear in the movie.
2 A frame is a measure of time on the Timeline. A keyframe is represented on the Timeline with a circle and indicates a change in content on the Stage.
3 Because there are too many tools to display at once in the Tools panel, some tools are grouped, and only one tool in the group is displayed. (The tool you most recently used is the one shown.) Small triangles appear on tool icons to indicate that hidden tools are available. To select a hidden tool, click and hold the tool icon for the tool that is shown, and then select the hidden tool from the menu.
4 You can undo steps in Flash using the Undo command or the History panel. To undo a single step at a time, choose Edit > Undo. To undo multiple steps at once, drag the slider up in the History panel.
5 Choose Help > Flash Help to browse or search Flash Help for information about using Flash CS5 and ActionScript 3.0. Choose Help > Flash Support Center or visit www.adobe.com to see tutorials, tips, and other resources for Flash users.