CHAPTER 4
Getting Started with the Timeline
The primary reason you want to use Flash is for its animation capabilities. The ability to create a compelling narrative using the elements of story, art, music, and video rendered over time is quite powerful, and Flash is a one-stop environment for doing this work. Given this, the timeline, the tool you use to move objects over time, may be the singularly most important feature of Flash.
- Becoming acquainted with the timeline
- Working with different frame types
- Copying and deleting frames
- Working with layers
- Aligning objects with snapping
Becoming Acquainted with the Timeline
 When working in the Essentials workspace, you’ll find the timeline below the stage, taking up a good deal of screen real estate. (The Motion Editor, a tool you’ll use to modify animations, shares the panel grouping.)
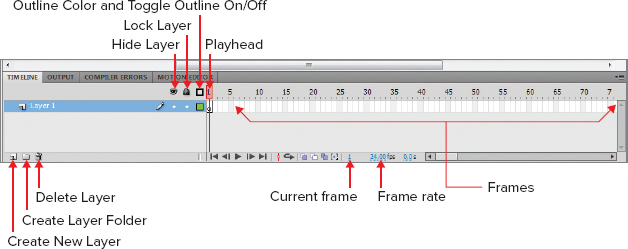
Figure 4.1 shows the timeline and all of the options available in this panel. The timeline consists of two basic parts: frames and layers. Each frame represents one instance of the frame rate—in other words, the number of frames per second in which the movie will play. For example, if the frame rate is 24 frames per second (fps), each frame is 1/24 of a second long. Thus, a 4-second movie would require 96 frames. Each layer represents one discrete unit of your overall animation. Generally speaking, it is good to separate things that move individually onto separate layers. Static content also belongs on its own layer. For example, suppose you want to have a scene in which a UFO or UFOs arrive in a pristine nighttime desert scene. One of the UFOs discovers a cow and abducts it. The nighttime scene represents one layer, each of the UFOs another, and the cow another. Different elements of your scene can come onto the stage at different times, and each element will probably require a different layer. You’ll be working on the cow abduction scene starting in this chapter.
As you can see in Figure 4.1 the Timeline is a busy little interface all its own. Some of the buttons you’ll use every time you work with Flash, others not so much. Your artwork will, for animation purposes, reside on different layers. If you’re a Photoshop user you’ll immediately get the connotation. Creating new layers is easy to do with the Create New Layer button. Likewise, deleting a layer is done with the Delete Layer button. Careful! You may delete a layer with some artwork on it—artwork you did not intend to delete. If this happens just hit Ctrl-Z (Command-Z on the Mac) to undo the deletion. You can also create folders for layers that belong together.
Hiding layers is an excellent way to get some of your artwork out of the way so you can pay attention to some detail work on a given layer. Locking a layer or layers prevents you from putting artwork on the wrong layer. Shifting a layer to outline mode by hitting the Toggle Outline On/Off button takes away the detail of a layer or layers’ artwork, but keeps the outline intact so you can pay attention to placement detail on the current layer in which you’re working. Each layer has its own outline color (denoted in the outline box on each layer). Click the Toggle Outline On/Off button for a given layer and that layer’s artwork is changed into outline mode. Click the Toggle Outline On/Off button at the top of all layers and all layers will be shown in outline mode. (Clicking the Hide or Lock button at the top of the layers accomplishes applies the activity to all layers as well.)
The playhead, a large red rectangle with a red line beneath it, highlights the current frame. Once you have several frames with content on them, you can drag the playhead back and forth, a process called scrubbing the playhead. Performing several playhead scrubs during an animation session helps you spot small issues and fix them in advance before they become a big problem.
Flash tells you what frame you’re currently on alongside the current frame rate. Also, every fifth frame is a different color than the rest.
To the left of the current frame number is a section that includes some advanced frame management tools we won’t be touching on in this chapter, such as onion skinning and working simultaneously with multiple frames. We will cover working with multiple frames and onion skinning in Chapter 7, “Developing Simple Flash Animations.” Finally, to the left of that section is a set of standard playback buttons that allow you to cycle through animations.
Note that when you start a new Flash document, frame 1 has a black-outlined circle in it, denoting a blank keyframe, ready for you to add your artwork. A term often used in the industry to denote your art is assets. Figure 4.1 shows the playhead sitting on frame 1.
As you work through the various exercises in this and ensuing chapters, you’ll have a chance to work with all of the buttons outlined in Figure 4.1.
Adding Different Frame Types to Your Animation
There are three basic frame types you’ll be using a great deal: keyframes, blank keyframes, and regular frames. A keyframe is a frame that contains at least one asset. The asset could be static or moving. Blank keyframes are frames that are ready to have an asset placed on them. Frames are just an extension of a keyframe that has an asset on it. Suppose, for example, you have a beautiful background scene you’ve created on layer 1. Above it you have several layers with various animations on them—animations that play over multiple frames’ worth of time. For the viewer to see the background while these animations are playing, you must extend the background frame out to the point where the animations stop. Since there’s nothing moving on the background frame—it contains static content—all you really need to do is have Flash show the frame in succeeding frames. There’s no need for a keyframe, just a frame extension. You’ll get a chance to work with keyframes and animations in the next few pages.
Follow these steps to work with the different frame types:
1. Select the Rectangle tool by pressing R on your keyboard.
2. Select a stroke and fill for your rectangle.
3. Take a look at frame 1, layer 1, noting the black circle with white fill in the middle of the frame block. This means the frame has a blank keyframe.
4. Draw a rectangle on the stage.
5. Note that the black outlined circle now has a black fill, indicating that the frame has an asset on it.
NOTE Keyframes contain some kind of asset—whether art, video, audio, or text.
Now that you have drawn some assets on frame 1, what now? One thing you may frequently want to do is duplicate the assets on the very next frame and then make some minor changes to the assets to denote some kind of movement.
6. Click frame 2.
7. Select Insert

Timeline
Keyframe from the main Flash menu or right-click the new frame, and then click Insert Keyframe or press the F6 key.
8. Note that Flash makes an exact copy of the asset on the stage in frame 1 and pastes it in exactly the same location on frame 2.
9. Note that frame 2 now shows a black circle, indicating that a keyframe has been created.
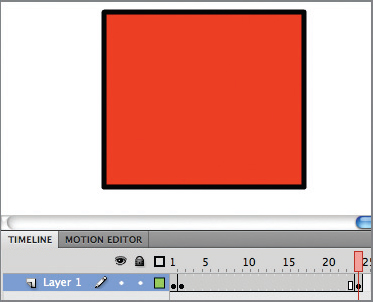
10. Click frame 24.
11. Right-click the frame and then choose Insert Keyframe from the context menu.
12. Note that Flash grays out frames 3 through 23, indicating that the rectangle will be continuously displayed from frame 2 to frame 24 (see
Figure 4.2).
When you insert a new keyframe, this action copies all of the assets on the previous frame to the new keyframe.
13. Make sure you’re still working in frame 24.
14. Press O to activate the Oval tool.
15. Pick a fill and stroke color for the oval.
16. Draw an oval on the stage.
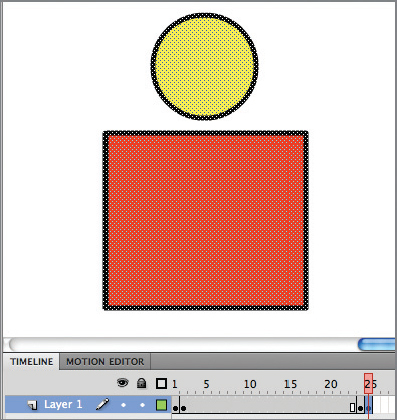
17. Click frame 25. Note that there are currently no art assets on the stage.
18. Right-click the frame, and select Insert Keyframe from the context menu.
19. Flash now copies both the rectangle and oval to the new keyframe on frame 25 (see
Figure 4.3).
Maybe you don’t want any of the current frame’s assets on the next frame; you want to start with a new, empty keyframe.
20. Click frame 26. Note there are no art assets currently on the frame.
You will create blank keyframes when you want new assets on the frame and do not want to carry forward assets from the previous keyframe.
21. Right-click the frame.
22. Select Insert
Timeline
Blank Keyframe from the Flash main menu or right-click the new frame and click Insert Blank Keyframe, or you can press the F7 key.
23. Flash inserts a blank keyframe. Note a black outline circle with a white fill, indicating a blank keyframe.
24. Draw a new oval on this frame, this time changing the fill and stroke colors.
25. Draw a new rectangle on this frame, changing its fill and stroke colors as well.
26. Click frame 48.
27. Select Insert
Timeline
Frame or right-click the new frame then click Insert Frame, or you can press the F5 key (see
Figure 4.4).
Note that Flash puts a white rectangle with a black stroke on the ending frame and colors the frames gray in between.
Note that no artwork is copied from frame to frame. Flash simply shows the artwork on the preceding keyframe for the length of time represented by the distance from the keyframe to the ending frame. For example, in the previous steps, the animation extends from frame 26 to frame 48: 22 frames. Since the frame rate is 24 fps, the artwork on frame 26 will display for 22/24 of a second.
This process is called extending frames. For example, in the nighttime sky background you created in the exercise in Chapter 3, you could opt to extend the frames as far as you like by simply selecting the frame to which you want to extend and then pressing F5. This is a very common thing to do: Many designers create a static background layer that includes all of the assets that will not be moving throughout the animation and then extend the frame out the appropriate length to accommodate the duration of the proposed new animation.
Suppose you find your animation will need to go a little longer than the current background’s length?
28. In your current Flash document, click frame 72.
29. Right-click the frame, and select Insert Frame from the context menu.
Flash simply extends the frame, moving the end frame from frame 48 to frame 72.
30. Press the Enter key. Flash automatically scrubs the playhead for you.
31. Press Ctrl+Enter (Command+Enter on the Mac) to play the movie in Flash Player.
Note that once you have played an animation, Flash creates a SWF file with the same name and in the same folder as your FLA file. Every time you replay the movie, Flash updates the SWF file. As a reminder, the SWF file is portable—you can take it to any computer and play it as long as the Flash Player is installed.
Copying and Deleting Frames
From time to time you may want to copy a group of frames and paste them elsewhere. One of the major reasons this happens is when you go through all the work of animating an object on the stage and then realize it would be better if you turned the whole thing into a movie clip.
Since movie clips have their own timeline, often designers and animators will create their animation on a movie clip and then drag an instance of the movie clip to the stage. The primary reason this is useful is that it keeps stage clutter and stage timeline confusion to a minimum. Also, it just makes good sense to isolate animated objects from one another in separate movie clips because you’re able to edit them independently. Additionally, accurate placement of movie clip animations on the stage is easier. In this exercise you’ll move the animation you created earlier to its own movie clip.
1. Using your work from the previous exercise, highlight an entire row of frames you just created by clicking and dragging across the frame selection you want or clicking the first frame and Shift+clicking the last.
2. Right-click and select Cut Frames from the context menu.
3. The frames disappear. Don’t worry: They are in the paste buffer, invisible to you right now but available to paste once you create a new movie clip.
4. Press the F8 key or click Insert
New Symbol from the main Flash menu. You can also right-click any frame and select Insert Symbol from the context menu.
5. Create a new movie clip symbol, giving it any name you like. No need to worry about the other settings in the Create New Symbol dialog right now.
6. Flash creates a blank movie clip and puts you into movie clip editing mode. You can tell you’re editing the movie clip because its name appears in the upper-left corner of the stage, adjacent to the stage’s name, Scene 1 (see
Figure 4.5). Notice the gear icon associated with movie clips.
7. Note that the playhead is parked at frame 1, layer 1.
8. Press Ctrl+Shift+V (Command+Shift+V on the Mac); on both PC and Mac this is called the “paste in place” hotkey. You can also right-click and select Paste Frames from the context menu or, from the Flash main menu, click Edit
Timeline
Paste Frames. Flash will copy the frames into the new place, leaving the stage empty.
You can also copy the frames using this technique and, instead of cutting, use the paste in place hotkey or right-click and select Edit
Paste Frames from the context menu.
Now that the animation is in a movie clip instead of on the stage, you have to bring it out of the library, placing it on the stage to use it.
9. Click the Scene 1 button to return to the stage.
10. If the Library tab in the Property Inspector is not clicked, click it to reveal the contents of the library. Note that your new movie clip is now in the library.
11. Note that frame 1 of the stage has a blank keyframe on it and that the frames are extended out to frame 72.
12. Click frame 2 and then Shift+click frame 72 to highlight all frames between 2 and 72.
13. Right-click and select Remove Frames from the context menu. This gets rid of all the frames with the exception of frame 1. Even if you had included frame 1 in the removal, Flash would continue to display a blank keyframe at frame 1.
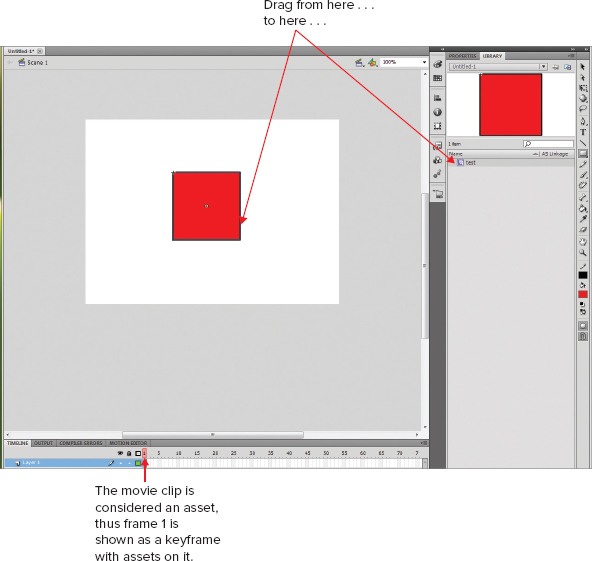
14. Click your movie clip library member and drag it out onto the stage (see
Figure 4.6).
15. If you wish, you can use the Free Transform tool to resize, rotate, or even skew the movie clip.
16. Press Ctrl+Enter to play the movie.
17. Save your work to a new file if you so desire. We won’t be reusing this work; no need to save changes if you won’t be going back to review them later.
Not a very interesting movie clip, but here’s the important takeaway: Frame 1 of the stage uses only one frame but still plays the animation action. This technique will be useful for you when you create more complex animations that consist of various movie clips.
Frame Names
When you click an individual frame in the Property Inspector you’ll notice a section called Label. This allows you to assign a meaningful name to the frame. There are three different kinds of frame labels you can attach to a frame:
1. Frame Label: You use a frame label to assign a meaningful name to a frame that you will later access in AS3. For example, suppose you want your program to move back to frame 2 upon completion. You could us the AS3 function gotoAndStop(2), but if you assigned a meaningful name, such as “Start” for example, the code would suddenly become more friendly because the AS3 function would now say gotoAndStop(Start). Frame labels are useful for naming frames that will be used in AS3.
2. Frame Comment: Exactly as their name stipulates, frame comments are used to provide a comment for a specific frame.
3. Frame Anchor: Think of a frame anchor as a bookmark, similar to the way an anchor element (<a>) works in HTML and you’ll have the sense of what a frame anchor does. Frame anchors do not require any ActionScript, and allow you to provide navigability to users as they traverse your Flash-based site. You put your anchor into a URL destination in any given frame after that. One thing to remember: When you get ready to publish your Flash document, you must select the Flash with Named Anchors template from within the HTML settings of the document. We’ll touch on publishing in Chapter 13.
Organizing Your Work with Layers
Layers are used to segment various components of your rich media. Some designers and developers use very few layers in their work; others use vast quantities. You want to find a middle ground when using layers. It’s not wise to put all of your assets on one layer, nor is it prudent to put every single thing on a separate layer. You will most likely find when you first begin using Flash that you don’t use layers enough—you’ll have situations in which you realize you need a separate layer for several pieces of artwork you’ve placed on a frame and you wind up cutting the assets from the original layer and pasting them into the new one. No worries! Flash provides the ability for you to adjust and correct. However, if you get into the habit of asking yourself whether a new asset belongs on the current layer or a new one, you’ll be ahead of the game.
Every horizontal line of frames in the timeline represents one layer. As new layers are created, Flash adds a new row of frames. To the left of the frames in Figure 4.1 you can see the layer name Layer 1. To the right of the layer name are some buttons you can click to control the layer’s visibility, lock the layer, and turn assets on the layer from full color into outline mode. The color of the square is the same as the color of the outline.
Creating a UFO Scene
Take a look at the UFO scene in Figure 4.7. Note that there are three layers in this scene: Background, Mountains and UFO.
Let’s use this exercise to re-create this scene:
1. Start a new ActionScript 3.0 document.
2. Click the Properties tab to show the document properties.
3. Click the stage Color Picker. This brings up the Document Properties window, which allows you to set the background color.
4. Set the stage color to a nice dark-blue nighttime-sky color such as hex #000066.
5. Double-click the layer name Layer 1 and change it to Background.
6. Click the Create New Layer button (see
Figure 4.1). A new layer appears above the Background layer.
7. Name the new layer Mountains.
8. Repeat steps 6 and 7, this time naming the new layer UFO.
You need to get into the habit of locking layers you do not want to work with right now so you don’t accidentally place assets on the wrong layer.
9. Simultaneously lock the Background and Mountains layers by holding down the Alt key (Option key on the Mac) and clicking the UFO layer’s padlock button. Flash locks all other layers, leaving the UFO layer unlocked.
10. Press the O key to activate the Oval tool.
11. Make sure Merge Drawing mode is active (the default with a new Flash document).
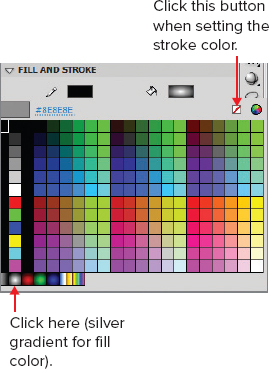
12. Select the silver gradient color from the fill Color Picker. Pre-built gradients show up in the bottom part of the Color Picker (see
Figure 4.8).
13. Make sure the stroke color is turned off (see
Figure 4.8).
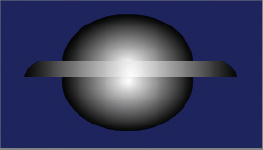
14. Draw a skinny, fairly short oval on the stage. This will become the middle section of the UFO.
15. Press V to activate the Selection tool.
16. Marquee the bottom half of the oval and press the Delete key. This activity leaves only the top half of the oval.
17. Marquee the top one-third of the remaining oval and press Delete again. This leaves a skinny angular middle section for the UFO (see
Figure 4.9).
18. With the same settings, draw another oval somewhere else on the stage. The new oval should be fatter and narrower than the first. This oval will be cut in two to make the top and bottom halves of the UFO.
19. Press V to activate the Selection tool.
20. Marquee the bottom half of the new oval. Be careful not to hit other buttons so that this half stays active because it will need to be that way in the next step.
21. Press Q to activate the Free Transform tool.
22. Move the bottom half of the oval so that it’s touching the bottom half of the mid-section you created earlier. Note that the mouse cursor of the Free Transform tool shows a black arrow with a plus sign (+) in it when you are able to move the object.
23. Marquee the remaining half of the oval. The Free Transform tool should still be active.
24. Move the top half into place on the UFO (see
Figure 4.10).
25. Draw a marquee around all three objects.
26. Press Ctrl+G (Command+G on the Mac) to group all the objects.
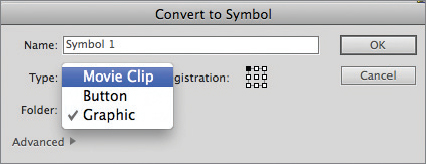
27. Press the F8 key to bring up the Convert To Symbol dialog.
28. In the Type drop-down, select Graphic (see
Figure 4.11).
29. In the name box, type grUFO. We’ll touch on symbol naming conventions in Chapter 6. Flash creates a graphic symbol and stores it in the library.
30. Making sure grUFO is selected, rotate, size, and move the UFO to your liking, keeping it somewhere in the upper third of the stage.
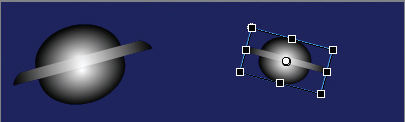
31. Press Ctrl+D (Command+D on the Mac) to duplicate the UFO.
32. Rotate, size, and move the second UFO somewhere else on the stage, making it a little smaller, with a different angle than the first (
Figure 4.12).
33. Click the Toggle Outline On/Off button. Note that Flash takes away all of the color, leaving only an outline to represent the UFOs on the screen.
34. Click the Toggle Outline On/Off button again to reshow the colors in the UFOs.
The outline feature is useful when you have a lot of busy artwork on the stage and you’re tying to make sense out of what’s where. Additionally, artwork can sometimes be distracting—putting some objects in outline mode allows you to concentrate on placing other objects in the scene in the correct location.
Hanging the Moon
Now it’s time to put the moon on the stage:
1. Alt+click the Background layer. This activity unlocks the Background layer and locks all the others.
2. Click the Background layer to make it active.
If you lock all other layers but do not move to the layer you want to work on, Flash sees that you’re on a locked layer. As soon as you try to put art content on the stage, Flash alerts you that you’re attempting to do so on a locked layer and offers to unlock it for you. This can happen frequently when you’re a beginner, so it’s a good idea to check to make sure you’re on the layer you kept unlocked so it’s active and ready for work.
3. The Oval tool should still be active in the basic shapes area but you can press O on the keyboard just to make sure.
4. Select a white or eggshell fill color for the moon, with no stroke.
5. In the Oval Options section, change the ending angle to 182.5. We want a waxing half moon, but if you draw an exact half oval, the moon will look too mechanical.
6. Draw the oval on the stage.
7. Press Q to switch to the Free Transform tool.
8. Rotate, size, and move the moon into the upper-right corner of the stage. Keep in mind that the moon is in the background so it should be smaller than the UFOs, which you want to appear as closer to the viewer.
9. With the moon still active, press F8 to bring up the Convert To Symbol dialog.
10. In the Type drop-down, select Movie Clip.
11. In the Name field, type mcMoon.
12. Click OK. Flash creates a movie clip out of the moon, places it in the library, and shows it on the stage. You can tell the moon is a movie clip this way: Looking in the Property Inspector, you see “instance of mcMoon.”
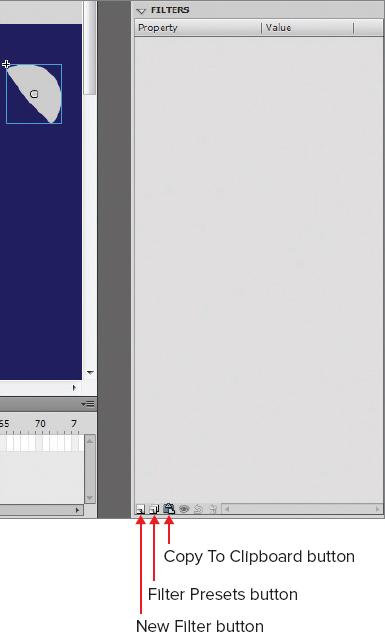
13. Note in the Property Inspector that for the moon movie clip there is a new section called Filters near the bottom of the screen. Click the triangle to open up the Filters selection (see
Figure 4.13).
14. With the moon still active, click the New Filter button.
15. Select Glow as the filter type. Flash creates a glow filter and applies it to the moon.
16. In the properties section for the filter, change the color to white by clicking the Color Picker.
17. In the Blur X setting, click and drag the number to the right to about 50. Note that Flash simultaneously adjusts the Blur Y setting because the two are locked by default.
If the moon was going to change over time—for example, you wanted to show the path of the moon as time elapses—putting it on the Background layer wouldn’t be the best option. It would be better to create a movie clip and use tweens and an elliptical motion path to set the moon’s motion. We’ll touch on this topic in Chapter 8.
Organizing Your Layers: Using Layer Folders
When you have a lot of layers in a scene, the timeline can become cluttered. Layer folders are useful because they allow you to group into a folder layers that have a commonality; the layer folders can then be expanded and contracted as needed. We will have three sets of hills/mountains in our scene. It may make sense to have each on its own separate layer, nested within a layer folder. Follow these steps to create layer folders:
1. Deactivate all objects on the stage by clicking anywhere on the stage or in the pasteboard.
2. In the timeline, click the middle button to create a new layer folder.
3. Rename the new layer folder Mountains/Hills.
4. Click the Lock Layer button (padlock icon) to lock the Background and UFO layers.
5. Drag the Mountains layer so it’s immediately under the new Mountains/Hills layer folder. When you let go, the Mountains layer should show up indented, to show it’s now a part of the Mountains/Hills folder.
6. Click the New Layer button. Because your last activity was inside the layer folder, Flash assumes you want to create a new layer inside this folder.
7. Name the new layer Hills.
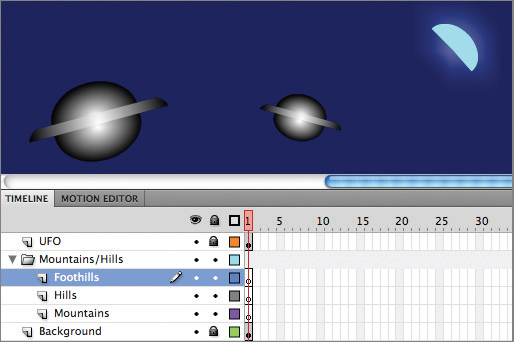
8. Repeat steps 6 and 7, this time naming the new layer Foothills (see
Figure 4.14).
Note that the Hide Layer, Lock Layer, and Toggle Outline On/Off radio buttons are still available for all art layers, but now that two of the layers are inside a layer folder, simply clicking the layer folder’s Hide Layer, Lock Layer and Toggle Outline On/Off buttons applies the same to all the layers that are inside it.
Because the Mountains layer is underneath the Hills and Foothills layers, it will appear to be in the back in terms of the display order.
9. Lock all layers except the Mountains layer by Alt+clicking the padlock button on the Mountains layer.
10. Click the Mountains layer to make sure it’s the active layer.
11. Press B to activate the Brush tool.
12. Change the color of the brush by clicking the Fill Color button near the bottom of the toolbar. Select a color that’s lighter than the nighttime sky but still relatively dark.
13. Using the brush, draw a set of mountains across the stage, down the right side, across the bottom, and up the left side, connecting to your original starting point. Do not let go of the mouse until you have completed the loop.
14. Press K to activate the Paint Bucket tool. The fill color should remain the same as the color you picked for the brush.
15. Click inside the loop you just created. Flash fills the loop in.
16. Press V to activate the Selection tool.
17. Click the mountain scene you just created to activate it.
18. Right-click and select Convert To Symbol from the context menu.
19. Make sure the type is still set to Movie Clip.
20. Key in the name mcMountains, and then click OK. Flash turns your Mountains artwork into a movie clip, storing it in the library and displaying it on the stage.
21. Add a new Drop Shadow filter.
22. Drag the Blur X slider to about 45.
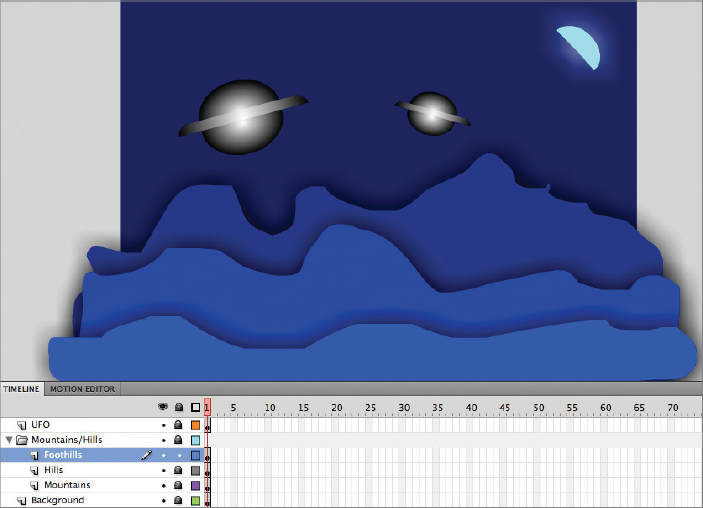
23. Repeat steps 9 through 22, this time on the Hills layer, making sure the hills are a little lighter in color than the mountains.
24. Repeat steps 9 through 22, this time on the Foothills layer, making sure the foothills are a little lighter in color than the hills.
Color Outside the Box
There is a design decision here: Most of the time, it’s wise to keep your drawing of things outside the stage (such as the mountains) to a minimum because these elements add to the overall file size. In other words, restrict your drawings to the stage. However, I have seen drawings that go over the bounds of the stage to be quite effective when the FLA file is made to go full screen (e.g., user clicks the maximize button when the movie is playing, or you write some AS3 code to force the movie to play in full screen). The latter technique places the drawing on a planar surface, as though the artist intended the stage to be in the center of the canvas. As a beginner to Flash, it’s probably best that you restrict your assets to the limits of the stage for the time being.
Layer upon Layer
Remember that as you build new layers over a layer, the art assets in the layers above will display first and you will not necessarily be able to see the assets on the lower layer. I say “not necessarily” because if an object on a higher layer has an alpha (transparency) value lower than 100 applied to it, you may well be able to see at least some of the detail on the lower layer. The concept of the precedence of one layer over another is going to require that you think about which objects should be placed on which layers. Generally speaking, background layers are always on the bottom. However, backgrounds can consist of many things. In the case of the UFO scene, for example, the background could comprise the road, mountains, fences, cattle, street lights, telephone poles, and all sorts of other accoutrements you see fit to put into your scene—some things that will not be moving, others that will. The primary question is this: Which elements do you want to always be visible and which elements are okay to hide should an animation on an upper layer move over them? Note that in animations, an element may be in motion, in which case, objects that are on a layer beneath it will be visible only part of the time.
Working with Special Layer Types
There are two specialized layer types you should be aware of: guide and mask.
Most people create a topmost Actions layer, reserved for any AS3 code they write. If you’re not planning on writing any AS3 code, you do not need this layer.
Guide layer A guide layer is used to simply guide the placement of objects in your scene. Right-click a layer and select Guide from the context menu to change a layer to a Guide layer. Flash assigns a different icon to the layer. When the movie plays (i.e., is converted to a SWF file), it will not show the guide layer; the user will never see the guide layer. In this exercise you’ll create a guide layer.
1. Start Flash and create a new ActionScript 3.0 document.
2. From the Flash main menu, click View
Rulers. To unview Rulers simply reverse the process.
3. From the Flash main menu, click Modify
Document. Using the Ruler Units drop-down, make sure the ruler units are in inches (decimal) (see
Figure 4.16).
4. Make sure the guides are enabled by clicking View
Guides.
5. Click View
Guides
Edit Guides, change the guide color to black, and then click OK.
6. Right-click the layer and select Guide from the context menu.
7. Rename the guide layer Guide.
8. Click on the horizontal ruler and drag out a guide to the 1 inch mark on the vertical ruler.
9. Click on the vertical ruler and drag out a guide to the 1 inch mark on the horizontal ruler.
10. Create a new layer called Box.
11. Lock the Guide layer by clickling View
Guides
Lock Guides from the main Flash menu. Unlock the same way.
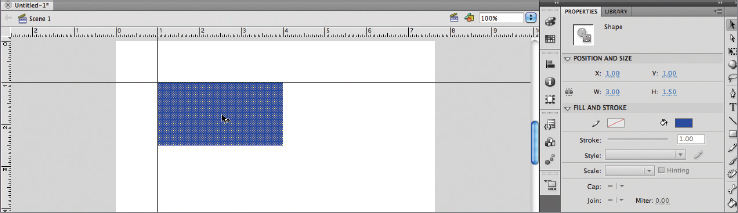
12. In the Box layer, draw a rectangle with its upper-left corner abutting the southeast corner of the guides.
13. Note that the Property Inspector shows you the exact x and y location of your object. You can click either coordinate to key in exact values (see
Figure 4.17).
14. Play the movie with Ctrl+Enter (Command+Enter on the Mac), noting that the guide layer does not display when the movie plays.
There are other guide properties you can adjust while in the Guide Properties dialog. In particular, the snapping mechanism by which objects on the stage will align themselves. By default, objects will snap to the guides placed out on the stage, but you can adjust this through the Guide Properties.
Mask layer Have you been to a theater event in which there’s a spotlight in use? In cases like that, you can see the activity where the spotlight is pointing and not very much anywhere else on the stage. The mask layer works basically the same way. You simply right-click the layer you want to make into a mask, select Mask from the context menu, then drag layers participating in the mask underneath the mask layer. Flash gives mask layers a different icon.
A mask layer is used almost exclusively in animations and shows only a part of the layers beneath as the animation progresses. Similar to the way a layer folder has layers underneath it, a mask layer has other layers that are participating in the mask grouped beneath it. Not all layers in the animation need to be grouped beneath the mask layer. In this exercise you’ll create a mask layer.
1. Start Flash and create a new ActionScript 3.0 document.
2. Change the stage color to a darker color.
3. Name the first layer Mask.
4. Draw a gray oval about 1/3 to 1/4 the size of the stage in the bottom-right corner of the stage. Note that the color of the oval does not matter.
5. Right-click the Mask layer and select Mask from the context menu.
6. Create a new layer, name it Box, and drag it beneath the Mask layer, noting that it indents itself.
7. Draw a rectangle of another color in the upper-left corner of the stage, a little smaller than the oval. Make sure the box does not touch the oval! (See
Figure 4.18.)
8. In the Mask layer, click frame 24 and then press the F5 key to create a new frame, or right-click and select Insert Frame from the context menu. The rectangle disappears.
9. In the Box layer, click frame 24 and then press the F6 key to create a new keyframe, or right-click and select Insert Keyframe. The rectangle shows up highlighted and ready for movement.
10. Move the rectangle so it is inside the oval. See
Figure 4.19.
11. Press Ctrl+Enter (Command+Enter on the Mac) to play the movie. Note that the rectangle appears once a second, only when it’s within the oval you created on the Mask layer.
12. Click the eye icon on the Mask layer and then replay the movie, noting that hiding the Mask layer from view does not alter the movie. Try clicking and unclicking the Lock Layer button on the masked layer to see how the mask will work.
Actions layer If your animations are going to have ActionScript code in them, you’ll need a layer named Actions at the top of all of the other layers. If you don’t have an actions layer and you select a snippet of code from the Snippets panel, Flash will create an actions layer for you.
If you know you’re going to be writing ActionScript code in your content, simply create a new layer, make sure it’s at the top of the layers, and rename it Actions. More on this in Chapter 13, “Working with ActionScript.”
Aligning Objects with Snapping
If you’ve worked with computer programs for any length of time, you’ve probably experienced the snapping feature. The computer program knows about a series of exact coordinates called snap points, and when a drawing object is placed on the work surface (in this case the Flash stage or symbol) and moved, it aligns itself into the most adjacent snap point.
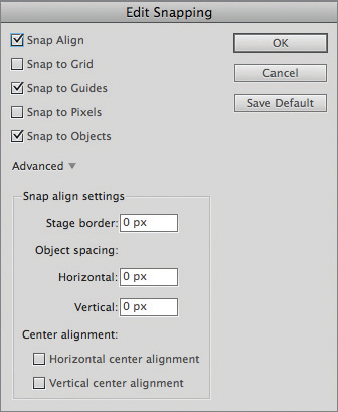
You can view and change Flash’s default snap settings by choosing View Snapping from the main menu. You can also edit snapping by clicking View Snapping Edit Snapping from the main menu. The Edit Snapping dialog box opens (Figure 4.20).
Generally speaking, it’s probably a good idea to leave the snap settings right where they are. However, if you do change some snap settings and would like to put things back to normal, don’t forget to just click the Workspaces drop-down and select Reset Essentials. The default snap settings will be put back into place.
The Essentials and Beyond
You must be sure you thoroughly understand the concept of the timeline as it pertains to movements over time, separating your assets on different layers, and the notion of keyframes. Once we begin talking about tweens, you’ll discover that there are other keyframes you can use for more complicated operations. For now though, the majority of your efforts should be focused on working with the basic frames, keyframes, and layers.
- Using the technique we talked about earlier to make a star part of a custom Deco tool, use the tool to spray-paint your sky with stars.
- Allow the Deco tool to randomize the size.
- Also put a few stray stars on the screen without benefit of the Deco tool—larger than the ones the Deco tool sprays, but not so large as to overwhelm the scene.
Answer to Additional Exercise
- Reference UFOScene.fla to see an example of what your outcome may look like.