CHAPTER 5
Adding Flash Text and Fonts to Your Creations
Flash brings you a wealth of ways to introduce text into your content. When you want to add text to your creation, you’ll use the Text tool (hotkey T), which will create a space for text called a text field. There are three basic kinds of text fields, based upon the kind of work you’d like to do: input, dynamic, and static.
With the input type, you allow viewers to input text into your content. For example, you can use the input text type to create an online form that requires users to key in their contact information.
You use dynamic text when you want to present a text field in which the text changes based upon certain events but is not changeable by the viewer. For example, when the user clicks a button, you want a certain text field’s caption to change. Finally, you use the static type for text that doesn’t need any interaction, such as the title of a website.
Easy enough, right? But, as with all things technical, there have been some improvements in the way Flash handles text fields. In fact, there is now an old text system called Classic Text and a newer one called the Text Layout Framework (TLF). Although the names of the text fields are a little bit different, the behavior is the same. We will discuss both in this chapter because there are varying reasons you would choose one over the other.
- Understanding when to choose Classic vs. TLF
- Picking the best font
- Using Classic text
- Using the Text Layout Framework
Understanding When You Can Use TLF Text Fields
Before we get started talking about Classic versus TLF, you need to understand the three rich media delivery components that will directly affect your text decisions.
Flash Player
Viewers use Flash player to see your rich media content, whether on the desktop or in a web browser, and there are currently 10 major versions and several minor versions of Flash Player.
An example of a major version is Flash Player 10, and an example of a minor version is Flash Player 10.2.
The most popular browsers today (with the exception of Apple’s iPhone and iPad) all allow Flash Player to consume Flash content in a website and accommodate Flash Player updates as provided by Adobe. But that does not guarantee that all of your viewers will have the latest and greatest Flash Player version installed, nor is it necessarily certain your viewers are using one of the most popular browsers: Internet Explorer, Firefox, Opera, Chrome, or Safari. There are lots of one-off browsers a viewer might be using.
The version of Flash Player you want to target will have an impact on the text field selection you make: Classic or TLF. TLF text fields cannot be viewed using anything less than Flash Player 10.0.
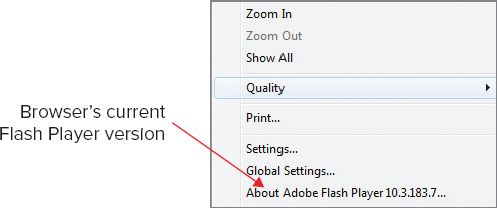
Try this exercise to discover your own browser’s Flash Player version:
1. Navigate to the We Choose The Moon website at
www.wechoosethemoon.org (or any other site you suspect might be using Flash).
2. Right-click anywhere in the site to reveal the current Flash Player version for the browser you’re using (see
Figure 5.1).
If you have a version of Flash Player earlier than 10.0, you won’t be able to test your TLF content. It’s wise for you to upgrade to the latest and greatest Flash Player or stick with Classic Text.
ActionScript
ActionScript is an evolving powerful language. Many applications have been written using ActionScript for Flash, or its desktop cousin, Adobe Integrated Runtime (AIR). The current version of ActionScript is 3.0, called AS3.
That said, there is a lot of AS2 code out there, along with older Flash Players and older browsers.
You cannot create TLF text fields and code with anything less than AS3. In other words, if you plan on writing AS2 code or you want to include TLF in a project that currently uses AS2 code, you will not be able to do so until you upgrade the project to AS3.
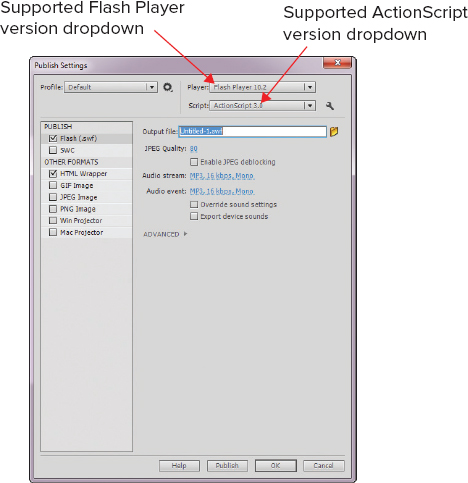
How can you determine what you’re going to use in your new project? If you don’t change anything, by default your Flash project is set for AS3 and Flash Player 10.2. Here’s how to find out what Flash is currently set for:
1. From the Flash main menu, click File

Publish Settings.
2. The default publish settings display (see
Figure 5.2).
You have lots more publish settings to be aware of; we’ll touch on them in more detail in Chapter 13.
Flash Builder
Besides being able to write ActionScript 3 (AS3) code in Flash, you can use an integrated development environment (IDE) called Flash Builder from Adobe. It allows professional software developers to write AS3 code for more complex applications. The version of Flash Builder you are using will also dictate whether you use Classic or TLF.
You cannot create TLF text fields using anything less than Flash Builder 4.0.
Picking the Best Font
 Fonts are software files installed on computers. They can vary (sometimes widely) depending on the computer’s operating system and whether a person has downloaded special fonts (either intentionally or as a part of some software they purchased).
Choosing Serif or Sans Serif
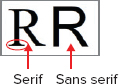
In the English language, there are two basic font categories: serif and sans serif. Serifs are the decorations at the edges of letters. The word sans is a French word that means “without.” So a font that doesn’t have serifs is denoted as sans serif. To see the difference, follow these steps:
1. Open up a new ActionScript 3.0 Flash document.
2. Press T to activate the Text tool.
3. At the top of the Property inspector for the Text tool, click the text engine drop-down and select Classic Text.
4. In the Family drop-down, select Times New Roman (TNR).
5. In the size box, key in a font size 42, or drag the numbers to the right till you hit 42.
6. Select a font color from the Color Picker.
7. Click the stage and type the capital letter R.
8. Repeat steps 4 through 7, this time selecting Arial (see
Figure 5.3).
TNR looks nice on the page, prints cleanly, and is a widely installed and utilized font on Windows, Mac, and Linux machines. There are other similar serif fonts, such as Garamond.
Arial is an equally widely used sans-serif font. There are similar sans-serif fonts, such as Helvetica.
With the evolution of HTML standards, various families of fonts have been designated. Web developers often create web pages that denote a serif or sans-serif font family rather than pointing to a specific font. This way, if someone doesn’t have the font TNR installed on their computer but does have Garamond, the computer can substitute the font and the viewer will see the page essentially as intended.
The problem is this limits the designer to categories of fonts that can be rendered by the browser. But there are so many great fonts being designed by typographers that would look great with your designs! Why limit yourself? What if there was a way to tell Flash about the fonts you want to use so that the viewer doesn’t have to have it installed on their computer to view it? Well, fortunately, there is: by embedding your fonts.
Flash vs. HTML5, CSS3 and Javascript
This is a good time to briefly mention HTML5, CSS3 and Javascript—the powerful troika that is currently in the process of revolutionizing web development. Steven Jobs, former chairman and CEO of Apple, decided to forbid iPads from being able to run Flash-enabled content. Why? Because he claimed HTML5, the newest HTML standard, has the same basic kinds of abilities built into it (in concert with CSS3 and Javascript), and he was right. Thus, the argument is that there is no need for Flash because one can simply develop HTML5/CSS3/Javascript pages to do the same work. Here’s the problem: The HTML5 and CSS3 standards are very new and it will be years before they are fully introduced and enabled across the world’s web servers and websites are rewritten. Most of the major browsers have introduced HTML5 compliance in their newest releases, and Adobe’s web development product, Dreamweaver, ships HTML5 ready, but cross-browser compliance is dicey at best at this juncture and requires plenty of workarounds. Flash may not be going away any time soon for several reasons:
- Flash is hugely prevalent in websites all over the globe, so rewriting those sites could be a lengthy, arduous process. Production time is always a concern in web development.
- There is a battle of proprietary formats and lack of agreed-upon standards in video and audio, particularly between Google and Apple.
- Flash plays outside the browser (such as in kiosks and mobile apps).
- Games built in Flash have more security than those built in HTML5; the latter are easily hacked because the HTML5 source is accessible.
- Videos bundled in Flash may be more pirate-proof than those bundled in HTML5 sites.
- The new Web Open Font Format (WOFF—see http://en.wikipedia.org/wiki/Web_Open_Font_Format) has not yet been universally embraced (or even fleshed out for that matter), leaving Flash to be the only interface to date that natively allows for font embedding (see below).
For more information on HTML5, see
www.html5rocks.com.
For more information on Adobe Lab’s efforts to bring about a tool for HTML5 development (called AdobeEdge), see
http://tinyurl.com/3rvgzm2.
Embedding Your Font
These days, regardless of whether you choose Classic or TLF, you have the ability to embed the font(s) you select for your work so that Flash Player is able to display the fonts you intended to display and not make any substitutions regardless of whether the viewer has a particular font installed on their computer or not. You can embed specific font families or choose to embed only certain portions of a font family—for example, maybe you want to exclude the special characters associated with a given font family because you know you won’t be using special characters in your work. Note that various font families have lots and lots of segments called character ranges that consist of glyphs, that is, symbols. So Times New Roman may not necessarily be just an English font. There may be character ranges that represent the TNR typography in different languages and for special characters such as various currency symbols, punctuation, and so on. You will use this exercise to learn how to embed fonts.
1. Using the Flash document you just created, click Text
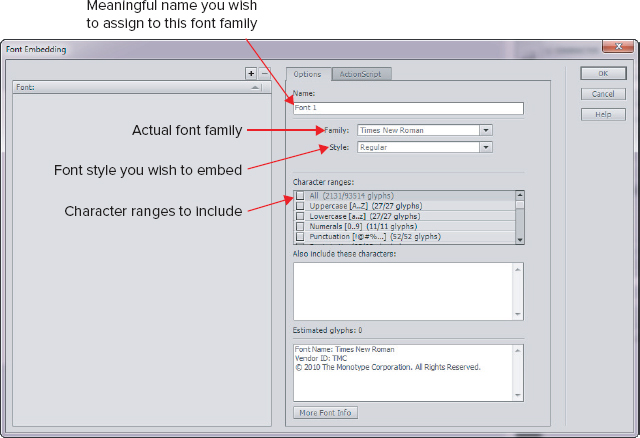
Font Embedding from the Flash main menu to bring up the Font Embedding dialog (see
Figure 5.4). Clicking the plus-sign button on the left side of the Font Embedding dialog actually embeds the font in the file. The newly embedded font will also show up in the library.
2. Because you drew a TNR text field first, the Font Embedding dialog shows it first.
3. In the Name box, type Times New Roman.
4. The Family drop-down shows the Times family, which is okay for now.
5. The Style drop-down is set for Regular, which is also okay.
6. Let’s suppose you don’t plan on including any special characters or numbers in this content. Click the Uppercase and Lowercase check boxes.
7. Click OK. The TNR font family is embedded in the current Flash document.
8. Repeat steps 3 through 7 using Arial in the Name box, selecting Arial from the Family drop-down, and choosing the same character ranges as you did with TNR.
Why embed fonts? It’s useful if it is likely the viewer will not have the font installed on their local computer. Maybe you purchase a special font from a typographer, or download a group of fonts from a design software company such as Adobe, or you’re using non-English characters such as Japanese kanji. Odds are fairly good the viewer will not have the font or special characters installed, thus the need to embed them.
Why would you not want to embed fonts? Embedding fonts makes your SWF file larger, which may not be good, especially if the file is already fairly large and the fonts you’re using are common. Remember, the larger the file, the longer the viewer has to wait for it to load, which may frustrate and drive away the viewer. There’s really no need to embed common fonts such as Arial or Times New Roman because they are likely installed on most English-language computers.
Starting with Creative Suite 5 (CS5), when you test your movies, Flash warns you that you may want to embed fonts, even though the font you’re using is quite common.
Using Placeholder Text
It’s beneficial for you to know about Lorem Ipsum, which is a fake Latin-like language that was invented so that designers could have non-readable text to put into text fields. The concept is this: If you’re a designer working on text fields, you have two issues. First, the content may not be ready before the design. Second, if it is, reading it may take you away from the actual design’s look and feel.
Lorem Ipsum allows you to take care of both situations easily. A Lorem Ipsum generator site you can use is www.lipsum.com. You simply tell the site how many paragraphs of Lorem Ipsum to generate for you, then copy and paste it into your text boxes. Once you have your layout squared away, you can go in and write the content or pass the writing work on to your content writers.
Checking Your Spelling
Nothing looks more unprofessional than unintentional spelling errors in your textual content. Follow these steps to avoid that:
1. From the Flash main, click Text
Check Spelling to start spell-checking.
2. Click Text
Spelling Setup to adjust the spell checker’s options.
Keep Your Font Choices to a Minimum
Keep your font choices to one or two selections. Overloading your content with multiple fonts may look cool but will ultimately drive viewers away because the content appears too busy. Also, for the same reason, avoid the desire to use fancy fonts that may be difficult to read. Finally, be aware that a black font on a red background or vice versa may be very difficult for color-blind users to read, especially if the font is small.
Using Classic Text
Even though TLF exists, there may be a lot of occasions when you opt to go with Classic text instead. TLF brings a lot more capability to the party, but in many cases it’s not required.
Deciding to Use Classic Text
You should definitely use Classic Text if you’re not at all certain which versions of Flash Player your viewers will be using. For example, if you are crafting a multinational site and you’re afraid many of your viewers won’t have the latest version of Flash Player installed, Classic Text is a good choice.
If you’re not going to do anything fancy with your text fields, you’re using ordinary well-known fonts, and you don’t require the typography tools that TLF brings to you, Classic Text is a good option.
Inserting Classic Text Boxes
There are three kinds of Classic Text boxes you can create in Flash:
Input text This is a text field in which the user is allowed to key in data. ActionScript is required to make them functional.
Dynamic text With this kind of text field, you change the text using ActionScript.
Static text These text fields just display text on the screen and do nothing else.
The Text Type option is important. When you’re new to Flash and you don’t know any AS3, you’ll likely settle for the Static text field type. This means the text simply sits on the screen and there are no expectations of it, apart from showing readable text. Use Static for titles, labels, and other such text requirements. One good use for static text is for button labels. The following exercise will show you how.
1. Press T to activate the Text tool.
2. From the text engine drop-down, make sure Classic Text is selected.
3. From the text type drop-down, make sure Static Text is selected.
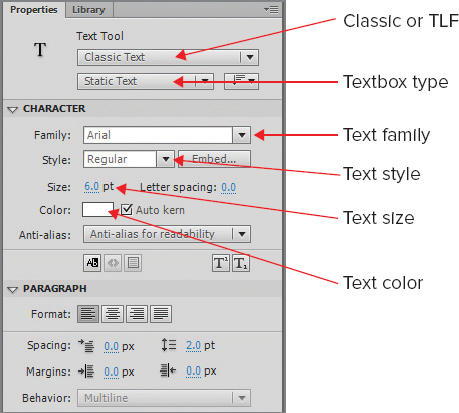
4. The first things you notice in the Property inspector are several text options (see
Figure 5.5).
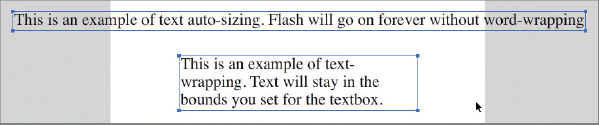
5. Click anywhere on the stage and type in a long sentence. Notice that Flash does not bother wrapping the text; it just keeps extending it beyond the edge of the stage.
6. Click away from the text field you created in step 3 and then click and drag to create a new text field.
7. Type in a long sentence, noting that the text goes to the edge of where you finished dragging and then begins to wrap (see
Figure 5.6).
8. Click away from the text fields, and then click to begin a new text field.
9. Before you begin writing some text, click the Align Center button in the Paragraph section. Flash will now center any text you type. The Paragraph drop-down allows you to set the type of justification (paragraph alignment) you want the text to have: left, right, center, or fully justified. The default is left-justified, right-ragged-edge text. Caution: With fully justified text, Flash makes decisions about letter spacing to provide a nice smooth line of letters on each side of the paragraph and you may wind up with some funny-looking text because of the width variations. You also have the ability to set margins and line spacing in the Paragraph section.
NOTE A text field you purposely size with given proportions is called a fixed-width text field. Text fields that are able to auto-resize to accommodate an increase in text are called expanding-width text fields.
Apart from the font you want to use and its size, style, and color, when you’re first beginning to use Flash the advanced options probably won’t make much difference to you. Kerning, for example, is the spacing between letters. Note that auto-kerning is turned on by default in Flash, so you can rely on Flash to handle the letter spacing for you.
We will deal with programmatically manipulating text fields using AS3 in Chapter 13.
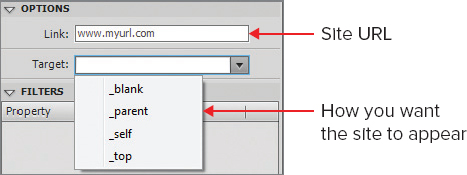
Once you have created some text, two new items pop up in the Property inspector (see Figure 5.7):
Options This drop-down allows you to select text to which you’d like to link a website. You key the site’s URL in the Link box and select the way in which you want the page to appear when selected.
Filters You have the ability to apply text filters to your text. More on this later on in the chapter.
Using Text Layout Framework
Starting with Flash Professional Creative Suite 5 (CS5), Adobe modified the product to include a new way to create text and utilize fonts. This new system is called the Text Layout Framework (TLF). The new text engine was built entirely using ActionScript 3.0 and will not work with Flash documents utilizing ActionScript 2.0. Additionally, TLF will not work when viewers are using Flash Player 9 or earlier versions. Viewers must be using Flash Player 10 or higher for TLF to work.
Deciding to Use TLF
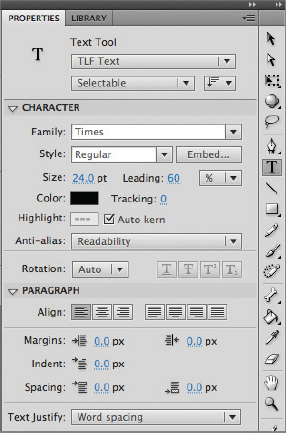
TLF is a typography engine, the purpose of which is to bring more granularity to typeface and formatting characteristics. In certain ways it is somewhat similar to Classic Text, in the sense that the adjustments you make to the text are similar. However, TLF brings a lot more control to your text manipulation. Figure 5.8 shows the TLF screen.
Recall that you switch from Classic to TLF text by simply clicking the text type drop-down at the top of the properties screen.
There are some additional features those who are new to Flash may be interested in with TLF:
Leading The typographic term leading (pronounced “ledding”) refers to the distance between lines of text. TLF provides a leading setting, which gives designers more flexibility in how the text is vertically spaced.
Paragraph last line alignment TLF also provides the ability to manage how the last line of each paragraph is aligned relative to the paragraph: start, center, end, or fully justified.
Text rotation You can rotate your text using the TLF text rotation capability.
Strikethrough and Underline With TLF, a couple of new buttons are included next to Toggle the subscript and Toggle the superscript: Strikethrough and Underline. Strikethrough is a useful thing when various people are editing the same text. An editor can use strikethrough to denote text that should be deleted and send it back to the author along with suggestions for revision. Incidentally, this is how it works in the book-writing business as well. Note that underline is not available with Classic Text.
Inserting TLF Text Boxes
Somewhat similar to Classic Text, TLF has three different text field selections:
Editable Similar to Classic’s input text type, editable allows users to key data into the text field. AS3 is required to take what the user typed and do something with it.
Selectable Basically translating to Classic’s dynamic text type, selectable means you can get at the text field with AS3 and manipulate it in code.
Read Only Similar to Static text in the Classic version, this is the text field type you’ll select when you want static text on the screen. A read only text field allows you to create an instance name for the box, which makes it addressable in AS3. For example, if you were to have a read only text box on the screen you wanted to use AS3 code to move it if a certain event happens. You cannot do this with a Classic static text field but you can with dynamic and input text fields.
Making Your Fonts Look Smooth
Both Classic and TLF include the ability to adjust
anti-aliasing capabilities. What is that anyway? Sometimes vector fonts are better when they are
not vector based, but instead raster based. For example, when a font is very tiny, it may render better as a raster-based font because the individual pixels can be adjusted to show a truer image. Anti-aliasing deals with figuring out which pixels actually make up a letter and adjusting the color of the pixels accordingly so that the letter displays more correctly. For more information on anti-aliasing, see
http://en.wikipedia.org/wiki/Font_rasterization.
You will use this exercise to create a Read Only TLF text field.
1. Press T to activate the Text tool.
2. Select TLF from the engine type drop-down.
3. Select Read Only from the text type drop-down.
4. In the Paragraph section, make sure the alignment is set to Align to start (first box on left).
5. Set the font size to 24.
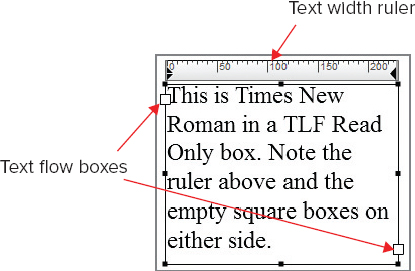
6. Set the font to Times New Roman.
7. Click and drag a square on the stage to begin the text field.
8. Type in a long sentence, noting that Flash does not wrap the text.
9. Click away from the current text field. The Text tool remains active.
10. Click and drag right and down to create a box about one-third the size of the stage.
11. Type in a paragraph, long enough to go just to the bottom of the box you drew.
12. Observe the two text flow boxes (see
Figure 5.9).
Note that the ruler units are dictated by the settings in the Document Settings screen brought up by clicking Modify
Document in the Flash main menu.
Additionally, and more important, Adobe has implemented a feature taken from its desktop publishing product InDesign: text flow boxes. The concept is straightforward and easy to implement. You’ve read articles in magazines or newspapers that stop at one page and start at another. This is handled in desktop publishing software by designating text fields that are chained together using flow boxes. This is great because you can set up your text fields to match the size restrictions of the page you are designing; you’re not forced to accommodate by reducing text size or other page features.
13. Click away from the current text field, noting that the Text tool remains active.
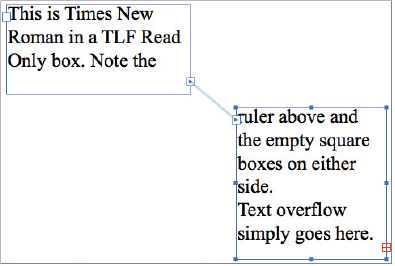
14. Click and drag a second text field about the same size as the first.
15. In the text field you created in the previous steps, click at the end of the last sentence you wrote to begin adding more text. (This will require two clicks: one to activate the previous text field, another to get you to the end of your sentence.)
16. Type another paragraph, extending the previous one you wrote.
17. Note that you cannot read all of the text you just typed because Flash won’t display anything below the lower boundary of the text field.
18. In the first text field, click the lower-right flow corner. The icon changes to show you’re in text field linking mode (see
Figure 5.10).
19. In the second text field, click the upper-left flow box.
20. The text that won’t fit in the first text field shows up in the second.
Selectable and Editable text fields also provide the linking feature.
As with Classic Text boxes, once you’ve selected the type of TLF text field you want, you either single-click and begin typing or click and drag to change the size. TLF text fields automatically provide control points at the corners and in the middle of the box boundaries for changing the size of the box.
NOTE You can double-click the white box (of which two are shown in
Figure 5.10) to convert it to an auto-sizing text field. If you started with an auto-sizing text field, the white box is replaced by a white circle. Double-clicking the white circle turns it into a box you must deliberately resize.
21. In one of the text fields you just linked, click one of the black square control points to resize the box. The mouse cursor changes to a double-headed vertical or horizontal arrow, depending on the direction of resize you wish to initiate. Pointing to the corner shows an angular double-headed arrow, meaning you intend to resize both horizontal and vertical measures at the same time.
22. As the box diminishes in size, some text no longer displays.
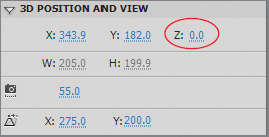
Once you have keyed some text into a TLF text field, many more options show up in the Property Inspector. For example, you have the ability to show your text in 3D (
Figure 5.11) and are given an additional z-axis. Changing the property makes the text field jump out of the page a bit, giving it the image of being farther toward or farther away from you, depending on which number you set.
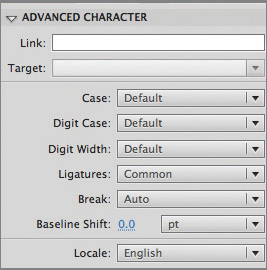
You can provide a link to a website and adjust the way the new link shows up as well as use some advanced tools for managing the case of your text (uppercase, lowercase, caps to small caps, lowercase to small caps, see
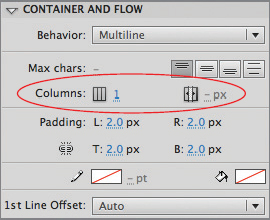
Figure 5.12). A neat new feature is the ability to break the text up into columns (
Figure 5.13). You can manipulate the color effect of the font (
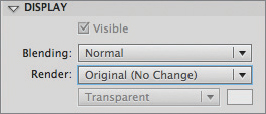
Figure 5.14) and you can modify the display characteristics of the text (
Figure 5.15). Some of these features are advanced; others you may find yourself using fairly regularly. It’s relevant to your design expertise and experience, especially in the area of typography.
The best thing to do is create some new read only text fields and simply start changing the text inside to see how the settings affect the text.
Finally, you can apply text filters to your text. This changes the text to add some features that pop the text off the screen a bit. Used judiciously, text filters can help you create some stunning effects.
23. Press V to activate the Selection tool.
24. Marquee around all of the active text fields.
25. Press Delete to erase them.
26. Press T to activate the Text tool.
27. Make sure TLF Read Only is still active.
28. Click and drag a smallish text field.
29. Type in some text.
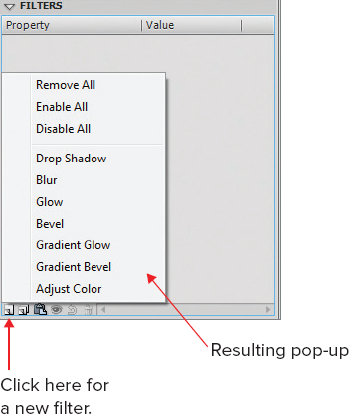
30. In the Property inspector, scroll to the bottom where you’ll see the Text Filters section (
Figure 5.16).
31. Click the lower-left button to create a new filter: you’ll see a pop-up like the one in
Figure 5.16.
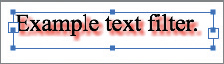
32. Select Drop Shadow. Your text should look similar to
Figure 5.17.
33. In the filter options, change the drop shadow color from the default black to red.
You are allowed to apply more than one text filter, but go easy. You can get some pretty messy-looking text if you go overboard.
What Else Does TLF Bring to the Party?
In addition to the above-listed new features, the updates to text formatting via TLF are astounding: TLF allows for you to introduce multiple languages into the same (or separate) text fields, including right-to-left reading. The list of typographic controls has been greatly enlarged with TLF as well: allowing for both typographic and digit case capabilities, support for super and subscripts, advanced kerning, tracking and leading functions, a feature called “discretionary hyphens” meaning that the hyphens appear when text needs to be broken at the end of a line, graphics which can be included in line with the text, support for tabs, and the ability to programmatically style text using XML, and new anti-aliasing support for compact format font (CFF) fonts, among others.
The Essentials and Beyond
This chapter was about how to put text in Flash rich media documents. You learned there are two text engines: Classic and TLF. You also learned that there three basic kinds of text fields: those for static text, those for dynamic text you intend to change in the field using AS3, and those for input text you will use to garner input from the user. You also learned about the new offerings in TLF text.
Now you should try your hand at using TLF text flow from one frame to another.
1. Visit
www.lipsum.com and generate two paragraphs’ worth of Lorem Ipsum content.
2. Use your mouse to highlight the Lorem Ipsum.
3. Press Ctrl+C (Command+C on the Mac) to copy the content.
4. Open a new ActionScript 3.0 document.
5. Right-click frame 2 and select Insert Blank Keyframe from the context menu.
6. Click frame 1.
7. Activate the Text tool by pressing T on the keyboard.
8. Select the text engine type TLF.
9. Set the text type to Read Only.
10. Select a font you like.
11. Select a font size of 24, color black.
12. Click and drag a square in frame 1 that takes up about one-quarter of the stage’s surface.
13. Repeat step 12 for frame 2.
14. Return to frame 1 and click on its text field.
15. Press Ctrl+V (Command+V on the Mac) to paste the Lorem Ipsum in the text field. Flash copies all of the text in to the text field.
16. Press V to activate the Selection tool.
17. Click the lower-right text flow box on the text field. The mouse cursor changes to show a black arrow and a little paragraph.
18. Navigate to frame 2.
19. Click the upper-right text flow box in frame 2’s text field. Flash flows as much of the Lorem Ipsum content as it can from frame 1’s text field to frame 2’s. Note that the lower-right text flow box has a marking in it, indicating it cannot accommodate all of the text.
20. Repeat the process by inserting new frames and text fields until all of the Lorem Ipsum text is visible.
Using this technique, you can stream text from frame 1 of your scene to outlying frames—magazine style.
Answer to Additional Exercise
See TextFlow.fla if you need help getting started.