CHAPTER 11
Working with Audio
A huge component of the way people communicate today involves audio. Working with Flash to include audio files is very easy to do. This chapter will walk you through the basics of including these kinds of files in your rich media work.
- Creating a rich media project with audio
- Creating the drum set
- Creating the cymbals and cymbal stands
- Adding sounds to the drums
- Compressing audio
- Using the sounds supplied with Flash
- Putting a sound on the stage
- Controlling a sound with a code snippet
Creating a Rich Media Project with Audio
When you think about audio, most likely your thoughts immediately turn to music and the things that make music happen. In this chapter, you’ll create a set of drums, each of which when hit plays its correct sound. Never played the drums before? Well, this will be a great educational exercise for you because it will teach you about the equipment needed to do so. If you’re a drummer, you will probably never have created a rich media document representing your passion before. It’s a win-win situation.
A standard drum set consists of at least two but usually more drums, some cymbals of different types, and the associated hardware needed to keep the assemblage of drums manageable and reachable by the drummer. When drummers talk about drum sets, they often refer to how many drums they have, and they often use the word kit in place of the more proper term drum set. For example, someone with a kit that has five drums will say they have a five-piece kit. They don’t count the cymbals in their description of the kit.
Drum kits usually consist of one or more of the following drums:
- Snare drum
- Bass drum
- Tom-toms (referred to singularly as a tom)
A drum kit also has one or more cymbals:
- Ride cymbal (usually used for keeping time)
- Crash cymbal (usually used for emphasis)
- High-hat cymbals (two cymbals mounted facing one another on a pedal-actuated stand that allows them to crash together)
Drum kits also have some required hardware:
- Cymbal stands
- High-hat stand
- Bass drum pedal
- Tom-tom stand in some kits
 Good designers who don’t know a lot about the subject for which they’re being contracted to create rich media will likely do some research before they begin crafting their work. In this first exercise, you will perform some of this research.
2. Type in the search string drum set, drumset, or drum kit. You’ll be presented with literally millions of pictures of various drum sets.
3. Select a picture of a kit you really like.
4. Count the number of drums (not the cymbals!). How many pieces does your favorite kit have?
5. Continuing to browse through the photos, see if you can figure out who the top drum manufacturers are. (Hint: Ringo Starr, formerly of the Beatles, plays Ludwig drums.) List at least three major drum manufacturers. (Ludwig’s URL is
www.ludwig-drums.com.)
6. Visit the website of the three manufacturers you chose.
7. Research how drum manufacturers make their drums. What wood(s) do they use for the shells?
8. What colors are available for the shells?
9. Repeat step 5, this time trying to figure out who the top cymbal manufacturers are. (Hint: Lots of drummers—myself included—believe Zildjian cymbals are at the top of the cymbal food chain.)
10. Visit the website of one of the cymbal manufacturers you chose. (Zildjian’s URL is
http://zildjian.com)
11. Research what material(s) are used to create cymbals.
12. Do some research to find out what a standard drum set made by a top-level manufacturer will cost. You’ll be surprised to find that drummers have thousands of dollars tied up in their equipment.
13. Finally, pick out the drum set that you really like: number of drums and cymbals, and color of shells. Make sure you have a picture of the kit because you’ll be using this information to create your Flash drum set.
Not All Drum Kit Layouts Are Alike
The kits you’ve just researched work for 99 percent of drummers, but because music is such a creative endeavor, drummers often resort to unusual layouts that include other drums or even non-drum objects that are used as drums. A great example of this kind of drummer is Will Champion from the band Coldplay. Champion plays a standard kit a lot of the time, but he will use unusual assemblages of drum objects for a kit as well.
Creating the Drum Set
Now that you’ve done your research, you can begin creating your Flash drum set. Because you want to show the drums’ depth—giving the viewer some perspective of the entire kit—you’ll draw the set as though it were rotated about 45 degrees away from you. You’ll also need to think about the light source illuminating the drums: Where is the light coming from? For this exercise, the light source will appear to be coming from the upper-left side of the screen.
Drawing the Bass Drum
Most of the drums consist of four basic parts: hoops, shells, connectors (lugs and rods), and drumheads. The hoops are used to hold the drumheads down on the shells. The lugs are bolt assemblages that fasten the hoops fast to the shell. Once you’ve got the technique down when you build the bass drum, you can repeat it with the other drums.
1. Open up a new ActionScript 3.0 document, and name it Drums. (You may also reference the file
Drums.fla on this book’s website at
www.sybex.com/go/flashessentials.)
2. Each component of the drum set will occupy its own layer. Name your first layer Bass Drum.
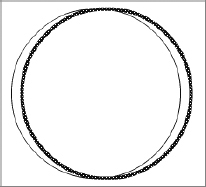
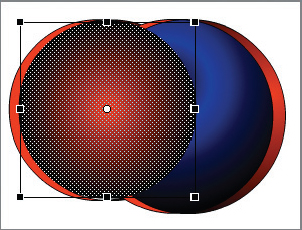
3. Begin by using Merge Drawing mode to draw two relatively large circles on the stage. These will represent one of the hoops that hold down the drumhead. Use a 1-pixel black stroke with no fill. Position the circles over one another with a slight overlap (see
Figure 11.1).
Drawing the Bass Drum Hoops
Follow these steps:
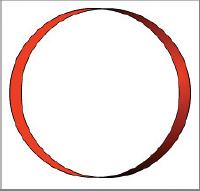
1. The overlap of the two circles creates two crescent-shaped areas where you can fill in a color. Because your imaginary light is shining from the top-left side of the screen, use the Paint Bucket tool to fill in the left section with a lighter color than the right section, but keep the color the same and only slightly vary the tint. In the example shown in
Figure 11.2, I used the standard red color (hex #FF0000, RGB 255 000 000) for the left hoop section and Flash’s canned red gradient for the right half. This gives the effect of light completely shining on the left section but only partially hitting the right one.
2. Using the Selection tool, marquee the hoops.
3. Press Ctrl+D (Command+D on the Mac) to duplicate the hoops.
4. Use the Selection tool or the Free Transform tool to move the duplicated hoop temporarily out of the way.
5. Marquee each hoop in turn and convert them to graphic symbols named grHoop1 and grHoop2.
Making the Drum Head
Most drumheads come in white, clear, and black and are made from a tough plastic called Mylar. You’ll put a drumhead in the oval described by the front hoop.
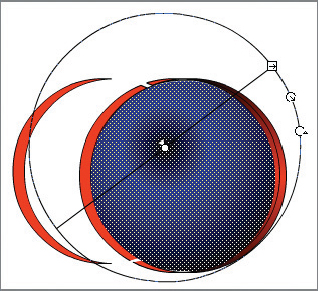
1. Using the Color tool, create a radial gradient that uses two or three colors for your drumhead. If you go with a black color, for example, then you want a deep blue or purple light somewhere in the middle of the gradient representing the light shining on the head.
2. Using the Oval tool, fill in the white circle resulting from the previous step.
3. Use the Gradient Transform tool to rotate and stretch the color blend, thinking about what the light will look like reflecting off of the head (see
Figure 11.3).
4. Right-click the drumhead and convert it to a graphic symbol called grBassDrumHead.
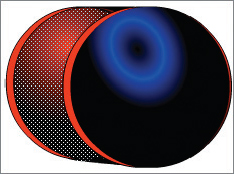
Moving the Back Hoop into the Back of the Front Hoop
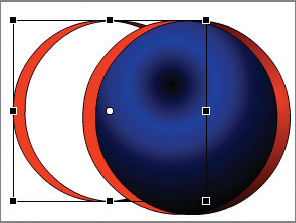
Now you want to move the back hoop into place behind the front hoop. You’re striving for a 3D look, paying attention to the perspective view of your photograph. Look at the nuances of the photo: What size is the back hoop relative to the front?
1. Activate the Free Transform tool.
2. Resize grHoop1 so it’s slightly smaller than grHoop2. Because you’re striving for a perspective effect, the back hoop will naturally appear to be slightly smaller than the front.
3. Move the grBackHoop into place so it’s slightly behind the front hoop.
4. With grBackHoop still active, right-click and select Arrange

Send To Back. This places the part of grBackHoop that was over grFrontHoop behind it (see
Figure 11.4).
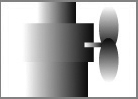
Creating the Drum Shell
Now you need a shell that fills in the depth between the front and back hoops. Real drums are made of a complex shell created from layers of birch or walnut wood glued together. The drum is then wrapped with its shell overlay. In your case, you’ll simply make a circle, tucking it in between the front and back hoops. This will almost get you where you want to go, but there will be two triangles—one on top, one on bottom—that need to be filled in to complete the effect.
1. Using the Oval tool with a black stroke and red gradient fill, draw a circle the same size as the inside of the back hoop (see
Figure 11.5).
2. Use the Gradient Transform tool to position the gradient so it too is properly reflecting light from the upper-left corner of the screen.
3. Activate the Free Transform tool and move the circle into place adjacent to the edge of the back hoop (see
Figure 11.6).
4. Using the Pencil tool, draw two black lines—one on the top, and one on the bottom—to connect the front and back hoops.
5. Using the Paintbrush tool, sample the darker color in the red gradient and then paint in the area between the lines you just drew and the area where the shell does not meet them.
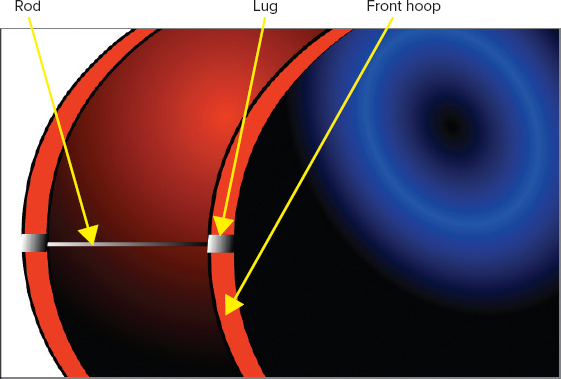
Drawing and Placing the Lugs and Rods
The front and back drum hoops go over the front and back drumheads, which in turn fit over the drum shell. Everything is held together using some combination of lugs, threaded rods, and screws. In the case of your drum, there’s no need to show extreme detail. Just showing rectangles representing the lugs and small, narrow rectangles representing the rods will work.
1. Use the Rectangle tool with no stroke and a silver gradient radial fill to draw a rectangle somewhere on the stage to represent a lug.
2. Right-click the new object and create a new graphic symbol called grLug.
3. Using the Rectangle tool again, still with no stroke and a silver gradient, draw a thin rectangle and turn it into a graphic symbol called grRod. The rods can also be used for the bass-drum support legs (called spurs).
4. Activate the Selection tool.
5. Click grLug and duplicate it.
6. Move it into place somewhere on the front hoop (see
Figure 11.7).
7. Use the Free Transform tool to skew, resize, and rotate the lug so it fits onto the front hoop.
8. Repeat the process for the back lug.
9. Duplicate grRod and move the duplicate into place between the two lugs you just put on the drum.
10. If the rod appears to be above the two lugs, right-click it and select Move Backward. This causes the rod to move under the lugs but does not completely hide it under the other objects (see
Figure 11.7).
11. If you group the two lugs and the rod, you can easily duplicate them and move them into the next place on the drum. However, you will need to break apart the group so that you can use the Free Transform tool to resize each of the lugs and the rod so the duplicate fits into its new position.
12. Put lugs on the right side of the drum.
13. Use grRod to make the drum spurs (the legs of the bass drum).
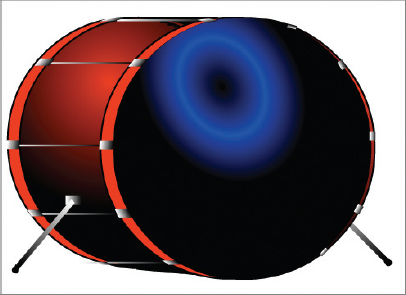
14. When you’re done, marquee all of the objects, group them, and create a new graphic symbol called grBassDrum (see
Figure 11.8).
15. Save your work.
Creating the Tom-Toms and Snare
Now that you understand the basic components that make up a drum—front and rear hoops, front and rear or top and bottom drumheads, drum shell, and lugs and rods—you can repeat the process for each of the tom-toms and the snare drum.
Before you begin, take a look at your picture. You should note that at least one tom-tom, and usually two, are mounted to the top of the bass drum via two tubes, one of which comes out of the bass drum, the second of which connects to the tom-tom. The two tubes are connected together with a ratchet system that locks down with the twist of a knob. The previously described mechanism probably isn’t necessary to include in your rich media document: Only drummers will notice. Just make it look similar to the actual mechanism by drawing the tubes (in your case, silver rectangles with a linear gradient) and you’ll be fine. Tom-toms that connect to the top of the bass drum are often called ride toms.
The bigger tom-toms that sit on the floor are called floor toms and usually have steel rods called legs coming out of them that allow them to sit on the floor. In some cases, floor toms mount to a stand that looks somewhat like a cymbal stand, only a little more heftily constructed. Many newer kits have a tom-tom that’s not as small as the ride toms and not as big as the floor tom(s): it’s called a mid-tom. These mid-toms usually mount to a stand, whether alone or with a cymbal. All toms can be tuned to specific pitches.
The snare drum is a unique animal. It’s not as tall as the other drums but very often as wide if not wider than the ride toms. Snare drums are generally constructed from metal, not wood, but some more expensive snare drums are constructed from very fine wood. Snare drums can be quite expensive and drummers pride themselves on the purchase of an upscale snare drum. The snare drum has its own stand: The upper half supports the snare drum with some rubber finger-like grips that can be tightened down on the rim, and the lower part swings out on a scissor-type system.
To get a better look at the detail of these objects, you can simply go to images.google.com and key in search terms such as “snare stand,” “snare drum,” “mid-tom,” and “floor tom.”
Why It’s Important to Convert Objects into Symbols
After you are finished with each drum, marquee it, right-click, and convert it into a movie clip symbol. Save the drums with names such as, for example, mcRideTom1, mcRideTom2, and so forth. Do the same with the cymbals and stands, and when all are completed and saved as movie clip symbols, you can pull them out of the library to put them together as a whole kit on the stage. Remember that with movie clip symbols, you have the ability to right-click an object and send it to the back, which allows you to arrange your kit so that some drums are behind one another—providing you with the perspective view you’re looking for.
Making the Cymbals and Cymbal Stands
Non-drummers are not aware of this, but very often a drummer will have more money tied up in their cymbals than in the actual kit itself. Cymbals—especially Turkish hand-hammered cymbals from companies like Zildjian—can be very costly.
With most kits drummers have at least one ride cymbal, which sits to their right (there is such a thing as a left-handed drummer, and in that case the entire layout of the kit is reversed, so the ride cymbal would be on that person’s left), a crash cymbal on their left, and a special set of cymbals called high-hat cymbals. High-hat cymbals face one another and crash together when the drummer steps on the high-hat pedal.
In the following sections, you will create a cymbal stand and a cymbal. As with the toms and bass drum, you will learn the techniques needed to repeat the process.
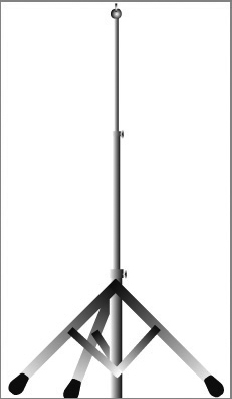
Drawing the Cymbal Stand
Cymbal stands are typically built out of strong steel tubes that have been chromed and that telescope inside one another. Cymbal stands have a scissor-like system that swing outward so they can stand on the floor. Atop the cymbal stand there is a wing nut and a rod that allows the cymbal to be attached to the cymbal stand.
1. Check your picture to get an idea of what a cymbal stand looks like. You’ll be re-referencing this picture as you draw your stand.
2. With the Drums.fla file still open, use the Selection tool to click and delete the bass drum. Don’t worry! You turned it into a graphic symbol, so you’re deleting only an instance of it off of the stage. The actual symbol is still nicely tucked away in the library.
3. Activate the Rectangle tool with no stroke and the silver linear gradient fill

.
4. Draw a long, narrow rectangle.
5. Draw a second long, narrow rectangle, this one slightly thinner than the rectangle you drew in step 4.
6. Draw a third long, narrow rectangle, this one slightly thinner than the one you drew in step 5.
7. Position the rectangles over one another: the widest on the bottom, the thinnest on the top (see
Figure 11.9).
8. Each of the tubes has a connector at its top with a wing nut that tightens down on the smaller tube inside it. Near the top of the lower and middle tube, draw a rectangle to mimic the connector.
9. Using the Oval tool with the same silver linear gradient fill and no stroke, draw an oval on the stage.
10. Press Ctrl+D (Command+D on the Mac) to duplicate the oval.
11. Move the second oval a little out of the way.
12. Using the Free Transform tool, rotate the second oval 180 degrees. You’re doing this because you’re going to combine the two ovals to look like a wing nut and the linear gradient will cause a light-colored line to run through the center of the wing nut if you don’t.
13. Join the two ovals.
14. Draw a small rectangle.
15. Move the small rectangle over one of the connectors you created in steps 8 through 13, positioning it so it appears as though it’s a screw coming out of the connector.
16. Rotate the two ovals so they’re vertical.
17. Move the ovals into place adjacent to the small rectangle you placed in step 15 (see
Figure 11.10).
18. Repeat steps 8 through 17 to create a second connector for the middle and top tube. While you are simply creating an art asset on the stage during these steps and not converting them to symbols, one consideration you might have is to convert them to symbols as well. Doing so allows you to reuse just one symbol at all spots on the cymbal stand. One of the points of this exercise is to show you that raw art assets can commingle with symbols on the stage.
19. Activate the Selection tool, marquee all of your work, right-click, and save the objects as a graphic symbol named grCymbalStandTubes.
20. Save your work.
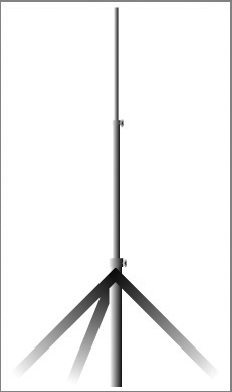
Drawing the Scissor-Style Brace for the Cymbal Stand Legs
Cymbal stands must be folded up and stored for easy transport from gig to gig. The legs for the cymbal stand are ingenious. Three legs connect on a round connector and are tightened down with a wing nut. There are three supports, one for each leg. They are riveted to each leg with a free-moving rivet and swing out when the legs are spread apart.
1. With the cymbal stand tubes still on the stage, drag a copy of grRod onto the stage.
2. Use your Free Transform tool to resize and manipulate grRod so it angles out near the top of the bottom tube.
3. Duplicate the instance of grRod and move the new copy to the opposite side of the tube.
4. Duplicate the on-stage instance of grRod one more time, moving it backward so it appears in perspective—that is, as though you are looking at the cymbal stand legs on the stage. This rectangle is behind the bottom tube and you can only barely see it. The other two are more fully visible to the viewer (see
Figure 11.11).
5. To make all of the graphic instances on the stage look real, you’ll have to work with the Arrange
Send To Back and Arrange
Send To Front commands to position all objects correctly.
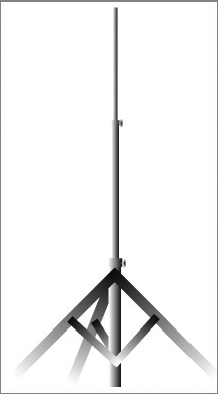
6. Now repeat steps 1 through 5 with slightly smaller rectangles connected at the opposite angle of the legs (see
Figure 11.12).
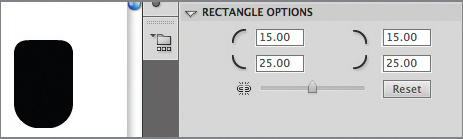
7. To create realistic-looking rubber tips for each of the legs, start by creating a small black rectangle, with 25 percent curve on the bottom and 15 percent curve on the top (see
Figure 11.13).
8. Activate the Free Transform tool, and then, using the Ctrl+Shift (Command+Shift on the Mac) trick, click the corner of the top and bottom of the rubber tips, widening out the bottom and narrowing in the top.
9. Right-click and convert to a graphic symbol called grRubberTip.
10. Resize the instance of grRubberTip and move it into place at the bottom of one of the legs.
11. Duplicate the grRubberTip instance twice and place each of the duplicates into their respective positions in the remaining legs.
12. At the top of the cymbal stand, draw a round circle with no border fill and a radial gradient. The circle should be about 1.5 times larger than the small tube.
13. On top of the circle you just drew, place a small rectangle, no border fill, linear silver gradient.
14. Marquee all objects, and save the collection as a graphic symbol called grCymbalStand (see
Figure 11.14).
15. Save your work
16. Delete the instance of grCymbalStand from the stage.
Creating the Cymbal
Cymbals are very interesting-looking instruments. They are slightly rounded, with a middle part called the bell that’s more rounded. There’s a hole in the middle of the cymbal that mounts it to the cymbal stand. The cymbal sits atop a thick wool cushion to keep it from rattling against the steel of the cymbal stand.
1. Take a look at the photo of your drum set, paying attention to the colors in the cymbal.
2. Open the Color panel.
3. Create a custom radial gradient that has the mixture of colors in it that you see in the photo.
4. Using Merge Drawing mode, draw a narrow oval on the stage using your custom gradient.
5. Activate the Selection tool.
6. Marquee the bottom half of the oval and delete it.
7. Repeat steps 4 through 6, this time making a smaller, fatter oval and cutting off its bottom half. Make sure you keep the objects separate until you are ready to join them together.
8. Marquee the two objects, right-click, and convert them to a movie clip symbol called mcCymbal (see
Figure 11.15).
9. Delete the instance of mcCymbal from the stage.
10. Save your work.
Creating the High-Hat Stand and Cymbals
The high-hat represents a little more complicated rendition of the cymbal stand you just created because it has a pedal that, when pressed, moves a steel rod up and down through the middle of the cymbal stand tubes. There are not one but two cymbals on a high-hat, each one facing the other. Typically the bottom cymbal is heavier than the top. Drummers buy cymbals that are specially designed for high-hats in pairs.
The concept is that when the drummer presses the pedal, the two cymbals clash together. The drummer can also hold the pedal slightly down, keeping the cymbals slightly apart, giving them a nice sssssttt sound.
The high-hat is used primarily for time keeping but also for emphasis in songs.
You have all of the information you need to create a high-stand and cymbals. You may want to create some additional hardware components such as washers and wing nuts as graphic symbols (see the Drums.fla file on this book’s website for reference). Remember that if you convert a symbol such as a drum to a movie clip, you have the ability to use the 3D Rotation Tool to give your drum a slight inward curve to produce a more 3D-like feel.
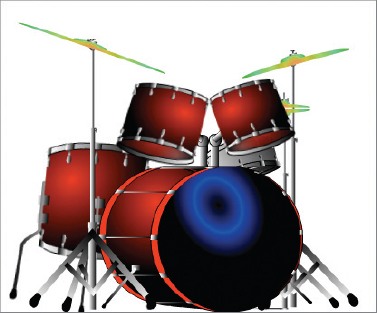
My completed drum kit is shown in Figure 11.16.
Adding Sounds to the Drums
You went through all of that development just so you could add some sounds to your rich media on-stage assets. But that’s one of the points that surfaces so easily when discussing design context: The assets come first, and the sounds are easy to add afterward.
Now that you have your drum kit made, you’ll convert each of the drum and cymbal movie clip instances on the stage to a button. When the user clicks one of the buttons, the drum or cymbal makes its appropriate sound. You’ll make use of the Code Snippets panel and modify the Click To Play/Stop Sound audio event snippet to accomplish your work. When sounds are played through Flash, they are said to be a sound stream and there is a sound event that handles the stream.
You’ll start with the first ride tom-tom (the one on your right as you’re looking at your kit).
Importing the Sounds and Preparing for ActionScript
Next you need to import the sounds for the drums (see the files in the Sounds folder on the book’s website.) and prepare each individual sound for ActionScript. Flash can work with a variety of audio file formats, including files created with Adobe Soundbooth (now called Adobe Audition) (.asnd), Wave (.wav), Audio Interchange File Format (.aiff, Mac OS only), and MP3 (.mp3). Optionally, you can just drag sounds to the stage and adjust in the timeline. This is discouraged for all but short sounds. Best to programmatically manage sounds.
1. From the Flash main menu, click File
Import To Stage.
2. From the Sounds folder, select all of the sounds to import.
3. Click OK.
4. Flash imports the sound files into the library. They are ready for use.
5. In the library, for each sound, right-click it. Select Properties, then in the ActionScript tab of the Properties window check Export for ActionScript. You will be prompted that a class definition could not be found for that file and one will be created for you. That’s OK. Select OK and proceed to the next sound, repeating the process until all of the drum sounds have been linked for ActionScript.
Creating the Buttons
You’ll use the techniques you used earlier to create a button, and then you’ll add glow filters to the different button states.
1. Right-click the first ride tom-tom and select Convert To Symbol from the context menu.
2. Create a button called btnRideTom1.
3. Double-click btnRideTom1 to go into button-editing mode.
4. Right-click the Over frame and select Insert Keyframe.
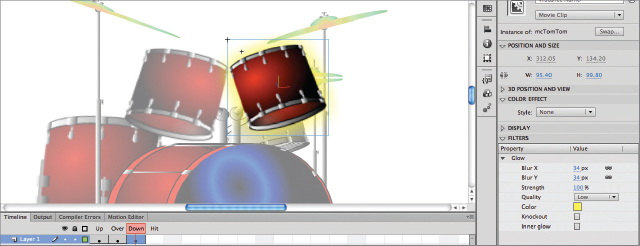
5. Create a glow filter with an orange color and 35-pixel BlurX and BlurY.
6. Right-click the Down frame and select Insert Keyframe. Flash copies the assets from the Over frame, including the application of the glow filter.
7. Change the Down frame’s glow filter to a yellow color (see
Figure 11.17).
8. While still in button-editing mode, insert a new layer called Sound.
9. In the Sound layer, click the Down frame.
10. Right-click the Down frame of the Sound layer and select Insert Blank Keyframe.
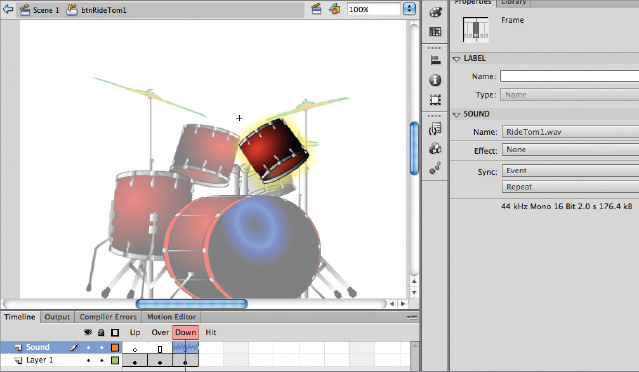
11. With the blank keyframe in the Sound layer highlighted, look over at the Property Inspector. There you’ll see a new section called Sound. Click the Name drop-down and select
RideTom1.wav (
Figure 11.18). Flash inserts an icon in the Down frame of the Sound layer, showing you that it has inserted the RideTom1 sound.
12. Make any other adjustments you’d like. For example, if you like you can make the sound play in the left channel or right or fade from one to the other by clicking the Effect drop-down. You should leave the Sync drop-down set to Event and the Repeat drop-down’s set to Repeat.
13. Navigate back to the stage.
14. Repeat steps 1 through 12 for the remaining drums and cymbals.
Movie Clip Extras
While you worked, you may have wondered why you made the drums and cymbals movie clip symbols and the stands graphic symbols? The simple answer is that movie clip symbols can have a filter applied to them and graphic symbols cannot. Therefore, when you were ready to create your buttons and you knew you wanted glow filters on each of them, movie clips were the appropriate choice. You could always use graphic symbols instead for your buttons and simply alter the tint of the object on each of the Over and Down frames, essentially accomplishing the same goal.
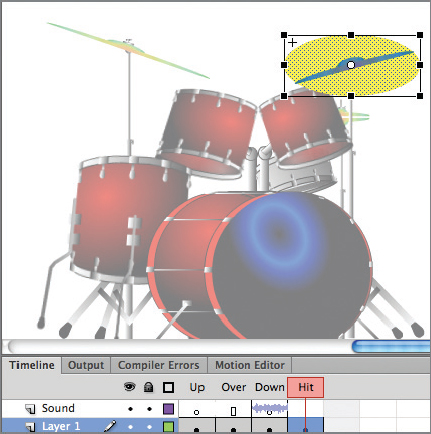
Adding a Hit Zone to the Cymbals
The cymbals are a little too narrow to easily hit. This is a time when you can use a button’s Hit frame to help out.
1. Double-click one of the cymbal buttons to enter button-editing mode.
2. In the bottom layer, click the Hit frame.
3. Right-click the Hit frame and select Insert Keyframe.
4. Activate the Oval tool, selecting no frame and a yellow fill.
5. Draw an oval over the cymbal, sizing it so it roughly covers the cymbal (see
Figure 11.19). Note that the color does not matter: as with a mask layer, you’re simply describing a shape by which Flash will determine the zone in which a button is active.
6. Click the Sound layer.
7. Right-click and select Insert Blank Keyframe.
8. Insert the same cymbal sound that you inserted in the Over frame.
9. Click Scene 1 to exit to the stage.
10. Press Ctrl+Enter (Command+Return on the Mac) to test the movie. The hand icon indicating a button should show up as you veer closely but do not touch the cymbal. This indicates that the Hit area is working. Note that the hit area does not have to be anywhere in proximity to the cymbal. You could put it clear across the stage in another place and it would work equally as well.
Compressing Audio
In addition to audio compression, Flash document quality can be enhanced by controlling JPEG quality.
Flash audio can be compressed using various presupplied algorithms. You should be aware that if you do not choose a different algorithm, when you play the movie (thus creating a .swf file), Flash compresses your audio in MP3 format, which is usually fine because it produces a low file size with reasonably good quality. In addition to audio compression Flash document quality can be enhanced by controlling JPEG quality. You have the following algorithm compression choices:
- Default: MP3, mono, 16 kilobits per second (16 Kbps).
- ADPCM: Use this selection for small sounds (of which your drum sounds are a great example). Sample and bit rates are selectable, and Flash shows you the expected file size reduction (see Figure 11.20). When you use this algorithm, by default stereo sounds are converted to mono.
- MP3: Even though the default compression is already MP3, this selection allows you to set the bit rate and quality of the compression, reducing the file size even further or increasing the quality of the output.
- RAW: No compression is applied. However, you are able to convert from stereo to mono using this feature.
- Speech: Useful for voice.
Although you have some basic sound-editing capabilities in Flash, most sounds are created using more robust sound-editing software. A good free example is Audacity.
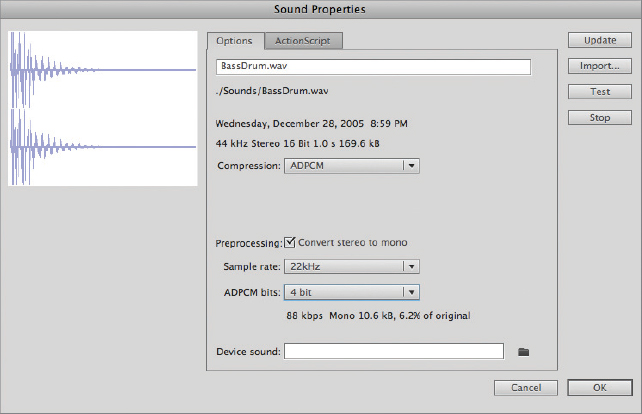
One of the sounds you used in your drum scene is in stereo. You’ll use this exercise to set a conversion algorithm that converts it to mono.
1. Navigate to the library.
2. Right-click the BassDrum.wav sound and select Properties.
3. Note that it was recorded in 44 kilohertz (kHz) stereo in 16-bit, it is 1 second long, and it’s relatively large at 169.6 Kilobits (Kb).
4. In the Compression drop-down select ADPCM.
5. Go with the default sample rate of 22 kHz and the number of bits at four. Keep the Convert Stereo To Mono check box checked. Note that the file size is only 6.2 percent of normal—a significant reduction. Click OK.
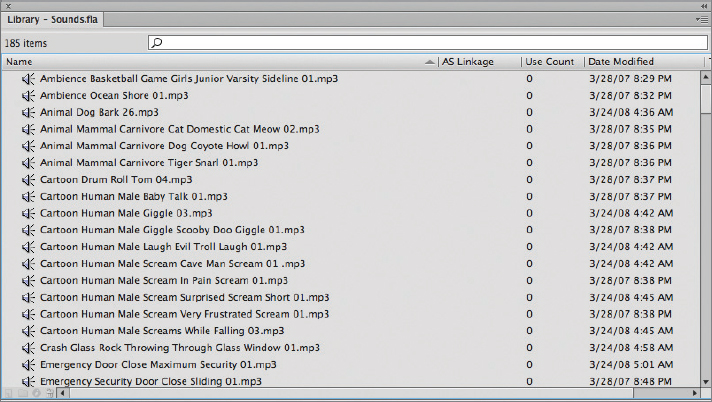
Using the Sounds Supplied with Flash
If you don’t want to go to the effort of supplying your own sounds, Flash comes with a ton of canned sounds. Use this exercise to access them.
1. With the
Drums.fla file still open, from the Flash main menu click Window
Common Libraries
Sounds (see
Figure 11.21).
2. Scroll through the list of sounds.
3. Right-click any sound you’re interested in and click Play on the context menu. Flash plays the sound.
Putting a Sound on the Stage
Sometimes you want a background sound that plays continuously. For example, maybe you have a beach scene in which you want the ocean waves to be an active part of your rich media. Flash allows you to drag and drop a sound right onto the stage for such purposes.
1. With the Drums.fla file still open, create a new layer called Background Sound.
2. Make sure the Background Sound layer is active.
3. Open the Flash Sounds library.
4. Select a sound you like and drag it to the stage. Human Crowd Hooray 04.mp3 might be a good choice because it’s short and optimistic.
5. Note that Flash puts a line over the keyframe

to note there’s a sound on the layer.
6. Play the movie.
7. Don’t like the sound? Delete the layer.
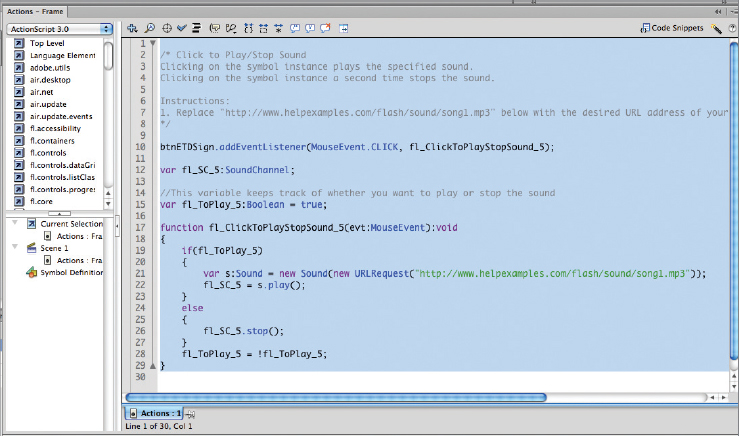
Controlling a Sound with a Code Snippet
Flash provides a Click To Play/Stop Sound code snippet you can use to play and stop sounds whenever a button is pressed. In this exercise, you will create a sign button to encourage the drummer to play a sound.
1. With the Drums.fla file still open, create a new layer called Encouragement Sign.
2. Make sure the Encouragement Sign layer is active and all the other layers are locked.
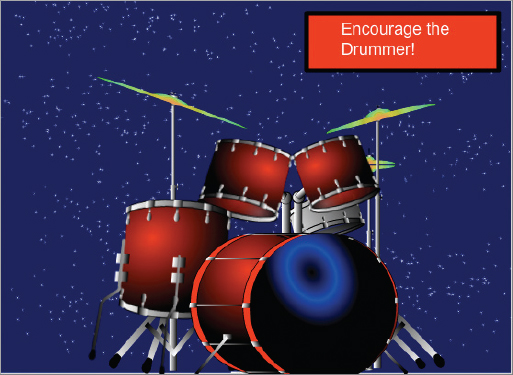
3. Create a sign that has as its text Encourage the Drummer! Use your own creative skills to design a sign of your choice. Put the sign somewhere in the upper-right corner of the stage.
4. Right-click the sign and convert it to a button called btnETDSign (see
Figure 11.22).
5. Highlight btnETDSign and give it the instance name of btnETDSign, the same name as the button. The button must have an instance name tied to it to be used with ActionScript.
6. Make sure the library is visible.
7. Open the Flash Sounds library.
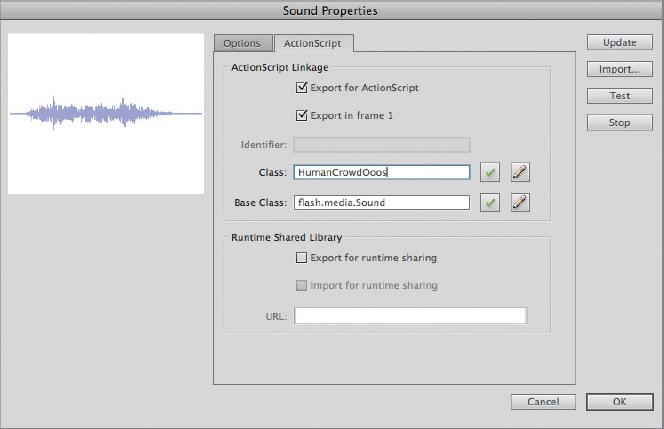
8. Drag the file Human Crowd Ooos 02.mp3 to the library.
9. Right-click the file and select Properties. The Sound Properties window for the sound opens.
10. Click the ActionScript tab.
11. Click the Export For ActionScript check box. Flash puts the name of the file in the Class box.
12. Delete the
02.mp3 section of the name (see
Figure 11.23).
13. Click OK.
14. Flash puts up a classpath box. Click OK.
15. Open the Code Snippets panel.
16. Make sure btnETDSign is selected, and then, in the Audio And Video section of the Code Snippets panel, double-click the Click To Play/Stop Sound snippet. Flash creates an Actions layer (if one doesn’t already exist), opens the Actions panel, and copies the Click To Play/Stop Sound code (see
Figure 11.24).
18. Press Ctrl+Enter (Command+Return on the Mac) to play the movie. If you have an error, Flash will switch to the Compiler Errors panel and give you a description of the error. Double-click it to be taken to the source of the problem. Check your spelling (especially the number of o’s in the phrase).
19. If the movie is successful, you should be able to click the button to encourage the drummer. Try clicking once to start the sound, then clicking it right away to stop it.
The Essentials and Beyond
In this chapter you have created an active rich media document and attached sounds to each of the elements in it. You also learned about the sound compression selections in Flash. You learned how to put a sound on the stage and how to set up a button to play and stop the sound when clicked repeatedly. Now use the following exercise to create a cool background for your drum set.
1. Create a new layer called Background and move it to the bottom.
2. Make sure all the other layers are locked.
3. Hide the Drums and Encouragement Sign layers.
4. Draw a dark-blue or dark-purple rectangle to fit the stage.
5. Use the Align panel to precisely fit the rectangle to the stage.
6. Enlarge the stage to 800%.
7. Draw a small white star with nine points.
8. Right-click the star and turn it into a graphic symbol with the name grStar.
9. Open the Spray Brush tool.
10. Click the Edit button and add the grStar graphic.
11. Spray the background with tiny stars.
12. Unhide the Drums and Encouragement Sign layers to reveal a beautiful background for your drums.
Answer to Additional Exercise