CHAPTER 10
Creating Characters with Inverse Kinematics
Inverse kinematics (IK) is an animation technique in which you add bones to a character at specific joint locations and then use animation to make the character move along the joint lines. Knowing how to use Flash’s IK tools will serve you well in your rich media development.
When you use Flash’s IK tools to put bones in a character, you are said to be rigging the character.
- Boning a character
- Constricting animations
- Animating IK’d objects
Boning a Character
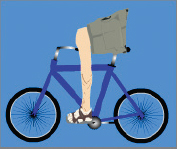
In the previous chapter, you created a riderless bicycle. Now it’s time to fix that issue. You’ll use a picture of yourself or someone else to make a relatively lifelike character and then use the Flash IK tools to rig it.
Snapping a Photo as a Base
 Follow these steps to start:
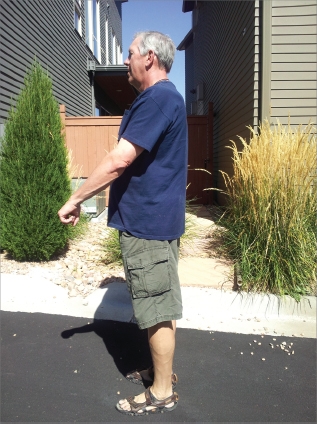
1. Have someone take a digital picture of you. The picture needs to be a side view of you. Hold your camera-side arm out from you a bit and curl your fingers as though you’re holding onto a bicycle’s handgrip.
2. After you have a picture you like, copy it to the folder in which you’re keeping your bicycle file. You’ll import the picture into Flash from there. See
Figure 10.1 for a picture my wife took of me.
3. Open the Bicycle document.
4. Create a new movie clip called mcRider. This movie clip will contain the tracing you make of your picture along with the rigging. The movie clip editing screen retains the same color as the stage, which is set to sky blue.
5. In the mcRider movie clip, create two layers: Rider Picture and Rider. The Rider Picture layer will hold the picture you took of yourself. The Rider layer will hold the tracing work you do on your picture. When you’re done, you’ll delete the Rider Picture layer.
6. Make sure the Rider layer is locked and you’re positioned on the Rider Picture layer.
7. From the Flash main menu, click File

Import
Import To Stage, or press Ctrl+R (Command+R on the Mac).
8. Find your picture, select it, and click Open. Your picture appears on the movie clip editing surface.
9. Use the Free Transform tool to rotate and resize the picture as needed so you can see the entire picture.
Tracing Your Picture
Remember when you were a child and you traced a picture? This is the activity you’ll engage in to “cartoonize” yourself. You’ll need to use the enlargement drop-down or the Zoom tool to shift back and forth between different sizes of your picture.
Before you begin, take a look at your picture. Try to figure out the various sections of your body that make up one unit: for example, your head and neck, your upper arm, lower arm, hand, and so forth. Think about your cartoonized self riding a bicycle. What parts need to move? The following might be a list you would create:
- Head able to rotate back and forth where head is connected to neck
- Neck able to rotate back and forth where neck is connected to body
- Upper arm rotates at shoulder
- Lower arm rotates at upper arm
- Hand rotates at lower arm
- Upper leg rotates at torso
- Lower leg rotates at upper leg
- Foot rotates at lower leg
- Lower pant leg rotates at pant seat (for shorts, or lower pant leg rotates at upper pant leg, which rotates at pant seat for regular jeans or slacks)
- Shirt sleeve rotates at shirt
Depending on how many sections you think need to move, you’ll have to trace and color in the parts of your photo as individual sections. For example, if you want the head to be able to turn on the neck, the neck and head have to be two independent sections that will be brought together when you get ready to do your rigging.
You’ll probably want to zoom in on sections of your body so you can trace them. Make sure you complete an entire loop of a section. In other words, as you trace, come back to the place where you started so that the loop is closed. In this way, you will be able to fill in the colors you need once the tracing is done.
1. Lock the Rider Picture layer and move to the Rider layer, making sure you unlock it.
2. Using the enlargement drop-down or Zoom tool (hotkey Z), zoom in on a segment of your picture that you wish to trace.
3. Select the Brush tool (hotkey B).
4. When you click the tool’s fill color to bring up the Color Picker, you are shown a dropper icon. This means you can sample a color from your picture. Sample a portion of flesh color.
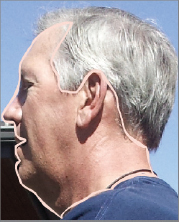
5. Begin tracing the segment that makes up your head, avoiding the hairline (for example, you want only the flesh that makes up your face).
6. Trace clear around until you’ve closed the loop for that segment (see
Figure 10.2). You can unclick your mouse at a good stopping point, reclick, and begin working again. Flash calculates the corrections needed to smooth out the brush stroke. If you have a drawing tablet, the work will be a little bit easier than with a mouse.
7. Now you’ll fill in some of the detail of the face before applying the final fill color. Pick out a part of your face that has a different color.
8. Sample the color and then trace the face component.
9. Activate the Paint Bucket tool (hotkey K). No need to change the fill color: the Paint Bucket tool will use the currently sampled color, the one you used to trace the face segment.
10. Click inside the segment you just traced. The segment should now completely fill in with that color. Hint: If it doesn’t fill in, activate the Selection tool and click the outline. It should show as a complete loop.
11. If it does not, press Ctrl+Z (Command+Z on the Mac) to undo the fill, enlarge the section so you can see the tracing, use the Brush tool to close in any unclosed lines, then try the fill again.
12. You can click the Show or Hide All Layers button on the Rider Picture layer to examine how well your tracing is going (see
Figure 10.3).
13. Continue working like this, picking out different segments of the face, sampling their color, and tracing and filling in the outline of the segments.
14. When you have all the inside facial segments created, activate the paint bucket tool one more time.
15. In the fill Color Picker, sample the flesh tone you used to outline the face.
16. Fill in all sections of the face that do not yet have a color, hiding the Rider Picture layer occasionally to check your work.
17. Using the Selection tool, marquee all of the face components.
18. Group the face components with Ctrl+G (Command+G on the Mac).
19. Right-click the grouped facial components and select Insert Symbol, or press Ctrl+F8 (Command+F8 on the Mac).
20. Create a movie clip symbol called mcFace.
21. Repeat the preceding steps to sketch the rest of your picture, grouping and naming each of the body components you want to bone into individual movie clip objects (for example, mcUpperArm, mcLowerLeg). The upper and lower arms and hand should be separate components; ditto for the upper and lower leg and foot, the shirt sleeve on the shirt, the pant leg on the pant seat (for shorts; lower pant leg, upper pant leg and pant seat for regular dungarees).
22. Right-click the Rider Picture layer and select Delete Layers.
23. Navigate back to the stage.
24. Press Ctrl+S (Command+S on the Mac) to save your work.
Tracing Tips
Here are some basic pointers to think about when doing this tracing work:
- Work from the inside out—focus on internal parts, and then move outward.
- As you draw a part of the body, create a rounded curve on each end of the body component. A rounded curve is best because once you join the components together and bone them, if you have sharp or squared edges in a component as the boned elements are moved, you’ll see a separation of the elements that does not look natural. Rounded ends rotate around, keeping the color and movement more natural.
- Enlarge the area where you’re working as required so you can more clearly see what you’re tracing
- Use the Eraser tool (hotkey E) to get rid of any errant lines.
- Don’t overdo it! Excessive detail isn’t necessary. Put the detail in that describes the basic elements of what you’re tracing, but don’t fret about every nuance. At the scale your bike rider is going to appear on the stage, viewers will not likely observe the incredible detail you put into the colors in their iris.
- If a segment has heavy shadows on it, there’s really no need to use very dark shadow colors if you don’t want. Just sample a color that’s a little lighter than the shadow.
- Allow yourself plenty of time. The tracing process may take hours, even days, to complete.
- If you’re not happy with the current picture and you have another in the library, you can easily use Swap Symbol to substitute the picture.
Once you’re done creating a cartoon version of yourself, you can delete the Rider Picture layer. It is no longer needed.
There’s an easier way than all the cartooning, but it may not produce exactly the results you’re looking for. Just take your photo, import it to the stage (or import it to the library then drag it out on the stage), highlight it and select Modify
Bitmap
Trace Bitmap from the Flash main menu. Stick with the default settings of Color threshold 100 and Minimum area 8 pixels and press OK. Don’t like the results? Hit Ctrl+Z (Command+Z on the Mac) and try again with different settings. Repeat until you get the desired results.
Inserting Bones into Your Character
So you can insert the bones in your character, each of the graphic elements that are going to be rigged must be brought together into a movie clip. In your case, you’ll have the upper and lower arms and hand as separate movie clips and the upper and lower legs and foot as separate movie clips as well. When done, you’ll combine all of the elements in the arm (hand, lower arm and upper arm) into the bicycle movie clip and animate them. Movie clips within movie clips within movie clips—it’s important to keep in mind what you’re doing and where you’re at during each step.
1. From the Flash main menu, click Insert
New Symbol, or press Ctrl+F8 (Command+F8 on the Mac).
2. Create a new movie clip called mcArmBones.
3. In the mcArmBones movie clip editing screen, use the up/down scrollbar to scroll the center X up toward the top of the screen. The X will help you align the items in your rigging.
4. From the library, drag mcUpperArm out onto the editing screen.
5. Activate the Free Transform tool.
6. Rotate mcUpperArm so it’s straight up and down.
7. Move the mcUpperArm registration point to the top, where the shoulder is (see
Figure 10.4).
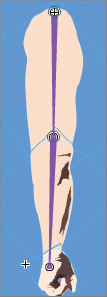
8. Repeat the previous process, dragging mcLowerArm out onto the editing screen, moving it into place, and adjusting its registration point as well.
9. Repeat the previous process, this time dragging mcHand onto the editing screen, moving it into place, and adjusting its registration point as well (see
Figure 10.5).
Now you’re ready to put the bones on the arms and hand:
1. In the Tools panel, click the Bone tool

or press the hotkey M.
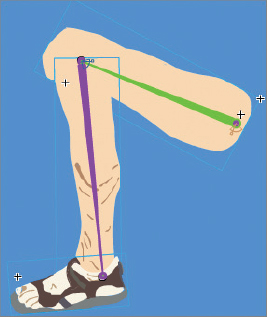
2. Starting with the shoulder, click and drag the first bone from the shoulder to the elbow. The bone color is the same as the outline color for the layer the asset is currently on.
3. Click the elbow and drag to the hand (see
Figure 10.6).
4. Look down at the timeline for mcArm. Note that Flash created a layer called Armature_x (where x is the next number in the sequence of armatures that have been created) when you inserted the bones. You cannot delete the Armature layer: It is required for the bones to work.
5. Activate the Selection tool.
6. If you’ve correctly boned the arm, you should be able to click and drag the hand and the arm, rotating them around the bone connection areas (see
Figure 10.7).
7. Repeat the preceding steps to create movie clips for the boned legs (mcLegBones), head (mcHead), neck and shoulders (mcNeckAndShoulders), pant leg and pant seat (mcPantLegsAndSeat), and sleeve and shirt (mcShirtAndSleeves).
Once you’re done, you should have one movie clip that handles all of the arm rigging, another for the legs, and so on.
Constricting Animations
If you think about your arm and hand, there are certain positions into which they cannot be moved. For example, you likely cannot rotate your arm back behind you in a 180-degree circle.
When you’re rigging characters, you have to be cognizant of the limitations of the limbs and constrain accordingly. Flash provides constraint options for this purpose.
1. Open the mcLegBones movie clip.
2. Resize the screen so all of the leg fits on the screen.
3. Click the upper leg bone. An IK bone property sheet appears in the Property Inspector (see
Figure 10.8).
4. Click the Constrain button and set the upper leg bone with −45 and +135 degrees, respectively. This means the upper leg can move up 135 degrees (consider a football kicker) and behind 45 degrees, for a total of 180 degrees of freedom of movement. The constraint indicator

shows up on the bone as a little scale.
5. Move the leg up into a position that looks as though it is coming up to the top of a bicycle’s pedal rotation (the foot is at 12:00 noon, to use a clock metaphor). See
Figure 10.9.
6. Right-click frame 2 of the Armature layer and select Insert Pose. This makes a copy of the original pose.
7. Move the upper and lower legs down slightly so it appears as though the foot and the pedal are at 9:00.
8. Repeat the process, inserting two more poses, each of which has the leg positioned at 6:00 and 3:00, respectively.
9. Finish off with one more pose, this time with the leg back at 12:00 again.
10. Scrub the playhead or press Enter to observe the pedaling motion.
11. While still in the mcLegBones movie clip, create a new layer called Pants.
12. Lock all other layers.
13. On the Pants layer, bring in the pant segments.
14. Using the Bone tool, bone the pant segments.
15. Using the process of inserting poses, make the pants behave the same way the leg behaves.
Repeat the previous steps for the arm bones and shirt. The shirt presents an interesting problem because the main part of the shirt really doesn’t move much, but the arms do.
When working with IK, there is the concept of parent and child bones. Each bone can be separately enabled for rotation, x or y translation (moving in a particular coordinate), and constraints. The trick with the shirt will be to disable its ability to rotate but make it the parent bone to the sleeve(s). That is, when you start dragging your first bone out, start at the shirt and move into the first sleeve part. This makes the shirt the parent. Click on the bone to see its properties. Use the arrow keys  to move back and forth or up and down between parent and child.
Animating IK’d Objects
You can animate IK’d objects and then use movie clips to show natural-looking movement. In the following sections, you’ll place your cartoonized and IK’d self on the bike you created earlier and then match up the two so you have natural-looking motion.
Creating the Bicycle Animation
Reference the file Bicycle.fla in the book’s website at www.sybex.com/go/flashessentials. Now it’s time to put the completed parts onto the mcMovingBike movie clip.
1. Open the mcMovingBike movie clip.
2. Press Enter to observe the motion tween in play. Note the pedal movements. You will almost certainly need to make some adjustments to the mcLegBones movie clip to make the leg movement match the pedal movement. But for now let’s get the legs moving with the bike.
3. Create a new layer called Rider’s Legs.
4. Lock the Bicycle layer.
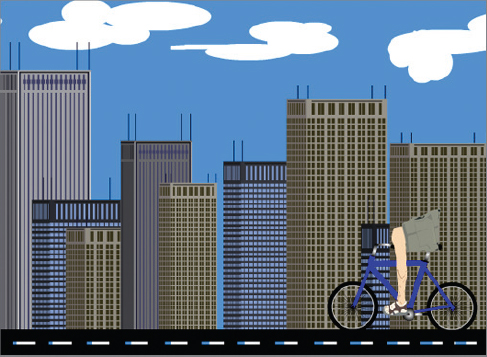
5. Drag the mcLegBones movie clip onto frame 1 of the new layer (see
Figure 10.10). (Note that I did not include the rest of the body for illustration purposes.)
6. Use the Free Transform tool to move the rider onto the bicycle, and resize accordingly.
7. In frame 1 of the Rider’s Legs layer, right-click and select Create Motion Tween. The new tween extends itself to match the tween on the Bicycle layer.
8. In the Rider’s Legs layer, navigate to the end of the tween.
9. Right-click and select Insert Keyframe
All.
10. Drag the legs so they are on top of the bike, which has moved to the left in the last frame of the tween.
11. Because you’ve updated mcMovingBike with the rider and you have an instance of mcMovingBike on the stage, the drawing is updated automatically (see
Figure 10.11).
12. Now you enter into an adjustment process. The leg strokes you’ve assembled in your IK work probably won’t match the pedal strokes of the bike. You must make tiny edits to the poses in your IK movie clip—mcLegBones—working to the point where you match the pedal movement. This may mean you have to add additional poses, lengthening out the movement over time to get the two to match up.
13. Repeat the previous process for the rest of the body parts. Fortunately, you do not need to do any pedal matching with these remaining parts. But you do need to make the hand look as though it’s gripping the handlebars. You may also want to make the head bob up and down a bit so it looks more realistic.
Your Other Options
There are several ways you could tackle the previous IK project. For example, you could have made the bicycle and the rider all in one movie clip. Or you could have made the bicycle in one movie clip, the rider in another. It’s not absolutely necessary to make a bunch of movie clips for different animation features. However, creating objects you can reuse is a time-saver and something to think about. If you have a library of previously created objects—an arm, a hand, a head—you can reuse those objects in other projects. Thus, boiling your work down to a variety of smaller objects might be a smart idea.
Keep in mind that drawing symbols independently and then scaling within Flash adds a little more to the calculations Flash must perform, albeit minute.
Creating Bouncing Movement Using IK Springs
When you’re not necessarily interested in things rotating around pivot points but you want to show things exploding or bouncing in and out, you can use the Spring setting of IK when working with Flash. For example, maybe you want to draw an exploding view of the way several parts fit together for a widget. You can reference Spring_IK.fla on the book’s website as you work through this chapter.
One of the advantages of the spring setting is that you can set it so viewers are able to manipulate the object, which is called runtime, versus you manipulating it, which is called authortime.
1. Open a new ActionScript 3.0 file and name it Spring IK.
2. On the stage, create a new perfect square. Make it small, with a colorful fill and a black stroke.
3. Activate the Selection tool by pressing the V key on the keyboard.
4. Marquee the square.
5. Press Ctrl+D (Command+D on the Mac) to duplicate the object.
6. Drag the duplicated object so it’s immediately below the first one.
7. Change the new object’s fill color.
8. Repeat steps 5 through 7 another three times until you have a total of five blocks on the stage.
9. Activate the Oval tool by pressing O on the keyboard.
10. Pick a colorful fill and a black stroke.
11. Hold down the Shift key and draw a perfect circle on the stage immediately below the five squares (see
Figure 10.12).
12. Activate the Selection tool.
13. Marquee the top square, making sure to get its stroke and fill.
14. Right-click the object and select Convert To Symbol from the context menu.
15. Make a movie clip, naming it mcSquare1.
16. Repeat steps 12 through 15 for the remaining squares, giving them consecutive numbers (e.g. mcSquare2, mcSquare3, etc.).
17. Marquee the oval.
18. Convert it into a move clip, giving it the name mcOval.
19. Your library should now have mcSquare1, mcSquare2, mcSquare3, mcSquare4, mcSquare5, and mcOval. The stage looks the same as before except you now know the objects on the stage are movie clips, not shapes.
20. Activate the Free Transform tool with the keyboard shortcut Q.
21. Click each movie clip in order, starting from the top and working your way down, and move the registration point to the top.
22. Activate the Bone tool with the keyboard shortcut B.
23. Starting at the top, draw a bone from the first block to the second.
24. Repeat until all blocks and the oval have a bone on them (see
Figure 10.13).
25. Activate the Selection tool. The cursor should continue to show a small bone on the lower-right corner.
26. Click the parent (top) bone.
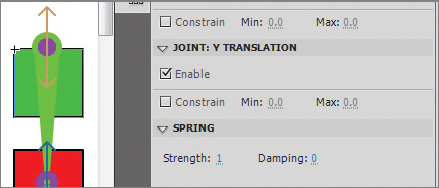
27. In the Property Inspector for the parent bone, in the Joint: Rotation section, uncheck the Enable check box.
28. In the Joint: Y Translation section, check the Enable check box.
29. In the Spring section, enter a strength of 1 (see
Figure 10.14).
30. In the IK Bone section at the top of the Property Inspector, click the down arrow to move to the next child.
31. Repeat steps 27 through 29 for each succeeding child bone.
32. The spring is now built. Click the oval and drag the spring up and down.
33. Play the movie with Ctrl+Enter (Command+Enter on the Mac). Note that nothing happens. You cannot move the spring.
34. Close the movie window.
35. Click the Armature_x layer name.
36. In the Property Inspector for the armature, in the Options section, click the Type drop-down and change it from Authortime to Runtime.
37. Play the movie again.
38. This time you can click the oval to move the spring up and down.
39. Play with the strength setting to see the difference between a light strength of 1 and a heavy strength of 100.
For more information, tutorials, and other content regarding Flash IK, see
http://tv.adobe.com.
Showing a spring in runtime is handy for a variety of uses, such as illustrating how parts go together to form a more complex object.
The Essentials and Beyond
In this chapter you learned how to create and add bones to movie clips, thus giving them movement. This technique, called inverse kinematics (IK), can be useful for creating realistic movement in living things. You also learned how to use the Flash IK infrastructure to create spring-like movement.
Additional Exercise
Use the file
BigHead.fla on the book’s website (
www.sybex.com/go/flashessentials) for your work. In this exercise, you’ll attach the head (a movie clip called mcBigHead) to various colored balls that are boned one to another. When you swing the head around, the string of balls should follow it.
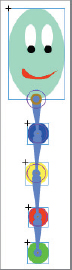
1. Draw a blue ball on the stage below the head.
2. Turn the blue ball into a movie clip called mcBlueBall.
3. Repeat steps 1 and 2 to create yellow, red, and green balls, each of which is a separate movie clip with a similar name (e.g., mcGreenBall).
4. Using the Free Transform tool, move the registration point of the head to the bottom. It’s okay to leave the registration point of the blue ball intact.
5. Using the Bone tool, connect mcBigHead and mcBlueBall together.
6. Repeat step 5, this time connecting mcBlueBall to mcYellowBall and so forth, adding a bone between each ball and the next one below it.
7. Press the Selection tool.
8. Try rotating mcBigHead. What happens? You should see that none of the boned objects below it move at all; they simply follow the path around BigHead’s rotation.
9. Now move one of the balls. You should see that the array of balls and BigHead become disrupted.
10. The key to making the balls flow smoothly around mcBigHead is to click the bottom ball and begin dragging around. You’ll see that mcBigHead follows obediently around.
Answer to Additional Exercise
The answer to this exercise can be found in the download file Bighead.fla