CHAPTER 7
Developing Simple Flash Animations
There are a couple of ways to create animations: frame by frame or using tweens, a technique you’ll learn about in the next chapter. In this chapter, we’ll start with frame-by-frame animations.
- Using storyboards to describe your animation
- Creating a frame-by-frame animation
- Differentiating between a stage animation and a movie clip
Developing Storyboards to Describe Your Animation
When you start with a new animation, generally you’ll want to create a storyboard.
Storyboards are nothing more than basic cartoon panels in which you draw each of the major turning points in your scene. They frequently include labels or some descriptive text for scene elements that are complicated or in which you need to leave yourself or others some kind of reminder. You can use storyboards if you’re going to work alone, but they really make sense if you’re working on a team. Storyboards show the active elements of a scene, include any examples of dialogue characters might engage in, illustrate how much time has elapsed between panels, and pinpoints where the viewer’s eye should be in the scene. Storyboards show transitions between scenes, sequencing of the activity in scenes, timing and navigation, and may include link information as well.
Although you can draw your storyboard panels using pencil and paper or buy storyboard software, there’s really no need to do either since you have Flash, which naturally lends itself to storyboarding. You can use a layer in Flash for your storyboard panels, each of which takes up one frame, and then simply delete the panels once your artwork is finished. Don’t forget you can also hide and unhide a layer. As you’re working, if you want the storyboard layer out of the way, you can simply hide it and work without having to look at it.
Another advantage you have in Flash storyboarding is that you can create the background for your scenes on a layer, getting it right and then essentially leaving it alone while you flesh out the story in upper layers.
Creating a Storyboard for Cow Abduction
 In Chapter 4 you created a UFO scene. Now you’re going to expand it into a frame-by-frame animation called Cow Abduction (thanks to one of my students, Ginger, for his idea). You’ll show a lonely desert road, move the UFOs and the moon across the scene, and include a surprise. You can use the assets from Chapter 4, but you’ll start first with the storyboard.
1. In Flash, start a new ActionScript 3.0 document.
2. Name the document Cow Abduction Storyboard.
Now you’ll change the stage color or add any nuances to the scene. You’ll simply use the Shape, Pen, Pencil, Eraser, and Text tools to create your storyboard. Remember, the storyboard is not the polished product: It is a rough approximation of your ideas. No need to create the Sistine Chapel at this point. For help, reference
CowAbductionStoryboard.fla on this books website at
www.sybex.com/go/flashessentials.
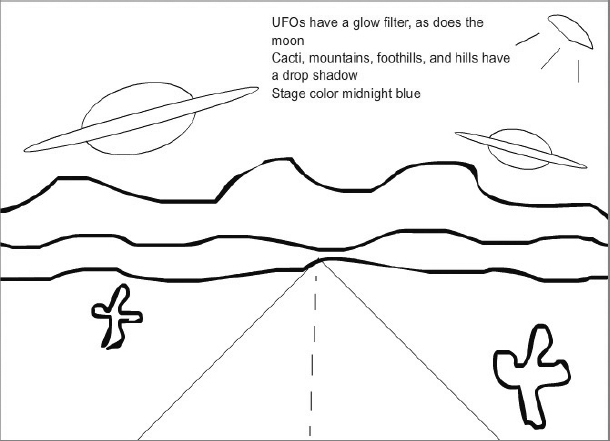
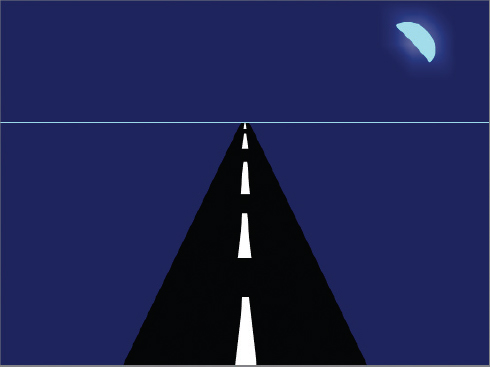
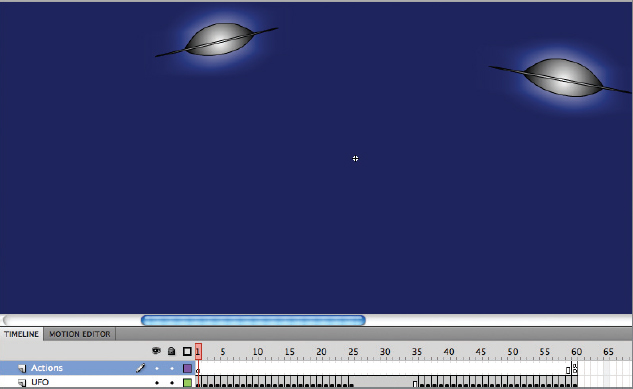
3. Using the Pencil tool, sketch a basic road moving out to a vanishing point. You can hold down the Shift key to inscribe a straight line. (We’ll deal more with perspective drawing later on in the chapter.)
4. Use the Eraser tool to erase any stray lines. (Don’t forget you can adjust the magnification of the document to zoom in on specific areas of work.)
5. Use the Brush tool to create mountains, hills, and foothills.
6. Use the shape tools (no fill, black stroke) to create a couple of UFOs. Remember to marquee all shapes that make up a UFO and then press Ctrl+G (Command+G on the Mac) to group them into one object.
7. Use the Brush tool to create a cactus or two.
8. Use the Text tool to write any notes about the scene.
Your first scene should look somewhat like Figure 7.1.
9. Click in frame 2, right-click, and select Insert Keyframe from the context menu. Flash copies all of the art from the first frame to the second.
10. Click away from all objects.
11. Press V to activate the Selection tool.
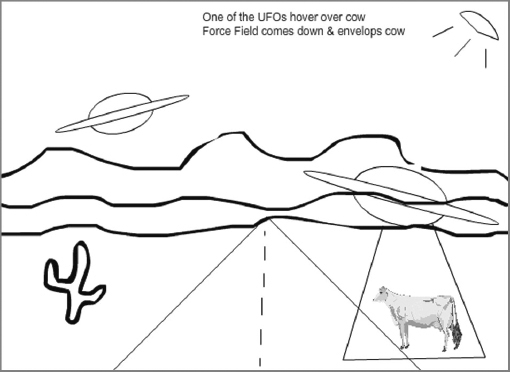
12. Move the UFOs, rotate, and resize as needed to show they’ve flown from one location to another.
13. Write a note about the new scene (see
Figure 7.2).
Note that you don’t need to include a panel in your storyboard for every frame in your animation. You’ll need to use several frames, slightly adjusting the movement, rotation, and size of the UFOs to convey the motion you’re looking for, which isn’t the point of the storyboard.
14. Click in frame 3, right-click, and select Insert Keyframe from the context menu. Flash copies all of the art from the second frame to the third.
15. Using the various shape tools or the Brush tool, draw a cow somewhere on the pasteboard.
16. Using the Selection tool, marquee the cow to select all lines.
17. Press Ctrl+G (Command+G on the Mac) to group the elements.
18. Right-click the cow and select Insert Symbol from the context menu.
19. Make the cow a graphic symbol with the name grCow.
20. Move the cow graphic onto the stage just below the closer UFO.
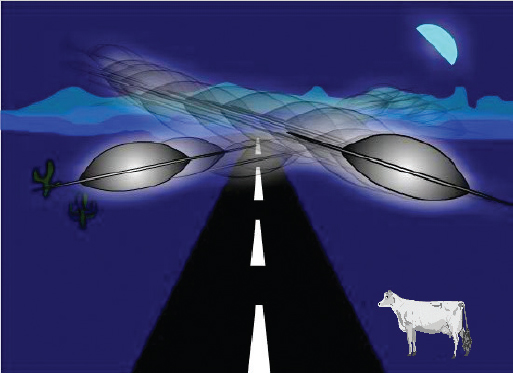
21. Using the Brush or Pencil tool, make a force field image surrounding the cow (see
Figure 7.3).
22. Update the notes for this panel.
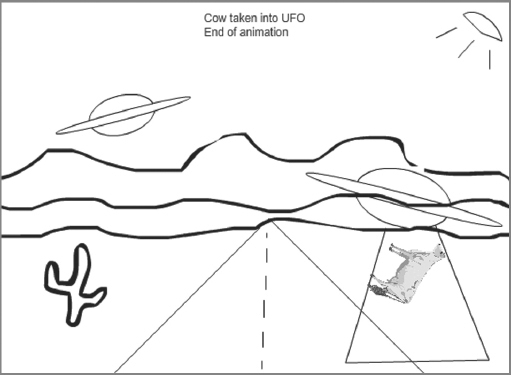
23. Click in frame 4, right-click, and select Insert Keyframe from the context menu. Flash copies all of the art from the third frame to the fourth.
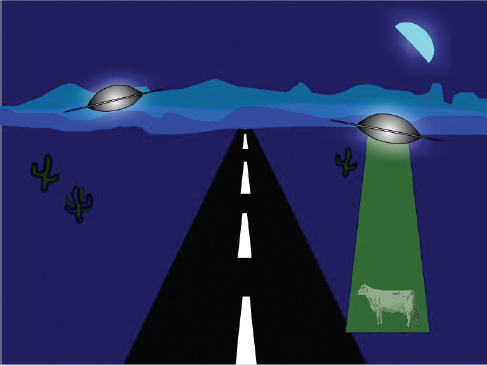
24. Using the Selection tool, move the cow up to show that it’s being taken into the UFO (see
Figure 7.4).
25. Update the notes for this panel.
26. Be sure to save your work, but don’t close the file yet because you’ll use the cow graphic in another file.
The text describing activity in your storyboard needs to be out of the way of the artwork and unobtrusive.
Animating the Cow Abduction
Now that you have a storyboard, you can begin the actual frame-by-frame animation steps needed to create Cow Abduction.
Drawing things like a horizon and a straight road using pencil and paper requires a ruler, at minimum. But with Flash’s Line tool, rulers, and guides, you can easily create your perspective views and be quite accurate at it.
1. Open the UFO file—CowAbduction.fla—included again for you here in Chapter 7.
2. From the Flash main menu, click Modify

Document.
3. Set the ruler units to inches and then click OK.
4. If locked, unlock the Background layer. Make sure all other layers are locked and that the Background layer is selected.
5. Make sure the Selection tool is activated.
6. Click in the stage somewhere.
7. In the Property Inspector, change the document’s size to 8″ × 6″.
8. From the Flash main menu, click View
Rulers.
9. Drag out two vertical guides, placing one at 2″ and one at 6″.
10. Drag out one horizontal guide, placing it at 2″.
11. Hide the Mountains/Hills folder and the UFO layer so that you can see your work on the road.
12. Click the magnification drop-down in the upper-right corner of the stage and select Fit in Window.
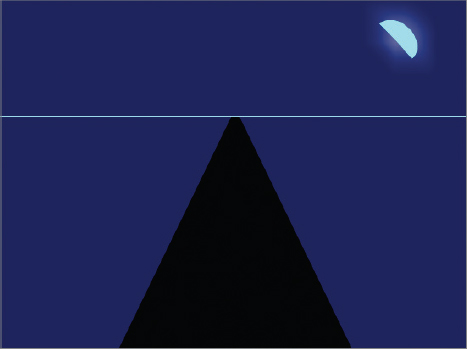
13. Using the Rectangle tool in Object Drawing mode with no stroke and a black fill, draw a rectangle from the bottom left and right corners of the vertical guides to meet the horizontal guide at the 2″ mark. Note that Flash draws a circle around the guide points as you’re drawing the rectangle. This is an indicator that you’ve snapped to the guides.
14. Press Q to activate the Free Transform tool. If you’ve somehow clicked away from your new rectangle object, click it so it’s active.
15. While holding down the Shift and Ctrl keys (Command key on the Mac), point to the top-right or top-left corner of the black rectangle until you see the mouse cursor change to a white arrow with two smaller black arrows pointing at each other. Drag quickly inward and Flash will move the two corners together to form a triangle.
16. Remove the vertical guides, but leave the horizontal guide in place for use in placing the mountains, hills, and foothills later (
Figure 7.5).
Now you’ll work on the road stripes using the same principle you used for the road. Because the rulers are still visible, they will be helpful for you in performing these next steps. As the stripes become smaller, keep in mind that you’ll need to enlarge the magnification so you can move a stripe into place and resize it accordingly.
17. Draw a small white rectangle in the middle of the road at the bottom of the screen. This will be your starting stripe.
18. With the Free Transform tool selected, use the Ctrl+Shift technique to squeeze the top corners of the first stripe together. Don’t squeeze them together into a point at the top; leave the top points slightly apart from one another.
19. With the stripe still selected by the Free Transform tool, press Ctrl+D (Command+D on the Mac) to duplicate the stripe object.
20. Move the duplicate up above the first stripe. Flash will provide a line so that you know the two are aligned.
21. Hold down the Shift key and, clicking one of the bottom corners of the duplicate, resize the object so it’s a little smaller than the lower stripe.
22. Repeat steps 19 through 21 until you have the road completely striped (see
Figure 7.6).
Now for the hills and mountains.
23. Unhide and unlock the Mountains layer underneath the Mountains/Hills folder.
24. Make sure all the other layers are locked.
25. Press Q to activate the Free Transform tool.
26. Resize the mountains to more accurately fit the scene. Use the technique of holding down the Shift key while pointing to one of the corners to keep the initial proportions. You can also resize them horizontally and vertically.
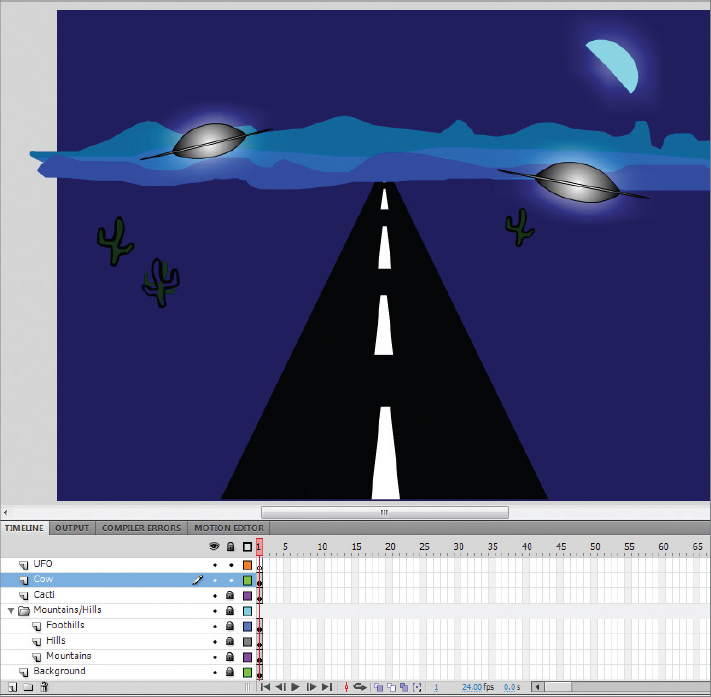
27. Place the mountains so their base is right on the horizontal guide (see
Figure 7.7).
28. Repeat steps 23 through 27 for the Hills and Foothills layers.
29. When finished, drag the horizontal guide off the stage.
30. Relock all layers.
31. From the Flash main menu, click File
Save As, giving this file the name Cow Abduction.
32. Hide the rulers if you desire.
33. Use this time to put permanent (i.e., nonmoving) items in the scene, such as a cactus or two, and/or some miscellaneous ground cover lines that you think would enhance it. Make sure they’re on a separate layer.
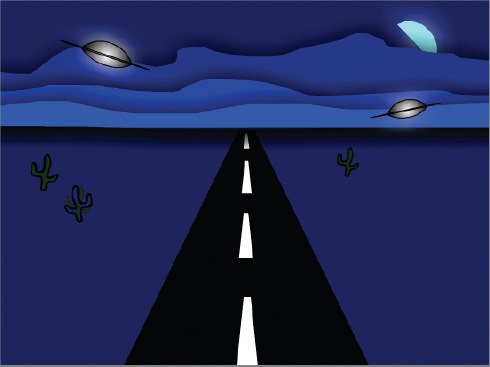
Next it’s time to put the UFOs into their initial position for their flight.
34. Unhide and unlock the UFO layer.
35. Using the Free Transform tool, resize and rotate the objects to your liking.
36. Move the UFO objects into place. This is your completed starting animation scene (see
Figure 7.8).
You can also put the cow in place, but there is something to consider when thinking about the cow. You don’t want it to be completely visible until the one of the UFOs is over it ready to abduct it. What to do? The best step may be to start the cow out with a zero transparency and gradually adjust the transparency as the UFO gets close to the cow. This keeps the cow relatively out of sight until you want it to appear underneath the UFO.
37. The CowAbductionStoryboard file should still be open. For this reason, you can use objects in its library in your current file.
38. Make sure you are working in the Cow Abduction file.
39. Create a new layer called Cow. Make sure it’s at the top of the layer stack, that it’s the active layer, and that the other layers are locked.
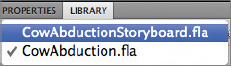
40. Click the Library tab.
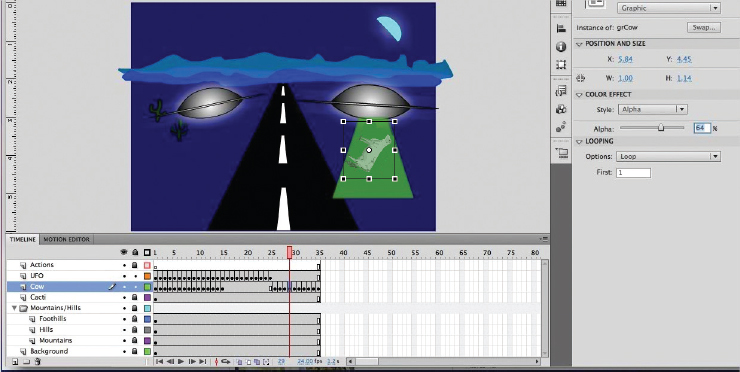
41. In the File drop-down, select
CowAbductionStoryboard.fla, making it the active library file (see
Figure 7.9). The grCow object appears.
42. Drag the grCow object onto the stage. The object is copied into the Cow Abduction file’s library.
43. Using the Free Transform tool, resize and adjust the cow graphic’s placement as needed.
44. In the Color Effect section in the Property Inspector, click the Style drop-down, select Alpha, and drag the slider to 0%. The cow disappears from the stage.
45. Save your work.
46. Close the CowAbductionStoryboard file. Name the document CowAbductionStoryboard, select CowAbductionStoryboard.fla, making it the active library file.
As you get ready to start animating, there are a couple of things you can do to help you concentrate on the important elements in the animation. First, you can turn on highlight mode in any layer that contains objects that will not be animated (see Figure 7.10). This takes all the color away in the things you’ve drawn, showing only their outline. This helps get the noise of the scene out of your way. Note that even though the cow’s alpha value is set to zero, it shows up in outline mode.
The other thing you can do is to temporarily change the stage color scene back to white so you can clearly see the elements you’re animating. This may or may not be productive; it depends on the colors you intend to use in your final scene. However, it’s easy to switch back and forth between a white stage color and the stage color you actually intend to use in your production animation, so there’s nothing lost either way.
Creating a Frame-by-Frame Animation
Now that you have your starting scene, you can create a new keyframe, copy the contents of the previous frame over to the new one, and then move the animation objects to a new location in the new frame. Note that the objects will probably need to be altered in their size and maybe their rotation as you move them across their path. You can also change an object’s color or even delete it and replace it with a new object. The point is that the action changes from the previous to the current frame.
You have three steps you have to go through at each frame in the first section of this animation: move the dominant UFO, move the nondominant UFO, and slightly increase the cow’s alpha value.
1. Make sure CowAbduction is the active open file.
2. Unlock the UFO and Cow layers. Make sure all other layers are locked.
3. Right-click frame 2 of the UFO layer and select Insert Keyframe from the context menu, or you can press F6. Note that the rest of the art in the scene disappears. This is because the frames for the other layers have not been extended.
4. Right-click frame 2 of the Cow layer and select Insert Keyframe from the context menu (or you can press F6). Remember that the cow’s alpha value is currently zero (invisible).
5. Click and highlight frame 2 the remaining layers. Right-click and select Insert Frame from the context menu (or press F5). Flash extends the view of the artwork on frame 1 to the next frame. It’s important to remember that the only copy of the artwork on the stage is currently on frame 1. When you use this technique, Flash puts a white rectangle in the ending frame. It does not matter if the layers are locked when you’re extending a frame.
When a UFO object is active, you can use your arrow keys to “nudge” the object slightly in one direction rather than using your mouse. This allows for more granular changes.
6. In the UFO layer, click one of the UFOs. Move it slightly and rotate/resize it as required to show slight movement toward you or away from you.
7. Repeat the process for the second UFO.
8. In the Cow layer, frame 2, increase the alpha value to 7. The cow will begin to be slightly visible.
9. Click the top layer of frame 15 and highlight all layers below the Cow layer. Press F5 to extend the frames.
10. Repeat steps 6 through 8 for the UFO and Cow layers until you arrive at frame 15, moving the UFOs in a flight pattern. Remember that you want one of the UFOs to wind up directly over the cow. Incrementing the cow’s alpha value by seven each time will result in a completely visible cow at frame 15.
Order of Objects in Layers
Remember that an object may appear in front of another even though you don’t want it to. This can happen for two reasons: One object is on a layer that’s higher than another, or in the drawing order of two objects on the same layer, one is in front of another.
Both issues are easy to solve. In the first case, just drag the layer down below the one that contains the object you wish to be in front. In the second case, simply click the object you want to be in back and from the Flash main menu, click Modify
Arrange
Send To Back. (You can also right-click the object and click Arrange
Send To Back.
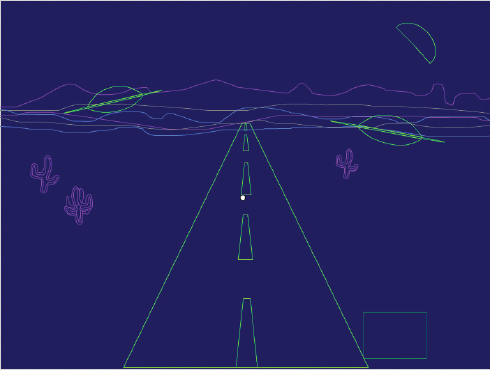
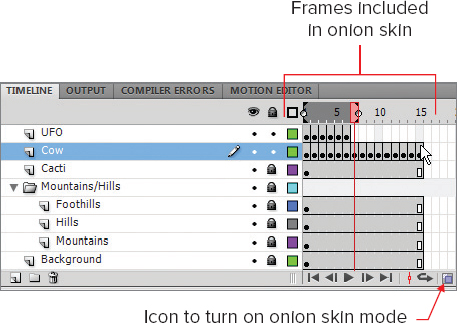
A great tool you can use to view the placement of the UFOs in the animation is called
onion skin (see
Figure 7.11). The name is taken from the translucene of a onion skin layers; you can see one beneath another. When you turn on onion skin, you are shown all of the components of your animation, allowing you to alter the placement in each frame to be more precise. You click the onion skin icon to produce a slider over the top of the frames. Simply drag the slider to include or exclude frames you want to see.
Figure 7.12 shows the UFO in onion skin mode with all of the frames selected.
11. Turn onion skin on.
12. Note the pattern your UFOs make. Are they in a consistent flight pattern?
13. Go back to various frames and make adjustments as required to attain a more consistent flight pattern.
14. Turn onion skin off.
Drawing the force field over the cow consists of essentially the animation process you used earlier, except that the UFO hovering over the cow will remain still while the force field is on. Additionally, you’ll want to move the now visible cow up into the ship, but not for a few frames while the force field is grabbing onto the cow.
15. In the UFO layer, frame 15, use the technique you learned earlier to create an oblique rectangle. Make the rectangle green or some other eerie color.
16. Right-click the rectangle and select Convert To Symbol from the context menu.
17. Make the rectangle a movie clip with the name mcForceField.
18. Set mcForceField’s alpha value to 50%.
19. Add a glow filter to mcForceField, adjusting the Blur X and Blur Y settings till you get a sufficient glow.
20. Position the rectangle under the UFO so that its narrower end is emanating from the UFO and the wider end is encompassing the cow. Adjust as necessary (see
Figure 7.13).
You want the force field to come down on the cow, so you’ll need to use the frame-by-frame animation techniques you used earlier to accomplish this.
21. In all of the layers except for the UFO layer, right-click frame 25 and select Insert Frame. (Don’t forget that you can click and drag in frame 25 to include contiguous layers at once.)
22. In the UFO layer, with the force field highlighted by the Free Transform tool, click the registration point—the white circle in the middle of the force field—and drag it to the top of the drawing.
23. Click the bottom middle control point. The mouse cursor changes to a two-headed arrow. Drag up to shrink the force field so that it’s barely visible.
24. Repeat step 23 till you reach frame 25, each time moving the force field down a little bit until it’s fully extended at frame 25.
25. Try playing the movie by pressing Ctrl+Enter (Command+Return on the Mac). The movie will loop over and over, which is normal behavior when there is no ActionScript code to stop it from doing so.
26. Close the movie.
Now you have to make the cow disappear into the ship, followed by the force field rolling up and disappearing and, finally, the UFOs flying away.
27. Extend all of the layers with the exception of the Cow layer to frame 35. When there are noncontiguous layers, you can hold down the Ctrl key (Command key on the Mac) and click each layer you want to select.
28. Press F5 to extend the frames or right-click and Select Insert Frame from the context menu. Note that the Cow layer stops at frame 25.
29. In frame 26, press F6 or right-click and select Insert Keyframe from the context menu. Flash copies the cow on frame 15 to frame 26.
30. Using the Free Transform tool, move the cow up slightly, resize it so it’s slightly smaller, and, if you desire, rotate it a bit.
31. Decrease the cow’s alpha value by nine.
32. Repeat steps 30 and 31 till the cow has gone up into the ship and complete disappeared.
33. Delete the cow altogether on the ending frame.
Figure 7.14 shows the process about halfway through the frames.
Next, to roll up the force field, simply extend all layers with the exception of the UFO and Cow layers to frame 45. (The Cow layer does not need to be seen any longer.) Repeat steps 23 and 24 in the UFO layer, this time rolling the force field up till it’s completely gone. On the end frame delete the force field altogether.
For the frames in which the ships are flying away, extend all layers with the exception of the UFO and Cow layers to frame 60. Repeat steps 6 and 7 to make the ships fly away (off screen, in this case).
Finally, you’ll need a tiny little snippet of ActionScript code to make the animation stop at the end.
34. Create a new layer called Actions.
35. Move the layer to the top.
36. In frame 60, right-click and select Insert Blank Keyframe from the context menu.
37. In the new blank keyframe, right-click and select Actions. The Actions panel appears.
38. At line one of the Actions code window, type in this code:
stop();.
Optionally, in the Actions panel, click the Code Snippets button then select Timeline Naviation and double-click Stop at this Frame to insert the required code. Another method would be to use the Script Assist tool, which can be found by clicking the magic wand button in the Actions Panel. From there click the plus sign that appears and select
flash.display MovieClip
Methods
stop. This inserts the command to import a Flash library and then execute the code
not_set_yet.stop(). Delete the
not_set_yet and the dot to leave just the stop() function call.
Play the movie to test its animation. You can go back and make adjustments on any frame until you’re satisfied with the results.
Differentiating between a Stage Animation and a Movie Clip
There are an awful lot of frames on the main timeline that really don’t need to be there. For example, you’ve extended the cactus, mountains, foothills, hills, road, and background frames clear to frame 60 when you really don’t need to do so.
The only two layers that really need to have numerous frames in them are the UFO and Cow layers.
You can fix this by creating movie clips, dragging them to the stage, and putting them in the places they need to be. By using movie clips instead of making animations directly on the timeline you gain several advantages: reduced file size (if you’re re-using an animation), ease of global editing, and consistency. You can also share them between projects (because they’re stored in the library). And, you can add interactivity to them. In most cases, you’re better off to make your animations in a movie clip, then place them on the stage when you’re ready.
1. Click frame 1 in the UFO layer and Shift+click the end frame to highlight all of the frames.
2. Right-click and select Cut Frames from the context menu.
3. Press the F8 key and create a new movie clip symbol, giving it a meaningful name, like mcUFO for example.
4. Right-click frame 1 of the movie clip and select Paste Frames from the context menu. Flash not only copies the frames in, it also creates the layers with the same names you used on the main timeline.
5. Insert a new layer, name it Actions, and move it to the top.
6. Check to make sure there isn’t a blank keyframe at frame 1 of the Actions layer. If so, right-click frame 1 of Actions and select Clear Keyframe from the context menu.
7. Right-click the ending frame of the Actions layer and click Insert Blank Keyframe.
8. Right-click the new blank keyframe and select Actions from the context menu.
9. In the Actions window, type
stop();. You should end up with something similar to
Figure 7.15.
10. Click Scene 1 to return to the stage.
11. Repeat the process for the Cow layer.
12. To get rid of the excess frames on the main timeline, click frame 2 in any of the layers and then Shift+click the ending frame. The entire section of frames from frame 2 to the end are highlighted in blue.
13. Right-click somewhere in the group of frames and select Remove Frames. Flash removes everything except for frame 1.
14. Repeat the process for all of the remaining layers except for the UFO and Cow layers.
15. In the UFO layer, drag mcUFO from the library to the stage and place it on the stage where it was when it was on the main timeline. You may now delete grUFO.
16. In the Cow layer, drag mcCow from the library to the stage, making sure it’s in the same place it was then the frames were on the main timeline. You may now delete grCow.
17. You should end up with a one-frame movie using movie clips, similar to
Figure 7.16. Play the movie to test it.
Simply clicking either of the UFOs in the UFO frame will alert you in the Property Inspector that you’re viewing an “instance of mcUFO.” This is how you know the animation’s coming from an instance of a movie clip placed on the main timeline.
The Essentials and Beyond
In this chapter you’ve learned how to create frame-by-frame animations by going through the process of moving individual assets and resizing and moving them as required to accomplish motion. You’ve also cut frames from the main timeline and moved them to a movie clip, which you then dragged back onto the stage.
When do you choose to use a movie clip as opposed to creating frame-by-frame animations on the main timeline? Good question, and one of individual choice—there’s no right or wrong answer. That said, in most cases it makes sense to keep the main timeline as neat as possible. There’s not a big change in the size of the SWF file generated, but in addition to cleaning up the main timeline, having movie clips in the library brings you one other advantage: If you want to use a movie clip in another movie, Flash provides the ability to look at another project’s library and bring items from that library right into the current scene, making the movie clips truly reusable. There are some issues though. If you have movie clips doing all of your animation work and you decide to export to a QuickTime file, QuickTime will ignore all of the embedded movie clips, making your movie kind of dull. A word of advice from one of the pros: Use movie clips when you intend to use ActionScript to manage them, otherwise go with frame-by-frame animations on the timeline.
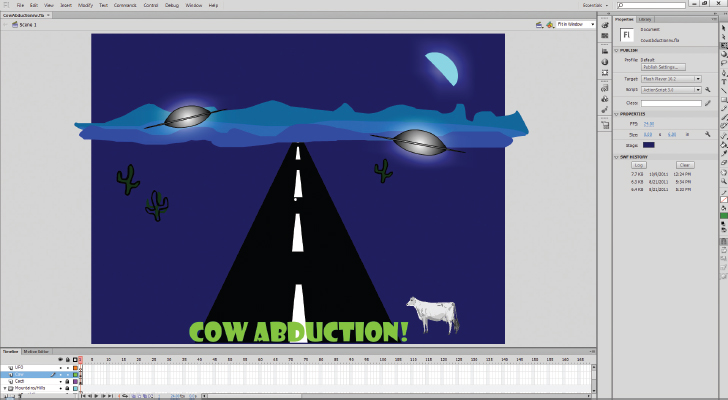
Time to create a title for the cow abduction scene.
1. Activate the Text tool.
2. Select the text engine Classic Text, text type Static Text, font Showcard Gothic (or similar UFO-ish font), font size 72, and an eerie green color.
3. Click the stage to begin typing the title.
4. Type Cow Abduction! in the text field.
5. Use the Selection tool and Align panel to move the title to the bottom center of the screen and center it.
Answer to Additional Exercise
Play the movie to see your work.